1
406")*\"9KTGNGUU"5WTXGKNNCPEG"5[UVGO
49-2534
OWNER’S MANUAL — Please read before using this equipment.
%106'065
Important Safety Precautions ..... 2
Installing The Batteries ............... 2
In the Camera ......................... 3
In the Monitor .......................... 4
Installation .................................. 4
Desk Mounting the Camera .... 5
Wall Mounting the Camera ..... 5
Setting Up Your System ............. 5
Setting Up the Camera ........... 5
Setting Up the Monitor ............ 5
Audio Output......................... 6
Video Output......................... 6
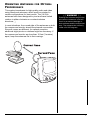
Orienting Antennas for Optimal
Performance ........................... 7
Setting the Auto-Switching
Sequence ................................ 8
Monitor to A/V function ............ 8
Night Vision ............................. 8
Troubleshooting ......................... 9
The FCC Wants You To Know .... 9
Care ......................................... 10
Service and Repair ................... 10
Specifications ............................ 11
Auto-Focus Lens — focuses
image automatically without
manual adjustment.
CMOS Sensor — provides
superior resolution even in lowlight conditions.
Built-in 8 LED Lighting —
enhances low light viewing at
two meters distance.
Built-In One-Way Microphone and
Speaker— lets you hear your baby
or individuals near the camera.
Long Distance
Monitoring — transmits
up to 300 feet clear-lineof-sight.
Portable and Easy To
Install– lets you take or
install the system virtually
anywhere.
Screen On/Off Switch —
lets you turn off the screen
for audio monitoring only.
#"+/2146#06"#
If an icon appears at the end of a
paragraph, go to the box on that
page with the corresponding icon
for pertinent information.
Rý— Warning
. — Caution
# — Important
± — Note
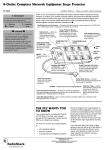
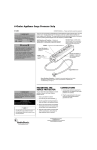
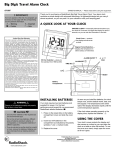
Thank you for purchasing the RadioShack 2.4 GHz
Wireless Surveillance System. This system adds safety and
security to your home or business. It can be used as a
component of an audio/video observation system, or
expanded by adding up to three additional wireless
cameras. The audio/video jacks let you connect to a VCR
for recording purposes. In your home, you can observe your
baby’s room, backyard, or patio area at night or in minimal
lighting. In your business, monitor low-light store-rooms,
warehouses, entry/exit-ways, or a reception area from one
central location.
© 2002 RadioShack Corporation.
All Rights Reserved.
RadioShack and RadioShack.com are trademarks
used by RadioShack Corporation.
+/2146#06"5#('6;"
24'%#76+105"
2#%-#)'"
%106'065
Please check that you have these
components before installation.
•
A camera with built-in
transmitter
•
A monitor with built-in receiver
•
A 9V AC adapter (for camera
only)
•
A larger 13.5V AC adapter (for
monitor only)
Before setting up or operating your system, please read all
these safety and operating instructions completely. Retain
instructions for future reference.
To avoid entanglement, never place the camera in a crib or
playpen.
Do not place or mount the camera on any surface or wall
where the camera and its AC adapter cord are within the
reach of a baby or other children.
Never use the camera or monitor near water. For example,
do not use near a bathtub, washbowl, laundry tub, kitchen
sink, aquarium, or in a wet basement.
WARNING: To reduce the risk of fire or shock
hazard, do not expose this product to rain or
moisture.
..CAUTION..
!
RISK OF ELECTRIC SHOCK
DO NOT OPEN
CAUTION: TO REDUCE THE RISK OF ELECTRIC
SHOCK, DO NOT REMOVE COVER OR BACK. NO
USER-SERVICEABLE PARTS INSIDE. REFER
SERVICING TO QUALIFIED PERSONNEL.
The lightning symbol is intended to alert you to
the presence of uninsulated dangerous voltage
within this product’s enclosure that might be of
sufficient magnitude to constitute a risk of
electric shock. Do not open the product’s case.
!
The exclamation symbol is intended to inform
you that important operating and maintenance
instructions are included in the literature
accompanying this product.
R
R
"9#40+0)"
Two AC adapters are included
with the Wireless Surveillance
System. The AC adapters can not
be interchanged. Use the adapter
labeled OUTPUT: 9V DC for the
camera. Use the larger adapter
labeled OUTPUT: 13.5V DC for
the monitor.
Disconnect the AC adapters from wall outlets during long
periods of non-use.
Position the camera, monitor and AC adapters to allow
adequate ventilation.
Keep the camera out of direct sunlight.
To prevent overheating, keep the camera, monitor and AC
adapters away from heat sources such as radiators, heat
registers, stoves or other appliances (including amplifiers)
which produce heat.
Use only the AC adapters provided. Use of any others may
damage the camera and/or monitor.
R
Plug into an electrical outlet with standard household power
(120 volt AC outlet).
Changes or modifications not approved by RadioShack void
the manufacturer’s warranty and could void user's authority
to operate the equipment.
+056#..+0)"6*'"$#66'4+'5
±"016'"±"
When the baby monitor’s sound
weakens or the picture becomes
unsteady while operating with
batteries, replace the batteries.
2
Both camera and monitor are battery powered so they can
work during a power failure. To activate the battery power,
you must disconnect the AC adapters from both the camera
and monitor. For optimum performance, we recommend
alkaline batteries (available at your local RadioShack store).
The battery power lasts eight hours for the camera and 2.5
hours for the monitor.±
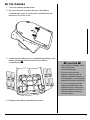
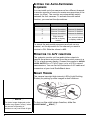
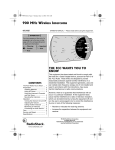
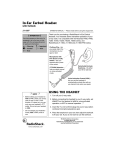
+0"6*'"%#/'4#
1. Turn the camera upside-down.
2. Use your thumbs to press the top of the battery
compartment cover in the direction indicated by the
arrows to lift off the cover.
3. Install eight AA batteries (not supplied) according to the
battery polarities marked inside of the battery
compartment..
."%#76+10".
•
Use only fresh batteries of the
required size and
recommended type.
•
Do not mix old and new
batteries, different types of
batteries (standard, alkaline, or
rechargeable), or rechargeable
batteries of different capacities.
•
If you do not plan to use the
system with batteries for an
extended period, remove the
batteries. Batteries can leak
chemicals that can destroy
electronic parts.
4. Replace the battery compartment cover.
3
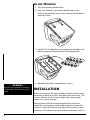
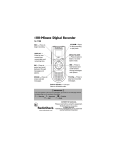
+0"6*'"/10+614
1. Turn the monitor upside-down.
2. Use your thumbs to press the dotted area on the
battery compartment cover in the direction illustrated to
open the cover.
3. Install 10 C cell batteries (not supplied) according to the
battery polarities marked inside the compartment.
R
R
"9#40+0)"
Dispose of old batteries promptly
and properly. Do not burn or bury
them.
4. Replace the battery compartment cover.
R
+056#..#6+10
Select a location for the camera that provides a clear view of
the area you want to monitor, and that is free from dust. The
location should not be in line-of-sight with a strong light
source or in direct sunlight.
Have a person hold the camera against the wall at the
selected mounting area, while another person moves the
monitor to various locations throughout the house to check
reception. If interference or other problems develop, refer to
4
“Troubleshooting” on Page 9. You may need to select a
different location in the room for mounting the camera.
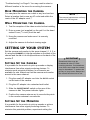
&'5-"/1706+0)"6*'"%#/'4#
You can place the camera on a desk or any level surface.
Select a location that is near an AC outlet and within the
reach of the AC adapter cord.±
±"016'"±"
The camera bracket does not freely
rotate a full 360 degrees.
9#.."/1706+0)"6*'"%#/'4#
1. Test the reception of the video monitor before installing.
2. Drive a screw (not supplied) on the wall. Let the head
extend 5 mm (3/16 inch) from the wall.
3. Hang the camera and make sure it is securely
mounted.
4. Adjust the camera to the best viewing angle.
5'66+0)"72";174"5;56'/
Set the camera and monitor to the same channel (1, 2, 3 or
4) using the CHANNEL 1 2 3 4 dip switches on the back of the
camera and the CH. 1 2 3 4 5 dip switches on the back of the
monitor.#
5'66+0)"72"6*'"%#/'4#
It is possible for the monitor to pick up sounds or display
interference from other signal producing devices. To
minimize such potential problems, four channels are
available for use. Make sure that the camera and monitor
are set to the same channel.
#"+/2146#06"#
Sound and video may be
broadcast to other 2.4 GHz
receiving devices. Conversations,
even from rooms near the camera,
may be broadcast. To protect the
privacy of your home, always turn
the camera off when not in use.
1. Plug the small AC adapter cord into the 9V DC socket
on the back of the camera.
2. Plug the AC adapter into a standard wall outlet.
3. Slide the ON/OFF/NIGHT switch on the rear of the
camera to ON. The power indicator lights.
4. Position the camera antenna so its curved side points
to the monitor antenna’s curved side.
5'66+0)"72"6*'"/10+614
It is possible for the monitor to pick-up sounds or picture
interference from other signal producing devices. To
minimize this potential problem, experiment setting the
5
CH. 1 2 3 4 5 dip switches in different positions and use the
setting which produces the best sound and picture. Make
sure that the camera and monitor are set to the same
channel.
±"016'"±"
Your Wireless Surveillance System
is factory preset at channel 1 for
one camera use.
Dip switches 1 to 4 are for channel selection. Switch 5 lets
you set up the auto-sequence timer for four cameras on four
different channels to monitor a series of rooms for maximum
supervision of the house (or office).±
1. Plug the large AC adapter cord into the DC 13.5V jack
on rear left of the monitor.
2. Plug the AC adapter into a standard wall outlet.
3. Rotate the monitor’s VOL ON/OFF clockwise to turn on
the monitor and adjust volume to a comfortable
listening level.
4. Adjust the video image using V-HOLD (Vertical Hold),
CONT (Contrast) and BRIGHT (Brightness) on the rear
right of the monitor.
5. Locate and orient the antennas on both the camera and
monitor according to “Orienting Antennas for Optimal
Performance” on Page 7.
#WFKQ"1WVRWV
To transfer the monitor’s sound to a TV or to a VCR for
recording purposes, connect the monitor’s AUDIO OUTPUT
to a TV’s or VCR’s audio input.
8KFGQ"1WVRWV
Connect the monitor’s VIDEO OUTPUT to a TV’s or VCR’s
video input for a large screen display, or to record
transmissions.
6
14+'06+0)"#06'00#5"(14"126+/#."
2'4(14/#0%'
This system broadcasts its high-quality audio and video
using directional antennas, which must be oriented in
certain configurations for best results. The 2.4 GHz
antennas have been designed to pivot and have limited
rotation in either clockwise or counterclockwise
directions.
R
In most situations, the curved side of the antennas on both
the camera and monitor should face toward one another.
Since all rooms are different, for optimal reception,
additional slight pivots or rotations might be necessary. If
the camera and monitor are less than 10 feet (3 meters)
apart, keep the antennas flat in their casings.
R
R
"9#40+0)"
Rotating the antennas beyond the
point where resistance is felt will
result in permanent damage to
both antennas and the mechanical
stop. The antennas do not freely
rotate a full 360 degrees.
7
5'66+0)"6*'"#761/59+6%*+0)"
5'37'0%'
You can install up to four cameras on four different channels
to monitor a series of rooms for maximum supervision of the
house (or office). The monitor can automatically switch
between the four cameras. To activate the auto-switch
function, you must set the dip-switches.
&KR"5YKVEJ
1P
1HH
Channel 1 disabled
1
Channel 1 enabled
2
Channel 2 enabled
Channel 2 disabled
3
Channel 3 enabled
Channel 3 disabled
4
Channel 4 enabled
Channel 4 disabled
5
Eight second
interval in display
rotation
Four second interval
in display rotation
To cancel the auto-switch sequence and lock on one
channel, set the dip-switch for the channel you want to
receive to ON. Slide the others to OFF.
/10+614"61"#18"(70%6+10
The system’s monitor unit has audio/video outputs to
transfer the picture and sound from the monitor screen to a
TV for a large screen display. Connect the monitor’s AUDIO/
VIDEO OUTPUT to a TV’s A/V input, or to a VCR to record
transmissions. You can find a full selection of A/V cable and
connectors at your local RadioShack store.
0+)*6"8+5+10
The camera has eight high-intensity LEDs (Light Emitting
Diodes) for picking up clear images in dark locations.
±"016'"±"
The video image displayed on the
monitor may appear “snowy” when
the camera is operating in
darkness or very low levels of light.
8
To turn on the night vision function, slide the
ON/OFF/NIGHT to NIGHT.±
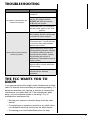
6417$.'5*116+0)
5[ORVQOU
%JGEM"2QKPVU
Is the power cord disconnected?
Connect it.
No power is supplied to the
camera or monitor
The wrong AC adapter was used.
Use the AC adapter labeled
OUTPUT: 9V with the camera,
13.5V with the monitor.
Camera/Monitor is not turned on.
Set the power switch to the “ON”
position.
Channel switches are not on the
same setting. Set the camera and
the monitor to same channel.
Signal interference due to
microwave oven. Turn off the oven
or remove it from path between
camera and monitor.
No sound or picture. Noisy
sound or picture.
Signal interference due to other
signal producing devices. Change
the channel setting on both the
camera and the monitor. Identify
and eliminate the source of
interference. Relocate the camera
and/or monitor.
Out of range. Relocate the
camera and/or monitor within the
300 feet range.
Improper antenna position. Adjust
camera/monitor antenna
orientation.
6*'"(%%"9#065";17"61"
-019
Your camera and monitor might cause interference on other
radio/TV devices even when they are operating properly. To
determine whether your camera or monitor is causing the
interference, turn them both off. If the interference goes
away, your surveillance system is causing it. Try to
eliminate the interference by:
• Moving your camera or monitor away from the other
device.
• Connecting your camera or monitor to an outlet that is
on a different electrical circuit from the other device.
• Contacting your local RadioShack store for help.
9
If you cannot eliminate the interference, the FCC requires
that you stop using your system.
This device complies with Part 15 of the FCC Rules.
Operation is subject to the following two conditions:
(1) This device may not cause harmful interference, and (2)
this device must accept any interference received, including
interference that may cause undesired operation.
%#4'
Keep the camera and monitor dry; if they get wet, wipe them
dry immediately. Use and store the camera and monitor
only in normal temperature environments. Handle them
carefully; do not drop them. Keep the camera and monitor
away from dust and dirt, and wipe them with a damp cloth
occasionally to keep them looking new.
5'48+%'"#0&"4'2#+4
If your camera or monitor is not performing as it should, take
it to your local RadioShack store for assistance. Modifying
or tampering with the camera’s or monitor’s internal
components can cause a malfunction and might invalidate
their warranty and void your FCC authorization to operate
them.
10
52'%+(+%#6+105
Monitor
Screen Size: ........................................................................................................................... 5.5 Inches
Receiver Frequency:........................................................................................... 2.4 GHz – 2.4835 GHz
Max. Range (clear line of sight): ............................................................................. 300 feet (92 meters)
Antenna: .....................................................................................Directional Circular-Polarized Antenna
AV Modulation/Demodulation Method: .............................................................................................. FM
Sound Output:............................................................................................................800 mW Maximum
Operating Temperature: ..............................................................................32°F – 104°F (0° C – 40° C)
Channel: ..............................................................................................................4 Selectable Channels
Power Supply:.......................................................................................................................... DC 13.5V
Dimensions (HWD): ........................................................................................8 11/16 x 61/8 x 71/4 Inches
(22 x 15.5 x 18.5 cm, with antenna erected)
Weight:...........................................................................................................................63.8 Oz (1.8 kg)
Camera
Transmitter Frequency:....................................................................................... 2.4 GHz – 2.4835 GHz
Max. Range (clear line of sight): ............................................................................. 300 feet (92 Meters)
Antenna: .....................................................................................Directional Circular-Polarized Antenna
Lens: ................................................................................................................................. f3.6 mm, F2.0
Picture Color: .................................................................................................................Black and White
AV Modulation/Demodulation Method: .............................................................................................. FM
Image Sensor: ......................................................................................... 1/4 Inch CMOS Image Sensor
Indoor/Outdoor:......................................................................................................................Indoor only
Microphone Sensitivity:....................................................................................................... 2 – 3 meters
Number of Channels:.............................................................................................................................4
Operating Temperature: 32°F – 104°F (0° C – 40° C)
Power Supply:............................................................................................................................. DC 9 V
Dimensions (HWD): ....................................................................................6 11/16 x 3 15/16 x 51/2 Inches
(17 x 10 x 14 cm, with antenna erected)
Weight:........................................................................................................................... 11.3 Oz (320 g)
Specifications are typical; individual units might vary. Specifications are subject to change and improvement
without notice.
11
Limited Ninety-Day Warranty
This product is warranted by RadioShack against manufacturing defects in material and workmanship under normal use for ninety (90) days from the date of purchase from RadioShack companyowned stores and authorized RadioShack franchisees and dealers. EXCEPT AS PROVIDED
HEREIN, RadioShack MAKES NO EXPRESS WARRANTIES AND ANY IMPLIED WARRANTIES,
INCLUDING THOSE OF MERCHANTABILITY AND FITNESS FOR A PARTICULAR PURPOSE,
ARE LIMITED IN DURATION TO THE DURATION OF THE WRITTEN LIMITED WARRANTIES
CONTAINED HEREIN. EXCEPT AS PROVIDED HEREIN, RadioShack SHALL HAVE NO LIABILITY OR RESPONSIBILITY TO CUSTOMER OR ANY OTHER PERSON OR ENTITY WITH RESPECT TO ANY LIABILITY, LOSS OR DAMAGE CAUSED DIRECTLY OR INDIRECTLY BY USE
OR PERFORMANCE OF THE PRODUCT OR ARISING OUT OF ANY BREACH OF THIS WARRANTY, INCLUDING, BUT NOT LIMITED TO, ANY DAMAGES RESULTING FROM INCONVENIENCE, LOSS OF TIME, DATA, PROPERTY, REVENUE, OR PROFIT OR ANY INDIRECT,
SPECIAL, INCIDENTAL, OR CONSEQUENTIAL DAMAGES, EVEN IF RadioShack HAS BEEN ADVISED OF THE POSSIBILITY OF SUCH DAMAGES.
Some states do not allow limitations on how long an implied warranty lasts or the exclusion or limitation of incidental or consequential damages, so the above limitations or exclusions may not apply to
you.
In the event of a product defect during the warranty period, take the product and the RadioShack
sales receipt as proof of purchase date to any RadioShack store. RadioShack will, at its option, unless otherwise provided by law: (a) correct the defect by product repair without charge for parts and
labor; (b) replace the product with one of the same or similar design; or (c) refund the purchase
price. All replaced parts and products, and products on which a refund is made, become the property of RadioShack. New or reconditioned parts and products may be used in the performance of
warranty service. Repaired or replaced parts and products are warranted for the remainder of the
original warranty period. You will be charged for repair or replacement of the product made after the
expiration of the warranty period.
This warranty does not cover: (a) damage or failure caused by or attributable to acts of God, abuse,
accident, misuse, improper or abnormal usage, failure to follow instructions, improper installation or
maintenance, alteration, lightning or other incidence of excess voltage or current; (b) any repairs
other than those provided by a RadioShack Authorized Service Facility; (c) consumables such as
fuses or batteries; (d) cosmetic damage; (e) transportation, shipping or insurance costs; or (f) costs
of product removal, installation, set-up service adjustment or reinstallation.
This warranty gives you specific legal rights, and you may also have other rights which vary from
state to state.
RadioShack Customer Relations, 200 Taylor Street, 6th Floor, Fort Worth, TX 76102
12/99
RadioShack Corporation
Fort Worth, Texas 76102
49-2534
05A02
Printed in China