1
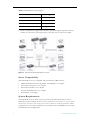
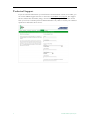
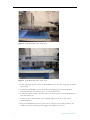
Ethernet TV VOD-WM
Video on Demand Server
VBrick v4.2.1 VOD-WM Server
Admin Guide
April 15, 2008
4410-0179-0003
Copyright
© 2008 VBrick Systems, Inc. All rights reserved.
12 Beaumont Road
Wallingford, Connecticut 06492, USA
www.VBrick.com
This publication contains confidential, proprietary, and trade secret information. No part of this document may be
copied, photocopied, reproduced, translated, or reduced to any machine-readable or electronic format without
prior written permission from VBrick. Information in this document is subject to change without notice and
VBrick Systems assumes no responsibility or liability for any errors or inaccuracies. VBrick, VBrick Systems, the
VBrick logo, StreamPlayer, and StreamPlayer Plus are trademarks or registered trademarks in the United States and
other countries. Windows Media is a trademarked name of Microsoft Corporation in the United States and other
countries. All other products or services mentioned in this document are identified by the trademarks, service
marks, or product names as designated by the companies who market those products. Inquiries should be made
directly to those companies. This document may also have links to third-party web pages that are beyond the
control of VBrick. The presence of such links does not imply that VBrick endorses or recommends the content of
any third-party web pages. VBrick acknowledges the use of third-party open source software and licenses in some
VBrick products. This freely available source code is posted at http://www.vbrick.com/opensource.
FCC Notice
This equipment carries the CE mark and is UL listed in the U.S. and Canada. This equipment also complies with
the limits for Class B digital devices pursuant to FCC Part 15 testing standards for most electronic equipment.
These limits are designed to provide reasonable protection against harmful interference when the equipment is
operated in a commercial environment. This equipment generates, uses, and can radiate radio frequency energy
and, if not installed and used in accordance with the instruction manual, may cause harmful interference to radio
communications. Operation of this equipment in a residential area is likely to cause harmful interference in which
case the user will be required to correct the interference at their own expense. This Class B digital apparatus meets
all requirements of the Canadian Interference-Causing Equipment Regulations. Cet appareil numerique de la
Classe B respecte toutes les exigences do reglement dur le materiel brouilleur du Canada.
About VBrick Systems
Founded in 1997, VBrick Systems, an ISO 9001 certified vendor, is a privately held company that has enjoyed rapid
growth by helping our customers successfully introduce mission critical video applications across their enterprise
networks. Since our founding, VBrick has been setting the standard for quality, performance and innovation in the
delivery of live and stored video over IP networks—LANs, WANs and the Internet. With thousands of video
appliances installed world-wide, VBrick is the recognized leader in reliable, high-performance, easy-to-use
networked video solutions.
VBrick is an active participant in the development of industry standards and continues to play an influential role in
the Internet Streaming Media Alliance (ISMA), the MPEG Industry Forum, and Internet2. In 1998 VBrick
invented and shipped the world's first MPEG Video Network Appliance designed to provide affordable DVDquality video across the network. Since then, VBrick's video solutions have grown to include Video on Demand,
Management, Security and Access Control, Scheduling, and Rich Media Integration. VBrick solutions are
successfully supporting a broad variety of applications including distance learning and training, conferencing and
remote office communications, security, process monitoring, traffic monitoring, business and news feeds to the
desktop, webcasting, corporate communications, collaboration, command and control, and telemedicine. VBrick
serves customers in education, government, healthcare, and financial services markets among others.
Contents
VOD-WM v4.2.1 Admin Guide
Organization . . . . . . . . . . . . . . . . . . . . . . . . . . . . . . . . . . . . . . . . . . . . . . . . . . . . . . . . . . . . . . v
Font Conventions . . . . . . . . . . . . . . . . . . . . . . . . . . . . . . . . . . . . . . . . . . . . . . . . . . . . . . . . . . v
Related Publications. . . . . . . . . . . . . . . . . . . . . . . . . . . . . . . . . . . . . . . . . . . . . . . . . . . . . . . . . v
Printer-Friendly . . . . . . . . . . . . . . . . . . . . . . . . . . . . . . . . . . . . . . . . . . . . . . . . . . . . . . . . . . . vi
1. Server Overview
Feature Overview . . . . . . . . . . . . . . . . . . . . . . . . . . . . . . . . . . . . . . . . . . . . . . . . . . . . . . . . . . . 1
Server Compatibility . . . . . . . . . . . . . . . . . . . . . . . . . . . . . . . . . . . . . . . . . . . . . . . . . . . . . 2
System Requirements . . . . . . . . . . . . . . . . . . . . . . . . . . . . . . . . . . . . . . . . . . . . . . . . . . . . 2
External Storage . . . . . . . . . . . . . . . . . . . . . . . . . . . . . . . . . . . . . . . . . . . . . . . . . . . . . . . . 3
VOD-WM Server Software . . . . . . . . . . . . . . . . . . . . . . . . . . . . . . . . . . . . . . . . . . . . . . . . . . . 3
VOD-WM Server Software CD . . . . . . . . . . . . . . . . . . . . . . . . . . . . . . . . . . . . . . . . . . . . 3
Technical Support . . . . . . . . . . . . . . . . . . . . . . . . . . . . . . . . . . . . . . . . . . . . . . . . . . . . . . . . . . 4
2. Getting Started
Installing the VOD-WM Server . . . . . . . . . . . . . . . . . . . . . . . . . . . . . . . . . . . . . . . . . . . . . . . . 5
Step 1. Unpack the Server . . . . . . . . . . . . . . . . . . . . . . . . . . . . . . . . . . . . . . . . . . . . . . . . . 5
Step 2. Connect the Server . . . . . . . . . . . . . . . . . . . . . . . . . . . . . . . . . . . . . . . . . . . . . . . . 5
Step 3. Login to the Server . . . . . . . . . . . . . . . . . . . . . . . . . . . . . . . . . . . . . . . . . . . . . . . . 7
Step 4. Configure the IP Address . . . . . . . . . . . . . . . . . . . . . . . . . . . . . . . . . . . . . . . . . . . 8
Step 5. Configure the ETV Portal Server . . . . . . . . . . . . . . . . . . . . . . . . . . . . . . . . . . . . . 9
Step 6. Verify the Installation . . . . . . . . . . . . . . . . . . . . . . . . . . . . . . . . . . . . . . . . . . . . . . 9
3. Managing the Server
Overview . . . . . . . . . . . . . . . . . . . . . . . . . . . . . . . . . . . . . . . . . . . . . . . . . . . . . . . . . . . . . . . . 11
Managing the Server . . . . . . . . . . . . . . . . . . . . . . . . . . . . . . . . . . . . . . . . . . . . . . . . . . . . . . . 11
Server Properties . . . . . . . . . . . . . . . . . . . . . . . . . . . . . . . . . . . . . . . . . . . . . . . . . . . . . . . 13
Performance Monitor . . . . . . . . . . . . . . . . . . . . . . . . . . . . . . . . . . . . . . . . . . . . . . . . . . . 14
Windows Event Viewer . . . . . . . . . . . . . . . . . . . . . . . . . . . . . . . . . . . . . . . . . . . . . . . . . . . . . 15
4. Creating Publishing Points
Creating Publishing Points . . . . . . . . . . . . . . . . . . . . . . . . . . . . . . . . . . . . . . . . . . . . . . . . . . . 17
Creating Authenticated Push Publishing Points . . . . . . . . . . . . . . . . . . . . . . . . . . . . . . . 18
Creating Non-Authenticated Push Publishing Points . . . . . . . . . . . . . . . . . . . . . . . . . . . 18
Creating Pull Publishing Points . . . . . . . . . . . . . . . . . . . . . . . . . . . . . . . . . . . . . . . . . . . . 18
5. Adding Content
Content Backup and Recovery . . . . . . . . . . . . . . . . . . . . . . . . . . . . . . . . . . . . . . . . . . . . . . . . 19
Best Practices . . . . . . . . . . . . . . . . . . . . . . . . . . . . . . . . . . . . . . . . . . . . . . . . . . . . . . . . . . . . . 19
VBrick VOD-WM Server Admin Guide
iii
6. Restoring Windows Media Services
Introduction . . . . . . . . . . . . . . . . . . . . . . . . . . . . . . . . . . . . . . . . . . . . . . . . . . . . . . . . . . . . . . 21
Restoring Windows Media Services . . . . . . . . . . . . . . . . . . . . . . . . . . . . . . . . . . . . . . . . 21
7. Reinstalling the Software
Reinstalling the Software . . . . . . . . . . . . . . . . . . . . . . . . . . . . . . . . . . . . . . . . . . . . . . . . . . . . 23
Initializing the Server . . . . . . . . . . . . . . . . . . . . . . . . . . . . . . . . . . . . . . . . . . . . . . . . . . . 23
Configuring the Server . . . . . . . . . . . . . . . . . . . . . . . . . . . . . . . . . . . . . . . . . . . . . . . . . . 24
Adding Content to the Server . . . . . . . . . . . . . . . . . . . . . . . . . . . . . . . . . . . . . . . . . . . . . . . . 30
Viewing and Verifying the Content . . . . . . . . . . . . . . . . . . . . . . . . . . . . . . . . . . . . . . . . . 30
iv
Contents
VOD-WM v4.2.1 Admin Guide
This VOD-WM Server Admin Guide is written for anyone who will be using or configuring a
VBrick EtherneTV VOD-WM Video on Demand Server. This includes system
administrators, network technicians, and others. This document explains how to set up and
configure the VOD-WM server and how to perform initial administration tasks. For most
common tasks like ingesting content, use the ETV Portal Server and refer to the ETV Portal
Server Admin Guide for details. You can perform most administration tasks using the Portal
Server. VOD-WM servers are a key component in VBrick's EtherneTV Media Distribution
System. They provide standard VOD features for Windows Media files.
Organization
Server Overview
provides an overview of the WM server including compatibility
and system requirements.
Getting Started
explains how to unpack and install the server. This includes
setting the IP address and configuration in ETV Portal Server.
Managing the Server
explains how to use monitoring and performance resources on
the server to track bandwidth, usage, logging, etc.
Creating Publishing
Points
explains how to create authenticated and non-authenticated
publishing points on the server.
Adding Content
explains how to ingest video content to the server.
Restoring Windows
Media Services
explains how to restore Windows Media Services management
after you change the computer name.
Font Conventions
Arial bold is used to
Programs > VBrick
describe dialog boxes and menu choices, for example: Start > All
Courier fixed-width font is used for code elements (C++, HTML) as well as
filenames, directories, etc.
Black Courier fixed-width font is used to indicate user input in keyboard commands,
scripts, etc.
Folder names and user examples are displayed in this sans serif font.
Folder names and user input are displayed in this bold sans serif font.
Italics are used to emphasize specific words or phrases.
Related Publications
Dell PowerEdge 1950 Documentation
Dell PowerEdge 2950 Documentation
VBrick VOD-WM Server Admin Guide
v
Printer-Friendly
VOD-WM Server Release Notes
VOD-WM Server Admin Guide
vi
Preface
Chapter 1
Server Overview
VBrick's VOD-WM Server has been integrated with the EtherneTV family of products
including the Portal Server, the WM Network Video Appliance, the Scheduler, and the
Network Video Recorder (NVR). The VOD-WM delivers stored Windows Media assets as
unicast/multicast streams across an Ethernet network and is built on a Dell hardware
platform. Other features include the ability to schedule asset playback, asset searching, user
and system statistics, and more. The Portal Server is required to gain the full benefits of the
VOD-WM server and is sold separately. In order to set up the Portal Server, follow the
directions in the EtherneTV Portal Server Admin Guide. Once the Portal Server is setup, you
can access video on the VOD-WM server through the Portal Server web interface.
Topics in this chapter
Feature Overview . . . . . . . . . . . . . . . . . . . . . . . . . . . . . . . . . . . . . . . . . . . . . . . . . . . . . . . . . . . 1
VOD-WM Server Software . . . . . . . . . . . . . . . . . . . . . . . . . . . . . . . . . . . . . . . . . . . . . . . . . . . 3
Technical Support . . . . . . . . . . . . . . . . . . . . . . . . . . . . . . . . . . . . . . . . . . . . . . . . . . . . . . . . . . 4
Feature Overview
VBrick VOD-WM servers provide interactive, on-demand playback of Windows Media video
that is stored on the server with a variety of methods. The VOD-WM servers are a basic
component in the VBrick's EtherneTV solution and work seamlessly with the EtherneTV
Portal Server. They ingest and deliver unicast (or multicast) streams in Windows Media
format. The VOD-WM Server supports Fast Forward and Rewind. The general
specifications for the VOD-WM servers are shown below. See the Dell documents listed in
Related Publications on page v for more information.
Table 1. VOD-WM Server Specifications
Model
Hardware † Software ††
Content Drives
(Internal)
Content Drives
(External) †††
Basic
Dell 1950
Standard Edition
1–2 (300GB)
Basic
Dell 1950
Enterprise Edition 1–2 (300GB)
5 drives per 1.5TB (27TB
max) Hardware RAID5
Advanced Dell 2950
Standard Edition
4 (146GB)
Hardware RAID5
Advanced Dell 2950
Enterprise Edition 4 (146GB)
(supports
Hardware RAID5
multicast)
† Dell PowerEdge Server (rack-mounted)
†† Microsoft Windows Server 2003
††† Dell MD1000 SAS with 1.5TB – 27TB (6 x 4.5TB).
VBrick VOD-WM Server Admin Guide
1
Table 2. VOD-WM Server Throughput
VOD-WM Server
Max Throughput †
VOD-WM Basic (Standard)
125 Mbps
VOD-WM Basic (Enterprise)
125 Mbps
VOD-WM Advanced (Standard)
300 Mbps
VOD-WM Advanced (Enterprise) 300 Mbps
† These are qualified throughput measurements. Actual throughput depends on bitrate,
number of connections, disk fragmentation, and other factors, and may be higher.
Figure 1. EtherneTV Media Distribution System
Server Compatibility
The VOD-WM servers are compatible with the following VBrick devices:
•
•
•
•
•
VB6000 WM Network Video Appliances with VBDNA 1.0 or higher.
EtherneTV Portal Server v3.2 or higher.
EtherneTV Scheduler v3.2 or higher
Network Video Recorder v3.2 or higher.
StreamPlayer 4.3 or higher.
System Requirements
The VOD-WM server has been tested to provide the specified performance with no
additional software installed. Be aware that the installation of virus scanners or security software
that consume system I/O resources may have an adverse impact on streaming performance. These
components are not tested by VBrick and you should test the VOD-WM for performance
and reliability after installing them.
2
© 2007 VBrick Systems, Inc.
Server Overview
External Storage
VBrick's SAS (serial attached SCSI) ES5, ES10, and ES15 external storage arrays are fully
compatible with all VOD-WM servers.
VOD-WM Server Software
All server software is pre-installed by VBrick. If, for some reason, you ever need to reinstall
the software, use the Dell recovery CDs to reinstall the Windows Server 2003 (Standard or
Enterprise) operating system. Contact VBrick Support Services if you need help. Each VODWM server has the following software pre-installed.
•
•
•
Windows Server 2003 (Standard or Enterprise Edition).
Internet Information Services (IIS).
ASP.NET.
Note
Windows Media Services are installed and a publishing point is configured on the
server prior to shipment. The Computer Name of the VOD-WM Server is VODWM .
If you subsequently change this name, you will temporarily be unable to manage
Windows Media Services. See Restoring Windows Media Services on page 21 and/
or contact VBrick Support Services for more information.
VOD-WM Server Software CD
The VOD-W Server Software CD has all server documentation including this VOD-WM
Server Admin Guide in searchable HTML format.
Figure 2. VOD-WM Server Product CD
VBrick VOD-WM Server Admin Guide
3
Technical Support
If you can’t find the information you need from the documentation or from your reseller, you
can contact VBrick Support Services on the web at www.VBrick.com/support The Support
Services website has downloads, FAQs, documentation, support guidelines, and an on-line
form you can use to submit questions. VBrick will make every effort to answer your technical
questions in 24 business hours or less.
4
© 2007 VBrick Systems, Inc.
Chapter 2
Getting Started
Installing the VOD-WM Server
The hardware installation of the VOD-WM server is straightforward. Unpack the server and
connect the cables as described below. Note that all server software is pre-installed before
being shipped.
T
To install the server onsite at your location
Step 1. Unpack the Server . . . . . . . . . . . . . . . . . . . . . . . . . . . . . . . . . . . . . . . . . . . . . . . . . . . . 5
Step 2. Connect the Server . . . . . . . . . . . . . . . . . . . . . . . . . . . . . . . . . . . . . . . . . . . . . . . . . . . 5
Step 3. Login to the Server . . . . . . . . . . . . . . . . . . . . . . . . . . . . . . . . . . . . . . . . . . . . . . . . . . . 7
Step 4. Configure the IP Address . . . . . . . . . . . . . . . . . . . . . . . . . . . . . . . . . . . . . . . . . . . . . . 8
Step 5. Configure the ETV Portal Server . . . . . . . . . . . . . . . . . . . . . . . . . . . . . . . . . . . . . . . . 9
Step 6. Verify the Installation. . . . . . . . . . . . . . . . . . . . . . . . . . . . . . . . . . . . . . . . . . . . . . . . . . 9
Step 1. Unpack the Server
Each shipment comes with:
• A Dell PowerEdge 1950 or 2950 server configured with a Microsoft Windows Media
streaming server.
• All power cords and cables.
• Rack mount kit.
• This EtherneTV-VOD-WM Server Admin Guide.
• VBrick VOD-WM Server Product CD.
Step 2. Connect the Server
Note The following steps explain how to connect Dell PowerEdge 1950/2950 servers. To
connect 1850/2850 servers, refer to the previous version of this manual that was
shipped with those servers. To view all VBrick product documentation, go to
www.vbrick.com/support/documentation
T
To set up the VOD-WM server:
1.
Connect the monitor, keyboard, mouse, and network cables as described below.
VBrick VOD-WM Server Admin Guide
5
Figure 3. VOD-WM (Dell 1950 – Rear View)
Figure 4. VOD-WM (Dell 2950 – Rear View)
2. If rack mounting the unit, mount the VOD-WM server in the rack, using the rack mount
kit provided.
3. Connect the VOD-WM server to the network by plugging the 10/100/1000 BaseT
Ethernet cable into the Ethernet port 1 on the rear of the unit.
4. Connect the monitor cable to the blue video port (front or rear) on the VOD-WM server.
Turn the monitor on.
5. Connect a mouse and keyboard to any available USB ports (front or rear) on the
VOD-WM server.
6. Plug the VOD-WM server into a power source, using the power cords provided. (All
VOD servers have redundant power supplies, each with its own cord.)
6
© 2007 VBrick Systems, Inc.
Getting Started
7. Turn the VOD-WM server's main power on by pressing the power switch at the front of
the unit.
Figure 5. VOD-WM (Dell 1950 – Front View)
Figure 6. VOD-WM (Dell 2950 – Front View)
8. The VOD-WM server will boot and automatically load using the default settings. Wait 5–8
minutes for the unit to fully power up. As new hardware is attached (for example a
keyboard and mouse) the operating system will automatically find and install the drivers.
Step 3. Login to the Server
After the server boots, the next step is to login with the default user name (Administrator ).
After logging in, it is always a good idea to add a password.
T
To add an administrator password:
1.
2.
3.
4.
Go to Start > Administrative Tools > Computer Management .
In the left panel expand Local Users and Groups and then click on Users.
Highlight the Administrator user and then right-click and select Set Password .
Ignore any warning and enter and confirm an Administrator password.
VBrick VOD-WM Server Admin Guide
7
Step 4. Configure the IP Address
You need to configure the IP address as explained below on the server machine. When done, be sure
to reboot the machine before configuring the server in the ETV Portal Server. VBrick
strongly recommends that you use a static IP address rather than a dynamically-configured
DHCP. The use of a DHCP server creates a number of issues when the IP address changes.
For example clients configured to point to the VOD-WM server's IP address may need to be
re-configured. Also, the ETV Portal Server is configured to use the IP address of the VODWM server so the Portal Server configuration will have to change. You can configure the IP
address by connecting a monitor to the VGA port on the server.
T
To configure the static IP address of the server machine in Windows:
1.
2.
3.
Go to Start > Control Panel > Network Connections > Local Area Connection .
Then click on Properties and double-click on Internet Protocol (TCP/IP) .
Click on Use the following IP address and enter the values provided by your system
administrator for IP address, Subnet mask , and Default gateway.
Click OK when done.
4.
8
© 2007 VBrick Systems, Inc.
Getting Started
Step 5. Configure the ETV Portal Server
The VOD-WM server must be configured in VBrick's ETV Portal Server before it is
recognized as part of the ETV system.
T
To configure the VOD-WM server in ETV Portal Server:
1.
2.
Launch ETV Portal Server and login as an administrator.
Go to Global Settings > Servers and select VOD-WM-STANDARD or VOD-WMENTERPRISE from the dropdown list.
3.
Enter the IP or Domain , Server Description (optional), FTP User Name (default =
and FTP Password (default = vbrickuser ).
Accept the default Publishing Point parameters and click Add when done.
vbrickuser )
4.
This completes the Portal Server configuration. However in order to verify the installation as
explained below, you must manually sync up the VOD-WM server with the ETV Portal
Server as follows:
T
1.
To manually sync the VOD-WM server with the ETV Portal Server:
Launch the ETV Portal Server admin tool and go to Global Settings > Global
Assignments > Assign VOD Polling Interval .
2.
Click Sync Now. Do not change anything else and exit when done.
Step 6. Verify the Installation
Use the following sequence of steps to verify the VOD-WM server is installed properly and
can communicate with the ETV Portal Server. If you can use the ETV Portal Server to
launch a video stored on the VOD-WM Server, you have tested connectivity and verified the
installation. For more information about ETV Portal Server, see the ETV Portal Server
Admin Guide.
VBrick VOD-WM Server Admin Guide
9
T
To verify the installation:
1.
2.
Ping the IP address of the VOD-WM server from any PC in the same network.
Launch an ETV Portal Server client. Open a browser and enter the ETV Portal Server
hostname or IP address (e.g. http://portalserveripaddress ) in the address bar.
Go to the Asset Library and launch any of the Windows Media (wmv) videos available in
the Demo folder. If it runs, you have successfully completed the installation.
3.
10
© 2007 VBrick Systems, Inc.
Chapter 3
Managing the Server
Topics in this chapter
Overview . . . . . . . . . . . . . . . . . . . . . . . . . . . . . . . . . . . . . . . . . . . . . . . . . . . . . . . . . . . . . . . . 11
Managing the Server . . . . . . . . . . . . . . . . . . . . . . . . . . . . . . . . . . . . . . . . . . . . . . . . . . . . . . . 11
Windows Event Viewer . . . . . . . . . . . . . . . . . . . . . . . . . . . . . . . . . . . . . . . . . . . . . . . . . . . . . 15
Overview
Windows Media Services provides numerous tools to help you manage a streaming media
server. This section provides a brief overview of some of the resources that are available to
help you manage the server. Use the Help pages embedded in the server application to
understand the concepts and get help for specific issues. You can also go to the Microsoft
Streaming Server website for additional information: http://www.microsoft.com/windows/
windowsmedia/9series/server.aspx
Managing the Server
T
To launch the Windows Media server:
1.
2.
Go to Start > Administrative Tools > Manage Your Server.
On the Managing Your Server Roles page, click on Manage this streaming media
server. This displays the Welcome to Windows Media Services 9 Series page.
Double-click on the server name to display the Getting Started page and expand the tree
control.
3.
VBrick VOD-WM Server Admin Guide
11
This page has four tabbed windows as follows.
12
Getting Started
Displays various help topics to help you get acquainted with the
system.
Properties
Displays various server properties such as Logging, Event
notification, etc. Highlight any property in the Category list, then
right-click and select Properties in the Plug-in list (or use the
View properties icon at the bottom of the page)
Advertising
Used to add advertising content.
Monitor
Information only. Click the View Performance Monitor icon to
launch the Windows Media Performance Monitor.
© 2007 VBrick Systems, Inc.
Managing the Server
Server Properties
Note
The default Publishing Point on the VOD-WM server is VBP and it must match the
server configuration in ETV Portal Server. You can change the Publishing Point
name but VBrick strongly recommends you keep the default.
T
To display or set logging properties:
1.
2.
3.
Select Logging in the Category list.
Select WMS Client Logging and right-click to Enable/Disable logging.
Right-click and select Properties to set Logging Properties including the location of the
log file.
VBrick VOD-WM Server Admin Guide
13
Performance Monitor
Click on the Monitor tab for a quick read-only view of bandwidth and usage metrics. Use the
icon to Start/Stop services, reset counters, or to launch the Performance Monitor.
14
T
To view the Performance Monitor:
1.
Click the View Performance Monitor icon
2.
Use the toolbar controls above the display area to add or remove counters.
at the bottom of the window.
© 2007 VBrick Systems, Inc.
Managing the Server
Windows Event Viewer
The Windows Event Viewer is available on Windows Server 2003 Standard or Enterprise
Edition and other operating systems. Use this tool to review any system-level messages
written to the Windows system event log.
T
1.
To launch the Windows event viewer:
Go to Start > Control Panel > Administrative Tools > Event Viewer and click on
to populate the viewer with messages.
Application
VBrick VOD-WM Server Admin Guide
15
2.
16
For more details, double-click on any event to launch the Event Properties window. Use
the arrows buttons on this window to page through the log.
© 2007 VBrick Systems, Inc.
Chapter 4
Creating Publishing Points
The WM Server can also be configured with publishing points to be used as a reflector
server. When used in this manner, live WM streams reflected from the WM Server can be
selected and viewed from the ETV Portal Server. To have the reflected stream appear on the
Live Broadcasts page of the Portal Server, go to the Configuration: Encoder > Server page
in IWS and complete the Announce External Server section. For more information, see the
"Configuration" chapter in the WM Appliance Admin Guide.
The following paragraphs explain how to create publishing points on a Windows Media
Server to allow live streaming from a VBrick WM appliance to the server. It is important to
note that, by default, WMS Publishing Points ACL Authorization is enabled on the Windows
Media Server. This means that an HTTP push from a WM appliance will not connect to the
server unless you first create a user name and password for an authorized user on the WM
Server and enter that user name and password in the appliance configuration. (If you disable
authorization entirely, anyone who knows the URL can view the stream.) See the ETV Portal
Server Admin Guide and the Microsoft Windows Media Server documentation for more
information.
Creating Publishing Points
The WM Appliance supports both authenticated and non-authenticated push publishing
points for the Microsoft Windows Media Server. Depending on how you configure the
Windows Media Server, authentication can be the default setting for all push publishing
points, it can be required on a per-publishing-point basis, or not required at all. A typical
deployment of the Windows Media Server will most likely have the authentication setting on
to force a push device to authenticate itself before it can send data to the publishing point.
T
To verify and enable or disable authentication:
1. Go to the Windows Media Services Manager. The first device directly under Windows
Media Services in the left pane is the name of the Windows Media server.
2. Select the named Windows Media server and click Properties in the right pane. This
displays two additional panes.
3. In the left pane, select Authorization and right-click WMS Publishing Points ACL
Authorization .
In the right pane click Properties. If there are user names in the list, click the username to
view the allowed function. The named user will have a combination of read/write/create
permissions as follows:
•
•
•
Read – will allow the user to read from the publishing point.
Write – will allow the user to write (push) to the publishing point.
Create – at the server level will allow a user to create publishing points, or at the
individual point level it will allow a user to create "Copy From Points. "
VBrick VOD-WM Server Admin Guide
17
Adding users and privileges at the server level will allow all inherited publishing points to
acquire the same security privileges. To add individual privileges for a specific publishing
point, select the Publishing Point , click Properties, select Authorization , and right-click
WMS Publishing Points ACL Authorization . To add users and subsequently, permissions, the
user must already exist as a domain user or as a local user on the server. The user name will be
listed and can be given the desired priveleges.
Creating Authenticated Push Publishing Points
On the WMS Publishing Points ACL Authorization screen from above, uncheck Allow Write
Permission for the Everyone user if already checked, and add write permission for a selected
user or set of users by adding the user. Click Ok to apply the change to the server. Only the
named users will be allowed to push to the server after being authenticated. If this change is
done at the server level, the changes must be propagated to the publishing point level to be
effective.
Creating Non-Authenticated Push Publishing Points
Either disable WMS Publishing Points Authorization , or keeping the default policy of
authorization always on, and selectively allowing authentication to be bypassed for some, on
the WMS Publishing Points ACL Authorization at the publishing point level, select Allow
Write Permission for the Everyone user (if already on the list or add to the list if necessary).
Click Ok to apply the change to the server. If this change is done at the server level, and the
change is propagated to all publishing points, all publishing points will allow push without
authentication.
Creating Pull Publishing Points
Create a broadcast publishing point on the server and use the WM Appliance's HTTP URL as
the source for the publishing point. When you start the publishing point it pulls the stream
from the appliance and you can see the server listed in the client table on the VBrick's Status:
Server Status > Slot1 Details page in IWS. You can optionally enable the Start publishing
point when first client connects feature in the publishing point's general properties to have
the server wait for a client to connect before it starts the pull from the appliance.
Note
18
The Windows Media Server must have the HTTP control protocol enabled to
accept a push. Go to Server Properties and select Control Protocol in the left pane
and in the right pane enable WMS HTTP Server Control Protocol to enable HTTP
Control Protocol on your server. The HTTP control protocol uses port 80 by
default so make sure you do not have other services running that also use that port.
Also, the WMS Negotiate Authentication must be enabled at the server or
Publishing Point level.
© 2007 VBrick Systems, Inc.
Chapter 5
Adding Content
VBrick strongly recommends that you use the EtherneTV Portal Server exclusively to ingest all
VOD-WM content. With the ETV Portal Server you can add individual files or you can FTP
or copy pre-recorded content to the ETV Portal Server for easy ingestion to the VOD-WM
server. The ETV server periodically (every 5 minutes) polls certain folders for presence of
content and if found ingests the content onto multiple VOD-WM servers. This process is
called Automatic Content Ingestion or Auto-ingestion. The content is placed in a pre-defined
subfolder under the FTP root folder. This pre-defined folder is called the auto-ingest root
folder. Content can also be added by using the Add Video function in ETV Portal Server or
by recording a live stream. See the Portal Server Admin Guide for more information.
Topics in this chapter
Content Backup and Recovery . . . . . . . . . . . . . . . . . . . . . . . . . . . . . . . . . . . . . . . . . . . . . . . . 19
Best Practices . . . . . . . . . . . . . . . . . . . . . . . . . . . . . . . . . . . . . . . . . . . . . . . . . . . . . . . . . . . . . 19
Content Backup and Recovery
VBrick strongly recommends that all stored VOD-WM video content be backed up to an
external storage system, a Storage Area Network (SAN), or a tape backup system. Backing up
video content onto an external system is insurance against the failure of one or more of the
VOD-WM disk drives.
Best Practices
After adding a new video to the EtherneTV system using the Portal Server, it may take a few
minutes or longer after ingestion before new video appears in the Portal Server content
directory. Use the Sync Now function to make the content available immediately.
T
1.
To sync the server with new content:
On the ETV Portal Server, go to Global Settings > Global Assignments > Assign VOD
Polling Interval.
2.
Click Sync Now. Do not enter anything else.
VBrick VOD-WM Server Admin Guide
19
20
© 2007 VBrick Systems, Inc.
Chapter 6
Restoring Windows Media Services
Introduction
Windows Media Services are installed and a publishing point is configured on the server prior
to shipment. The Computer Name of the VOD-WM Server is VODWM . If you subsequently
change this name, the Windows Media Services branch in the Microsoft Management
Console (MMC) shows no server and all Windows Media Services configuration, such as
Publishing Points, are missing. Windows Media Services management is unavailable. This
procedure explains how to restore Windows Media Services management after a server
rename. Contact VBrick Support Services if you need help or more information.
Restoring Windows Media Services
When you rename the server, using any available method, you will typically be prompted for a
reboot. Run the following procedure after you reboot the server.
T
1.
To restore Windows Media Services management:
From the Start menu, select Windows Media Services from the panel or from
Alternatively, select Manage Your Server and from the interface
select Manage this streaming media server to launch the MMC.
(Ignore any popup error windows from Windows Media Services.)
Administrative Tools.
2.
3.
In the left panel, right-click on Windows Media Services and select Add Server from the
popup.
VBrick VOD-WM Server Admin Guide
21
4.
In the Add Server popup enter localhost or the new name of the server.
5.
The new server name will appear under Windows Media Services. Expand the tree
under the new server name and the previous configurations including Publishing Points
will be visible and accessible.
This completes the restore procedure. Now you can launch the ETV Portal Server, go to
Global Settings > Servers, and configure the VOD-WM Server with the new server
name if necessary.
6.
22
© 2007 VBrick Systems, Inc.
Chapter 7
Reinstalling the Software
Topics in this chapter
Reinstalling the Software . . . . . . . . . . . . . . . . . . . . . . . . . . . . . . . . . . . . . . . . . . . . . . . . . . . . 23
Adding Content to the Server . . . . . . . . . . . . . . . . . . . . . . . . . . . . . . . . . . . . . . . . . . . . . . . . 30
Reinstalling the Software
The VBrick EtherneTV VOD-WM server is shipped with Windows 2003 Server (Standard or
Enterprise Edition) already installed and configured. (Enterprise Edition supports multicast;
Standard Edition does not.) Installation instructions are provided here only in the unlikely
event that you ever need to reinstall the operating system.
Initializing the Server
After Windows 2003 Server Standard or Enterprise Edition is installed, use the following
steps to initialize the VOD-WM server.
T
To initialize the VOD-WM:
1.
Apply power to the server by pressing the main power switch on the front of the unit.
The server will boot up using the default settings.
Press any key to display the "Dell Eula" page.
Press any key for "Service Tag/Technical Support information."
Press any key for "Important Information (OS Preinstalled)."
Click Next on "Windows Setup Wizard."
Click Next on "I Accept License Agreement."
Click Next on "Regional Languages."
Personalize Your Software, Name: "user", Organization: "company", then click Next .
Enter Computer Name: VODWM , Administrator password: (leave blank) then click Next .
Adjust the computer time and time zone and then click Next .
Click Next on Networking Settings.
Click Next for workgroup.
Install Critical Update select "Step 1 Update this Server."
Click on OK on the popup windows.
Click on Install for security warning.
Click on the Internet Explorer updates window's Install Now.
Click on Express.
Click Yes in the popup windows.
Click on Install Updates.
Click on I Accept and the download will begin.
Click on Restart Now after the update completes.
2.
3.
4.
5.
6.
7.
8.
9.
10.
11.
12.
13.
14.
15.
16.
17.
18.
19.
20.
21.
VBrick VOD-WM Server Admin Guide
23
Configuring the Server
T
1.
To configure the server:
Login and go to Control Panel > Add/Remove Programs > Add/Remove Windows
Highlight and select "Application Server".
Components.
24
2.
Select Details then select "ASP.NET."
3.
Highlight Internet Information Services (IIS), select Details and then select "File
Transfer Protocol (FTP) Service". After selecting "FTP" press OK to close the IIS
window, then press OK to close the Application Server Window.
© 2007 VBrick Systems, Inc.
Reinstalling the Software
4.
In the Windows Components Wizard, highlight and select Windows Media Services and
then click Details.
5.
In the Windows Media Services dialog box, verify the "Windows Media Services" and
"Windows Media Services snap in" components are selected. Press OK in the "Windows
Media Services" box and Next " in the Windows Components Wizard. The Windows
Components will now be installed.
VBrick VOD-WM Server Admin Guide
25
6.
Using Windows Explorer, browse to drive D:\ and create a folder named wmpub. Then
create another folder inside of wmpub named WMRoot . Verify the correct path was
created as D:\wmpub\WMRoot (verify the correct case for WMRoot ).
Highlight the WMRoot folder, right-click and select Properties. In the Properties box
select the Security tab and highlight Users (VODWM\Users) . Then select Full Control in
the Allow column and press OK .
26
7.
Go to Start > Administrative Tools > Internet Information Services (IIS) Manager.
Select Web Sites and highlight "Default Web Site". Then right-click and select Stop.
8.
Open Windows Media Services and select the server name. On the Properties tab,
select Control protocol and enable WMP HTTP Server Control Protocol .
© 2007 VBrick Systems, Inc.
Reinstalling the Software
9.
Highlight WMP HTTP Server Control Protocol , then right-click and select Enable. If
there is an error popup verify the Default Web Services were stopped properly as
explained above.
10. Highlight the server name, then right-click and select Add Publishing Point
(Advanced)…
[
11. Select On-demand and Browse to the directory D:\wmpub\WMRoot for Location of
Content and press OK .
12. Go to Start > All Programs > Administrative Tools > Internet Information Services
(IIS) Manager. Select the server name, open the "FTP Sites" box and highlight the
"Default FTP Site".
VBrick VOD-WM Server Admin Guide
27
13. Right-click on the "Default FTP Site" and select Properties. In Security Accounts
change the User name to VODWM\vbrickuser, set the password to vbrickuser, and then
click Apply and confirm. Then uncheck "Allow anonymous connection" and "Allow only
anonymous connections" and click Apply. Press the Home Directory tab and enter
vbrickuser to verify the password.
28
© 2007 VBrick Systems, Inc.
Reinstalling the Software
14. In the Home Directory tab, change the Local path: to D:\wmpub\WMRoot and select the
check box next to "Write". Click OK to close the "Default FTP Site Properties".
15. Go to Start > All Programs > Administrative Tools > Computer Management to open
the "Computer Management" window. Select "Local Users and Groups" and highlight
"Users". Then right-click on "Users" and select "New User".
16. In the "New User" box enter User name: vbrickuser and the password vbrickuser. Then
confirm and press Create.
17. Highlight the User vbrickuser and select Properties. In the "vbrickuser Properties" box
select the General tab. Deselect "User must change password at next logon" and select
"Password never expires" and "User cannot change password". Select the Member Of tab
and verify that "Member of:" lists "Users". If not, select Add , which opens the Select
Groups box. In the Select Groups box select Advanced… then press Find Now. In the
Search Results portion of the box select "Users" and press OK , then press OK again.
Press OK to close the "vbrickuser Properties" box.
VBrick VOD-WM Server Admin Guide
29
The Windows Media Server configuration is now complete.
Adding Content to the Server
T
To add content to the VOD-W server:
1.
Insert the Documentation CD into the CD-ROM drive of the server.
2.
Copy the video demo files from the CD-ROM (E:\video\*.wmv ) to D:\wmpub\WMRoot\
Viewing and Verifying the Content
30
T
To view and verify the content:
1.
2.
3.
4.
5.
6.
7.
Launch Internet Explorer and open the Admin console of the EtherneTV Portal Server.
Click on Global Settings > Servers.
Enter the sever IP address, select Server Type (VODWM) , then click Modify.
Go Global Assignments > Assign Polling Interval and click Sync Now.
Logout of the EtherneTV Portal Server and open a browser window.
Launch the Portal Server and click on the Asset Library.
This will display the content you added above. Click on one of the demos and verify that
the video plays and is of good quality.
© 2007 VBrick Systems, Inc.
VBrick Systems, Inc.
12 Beaumont Road
Wallingford, Connecticut 06492, USA