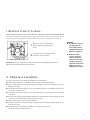
1
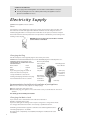
Congratulations on the purchase of your new
built-in appliance.
IMPORTANT INFORMATION
Please read this Instruction Manual
thoroughly before installing and using
your appliance for the first time.
Instructions for
Installation and Use
For Integrated Washer and Washer Dryer
Models IWM12 & IWD12
IMPORTANT INFORMATION:
● Do not plug in and switch appliance on at the mains until installation is complete.
● You may be charged for a service call if a problem with your appliance is caused
by incorrect installation or misuse.
Electricity Supply
WARNING: This appliance must be earthed.
Fuses
Your appliance comes fitted with a plug and a 13A fuse. If you need to replace the fuse, only
those rated at 13A and ASTA approved to BS1362 should be used. To change the fuse in a
moulded plug, lift holder to vertical position and lift fuse out. To replace, insert fuse and push
fuse holder down into locked position. Correct replacement is identified by colour coding or the
marking on base of plug.
WARNING: Do not use plug unless fuse holder is in locked
position and fuse cover fitted.
Changing the Plug
Cut off and dispose of the supplied plug if it does not fit your socket.
WARNING: To avoid a shock hazard do not insert the discarded plug into a socket anywhere else.
IMPORTANT: WIRES IN THE MAINS LEAD
Green and yellow (Earth)
ARE COLOURED IN ACCORDANCE WITH THE
wire to terminal
13A ASTA approved
FOLLOWING CODE:
marked ‘E’,
fuse to BS1362.
Green/Yellow
Earth
symbol , or
Blue
Neutral
coloured green
Brown
Live
and yellow.
Brown (Live)
If you change the plug, the colour of
wire to terminal
wires in the mains lead may not
marked ‘L’ or
correspond with the colour of the
Blue (Neutral)
coloured red.
markings identifying terminals in the plug.
wire to terminal
You should therefore wire it as shown.
marked ‘N’ or
coloured black.
Cord clamp
Recommendations for the Electrical Installation of your Appliance
● Do not use extension leads, adaptors or multiple plugs.
● Never remove the earth connection.
● You should plug your appliance into a socket that is easily accessible but out of reach of
children.
If in doubt, get in touch with your installer.
Changing the Mains Lead
A special lead can be ordered from Service UK: 08709 066 066 or
Republic of Ireland: 1850 302 200
If you have damaged the existing lead or require a longer one a charge will be made.
It is strongly advised that this work is carried out by a qualified electrician.
CE marking certifies that this appliance conforms to the following EEC directives:Low Voltage Equipment - 73/23/EEC
Electromagnetic compatibility - 89/336/EEC (including the modification directive
92/31/EEC)
2
Contents
Electricity Supply ......................................
Recycling & Disposal Information ..............
2
3
Installation Instructions............
4
i. Remove Transit Bolts .......................
5
ii. Choose a Location... ...
5
iii. Connect to the Water Supply...........
6
iv. Connect to a Drainage System..............
7
v. Fitting the Door Panels and Plinth........
8
vi. Fitting your appliance into your kitchen.. 10
vii. Levelling...................
11
The Controls..................................
12
Getting to know your Appliance:
Washing Machine IWM12..............................13
The Dispenser Drawer......................
17
Using your Appliance......................
18
Washcare Tips......................
20
Cleaning..........................................
21
Troubleshooting
General Maintenance...................
22
Key Contacts ................................. Back Page
Washer Dryer IWD12.......................................14
Choosing a Programme:
Washing Machine IWM12..............................15
Washer Dryer IWD12.......................................16
Retention of this
Instruction Manual
Recycling & Disposal Information
As part of our continued commitment to helping the environment, We reserve the right to use
quality recycled components to keep down customer costs and minimise material wastage.
Please dispose of packaging and old appliances carefully. To minimise risk of injury to children,
remove the door, plug and cut mains cable off flush with the appliance. Dispose of separately to
ensure that the appliance can no longer be plugged into a mains socket.
Keep this instruction manual in a
handy place for reference.
It contains important details on
the safe and proper use of your
appliance. If you sell the
appliance, pass it on to someone
else, move house and leave it
behind, make sure that you
provide this manual so that the
new owner can become familiar
with the appliance and safety
warnings.
3
Installation Instructions
IMPORTANT INFORMATION:
● Do not plug in and switch appliance on at the mains until installation is complete.
● You may be charged for a service call if a problem with your appliance is caused
by incorrect installation or misuse.
Follow these 7 steps for a trouble free installation:
i.
ii.
iii.
iv.
v.
vi.
Remove the Transit Bolts...
Choose a Location...
Connect to the Water Supply...
Connect to a Drainage System...
Fitting the door panels and plinth...
Fitting your appliance into your
kitchen...
vii. Levelling...
4
i. Remove Transit Screws...
BEFORE ATTEMPTING TO USE THE MACHINE, YOU MUST FOLLOW THE PROCEDURE DESCRIBED BELOW.
The inside of the appliance is supported, for transportation, by four screws on the back panel. Before
using the appliance these MUST be removed. NOTE: You may need a second person to help you.
1.
Remove the screws , along with the
spacers together with the washers
intact.
must now cover the holes with the
2. You
four plastic covers provided.
Important: Use the cap supplied to close the 3 holes which housed the plug, situated in the
right hand part of the lower back of the appliance.
WARNING:
● The appliance must not
be plugged into the
mains supply until all
installation instructions
have been completed.
● Retain the transit
screws, spacers and
washers. Should you
move house then these
should be replaced to
support the inside of the
appliance to prevent
damage when in transit.
ii. Choose a Location...
The choice of location for your appliance will influence its performance.
● Position where possible on a solid floor. Vibration may occur with a wooden floor.
● Take care with vinyl floor coverings. The weight of the appliance may cause indentations in some
vinyl floor coverings.
● You should not install your appliance on a carpeted floor, but if this is unavoidable, ensure that air
can circulate around its base.
● If locating next to another appliance or an item of furniture, leave space between them to allow air
to circulate.
● For your safety and to comply with IEE regulations, you should not install your appliance in a bath
or shower room. Seek professional advice if you wish to do so.
● Ensure sufficient space is allowed for the appliance.
● Ensure the electrical socket and water taps are easily accessible and that the water supply can be
isolated if necessary.
● Risk of freezing: Do not position the appliance in rooms exposed to frost.
Frozen pipes may burst under pressure.
5
iii. Connect to the Water Supply...
WARNING
● Do not connect
appliance to a single
outlet instantaneous
water heater.
● Water taps and standpipe should be situated away from the rear of appliance but in easy
access for turning on and off.
● For your machine to operate correctly it requires water pressures in the range of 6-150 psi
(100 - 1000KPa). Most water supplies will be in this range.
● Connect the hoses to the water supply pipes at the rear of the appliance
and onto the water supply taps (Red end fitting to the hot water supply
and adjacent to ‘H’ on the rear of the appliance and White end fitting to
the cold water supply and adjacent to ‘C’ on the rear of the appliance).
Remember to insert a sealing washer (A) to ensure each connection is
watertight.
Fit securely and turn on the water supply to check for leaks.
If there is a leak, turn off the water supply, remove the connector
and check that the sealing washer is in place. Refit the connector
and tighten it. Turn on the water supply.
Note: Do not over tighten the water supply pipe connection. Hand
tight should be sufficient.
We recommend you use the new hoses provided with your appliance to ensure correct
connections and prevent leaks.
If the fill hoses are too short:
Longer fill hoses are available from our Genuine Parts and
Accessories Mail Order Hotline
UK on 08709 077 077
(or in the Republic of Ireland on (01) 842 6836).
Remove the existing fill hoses from the inlet valves on the
back of the machine and fit the new longer fill hoses as shown
with the angled ends of the hoses connected to the machine.
Remember you may be
charged for a service
call if a problem with
your appliance is
caused by incorrect
installation or misuse.
If you have no hot water supply or your hot water pressure is low:
A cold fill adaptor and fitting instructions are available from
your local Creda authorised Service Centre or by calling the
Genuine Parts and Accessories Mail Order Hotline
UK on 08709 077 077
(or in the Republic of Ireland on (01) 842 6836).
A cold fill adaptor
6
iv. Connect to a Drainage System...
● Connect up the drain hose, after fitting the hooked end support supplied in the machine.
● Ensure the drainage hose is not obstructed, trapped or kinked.
● Any extension of the drainage pipe must be no longer than 1 metre, it must have the same
inner diameter and must have no constrictions of any nature.
● Do not position standpipe near an electrical outlet.
We recommend one of the following drainage methods:-
Standpipe
Note: Ensure the standpipe has a minimum diameter of 38mm.
● The standpipe should be installed away from the
rear of the appliance.
1. Ensure hooked end of drain hose is positioned between 100
and 60cm above the bottom of the machine.
2. Untie the end of the GREY drainage hose from the rear of the
appliance and place approximately 100mm into the standpipe or
sink trap spigot.
● Ensure the drain hose is firmly in position, to prevent it coming
away while the machine is in use and causing a flood.
Sink Waste System
Note: Ensure the sink outlet pipe has a minimum diameter of 32 mm.
1. Untie the end of the GREY drainage hose from the
rear of the appliance.
2. Reposition ‘hooked end’ support as required along the GREY
drainage hose.
3. If fitting an under sink waste disposal unit cut out the
membrane, bung or blanking plug.
4. Attach the GREY drainage hose to the under sink waste
disposal unit securely, using a suitable hose clip.
5. Raise the hose to a minimum height of between
90 and 65cm to avoid syphoning.
cut off end
● Ensure the drain hose is securely attached, to prevent it coming
away while the machine is in use and causing a flood.
hose clip
If the GREY drainage hose is too short:
A longer drainage hose is available from our Genuine Parts & Accessories Mail Order Hotline
UK on 08709 077 077 (or in the Republic of Ireland on (01) 842 6836).
7
v. Fitting the Door Panel...
The packaging is designed to
make it possible to mount the
wooden panel onto the appliance
without removing it completely.
● The wooden panel that
covers the face of the machine
must not be less than 18mm
in thickness and can be
hinged on either side.
For practical reasons, it is
advisable to maintain the
same opening direction as the
appliance door itself (hinges
applied to the left hand side).
DOOR MOUNTING ACCESSORIES:
6 x type A self threading screws 1=13mm
2 x type B metric countersunk screws 1=25mm, for fastening
the magnet plate to the cabinet
4 x type C metric screws 1=15mm, for mounting the hinge
supports to the cabinet
4 x type D metric screws 1=7mm, for mounting the hinges on
the supports
8
Fitting the Door Panel and Plinth...
Mounting parts onto the face of the appliance:
-
Mount the hinge supports onto the face of the machine, positioning the hole indicated by
the arrow, in Fig.1, towards the inside of the face and using the type C screws.
-
Mount the magnetic plate on the opposite side, at the top, using the two type B screws.
-
Place the spacer illustrated in Fig 4/B between the machine front and the magnet receiver.
Using the drilling template:Proceed as follows when applying the panel to the appliance:
-
To trace the positions of the holes on the left hand side of the panel, align the drilling
template to the top left side of the panel, using the lines traced on the extremities as a
reference.
-
To trace the positions of the holes on the right hand side of the panel, align the drilling
template to the top right side of the panel.
-
Use an appropriately sized router to mill the holes for the two hinges, the rubber plug and
the magnet.
Mounting the parts onto the wooden door panel:-
Insert the hinges into the holes (NB. the movable part of the hinge must be positioned
facing away from the panel) and fasten them with the 4 type A screws.
-
Insert the magnet into the top hole on the opposite side of the hinges and fasten it with
the 2 type B screws.
-
Insert the rubber plug into the bottom hole.
-
The panel is now ready to be mounted onto the machine.
Mounting the panel onto the machine:-
Insert the nib of the hinge (indicated by the arrow in Fig.2) into the hole for the hinge and
push the panel towards the front of the machine. Fasten the two hinges with the type D
screws.
Fastening the plinth guide:If the machine is installed at the end of a set of modular cabinets, mount either one or both of
the guides for the base moulding (as shown, Fig.6).
Adjust them for depth, based on the position of the base moulding and if necessary fasten the
base to the guides (Fig.7).
This is how to assemble the plinth guide (Fig.6).
-
Fasten angle P using screw R, insert plinth guide Q into the special slot and once it is in the
desired position, lock it in place using angle P and screw R.
Fig.6
Fig.7
9
vi. Fitting your appliance into your
kitchen...
Inserting the machine into the cabinet:-
Push the machine into the opening, aligning it with the cabinets (Fig.8).
-
Regulate the adjustable feet to raise the machine to the appropriate height.
-
To adjust the position of the wooden panel in both the vertical and horizontal directions,
use the C and D screws, as shown in Fig.9.
Important: Close the lower part of the appliance front by ensuring that the plinth rests against the
floor.
Fig. 8
Fig. 9
Move the appliance into position, care must be taken that the Water Supply pipes and the
Drainage hose are not kinked or trapped.
Direct the mains cable towards the electrical socket to be used but DO NOT plug in at this
stage.
Remember you may be
charged for a service
call if a problem with
your appliance is
caused by incorrect
installation or misuse.
10
There must be at least 2mm clearance at the sides and top of the appliance. The back of
the appliance must also remain some distance away from the back wall. If the recessing cavity
is higher than 820mm, the opening between the floor and sides of the appliance (when
installed at the end of a line of furniture) must be completely closed in.
vii. Levelling...
Adjust the feet until all four feet are in firm contact with the floor ensuring the
appliance stands level in every direction. You can check this using a spirit level.
We recommend you level the appliance to prevent vibration being transmitted to
the surrounding furniture, check that the sides and the top of the appliance are
unable to touch the furniture.
Accessories provided for height adjustment
The following can be found inside the polystyrene lid (Fig.10):
2 x crossbars (G)
1 x strip (M)
The following can be found inside the appliance drum:
4 x adjustable feet (H)
4 x screws (I)
4 x screws (R)
4 x nuts (L)
2 x plinth guides (Q)
Adjusting the appliance height
The height can be adjusted (from 815mm to 835mm), by turning the 4 feet.
Should you require the appliance be placed higher than the above height you
need the following accessories to raise it up to 870mm:
- the 2 x crossbars (G)
- the 4 x adjustable feet (H)
- the 4 x screws (I)
- the 4 x nuts (L)
Then carry out the following steps (Fig.11):
Remove the 4 original feet, place a crossbar G at the front of the machine, fasten
it in place using screws I (screwing them in where the original feet were) then
insert the new feet H.
Repeat at the back of the appliance.
Now adjust the feet H to raise or lower the appliance from 835mm to 870mm.
Once you have reached the desired height lock the nuts L onto the crossbar G.
To adjust the appliance to a height between 870mm and 900mm you need to
mount strip M, adjusting feet H to the required height.
Insert strip M as follows: Loosen the three screws N situated at the front of the
top cover of the appliance, insert strip M as shown in Fig.12, then fasten screws
N.
Fig. 10
Fig. 11
Fig. 12
11
The Controls
Understanding the Control Panel:
F
E
D
C
G
H
A
BM L I
The Controls
Washing Machine:
Washer Dryer:
Selection Knob and
A. Programme
Programme Start
Programme Selection Knob and
Programme Start
B. Temperature Control Knob
Temperature Control Knob
C.
Drying Cycle Knob
Spin Selection Knob
D. Detergent Dispenser
Detergent Dispenser
E.
Rinse Hold
Rinse Hold
F.
Fast Wash
Reduced Spin
G. Intensive Wash
Fast Wash
H. PreWash
Intensive Wash
WARNINGS
● Do not allow children to
play with the appliance
or tamper with the
controls.
I.
On / Off button
On / Off button
L.
Mains On / Off Indicator Light
Mains On / Off Indicator Light and
Door Locked Indicator
M. Door Locked Indicator
12
Drying Cycle Indicator
Getting to Know Your Appliance
Functions - Washing Machine
A. Programme Selection knob...
Turn the knob, clockwise only, until the symbol/letter of the required programme (refer to
Choosing a Wash Programme) is in line with the pointer on the control panel.
After the wash programme has been set and accepted by the washing machine, turning the
Programme Selection knob will have no effect (except for when turned to position ●
Stop/Reset).
WARNINGS
● Do not overload
appliance! It may
damage laundry and
reduce the quality of
the wash.
B. Temperature control knob...
For each programme it is always necessary to select a temperature.
Used to set the required wash programme temperature (refer to the Choosing a Wash
Programme).
It also allows you to reduce the recommended temperature for the selected programme
and even to set a cold wash cycle.
C. Spin selection knob...
This is used to exclude the spin cycle (by selecting No Spin) or to reduce the spin speed of
the selected programme. Maximum spin speeds for the four types of fabric are:
Fabric
Spin Speed
Cotton
1200rpm
Synthetics
800rpm
Wool
600rpm
Silk
n/a
Note: distribution phase will be carried out at a low speed.
D. Detergent Dispenser...
The dispenser is divided into three compartments.
1.
Pre-wash detergent compartment
2.
Main wash detergent compartment
3.
Fabric Conditioner compartment
E. Rinse Hold...
This function allows you to interrupt a programme (on symbol
) holding the laundry in
the water before the final spin cycle. Before opening the door, finish the wash cycle as
follows:
Silk and curtains: Press button E and the machine will drain the water.
Synthetics:
If you want a spin cycle - Press button E
OR
Turn knob A to programme L if you want to drain the
water.
With ‘Delicate Acrylics, Programme H’ or ‘Machine Wash Wool, Programme J’ this function is not
performed.
F. Fast Wash...
Pressing this button reduces the length of the selected wash programme by about 30%.
It cannot be used with special programmes or those for wool and silk.
G. Intensive Wash...
With this button you can carry out a more intensive wash that optimises the effectiveness
of the detergents, thus allowing more resistant stains to be removed. If you use this
function, you cannot activate the pre-wash cycle (Button H).
H. Pre-Wash...
With this button you can pre-wash on all programmes, except the wool programme and
the special programmes (see Choosing a Wash Programme). If you use this function, you
cannot use the Intensive Wash button.
I.
On / Off button...
When pressed the appliance is switched on. When it is not the appliance is switched off.
Switching the appliance off does not cancel the selected programme.
L. Mains On-Off Indicator Light...
This light flashes when the appliance is switched on and awaiting a programme to be set.
A steady light means that the appliance has accepted the selected programme.
M. Door Locked Indicator Light...
The door locked indicator light shows that the machine door is locked to prevent it from
being opened accidentally. To avoid any damage to the mechanism you must wait until
this light goes out before attempting to open the door.
Note: We recommend on
completion of your
programme that you switch
off the appliance by
pressing the ‘ON/OFF’.
As a safety measure, switch
off both the mains
electricity and water supply
to the appliance.
13
Getting to Know Your Appliance
WARNINGS
● Do not overload
appliance! It may
damage laundry and
reduce the quality of
the wash.
Functions - Washer Dryer
A. Programme Selection knob...
Turn the knob, clockwise only, until the symbol/letter of the required programme (refer to
Choosing a Wash Programme) is in line with the pointer on the control panel.
After the wash programme has been set and accepted by the washing machine, turning the
Programme Selection knob will have no effect (except for when turned to position ●
Stop/Reset).
B. Temperature control knob...
For each programme it is always necessary to select a temperature.
Used to set the required wash programme temperature (refer to the Choosing a Wash
Programme).
It also allows you to reduce the recommended temperature for the selected programme
and even to set a cold wash cycle
.
C. Drying cycle knob...
Use this to select the desired drying cycle. Two options are available:
A
Based on time:
from 40 minutes to 150 minutes
B
Based on dry level required:
Iron Dry: slightly damp clothes, easy to iron.
Hanger Dry: dry clothes to put away.
Extra Dry: very dry clothes, recommended for
towelling and bathrobes.
NB. Each drying cycle ends with a Cooling Phase.
D. Detergent Dispenser...
The dispenser is divided into three compartments.
1.
Pre-wash detergent compartment
2.
Main wash detergent compartment
3.
Fabric Conditioner compartment
E. Rinse Hold...
This function allows you to interrupt a programme (on symbol
) holding the laundry in
the water before the final spin cycle. Before opening the door, finish the wash cycle as
follows:
Silk and curtains: Press button E and the machine will drain the water.
Synthetics:
If you want a spin cycle - Press button E
OR
Turn knob A to programme M if you want to drain the
water.
With ‘Delicate Acrylics, Programme J’ or ‘Machine Wash Wool, Programme K’ this function is not
performed.
F. Reduced Spin...
Use this button to reduce the spin speed from 1200 to 600rpm for the Cotton programmes
and from 850 to 600rpm for the Synthetic fabric programmes.
G. Fast Wash...
This button reduces the length of the selected wash programme by about 30%. It cannot
be used with special programmes or those for wool and silk.
H. Intensive Wash...
With this button you can select a more intensive wash that optimises the effectiveness of
the detergents, thus allowing more resistant stains to be removed.
I.
Note: We recommend on
completion of your
programme that you switch
off the appliance by
pressing the ‘ON/OFF’.
As a safety measure, switch
off both the mains
electricity and water supply
to the appliance.
14
On / Off button...
When pressed the appliance is switched on. When it is not the appliance is switched off.
Switching the appliance off does not cancel the selected programme.
L. Mains On-Off Indicator Light / Door Locked Indicator Light...
This light flashes when the appliance is switched on and awaiting instructions at the end of
a cycle, indicating that the door can be opened.
It flashes quickly when the door should not be opened.
A steady light means the appliance has accepted the selected programme.
M. Drying Cycle Indicator Light...
When this light is on it shows that knob C has been set on a drying cycle. At the end of the
wash cycle the appliance will run the selected tumble drying cycle.
Choosing a Programme
Washing
Machine:
IWM12
IMPORTANT INFORMATION: Always observe the laundry items wash care label.
Type of fabric, dirt degree - Always observe the treatment advice of the fabric manufacturer
Temperature
Control
knob ‘B’
Detergent
washing
Fabric
Conditioner
Description of washing cycle
A
90˚
✓
✓
Main wash 90˚, rinse cycles, intermediate and final spin
cycles
Minutes
Programme
Selection
knob ‘A’
*Duration
COTTONS
Exceptionally soiled
whites
Heavily soiled whites
We recommend the Persil
range of detergent products
Heavily soiled whites and
colourfast
Slightly soiled whites and
delicate colours
Sort the laundry according
to the wash care labels and
the degree of soiling.
Close all zips and remove
items from pockets.
Place the laundry in the
drum loosely for best
results, if possible combine
large and small items. An
overloaded drum will give
unsatisfactory wash results.
TEMPERATURE CONTROL:
NOTE:
For each program it is
always necessary to select
a temperature.
To cancel the wash
programme you have just
set, select one of the ●
symbols (Stop/Reset) and
wait for at least 5
seconds.
C
D
60˚
40˚
40˚
✓
✓
✓
Rinse cycles
✓
130
✓
Main wash 40˚, rinse cycles, intermediate and final spin
cycles
150
✓
Main wash 40˚, rinse cycles, intermediate and final spin
cycles
95
✓
Rinse cycles, intermediate and final spin cycles
Spin cycle
Stop / Reset
Draining and final spin cycle
●
Interrupts / Cancels the selected programme
SYNTHETICS
Heavily soiled colourfast
synthetics
E
60˚
✓
✓
Main wash 60˚, rinse cycles, anti-crease or delicate spin
cycle
100
95
Heavily soiled
non-colourfast synthetics
F
50˚
✓
✓
Main wash 50˚, rinse cycles, anti-crease or delicate spin
cycle
Acrylics
G
40˚
✓
✓
Main wash 40˚, rinse cycles, anti-crease or delicate spin
cycle
70
✓
Main wash 30˚, rinse cycles, anti-crease or delicate spin
cycle
30
✓
Rinse cycles, anti-crease or delicate spin cycle
✓
Rinse cycles with automatic introduction of softener,
anti-crease or delicate spin cycle
Delicate Acrylics
H
30˚
✓
Rinse cycles
Fabric conditioner
Spin cycle
Stop / Reset
Draining and delicate spin cycle
●
Interrupts / Cancels the selected programme
WOOL
Machine wash wool
IMPORTANT:
B
145
Main wash 60˚, rinse cycles, intermediate and final spin
cycles
J
40˚
✓
Rinse cycles
✓
Main wash 40˚, rinse cycles and delicate spin cycle
✓
Rinse cycles and delicate spin cycle
Spin cycle
Stop / Reset
45
Draining and delicate spin cycle
●
Interrupts / Cancels the selected programme
SILK
Silks
K
Rinse cycles
30˚
✓
✓
Main wash 30˚, rinse cycles, anti-crease or draining
✓
Rinse cycle, anti-crease or draining
Pump out
L
Pump out
Stop / Reset
●
Interrupts / Cancels the selected programme
50
PROGRAMMED START
Start is delayed by 12, 9, 3 or 1 hours
12 - 9 - 3 - 1 hour delay
*Duration can depend on
the temperature of the
incoming water supply.
Stop / Reset
●
Interrupts / Cancels the selected programme
SPECIAL PROGRAMMES: ‘A’ Wash Performance - This machine has a special programme which allows you to obtain optimum results even at low temperatures. By setting
programme 4 at a temperature of 40˚C, you will get the same results as you would normally obtain at 60˚C, thanks to the machines action and the length of the wash cycle.
15
Choosing a Programme
IMPORTANT INFORMATION: Always observe the laundry items wash care label.
Washer
Dryer:
IWD12
Type of fabric, dirt degree - Always observe the treatment advice of the fabric manufacturer
Temperature
Control
knob ‘B’
Detergent
washing
Fabric
Conditioner
Description of washing cycle
Exceptionally soiled
whites
A
90˚
✓
✓
Prewash, Main wash 90˚, rinse cycles, intermediate and
final spin cycles
165
Exceptionally soiled
whites
B
90˚
✓
✓
Main wash 90˚, rinse cycles, intermediate and final spin
cycles
145
130
Minutes
Programme
Selection
knob ‘A’
*Duration
COTTONS
We recommend the Persil
range of detergent products
Heavily soiled whites and
colourfast
C
60˚
✓
✓
Main wash 60˚, rinse cycles, intermediate and final spin
cycles
Heavily soiled whites and
colourfast
D
40˚
✓
✓
Main wash 40˚, rinse cycles, intermediate and final spin
cycles
150
✓
Main wash 40˚, rinse cycles, intermediate and final spin
cycles
95
✓
Rinse cycles, intermediate and final spin cycles
Slightly soiled whites and
delicate colours
E
40˚
✓
Rinse cycles
Sort the laundry according
to the wash care labels and
the degree of soiling.
Close all zips and remove
items from pockets.
Place the laundry in the
drum loosely for best
results, if possible combine
large and small items. An
overloaded drum will give
unsatisfactory wash results.
Spin cycle
Draining and final spin cycle
Drying cycle for cotton
fabrics
Full Heat
Stop / Reset
●
Interrupts / Cancels the selected programme
SYNTHETICS
Heavily soiled colourfast
synthetics
F
60˚
✓
100
95
G
50˚
✓
✓
Main wash 50˚, rinse cycles, anti-crease or delicate spin
cycle
Acrylics
H
40˚
✓
✓
Main wash 40˚, rinse cycles, anti-crease or delicate spin
cycle
70
✓
Main wash 30˚, rinse cycles, anti-crease or delicate spin
cycle
30
Delicate Acrylics
J
30˚
✓
Rinse cycles
For each program it is
always necessary to select
a temperature.
Main wash 60˚, rinse cycles, anti-crease or delicate spin
cycle
Heavily soiled
non-colourfast synthetics
TEMPERATURE CONTROL:
NOTE:
✓
Fabric conditioner
✓
Rinse cycles, anti-crease or delicate spin cycle
✓
Rinse cycles with automatic introduction of softener,
anti-crease or delicate spin cycle
Spin cycle
Draining and delicate spin cycle
Drying cycle for synthetic
fabrics
Half Heat
Stop / Reset
●
Interrupts / Cancels the selected programme
WOOL
IMPORTANT:
To cancel the wash
programme you have just
set, select one of the ●
symbols (Stop/Reset) and
wait for at least 5
seconds.
Machine wash wool
K
40˚
✓
Rinse cycles
✓
Main wash 40˚, rinse cycles and delicate spin cycle
✓
Rinse cycles and delicate spin cycle
Spin cycle
45
Draining and delicate spin cycle
Drying cycle for wool
Stop / Reset
●
Interrupts / Cancels the selected programme
SILK
Silks
L
Rinse cycles
*Duration can depend on
the temperature of the
incoming water supply.
30˚
✓
✓
Main wash 30˚, rinse cycles, anti-crease or draining
✓
Rinse cycle, anti-crease or draining
Pump out
M
Pump out
Stop / Reset
●
Interrupts / Cancels the selected programme
50
PROGRAMMED START
Start is delayed by 12, 9 or 3 hours
12 - 9 - 3 hour delay
Stop / Reset
●
Interrupts / Cancels the selected programme
SPECIAL PROGRAMMES: ‘A’ Wash Performance - This machine has a special programme which allows you to obtain optimum results even at low temperatures. By setting
programme 4 at a temperature of 40˚C, you will get the same results as you would normally obtain at 60˚C, thanks to the machines action and the length of the wash cycle.
16
The Dispenser Drawer
Index
1. Pre-wash detergent compartment
2. Main wash detergent compartment
3.
1
2
Fabric conditioner compartment
IMPORTANT:
- Do not exceed the
maximum levels.
NB. Choose ‘low suds’ automatic powder,
liquid or tablets, designed specifically for
automatic washing machines / washer
dryers. DO NOT use handwash detergent
as excessive suds occur.
3
The dispenser drawer is opened by rotating outwards.
Adding Detergent
● (1) Pre-wash tray (powder) and (2) Main wash detergent tray (powder or liquid)
To obtain the desired wash results and optimum detergent consumption, determine the
amount of detergent in relation to the water hardness in your area, the type and quantity of
laundry and its degree of soiling. Detergent packages indicate the amount, according to four
levels of hardness and for normal soiled loads from 4 - 5 kg. Contact your local water board for
information concerning the degree of water hardness in your area.
Follow all detergent manufacturers dosage recommendations.
For normal soiling, choose a programme without pre-washing, add detergent to compartment
2. For heavily soiled loads choose a programme with pre-washing, add detergent to
compartments 1 and 2.
If there is no indication of recommended dosage for a delicate wash, use 1/2 to 2/3 of the
recommended dosage indicated for wash resistant cotton fabrics.
For a wool programme we recommend that you only use neutral detergents for wool and
follow the detergent manufacturers recommended dosage.
● (3) Fabric conditioner
The conditioner is designed to make your clothes soft and pleasant smelling. Do not
exceed the maximum level indicated.
Overdosing the amount of detergent does not improve the quality of the wash and could
cause excessive suds potentially leading to an overflow.
The dispenser can be removed and cleaned (see Cleaning section, page 21).
NB. When washing with cold water, always reduce the amount of detergent you use - it dissolves
less easily in cold water than in hot water, so some would be wasted.
17
Using your appliance
Setting a Wash Programme / Starting the appliance
Load the laundry into the appliance and close the door. Load the detergent. Set the required
programme. Turn the Temperature knob to that of the selected programme.
Press on the ‘On/Off’ button.
The On/off Indicator light (L) will start to flash. After a short time the selected programme will
be accepted and the light will stop flashing and the wash cycle will begin.
After washing and/or drying
Press the ‘On/Off’ button to switch off the appliance. The Operating Indicator light will go out.
Wait until the Door Locked indicator light goes out before opening the door, to allow the safety
device to disconnect. Unload the laundry.
Cancelling or changing the programme
Should you wish to interrupt the programme in progress or set a new one, turn the Programme
Selection knob to select one of the symbols ● (Stop/Reset). After a short time the cancellation
will be accepted, the On/Off Indicator light will flash - you can then either turn the appliance
off or select another programme.
Delayed start
IMPORTANT:
- Do not open the door to
stop the appliance.
- Do not try to open the
door while the Door
Locked Indicator light is lit.
18
Use the Programme Selection knob to delay the start of the selected wash programme:
Select one of the delay time positions (12, 9, 3 or 1 hours with Washing Machine Model IWM12
and 12, 9 and 3 hours with Washer Dryer Model IWD12), press the On/Off button wait a short
time until the On/Off indicator light stops flashing to show the setting has been accepted.
You can now select the programme required.
The On/Off indicator light has a particular flashing motion (2 seconds on and 4 seconds off ) to
indicate that a delayed start has been set.
During the ‘delay’ you can open the door and change the wash load, should you wish to do so.
Using your appliance
cont...
How to dry (Washer Dryer only).
A Combined Washing and drying programme
See table below and follow instructions provided for MAX load to have an automatic washing
and drying cycle.
- Select the wash programme.
- Select the programme wash temperature.
- Set the Drying Cycle knob C to the type of drying cycle required. Drying times vary in
accordance to spin speed, the higher the spin speed the shorter the drying time and
therefore the lower consumption of electricity. The highest possible spin speed for your
type of laundry is recommended.
NB. If a spin speed has not been selected the appliance will not carry out the automatic
drying cycle:
- Press the On/Off button, I, to start the washing and drying programme.
Fabric Type
Load Type
Maximum
Load
Approximate Drying Time (minutes)
Extra Dry
Hanger Dry
Iron
Cotton,
Linen
Clothing of
different sizes
4kg
155
140
130
Cotton
Terry
Towels
4kg
155
140
130
Terital,
Cotton
Sheets,
Shirts
2.5kg
110
100
90
Acrylics
Pyjamas,
socks etc.
1kg
65
60
60
Nylon
Slips, Tights,
Stockings etc.
1kg
65
60
60
IMPORTANT:
- If you use in-drum
dosing for your washing
programme please ensure
the plastic container is
removed before a drying
programme
If the laundry load to be
washed and dried exceeds
the maximum listed in the
table, then follow instructions for Wash only.
When the Wash Programme
has finished, divide up the
wash load and set a drying
only programme. Repeat for
the remaining wash load.
Drying only
Once you have loaded the washing to be dried (refer to table for Max. load).
- Ensure that the door is shut correctly, both the mains electricity and water supply is turned
on.
- Ensure the On/Off button, I, is depressed to the ON position.
- Set the Programme Selection knob, A, to the appropriate drying setting
(depending
on fabric type).
- Set the Drying Cycle knob,C, and press the On/Off button, I, to ON.
- Wait for the On/Off Indicator / Door Locked Indicator light, L, to flash slowly, then press the
On/Off button, I, OFF.
- Now you can open the door and remove the laundry.
IMPORTANT:
- Make sure the water
supply taps are turned on
during the drying cycles.
Wool drying cycle
The drying cycle for woollen garments should only, and exclusively, be run together with the
selection of a specific cycle time (150 - 100 - 60 - 40 minutes).
We recommend a 60 minute drying cycle for a 1kg load.
If one of the three levels (Extra Dry
, Hanger Dry
, Iron
) is selected by mistake, the
appliance will run a drying cycle lasting the Max. time foreseen (150 minutes).
Important
A spin cycle is carried out during the drying if you have set a cotton programme and a level of
dryness (Extra Dry , Hanger Dry , Iron
).
19
Washcare tips
Cutting costs effectively:-
● Maximise the load size Achieve the best use of energy, water, detergent and time by using
the recommended maximum load size. Save up to 50% energy by washing a full load
instead of 2 half loads.
● Do you need a pre-wash? For heavily soiled laundry only! Save detergent, time, water and
between 5 to 15% energy consumption by NOT selecting pre-wash for slight to normal
soiled laundry.
● Is a hot wash required? Pretreat stains with stain remover or soak dried in stains in water
before washing to reduce the necessity of a hot wash programme. Save up to 50% energy
by using a 60˚C wash programme.
● Before using a drying programme Save energy and time by selecting a high spin speed to
reduce the water content before using a drying programme (Washer Dryer only).
Washing
Before washing laundry:-
● Pre-treat stains.
● Close zips, fasten belts, tie strings etc... and press studs to prevent tangling.
● Remove all items from pockets.
● Limit size of absorbent loads to give good washing/rinsing results.
● Place small items in a wash bag.
● Check wash labels as some items may require a cool programme.
● Wash non-colour fast items, woollens or really dirty clothes separately as they may affect
other items.
● Laundry will not wash properly if you over load your appliance.
● Laundry without a wash label should not be machine washed.
Drying
(Washer Dryer only)
To carry out a drying only programme the laundry must previously have been washed and
spun.
● When drying bedspreads, single blankets etc... we recommend that you remove, shake and
reload during the cycle to ensure faster and more even drying.
● Starched articles should be dried together to avoid distribution of starch onto non-starched
items.
● Be careful not to over dry.
● After you have dried a particularly ‘fluffy’ load or you have used the machine as a dryer only,
you MUST, after the load has been removed, set your machine to rinse and spin.
Items Not Suitable For Tumble Drying
● Garments with the ITCL code -DO NOT TUMBLE DRY
● Woollens - except on special dry programme (see page 16).
● Large bulky items eg. quilts, bedspreads pillows etc... expand when dry, preventing
air flow through the appliance.
● Items containing plastic film, foam rubber or rubber like materials eg. pillows, cushions,
PVC rainwear or inflammable articles which contain inflammable substances eg. towels
contaminated with hair lacquer.
● Fibreglass (eg. some types of curtains).
● Items which have been dry cleaned.
20
Cleaning
Removing and Cleaning the Dispenser Drawer...
Note: It is advisable to clean the detergent compartment regularly. To do this:
1
Open the drawer out as
far as it will go.
Lift it up (1) and pull (2),
this should release it from
its housing.
2
Rinse all parts under the
tap (take care to remove
any excess water
remaining inside the
compartment)
WARNING
● Disconnect from the
electricity supply
before cleaning.
● Do not clean any part
of your appliance with
abrasive cleaners,
scouring agents, acids,
chlorine based bleach
or metal polish as they
may cause damage.
Cleaning the Exterior...
Use only soap and warm water to clean the exterior surfaces of the appliance.
Use a soft cloth moistened with water when cleaning the plastic parts (control panels, plinth etc.)
Dry using a clean soft cloth.
Cleaning the Door...
Use a soft cloth with soap and warm water to wipe over the door bowl and along the rubber seal.
Dry using a clean soft cloth.
21
Troubleshooting...
General
Maintenance...
Incidents may occasionally occur when you are using your appliance, if so, check the
following points:
My appliance does not work
Check:
● water and power supplies and the fuse.
● if the door is closed properly.
● have you selected a delayed start?
The Programme Selection knob
keeps turning
● wait a few minutes for the drum to empty
- switch off, select one of the ● symbols
(Stop/Reset), then switch back on.
It will not load water
It will not drain water or spin
Check:
● it is plugged in and switched on.
● if the door is closed properly.
● the water supply taps are turned on.
● the fill hoses are connected correctly and
are not kinked.
After having checked the points listed above,
turn off the appliance, re-select the program
and then switch the appliance on.
Check:
● if the selected programme includes
draining, some require manual draining
selection.
● is Rinse Hold selected, this function will
hold laundry in the water until spin /
draining is set manually.
● is the drainage hose bent / squashed.
No spin
It loads and discharges continually
Check:
● the drainage hose is positioned correctly
ie. not too low creating a syphoning effect.
It vibrates when spinning
Check:
● it has been properly unpacked, have the
transit bolts been removed?
● machine is level.
● if it is knocking against the unit.
There is water on the floor
Check:
● the water supply pipe connectors are
tight).
● the end of the drainage pipe has not
moved out of position.
It does not empty
Check:
● the drainage pipe is not kinked or trapped.
Poor wash
Check:
● that you selected the correct wash
temperature.
Check:
● if the Spin Selection knob has been set to
No Spin (Washing Machine only).
● You have an unbalanced load, the laundry
is not evenly distributed inside the drum.
Open the door, rearrange the wash load by
hand and run a spin only programme.
● Periodic Checks:
You should check the condition
of the water inlet and the drain
hoses. If you find any splits,
however minor, do not hesitate
to replace them, call our Genuine
Parts & Accessories Hotline, see
back cover for details.
Too many suds form in the drum
and it comes out of the drawer
Check:
● you are using detergent suitable for
automatic washing and not washing by
hand.
● you have not exceeded the detergent
manufacturers recommended dosage.
Fabric Conditioner remains in the
dispenser or there is too much
water left there
Check:
● the syphons are not clogged up, clean the
dispenser drawer if necessary.
The laundry will not dry
(Washer Dryer only)
Check:
● the cold water tap is open.
● the load of laundry is not too large.
● the selected drying time is sufficient.
● have you selected a delayed start?
If there is still a problem contact Creda Service
(see KEY CONTACTS back cover).
22
● Maintenance of internal parts:
In the interest of hygiene (eg.
to prevent mould):
- every month or so, clean the
plastic and rubber parts around
the tub access using a slightly
chlorinated product.
Rinse thoroughly.
- do a wash cycle at 90˚ at least
once a month.
Remember you may be
charged for a service
call if a problem with
your appliance is caused
by incorrect installation
or misuse.
Key Contacts
Service
Creda has the largest appliance manufacturer’s service team in Europe, trained specialists directly employed by us
to ensure your complete confidence.
Repair Service
UK: 08709 066 066
Republic of Ireland: 1850 302 200
You will be asked for the following information:Name, address and postcode.
Telephone number
Model / Serial number of the appliance
Clear and concise details of the query or fault
Place and Date of purchase
(Please keep the receipt as evidence will be required when the engineer calls).
Extended Warranty
To join: UK 08709 088 088
Republic of Ireland: 1850 502 200
Genuine Parts & Accessories
Mail Order Hotline
UK: 08709 077 077
Republic of Ireland: (01) 842 6836
For further product information
08701 546474
All Creda Services are offered as an extra benefit and do not affect your statutory rights.
General Domestic Appliances Limited, Morley Way, Peterborough, PE2 9JB.
November 2002
Part number FP123 - 02