1
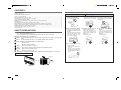
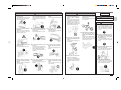
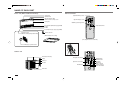
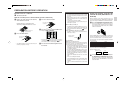
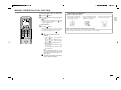
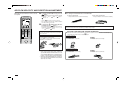
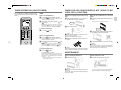
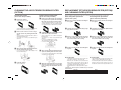
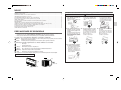
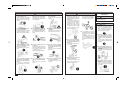
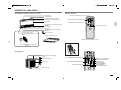
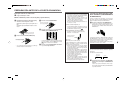
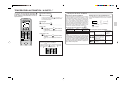
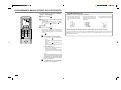
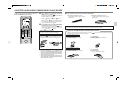
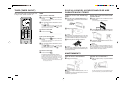
Floor And Ceiling-Type Air-Conditioners
MCF-18TN/24TN
FOR USER
PARA EL USUARIO
OPERATING INSTRUCTIONS
MANUAL DE INSTRUCCIONES
English
Español
HEAD OFFICE: MITSUBISHI DENKI BLDG., 2-2-3, MARUNOUCHI, CHIYODA-KU, TOKYO 100-8310, JAPAN
SG79A614H01
CONTENTS
SAFETY PRECAUTIONS ........................................................................................................................................................ 2
NAME OF EACH PART ............................................................................................................................................................ 4
PREPARATION BEFORE OPERATION .................................................................................................................................. 5
“I FEEL...” AUTO OPERATION ................................................................................................................................................. 6
MANUAL OPERATION (COOL, DRY, FAN) ............................................................................................................................. 7
AIR FLOW VELOCITY AND DIRECTION ADJUSTMENT ...................................................................................................... 8
TIMER OPERATION (ON/OFF TIMER) ................................................................................................................................... 9
WHEN THE AIR CONDITIONER IS NOT GOING TO BE USED FOR A LONG TIME ............................................................ 9
MAINTENANCE ....................................................................................................................................................................... 9
CLEANING THE AIR FILTER/DEODORIZING FILTER (OPTION) ........................................................................................ 10
REPLACEMENT OF THE DEODORIZING FILTER (OPTION)/AIR CLEANING FILTER (OPTION) ..................................... 10
BEFORE CONTACTING THE SERVICE REPRESENTATIVE, CHECK THE FOLLOWING AGAIN ...................................... 11
WHEN YOU THINK THAT TROUBLE HAS OCCURRED ...................................................................................................... 11
INSTALLATION, RELOCATION AND INSPECTION .............................................................................................................. 12
SPECIFICATIONS ................................................................................................................................................................. 12
SAFETY PRECAUTIONS
• Since rotating parts and parts which could cause an electric shock are used in this product, be sure to read
these “SAFETY PRECAUTIONS” before use.
• Since these cautionary items shown here are important for safety, be sure to observe them.
Marks and their meanings are as shown below.
Warning:
Caution:
•
This air conditioner is NOT intended for use by children or infirm persons without supervisions.
Warning
■ Do not expose your skin directly
to cool air for a long time.
This could damage your health.
■ Do not insert your finger or a stick, etc. into the air inlet/air outlet.
• Since the fan rotates at high • Young children should be supervised
speed, this may cause an injury.
to ensure that they do not play with the
air conditioner.
■ When an abnormality (burning
smell, etc) occurs, stop the air
conditioner and turn off the
breaker.
If the unit continues to be operated
in an abnormal condition, it may
cause a fire, trouble, etc. In this
case, consult your dealer.
■ Repair or relocation should not
be done by the customer.
If this is done incorrectly, it may
cause a fire, an electric shock, or
injury from the unit falling, water
leaking, etc.
Consult your dealer.
Incorrect handling could cause a serious hazard, such as death, serious injury etc. with a high probability.
Incorrect handling could cause a serious hazard depending on the conditions.
Meanings of symbols used in this manual are as shown below.
: Be sure not to do.
: Be sure to follow the instruction.
(Black)
: Never insert your finger or a stick, etc.
(Black)
: Never step onto the indoor/outdoor unit and do not put anything on them.
(Yellow) : Danger of electric shock. Be careful.
(Blue)
: Be sure to shut off the power.
• After reading this manual, keep it together with the installation manual in a handy place for easy reference.
Warning mark position and Safety device
Enclosure
Enclosure
Air outlet
Air inlet
2
■ Do not turn the breaker off/on
during operation.
• This may cause a fire due to
spark, etc.
• Be sure to turn off the breaker
absolutely after switching the indoor unit off with the remote controller.
■ The customer should not install
this unit.
If this is done incorrectly, it may
cause a fire, an electric shock, or
injury from the unit falling, water
leaking, etc.
Consult your dealer.
Caution
■ Do not put a vase or glass on
the indoor unit.
Water dropping into the indoor unit
may deteriorate the insulation,
causing electric shock.
■ Do not clean the air conditioner
with water.
Water may enter the unit and degrade the insulation. This may
cause an electric shock.
■ When the unit is to be cleaned,
switch it off and turn off the breaker.
Since the fan rotates at high speed
during operation, this may cause
an injury.
■ Do not put a pet or houseplant
where it will be exposed to direct air flow.
This could injure the pet or plant.
Caution
■ Do not operate switches with wet
hands.
This may cause an electric shock.
■ Do not operate the unit for a
long time in high humidity, e.g.
leaving a door or window
open.
In the cooling mode, if the unit is
operated in a room with high humidity (80%RH or more) for a
long time, water condensed in
the air conditioner may drop and
wet or damage furniture, etc.
■ Do not use an insecticide or
flammable spray.
This may cause a fire or deformation of the cabinet.
■ Do not step onto an unstable
bench when maintaining the
unit, etc.
This may cause an injury, etc. if
you fall down.
■ Ventilate well in using the unit
with a stove, etc.
An oxygen shortage may occur.
■ When the unit is not going to be
used for a long time, turn off the
breaker.
Otherwise, dirt may collect and this
may cause a fire.
■ Do not use the unit for special
purposes.
Do not use this air conditioner to
preserve precision devices, food,
animals, plants and art objects.
This may cause deterioration of
quality, etc.
■ Do not step or put anything on
the indoor/outdoor unit.
This may cause an injury, etc. if you
fall down.
■ Do not put a stove, etc. where
they are exposed to direct air
flow.
This may cause imperfect combustion.
■ Do not leave the unit on an installation stand which is damaged.
The unit may fall and this may
cause an injury.
■ Do not charge or disassemble
the batteries and do not throw
them into a fire.
This may result in leakage, fire
or an explosion.
For installation
Warning
Consult your dealer for installation of the
air conditioner.
Caution
■ Earth the unit.
Do not connect the earth to a gas
pipe, water pipe, lightning rod or the
earth of a telephone. If the earthing
is incorrect, it may cause an electric
shock.
■ If liquid from the alkaline batteries gets onto your skin or
clothes, wash it well with clean
water.
If liquid from the alkaline batteries gets into your eyes, wash
them well with clean water and
consult a doctor at once.
■ Install an earth leakage breaker
depending on the place where the
air conditioner is to be installed
(humid place, etc.).
If the earth leakage breaker is not
installed, it may cause an electric
shock.
■ Do not install the unit where flammable gas could leak.
If gas leak and collect around the
unit, it may cause an explosion.
■ Replace the 2 batteries with
new ones of same type.
Using an old battery together
with a new one may result in heat
generation, leakage or an explosion.
■ Drain should be fully drained.
If the drainage route is incomplete,
water may drop from the unit. This
may wet and damage furniture.
3
NAME OF EACH PART
Remote controller
Indoor unit (When installed on the floor)
Vertical vane
Signal transmitting section
Horizontal vane
Operation Indicator lamp
Remote control receiving section
˚C
Operation display section
CLOCK
AMPM
12345
Front panel
AMPM
ON/OFF (operate/stop) button
TOO
ON/OFF WARM
TOO
COOL
Temperature buttons
Air cleaning filter (White bellows type) (OPTION)
Air inlet
Air filter
Deodorizing filter (Gray sponge type) (OPTION)
Remote controller
Operation section
(When the air inlet grille is pulled forward)
(When installed on the ceiling)
(This diagram shows an overall view.)
Open the front lid.
Emergency operation switch
˚C
CLOCK
AMPM
Outdoor unit
AMPM
TOO
ON/OFF WARM
TOO
COOL
Air inlet (back and side)
Fan speed control button
FAN
STOP
VANE
START
Off-timer button
I FEEL COOL
Piping
On-timer button
FAN DRY
Drain hose
MODE
HR.
Operation select button
MIN.
Air outlet
RESET CLOCK
RESET button
HR. button
MIN. button
(Time set button)
CLOCK set button
Vane control button
Drain outlet
4
PREPARATION BEFORE OPERATION
Breaker for the air conditioner
■
Turn the breaker ON.
Remote controller (How to set the batteries and the current time)
1
Remove the front lid and insert batteries.
Then reattach the front lid.
3
Press the CLOCK set button.
Press here using
a thin stick.
Insert the minus pole of the batteries first.
Check if the polarity of the batteries is correct.
˚C
When the batteries of the remote controller run out or the
remote controller malfunctions, EMERGENCY OPERATION
can be done using the EMERGENCY OPERATION switch.
1
4
HR.
TOO
ON/OFF WARM
MIN.
TOO
COOL
Press the
and
button (TIME set button) to set the current time.
FAN
STOP
VANE
START
I FEEL COOL
Press the RESET button.
Press the EMERGENCY OPERATION switch.
When the EMERGENCY OPERATION switch is
pressed, the unit will operate in test run for 30 minutes
at first and then the operation mode shifts to EMERGENCY COOL MODE.
AMPM
Insert the minus pole of
the batteries first.
When installing on a wall, etc.
• Install the remote controller installation case in a position where the signal reception sound (beep) can
be heard from the indoor unit when the ON/OFF button is
pressed.
How to install/remove the remote controller
Installing : Insert the remote controller downward.
Removing : Pull it up.
FAN DRY
Press here using
a thin stick.
MODE
HR.
ECONO COOL
MIN.
Remote controller
installation case
RESET CLOCK
HR.
• Each time the
button is pressed, the set time is
MIN.
counted up by 1 hour, and each time the
button is
pressed, the set time is counted up by 1 minute.
• If the RESET button is not pressed, the remote controller may not operate correctly.
WHEN THE REMOTE CONTROLLER
CANNOT BE USED (EMERGENCY OPERATION)
CLOCK
AMPM
2
Handling of the remote controller
• The range that the signal can reach is about 6 m when
the remote controller is pointed at the front of the indoor unit.
• When a button is pressed, one or two beeps will be
heard from the indoor unit. If no sound is heard, operate again.
• Use the remote controller carefully.
If it is dropped, thrown or it gets wet, the remote controller may not operate.
5
Press the CLOCK set button again and close
the front lid.
Dry-cell batteries
■ Reference for replacing batteries
When the indoor unit does not respond to the signal from
the remote controller, or the display becomes dim, replace the batteries with new ones (size AAA).
• Though both alkaline batteries and manganese batteries can be used, alkaline batteries are recommended because their service life is longer than that
of manganese batteries.
• The service life of an alkaline battery is about 1 year.
However, a battery which the time limit is approaching may be exhausted soon. The recommended usable time limit is indicated (month/year) on the bottom of the battery.
• Replace the 2 batteries with new ones of the same
type.
• Do not use rechargeable batteries.
• To prevent liquid leakage, take out all batteries when
the remote controller is not going to be used for a
long time.
• Dispose of exhausted batteries in the correct manner.
Details of EMERGENCY COOL MODE are as shown below.
However, the temperature control does not work for 30 minutes in test run and the unit is set to continuous operation.
The fan speed is set to High in test run and shifts to Medium
after 30 minutes.
Operation Mode
Set temperature
Fan speed
Horizontal vane
COOL
24°C
Medium
Auto
The operation mode is indicated by the Operation Indicator
lamp on the indoor unit as following figures.
Operation Indicator Lamp
■
EMERGENCY COOL
STOP
Operation Indicator
Operation Indicator
To stop the EMERGENCY COOL MODE, press
the EMERGENCY OPERATION switch again.
Each time the switch is pressed, the operation mode
alternates between the EMERGENCY COOL MODE
and STOP MODE.
5
“I FEEL...” AUTO OPERATION
With the “ (I FEEL...)” auto operation mode, the
optimum room condition can be set automatically
with a one-touch operation.
To start operation:
■
Description of “I FEEL...” mode
ON/OFF
Press the
Details of operation
button.
○ ○ ○ ○ ○ ○ ○ ○ ○ ○ ○ ○ ○ ○ ○ ○ ○ ○ ○ ○ ○ ○ ○
If you feel slightly warm,
Details of auto operation
When the “
(I FEEL...)” mode is selected, the air
conditioner is automatically controlled at the optimum
temperature.
˚C
CLOCK
AMPM
AMPM
TOO
ON/OFF WARM
TOO
COOL
To stop operation:
■
ON/OFF
Press the
■
FAN
STOP
VANE
START
button.
TOO
WARM
Press the
perature.
button to lower the tem-
One press lowers the temperature by about 1°C.
I FEEL COOL
FAN DRY
MODE
HR.
ECONO COOL
MIN.
If you feel slightly cool,
the
■ Press
perature.
TOO
COOL
button to raise the tem-
One press raises the temperature by about 1°C.
RESET CLOCK
When “
(I FEEL...)” is not selected, press the
button until it is set.
MODE
Each time the button is pressed, the operation mode is
changed in sequence :
(I FEEL...) →
(COOL) →
(DRY) → (FAN)
FAN
STOP
VANE
START
I FEEL COOL
FAN DRY
6
Details of display on the indoor unit
According to the room temperature when the operation
starts, the operation mode is automatically set to either
COOL or DRY. However, when operation is started again
within 2 hours after it is stopped, the same operation mode
before the operation is stopped is selected. The operation
mode selected first is not changed even if the room temperature changes. If the operation mode does not match
the room condition, select the appropriate operation mode
MODE
by pressing the
button.
MODE
HR.
ECONO COOL
MIN
Room temperature
when started
Operation mode
Target temperature
(initial state)
About 25°C or higher
COOL
About 24°C
About 25°C or lower
DRY
—
Note:
When both Operation Indicator lamps are lighting, as
the air conditioner is operating to reach the target temperature, the set temperature may not be changed. In
this case, please wait until the lighting of Operation Indicator lamp changes from two to only one and then
change the set temperature.
The Operation Indicator lamps at the right side of the indoor unit indicate the operation state.
Operation Indicator
Lighted
Not lighted
Operation Indicator lamp
Indication
Operation state
Difference between
target temperature
and room
temperature
This shows that the air conditioner is operating to reach the
target temperature. Wait until
the target temperature is obtained.
About 2°C or
more
This shows that the room temperature is approaching the
target temperature.
About 2°C or
less
MANUAL OPERATION (COOL, DRY, FAN)
To select the “COOL”, “DRY” or “FAN” mode:
1
2
ON/OFF
Press the
button.
Select the operation mode by pressing the
MODE
button.
CONVENIENT INFORMATION
“COOL” For effective cooling
1 Close the windows and pull down
blinds. Sunlight is reduced and
cooling efficiency increases.
2 Paste a heat shield film (generally
available) on the window. Heat entering the room is reduced.
3 Block the outdoor unit from direct
sunlight. This saves energy.
Each time this button is pressed, the operation mode
is changed in sequence :
(I FEEL...) →
(COOL)
→ (DRY) → (FAN)
˚C
CLOCK
AMPM
AMPM
TOO
ON/OFF WARM
TOO
COOL
FAN
STOP
VANE
START
I FEEL COOL
FAN DRY
MODE
HR.
ECONO COOL
MIN.
To stop operation:
■
ON/OFF
Press the
button.
After the operation mode is set once, the operation
starts in the same mode as the one set previously from
the next time by simply pressing the ON/OFF button.
“DRY” The humidity at which people feel comfortable
When air contains too much moisture, people feel uncomfortable. Humidity is related to temperature and wind. The humidity at which people feel comfortable is 60%-75% RH. in summer, 55%-70% RH. in winter.
○ ○ ○ ○ ○ ○ ○ ○ ○ ○ ○ ○ ○ ○ ○ ○ ○ ○ ○ ○ ○ ○ ○
■
When the set temperature is to be
changed:
TOO
WARM
RESET CLOCK
• Press the
button to lower the temperature.
One press lowers the temperature by about 1°C.
TOO
• Press the COOL button to raise the temperature.
One press raises the temperature by about 1°C.
In “DRY” operation
• The temperature control (temperature setting)
cannot be done.
• The room temperature is slightly lowered in
this operation mode.
■
Note:
When the ambient temperature is too high,
the room temperature may not reach the set
temperature since the unit operates to cool
under high load.
The details of the display on the indoor
unit are explained on page 6.
7
AIR FLOW VELOCITY AND DIRECTION ADJUSTMENT
AIR FLOW velocity and direction can be selected
as required.
■
To change the AIR FLOW velocity, press the
FAN
button.
Each time the button is pressed, the fan speed is changed
in sequence: (Low) →
(Med.) →
(High) →
(AUTO)
˚C
CLOCK
AMPM
12345
AMPM
ON/OFF
TOO
WARM
TOO
COOL
FAN
STOP
VANE
START
■
To change the horizontal direction of the AIR FLOW
For the floor standing unit
• Change the direction of the vertical vane manually.
For the ceiling suspended unit
• Change the direction of the vertical vane manually.
• Use the
(High) notch to cool the room more.
• If the operating sound of the air conditioner disturbs
your sleep, use the (Low) notch.
■
To change the AIR FLOW blowing direction
VANE
vertically, press the
button.
Each time the button is pressed, the angle of the horizontal vane is changed in sequence : 1 → 2 → 3 → 4
→ 5 → (SWING) →
(AUTO)
Adjust the vane before operation starts.
Since the horizontal vane moves automatically, your fingers may be caught.
I FEEL COOL
FAN DRY
MODE
HR.
ECONO COOL
SWING OPERATION
Use the swing operation for the air flow to reach all corners of the room.
MIN.
RESET CLOCK
Recommended horizontal vane range
Use the
(AUTO) position usually.
Use position 1 or 2 in the COOL or DRY mode when
adjusting to your requirements.
1
AUTO AIR FLOW DIRECTION CONTROL OPERATION
VANE
• When the AUTO mode is selected with the
button, the position of the horizontal vane is automatically set to
correspond to the operation mode for effective operation.
For the floor standing unit
(1) COOL, DRY
• The air is blown out upwards.
(2) FAN
• The air is blown out horizontally.
COOL
DRY
2
3
4
5
1
2
COOL
DRY
3
4
5
For the ceiling suspended unit
Notes:
• In the cooling operation, when the air conditioner is
operated with setting the horizontal vane to 4 or 5 for
1 hour, the AIR FLOW direction is automatically set to
position 1 to prevent condensed water from dropping.
• Adjust the vertical AIR FLOW direction using the remote controller. If the horizontal vane is moved manually, it may cause trouble.
8
(1) COOL, DRY
• The air is blown out horizontally.
(2) FAN
• The air is blown out downwards.
TIMER OPERATION (ON/OFF TIMER)
It is convenient to set the timer for the time when
you go to bed, when you get home, when you get
up, etc.
WHEN THE AIR CONDITIONER IS NOT GOING TO BE
USED FOR A LONG TIME
TIMER
How to set the ON timer
1
Press the
START
button during operation.
Each time the button is pressed, the ON timer mode
alternates between ON and OFF.
˚C
CLOCK
AMPM
2
HR.
When the air conditioner is to be used
again:
1
1
Perform FAN operation for 3 or 4 hours to
dry the inside of the air conditioner.
(Refer to page 10 for cleaning instructions.)
and
FAN operation
Each time the
button is pressed, the set time is
MIN.
counted up by 1 hour; each time the
button is
pressed, the set time is counted up by 10 minutes.
TOO
COOL
2
Turn off the breaker.
Clean the filter
before installing.
To release the ON timer:
FAN
STOP
VANE
START
I FEEL COOL
FAN DRY
MODE
■
Press the
START
button.
2
○ ○ ○ ○ ○ ○ ○ ○ ○ ○ ○ ○ ○ ○ ○ ○ ○ ○ ○ ○ ○ ○ ○
How to set the OFF timer
MIN.
RESET CLOCK
1
STOP
Press the
button during operation.
Each time the button is pressed, the OFF timer mode
alternates between ON and OFF.
2
Set the time of the timer using the
MIN.
buttons.
HR.
3
Remove the batteries from the remote controller.
3
and
HR.
Each time the
button is pressed, the set time is
MIN.
counted up by 1 hour; each time the
button is
pressed, the set time is counted up by 10 minutes.
To release the OFF timer:
■
STOP
Press the
Check that the air inlet and outlet of the indoor/outdoor unit are not blocked.
Caution:
Turn off the breaker when the air conditioner is not going to be used for a long time.
Dirt may collect and this may cause a fire.
HR.
ECONO COOL
Clean the air filter and install it in the indoor
unit.
HR.
AMPM
TOO
ON/OFF WARM
Set the time of the timer using the
MIN.
buttons.
When it is not going to be used for a long
time:
Caution:
To prevent liquid leakage, take out all batteries when the
remote controller is not going to be used for a long time.
Check that the earth is connected correctly.
Caution:
Earth the unit.
Do not connect the earth to a gas pipe, water pipe, lightning rod or the earth of a telephone. If the earthing is
incorrect, it may cause an electric shock.
button.
Programming timer operation
The ON timer and the OFF timer can be used in combination. The timer of the set time that is reached first
will operate first. (“ ” mark indicates the order of timer
operations.)
• If the current time has not been set, the timer operation cannot be used.
MAINTENANCE
Before starting maintenance
Cleaning the indoor unit
■
■
Turn off the breaker.
Caution:
When the unit is to be cleaned, switch it off and turn off
the breaker.
Since the fan rotates at high speed during operation, it
may cause an injury.
Clean the unit using a soft dry cloth.
Do not use gasoline, benzine, polishing powder, detergent and insecticide. The unit may be damaged.
9
CLEANING THE AIR FILTER/DEODORIZING FILTER
(OPTION)
REPLACEMENT OF THE DEODORIZING FILTER (OPTION)/
AIR CLEANING FILTER (OPTION)
Cleaning the air filter
(about once every 2 weeks)
Cleaning the deodorizing filter
(about once every 2 weeks)
When the capacity is lowered because of dirt, etc., it is necessary to replace the deodorizing filter/air cleaning filter.
1
1
Remove the air filter.
• Pull the air inlet knob forward.
Remove the air filter and the deodorizing filter together. Then separate the deodorizing
filter (Gray sponge type) from the air filter.
Deodorizing filter replacement
(about once a year)
Air cleaning filter replacement
(about once every 4 months)
1
1
Remove the air filter and the deodorizing filter together.
Remove the air filter and the air cleaning filter together.
• The deodorizing filter is harmless to people. However,
to keep its effectiveness, be sure to hold the frame and
not to touch the surface of the filter with your hand.
2
(If there is deodorizing or air cleaning filter (OPTION),
please remove it before cleaning the air filter.)
2
Remove dirt from the air filter using a
vacuum cleaner or by washing the filter with
water.
• If dirt is conspicuous, wash the filter with a solution of
detergent in lukewarm water.
• If hot water (50°C or more) is used, the filter may be
deformed.
FR
ON
T
2
Separate the deodorizing filter (Gray sponge
type) from the air filter.
Soak the filter together with its frame in lukewarm water for about 15 minutes.
• If dirt is conspicuous, use a solution of detergent in
lukewarm water.
• If hot water (50°C or more) is used, the filter may be
deformed.
• Do not use a scrubbing brush or sponge.
This may damage the surface of the filter.
• Do not use a chlorine detergent.
2
Separate the air cleaning filter (White bellows
type) from the air filter.
FR
ON
T
FR
ON
T
3
Replace a new deodorizing filter and attach
it to the air filter. (Place the catch into the
hole of the air filter for the security.)
3
Replace a new air cleaning filter and attach
it to the air filter. (Place the catch into the
hole of the air filter for the security.)
FR
ON
T
3
4
After washing with water/lukewarm water,
dry the air filter well in the shade.
• Do not expose the air filter to direct sunlight or heat
from a fire when drying it.
3
Install the air filter.
• Set the air inlet knob.
4
T
4
Install the air filter and the air cleaning filter
together.
Attach the deodorizing filter to the air filter.
(Place the catch into the hole of the air filter
for the security.) Then install both of them to
the body.
○ ○ ○ ○ ○ ○ ○ ○ ○ ○ ○ ○ ○ ○ ○ ○ ○ ○ ○ ○ ○ ○ ○
○ ○ ○ ○ ○ ○ ○ ○ ○ ○ ○ ○ ○ ○ ○ ○ ○ ○ ○ ○ ○ ○ ○
Deodorizing filter
Air cleaning filter
• Cleaning is necessary about once every 2 weeks. However, if dirt is conspicuous, clean more often.
• When the color of the filter is not restored even if the
filter is washed as the procedure shown in the left
(Cleaning the deodorizing filter) or when the filter becomes black, replace the filter with a new one.
• Standard interval for the filter replacement is about 1
year.
• If the air cleaning filter is clogged, it may lower the unit’s
capacity or cause condensation at the air outlet.
• The air cleaning filter is disposable. The standard usable term is about 4 months. However, if the color of
the filter turns to dark brown, replace the filter at once.
Optional parts Optional parts are available from your local dealer.
FR
10
ON
After washing with water/lukewarm water,
dry the deodorizing filter well in the shade.
• Do not expose the deodorizing filter to direct sunlight
or heat from a fire when drying it.
4
Install the air filter and the deodorizing filter
together.
FR
ON
T
Part name
Deodorizing filter
Air cleaning filter
Model
MAC-1700DF
MAC-1200FT
BEFORE CONTACTING THE SERVICE REPRESENTATIVE, CHECK THE FOLLOWING AGAIN
The air conditioner
cannot be operated.
Cannot be cooled
sufficiently.
d
d
Check the following.
Check the following.
1
Is the breaker turned 1
on?
2
Isn’t the fuse blown?
3
Isn’t the ON-timer set? 3
2
Is the temperature setting correct?
Isn’t the filter dirty?
Display of the remote
controller does not
appear(1, 2).
The remote control
signal cannot be
received if the remote
controller is not
operated near the air
conditioner (1).
When a power failure
occurs.
To restart the unit, press
the ON/OFF button on the
remote controller again after the restoration of the
power.
WHEN YOU THINK THAT TROUBLE HAS OCCURRED
Question
• This protects the air conditioner according to the instructions from the
microprocessor.
Please wait.
Cracking sound is heard.
• This sound is generated by the expansion/contraction of the front panel, etc.
due to change in temperature.
The room smells strange.
• The air conditioner sucks in an odor adhering to the wall, carpet, furniture,
cloth, etc. and blows it out with air.
The fan stops during the DRY operation.
• In DRY operation, the unit operates using the same refrigerant circuit as in
COOL operation. DRY operation time has to be reduced in order to lower
humidity without much room temperature decreasing. So the compressor
sometimes stops, and at the same time the indoor fan stops. This prevents
water condensed on the heat exchanger from evaporating again.
The sound of water flowing is heard.
• This is the sound of refrigerant flowing inside the air conditioner.
• This is the sound of condensed water flowing in the heat exchanger.
• This is the sound of the heat exchanger defrosting.
The sound as burbling is heard.
• This sound is heard when the outside air is absorbed from the drain hose in
turning on the range hood or the ventilation fan and that makes water flowing
in the drain hose spout out. This sound is also heard when the outside air
blows into the drain hose in case the outside wind is strong.
The room cannot be cooled sufficiently.
• When a ventilation fan or a gas cooker is used in a room, the cooling load
increases, resulting in an insufficient cooling effect.
• When the outside air temperature is high, the cooling effect may not be sufficient.
Mechanical sound is heard from the indoor unit.
• This is the switching sound in turning on/off the fan or the compressor.
The air flow direction is changed during
operation.
• When the air conditioner is operated in the COOL or DRY mode, if the operation continues with air blowing down for 1 hour, the direction of the air flow is
automatically set to position 1 to prevent condensed water from dropping.
Water leaks from the outdoor unit.
• During COOL and DRY operations, pipe or pipe connecting sections are
cooled and this causes water to condense.
d
Isn’t the outlet of the outdoor unit blocked?
Check the following.
1
Aren’t the batteries exhausted?
2
Is the polarity (+, -) of
the batteries correct?
Even if the above items are checked, when the air conditioner does not recover from the trouble,
stop using the air conditioner and consult your dealer.
In the following cases, stop operation and consult your dealer.
• The remote control signal may not be received in a room where an electronic ON/OFF type fluorescent lamp (inverter
type fluorescent lamp, etc.) is used.
• In the region where the electric wave is weak, when the air conditioner is operated, noise may be generated in radio
reception.
• When thunder is heard, stop operation and turn off the breaker. Otherwise, the electrical parts may be damaged.
Answer (not a malfunction)
The air conditioner cannot be operated
for about 3 minutes when restarted.
11
INSTALLATION, RELOCATION AND INSPECTION
Installation place
Keep the outdoor unit 3 m or
more away from the antennas
of TV sets or radios.
Avoid installing the air conditioner in the following places.
• Where flammable gas could leak.
Caution:
Do not install the unit where flammable gas could leak.
If gas leaks and collects around the unit, it may cause an
explosion.
•
•
•
•
• When the air conditioner is to be removed or reinstalled because of rebuilding, moving, etc., special techniques and work
are required.
Inverter type fluorescent lamp
To prevent the effect of
a fluorescent lamp, keep
it away as far apart as
possible.
Where there is much machine oil.
Salty place such as the seaside.
Where sulfide gas is generated such as a hot spring.
Where oil is splashed or where the area is filled with
oily smoke.
Keep a space to
prevent the picture distortion or
the noise.
Wall, etc.
Wellventilated
dry place
100mm or
more
TV
500mm or
more
Warning:
Repair or relocation should not be done by the customer.
If this is done incorrectly, it may cause a fire, electric shock, injury from the unit falling, water leakage, etc. Consult
your dealer.
Disposal
• To dispose of this product, consult your dealer.
1m or more
Radio
3m
or more
Warning:
If the air conditioner operates but does not cool or heat (depending on model) the room, consult your dealer since
there may be a refrigerant leak. Be sure to ask the service representative whether there is refrigerant leakage or not
when repairs are carried out.
The refrigerant charged in the air conditioner is safe. Refrigerant normally does not leak, however, if refrigerant gas
leaks indoors, and comes into contact with the fire of a fan heater, space heater, stove, etc., harmful substances will be
generated.
Electrical work
• Provide an exclusive circuit for the power supply of the air conditioner.
• Be sure to observe the breaker capacity.
Warning:
The customer should not install this unit. If the unit is installed incorrectly, fire, electric shock, injury due to the unit
falling, water leakage, etc. may result.
Caution:
• Earth the unit.
Do not connect the earth to a gas pipe, water pipe, lightning rod or the earth of a telephone.
If the earthing is incorrect, it may cause an electric shock.
• Install an earth leakage breaker depending on the place where the air conditioner is to be installed (humid place,
etc.).
If the earth leakage breaker is not installed, it may cause an electric shock.
Inspection and maintenance
• When the air conditioner is used for several seasons, the capacity may be lowered due to dirt inside the unit.
• Depending upon the conditions of use, an odor may be generated or dirt, dust, etc. may prevent proper drainage.
• It is recommended that the unit be inspected and maintained (charged) by specialist in addition to normal maintenance.
Consult your dealer.
Operating sound considerations
• Do not put an object around the air outlet of the outdoor unit. It may cause lowering of capacity or increasing of operating
sound.
• If abnormal sound is heard during operation, consult your dealer.
12
Relocation
If you have any questions, consult your dealer.
SPECIFICATIONS
Model
MCF-18TN
Function
Power supply
Standard
Capacity
Running current
Input
Refrigerant filling capacity (R-22)
kW
kcal/h
A
W
kg
Note:
Rating condition
SSA 385/386
Cooling — Indoor:
29°C DB, 19°C WB
Outdoor: 46°C DB, 24°C WB
JIS C 9612
Cooling — Indoor:
27°C DB, 19°C WB
Outdoor: 35°C DB, (24°C WB)
MCF-24TN
Cooling
1ø, 220V, 60Hz
SSA 385/386
JIS C 9612
SSA 385/386
JIS C 9612
4.4
5.1
5.5
6.3
3780
–
4720
–
11.2
9.6
16.3
13.4
2300
1910
3400
2800
1.50
2.15
ÍNDICE
PRECAUCIONES DE SEGURIDAD ......................................................................................................................................
NOMBRE DE CADA PIEZA ...................................................................................................................................................
PREPARACIÓN ANTES DE LA PUESTA EN MARCHA .......................................................................................................
TEMPERATURA AUTOMÁTICA “A GUSTO...” ......................................................................................................................
FUNCIONAMIENTO MANUAL (FRESCO, SECO, VENTILADOR) .......................................................................................
AJUSTE DE LA VELOCIDAD Y DIRECCIÓN DEL FLUJO DE AIRE ....................................................................................
TIMER (TIMER ON/OFF) .......................................................................................................................................................
SI NO VA A USAR EL ACONDICIONADOR DE AIRE DURANTE MUCHO TIEMPO ...........................................................
MANTENIMIENTO .................................................................................................................................................................
LIMPIEZA DEL FILTRO DEL AIRE/FILTRO DESODORIZANTE (OPCIÓN) .........................................................................
CAMBIO DEL FILTRO DESODORIZANTE (OPCIÓN)/FILTRO LIMPIADOR DEL AIRE (OPCIÓN) .....................................
ANTES DE AVISAR AL TÉCNICO, VUELVA A COMPROBAR LO SIGUIENTE ...................................................................
SI CREE QUE HA OCURRIDO ALGÚN PROBLEMA ...........................................................................................................
INSTALACIÓN, REUBICACIÓN E INSPECCIÓN ..................................................................................................................
CARACTERÍSTICAS TÉCNICAS ..........................................................................................................................................
13
15
16
17
18
19
20
20
20
21
21
22
22
23
23
PRECAUCIONES DE SEGURIDAD
• Puesto que en este artículo se incluyen piezas de rotación y piezas que pueden causar una sacudida eléctrica,
asegúrese de leer estas “PRECAUCIONES DE SEGURIDAD” antes de su puesta en marcha.
• Puesto que estas advertencias son importantes para su seguridad, obsérvelas atentamente.
•
Este aparato de aire acondicionado NO debe ser utilizado por niños ni por personas inválidas sin el control de una persona adulta.
Atención
■ No se exponga al aire acondicionado durante un período de
tiempo prolongado.
Podría provocarle problemas de
salud.
■ No introduzca el dedo o un palillo, etc. en la unidad interior/exterior.
• Puesto que el ventilador gira a
• Los niños pequeños deben esgran velocidad, puede hacerse
tar vigilados por personas aduldaño.
tas para impedir que jueguen
con el equipo de aire acondicionado.
■ Ante cualquier anomalía (olor a
quemado, etc), pare el acondicionador de aire y apague el interruptor.
Si la unidad continúa funcionando
de manera anormal, podría ocasionar un incendio u otro accidente, por lo que en tal caso consulte
a su proveedor.
■ No repare ni cambie de lugar el
acondicionador por su cuenta.
Un manejo incorrecto puede causar un incendio, una descarga
eléctrica o daños si se cae la unidad o gotea agua, etc.
Consulte a su proveedor.
■ No debe instalar esta unidad por
su cuenta.
Un manejo incorrecto puede causar un incendio, una descarga
eléctrica o daños si se cae la unidad o gotea agua, etc.
Consulte a su proveedor.
Los signos y sus correspondientes significados se muestran a continuación.
Atención:
Cuidado:
Existe un alto riesgo de accidente en caso de manejo incorrecto que podría provocar accidentes,
heridas graves e incluso la muerte.
Un manejo incorrecto puede provocar un accidente grave según las condiciones.
A continuación se detalla el significado de los símbolos utilizados en este manual.
: No lo haga.
: Siga las instrucciones.
(Negro)
: No introduzca los dedos o un palillo, etc.
(Negro)
: No se suba nunca ni coloque nada encima de la unidad interior/exterior.
(Amarillo): Peligro de descarga eléctrica. Tenga cuidado.
(Azul)
: Asegúrese de desconectar la unidad de la corriente.
• Después de leer este manual, téngalo a mano junto con el de instalación para una consulta rápida.
■ No encienda/apague el interruptor durante el funcionamiento.
• Esto podría producir un incendio
provocado por chispas, etc.
• Asegúrese de desactivar completamente el interruptor después de apagar la unidad con el
mando a distancia.
Señal de advertencia y dispositivo de seguridad
Caja
Caja
Salida de aire
Entrada de aire
13
Cuidado
■ No ponga ninguna jarra ni vaso
sobre la unidad interior.
Si cae agua dentro de la unidad
interior, puede deteriorar el aislamiento y provocar una descarga
eléctrica.
■ No utilice agua para limpiar el
acondicionador de aire.
El agua podría entrar en la unidad
y afectar al aislamiento lo que podría provocar descargas eléctricas.
■ Cuando vaya a limpiar la unidad,
apáguela y cierre el interruptor.
El ventilador gira a mucha velocidad cuando está en funcionamiento y podría herirle.
■ No deje ningún animal doméstico o planta donde pueda llegarle la corriente de aire directa.
Esto puede dañar al animal o a la
planta.
Cuidado
■ No maneje interruptores con las
manos húmedas.
Puede provocar una descarga
eléctrica.
■ No aplique insecticidas o sprays
inflamables.
Puede provocar un incendio o la
deformación de la carrocería.
■ Ventile bien la estancia cuando
utilice el acondicionador de aire
y una estufa o similar.
Podría producirse escasez de oxígeno.
■ No utilice la unidad para fines
particulares.
No utilice el acondicionador de aire
para preservar dispositivos de precisión, alimentos, animales, plantas u objetos de arte.
Puede deteriorar la calidad, etc.
■ No coloque estufas o similares
donde les alcance directamente el aire que proviene del acondicionador.
Podría provocar una combustión
defectuosa.
■ Cierre el interruptor de la unidad
cuando no la vaya a utilizar durante un período prolongado de
tiempo.
De no hacerlo, se podría acumular suciedad y provocar un incendio.
■ No se suba ni coloque nada encima de la unidad interior/exterior.
Puede dañarse por una posible
caída.
■ No instale la unidad en lugares
que estén deteriorados.
La unidad podía caerse y provocar daños.
14
■ No maneje la unidad mucho
tiempo en condiciones de
gran humedad, como por
ejemplo, con una puerta o ventana abierta.
En el modo de enfriamiento, si
se utiliza para refrescar una habitación con un alto índice de
humedad (80% RH o superior)
durante mucho tiempo, puede
condensarse agua en la máquina y gotear mojando o deteriorando los muebles, etc.
■ No se suba encima de una plataforma inestable cuando
efectúe el mantenimiento de la
unidad, etc.
Esto podría provocar daños, etc.
si se cayera.
■ No cargue o desmonte las pilas y no las arroje al fuego.
Esto podría provocar pérdidas,
un incendio o una explosión.
Instrucciones sobre la
instalación
Atención
Consulte a su proveedor para instalar el
acondicionador de aire.
Cuidado
■ Si el líquido de las pilas
alcalinas entra en contacto
con su piel o ropa, límpielo
con agua.
Si el líquido de las pilas alcalinas
entra en contacto con sus ojos,
lávelos abundantemente con
agua limpia y consulte a su médico.
■ Conexión a tierra.
No conecte el cable de tierra a una
tubería de gas o de agua, a un pararrayos o a la toma de tierra de un teléfono. Si la conexión a tierra no se
efectúa correctamente, podrían producirse descargas eléctricas.
■ Instale un interruptor contra tierras según el lugar en el que va a
instalar la unidad de aire acondicionado (en un lugar húmedo,
etc...).
Si no se instala el interruptor contra
tierras se podrían producir descargas
eléctricas.
■ No instale la unidad en lugares en
los que pueda haber fugas de gas
inflamable.
Si se producen fugas de gas y éste
se acumula se podría producir una
explosión.
■ Sustituya las 2 pilas por unas
nuevas del mismo tipo.
Si utiliza una pila vieja con una
nueva, podría generarse calor,
pérdidas o una explosión.
■ El agua debe drenarse completamente.
Si la conducción del agua de drenaje no es la correcta, el agua podría
gotear y llegar a mojar o a estropear
los muebles.
NOMBRE DE CADA PIEZA
Mando a distancia
Unidad interior (Cuando se instala en el suelo)
Paleta verticale
Sección de transmisión de señales
Paleta horizontal
Luz indicadora de funcionamiento
Área receptora del mando a distancia
˚C
Pantalla visualización del funcionamiento
CLOCK
AMPM
12345
Panel frontal
AMPM
Botón ON/OFF (funcionamiento/parada)
TOO
ON/OFF WARM
TOO
COOL
Filtro limpiador del aire (Tipo fuelle blanco)
(OPCIÓN)
Entrada de aire
Botones de temperatura
Filtro del aire
Filtro desodorizante (Tipo esponja gris)
(OPCIÓN)
Sección de funcionamiento
(Cuando la rejilla de entrada de aire está
abierta)
Mando a distancia
(Cuando se instala en el techo)
(Este dibujo muestra una visión general.)
Abra la tapa delantera.
Interruptor funcionamiento de
emergencia
˚C
CLOCK
AMPM
Unidad exterior
AMPM
TOO
ON/OFF WARM
TOO
COOL
Entrada de aire (posterior y lateral)
Tubería
Botón CONTROL VELOCIDAD VENTILADOR
FAN
STOP
VANE
START
Botón para desconectar TIMER
I FEEL COOL
Manguera de desagüe
Botón para conectar TIMER
FAN DRY
Salida de aire
MODE
HR.
Botón SELECCIÓN FUNCIONAMIENTO
MIN.
RESET CLOCK
Botón RESET (REAJUSTE)
Botón HR. (Horas)
Botón MIN. (Minutos)
(Botón FIJAR TIEMPO)
Botón FIJAR RELOJ
Botón CONTROL PALETAS
Salida de desagüe
15
PREPARACIÓN ANTES DE LA PUESTA EN MARCHA
Interruptor del aire acondicionado
■
Ponga el interruptor en ON.
Mando a distancia (cómo colocar las pilas y ajustar la hora)
1
Extraiga la tapa delantera, introduzca pilas y
vuelva a colocar la tapa en su sitio.
Introduzca en primer lugar el polo negativo de la
pila.
Compruebe que la polaridad de las pilas sea la correcta.
3
Presione aquí con ayuda
de un objeto puntiagudo.
AMPM
AMPM
TOO
ON/OFF WARM
HR.
TOO
COOL
FAN
STOP
VANE
START
Presione el interruptor de EMERGENCIA.
Cuando pulse el interruptor de EMERGENCIA la unidad funcionará en modo de prueba durante 30 minutos primero y luego cambiará a MODO FRESCOR DE
EMERGENCIA.
Cuando se instala en la pared, etc.
• Instale la funda del mando a distancia en una posición en la que se pueda oír la señal acústica desde
la unidad interior al apretar el botón ON/OFF .
Cómo instalar/extraer el mando a distancia
Instalación : Introduzca el mando hacia abajo.
Extracción : Tire hacia arriba.
HR.
ECONO COOL
MIN.
Funda del mando a distancia para instalar
RESET CLOCK
HR.
• Cada vez que presione el botón
, sumará una hora
a la hora señalada, y cada vez que presione el botón
MIN.
sumará 1 minuto a la hora señalada.
5
• Si no se presiona el botón de reajuste, es posible que
el mando a distancia no funcione bien.
1
FAN DRY
MODE
Presione el botón RESET (REAJUSTE).
Presione aquí con ayuda
de un objeto puntiagudo.
Cuando se agotan las pilas del mando o éste no funciona
bien, puede recurrirse al FUNCIONAMIENTO DE EMERGENCIA mediante el interruptor de EMERGENCIA.
MIN.
Presione el botón
y
(botón FIJAR
TIEMPO) para fijar la hora correcta.
I FEEL COOL
Introduzca en primer lugar
el polo negativo de la pila.
CUANDO NO PUEDA USARSE EL MANDO A DISTANCIA (FUNCIONAMIENTO
DE EMERGENCIA)
˚C
CLOCK
4
2
Presione el botón FIJAR RELOJ.
Manejo del mando a distancia
• El alcance de la señal es de 6 m aproximadamente
si se apunta con el mando a distancia directamente
hacia la parte frontal de la unidad interior.
• Cuando se presiona el botón, se oirán una o dos
señales acústicas desde la unidad. Si no se oye dicha señal, vuelva a ponerla en marcha.
• Utilice el mando a distancia con cuidado.
El mando a distancia puede dejar de funcionar si se
cae al suelo o se moja.
Presione el botón FIJAR RELOJ nuevamente y cierre la tapa delantera.
Pilas secas
■ Consulte para el recambio de pilas
Cuando la unidad interior no recibe la señal del mando a
distancia, o la pantalla se oscurece, reemplace las pilas
por pilas nuevas (Del tamaño AAA).
• Aunque se pueden utilizar tanto las pilas alcalinas
como las de manganeso, se recomienda la utilización de pilas alcalinas ya tienen una mayor duración
que las pilas de manganeso.
• La duración de una pila alcalina es de aproximadamente un año. No obstante, es posible que ésta se
agote a medida que se aproxime el tiempo de utilización recomendado que aparece en la parte inferior
de la pila (indicado en meses/años).
• Coloque 2 nuevas pilas del mismo tipo.
• No utilice pilas recargables.
• Para evitar fugas de líquidos, extraiga todas las pilas
cuando no vaya a utilizar el mando a distancia durante un período prolongado de tiempo.
• Tire las pilas agotadas en el lugar adecuado.
A continuación aparecen los detalles del MODO FRESCOR
DE EMERGENCIA. De todos modos, el control de temperatura no funciona durante 30 minutos en el modo de prueba y
la unidad se pone en funcionamiento continuo.
Durante la prueba, la velocidad del ventilador es alta y luego,
transcurridos 30 minutos, pasa a media.
Modo de funcionamiento
Temperatura fija
Velocidad del ventilador
Paleta horizontal
FRESCO
24°C
Media
Auto
La luz indicadora de funcionamiento de la unidad interior
muestra el modo de funcionamiento mediante las siguientes
ilustraciones.
Luz indicadora de funcionamiento
■
FRESCOR DE
EMERGENCIA
PARADA
Operation Indicator
Operation Indicator
Para parar el funcionamiento de EMERGENCIA, presione el interruptor de EMERGENCIA
otra vez.
Cada vez que se pulsa el interruptor, el modo de operación cambia entre MODO FRESCOR DE EMERGENCIA y MODO PARADA.
16
TEMPERATURA AUTOMÁTICA “A GUSTO...”
Con el modo de funcionamiento automático “
(A GUSTO...)” se puede fijar la temperatura ambiente óptima de forma automática con tan solo
apretar un botón.
Para poner en marcha:
■
Descripción del modo “A GUSTO…”
ON/OFF
Presione el botón
.
Cuando se selecciona el modo “
(A GUSTO...)”, el
acondicionador de aire queda fijado automáticamente
en la temperatura óptima.
Para apagar:
˚C
CLOCK
AMPM
AMPM
TOO
ON/OFF WARM
TOO
COOL
FAN
STOP
VANE
START
■
ON/OFF
Presione el botón
○ ○ ○ ○ ○ ○ ○ ○ ○ ○ ○ ○ ○ ○ ○ ○ ○ ○ ○ ○ ○ ○ ○
Si tiene calor,
■
I FEEL COOL
FAN DRY
MODE
HR.
ECONO COOL
MIN.
RESET CLOCK
.
La luz indicadora de funcionamiento que está en la parte
derecha de la unidad interior muestra cuál es el funcionamiento.
para reducir la
Temperatura de la
habitación al inicio
Modo de
funcionamiento
Temperatura ideal
(estado inicial)
Cada toque reduce la temperatura alrededor de
1°C.
Unos 25°C o más
Unos 25°C o menos
FRESCO
SECO
Unos 24°C
Si tiene algo de frío,
■
Detalles del visor de la unidad interior
Según la temperatura de la habitación en el momento de
conectar la unidad, el modo de funcionamiento se ajusta
automáticamente en FRESCO o SECO. Sin embargo, cuando se vuelve a poner en funcionamiento el aparato dentro
de las 2 horas siguientes a haberlo apagado, se seleccionará el mismo modo que estaba antes de su parada. El
modo seleccionado no cambia inicialmente aunque la temperatura de la habitación haya cambiado. Si el modo no se
corresponde con las condiciones de la habitación, selecMODE
cione el modo adecuado presionando el botón
.
TOO
COOL
Presione el botón
peratura.
Operation Indicator
Luz encendida
Luz apagada
Descripción del funcionamiento automático
TOO
WARM
Presione el botón
temperatura.
Descripción del funcionamiento
para elevar la tem-
Cada toque eleva la temperatura alrededor de
1°C.
Cuando no seleccione el modo “
(A GUSTO...)”, pulMODE
se el botón
hasta que quede fijado.
—
Nota:
Cuando estén encendidas las dos luces indicadoras de
funcionamiento, como por ejemplo cuando el aparato
esté funcionando para alcanzar la temperatura seleccionada, no se puede variar la temperatura elegida.
Cuando esto suceda, espere hasta que una de las dos
luces indicadoras de funcionamiento se apague y después cambie la temperatura.
Luz indicadora de funcionamiento
Luz
indicadora
Funcionamiento
Diferencia entre la
temperatura fijada
y la de la
habitación
Muestra que el acondicionador
de aire funciona para alcanzar
la temperatura fijada. Espere
hasta que se alcance la temperatura deseada.
mínimo 2°C
Muestra que la temperatura de
la habitación se está acercando a la fijada.
máximo 2°C
Cada vez que apriete el botón, el modo de funcionamiento
cambia de secuencia:
(A GUSTO...) →
(FRESCO) → (SECO) → (VENTILADOR)
FAN
STOP
VANE
START
I FEEL COOL
FAN DRY
MODE
HR.
ECONO COOL
MIN
17
FUNCIONAMIENTO MANUAL (FRESCO, SECO, VENTILADOR)
Para seleccionar las opciones “FRESCO”,
“SECO” o “VENTILADOR”:
1
2
˚C
CLOCK
AMPM
TOO
COOL
FAN
STOP
VANE
START
FAN DRY
MODE
HR.
ECONO COOL
MIN.
RESET CLOCK
Seleccione la opción deseada presionando
MODE
el botón
.
2 Ponga una pantalla térmica (fácil
de adquirir) sobre la ventana. Reducirá el calor que pueda entrar en
la habitación.
3 Proteja la unidad exterior de la luz
solar directa, para ahorrar energía.
ON/OFF
Presione el botón
.
Tras haber fijado una opción de funcionamiento, la
unidad empezará a funcionar en la opción fijada previamente a partir de la próxima vez con sólo presionar
el botón ON/OFF .
○ ○ ○ ○ ○ ○ ○ ○ ○ ○ ○ ○ ○ ○ ○ ○ ○ ○ ○ ○ ○ ○ ○
■
Para cambiar la temperatura fijada:
TOO
WARM
• Presione el botón
para reducir la temperatura.
Cada toque disminuye la temperatura alrededor de 1°C.
TOO
• Presione el botón COOL para aumentar la temperatura.
Cada toque eleva la temperatura alrededor de
1°C.
En la modalidad “SECO”
• No es posible el control de temperatura (programación de la temperatura).
• La temperatura de la habitación desciende ligeramente en este modo de funcionamiento.
■
18
“FRESCO” Para una refrigeración efectiva
1 Cierre las ventanas y baje las persianas. Al reducir la luz del sol aumenta la eficacia de la refrigeración.
Para apagar:
■
I FEEL COOL
.
Cada vez que se presiona este botón, se cambia de
opción en secuencia:
(A GUSTO...) →
(FRESCO) → (SECO) → (VENTILADOR)
AMPM
TOO
ON/OFF WARM
ON/OFF
Presione el botón
INFORMACION PRACTICA
Nota:
Cuando la temperatura ambiental es demasiado elevada, es posible que la temperatura
de la habitación no alcance la temperatura fijada ya que la unidad funciona bajo una gran
carga en la refrigeración.
Los detalles del visor de la unidad interior aparecen en la página 17.
“SECO” El grado de humedad que hace que las personas se sientan cómodas
Un exceso de humedad en el aire resulta molesto. La humedad guarda relación con la temperatura y el viento. El grado de
humedad que hace que las personas se sientan bien es del 60%-75% (humedad relativa) en verano y del 55%-70%
(humedad relativa) en invierno.
AJUSTE DE LA VELOCIDAD Y DIRECCIÓN DEL FLUJO DE AIRE
Se puede seleccionar la velocidad y la dirección
del FLUJO DE AIRE según se precise.
■
Para cambiar la velocidad del FLUJO DE
FAN
.
AIRE, presione el botón
Cada vez que presione este botón, la velocidad del
ventilador cambia en secuencia:
(baja) →
(media) →
(alta)→
(AUTO)
˚C
CLOCK
AMPM
12345
AMPM
TOO
ON/OFF WARM
TOO
COOL
FAN
STOP
VANE
START
I FEEL COOL
FAN DRY
MODE
HR.
ECONO COOL
MIN.
RESET CLOCK
■
Para cambiar la dirección horizontal del FLUJO DE AIRE
Para unidades instaladas en el suelo
• Cambie la dirección de las paletas verticales
manualmente.
Para unidades instaladas en el techo
• Cambie la dirección de las paletas verticales
manualmente.
• Utilice la muesca
(alta) para enfriar más la sala.
• Si el sonido de funcionamiento de su unidad le molesta al dormir, utilice la muesca (baja).
■
Para cambiar la dirección del FLUJO DE AIRE
VANE
verticalmente, presione el botón
.
Cada vez que presione este botón, el ángulo de la paleta horizontal cambia en secuencia: 1 → 2 → 3 → 4
→ 5 → (AMPLITUD) →
(AUTO)
FUNCIONAMIENTO DE AMPLITUD
Utilice el funcionamiento de amplitud para que el flujo de
aire alcance todas las esquinas de la habitación.
Posición recomendada de la paleta horizontal
Use la posición
(AUTO) normalmente.
Utilice la posición 1 o 2 en los modos FRESCO o SECO
cuando quiera realizar el ajuste según sus preferencias.
1
Ajuste las paletas antes de poner en marcha la unidad.
Puesto que la paleta horizontal se mueve automáticamente, ésta podría engancharle los dedos.
CONTROL AUTOMATICO DE LA DIRECCIÓN DEL AIRE
• Cuando se selecciona el modo AUTO (automático) con el botón
automáticamente para ajustarse al modo más efectivo.
VANE
, la posición de la paleta horizontal se regula
Para unidades instaladas en el suelo
(1) FRESCO, SECO
• El aire es expulsado hacia arriba.
(2) VENTILADOR
• El aire es expulsado horizontalmente.
COOL
DRY
2
3
4
5
1
2
COOL
DRY
3
4
5
Para unidades instaladas en el techo
Notas:
• En el modo refrigeración, si el acondicionar de aire
funciona con la paleta horizontal 4 o 5 durante 1 hora,
la dirección del FLUJO DE AIRE cambia automáticamente a la posición a la posición 1 para evitar que el
agua condensada llegue a gotear.
• Utilice el mando a distancia para ajustar la dirección
del aire hacia arriba. Si mueve la paleta horizontal manualmente podría estropearla.
(1) FRESCO, SECO
• El aire es expulsado horizontalmente.
(2) VENTILADOR
• El aire es expulsado hacia abajo.
19
TIMER (TIMER ON/OFF)
Utilice el timer para cuando se vaya a dormir, cuando llegue a casa, cuando se levante, etc...
SI NO VA A USAR EL ACONDICIONADOR DE AIRE
DURANTE MUCHO TIEMPO
TIMER
Cómo activar el timer ON
1
Presione el botón
miento.
START
durante el funciona-
Cuando no se va a usar durante largo
tiempo:
Cuando vaya a usar otra vez el acondicionador de aire:
1
1
Cada vez que se aprieta el botón, el timer ON va alternando entre ON y OFF.
˚C
Haga funcionar el VENTILADOR durante 3 ó
4 horas para secar el interior del acondicionador de aire.
Limpie el filtro de aire e instálelo en la unidad interior.
(Consulte la página 21 para su limpieza.)
CLOCK
AMPM
AMPM
TOO
ON/OFF WARM
FAN
Para liberar el timer ON:
START
Presione el botón
MODE
HR.
ECONO COOL
MIN.
Ventilador en
funcionamiento
HR.
STOP
FAN DRY
RESET CLOCK
Fije el tiempo del timer mediante los botoMIN.
HR.
nes
y
.
Cada vez que se aprieta el botón
, el tiempo fijado
MIN.
va sumando 1 hora; al apretar el botón
, el tiempo
fijado va sumando 10 minutos.
TOO
COOL
I FEEL COOL
VANE
2
■
START
2
Cómo poner el timer OFF
2
Limpie el filtro antes de instalarlo.
Apague el interruptor.
.
○ ○ ○ ○ ○ ○ ○ ○ ○ ○ ○ ○ ○ ○ ○ ○ ○ ○ ○ ○ ○ ○ ○
1
2
STOP
Presione el botón
miento.
durante el funciona-
Compruebe que la entrada y salida del aire
de la unidad interior/exterior no están bloqueadas.
Cuidado:
Cierre el interruptor de la unidad cuando no lo vaya a utilizar durante un período prolongado de tiempo. De no hacerlo, se podría acumular suciedad y provocar un incendio.
3
Quite las pilas del mando a distancia.
Cada vez que se aprieta el botón, el timer OFF va alternando entre ON y OFF.
3
Fije el tiempo del timer mediante los botoMIN.
HR.
nes
y
.
Cuidado:
Conexión a tierra.
No conecte el cable de tierra a una tubería de gas o de
agua, a un pararrayos o a la toma de tierra de un teléfono. Si la conexión a tierra no se efectúa correctamente,
podrían producirse descargas eléctricas.
HR.
Cada vez que se aprieta el botón
, el tiempo fijado
MIN.
va sumando 1 hora; al apretar el botón
, el tiempo
fijado va sumando 10 minutos.
Cuidado:
Para evitar el goteo de líquido, retire todas las pilas cuando no vaya a utilizar el mando a distancia durante un periodo prolongado de tiempo.
Compruebe que la toma a tierra esté correctamente conectada.
Para liberar el timer OFF:
■
STOP
Presione el botón
.
Programación del funcionamiento del timer
Se pueden utilizar el timer ON y el timer OFF en combinación. El timer que esté programado con la hora
más próxima será el primero en funcionar. (La señal
indica el orden en que funcionará el timer.)
• El timer no funcionará si el acondicionador de aire
no está puesto en hora.
MANTENIMIENTO
Antes de iniciar el mantenimiento
Limpieza de la unidad interior
■
■
Apague el interruptor.
Cuidado:
Cuando vaya a limpiar la unidad, apáguela y cierre el
interruptor.
El ventilador gira a mucha velocidad cuando está en funcionamiento y podría herirle.
20
Utilice un paño suave y seco para realizar la
limpieza.
No utilice gasolina, bencina, polvo abrillantador, detergente ni insecticidas ya que podría dañar la unidad.
LIMPIEZA DEL FILTRO DEL AIRE/
FILTRO DESODORIZANTE (OPCIÓN)
CAMBIO DEL FILTRO DESODORIZANTE (OPCIÓN)/
FILTRO LIMPIADOR DEL AIRE (OPCIÓN)
Limpieza del filtro del aire (aproximadamente una vez cada dos semanas)
Limpieza del filtro desodorizante (aproximadamente una vez cada dos semanas)
Cuando disminuya la eficacia debido a la suciedad, etc., es necesario reemplazar el filtro desodorizante/filtro limpiador del aire.
1
1
Extraiga el filtro del aire.
• Tire del tirador de la toma de aire hacia delante.
Extraiga el filtro del aire y el desodorizante
juntos. A continuación separe el filtro desodorizante (Tipo esponja gris) del filtro del aire.
Cambio del filtro desodorizante
(aproximadamente una vez al año)
Recambio del filtro limpiador del aire
(aproximadamente cada 4 meses)
1
1
• El filtro desodorizante es inocuo para las personas.
Sin embargo, para mantener su eficacia, procure sujetarlo por el bastidor sin tocar la superficie del filtro
con la mano.
2
(Si dispone de filtro desodorizante o limpiador (OPCIÓN), extráigalo antes de limpiar el filtro del aire.)
2
Limpie la suciedad del filtro del aire con un
aspirador o lavándolo con agua.
• Si la suciedad persiste, lave el filtro con agua tibia y
detergente neutro.
• Si utiliza agua demasiado caliente (50°C o superior),
el filtro se podría deformar.
FR
ON
T
2
Extraiga el filtro del aire y el filtro desodorizante juntos.
Separe el filtro desodorizante (Tipo esponja
gris) del filtro del aire.
FR
ON
2
Extraiga el filtro del aire y el filtro limpiador del
aire juntos.
Separe el filtro limpiador del aire (Tipo fuelle
blanco) del filtro del aire.
FR
ON
T
T
Ponga a remojo el filtro junto con el marco
en agua tibia durante 15 minutos.
• Si la suciedad persiste, utilice agua tibia con detergente neutro.
• Si utiliza agua demasiado caliente (50°C o superior),
el filtro se podría deformar.
• No utilice ningún cepillo o esponja que rasque.
Puede dañar la superficie del filtro.
• No use detergentes con cloro.
3
Ponga un nuevo filtro desodorizante y únalo
al filtro del aire. (Sujételos bien con el gancho del filtro del aire para más seguridad.)
3
Ponga un nuevo filtro limpiador del aire y únalo al filtro del aire. (Sujételos bien con el gancho del filtro del aire para más seguridad.)
FR
FR
ON
T
ON
T
3
4
Después de lavar el filtro del aire en agua,
preferiblemente templada, déjelo secar totalmente a la sombra.
• No exponga el filtro del aire a la luz directa del sol ni lo
caliente cerca de una fuente de calor cuando lo seque.
4
Instale el filtro del aire.
• Vuelva a poner el tirador de la toma de aire.
3
4
Instale el filtro del aire y el filtro limpiador del
aire juntos.
Después de lavar el filtro desodorizante en
agua, preferiblemente templada, déjelo secar totalmente a la sombra.
• Cuando se esté secando, no exponga el filtro desodorizante a la luz solar directa ni al calor de una llama.
4
Instale el filtro del aire y el filtro desodorizante juntos.
Una el filtro desodorizante al filtro del aire.
(Sujételos bien con el gancho del filtro del
aire para más seguridad.) A continuación instálelos en la caja.
○ ○ ○ ○ ○ ○ ○ ○ ○ ○ ○ ○ ○ ○ ○ ○ ○ ○ ○ ○ ○ ○ ○
○ ○ ○ ○ ○ ○ ○ ○ ○ ○ ○ ○ ○ ○ ○ ○ ○ ○ ○ ○ ○ ○ ○
Filtro desodorizante
Filtro limpiador del aire
• Se debería limpiar aproximadamente cada dos semanas. Sin embargo, si la suciedad persiste lávelo más a
menudo.
• Reemplace el filtro por uno nuevo cuando éste no recupere su color ni siquiera al lavarlo según el procedimiento indicado a la izquierda (Limpieza del filtro
desodorizante) o cuando se torne de color negro.
• El margen de tiempo para cambiar el filtro es generalmente de aprox. 1 año.
Piezas opcionales
FR
ON
T
• Si el filtro limpiador del aire está obstruido, la potencia
de la unidad puede reducirse o puede haber condensación en la salida del aire.
• El filtro limpiador del aire es desechable. El tiempo de
utilización medio es de unos 4 meses. No obstante, si
el color del filtro se vuelve marrón oscuro, cámbielo
rápidamente.
Puede obtenerlas en su establecimiento local.
Nombre de la pieza
Filtro desodorizante
Filtro limpiador del aire
Modelo
MAC-1700DF
MAC-1200FT
21
ANTES DE AVISAR AL TÉCNICO, VUELVA A COMPROBAR LO SIGUIENTE
El acondicionador de
aire no se pone en
marcha.
d
Compruebe lo siguiente.
No aparece ninguna
señal en el mando a
distancia (1, 2). No se
d
puede recibir la señal
Compruebe lo siguiente.
del control remoto si
éste no se utiliza cerca
1
¿La temperatura está
del equipo (1).
No refrigera lo
suficiente.
¿El interruptor está co2
nectado?
bien ajustada?
2
¿Se ha fundido el fusi- 3
ble?
3
¿Está ajustada la hora
de encendido del temporizador?
¿Está bloqueada la salida de la unidad exte- 1
rior?
1
¿El filtro está sucio?
Cuando se va la luz.
Para volver a activar la unidad, pulse nuevamente el
botón ON/OFF del mando
a distancia una vez restablecida la energía.
d
Compruebe lo siguiente.
2
SI CREE QUE HA OCURRIDO ALGÚN PROBLEMA
Pregunta
Respuesta (no es mal funcionamiento)
El acondicionador de aire no funciona
durante unos 3 minutos cuando vuelve
a ponerse en marcha.
• Esto protege el acondicionador de aire gracias a las instrucciones del
microprocesador.
Espere.
Se oye un ruido de crujido.
• Este sonido lo produce la expansión/contracción del panel frontal, etc. debida a cambios de temperatura.
En la habitación huele raro.
• El acondicionador de aire absorbe algún olor adherido a una pared, alfombra, mueble, tela, etc. y lo despide con el aire.
El ventilador se para mientras funciona
la modalidad SECO.
• El equipo utiliza el mismo circuito de refrigerante tanto en modo SECO (DRY)
como en modo FRESCO (COOL). Se debe reducir el tiempo de funcionamiento en modo SECO (DRY) para que la humedad descienda sin que la
temperatura de la sala baje excesivamente. Por ello, a veces se detienen a
la vez el compresor y el ventilador interior. Es el modo de evitar que el agua
condensada en el intercambiador térmico vuelva a evaporarse.
Se oye goteo de agua.
• Es el sonido del refrigerante que fluye en el interior del condicionador.
• Es el sonido de agua condensada en el intercambiador térmico que fluye.
• Es el sonido del intercambiador térmico que se está descongelando.
Se oye un ruido burbujeante.
• Este ruido se oye cuando, al encenderse la campana o el ventilador, la manguera de drenaje absorbe aire del exterior y el agua que fluye por la manguera sale expulsada.
Este ruido también se oye cuando hace mucho viento y entra aire en la
manguera de drenaje.
La habitación no puede enfriarse lo suficiente.
• Cuando se utiliza en la habitación un ventilador o una cocina a gas, aumenta
la carga de enfriamiento dando como resultado un efecto de enfriamiento
insuficiente.
• Cuando la temperatura del aire exterior sea elevada, es posible que el efecto de enfriamiento no sea el suficiente.
Se oye un sonido mecánico desde la
unidad interior.
• Es el sonido del interruptor que pone en on/off el ventilador o compresor.
La dirección del flujo de aire ha cambiado durante el funcionamiento.
• Si el acondicionador de aire funciona en modo FRESCO o SECO y expulsa
el aire hacia abajo durante una hora, la dirección del flujo del aire cambia
automáticamente a la posición 1 para evitar que el agua condensada llegue
a gotear.
Hay un escape de agua desde la unidad exterior.
• Durante FRESCO y SECO, el enfriamiento de los tubos y de las conexiones
de los tubos hace que se condense el agua.
¿Se han agotado las
pilas?
¿Los polos de las baterías corresponden con
las marcas + y -?
Si, a pesar de haber realizado las comprobaciones anteriores, el acondicionador de aire sigue teniendo anomalías, apáguelo y acuda a su proveedor.
En los siguientes casos, apague la unidad y consulte a su proveedor.
• La señal del mando a distancia puede no recibirse bien en una habitación con una lámpara fluorescente electrónica tipo
ON/OFF (tipo inversor, etc.).
• En una zona donde haya ligeras ondas eléctricas, al utilizar el acondicionador de aire se pueden generar ruidos debidos
a la recepción de ondas de radio.
• Cuando se oigan tormentas, apague la unidad y desconecte el interruptor. Si no, podrían dañarse las piezas eléctricas.
22
INSTALACIÓN, REUBICACIÓN E INSPECCIÓN
Mantenga alejada la unidad
exterior a 3 m como mínimo de
las antenas de TV o las radios.
Lugar para la instalación
Evite instalar el acondicionador de aire en los siguientes lugares.
• Donde pudiera gotear gas inflamable.
Cuidado:
No instale la unidad en lugares en los que pueda haber
fugas de gas inflamable.
Si se producen fugas de gas y éste se acumula se podría producir una explosión.
• Donde haya mucho aceite de máquinas.
• Lugar de mucha sal como en la costa.
• Donde se genere gas sulfúrico, tal como aguas
termales.
• Donde se salpique aceite o en zonas en las que haya
mucho humo graso.
• Cuando se ha de extraer o reinstalar el condicionador de aire debido a nueva construcción, cambio de casa, etc. se
requieren técnicas y trabajos especiales.
Lámpara fluorescente tipo inversor
Para evitar el efecto de
la lámpara fluores-cente,
manténgalo lo más alejado posible.
Para evitar distorsión de las imágenes o ruidos,
mantenga un mínimo espacio.
Reubicación
Pared, etc.
Lugar seco
bien ventilado
100 mm
o más
Televisor
500 mm
o más
Atención:
No repare ni cambie de lugar el acondicionador de aire por su cuenta.
Un manejo incorrecto puede causar un incendio, una descarga eléctrica o daños si se cae la unidad o gotea agua, etc.
Consulte a su proveedor.
Cuando quiera deshacerse de la unidad
• Antes de tirar este artículo, consulte a su proveedor.
1 m o más
Radio
3mo
más
Atención:
Si el acondicionador de aire funciona pero no genera fresco ni calefacción en la habitación (dependiendo del modelo),
consulte con su distribuidor ya que puede tratarse de una fuga de refrigerante. Debe preguntar al responsable del
mantenimiento si existe o no una fuga de refrigerante cuando se lleve a cabo la reparación.
El refrigerante cargado en el acondicionador de aire es seguro y normalmente no tiene fugas. No obstante, si existe
pérdida de gas refrigerante en el interior y entra en contacto con las llamas del calentador de un ventilador, calentador, horno o aparato similar, se generarán sustancias nocivas.
Partes eléctricas
• Facilite un circuito exclusivo para el suministro de corriente del condicionador de aire.
• Asegúrese de observar la potencia del interruptor.
Atención:
No instale la unidad por su cuenta. Si la instalación es incorrecta podrían producirse incendios, descargas eléctricas,
fugas de agua, podría resultar herido de caerse el acondicionador de aire, etc.
Cuidado:
• Conexión a tierra.
No conecte el cable de tierra a una tubería de gas o de agua, a un pararrayos o a la toma de tierra de un teléfono. Si
la conexión a tierra no se efectúa correctamente, podrían producirse descargas eléctricas.
• Instale el interruptor contra tierras según el lugar en el que va a instalar la unidad de aire acondicionado (en un
lugar húmedo, etc...). Si no se instala el interruptor contra tierras se podrían producir descargas eléctricas.
Inspección y mantenimiento
Ante cualquier duda, consulte a su proveedor.
CARACTERÍSTICAS TÉCNICAS
Modelo
Función
Suministro eléctrico
Estándar
kW
kcal/h
Corriente
A
Entrada
W
Capacidad de relleno de refrigerante (R-22) kg
Potencia
MCF-18TN
MCF-24TN
Fresco
1ø, 220V, 60Hz
SSA 385/386
JIS C 9612
SSA 385/386
JIS C 9612
4,4
5,1
5,5
6,3
3780
–
4720
–
11,2
9,6
16,3
13,4
2300
1910
3400
2800
1,50
2,15
Nota:
Condiciones normales de funcionamiento
SSA 385/386
Fresco — Interior: 29°C DB, 19°C WB
Exterior: 46°C DB, 24°C WB
JIS C 9612
Fresco — Interior:
Exterior:
27°C DB, 19°C WB
35°C DB, (24°C WB)
• Si usa el acondicionador durante varias temporadas, es posible que su potencia se reduzca por acumulación de suciedad dentro de la unidad.
• Según las condiciones de uso, es posible que se produzcan algunos olores o que el agua de la deshumidificación no se
desagüe correctamente debido a la suciedad, el polvo, etc.
• Además del mantenimiento habitual se recomienda que solicite a un especialista la inspección y el mantenimiento (a su
cargo) de la unidad.
Consulte a su distribuidor.
Observe también el sonido de funcionamiento
• No coloque nada sobre la salida de aire de la unidad exterior, ya que podría reducirse la potencia o aumentar el sonido
producido por el funcionamiento.
• Si oye un ruido anormal mientras funciona, consulte a su proveedor.
23