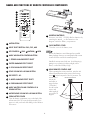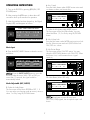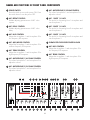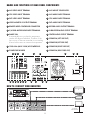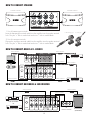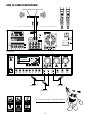
1
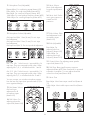
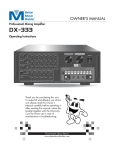
OWNER'S MANUAL Karaoke Mixing Amplifier The World’s first CPU-controlled Karaoke Amplifier DX-222 Operating Instructions ECHO VOLUME DX-222 KARAOKE AMPLIFIER MIC MASTER VOLUME MUSIC VOLUME 24 BIT 48KHz SAMPLING RATE LOADING... DIGITAL PROCESS STEREO POWER KARAOKE AMPLIFIER MICROPHONE TONE MICROPHONE VOLUME MICROPHONE INPUT Thank you for purchasing this unit. To make full and effective use of this unit, please read this Owner's Manual carefully before operating it. After reading this manual, retain this booklet together with the Warranty Card for future use in case of maintenance or troubleshooting. EVOLUTION OF KARAOKE www.bmbkaraoke.com MUSIC TONE against them. Please pay particular attention to cords plugs, convenience receptacles, and the point where they exit this BMB product. RISK OF ELECTRIC SHOCK DO NOT OPEN 11. Object and Liquid Entry: Care should be taken so that objects do not fall on, or liquids are not spilled into this BMB product. CAUTION: TO REDUCE THE RISK OF ELECTRIC SHOCK DO NOT REMOVE COVER (OR BACK) NO USERSERVICEABLE PARTS INSIDE REFER SERVICING TO QUALIFIED PERSONNEL 12. Damage Requiring Service: This BMB product should be serviced only by qualified service personnel when: A. The power-supply cord or the plug has been damaged; or B. Objects have fallen, or liquid has spilled into this BMB product; or C. This BMB product has been exposed to rain; or D. This BMB product does not appear to operate normally or exhibits a marked change in performance; or E. This BMB product has been dropped, or its chassis damaged. SAFETY INSTRUCTIONS 1. Read Instructions: All the safety and operation instructions should be read before this BMB product is operated. 2. Retain Instructions: The safety and operating instructions should be kept for future reference. 3. Warnings: All warnings on this BMB product in these operating instructions should be followed. 4. Follow Instructions: All operating and other instructions should be followed carefully. 13. Servicing: The user should not attempt to service this BMB product beyond those means described in this operating manual. All other servicing should be referred to the BMB Service Department. 5. Water and Moisture: This BMB product should not be used near water, for example, near a bathtub, washbowl, kitchen sink, laundry tub, in a wet basement, near a swimming pool, swamp or salivating St. Bernard dog, etc. 14. To prevent electric shock, do not use this polarized plug with an extension cord, receptacle or other outlet unless the blades can be fully inserted to prevent blade exposure. 6. Cleaning: Clean only with a dry cloth. 15. Grounding or Polarization: Precautions should be taken so that the grounding or polarization means of this BMB product is not defeated. 7. Ventilation: This BMB product should be situated so that its location or position does not interfere with its proper ventilation. For example, the Component should not be situated on a bed, sofa, rug, or similar surface that may block any ventilation openings, or placed in a built-in installation such as a bookcase or cabinet that may impede the flow of air through ventilation openings. 16. Power Precaution: Unplug this BMB product during lightning storms or when unused for long periods of time. Note that this BMB product is not completely disconnected from the AC mains service when the power switch is in the OFF position. 8. Heat: This BMB product should be stayed away from heat sources such as radiators, or other devices producing heat. 17. This apparatus does not exceed the Class A/Class B (whichever is applicable) limits for radio noise emissions from digital apparatus as set out in the radio interference regulations of the US Department of Communications. 9. Power Sources: This BMB product should be connected to a power supply only of the type described in these operation instructions or as marked on this BMB product. 18. Exposure to extremely high noise levels may cause permanent hearing loss. Individuals vary considerably in susceptibility to noise-induced hearing loss, but nearly everyone will loss some hearing if exposed to sufficiently intense noise for a period of time. The U.S. 10. Power Cord Protection: Power supply cords should be routed so that they are not likely to be walked upon or pinched by items placed upon or 2 Accessories Do not place the set on an unstable cart, stand, tripod, bracket, or table. The set may fall, causing serious injury to a child or an adult, and serious damage to the set. Use only a cart stand tripod, bracket, or table recommended by the manufacturer. Government's Occupational Safety and Health Administration (OSHA) have specified the permissible noise level exposures shown in the following chart. According to OSHA, any exposure in excess of these permissible limits could result in some hearing loss. To ensure against potentially dangerous exposure to high sound pressure levels, it is recommended that all persons exposed to equipment capable of producing high sound pressure levels use hearing protectors while the equipment is in operation. Ear plugs or protectors in the ear canals or over the ears must be worn when operating the equipment in order to prevent a permanent hearing loss if exposure is in excess of the limits set forth here. For the set with a three-wire grounding type ac plug: This plug will only fit into a grounding-type power outlet. This is a safety feature. If you are unable to insert the plug into the outlet, contact your electrician to have a suitable outlet installed. Do not defeat the safety purpose of the grounding plug. AC-Power Sources This set should be operated only from the type of power source indicated on the marking label. If you are not sure of the type of electrical power supplied to your home, consult your dealer or local power company. For those sets designed to operate from battery power, or other sources, refer to the operating instructions. 110V AC-POWER The serial and model number for this unit is located on the rear panel. Please write down the numbers here and retain for future reference. Model No.____________________________________ Serial No.____________________________________ Purchase Notes: Date of Purchase_______________________________ Dealer Name_________________________________ Dealer Address________________________________ _____________________________________________ Dealer Phone__________________________________ E-Mail________________________________________ AC-POWER CORD INCLUDED ECHO VOLUME DX-222 KARAOKE AMPLIFIER MIC MASTER VOLUME MUSIC VOLUME 2 4 B I T 4 8 K H z S A M P L I N G R A TE LOADING... DIGITAL PROCESS STEREO POWER KARAOKE AMPLIFIE R MICROPHONE TONE MICROPHONE VOLUM E MICROPHONE INPU T MUSIC TONE CONTENTS Overloading Do not overload wall outlets, extension cords or convenience receptacles beyond their capacity, since this can result in fire or electric shock. Introduction.................................................... 4 Safety precautions........................................... 5 Specifications................................................. 5 Package accessories........................................ 5 Name and functions of remote controller.............. 6 Operating instructions................................... 7~8 Features and functions of the amplifier............ 8~11 110V AC-POWER How to connect speaker................................. 12 How to connect music A.V. source.................... 12 How to connect recorder................................. 12 An appliance and cart combination should be moved with care. Quick stops, excessive force and uneven surfaces may cause the appliance and cart combination to overturn. Connector information..................................... 13 Physical........................................................ 13 How to connect microphone............................ 14 Maintenance note.......................................... 15 3 Single-Shot mode automatically searches and attenuates feedback frequencies and locks the filter until manually reset INTRODUCTION � Thank for your choosing BMB DX-222 Karaoke Mixer with DSP (Digital Sound Processor) and built-in feedback destroyer. We appreciate your vote of confidence in this innovative product. Our talented engineering team has many years of experience in audio equipment design. BMB DX-222 includes distinguished features of 8 to 10 channel mixer, equalizer, feedback destroyer, Karaoke key controller and crossover into one single unit by using state-of-the-art CPU control technology. Therefore, it is very easy for anyone to operate it without any complications. We hope you have fun with it and enjoy playing it. Music modulation with 9-step key control and adjustable up and down effects for selection Music volume lock is used to lock up the super bass 2-Way stereo crossover 24 dB/octave, state-variable Linkwitz-Riley filters for precise frequency separation Absolutely flat summed amplitude response with zero phase difference BMB DX-222 is equipped with the following special features: Separate subwoofer output with independent frequency control DSP (Digital Sound Processor) The super bass volume can be adjusted from 00 dB to the maximum 80 dB 4 kinds of DSP Karaoke effect selection: (1) Stereo effects (2) Echo effects (3) Two effects mixed with fixed echo return times, with no adjusting (4) Adjust the fix-up effects setup by manufacturer. Parameters cannot be adjusted. On/Off switch for super bass Subwoofer auto cut to adjust the parameters from 00 dB to 50 dB High performance 24-bit multi-engine effect process Dynamic or condenser microphone limiter effectively protects your equipment from overload High-precision vacuum tube turbo vocal microphones/line preamplifier Microphone reverb (echo) time delay and repeat adjusting for parameters between 30 mS to 190 mS Discrete mic/line input sates with soft mute +48 phantom power Font Panel View Ultra-wide bandwidth from 2 Hz to 200 kHz for open sound Built-in high quality vacuum tube for outstanding, ultra-musical tube sound Music tone with bass +/- 10dB and treble +/- 10dB Rear Panel View High-performance 24-bit dual-engine Feedback Destroyer Two software engines allow independent or coupled functions on left and right channels on lines preamplifier 4 SAFETY PRECAUTIONS PACKAGE ACCESSORIES Selecting fine audio equipment such as the unit you've just purchased is only the first step to your musical enjoyment. Now it's time to consider how you can maximize the fun and the safety of your new equipment. We want you to get the most out of your equipment by playing it at a safe level without affecting your hearing. Sound can be very harmful. Over time your hearing "comfort level" adapts to higher volume of sound. What sounds "normal" can actually be loud and harmful to your hearing. Therefore, please guard against this by setting your equipment at a safe level before your hearing adapts. To establish a safe level, you can start your volume control at a low setting, then slowly increase the sound until you can hear it comfortably and clearly. If used wisely, your new sound equipment will provide you a pleasant experience in music. Since hearing damage from loud noise is often undetectable until it is too late, we recommend you avoid prolonged exposure to excessive noise. The following noises can be dangerous under constant exposure. Therefore, please be cautious with the dB level when playing your new equipment. Decible Level 120 dB 140 dB 180 dB NO POSTAGE NECESSARY IF MAILED IN THE UNITED STATES BUSINESS REPLY MAIL AUX CDG FIRST-CLASS MAIL PERMIT NO. 27249 SAN FRANCISCO CA POSTAGE WILL BE PAID BY ADDRESSEE CUSTOMER SERVICE PO BOX 880023 SAN FRANCISCO CA 94188-9912 Consumer survey card <Mail in U.S.A. only> AAA ALKA L BATT INE ERY ALKA L BATT INE ERY AAA Battery size: AAA (R6 1.5 V) Example Rock band concert in front of speakers, thunderclap Gunshot blast, jet plane Rocket launching pad DX-222 SPECIFICATIONS AC power cable (6 feet) United States (2M) to IEC (F) Remote control one unit Audio Out............................. 500W (250W+250W) Music Input (DVD,CDG, AUX) S/N Ratio............................. >90dB THD..................................... 0.01% Input Sensitivity/Impedance...... 0.707v/47k. ohm Frequency Response................ 20Hz~20kHz – 2dB Max. Output.......................... 4Vpp/60W HF (increase/attenuate)............ – 10dB LF (increase/attenuate)............. – 10dB Key Control............................ – 4dB Super Bass (SUB): THD............ 0.07% 20Hz~15kHz Mic. Input Section (4 input) S/N Ratio............................. >80dB (effect on) THD (effect off)....................... 0.04% 50Hz~16kHz Frequency Response................ 50Hz~20kHz – 3dB Input Sensitivity/Impedance...... 100mv~500mv/4.7KW Equalize Low...................................... 100Hz– 5dB Middle.................................. 1kHz– 5dB High..................................... 10kHz– 5dB Standard Power...................... AC 220V/50Hz Power Consume...................... 500 W Weight................................. 28 LBs Dimensions............................ 17”X14.5”X6” OWNER'S MAUNAL Karaoke Mixing Amplifier DX-222 Operating Instructions ECHO VOLUME DX-222 K A R A O K E A M P L I F I E R MIC MASTER VOLUME MU S I C V O L U M E 24 BIT 48KHz SAMPLING RATE LOADING... DIGITAL PROCESS STEREO POWER KARAOKE AMPLIFIER MICROPHONE TONE M I C R O P H O N E V O L U ME M I C R O P H O N E I N P UT Thank you for purchasing this unit. To make full and effective use of this unit, please read this Owner's Manual carefully before operating it. After reading this manual, retain this booklet together with the Warranty Card for future use in case of maintenance or troubleshooting. EVOLUTION OF KARAOKE < JAPAN > www.bmbkaraoke.com Owner's manual 5 MU S I C T O N E NAMES AND FUNCTIONS OF REMOTE CONTROLLER COMPONENTS 14 1 CDG AUX 2 3 4 9 5 10 6 11 AAA ALKA LI BATT NE ERY 15 ALKA LI BATT NE ERY AAA 7 8 16 12 13 DX-222 1 15 INSERTING BATTERIES Insert two size AAA 1.5V (R6) alkaline batteries by matching the + and _ on the batteries to the diagram inside the battery compartment. 16 CLOSE BATTERY COVER Close the cover of the battery case. MUTE BUTTON 2 INPUT SELECT BUTTON: DVD, CDG, AUX 3 KEY CONTROL: 4 MUSIC MODULATOR CONTROL BUTTON 5 1. STEREO KARAOKE EFFECT SELECT 6 EXCITER KARAOKE EFFECT SELECT 7 2. ECHO KARAOKE EFFECT SELECT LOW, NATURAL, NOTE HIGH Remove the batteries to avoid damage from possible battery leakage whenever you anticipate that the remote control will not be used for an extended period. Handle the remote control with care. Avoid dropping it, getting it wet, or placing it in direct sunlight, near a heater, or where the humidity is high. 17 8 ECHO VOLUME UP & DOWN BUTTON 9 DSP EFFECT 1 & 2 10 3. MIXED KARAOKE EFFECT SELECT 11 4. FIXED KARAOKE EFFECT SELECT 12 MUSIC MASTER VOLUME CONTROL UP & DOWN BUTTON 13 MICROPHONE VOLUME UP & DOWN BUTTON 14 OPEN BATTERY COVER Open the battery compartment cover on the back of the remote control unit. The cover should open easily if you press on in with your thumb while sliding it in the direction of the arrow. USING REMOTE CONTROL UNIT When operating the remote control unit, point the unit's infrared signal transmitter at the remote control remote sensor R on the front panel of the AV processor. The remote control Remote control sensor unit can be REMOTE used within a range of about 17 18 feet (6m) from the remote sensor, and 18 feet within angles of (6 m) up to about 30 o 30 o 30 degrees. CDG DX-222 6 AUX OPERATIING INSTRUCTIONS 6. Key Control Press the Audio button under MODE section twice and use button to select your favorite Key. 1. Turn on the DX-222 by pressing I/O (ON/OFF POWER) button. DX-222 KARAOKE AMPLIFIER 24 BIT 48KHz SAMPLING RATE 2. After pressing the I/O button, it takes about 40 seconds to boot up the machine for operation. MUSIC KEYCONTROL I----I----I 0 DIGITAL PROCESS STEREO POWER KARAOKE AMPLIFIER 3. After the machine has been booted up, the Digital Display (VFD) would appear as follows: 24 BIT 48KHz SAMPLING RAT E 7. Select the Mic button under MODE section The first screen will be Mic Effect Mode: You may select Mic Effect 1,2,3 or Fix by using UP/DOWN button. MUSIC VOL 80dB AUX CDG DVD 8. Mic Volume Lock Press the Mic button under MODE section twice to lock the Mic Volume screen and use UP/DOWN to lock ON/OFF mic. volume. D I G I T AL PROCESS STEREO POWER K A R A O K E Music Input 9. Mic Exciter Button The first screen will be ON/OFF option: You may select the UP/DOWN button to turn ON/OFF. When the Exciter is on, it will increase the mic. signal sensitivity. 4. Press the INPUT/AUDIO button to select the source as follows: 24 BIT 48KHz SAMPLING RAT E MUSIC VOL 80dB AUX CDG DVD DX-222 KARAOKE AMPLIFIER 24 BIT 48KHz SAMPLING RATE MUSIC KEYCONTROL I----I----I 0 DIGITAL PROCESS STEREO POWER KARAOKE AMPLIFIER D I G I T AL PROCESS STEREO POWER K A R A O K E Press the INPUT/AUDIO button to move the arrow to select the source AUX, CDG or DVD you want. After 10 seconds, the signal would be automatically locked. NOTE 10. Mute Button (Music OFF only) DX-222 KARAOKE AMPLIFIER Mode Adjustable (MIC, AUDIO) 24 BIT 48KHz SAMPLING RATE MUSIC KEYCONTROL I----I----I 0 5. Select the Audio Button The first screen will be Music DSP Effect OFF, 1, 2 You may select your favorite mode at memory arrow to select 1 or 2 by using UP/DOWN botton. DIGITAL PROCESS STEREO POWER KARAOKE AMPLIFIER Press button to mute all music input (AUX,CDG, DVD) signals, but microphone input is still active. NOTE 7 11. Microphone Tone (Adjustable) 15. Music Volume: Music level adjustment for audio inputs (button #17) Repeat Adjust: For vocal timing repeat (button #19) Delay Adjust: For vocal timing delay (button #20) Bass Adjust: For vocal low frequency (button #21) Mid Adjust: For vocal mid-tone frequency (button #22) Treble Adjust: For vocal high frequency (button #23) 16. Music Lock: Set the music gain output to a certain level for protection. MICROPHONE TONE 12. Microphone Volume (Adjustable) 17. Echo Volume: Echo level adjustment for all microphone inputs (button #12) Mic Input Level (Mic 1 front/4 rear): For mic input level adjustment. Mic Input Level (Mic 2 front/5 rear): For mic input level adjustment. Mic Input Level (Mic 3): For mic input level adjustment. E C H O V O LUME 18. Echo (Adjustable) Bass Adjust: For adjusting echo low frequency (button #10) Treble Adjust: For adjusting echo high frequency (button #11) MICROPHONE VOLUME NOTE 19. Center Volume: For adjusting center speaker output level (button #13) Mic 1/4: Mic 1 is the front mic. input and Mic 4 is rear input. They are connected to each other. When adjusting Mic 1/4, it will affect both Mic 1 and 4. 20. Sub/Freq: Bass signal frequency response adjustment (button #30). Rear connection for powered subwoofer or amplifier. You may adjust subwoofer volume from front panel (button #14). Mic 2/5: Mic 2 is the front mic. input and Mic 5 is rear input. They are connected to each other. When adjusting Mic 2/5, it will affect both Mic 2 and 5. 21. Music Tone You may connect your wireless microphone systems from the rear Mic inputs (rear input terminals 4/5) for more organized design. 13. Mic Master Volume: Mic level input adjustment for all microphone inputs. (button #15) M U S I C V OLUME Bass Adjust: Music bass output control level (button # 31) Treble Adjust: Music treble output control level (button #32) MIC MASTER VOL U M E 14. Sub Volume: For adjusting subwoofer output level (button #14) MUSIC TONE 8 NAMES AND FUNCTIONS OF FRONT PANEL COMPONENTS 1 THE DISPLAY WINDOW FOR RECEIVING SIGNAL OF REMOTE CONTROL 2 LCD: CPU display window 3 MUTE BUTTON 4 MIC. COMPRESS CONTROL KNOB Mic. will be more sensitive 5 MIC. MODE: Mic mode program button 6 AUDIO MODE: Music mode program button 7 UP CONTROL BUTTON Move to up control button, should use it with MODE ADJUSTABLE program button together. 8 9 DOWN CONTROL BUTTON Move to down control button, should use it with MODE ADJUSTABLE program button together. 10 ECHO BASS ADJUSTING 11 ECHO TREBLE ADJUSTING 12 ECHO VOLUME CONTROL Mic. echo depth effects control potentiometer knob 13 CENTRE VOLUME Center speaker level control, connect to powered center speaker or amplifier. 14 SUBWOOFER VOLUME Subwoofer level control, connect to powered Subwoofer or amplifier. 15 MIC. MASTER VOLUME CONTROL 16 MUSIC LOCK: Music output level gain. 17 MUSIC VOLUME CONTROL This control allows you to adjust the volume of the musical source. AUDIO INPUT SELECTOR 1 2 3 4 5 6 7 8 9 10 11 12 13 14 15 ECHO VOLUME DX-222 KARAOKE AMPLIFIER 16 17 MIC MASTER VOLUME M U S I C VOLUME 24 BIT 48KHz SAMPLING RATE LOADING... DIGITAL PROCESS STEREO POWER KARAOKE AMPLIFIER MICROPHONE TONE 18 19 20 21 MICROPHONE VOLUME 22 23 24 25 26 9 MICROPHONE INPUT 27 28 M U S I C TONE 29 30 31 32 NAMES AND FUNCTIONS OF FRONT PANEL COMPONENTS 18 POWER SWITCH Press this switch up to turn the power ON. Press the switch down to turn the power OFF. 26 MIC. (MICROPHONE) 3 VOLUME CONTROL This control microphone 1 and microphone 2 to adjust the volume. 19 MIC. REPEAT CONTROL Hidden adjusting potentiometer of MIC. echo repeats. 27 MIC. 1 INPUT 1/4 JACK This jack is for connecting front 1 microphone and rear microphone 3. 20 MIC. DELAY CONTROL Hidden adjusting potentiometer of MIC. echo delay. 28 MIC. 2 INPUT 1/4 JACK This jack is for connecting front 2 microphone and rear microphone 4. 21 MIC. BASS CONTROL Adjusts the microphone 1 and microphone 2 for low frequency EQ response. 29 MIC. 3 INPUT 1/4 JACK This jack is for connecting front 2 microphone and rear microphone 5. 22 MIC. (MID) MIDDLE CONTROL Adjusts the microphone 1 and microphone 2 for mid-tone frequency EQ response. 30 SUBWOOFER CROSSOVER CONTROL KNOB 31 MIC. BASS CONTROL Adjusts the microphone 1 and microphone 2 for low frequency EQ response. 32 MIC. TREBLE CONTROL Adjusts the microphone 1 and microphone 2 for high frequency EQ response. 23 MIC. TREBLE CONTROL Adjusts the microphone 1 and microphone 2 for high frequency EQ response. 24 MIC. (MICROPHONE) 1/4 VOLUME CONTROL This control microphone 1 and microphone 2 to adjust the volume. 25 MIC. (MICROPHONE) 2/5 VOLUME CONTROL This control microphone 1 and microphone 2 to adjust the volume. 1 2 3 4 5 6 7 8 9 10 11 12 13 14 15 ECHO VOLUME DX-222 KARAOKE AMPLIFIER 16 17 MIC MASTER VOLUME M U S I C VOLUME 24 BIT 48KHz SAMPLING RATE LOADING... DIGITAL PROCESS STEREO POWER KARAOKE AMPLIFIER MICROPHONE TONE 18 19 20 21 MICROPHONE VOLUME 22 23 24 25 26 10 MICROPHONE INPUT 27 28 M U S I C TONE 29 30 31 32 NAMES AND FUNCTIONS OF REAR PANEL COMPONENTS 33 AUX VIDEO INPUT TERMINAL 42 AUX ADJUST SENSOR LEVEL 34 CDG VIDEO INPUT TERMINAL 43 AUX AUDIO INPUT TERMINAL 35 DVD VIDEO INPUT TERMINAL 44 CDG AUDIO INPUT TERMINAL 36 VIDEO MONITOR 3 OUTPUT TERMINAL 45 DVD AUDIO INPUT TERMINAL 37 REMOTE WIRED CONTROLLER CONNECTOR 46 RECORD AUDIO OUTPUT TERMINAL 38 5/4 REAR MICROPHONE INPUT TERMAINAL 47 SUBWOOFER AUDIO OUTPUT TERMINAL 39 SMART FAN It automatically turns on when the temperature reaches 60 degrees Fahrenheit. Therefore, if the fan is not on, it does not mean that it is not working. It has a built-in sensor to measure the temperature. 48 CENTER AUDIO OUTPUT TERMINAL 49 SPEAKER A (LEFT SIDE OUT) 50 SPEAKER B (LEFT SIDE OUT) 40 120V 60Hz (MAX. 100W) AC-POWER PLUG 51 SPEAKER B (RIGHT SIDE OUT) 41 POWER FUSE HOLDER 52 SPEAKER A (RIGHT SIDE OUT) 33 34 35 36 37 38 39 40 41 Fan turns on automatically when the temperature reaches 60 F O MODEL NO. DX-222 CALIFORNIA, UNITED STATES OF AMERICA COMMENTS? E-MAIL: [email protected] ENGINEERED AND DESIGN IN U.S.A. VIDEO INPUT TERMINAL REAR MIC. INPUT REMOTE AUX CDG DVD 1 2 020898-11 SA FETY 3 M A RK MIC 4 AUDIO INPUT TERMINAL ITEM NO. D030905 VIDEO MONITOR OUTPUT MIC 5 USA 020898-11 AUDIO OUTPUT AUX INPUT LEVEL AC OU T 1 2 0 V 6 0 H z (MA X . 1 0 0 W ) AUX CDG DVD RECORD PRE-OUT SUB CENTER SPEAKER OUT 42 43 44 45 46 47 49 48 50 AC~120V 51 52 HOW TO CONNECT VIDEO MONITOR VIDEO MONITOR TV V I D E O I N P U T TERMINAL AUX CDG DVD VIDEO MONITO R O U T P U T 1 2 3 LCD PROJECTOR 13" KARAOKE VIDEO MONITOR 11 HOW TO CONNECT SPEAKER A SPEAKER CONNECT B SPEAKER CONNECT SPEAKER OUT 1. Use of banana type terminals: Insert the banana-type terminal cable from the amplifier into the speaker terminal hole. The plus "+" side is marked red and minus "-" side is marked black. 2. Insert Type 1. Banana Plug Type 2. Use of insert-type terminals: Depress the insert-type terminal cable from the amplifier into the speaker terminal hole. The plus "+" side is marked red and minus "-" side is marked black. HOW TO CONNECT MUSIC A.V. SOURCE VIDEO CONNECT VIDEO INPUT TERMINAL VIDEO CONNECT VIDEO MONITOR OUTPUT POWER DVD PLAYER AUX CDG DVD 1 2 3 AUDIO CONNECT VIDEO CONNECT OR AUDIO INPUT TERMINAL AUDIO OUTPUT AUX INPUT MAGIC MIC. LEVEL AUX CDG DVD RECORD PRE-OUT SUB CENTER AUDIO CONNECT AUDIO CONNECT CDG POWER CDG PLAYER HOW TO CONNECT RECORDER & SUB WOOFER AUDIO CONNECT AUDIO CONNECT AUDIO CONNECT AUDIO INPUT T E R M I N A L AUDIO OUTPUT AUX INPUT POWER TYPE RECORDER OR POWER CD RECORDER LEVEL AUX CDG DVD RECORD PRE-OUT 12 SUB CENTER POWERED CENTER SPEAKER OR THROUGH AMPLIFIER SUBWOOFER (POWERED) CONNECTOR INFORMATION PHYSICAL Height Width Depth Net Weight BALANCE XLR CONNECTORS XLR Pin 2 Pin 3 Pin 1 Hot (+) Cold (-) Shield (Ground) TRS Tip Ring Shield Front view DIGITAL PROCESS STEREO POWER KARAOKE AMPLIFIER H. 6 inches MICROPHONE TONE MICROPHONE INPUT M U S I C TONE W. 17 inches Side view D. 14.5 inches 2 SHID 1 3 H. 6 inches COLD 2 1 4 MICROPHONE VOLUME 1 FEMALE BALANCE M U S I C VOLUME LOADING... SHIELD 1 COLD 3 HOT MIC MASTER VOLUME 24 BIT 48KHz SAMPLING RATE MALE 3 ECHO VOLUME DX-222 KARAOKE AMPLIFIER 2 SHIELD HOT COLD 6 inches 17 inches 14.5 inches 28 LBs HOT Top view TRS PLUG RING SLEEVE SLEEVE RING TIP TIP RING (COLD) D.14.5 inches TIP (HOT) SLEEVE (SHIELD) UNBALANCE 1 4 TRS PLUG SLEEVE SLEEVE TIP Optional for 19" rack mount kit TIP ECHO VOLUME DX-222 KARAOKE AMPLIFIER DIGITAL PROCESS STEREO POWER KARAOKE AMPLIFIER SLEEVE (SHIELD) MICROPHONE TONE MICROPHONE VOLUME RCA UNBALANCE JACK SLEEVE R (right) TIP TIP SLEEVE SLEEVE Front Panel L (left) TIP MUSIC VOLUME LOADING... TIP (HOT) SLEEVE MIC MASTER VOLUME 24 BIT 48KHz SAMPLING RATE RING (COLD) TIP 13 MICROPHONE INPUT MUSIC TONE HOW TO CONNECT MICROPHONE WIRELESS MICROPHONE RECEIVER BATT LOW connect to MIC. receiver (REAR MIC. 4) BATT LOW ON ON OFF OFF connect to MIC. receiver (REAR MIC. 5) SA FETY M A RK REAR PANEL ECHO VOLUM E D X - 222 KARAOKE AMPLIFIER MIC MASTER VOLUM E MUSIC VOLUM E 2 4 B I T 4 8 K H z S A M P L I N G R A TE LOADING... D I G I T A L P R O C E S S S T E R E O P O W E R K A R A O K E A M P L I F I ER MICROPHONE TONE MICROPHONE VO LUM E MICROPHONE INPU T MUSIC TONE FRONT PANEL WIRE MIC. 1 WIRE MIC. 3 WIRE MIC. 2 home karaoke vocal beach church restau rant It's your sound's of performance. Find more information at www.bmbkaraoke.com 14 -6 dB 80 Degree -6 dB 70 Degree -6 dB -6 dB 8 Feet 70 Degree NOTE 15 Printed on 100% Recycled Paper Code: 20050508 Print 10K ©2005 Better Music Builder Comments E-mail to [email protected] USA All Right Reserved.