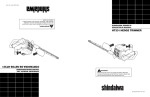
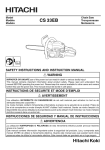
1
SHINDAIWA OWNER'S/
OPERATOR'S MANUAL
357 CHAIN SAW
WARNING!
Shindaiwa Inc.
11975 S.W. Herman Rd.
Tualatin, Oregon 97062
Telephone: 503 692-3070
Fax:
503 692-6696
www.shindaiwa.com
Always wear eye
protection when operating this unit.
WARNING!
Shindaiwa Kogyo Co., Ltd.
6-2-11 Ozuka-Nishi,
Asaminami-Ku, Hiroshima
731-3167, Japan
Telephone: 81-82-849-2220
Fax:
81-82-849-2481
Minimize the risk of
injury to yourself and
others; read this manual
and familiarize yourself
with its contents!
䊚2003 Shindaiwa, Inc.
Part Number 72362-93115
Revision 9/03
Shindaiwa is a registered trademark
of Shindaiwa, Inc.
Specifications subject to change without
notice.
Part Number 72362-93115 Rev. 9/03
35701
NOTES
2
39
Introduction
If other than the parts authorized by Shindaiwa Kogyo Co., Ltd. are used for
maintenance replacements or for the repair of components affecting emission
control, you should assure yourself that such parts are warranted by their
manufacturer to be equivalent to the parts authorized by Shindaiwa Kogyo Co.,
Ltd. in their performance and durability.
OBTAINING WARRANTY SERVICE
All repairs qualifying under this limited warranty must be performed by a
dealer authorized by Shindaiwa Kogyo Co., Ltd.
If any emission-related part is found defective during the warranty period, it is
your responsibility to present the product to an authorized Shindaiwa dealer.
Bring your sales receipts showing the date of purchase for this engine. The
dealer authorized by Shindaiwa Kogyo Co., Ltd. will perform the necessary
repairs or adjustments within a reasonable amount of time and furnish you with a
copy of the repair order. All parts and accessories replaced under this warranty
become the property of Shindaiwa Kogyo Co., Ltd.
To locate an authorized Shindaiwa dealer near you, contact your Shindaiwa
Distributor. For the name and telephone number of the Shindaiwa Distributor in
your area, please call Shindaiwa Inc. at (503) 692-3070 between the hours of 8:00
AM and 5:00 PM Pacific Standard Time.
The Shindaiwa 357 Top-Handle saw
has been designed and built to deliver
superior performance and reliability
without compromise to quality,
comfort, safety, or durability.
Shindaiwa high performance
engines represent the leading edge of
2-cycle engine technology, and deliver
exceptionally high power at remarkably low displacement and weight. As
a professional owner/operator, you'll
soon discover why Shindaiwa is simply
in a class by itself.
Page
Attention Statements ........................... 4
Product Description ............................ 5
Specifications ....................................... 6
Safety Information ............................... 7
Installing the Bar and Chain ............. 11
Adjusting the Saw Chain ................... 13
Mixing Fuel ......................................... 14
Filling the Fuel Tank/Bar Oil ........... 15
Starting the Saw .................................. 16
Carburetor Adjustments .................... 19
IMPORTANT!
The information contained in this
manual describes machines available
at the time of production. While every
attempt has been made to give you
the very latest information about your
Shindaiwa 357 chain saw, there may
be some differences between your
saw and what is described here.
Shindaiwa Inc. reserves the right to
make changes in production without
prior notice, and without obligation to
make alterations to machines previously manufactured.
Chain Brake ........................................ 21
Cutting with the Saw .......................... 23
Routine Maintenance ......................... 27
Long-term Storage ............................. 29
The Saw Chain .................................... 30
Troubleshooting ................................. 33
Emission System Warranty ............... 36
WARNING!
THIS WARRANTY IS ADMINISTERED BY
Shindaiwa Inc.
11975 S.W. Herman Rd.
Tualatin OR. 97062
(503) 692-3070
The engine exhaust from this
product contains chemicals known
to the State of California to cause
cancer, birth defects or orther
reproductive harm.
CN
38
This symbol on the nameplate
means this saw is listed by the
Underwriters Laboratory, Inc.
3
DESCRIPTION
MAINTENANCE, REPLACEMENT OR REPAIR OF EMISSION CONTROL
DEVICES AND SYSTEMS MAY BE PERFORMED BY ANY REPAIR
ESTABLISHMENT OR INDIVIDUAL; HOWEVER, WARRANTY REPAIRS
MUST BE PERFORMED BY A DEALER OR SERVICE CENTER AUTHORIZED
BY SHINDAIWA KOGYO CO., LTD. THE USE OF PARTS THAT ARE NOT
EQUIVALENT IN PERFORMANCE AND DURABILITY TO AUTHORIZED
PARTS MAY IMPAIR THE EFFECTIVENESS OF THE EMISSION CONTROL
SYSTEM AND MAY HAVE A BEARING ON THE OUTCOME OF A
WARRANTY CLAIM.
Contents
Attention Statements
DESCRIPTION
Throughout this manual are special
“attention statments”.
Read and follow the Operator’s
Manual. Failure to do so could
result in serious injury.
Wear eye and hearing
protection at all times during
the operation of this unit.
WARNING!
A statement preceded by the
word “WARNING” contains
information that should be
acted upon to prevent serious
bodily injury.
CAUTION!
A statement preceded by the
word “CAUTION” contains
information that should be
acted upon to prevent
damaging your saw.
IMPORTANT!
A statement preceded by the word
“IMPORTANT” is one that possesses
special significance.
NOTE:
A statement preceded by the word
“NOTE” contains information that is
handy to know and may make your job
easier.
4
Do not operate this tool if you
are tired, ill or under the
influence of alcohol, drugs,
or medication.
Beware of Kickback!
Kickback can occur whenever
the tip of the guide bar touches
an object while the saw is
operating. Kickback may force
the bar up and back toward
the operator with a lightningfast reaction!
Pinching the saw along the
top of the guide bar may force
the bar rapidly back toward
the operator. Pinching can
occur whenever wood closes
in around the moving chain.
All chain saw service, other than the
items listed in the owner's manual
maintenance instructions, should be
performed by trained Shindaiwa
chainsaw service personnel. (For
example, if improper tools are used to
remove the flywheel or if an improper
tools is used to hold the flywheel in
order to remove the clutch, structural
damage to the flywheel could occur
and could subsequently cause the
flywheel to burst).
PARTS COVERED
Listed below are the parts covered by the Federal Emission Design and Defect
Warranty. Some parts listed below may require scheduled maintenance and are
warranted up to the first scheduled replacement of that part. The warranted parts
include:
1. Carburetor Internal Components
• Valve Assembly-throttle, Jet, Metering Diaphram
2. Ignition System Components
• Ignition Coil
• Flywheel Rotor
The emission control system for your particular Shindaiwa engine may also
include certain related hoses and connectors.
LIMITATIONS
The Federal Emission Design and Defect Warranty shall not cover any of the
following:
(a) conditions resulting from tampering, misuse, improper adjustment
(unless they were made by the dealer or service center authorized by
Shindaiwa Kogyo Co., Ltd. during a warranty repair), alteration,
accident, failure to use the recommended fuel and oil, or not performing required maintenance services,
(b) the replacement parts used for required maintenance services,
(c) consequential parts used for required maintenance services,
(d) diagnosis and inspection fees that do not result in eligible warranty
service being performed, and
(e) any non-authorized replacement part, or malfunction of authorized
parts due to use of non-authorized parts.
MAINTENANCE AND REPAIR REQUIREMENTS
You are responsible for the proper use and maintenance of the engine. You
should keep all receipts and maintenance records covering the performance of
regular maintenance in the event questions arise. These receipts and
maintenance records should be transferred to each subsequent owner of the
engine. Shindaiwa Kogyo Co., Ltd. reserves the right to deny warranty coverage
if the owner has not properly maintained the engine. Shindaiwa Kogyo Co., Ltd.
will not deny warranty repairs, however, solely because of the lack of repair,
maintenance or failure to keep maintenance records.
37
The following statement only applies to United States and its territories
Brake Lever/Hand
Guard
Throttle
Lockout Lever
Guide Bar
Rear Handle
Saw Chain
Shindaiwa Kogyo Co., Ltd. warrants to the initial purchaser and each
subsequent owner, that this utility equipment engine (herein engine) is
designed, built and equipped to conform at the time of initial sale, to all
applicable regulations of the U.S. Environmental Protection Agency (EPA),
and that the engine is free of defects in materials and workmanship that would
cause this engine to fail to conform with EPA regulations during its warranty
period. This emission warranty is applicable in all States, except the State of
California.
For parts listed under PARTS COVERED, the dealer authorized by
Shindaiwa Kogyo Co., Ltd. will, at no cost to you, make the necessary
diagnosis, repair, or replacement of any defective emission-related component
to ensure that the engine complies with applicable U.S. EPA regulations.
Fuel Filler Cap
35701
Front Handle
MANUFACTURERS WARRANTY COVERAGE
Throttle
Lockout Lever
When sold within the U.S., this engine’s emission control system is warranted for a period of two (2) years from the date this product is first delivered
to the original retail purchaser.
Starter
Handle
Oil Filler
Cap
Throttle Lockout
Button
OWNER’S WARRANTY RESPONSIBILITIES
As the engine owner, you are responsible for the performance of the required maintenance listed in your owner’s manual. Shindaiwa Kogyo Co., Ltd.
recommends that you retain all receipts covering maintenance on your engine,
but Shindaiwa Kogyo Co., Ltd. cannot deny a warranty claim solely for the lack
of receipts or for your failure to ensure the performance of all scheduled
maintenance.
As the engine owner, you should however be aware that Shindaiwa Kogyo
Co., Ltd. may deny your warranty coverage if your engine or a part has failed
due to abuse, neglect, improper maintenance or unapproved modifications.
You are responsible for presenting your engine to the nearest dealer
authorized by Shindaiwa Kogyo Co., Ltd. when a problem exists.
If your Shindaiwa Dealer is unable to answer questions regarding your
warranty rights and responsibilities, you should then contact your Shindaiwa
Distributor.
For the name and telephone number of the Shindaiwa Distributor in your
area, please call Shindaiwa Inc. at (503) 692-3070 between the hours of 8:00
AM and 5:00 PM Pacific Standard Time.
36
35702
Muffler
Outlet
Clutch
Cover
35723
Throttle Trigger
Ignition Switch
IMPORTANT!
The operational procedures described in this manual are intended to
help you get the most from your
machine and also to protect you and
others from harm. These procedures
are general guidelines only, and are
not intended to replace any safety
rules/laws that may be in force in
your area.
If you have any questions regarding
your 357 chainsaw, or if you do not
understand something in this manual,
your Shindaiwa dealer will be glad to
assist you.
5
DESCRIPTION
Shindaiwa Kogyo Co., Ltd.
Federal Emission Design And Defect Limited Warranty
Utility And Lawn And Garden Engines
Product Description
Specifications
Troubleshooting
DESCRIPTION
ADDITIONAL PROBLEMS
Model ....................................................................................................................... 357
Possible Cause
Remedy
Clogged air cleaner.
Clean the air cleaner element.
Clogged fuel filter.
Replace the fuel filter.
Chain brake engaged
Inspect and/or test brake.
Consult with an authorized
servicing dealer.
Carburetor mixture
too rich or too lean.
Adjust carburetor.
Idle speed set too low.
Adjust: 2,600-3,000 RPM (min-1)
Spark arrester clogged
Clean spark arrester.
(See page 29).
Switch turned off.
Set the switch to “I” (ON), re-start.
Fuel tank empty.
Refuel.
Oil tank capacity .................................................................................. 210 ml (7.1 oz)
Clogged fuel filter.
Clean or replace filter as required.
Front/Rear Handles .............................................. Special anti-vibration mountings
Water in the fuel.
Drain; replace with clean fuel.
Cooling system ........................................................................................... Forced air
Safety devices .......... Front guard, throttle lock, chain catcher and inertial brake
Shorted spark plug or
loose terminal.
Clean and replace spark plug.
Tighten the terminal.
Weight (less bar and chain) ............................................................... 4.2 kg (9.3 lbs)
Ignition failure.
Tools Included
Piston seizure.
Consult with an authorized
servicing dealer.
Consult with an authorized
servicing dealer.
Engine Type ................................................................ 2 cycle air cooled gas engine
Displacement .............................................................................. 35.5 cc (2.17 cu.in.)
Fuel ..................... Gasoline-Oil Mixture—50:1 with Shindaiwa 2-cycle Mixing Oil
Symptom
Poor
acceleration.
Carburetor ......................................................... Diaphragm (WALBRO Model WT)
Ignition ...................................................... All transistor electronic ignition system
Spark Plug .......................................................................................... Champion CJ6Y
................................................................. For EMC compliance use NGK BPMR7A
Starting ...................................................................................................... Auto-rewind
Stopping ............................................................................ Grounding (toggle switch)
Power transmission ...................................................... Automatic centrifugal clutch
Chain lubrication ........................................................ Automatic clutch-driven oiler
Chain ..................................................................................... 3/8" pitch, gauge 0.050"
Chain oil ................ Shindaiwa brand premium Bar and Chain Oil (or equivalent)
Engine stops
abruptly.
Fuel tank capacity ............................................................................... 265 ml (9.0 oz)
■ Screwdriver
WARNING!
■ Spark plug/13 mm socket wrench
■ 4 mm hex wrench
■ 5 mm hex wrench
Do not make unauthorized modifications to this saw, guide bar, or
chain!
Test and replace as required.
Overheating due to
incorrect spark plug.
Correct plug:
Champion CJ6Y. For EMC
compliance use NGK BPMR 7A
Overheated engine.
Idle engine until cool.
Chain rotates
at idle speed.
Engine idle too high.
Set idle: 2,600-3,000 RPM (min-1).
Broken clutch spring
or shoe.
Replace spring/shoes as
required.
Excessive
vibration.
Worn or damaged
sprocket, chain or bar.
Inspect and replace chain
components as required.
Bent crankshaft.
Consult with an authorized
servicing dealer.
RECOMMENDED BAR AND CHAIN COMBINATIONS
Part Number
Size
Chain
12-inch Oregon威 91 VG-45X
14-inch Oregon威 91 VG-53X
16-inch Oregon威 91 VG-57X
6
Bar
36120-12
36349-14
36450-16
WARNING!
Replacement chain for
this saw must meet applicable
ANSI B175.1-2000 kickback
performance requirements,
and/or be designated as “low
kickback chain” per ANSI
B175.1-2000 standards.
TROUBLESHOOTING
Ground (stop) wire is
disconnected, or switch
is defective.
Engine difficult
to shut off.
35
Troubleshooting
Kickback Safety
DESCRIPTION
LOW POWER OUTPUT
What To Check
Is the engine
overheating?
Engine is rough
at all speeds.
May also have
black smoke
and/or unburned
fuel at the
exhaust.
Possible Cause
Remedy
Operator is overworking
the machine.
Cut at a slower rate. Sharpen
the chain as required.
Carburetor mixture is
too lean.
Adjust the carburetor.
Improper fuel ratio.
Re-fill with fresh fuel of the
correct mixture (gasoline
and Shindaiwa 2-cycle
Mixing Oil, 50:1 ratio).
Fan, fan cover, cylinder
fins dirty or damaged.
Clean, repair or replace
as necessary.
Clogged air cleaner.
Service the air cleaner.
Loose or damaged
spark plug.
Tighten or replace.
Air leakage or clogged
fuel line.
Repair or replace
filter and/or fuel line.
Water in the fuel.
Replace the fuel.
Piston seizure.
Consult with an authorized
servicing dealer.
Faulty carburetor and/or Consult with an authorized
diaphragm.
servicing dealer.
Engine is
knocking.
Carbon deposits on the
piston or in the muffler.
Consult with an authorized
servicing dealer.
Overheating condition.
See above.
Improper fuel.
Check fuel octane rating;
check for presence of
alcohol in the fuel.
Refuel as necessary.
TROUBLESHOOTING
Carbon deposits in the
combustion chamber.
34
Consult with an authorized
servicing dealer.
WARNING!
Kickback can
happen lightningfast!
35703
This saw is equipped with the following
safety equipment:
■ Operator activated and Inertial
■ “Low kick” chain. When used in
type chain brake. In the event of
combination with the appropriate
kickback, kickback energy either
guide bar, low kick chain signififorces the brake lever against the
cantly reduces the effects of
operator's hand when the saw is
kickback.
held as illustrated above activating
the chain brake and/or inertia
WARNING!
causes chain brake activation.When
the brake is activated, a springBrake engagement and
loaded brake band is applied against
operation depends upon proper
the chain drive mechanism, stopinspection and maintenance
ping the chain rotation.
procedures! For correct procedures, see page 21.
WARNING!
To reduce the risk of kickback, all
of the above devices must be
properly installed and in good
repair. Use of other than ANSI
B175.1-2000 bar and chain
combinations may result in
reduced kickback protection!
WARNING!
Never operate this or any
other chain saw with only one
hand! One-handed operation
could cause serious injury to the
operator, helper, or any nearby
observers! A chain saw is intended for two-handed operation!
7
DESCRIPTION
Kickback Safety Precautions
Troubleshooting
ENGINE DOES NOT START
WARNING!
Either of the following reactions
could cause you to lose control of
your saw while cutting, possibly
resulting in serious injury!
1. Kickback can occur whenever the
guide bar nose or tip contact an
object while the saw is running.
Tip contact may cause the guide
bar to kick upward and back
toward the operator, with a
lightning-fast reaction!
2. Pinching the saw along the top of
the guide bar may push the guide
bar rapidly back toward the
operator! Pinching can occur
whenever wood closes in around
the moving chain!
Do not rely exclusively on the safety
devices incorporated with your saw.
As a chain saw user, observing the
following steps will also help you to
avoid accident or injury on the job:
■ Sudden surprise can contribute to
accidents! With a basic understanding of kickback, you can
reduce or eliminate the element of
surprise.
■ Clear obstructions from the work
area before cutting. Remove any
log, branch, or other obstruction
that might contact the guide bar
tip during cutting operations.
■ Accelerate the saw before the
chain contacts the work area, and
always maintain high engine
speeds throughout the cut.
■ Do not overreach or attempt to cut
above shoulder height.
■ Follow the manufacturer's
instructions for sharpening and
maintenance of the saw chain.
■ Use only the replacement bar and
chain combinations specified by
the manufacturer.
■ Never stand directly over the saw
while cutting!
■ Use low-kickback chain, chain
brakes, or special guide bars to
reduce the risk of kickback. Low
kickback chain is chain that has
met the kickback performance
requirements of ANSI B175.12000 (American National Standard
for Power Tools-Gasoline Powered
Chain Saws-Safety requirements)
when tested on the representative
sample of chain saws below 3.8
c.i.d. specified in ANSI B175.12000.
Possible Cause
Remedy
Faulty recoil starter.
Fluid in the crankcase.
Internal damage.
Consult with an authorized
servicing dealer.
NO
Loose spark plug.
Excess wear on
cylinder, piston, rings.
Tighten and re-test.
Consult with an authorized
servicing dealer.
NO
Stale, or contaminated
fuel mixture.
Re-fill with fresh fuel of
the correct mixture
(gasoline and Shindaiwa
2-cycle Mixing Oil
at a 50:1 ratio).
Check for clogged fuel
filter and/or vent.
Clean as required;
restart.
Is the ignition
switch ON?.
Faulty ignition ground.
Faulty ignition unit.
Move switch to “I” (ON)
position and re-start.
Consult with an authorized
servicing dealer.
If the plug is wet, excess
fuel may be in the
cylinder.
Crank the engine with the
plug removed, replace the
plug, and re-start.
The plug is fouled
or improperly gapped.
Clean and re-gap the plug to
0.024 inch (0.6 mm). Re-start.
The plug is damaged
internally or of the
wrong size.
Replace the plug with a
Champion CJ6Y. Re-start.
For EMC compliance use
NGK BPMR 7A
Does the engine NO
crank?
YES
Good
compression?
YES
Does the tank
contain fresh
fuel of the
proper grade?
YES
Is fuel reaching NO
the cylinder and
combustion
chamber?
YES
Is there spark at NO
the spark plug
wire terminal?
YES
Check the
spark plug.
33
TROUBLESHOOTING
8
■ Grip the saw firmly with your right
hand on the rear handle and your
left hand on the front handle,
thumbs and fingers encircling the
handles, whenever the saw is
running. Don't let go: A firm grip
will help you to reduce kickback
while maintaining control of the
saw.
What To Check
Sharpening the Chain (cont.)
DESCRIPTION
Additional Safety Precautions
Correct Filing Technique
Correct angle on
top plate
Slightly protruding hook
or point (curve on nonchisel chain)
A
Top of depth
gauge at correct
height below top
plate
CHN-08
A=B
B
NOTE:
CHN-01
Keep all cutter lengths equal
Front of depth
gauge rounded
Filing Problems
Top plate angle Cause
less than
File held at less than
recommended recommended angle.
CHN-06
30°
Hook in side
plate cutting
edge
CHN-02
MAINTENANCE
High depth
gauge
CHN-04
32
Result
Slow cutting. Requires extra
effort to cut.
Remedy
File cutters to recommended
angle.
WARNING!
0.020"
Top plate angle Cause
more than
File held at more than
recommended recommended angle.
CHN-07
60°
Cause
File held too low or the file
was too small.
Result
Rough cutting. Chain grabs.
Cutters dull quickly or won’t
hold a cutting edge.
Remedy
File cutters at recommended
angle. Check file size.
Backslope on
side plate
cutting edge
Cause
Depth gauge never filed.
Result
Slow cutting. Must force
chain to cut. Will cause
excessive wear on the cutter
heel.
Remedy
Lower gauges to recommended setting.
Low depth
gauge
CHN-03
CHN-05
Result
Cutting angle is very sharp
but will dull fast. Cutting
action rough and erratic.
Remedy
File cutters to recommended
angle.
Cause
File held too high or the file
was too large.
Result
Cutters won’t feed into wood.
Slow cutting. Must force
chain to cut. Causes
excessive bottom wear.
Remedy
File cutters at recommended
angle. Check file size.
These safety precautions are
intended primarily for consumers or
occasional users. When using this
chain saw for logging purposes, refer
to: CFR Section 1910. 266 (5); 2.5.1
of the American National Safety
Standard; Requirements for Pulpwood Logging ANSI 03.1-1978; and
any applicable state safety codes.
■ Never operate this chain saw with
one hand! One-handed operation
could cause you to lose control,
causing serious injury to yourself
or others! A chain saw is intended
for two-handed use.
■ Wear safety footwear, snug-fitting
clothing, protective gloves, and
eye, hearing, and head-protection
devices while working with this
chain saw.
■ Do not allow other persons to be
near the chain saw when starting
or running the chain saw. Keep
bystanders and animals out of the
work area.
■ Never allow young children or any
person unfamiliar with chain saws
to operate this saw!
■ Clear the work area before using
the saw. Never start cutting until
you are sure you have a secure
footing and have planned a retreat
path from the falling tree.
■ Before starting the saw engine,
make sure nothing is touching the
saw chain.
■ Keep all parts of your body away
from the saw chain whenever the
engine is running!
■ Stop the engine before carrying
the saw. Carry the saw with the
engine stopped, the guide bar and
saw chain pointing to the rear, and
the engine muffler away from your
body.
■ Never operate this chain saw if
you are fatigued.
■ Stop the engine before setting the
chain saw down.
Cause
Wrong gauge setting or no
gauge used.
Result
Rough cutting. Chain grabs.
Saw won’t pull chain through
wood. Excessive wear on the
cutter heel.
Remedy
If depth gauges are too low,
the chain is no longer
serviceable.
9
DESCRIPTION
Additional Safety Precautions (cont.)
Sharpening the Chain
WARNING!
■ Install the appropriate guide-bar
scabbard before transporting the
saw.
■ Never operate a saw that is
damaged, improperly adjusted, or
not completely and securely
assembled.
■ Use only Shindaiwa-recommended
parts when repairing or servicing
this saw.
■ Do not use this saw if the saw
chain continues to move after the
throttle control trigger is released.
■ Use extra care when cutting a
limb that is under tension! A limb
under tension could spring back
suddenly, causing you to lose
control of the saw!
■ Use extreme caution when cutting
smaller brush and saplings! Smalldiameter material may catch in the
chain and be whipped toward you
or pull you off balance, causing
you to lose control of the saw!
■ Never operate any saw while in a
tree unless you have been specifically trained to do so!
Using a filing gauge
■ Never perform service or repairs
to this saw unless you are specifically trained and equipped to do
so!
■ Improper maintenance, use of
nonconforming replacement
components, or the removal of
safety devices, such as the chain
brake or any of the chain brake
components, could result in
serious injury.
Using a depth
gauge joiner
CHN-19
■ Never allow any part of your body
near the clutch cover of an
operating saw.
■ Never operate a saw with damaged or missing anti-vibration
cushions. Long-term exposure to
vibration can damage your hands.
■ Always maintain a firm footing
while operating this saw! Ladders
and other temporary platforms can
shift unexpectedly, and are not
recommended!
Using a flat file to round
the front corner on a
depth gauge
Sharpening Technique
1. Using a 5/32" round file, sharpen all
cutters to a 30° angle .
IMPORTANT!
File all cutters to the same angle and
depth! Unequal filing may cause the
saw to vibrate or cut erratically!
NOTE:
For consistent filing angles, use a filing
guide such as Oregon姞
p/n 37534 or equivalent.
10
CHN-18
2. After all cutters are sharpened, use
a depth gauge joiner (Oregon姞
p/n 106738 or equivalent) to
measure the height of each depth
gauge.
3. As required, lower the depth gauges
to a height of 0.020"
(0.5 mm). Use a flat file; Oregon威 p/
n 12211 or equivalent.
4. After all depth gauges have been
adjusted, use a flat file to round each
depth gauge leading edge to its
original curvature and angle.
31
MAINTENANCE
■ Operate the saw only in a well
ventilated area.
■ Keep the saw handles dry, clean
and free of oil or fuel mixture.
Saw Chain
Installing and Adjusting the Guide Bar and Saw Chain
a
PRESS
DOWN
Pull back
35705
ASSEMBLY
b
CHN-09
35707
35706
1. Remove the clutch
cover nuts.
3. Remove the clutch
cover
1.
2.
3.
4.
IMPORTANT!
Your saw’s performance on the job
depends greatly on the condition of its
saw chain.
How the saw chain works
MAINTENANCE
As the chain is pulled through the
wood:
1. The depth gauge determines the
depth of cut for the cutter.
2. The cutter’s leading edge enters
the wood, causing the entire cutter
to “rock back” and lift away from
the bar.
3. The top plate peels the severed
wood chip away.
4. The chip is discharged out the rear
of the cutter.
IMPORTANT!
Most of the actual cutting is done by
the sides and corners of the individual
cutters.
The chain brake must be completely
disengaged before removing or
installing the clutch cover!
1. Use the 13 mm socket wrench to
remove the clutch cover nuts. Turn
the nuts counter-clockwise to
remove.
2. Slide the rubber stopper downward
and unhook the support arm from
the brake lever (see illustration
below).
2. Unhook the brake lever
support arm.
3. Disengage the clutch cover retaining hook by pressing the cover as
shown, and then remove the clutch
cover.
4. Remove and discard the packing
spacer.
5. Place the guide bar over the guide
bar studs and chain tensioner pin. If
necessary, turn the chain tension
screw in or out until the loop slips
easily over the guide bar tip.
Continued on next page.
Stopper
30
11
Installing and Adjusting the Guide Bar and Saw Chain
Brake lever
support arm
57704
4. Remove the
packing spacer.
Long Term Storage
Hard starting or a gradual loss of
performance can be caused by carbon
deposits lodged in the spark arrester
screen. For maximum performance,
the spark arrester screen should be
periodically cleaned as follows:
(over 30 days)
1. Unscrew the two clutch cover nuts,
and remove the clutch cover (see
page 11).
ASSEMBLY
2. Use a screwdriver to remove the
two spark arrester retaining
screws, and then remove the spark
arrester cover and screen.
35708
5. Install the
guide bar.
Spark Arrester
Tensioner Pin
Spark
Arrester
Cover
Top of Bar
■ Thoroughly clean the saw exterior.
■ Remove all chips and other debris
from the cylinder fins and cooling
passages.
■ Drain the fuel tank, and then clear
the carburetor and lines by running
the saw until it stops from lack of
fuel.
CAUTION!
Never store the saw with any fuel
remaining in the tank, fuel lines, or
carburetor!
Your Shindaiwa warranty does not
include coverage for damage caused
by “stale” or contaminated fuels!
BAR
TIP
■ Drain any remaining bar oil from
the oil reservoir.
CHN-14
Bottom of Bar
35722
6. Install the
chain loop.
35709
6. Install the chain loop over the drive
sprocket, and then align the chain
drive links within the guide bar
groove. Make sure the cutters are
properly oriented.
12
WARNING!
Never start the engine
without the clutch cover
installed!
7. Install the clutch cover over the two
bar studs, and then engage the
brake lever and support arm. Install
the two 13 mm bar nuts and tighten
finger-tight only.
Spark Arrester
Screen
3. Use a plastic scraper or wire brush
to remove carbon deposits from the
arrester screen and cover.
■ Remove, clean, and reinstall the air
filter element as described under
“Daily Maintenance’’.
4. Inspect the screen carefully, and
replace any screen that has been
perforated, distorted, or is otherwise unserviceable.
■ Repair or replace any damaged
components as required, and then
store the machine in a clean, dry,
dust-free area.
5. Install the screen and cover in the
reverse order of disassembly, and
then tighten the two cover retaining
screws securely.
6. Install the clutch cover and cover
retaining nuts in the reverse order
of removal, and then tighten both
nuts securely.
29
MAINTENANCE
CAUTION!
Failure to align the guide bar and
chain tensioner pin as shown can
cause serious damage to the
clutch cover, guide bar, tensioner
pin and/or engine crankcase!
Engine
Muffler
■ Remove the spark plug, and then
pour about 1/4-oz of 2 cycle mixing
oil into the cylinder through the
spark plug hole. Before reinstalling
the spark plug, slowly pull the recoil
starter 2 or 3 times to distribute the
oil over the cylinder walls.
10/15 Hour Maintenance
40/50 Hour Maintenance
■ Replace the spark plug with a
Champion CJ6Y (or equivalent),
gapped to 0.024" (0.6 mm). For EMC
compliance use NGK BPMR 7A.
35719
■ Remove and clean the spark plug.
Adjust the spark plug gap to 0.024"
(0.6 mm), and reinstall. If a torque
wrench is available, torque the plug
to 148–165 in.-lbs. Replace a
damaged or visibly worn plug with
a Champion CJ6Y or For EMC
compliance use NGK BPMR 7A.
MAINTENANCE
■ Remove the guide bar and chain.
Carefully inspect the drive sprocket
for wear or damage, and replace if
needed. Inspect the guide bar
grooves and tip for wear or damage, and repair or replace components as required.
IMPORTANT!
Always replace the drive sprocket and
cutting chain loop as a set! For
economy, rotate the same 2 or 3
chains daily. When these chains are
worn out, replace both the chains and
the sprocket at the same time.
28
Chain
Adjusting
Screw
■ Extract the fuel filter from inside the
fuel tank. Remove and wash both
filter elements in clean fuel. If you
discover damage or deterioration to
the fuel lines or other fuel system
components, remove the saw from
service until it can be inspected by a
Shindaiwa-trained service technician.
57707
35710
Check the gap between chain side
plates and the bar rail
Turn clockwise to tighten
the chain (extend the
guide bar)
35720
IMPORTANT!
Proper chain adjustment is essential
for maximum performance, chain life,
and operator safety. Always inspect
chain tension before operating the saw!
NOTE:
CAUTION!
The fuel line can be punctured or
torn by careless handling! Never
use sharp or jagged-edged tools to
extract the fuel line.
For longest chain life, place new or
replacement chain loops in oil and soak
overnight before installation.
8. Place the saw on a flat surface, and
lift the bar nose slightly.
9. To adjust chain tension:
■ turn the chain tension screw
clockwise to tighten the chain.
■ turn the chain tension adjuster
counter-clockwise to loosen the
chain.
■ Hard-nose Guide Bar Gently lift
the chain at about mid-bar. Tension
is correct when there is a gap of
3–3.5 mm (about 0.125") between
the chain side plates and the bar
rail.
■ Sprocket-nose Guide Bar The
chain should be adjusted slightly
tighter than on a hard-nose bar, but
must still pull freely around the bar.
10.Tighten both bar nuts securely,
making sure chain adjustment is
correct for the type of bar installed.
Adjusting Chain Tension in the
Field Stop the saw, loosen both bar
nuts about 1 turn each, then repeat
Steps 8 through 10 (above). Never
operate the saw when the chain is
loose!
WARNING!
Inspect chain tension
often during operation,
especially when breaking in a new
chain. A loose saw chain can
unexpectedly jump the guide bar
during operation, possibly causing
serious personal injury!
13
OPERATION
CAUTION!
Incorrect spark plug installation
can result in serious engine
damage!
Never allow chips or other
debris to enter the cylinder bore!
Before removing the spark plug,
thoroughly clean the spark plug
and cylinder head area!
Installing and Adjusting the Guide Bar and Saw Chain
Mixing Fuel/Filling With Fuel
Daily Maintenance
CAUTION!
WARNING!
OPERATION
Minimize the risk of fire burns and
personal injury!
■ STOP engine before refueling.
■ ALWAYS allow the engine to
cool before refueling!
■ ALWAYS open the fuel cap
slowly to allow any pressure
build-up in the tank to release
fuel vapor slowly.
■ Wipe all spilled fuel and move
the engine at least 10 feet (3
meters) from the fueling point
and source before restarting!
■ NEVER start or operate this
unit if there is a fuel leak.
■ NEVER start or operate this
unit if the carburetor, fuel lines,
fuel tank and/or fuel tank cap
are damaged.
■ NEVER smoke or light any
fires near the engine or fuel
source!
■ NEVER place any flammable
material near the engine
muffler!
■ NEVER operate the engine
without the muffler and spark
arrester in good working condition.
1. Use only fresh, clean unleaded
gasoline with a pump octane rating
of 87 or higher.
2. Mix fuel with a 2-cycle engine oil
designed for use in high-performance 2-cycle air-cooled engines.
14
䡵 Generic engine oil and marine
engine oil may not be intended
for use in high-performance 2cycle engines and should never
be used in Shindaiwa engines.
Engine oils not intended for use
high-performance air-cooled 2cycle engines can cause
excessive carbon deposits,
reduce engine life and/or cause
engine failure.
WARNING!
Before performing any
maintenance on this saw,
stop the engine and disconnect
the spark plug wire!
■ Remove dirt and debris from the
saw exterior, cylinder fins, and
cooling air intake.
■ Inspect the saw for fuel and oil
leaks. Repair as necessary.
35718
NOTE:
Shindaiwa offers two performance
levels of 2-cycle air-cooled engine oils,
Shindaiwa 2-Cycle Engine Oil and
Shindaiwa ONE High Performance 2Cycle Engine Oil. Shindaiwa 2-Cycle
Engine Oil is designed to meet the
lubrication demands of most 2-cycle
air-cooled engines. Shindaiwa ONE
High Performance 2-Cycle Engine Oil
is recommended when superior
lubrication is needed to help protect
engines used in severe operating
conditions. Shindaiwa ONE also
contains a fuel stabilizer to help
maintain fuel quality when fuel is
stored longer than 30 days.
■ Remove
the air
cleaner
cover and
element.
Wash both
parts with
soap and
water. Let
dry before
reassembly.
CAUTION!
Never allow chips or other debris to
enter the carburetor bore! Avoid
forcing dirt into the air filter
element! When using compressed
air to dry the element, blow only on
the inside (carburetor side) face of
the element!
■ Sharpen and adjust the chain as
required.
■ Clean the guide bar groove and oil
hole. Inspect the bar groove and tip
for damage or unusual wear. Repair
or replace components as necessary.
■ Inspect the entire saw for damage,
including loose or missing components or fastenings. Repair as
necessary.
27
MAINTENANCE
IMPORTANT!
Shindaiwa high-performance 2-cycle
engines are designed to operate on a
50:1 mixture of unleaded gasoline
and 2-cycle engine oil. Using a fuel
mixture less than 50:1 ratio (such as
80:1 or 100:1) can cause catastrophic engine failure!
䡵 Some types of gasoline contain
alcohol. Never use any type of
gasoline containing more than
10% alcohol by volume! More
than 10% alcohol by volume
may affect the lubricating
qualities of 2-cycle engine oils
reducing engine life and/or
causing engine failure.
IMPORTANT!
MAINTENANCE, REPLACEMENT,
OR REPAIR OF EMISSION CONTROL DEVICES AND SYSTEM MAY
BE PERFORMED BY ANY REPAIR
ESTABLISHMENT OR INDIVIDUAL.
HOWEVER, WARRANTY REPAIRS
MUST BE PERFORMED BY A
DEALER OR SERVICE CENTER
AUTHORIZED BY SHINDAIWA
KOGYO, LTD. AND USE OF PARTS
THAT ARE NOT EQUIVALENT IN
PERFORMANCE AND DURABILITY
TO AUTHORIZED PARTS MAY
IMPAIR THE EFFECTIVENESS OF
THE EMISSION CONTROL SYSTEM
AND MAY HAVE A BEARING ON
THE OUTCOME OF THE WARRANTY CLAIM.
Bucking
Mixing Fuel/Filling With Fuel (cont.)
WARNING!
Always cut downed timber from the uphill side of the tree!
Downed timber may shift or roll unpredictably during cutting or
handling. Be alert for potential injury from rolling or shifting logs!
First Cut
Second Cut (overbuck)
CHN-12
3. Refer to following chart for
examples of 50:1 fuel to oil mix
quantities.
5. Remove the fuel cap and fill the tank
with clean, fresh 2-cycle fuel mix.
Avoid overfilling and fuel spillage.
4. Place the saw on a hard surface with
the fuel cap up and wipe any chips
or debris from around the fuel cap.
6. Wipe any spilled fuel and move the
saw at least 10 feet (3 meters) from
the fueling point before starting the
engine.
Gasoline
2-cycle oil
U.S. Gal.
U.S. fl. oz.
1 gal. ................ 2.6 oz.
2 gal. ................. 5.2 oz.
2.5 gal. .............. 6.4 oz.
5 gal. ................. 12.8 oz.
Gasoline
2-Cycle Oil
liters
milliliters
2.5 l ................... 50 ml
5 l ...................... 100 ml
10 l .................... 200 ml
20 l .................... 400 ml
Second Cut
CHN-13
If the log is well supported, start your
cut from the top of the log. Keeping
the guide bar parallel to the ground,
cut straight down but do not allow the
saw to cut into the ground.
Cutting downed timber, or “bucking,”
increases the possibility of the wood
settling and pinching the guide bar.
Driving one or more soft plastic or
wooden bucking wedges can help
prevent bar-pinching during a cut.
First Cut (underbuck), about
1/3 tree diameter
Use two cuts when bucking the
outboard end of an unsupported log.
Your first cut should be an underbuck. Cut the underbuck about 1/3
the diameter of the tree, then move to
the top of the log and finish the cut by
bucking down (overbucking) to the
first cut.
WARNING!
Do not overreach or
attempt to cut above
shoulder height!
NOTE:
When cutting unsupported logs or
limbs, starting with an underbuck cut
will minimize the possibility of the
wood splitting during the bucking cut.
Use two cuts when bucking near the
inboard end of an unsupported log.
■ Make the first cut as an underbuck
about 1/3 the diameter of the log.
■ Finish the job from above with an
overbuck joining the first cut.
26
䡵 When Shindaiwa oil is not available,
use a premium 30-weight oil
specifically blended for bar & chain
lubrication.
35711
Fuel Cap
Oil Cap
䡵 For cold weather operation, bar oil
may be thinned by mixing with
clean kerosene at a ratio of 1:1.
Filling the Oil Reservoir
䡵 Filling the Oil Reservoir Place the
saw on its side (clutch cover
down), and wipe any chips or
debris from around the oil cap.
䡵 Remove the oil cap at the front of
the saw.
LIMBING
Limbing a standing tree is usually
accomplished in the same manner as
bucking, with a third and final cut used
to remove the remaining stub of the
limb.
Oil Requirements
䡵 When available, use Shindaiwa
Premium bar & chain oil.
䡵 Fill the oil reservoir with bar &
chain oil, and replace the cap.
䡵 Wipe spilled oil from handles and
controls before starting the saw.
CAUTION!
Proper lubrication is critical to
the performance and service life
of your saw's oil pump, guide
bar, and saw chain! Always use
a high quality lubricating oil
designed for saw chain lubrication! Never use dirty or reclaimed oil!
15
OPERATION
OPERATION
NOTE:
Bar Oil/Filling With Oil
Preparing to Start the Saw
Felling Trees (cont.)
Throttle Lock
Button
Throttle Lockout
Lever
Throttle
Trigger
Felling Small Trees
(less than 6 inches in diameter)
1. Determine the direction of fall. If
you are uncertain as to direction of
fall, use the procedure “Falling
Large Trees”.
Ignition
Switch
35712
2. Start cutting on the side of the tree
away from the direction of fall, and
make a single felling cut all the way
through the tree.
3. Stop the saw and put it down on the
ground.
4. Use your retreat path to exit the
area quickly.
Felling Large Trees
(more than 6 inches in diameter)
IMPORTANT!
Engine ignition is controlled by a twoposition “ON-OFF” switch located
below the throttle lever. This switch is
labeled “I” for ON and “O” for OFF.
Control Positions (cold engine)
1. Switch the ignition ON
(“I” position).
2. Choke the engine by pulling the
choke control all the way out (choke
is closed).
3. Set the throttle to “fast idle” by
performing the following:
■ Depress the throttle lockout lever.
■ Squeeze the throttle trigger.
■ Press and hold the throttle lock
button while releasing the throttle
trigger.
16
Pull the choke
control out to
close.
35713
Control Positions (warm engine)
■ Set the throttle to “fast idle” (as
discribed in step 3).
IMPORTANT!
The throttle lever cannot be moved
without first depressing the lockout
lever.
If a tree is otherwise healthy and not
seriously out of balance, its direction of
fall can often be encouraged by first
“notching” the tree on the side facing
the desired direction of fall.
After the notch is completed, start
the felling cut slightly higher and on
the opposite side of the tree, away from
the direction of fall.
The goal of this method is to leave a
sturdy wooden “hinge” on which the
tree will pivot while it’s falling.
5. Stop the saw, and put it down.
6. Use your retreat path to exit the
area quickly.
WARNING
Failure to leave a wooden
hinge during the felling or
“back cut” can cause the tree to
pinch the saw’s guide bar, and may
also change the direction of fall!
Always make the felling cut
parallel to the bottom cut! An
angled falling cut may cause the
tree to split, possibly changing the
direction of fall!
OPERATION
OPERATION
WARNING!
The saw chain will rotate
when the saw is started!
Clear a safe work area before
starting the saw!
NOTE:
If the felling cut appears to be closing
on the bar, use a mallet to drive one or
two plastic or wooden wedges into the
cut behind the bar.
Direction of
Fall
Hinge
Notch
Felling
Cut
1. Determine the direction of fall.
2. On the side of the tree facing the
direction of fall, make a single 90°
cut through about 1/3 the tree’s
diameter.
CHN-11
Felling Large Trees
3. Make a second cut at a 45° angle to
the first cut to remove a notch from
the tree.
4. Make the final felling cut on the
opposite side of the tree about 2
inches above the bottom of the
notch.
25
Felling Trees
Starting the Saw
NOTE:
The Shindaiwa 357 Chain Saw is
equipped with a sliding trigger extension to improve comfort when operating the saw in a variety of hand grip
positions. When not needed, keep the
extension retracted.
Escape 45°
Path
45°
Direction
of Fall
CHN-10
Trigger Extended
Before Felling a Tree
1. Determine the direction of fall by
inspecting:
■ Tree shape and angle of lean.
■ Size, shape and placement of
limbs.
■ Location of nearby trees or other
obstacles.
Trigger Retracted
■ Condition of the tree (damage,
disease, etc.).
2. Clear a safe work area around the
tree. Be alert for loose or dead limbs
overhead. Clear an appropriate
escape path approximately 45° from
the direction of fall.
3. Notify nearby workers of your
intentions!
1. Place the saw on the ground.
When the engine starts:
2. Secure the saw firmly as shown.
1. Push the choke control all the way
in (choke is open).
3. Grip the starter handle with your
right hand, pull the starter cord
slowly until you feel the starter
engage, then…
4. Start the saw by pulling the starter
cord upward rapidly.
CAUTION!
The recoil starter can be easily
damaged by abuse!
■ Never pull the starter cord to its
full length.
■ Always engage the starter
before cranking the engine.
■ Always rewind the starter cord
slowly.
24
2. If the engine did not continue to
run, pull the recoil again.
3. As the engine starts, clear excess
fuel from the combustion area by
revving the engine several times.
WARNING!
The saw chain will move
as the engine accelerates!
4. Operating the throttle will automatically disengage the fast-idle setting.
If the engine does not start:
Repeat the appropriate starting
procedure for a hot or cold engine. If
the engine still will not start, follow the
“Starting a Flooded Engine” procedure
(next page).
17
OPERATION
OPERATION
■ Prevailing wind direction.
35717
35714
Starting a Flooded Engine
Cutting with the Saw
1. Disconnect the spark plug lead,
then use the spark plug wrench to
remove the spark plug (turn
counter-clockwise to remove).
IMPORTANT!
THINK SAFETY!
2. If the spark plug is fouled or is
soaked with fuel, clean or replace
the plug as required. For correct
spark plug size and gapping
procedure, see page 26.
Stop the saw before moving it
from the work area.
Clear a safe work area
before cutting.
Always wear hearing
protection (ear plugs or ear
muffs) to protect your
hearing
3. Clear excess fuel from the combustion chamber by cranking the
engine several times while the
spark plug is removed.
4. Replace the spark plug and tighten
it firmly with the spark plug
wrench. If a torque wrench is
available, torque the spark plug to
140–165 inch-pounds (170–190
kgf ● cm).
Use full throttle while cutting! Forcing
the saw into the work reduces cutting
performance and also increases
operator fatigue!
Always wear eye
protection such as a face
shield or goggles.
Always wear gloves
when operating the
saw.
35719
Use full-throttle while
cutting, and apply
only enough bar
pressure to maintain
engine speeds of
7000-8000 rpm.
OPERATION
OPERATION
CAUTION!
Incorrect spark plug installation
can result in serious engine
damage!
Wear close-fitting
clothing to protect your
legs and arms. Do not
wear clothing or jewelry
that could get caught in
machinery or brush.
5. Repeat the starting procedure for a
warm engine.
6. If the engine still fails to fire or
start, refer to the troubleshooting
chart at the end of this manual.
Stopping
Turn the switch ”OFF‘‘ after idling at
low speed for 1 to 2 minutes.
Never operate with a loose
cutting chain!
Never operate the saw if
fastenings are loose or
missing!
Never operate the saw if any
component parts are damaged, loose, or missing!
35716
Keep a proper footing—do
not overreach!
Wear appropriate
non-skid footwear.
18
23
Chain Brake (cont.)
Carburetor Adjustments
Chain Brake Maintenance
■ Keep the brake mechanism clean
and free of sawdust or debris.
High-speed Mixture Adjustment Screw
(Non Emission Compliance Engines Only)
Choke
Control
■ If the chain brake becomes damaged or worn, or fails to completely
engage or release the clutch drum,
return the saw to your dealer for
repairs.
Low-speed
Mixture
Adjustment
Screw
Idle Adjustment Screw
CAUTION!
■ Never start or operate this saw
while the chain brake is
engaged!
■ Never carry the saw by the
brake lever! Carry the saw by
the front handle.
Chain Brake Inspection
(engine “off”)
1. Turn the engine “off,” and make
sure the ignition switch is in the
“O” or “off” position.
2. Hold the saw with the bar tip 12 to
20 inches (30-50 cm) above a soft
wood block.
3. Quickly release the front handle,
allowing the guide bar tip to strike
the wooden block.
4. The chain brake must engage as
soon as the bar tip strikes the
wood.
WARNING!
The above procedure
must cause the chain
brake to engage! If the chain brake
does not fully engage during this
test, do not operate the saw! Return
the saw to your dealer for repairs!
22
■ Never make carburetor
adjustments while the chain
brake is engaged!
A clean and unrestricted airflow is
essential to your saw engine’s performance and durability! Before attempting any carburetor adjustments,
inspect and clean the engine air filter
as required! Procedures for maintaining this saw’s air cleaner are described
on page 27 of this manual.
Before starting the engine
1. Inspect saw chain tension, and
adjust if necessary. (see page 13)
Low and High Mixture Adjustments for Emission Compliance
Engines.
Low Speed Mixture (engine idling
at operating temperature)
1. Using a small screwdriver, slowly
turn the low speed mixture screw
clockwise (lean mixture), and note
any changes in engine rpm. See
illustration above.
2. Make sure the chain brake is
disengaged, and that the saw chain
is free to rotate.
2. Next, turn the low speed mixing
screw counter-clockwise (rich
mixture) and note any changes in
engine rpm.
Start the engine, warm the engine to
operating temperature. Place the saw
on the ground, and adjust the
caburetor as follows:
3. Adjust the low speed mixture screw
to provide the smoothest possible
idle with no sacrifice in acceleration.
Idle speed adjustment
(engine idling)
4. If necessary, readjust the idle speed
screw for an engine idle speed of
2,600-3,000 rpm (min-1).
Use a screwdriver to slowly turn the idle
speed adjusting screw in or out until the
engine idles at 2,600-3,000 rpm (min-1).
High Speed Mixture
High-speed adjustments are factory
set and can not be adjusted.
WARNING!
The saw chain must never
rotate at engine idle speed!
19
OPERATION
OPERATION
35721
■ Always disengage the chain
brake before removing or
replacing the clutch cover!
35715
Carburetor Adjustments (cont.)
Low and High Mixture Adjustments for Non Emission Compliance Engines.
1. No adjustment is necessary when
the saw is new.
Low Speed Mixture (engine idling
at operating temperature.
2. After approximately 10 hours
running, readjust the H-needle to
1 1/4 turns (± 1/4 turn).
1. Using a small screwdriver, slowly
turn the low speed mixture screw
clockwise (lean mixture) and note
any changes in engine rpm.
2. Next, turn the low speed mixture
screw counter-clockwise (rich
mixture) and note any changes in
engine rpm.
3. Adjust the low speed mixture screw
to provide the smoothest posible
idle with no sacrifice in engine
acceleration.
High Speed Mixture
CAUTION:
Do not run saw at full throttle with
no load. If run in this condition,
seizure can occur.
CAUTION:
Do not adjust H-speed needle to
less than 1 turn. If run at less than 1
turn, seizure can occur.
Chain can rotate
Low and High speed adjustment.
Standard opening.
L ........................... 1 1/8 ± 1/4 turn
H ........................... 1 1/4 ± 1/4 turn
“Standard opening’’ means number
of turns from the fully closed
position by turning needle gently
counter-clockwise.
Chain is stopped
35704
Chain Brake Operation
The Shindaiwa 357 saw is equipped with
an inertial chain brake that stops the
saw chain whenever the brake lever is
moved to the forward (engaged)
position.
■ Engaging the brake lever causes a
brake band to tighten around the
clutch drum, stopping the chain.
■ The chain brake is designed to
engage whenever the brake lever
strikes the operator’s hand.
OPERATION
OPERATION
4. If necessary, readjust the idle speed
screw for an engine idle speed of
2,600-3,000 rpm (min-1).
Chain Brake
WARNING!
The chain brake is
installed only to reduce
the risk of injury from kickback!
The chain brake is not a substitute
for careful operation!
IMPORTANT!
Release the throttle whenever the
chain brake is activated!
■ The chain brake can also be
activated by pushing the brake
lever forward manually.
■ To release (disengage) the chain
brake, pull the brake lever toward
you.
20
21