1
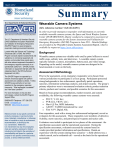
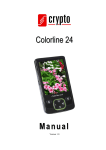
User Manual
1. Introduction
2. Precautions
Thank you for purchasing the Veho K-Series HD camcorder. Its small size, integrated
design and easy to use functions mean that you can record and photograph anytime,
anywhere using high-definition and dynamic photography, so that you can share
your videos and photos with your family members and friends.
When using the K-Series HD camcorder please adhere to the following precautions:
This manual covers detailed instructions on use, operation, installation and technical
specifications of the K-Series HD camcorder. Please read this manual carefully before
use and retain for future reference.
Index
Introduction 2
Precautions
3
Tour of your Muvi K-Series
4
Description of LED indicators
6
Getting Started
8
Accessing Muvi K-Series Settings
10
General camcorder settings
11
Switching between modes
13
Video Recording
15
G-Sensor
17
Photo capture
18
K-Series Waterproof Case
20
Download and install app
22
Turning on the WiFi and connecting to the app
23
Guide to using the app
26
K-Series Camcorder Specs
37
2
1.
Do not drop, knock or shake the camcorder.
2.Do not put the camcorder close to an object that generates strong magnetic
field, such as a magnet or a motor or close to an object that emits powerful
radio waves. A strong magnetic field may cause faults on the camcorder or
damage the video/audio recordings.
3.Do not expose the video camera to high temperatures or direct sunshine.
4.Do not put the microSD card close to an object that generates a strong
magnetic field, such as a television set or a magnet. Do not put the microSD
card in a place where static electricity is easily generated.
5.If the camcorder overheats or you see or smell smoke whilst it is charging,
immediately disconnect the power supply to stop charging the battery.
6.Keep the camcorder out of reach of children during charging as the power
cable may cause asphyxia or electric shocks.
7.Store the camcorder in a cool, dry and dust-free place.
3
3. Tour of your Muvi K-Series
10
8
5
1
18
18
7
6
9
17
4
2
11
19
16
15
14
19
3
1.
On/Off Switch
8. Stop Record Button
14. Battery Lock Switch
2.
WiFi On/Off Switch
9. Capture Button
15. Microphone
3. Start Record Button
10. Microphone
16. Tripod Mount
4. Lens
11. HDMI Port
Mini USB/AV Out Port
microSD Slot
17. Lanyard Hole
5. Power Indicator (red)
6. Top LED Indicator (blue)
18.Connections for Optional LCD Screen
19. Bottom LED Indicators
7. LCD Display
4
5
4. Description of LED indicators
Status
Power Indicator
(Red)
Top LED Indicator
(Blue)
Power On
Solid On
Record Button
Indicator
Recording Video
Flash Slowly
Solid On
Recording Audio
Flash Slowly
Solid On
Capturing Photo
Flash Once
Flash Once
microSD Card Full
Solid On
Charging
Flash Slowly
Fully Charged
Solid On
Low Battery
Flash Fast for 5
seconds and then
auto power off
WiFi On
6
Bottom LED
Indicators (Blue)
Flash Slowly
7
5. Getting Started
Inserting the battery
Before inserting the battery make sure that the lock switch is in the unlock position.
Slide the battery into the camcorder, and then move the lock switch into the lock
position to lock the battery into place.
LCD information display
Camcorder mode
Video resolution and frame rate
Charging the Muvi K-Series
To charge the camcorder, connect it to a USB port using the supplied USB cable. The
red LED will flash whilst charging. It will take approximately 3 hours for the camcorder
to fully charge. Once fully charged the red LED will stop flashing and stay on.
Inserting the microSD card
The K-Series camcorder supports microSD and microSDHC cards up to 32GB.
Although any class of card can be used with the camcorder it is recommended that a
class 6 or higher card is used for the best results.
With the camcorder turned off, remove the port cover on the side of the camcorder
and insert the microSD card into the microSD slot. You will hear a click to indicate
that the card has been inserted correctly. To remove the microSD card press the
card into the camcorder to release it. The card will pop out slightly so that you can
remove it.
Turning on the Muvi K-Series
Remaining video recording
time on microSD card
Battery level
Turn on the camcorder by moving the power switch on the front of the camcorder to
the on position. The start-up Muvi logo will appear on the LCD display and the power
indicator will turn red. Once the LCD display changes to the information display the
camcorder is ready to use. Please note that the camcorder will be become warm
during use.
8
9
6. Accessing Muvi K-Series Settings
7. General camcorder settings
To enter the settings menu press and hold
the start record button for three seconds. The
camcorder symbol will appear on the LCD
display.
Enter the settings menu and then select the general camcorder settings menu. Use
the stop record button to move between the options. Press the start record button
to select the option you want to change and the camera button to exit the option
that you are in.
Press the stop record button repeatedly to
navigate through the options until you reach
the M symbol. Press the start record button to
enter the menu.
Set the key tone volume to off, medium or standard.
Turn status LEDs on or off.
Turn the on screen display on or off on optional LCD screen.
Set the auto standby function to off, 2, 5 or 10 minutes.
See the TV standard to NTSC or PAL depending on your area.
Changing this setting will also affect the frame rate per second that
you can record at. See page 16
The following menu will appear.
Turn on the central spot exposure mode to on or off.
Turn the G-Sensor mode on or off. For further information on the
G-Sensor function please see page 17.
Set the language for the camcorder menu. Languages available are:
Simplified Chinese, Traditional Chinese, English, German, French,
Italian, Spanish, Portuguese, Russian or Japanese.
Use the stop record button to move between the options. Press the start record
to enter video settings,
to enter photo settings or
button to select
to enter general camcorder settings. Press the camera button to return to the
previous mode that you were in.
10
Set the date and time. See below for further information.
11
8. Switching between modes
Format the microSD card in the camcorder. Note: Formatting will
delete all files, including protected ones.
Restore the camcorder to the factory setting default.
Ver:C.E4.10
Shows the version of Muvi K-Series firmware you have
Setting the date/time
Select the date/time option from the setting menu then select the format that you
would like the date to appear as between:
Y-M-D H:M
M-D-Y H:M
D-M-Y H:M
After selecting the format the camcorder will enter the date and time setup. Use
the camera and stop record buttons to change the highlighted position. After you
have selected the correct number press the start record button to move to the next
position.
Once you have changed the minute setup press the start record button to return to
the format setup, then press the camera button to exit the date and time setup.
12
To switch between modes press and hold the start
record button for three seconds.
Press the stop record button repeatedly to navigate through the options. Press the
start record button to select your preferred option. For further information on each
option please see below.
Symbol
Mode
Further Information
Video Page 15
Silent Page 15
Audio
Page 15
Time Lapse
Page 15
Auto Video
Page 15
Piv
Page 16
Single Shot
Page 18
13
9. Video Recording
Fast Shot
Page 18
Make sure that a microSD card is inserted and turn the camcorder on. Select
your preferred video mode and press the start record button on the front of the
camcorder to start recording. The LEDs around the start record button will turn solid
blue, the red status LED will turn off and the top LED indicator will flash blue.
Cont Capture
Page 18
Timed
Page 18
To stop recording press the stop record button on the top of the camcorder. The blue
LEDs will turn off and the red status LED will turn back on.
Settings Page 10
Video Settings
Note: To change the video settings you must be in video mode before you enter the
settings menu.
Switching quickly between video and photo
Whilst in video mode press the capture button once to enter photo mode. Whilst in
photo mode press the start record button once to enter video mode.
14
Enter the settings menu and then select the video settings menu. Use the stop record
button to move between the options. Press the start record button to select the
option you want to change and the camera button to exit the option that you are in.
Choose between
Video
Record video and audio together
Silent
Record video only
Audio
Record audio only
Time LapseRecord a time lapse video. Set the camcorder to take
an image every 1, 2, 5, 10 or 30 seconds. Press the start
record button to start taking images and press the stop
record button to finish. Camcorder will automatically
create a time lapse video using the images.
Auto VideoVideo self-timer. After pressing the start record button
the camcorder will start recording after 5, 10 or 20 secs.
15
10. G-Sensor
PivSet the camcorder to take a photo every 5, 10, 30 or
60 seconds whilst recording video at the same time.
Select HM so that you can manually press the capture
button at any point during filming to take a photo
without having to stop recording.
Choose between
PAL (see page 11,
camcorder settings)
NTSC (see page 11, camcorder settings)
1080p at 24fps, 25fps, 1080p at 24fps, 30fps, 48fps or 50fps
48fps or 60fps
960p at 48fps or 50fps
960p at 48fps or 60fps
720p at 50fps or 100fps
720p at 60fps or 120fps
The G-Sensor mode on the K-Series camcorder is a camera movement activation
function. This means that when the G-Sensor mode is turned on it will actively
sense a change in gravity, for example if it is knocked, tilted or moved, and will start
recording automatically without needing to press the start record button. If the
camcorder has not sensed any gravity change for 3 minutes it will stop recording.
You can also stop recording by manually pressing the stop record button.
Please note that this is a video function only and if the G-Sensor mode is turned
on whilst in camera mode it will automatically revert to video mode and then start
recording if it senses a change in gravity.
Choose the angle of view for recording between wide (140°),
medium (120°), narrow (100°) and small (80°).
Choose the bit rate for recording videos between fine or normal.
The fine bit rate is higher so you will get a clearer picture with an
increased file size.
Loop Record – Turn on to continually overwrite files when the memory
becomes full.
180° photo rollover. Turn this option on to keep your videos upright
when using the camcorder upside down.
16
Turn the date and time stamp on or off.
17
11. Photo capture
Make sure that a microSD card is inserted and turn the camcorder on. Press the
camera button once on the top of the camcorder to enter photo mode. Select
your preferred photo mode and then press the camera button on the top of the
camcorder to take a photo.
Choose between capturing 16, 12 or 8 mega pixel images.
Turn the date and time stamp on or off.
Photo Settings
Note: To change the photo settings you must be in photo mode before you enter the
settings menu.
Enter the settings menu and then enter the photo settings menu. Use the stop record
button to move between the options. Press the start record button to select the
option you want to change and the camera button to exit the option that you are in.
Choose between
Single Shot
Fast ShotChoose between capturing 3 photos in 1 second, 6
photos in 1 second or 8 photos in 1 second. When
you press the camera button the top LED indicator will
flash twice quickly to indicate all photos have been
taken.
Cont CaptureChoose between continually capturing a single photo
every 0.5, 1, 2, 3, 5, 10 or 20 seconds. Press the
camera button to start taking photos. The top LED
indicator will flash blue each time a photo is taken. To
stop taking photos press the stop record button.
TimedPhoto self-timer. After pressing the camera button the
camcorder will take a photo after 3, 5 or 10 seconds.
The top LED indicator will flash blue when the photo
has been taken.
18
Capture a single photo
19
12. K-Series Waterproof Case
Please ensure that you keep the rubber seal that lines the waterproof case clean.
Small particles such as a hair or grain of sand can break the waterproof seal and
cause a leak and damage your K-Series camcorder.
If you use the waterproof case in salt water rinse it with fresh water after each use.
Failure to do this will cause a build-up of salt and compromise the waterproof seal.
Never dry the waterproof case with a cloth as lint may compromise the waterproof
seal, either shake dry or leave to air dry.
Veho cannot be held liable for consequential, incidental and contingent damages
to personal property due to misuse or improper installation, or improper care and
maintenance of the K-Series waterproof case. Veho will not, under any circumstance,
cover the replacement or cost of repair of any electronic device or personal property
inside or outside of the case.
Anti-Mist Inserts
To prevent misting when using the waterproof case place two Anti-Mist inserts down
the sides of the waterproof case prior to use, ensuring that they do not interfere
with the rubber seal on the housing. The insert will soak up any moisture and
stop the lens from misting. To reuse dry the insert in an oven at 150°C/300°F for
5 minutes. Each insert can be re-used 4-5 times. Please ensure that you store the
inserts in an airtight bag.
20
21
13. Download and install app
14. Turning on the WiFi and
connecting to the app
The free Muvi K-Series app is available for iOS and Android and allows you to connect
your K-Series camcorder to your phone using the in-built WiFi.
Turning on the WiFi
To install the app on your phone open the App Store (iOS) or Play Store (Android) on
your phone and use the search function to search for Muvi K-Series. Select the app
and then click on the install button to install the app on your phone.
Please note that to use the K-Series camcorder with the app you will need to have a
microSD card inserted in the camcorder as all videos and images will be saved to the
microSD card and not the the phone itself.
To connect to the Muvi K-Series app you will need to turn on the WiFi on the
camcorder. Turn the camcorder on and then, once the LCD information display
appears move the WiFi switch on the front of the camcorder to the WiFi position.
The blue LEDs on the bottom of the camcorder will flash slowly to indicate that the
WiFi is turned on.
Connecting to the app
Turn on the WiFi on your phone and then enter the phone’s WiFi settings. Look for
Muvi K-Series in the list of available networks and select to connect. You may need
to refresh the list or scan for networks for the camcorder to appear. Please enter
00000000 as the password.
Exit the WiFi settings and open the Muvi K-Series app on your phone.
22
23
To finish connecting to the app click on the arrows.
If the WiFi connection has failed the app will ask if there was a failed connection.
For iOS users select yes and the app will automatically start to try and connect again.
If this fails exit the app and go the WiFi settings to connect to the camcorder again.
For Android users select yes and then click on the WiFi icon to return to your phone’s
WiFi settings so that you can connect again.
To enter the app without connecting the camcorder select no when the app asks if
there was a failed connection and then click on the arrows. You can then enter the
app to view local files on your phone.
Once connected to the app the WiFi icon will appear on the LCD display.
24
25
15. Guide to using the app
Video recording
Photo capture
Make sure that you are in video record mode by pressing the Video button. The
Video button will turn blue to indicate that it is in video record mode. Start recording
by pressing the camcorder icon to the right of the preview screen.
Make sure that you are in photo capture mode by pressing the Photo button. The
Photo button will turn blue to indicate that it is in photo capture mode. Take a photo
by pressing the camera icon to the right of the preview screen. The top LED indicator
on the camcorder will flash blue once to indicate that a photo has been captured.
Total number of files
WiFi status
Battery status
Maximise preview
icon
Camcorder icon
Settings
Remaining recording
time available
Recording duration
Total number of files
Camera icon
WiFi status
Battery status
Remaining number
of shots
Zoom out
Zoom in
Fast shot photo capture
The camcorder icon will turn blue to indicate that it is recording and the blue LEDs
around the start record button on the camcorder will turn on.
To stop recording press the camcorder icon again. The icon will turn white to indicate
that the camcorder has stopped recording.
26
Make sure that you are in fast shot capture mode by pressing the Fast Shot
button. The Fast Shot button will turn blue to indicate that it is in fast shot
capture mode. Take several photos in one second by pressing the fast shot camera
icon to the right of the preview screen. The top LED indicator on the camcorder will
flash blue once to indicate that the photos have been captured.
27
Maximise the preview screen
Close the preview screen
You can maximise the preview screen in Video, Photo and Fast Shot mode. To
maximise the preview screen press the maximise icon to the right of the preview
screen. You can view the maximised preview screen in both portrait and landscape.
To record video or capture a photo or fast shot press the camcorder or camera icon
(dependant on mode) at the bottom of the screen. To exit the maximised preview
screen press the back button at the top in the right hand corner.
You can close the preview screen in both normal and maximised screen modes. To
close the preview tap the preview screen. The message Preview closed will appear.
To open the preview tap the preview screen again and the preview will reappear.
Zooming in and out
To zoom in press the T icon and to zoom out press the W icon. Please note that you
cannot zoom in or out whilst in the maximised screen, therefore if you wish to zoom
in or out you must first do this in the normal preview screen mode and then press
the maximise screen icon.
28
29
Settings
To change settings on the camcorder press the settings icon to enter the settings
menu. You can only change the size in record settings when you are in video record
mode first. Not all of the camcorder’s functions are supported by the app but you
can change the following settings:
Record Settings
LanguageChange the language on the camcorder. Note: Does not
change the language of the app
Date/TimeSet the date and time on the camcorder to match the date
and time on your phone
FormatSelect yes to format the microSD card. Note: Formatting
will delete all files
Version
Shows the version of Muvi K-Series firmware that you have
ViewSet the angle of view between broad, medium, narrow and
small
Nesignation Shows the WiFi name of your Muvi K-Series camcorder
Bit Rate
Set the bit rate between normal and high bit rate
Playback
Choose between capturing 8, 12 or 16 mega pixel images
To view your videos and photos press the
Playback button. Thumbnails of your video
and photos on the microSD card will load in
the playback screen.
Size
Set the resolution and frame rate for video capture
Capture Settings
Size
Fast ShotChoose between capturing 3 photos in 1 second, 6 photos
in 1 second or 8 photos in 1 second
Param Settings
Warning ToneSet the volume of the warning indicator to off, medium or
standard
Front Indicator
To view the required video or photo tap the
relevant thumbnail and the video or photo
will maximise.
Turn the status indicator on the camcorder off or on
Video Content LoopTurn on to continually overwrite files when the memory
becomes full
TV Output Format
30
Set the TV output to PAL or NTSC
31
To play the video tap the play button in the
centre of the screen.
To move to the next video or photo slide your
finger across the screen to the left or to the
right. The information and icons displayed
around the video or photo will disappear
after 4 seconds. To bring them back tap the
screen.
To download the video or photo to
your phone tap the download icon.
On iOS the file will be saved in the app, on
Android the file will be saved in the Gallery.
To delete the video or photo press the
bin icon.
To download multiple files press the
download icon in the bottom right
hand corner, then tap the files you
wish to download or select download
all to download all files.
As soon as you tap a thumbnail it will begin to download and an icon will appear in
the top right hand corner of the thumbnail:
IconMeaning
File waiting to download
File in the process of downloading
File successfully downloaded
Press the back key to return to the
thumbnails.
To cancel the download press the cancel button.
Downloading and deleting multiple files
To delete multiple files press the selection icon
then tap the thumbnails of the
files you wish to delete and select delete selected item(s).
To edit the download settings press
the settings icon in the top right hand
corner. Here you can choose between
Quick Download Original files and you
can also clear the cache data.
32
33
Downloaded files
To see the files that you have downloaded to your phone move the slider at the top
of the screen from the camera icon to the phone icon.
To trim your videos tap the thumbnail of the video you wish to edit and then tap the
edit icon
Back
Menu
Storyboard
Once downloaded to your phone you can use the app to share your photos and
videos through social media and to trim your videos.
Current frame
Start frame
End frame
Length of video
To share a video or photo press the selection icon, tap the thumbnails of the files
you want to share, then tap share icon in the bottom left of the screen and choose
the social media platform that you wish to use.
Set the current frame
as the end frame
Set the current frame
as the start frame
Play video
Expand the frame
Narrow the frame
To trim the video drag the start frame and end frame markers inwards on the story
board or play the video and pause at the moment you want to start/end the film and
press the set current frame as the start/end frame button as required.
34
35
16. K-Series Camcorder Specs
You can use the expand frame button to stretch the storyboard for more accurate
trimming. Use the narrow frame button to reduce the length of the storyboard.
Camera Optics
Minimum focal range
2.5cm
To save your edited file press the menu button in the top right hand corner and
select Save. The file will be saved as a new video and will not overwrite the original.
Maximum focal range
Endless
Aperture
f/2.8
To return to the original file press the back button. To return to the thumbnails press
the back button again.
Focus
Fixed focus
To return to the preview screen press the camera button in the bottom left
hand corner
Angle
140 degrees
Video
Resolution
Full HD 1080p
Frame rate24, 25, 30, 48, 50, 60, 100 or 120
(dependant on PAL or NTSC setting)
Bit rate
19 mbit/s
Sensor type
CMOS lens
Video recording format
MOV (H.264 codec)
Photo
Photo resolution
16 mega pixels
Photo format
JPG
Power and battery
36
Battery
1500mAh lithion rechargeable
Battery charge time
Approximately 3 hours
Battery life
Up to 3 hours continuous recording
37
Other
Audio recording format
WAV
WiFi transmission range
Up to 60 metres
Memory
Up to 32GB microSD/microSDHC card
Connections
Mini USB, HDMI out, AV out
Storage temperature
-10°C ~ 60°C
Operating temperature
-10°C ~ 50°C
Dimensions
L59 x W43 x D35mm
Weight
84g
38
39
www.veho-world.com