1
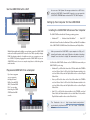
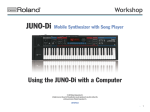
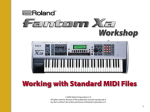
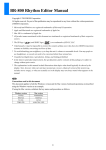
Workshop ®ÂØÒňΠ® JUNO-STAGE 128-Voice Expandable Synthesizer with Song Player Using the JUNO-STAGE with a Computer © 2009 Roland Corporation U.S. All rights reserved. No part of this publication may be reproduced in any form without the written permission of Roland Corporation U.S. JSWS02 1 About the Workshop Booklets Roland’s JUNO synthesizers have been making history since the 1980s. They’ve always been affordable, easy to use, and sounded great. The JUNO-STAGE is designed specifically for performing, with everything you need on a gig at your fingertips. The JUNO-STAGE’s got 128-note polyphony and killer sounds derived from Roland’s acclaimed Fantom-X synths. Two SRX expansion slots allow you to add even more sounds from Roland’s huge SRX sound library. Split the keyboard or layer sounds quickly using dedicated buttons. Realtime controls let you shape JUNO-STAGE sounds as you play. Play along with audio files or SMFs stored on a USB flash drive, or connect a personal music player. Mix in, and add reverb to, a connected mic. Instantly configure the JUNO-STAGE as a MIDI controller of external MIDI devices or a computer-based DAW with a single button-press. Hot Links Each Workshop booklet is meant to be read in order from beginning to end. However, if we mention an upcoming section—and you see this arrow—you can click the arrow to jump there immediately. Things You Can Do with Your MIDI Connection Though you might think the JUNO-STAGE’s Playlist Editor software somehow involves MIDI communication, it doesn’t—all you need to use it is a JUNO-STAGE-formatted USB stick you can plug first into your computer, and then into your JUNO-STAGE. This Workshop booklet is intended as a companion to the JUNO-STAGE Owner’s Manual. It requires JUNO-STAGE Operating System v1.03 or higher. Download the latest JUNO-STAGE O.S. for free from www.RolandUS.com. About This Booklet In this booklet, we’re going to assume you know how to operate your computer. If you don’t, consult its documentation before proceeding. Edit and Create JUNO-STAGE Sounds This JUNO-STAGE’s streamlined front panel conceals the many possibilities of the JUNO-STAGE’s sound engine. The JUNO-STAGE Editor software allows you to unlock this power. The accompanying Librarian software helps you store and keep track of all of your JUNO-STAGE sounds and performances. The JUNO-STAGE can exchange MIDI data with a Mac or PC via USB, letting you use the JUNO-STAGE as MIDI controller for a DAW and/or as a multitimbral sound module. It also allows you to create JUNO-STAGE sounds on your computer. This booklet explains how to get connected. Understanding the Symbols in This Booklet Throughout this booklet, you’ll come across information that deserves special attention—that’s why it’s labeled with one of the following symbols. Current settings... ...go to the JUNO-STAGE. U S B U S B A note is something that adds information about the topic at hand. ...are sent to the software. Your edited settings... A tip offers suggestions for using the feature being discussed. Warnings contain important information that can help you avoid possible damage to your equipment, your data, or yourself. 2 Use the JUNO-STAGE with a DAW You can use a GM2 System On message contained in an SMF file to select the JUNO-STAGE’s General MIDI 2 sounds, or you can press the JUNO-STAGE’s PERFORM button and select PRST 033 GM2 Template. ...where they play notes. MIDI notes... U S B U S B Setting Up Your Computer for the JUNO-STAGE Installing the JUNO-STAGE Software on Your Computer Notes go to JUNO-STAGE... ...are captured in the DAW. The JUNO-STAGE works with the following operating systems: • Windows XP™ • Windows Vista 32-bit Edition™ • Mac OS X™ In this booklet we’ll describe the Windows XP, Vista, and Mac OS X installation of the JUNO-STAGE’s USB MIDI driver, Editor/Librarian, and Playlist Editor. With its light weight and its ability to run on battery power, the JUNO-STAGE makes an excellent portable MIDI controller for a DAW, especially a laptop DAW. By plugging earbuds or headphones into your computer, you can use a DAW’s soft synths; plugging them into the JUNO-STAGE lets you use JUNO-STAGE sounds. In a more complex setup, listen to both through an audio interface. Play General MIDI2 SMFs from a Computer If you have a program on your computer that plays General MIDI or General MIDI2 SMFs (“Standard MIDI Files”), you can play them using the JUNOSTAGE’s built-in GM2 sounds. When you connect the JUNO-STAGE to your computer via USB, you’ll typically get the best results using USB jacks on the back of a desktop computer or on the side of a laptop. We recommend not using a hub. You’ll find the JUNO-STAGE software on the CD-ROM that came with your JUNO-STAGE. If you’re using • Windows XP—you’ll find the driver in the XP folder within the CD-ROM’s root-level Driver folder. You’ll find the Editor/Librarian installer in the root-level Editor folder, and the Playlist Editor in the root-level Playlist Editor folder. • Vista—you’ll find the driver in the Vista folder within the CD-ROM’s root-level Driver folder. You’ll find the Editor/Librarian installer in the root-level Editor folder, and the Playlist Editor in the root-level Playlist Editor folder. • Mac OS X—you’ll find the driver installer in the CD-ROM’s root-level U S B Driver folder, the Editor installer in the root-level Editor folder, and the Playlist Editor installer in the root-level Editor folder. The Downloads tab at http://www.rolandus.com/products/ productdetails.php?ProductId=967 has the latest JUNO-STAGE software. 3 Windows XP Installing the JUNO-STAGE USB MIDI Driver 1 Power up your PC with all USB cables disconnected except for your keyboard and mouse. If any applications are running, quit them. 2 Open up the XP Drivers folder, and then double-click the Setup file inside to display the following window: If XP asks if you want to run this file, click Run. If an “Install Program as Other User” dialog appears, quit the installer, and then log in as the system administrator before re-launching the Setup application. 3 If you see the Software Installation window instead of the one shown above, click Continue Anyway. If you can’t continue, see “About Driver Signing Options” later in this booklet. (You can click this button to jump there now.) 4 Click Next—the driver is installed and instructions appear telling you what to do next. We’ll take you through these instructions in this booklet, so you can close this window, or drag it over to the side of the screen if you want to keep it open. 5 With the JUNO-STAGE’s power turned off, plug one end of the included USB cable into its USB jack, and the other end into the USB jack you want to use on your computer. 6 Turn on the JUNO-STAGE—after a few moments, the PC’s Found New Hardware Wizard window appears, as shown in the following screenshot. Click Next to display the installation start window: If, instead of seeing the Found New Hardware window, you’re asked if you want to connect to Windows Update, select No, not this time, and then click Next to display the Found New Hardware window. 4 About Driver Signing Options The Driver Signing window lets you select whether Windows should block the installation of an unknown driver, warn you about it, or just install it. 1 In the Start menu, select Control Panel. 2 If you’re in • Category View—click Performance and Maintenance, and then click System. • Classic View—double-click System. 7 Click the button to the left of “Install the software automatically (Recommended),” and then click Next to install the driver. When the driver’s installed, the wizard announces the completion of the installation process. If the “Software installation” window appears after you click Next, click Continue Anyway. If you can’t continue, see “About Driver Signing Options” to the right of this page. If the “System Settings Change” window appears, click Yes to restart Windows. 8 9 10 3 Click the Hardware tab, and then click Driver Signing. Click Finish. 4 Set “What action do you want Windows to take?” to Ignore or Warn. Windows displays “Your new hardware is ready to use.” 5 Click OK to close the Driver Signing window. 6 Click OK to close the System Properties window. 7 Return to the driver installation instructions earlier in this booklet. If the Driver Setup window’s still open, click its Close button. Restart your computer. Should you ever need to remove the JUNO-STAGE driver from your system, its installer folder contains an uninstaller. You can hold onto this file, or re-download the driver folder later should you need it. Later in this booklet, we’ll provide some further information on using the JUNO-STAGE with a DAW. Click the button here to jump to this section now if you like. 5 Installing the Editor/Librarian and Playlist Editor You can install both the JUNO-STAGE Editor/Librarian software and the Playlist Editor software in a single operation. Here’s how to do this. 1 Double-click the JUNO-STAGE Editor Setup executable file. The installer opens. (If XP asks if you want to run this file, click Run.) 6 Checkmark both the JUNO-STAGE Editor and the JUNO-STAGE Librarian software—if they’re not already checked—and then click Next. If you want to install only one of the JUNO-STAGE programs, make sure it’s the only one that’s checked in this window. 2 Click Next. 3 Read the License Agreement, and if you’d like to proceed with the installation, click Yes. 4 In the Choose Destination Location window, you can select a location on your hard drive for the JUNO-STAGE software—if you don’t have a specific reason to choose a different location, leave the default location as is—and then click Next to display the Setup Type window. 7 The installer displays your installation selections and tells you it’s now ready to install the JUNO-STAGE software. Click Next to proceed—the files are installed. 8 Click Finish to exit the installer. Vista Installing the JUNO-STAGE USB MIDI Driver 1 Power up your PC with all USB cables disconnected except for your keyboard and mouse. If any applications are running, quit them. 2 Open up the Vista Drivers folder, and double-click the Setup file inside. If Vista tells you a program needs your permission to continue, click Continue. 5 Highlight the Custom installation, and then click Next. 6 3 4 The Driver Setup window appears: We’ll take you through these instructions in this booklet, so you can close this window, or drag it over to the side of the screen if you want to keep it open. Click Next to display the Driver Setup instructions window: 7 With the JUNO-STAGE’s power turned off, plug one end of the included USB cable into its USB jack, and the other end into the USB jack you want to use on your computer. 8 Turn on the JUNO-STAGE—after a few moments, “Installing device driver software” appears in the lower right corner of the screen. 9 When the PC’s finished installing the driver, “JUNO Series Device driver software installed successfully” appears onscreen. 10 5 Click Next. Restart your computer. Later in this booklet, we’ll provide some further information on using the JUNO-STAGE with a DAW. Click the button here to jump to this section now if you like. Installing the Editor/Librarian and Playlist Editor 6 If Windows Security asks if you’d like to install this device software— as shown above—click Install. The driver’s installed, and a window opens with instructions. You can install both the JUNO-STAGE Editor/Librarian software and the Playlist Editor software in a single operation. Here’s how to do this. 1 Double-click the JUNO-STAGE Editor Setup executable file. The installer opens. If Vista tells you a program needs your permission to continue, click Continue. 7 Mac OS X Installing the JUNO-STAGE USB MIDI Driver The JUNO-STAGE USB MIDI driver is compatible with Mac OS X 10.3.9 and higher. It’ll work on any Mac with an Intel processor or PowerPC G4 or G5. 2 Click Next, read the License Agreement, and if you’d like to proceed with the installation, click Yes. 3 In the Choose Destination Location window, you can select a location on your hard drive for the JUNO-STAGE software—unless you have a reason to choose a different location, leave the default location as is—and then click Next to display the Setup Type window. 4 1 Disconnect all USB cables from your computer except for your keyboard and mouse. 2 Open the Driver folder on the JUNO-STAGE CD-ROM and double-click the JUNOSeriesUSBDriver.pkg file. 3 If the installer says it needs to run a program to determine if the driver can be installed, click Continue. Highlight the Custom installation, and then click Next. The Roland JUNO Series Driver Ver.X.X.X for Mac OS X window appears. 5 Checkmark both the JUNO-STAGE Editor and the Librarian software— if they’re not already checked—and then click Next. If you want to install only one of the JUNO-STAGE programs, make sure it’s the only one that’s checked in this window. 4 6 When the installer displays your installation selections, click Next to proceed—in a few moments, the files are installed. 7 Click Finish to exit the installer. Click Continue to display the Installation Type window, shown on the next page. 8 9 We recommend using the default install location unless you’ve got a specific reason for not doing so. If you do, click Change Install Location... and then choose the location you want. If your Mac has more than a single hard drive or volume, you may be asked to select the drive on which you want to install the driver. Select the drive with your active operating system on it. 5 Click Install to display the password authentication window. Most likely, your user name will already be filled in. When you see the Install Succeeded window, click Restart. If your Mac displays a message about reboot caches, click OK. When the Mac’s restarted, make sure the JUNO-STAGE’s power is turned off, plug one end of your USB cable into the JUNO-STAGE’s rearpanel USB jack, plug the other end into the USB jack you want to use on your computer, and then turn on the JUNO-STAGE. Whenever you perform Mac OS X system updates, please disconnect the JUNO-STAGE during the process to avoid having to reinstall the JUNO-STAGE USB MIDI driver. In the same folder as the JUNOSeriesUSBDriver.pkg file you’ll find the JUNOSeries Uninstaller. You can hold onto this file, or re-download the driver folder later should you need it. 6 Type an administrator password for your computer. 7 Click OK—the installer informs you that a restart of your computer will be required after the driver’s installed. 8 Later in this booklet, we’ll provide some further information on using the JUNO-STAGE with a DAW. Click the button here to jump to this section now if you like. Click Continue Installation to install the JUNO-STAGE USB MIDI driver. 9 Installing the Editor/Librarian and Playlist Editor The procedures for installing both the JUNO-STAGE Editor/Librarian software and the Playlist Editor software are identical. The two programs must be installed separately, and no restart is required after either installation. The Editor/Librarian and Playlist Editor come with their own documentation, so we’re just going to discuss their installation here. 1 In the Editor folder, double-click the JUNO-STAGE Editor Installer. mpkg or the Playlist Editor file—the installer window appears. 2 Click Continue. 3 At the Software License Agreement window, click Continue, and then click Agree when the licensing sheet comes down. (If you want to read the agreement first, click Read License.) About Using the JUNO-STAGE with a DAW Setting Up MIDI Communication Using the JUNO-STAGE as a MIDI Controller Only The JUNO-STAGE’s MIDI Controller mode makes it simple to configure the JUNO-STAGE for use with a DAW. Press the JUNO-STAGE’s MIDI CONTROLLER button to light it and display the MIDI CONTROLLER screen. Most DAWs “re-channelize” the incoming data to the desired MIDI track, so there’s seldom a need to match the JUNO-STAGE’s transmit channel to the DAW’s MIDI receiving channel. However, if you do need to do this, this is where you can see and set the JUNO-STAGE’s transmit channel for MIDI Controller mode—the MIDI Ch parameter is selected in the picture above. The Local Sw determines whether or not the current JUNO-STAGE sound plays in MIDI Controller mode. When you’re sequencing you’ll want to leave this set to Off so notes you play go only to the DAW. This is because 4 In the Installation Type window, click Install unless you want to change the installation location for some reason. 5 In the password authentication window, enter your password—the Editor/Librarian or Playlist Editor is installed. 6 When “Install Succeeded” appears, click Close to exit the installer. The programs you’ve installed can be found in the Roland folder within your Applications folder, presuming you didn’t change their destination location during installation. The Editor and Librarian programs are located in the JUNO-STAGE Editor folder. The Playlist Editor’s in its own folder. • you don’t want to hear doubled notes—when a DAW track’s MIDI output is being sent back to the JUNO-STAGE, each note would sound once when you struck a key, and then again when the data had passed through the DAW and back to the JUNO-STAGE (this is called a “MIDI loop”). • you want to hear what you’re actually sequencing—when you’re sequencing with DAW soft synths. If you’re also hearing a JUNO-STAGE sound as you sequence, what you hear is not so much what you get. When you’re using MIDI Controller mode to control external MIDI sound modules, you may want to turn Local Sw on to combine JUNO-STAGE sounds with those from your external modules. The MIDI CONTROLLER screen offers some other interesting tools, explained on Page 89 of the JUNO-STAGE Owner’s Manual. 10 Using the JUNO-STAGE as a Controller and Sound Module You can use the JUNO-STAGE’s keyboard as a MIDI controller for a DAW whose tracks are playing JUNO-STAGE sounds. Here’s how to set this up: 1 Press the JUNO-STAGE’s MENU button. Piano MIDI Channel 1 Part 1—GM 001 PIANO 001 Bass MIDI Channel 2 Part 2—GM 079 Fingered Bs Drums MIDI Channel 10 Part 10—GM 001 STANDARD DAW tracks 2 3 The performance’s parts are also set to respond to various MIDI Program Change, Bank Select, and Control Change messages. All of the parts are also set to default levels you can change with MIDI messages from the DAW. Press ENTER to display the first system screen. Press F3 (MIDI/SYNC) to display the MIDI screen. JUNO-STAGE performance parts To learn about MIDI Program Change, Bank Select, and Control Change messages, see our An Introduction to MIDI InFocus booklet. To learn how to work with them in your DAW, see your DAW’s documentation. You’re now set up. 7 4 Set Local Switch to Off. (For an explanation of why you should do this, see the above explanation of MIDI Controller mode’s Local Sw parameter.) 5 Press F6 (WRITE) to save the change you’ve made. 6 Press the PERFORM button and select PRST 033 GM2 Template. This performance sets up the JUNO-STAGE for use as multitimbral sound module, and allows you to play up to 16 separate JUNO-STAGE sounds from your DAW. As you sequence tracks, there’s nothing you need to do on the JUNOSTAGE other than play. Everything else takes place in the DAW. About Selecting JUNO-STAGE Sounds for Use with a DAW No matter how you decide to select sounds for use with a DAW, we recommend starting with PRST 033 GM2 Template. When you’re playing JUNO-STAGE sounds from a DAW, there are three ways to select the sounds in the JUNO-STAGE performance you use. • You can create a performance with the desired sounds on the JUNO-STAGE—Here’s how: 1 With your performance selected, press the PART SELECT button. In this performance, the 16 parts are lined up with the 16 MIDI channels so that Parts 1-16 receive MIDI data on MIDI Channels 1-16, respectively. Each DAW track sends out data on the MIDI channel corresponding to the part that plays its sound. 11 2 Select each part using the parameter circled in the previous screenshot. 3 Select the desired sound for the part. • You can build the performance you want using the JUNO-STAGE Editor— on your computer, and then send it to the JUNO-STAGE’s memory. To preserve performances you create using either method, write them into the JUNO-STAGE’s memory. See Page 133 in the Owner’s Manual. • The DAW tracks can select each part’s sound—by sending MIDI Bank Select and Program Change messages to the JUNO-STAGE on the part’s MIDI channel. Configuring Your DAW for Use with the JUNO-STAGE Once you’ve installed the JUNO-STAGE driver and made your USB connection, your software DAW can • receive MIDI data from the JUNO-STAGE—This allows you to play the DAW’s soft synths, and to sequence your playing onto DAW tracks. • use the JUNO-STAGE as a destination for outgoing MIDI data—This allows If • you’ve selected a performance on the JUNO-STAGE so you can sequence using multiple JUNO-STAGE sounds—each of the performance’s parts transmits on its same-numbered MIDI channel. From the PERFORM PLAY screen, press F6 (PARTVIEW), and then use the 6 and 5 buttons to move from part to part. The JUNO-STAGE will transmit MIDI data on the currently selected part’s channel. • you haven’t selected a performance on the JUNO-STAGE—you can set the Kbd Patch Tx/Rx Channel parameter to the desired channel. To get to the parameter, follow the instructions on Page 11 of this booklet to navigate to the System MIDI screen. Sending Data from DAW Tracks to the JUNO-STAGE All DAWs provide a method for directing sequenced MIDI data from individual MIDI tracks to the desired external devices—for example, the parts of a JUNO-STAGE performance. Consult your DAW’s documentation to learn how to direct the data on each of your DAW’s MIDI tracks to the desired JUNO-STAGE parts. The End the DAW to play the JUNO-STAGE’s sounds from its tracks. While each DAW has its own way of doing things, some general principles always apply. (You can consult your software’s documentation for details.) We hope you’ve found this workshop helpful. Keep an eye out for new JUNO-STAGE updates and support documents you can download for free at www.RolandUS.com. Receiving JUNO-STAGE MIDI Data in a DAW To get your DAW to receive MIDI data from the JUNO-STAGE, select the JUNO-STAGE as a MIDI input within the DAW, or set the DAW to receive all MIDI data coming into the computer. If your DAW can accept MIDI data on all MIDI channels—often referred to as “omni” mode—enable this option. As we mentioned earlier, there’s seldom a need to match the DAW’s incoming MIDI channel to the JUNO-STAGE’s transmit channel. However, if you need to do this, here’s how to figure out and/or set the JUNO-STAGE’s MIDI transmit—shown as “Tx” onscreen—channel when you’re not in MIDI Controller mode. 12