1
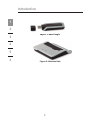
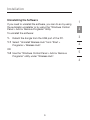
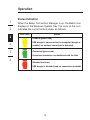
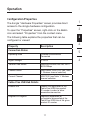
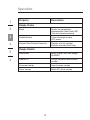
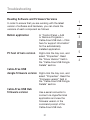
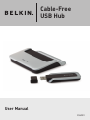
Cable-Free
USB Hub
User Manual
F5U301
Table of Contents
1. Introduction ....................................................................1
Features ........................................................................ 3
System Requirements ................................................... 3
Package Includes .......................................................... 3
Technical Specifications ................................................ 4
2. Installation......................................................................6
3. Operation ...................................................................... 10
4. Troubleshooting ............................................................ 18
5. Technical Specifications ................................................ 22
6. Information ................................................................... 24
Introduction
1
2
3
Figure 1: USB Dongle
4
5
6
Figure 2: Wireless Hub
2
Introduction
Features
• Wireless connectivity through USB for printers, cameras,
scanners, and other devices to your computer, from up
to 30 ft. away
• Reduced cable clutter
• Data-transfer speeds of up to 480Mbps for
USB 2.0 devices
1
2
3
• Ports for linking up to 4 high- or low-speed devices with
your computer
4
• Belkin Lifetime Warranty
5
System Requirements
6
For PC Users
• Pentium® processor-based computer with Hi-Speed
USB 2.0 port available
• Windows® XP with Service Pack 2
Package Includes
• Cable-Free USB Hub
• Cable-Free USB Dongle
• Power Adapter
• Installation CD
• User Manual
3
Introduction
Belkin unleashes USB.
Congratulations and thank you for purchasing the Belkin
Cable-Free USB Hub. This revolutionary product lets you
connect all your USB devices to your computer—wirelessly.
Now you can print, play music, scan, download photos, and
burn CDs from anywhere in the room, from up to 30 feet
away, without the hassle of connecting cables. The Hub is
easy to use and gives you the freedom to roam—and
stay connected.
Please review this User Manual carefully so that you are sure
to get the most from your Cable-Free USB Hub.
1
2
3
4
5
6
1
Introduction
1
Technical Specifications
Upstream Ports:
1
2
Downstream Ports:
4
Per-Port Voltage:
5V
3
Per-Port Current:
500mA
Power Mode:
Self
4
Operating Temperature:
41° to 104° F (5° to 40° C)
Storage Temperature:
-4° to 140° F (-20° to 60° C)
5
Power Supply:
Output:
5V, 2.6mA
6
Plug Size:
3.5mm
Plug Polarity:
Center-pin
positive
Main-Power-LED Color
Definitions
Green:
Constant on when 5V DC
is applied
Port-Status-LED Color
Definitions
Green:
Blinks rapidly to indicate
Rx/Tx traffic
4
Introduction
Certifications
1
FCC
2
Humidity
5% to 95% non-condensing
3
Chipset
Wisair
4
Ports
5
4 USB A
6
Indicator-Light Status
Individual-status LED for each downstream port
Power LED
Power Supply
5V
Operating Range
Up to 30 ft.
5
Installation
1
The following diagram illustrates the basic steps in
connecting and getting started with the dongle.
2
Note: Do not attach the USB dongle before the host
drivers are installed.
3
Step 1
4
Install software and drivers from the
included CD-ROM.
5
Step 2
6
Connect the USB Dongle to the PC and
approve the multiple-driver installation.
Step 3
Connect the included power adapter to
the Cable-Free USB Hub.
Step 4
Open the Wireless Hub utility from the
system tray and register the product ID
number found on the bottom of the Hub.
Then, approve the final driver installation
on the PC.
Step 5
Connect USB peripherals to the
Cable-Free USB Hub.
6
Installation
After you install the software and drivers, connect the dongle
to a free USB 2.0 port on your computer. The Windows
Hardware Installation Wizard automatically registers the
corresponding drivers.
Note: If a previous installation of USB drivers already exists
1
2
in your PC, uninstall the previous version using the uninstall
utility (select “Start > Programs > Belkin >”).
3
Install the USB Drivers and Software
4
Ensure that your PC system hardware and software are
both operational.
5
1.
Insert the Belkin driver-installation CD.
a. After a few moments, the setup application should
appear on your computer screen.
b. If the setup application does not appear,
double-click on “My Computer”, then click on
your CD-ROM-drive icon. This will load the setup
application’s main page.
2.
Click the “Install Driver” button.
3.
The InstallShield Wizard starts.
4.
When the Device Driver Installation Wizard appears,
click “Next” to install the device drivers.
5.
Click “Finish”.
6.
Click “Finish” again to exit the Wizard.
7
6
Installation
1
Connecting the USB Dongle
1.
Place the Hub no more than three feet from the dongle.
2
2.
Power OFF the Hub and disconnect it from all USB
devices (e.g., cameras, hard drives, scanners).
3
3.
Ensure that the dongle and Hub are facing each other.
4.
Connect the USB dongle to the PC’s high-speed USB
port. The system will automatically detect and complete
installation of the drivers for the connected dongle.
5.
Restart your computer.
4
5
6
Connecting the Hub
1.
Ensure that the Hub is switched OFF.
2.
Place the Hub within three feet from the dongle. Ensure
that the two units are facing each other.
3.
Connect the power adapter to the Hub. Check that
the LEDs light.
4.
To complete installation of the final driver, follow the
instructions for the registration of the product ID
number in the section “Registration (Pairing)”, on
page 14 of this User Manual.
5.
Restart your computer.
To verify a successful installation, run the Windows Device Manager
utility (“Start > Run > devmgmt.msc”) and verify that it recognizes the
new drivers that were installed. You should see the following names:
UWB Dongle Control, USB Composite Device, UWB Dongle over USB,
and Wireless Hub Device.
8
Installation
Uninstalling the Software
If you need to uninstall the software, you can do so by using
the automatic uninstaller or by using the “Windows Control
Panel > Add or Remove Programs” utility.
To uninstall the software:
1.
Detach the dongle from the USB port of the PC.
1.1 Select “Uninstall Wireless Hub” from “Start >
Programs > Wireless Hub”.
OR
1.2 Use the “Windows Control Panel > Add or Remove
Programs” utility under “Wireless Hub”.
9
1
2
3
4
5
6
Operation
1
2
3
Status Indication
When the Belkin Connection Manager is up, the Belkin icon
displays in the Windows System Tray. The color of the icon
indicates the current activity state, as follows:
Icon Color
Status
Enabled (yellow icon)
4
USB dongle is connected to the computer (dongle is
enabled, no wireless connection is detected)
5
Connected (green icon)
A wireless connection is established with the Hub
6
Disabled (red icon)
USB dongle is disabled (and no connection available)
10
Operation
Configuration Properties
The dongle “Hardware Properties” screen provides direct
access to the dongle hardware configuration.
To open the “Properties” screen, right-click on the Belkin
icon and select “Properties” from the context menu.
The following table explains the properties that can be
configured or viewed:
Property
Description
Connection Status
Operating State
Disabled/Disconnected/
Connected
Signal Strength
0–100%
Transmit Rate Select
Auto/480/400/320/200/160/106.7/
80/53.3Mbps
Channel Select
Auto-Detect /A/B/C/D/E (see Table
1: Wireless channel selection)
Current Channel
A/B/C/D/E (see Table 1: Wireless
channel selection
Cable-Free USB Hub Details
Product ID#
Enables the registration of the
Cable-Free USB Hub product
ID number in order to allow
association/connection
Register/Un-Register
Registers (associates) or
un-registers (disassociates) the
Cable-Free USB Hub of the given
product ID number
11
1
2
3
4
5
6
Operation
1
Property
Description
Dongle Status
2
Reset
Resets the connection/
disassociates Cable-Free USB
Hub and restarts scanning
3
Disable/Enable
Turns off dongle to save
PHY power
Packets Sent/Packets Received
Packets sent (by dongle)
Packets received (from Hub)
4
5
6
Dongle Details
Description
Belkin Cable-Free USB dongle
(HWA531)
Product ID
Unique hardware identification
number
Firmware Version
Host-firmware version
Driver Version
Belkin PC-driver version
12
Operation
Table 1: Wireless channel selection
Belkin
Channel
Name
TFC
Channel
Band Search Pattern
A
TFC1
F1 F2 F3 F1 F2 F3
B
TFC2
F1 F3 F2 F1 F3 F2
C
TFC5
F1 F1 F1 F1 F1 F1
D
TFC6
F2 F2 F2 F2 F2 F2
E
TFC7
F3 F3 F3 F3 F3 F3
1
2
3
4
5
6
Figure 3: Cable-Free USB Hub Connection Status screen
13
Operation
1
2
3
4
5
6
Pairing and Association/Connection
Once the Hub is powered up and completes its initialization,
it is ready for association. First-time association occurs after
manually registering the product ID number of the Hub with
the PC. This is also called “pairing” the two entities.
After the first-time connection/association, future association
is handled automatically, so that no user intervention
is necessary.
Registration (Pairing)
To register the product ID number:
1. Open the “Cable-Free USB Hub Connection Status”
screen (double-click the CM tray icon).
2. In the “Cable-Free USB Hub Details (Pairing)” section,
enter the product ID number found on the bottom of the
Hub. (There are six pairs of character/digit combinations
in the product ID.)
3. Press “Register” to finalize the registration/pairing. Once
the product ID number is accepted, the product ID
numbers are displayed as read-only, and the button is
labeled “Un-Register”.
14
Operation
4. Following registration/pairing, association/connection is
established, and a tool tip is displayed in the System
Tray area showing the product ID number and a message
that the Hub is connected with the PC as shown in
the image below.
1
2
3
4
5. Check the “Operating State” field in the “Cable-Free
USB Hub Connection Status” screen to see if the status
changes from “Disconnected” to “Connected”.
5
6
Automatic Association
After the first manual association, the same Hub is
automatically associated to the same computer whenever
the Hub operates within range. To associate to another Hub,
you must manually un-register the previous Hub by pressing
“Un-Register”, which causes the Hub to disassociate from
the computer.
15
Operation
1
2
3
Changing Association/Registration (Pairing)
To change the association/registration from one Hub
to another:
1. In the “Hub Connection Status” screen, click
“Un-Register”.
4
5
2. Enter the product ID number of the Hub to which you
want to associate and press “Register”.
6
3. A tool tip is displayed in the System Tray area, containing
the product ID and a message that the Hub is now
connected with the PC.
4. Check the “Operating State” field to see if the status
changes from “Disconnected” to “Connected”.
16
Operation
Closing the Connection Manager Application
To shut down the Connection Manager:
1.
Right-click the tray icon and select “Exit”.
1
2
3
4
2.
Click “Yes” to confirm that you want to shut down
the application.
Maintenance
The following sections provide maintenance information and
troubleshooting advice.
17
5
6
Troubleshooting
1
Dongle LED Indicator
2
3
Traffic
Figure 4: Dongle LED Indicator
4
Traffic: Flashes green when packets are received.
5
Hub LED Indicators
6
Association/Traffic
Power
Figure 5: Cable-Free USB Hub LED Indicators
Power: Constant on when 5V DC is applied.
Association with Dongle/Traffic Indicator: Blinks slowly
when a new device is connected to the Hub; blinks rapidly
to indicate Rx/Tx traffic with your peripheral device.
18
Troubleshooting
Channel Busy
If the user selects a specific channel (frequency range) and
the dongle (after scanning) finds it cannot be the master on
that channel, an information message window will display
automatically. This is the result of more than one dongle
present in the same range.
1
2
3
4
5
Figure 6: Channel-busy message
To resolve this conflict, select a different channel or “Auto
Detect” in the “Connection Manager Properties” screen of
one of the dongles.
Support for USB Classes
Audio devices (“USB Audio” class) and some webcams
(“USB Video” class), which have isochronous end points, are
not supported by the Hub.
Wireless Link Out of Range
If you are experiencing frequent wireless-link breaks, the Hub
may be out of range—the solution is to shorten the range
between the dongle and Hub.
19
6
Troubleshooting
1
2
3
Extended or External Wired USB Hub Connections
If you are connecting the dongle to a PC via an external
wired USB hub, we recommend that you:
• Apply external power to the wired USB hub.
• Do not use the external hub during initial connect and
driver installation.
4
5
6
20
Troubleshooting
Reading Software and Firmware Versions
In order to ensure that you are working with the latest
version of software and hardware, you can check the
versions of each component as follows:
Belkin application
PC host drivers version
In “Control Panel > Add
or Remove Programs >
Cable-Free USB Hub > Click
here for support information”
for the automatically
installed application.
Right-click the tray icon, and
select “Properties”. Read
the “Driver Version” field in
the “Cable-Free USB Dongle
Details” section.
Cable-Free USB
dongle firmware version Right-click the tray icon, and
select “Properties”. Read the
“Firmware version” field in
the “Cable-Free USB Dongle
Details” section.
Cable-Free USB Hub
firmware version
Use a serial connector to
connect via HyperTerminal
application and view the
firmware version in the
command prompt of the
Cable-Free USB Hub.
21
1
2
3
4
5
6
Technical Specifications
1
Model Number
HWA531 — Cable-Free
USB dongle
DWA531 — 4-port Cable-Free
USB Hub
2
UWB Chipset
Belkin 531 MAC/BB chip,
Belkin 502 RF chip
Operational Range
Up to 30 to 60 ft. (10 to 20m)
4
PHY Data Rate
Up to 480Mbps (automatically
or manually selected)
5
Frequency Range
3.1GHz to 4.8GHz; supporting
3 sub-bands, 528MHz each
6
RF Modulation Type
Multiband OFDM
Max. Output Power
80µW (-41.25 dBm/MHz max.)
Max. Power Consumption
HWA531 — 1.75W (350mA
max. @ 5VDC from USB port)
3
DWA531 — 3W (600mA @
5VDC from external
power supply)
USB End-Point Types
Bulk in/out, Interrupt, Control
Number of End Points
32 end points
USB Power Drive
Powers up to 4 USB external
devices (500mA @ 5VDC each)
USB Association Type
Host GUI-based association
LED Indicators
Power, Association, Traffic
PCB Size
HWA531 — 25 by 69mm
DWA531 — 38 by 92mm
22
Technical Specifications
Antenna
HWA531 — UWB on-board
omnidirectional antenna
1
DWA531 — UWB 2 internal
omnidirectional antennas
2
Operating
Temperature Range
5° C to 50° C
Operational Humidity
10–95%
PHY Compliance
Complies with WiMedia® PHY
spec. rev. 1.0
4
FCC Compliance
Complies with FCC CFR
47 Part 15 subpart F; UWB
intentional radiation
5
USB Hub Compliance
Complies with USB 2.0/1.1
OS Compliance
Microsoft Windows XP SP2;
Windows Plug-and-Playcompliant
Coexistence
Coexists with standard
WiMedia devices
®
Coexistence with co-located
additional dongles or UWB
systems (FFI, TFI schemes)
23
3
6
Information
1
2
3
4
5
6
FCC Statement
DECLARATION OF CONFORMITY WITH FCC RULES FOR
ELECTROMAGNETIC COMPATIBILITY
We, Belkin International, Inc., of 501 West Walnut Street, Compton,
CA 90220, declare under our sole responsibility that the product:
F5U301
to which this declaration relates:
Complies with Part 15 of the FCC Rules. Operation is subject to
the following two conditions: (1) this device may not cause harmful
interference, and (2) this device must accept any interference received,
including interference that may cause undesired operation. This
equipment may only be operated indoors. Operation outdoors is in
violation of 47 U.S.C. 301 and could subject the operator to serious
legal penalties.
CE Declaration of Conformity
We, Belkin International, Inc., declare under our sole responsibility that the
F5U301, to which this declaration relates, is in conformity with Generic Emissions
Standard EN55022:1998 Class B, EN50081-1, and with Generic Immunity
Standard EN50082-1:1992.
Belkin International, Inc., Limited Lifetime
Product Warranty
What this warranty covers.
Belkin International, Inc., warrants to the original purchaser of this Belkin product
that the product shall be free of defects in design, assembly, material,
or workmanship.
What the period of coverage is.
Belkin International, Inc., warrants the Belkin product for the lifetime of
the product.
What will we do to correct problems?
Product Warranty.
Belkin will repair or replace, at its option, any defective product free of charge
(except for shipping charges for the product).
24
Information
What is not covered by this warranty?
All above warranties are null and void if the Belkin product is not provided
to Belkin International, Inc., for inspection upon Belkin’s request at the sole
expense of the purchaser, or if Belkin International, Inc., determines that the
Belkin product has been improperly installed, altered in any way, or tampered
with. The Belkin Product Warranty does not protect against acts of God (other
than lightning) such as flood, earthquake, war, vandalism, theft, normal-use wear
and tear, erosion, depletion, obsolescence, abuse, damage due to low voltage
disturbances (i.e. brownouts or sags), non-authorized program, or system
equipment modification or alteration.
How to get service.
1
2
3
To get service for your Belkin product you must take the following steps:
4
1. Contact Belkin International, Inc., at 501 W. Walnut St., Compton
CA 90220, Attn: Customer Service, or call (800)-223-5546, within 15 days of
the Occurrence. Be prepared to provide the following information:
5
a. The part number of the Belkin product.
b. Where you purchased the product.
c. When you purchased the product.
d. Copy of original receipt.
2. Your Belkin Customer Service Representative will then instruct you on how to
forward your receipt and Belkin product and how to proceed with your claim.
Belkin International, Inc., reserves the right to review the damaged Belkin
product. All costs of shipping the Belkin product to Belkin International, Inc.,
for inspection shall be borne solely by the purchaser. If Belkin determines, in its
sole discretion, that it is impractical to ship the damaged equipment to Belkin
International, Inc., Belkin may designate, in its sole discretion, an equipment
repair facility to inspect and estimate the cost to repair such equipment. The
cost, if any, of shipping the equipment to and from such repair facility and of
such estimate shall be borne solely by the purchaser. Damaged equipment must
remain available for inspection until the claim is finalized. Whenever claims are
settled, Belkin International, Inc., reserves the right to be subrogated under any
existing insurance policies the purchaser may have.
How state law relates to the warranty.
THIS WARRANTY CONTAINS THE SOLE WARRANTY OF BELKIN
INTERNATIONAL, INC., THERE ARE NO OTHER WARRANTIES, EXPRESSED
OR, EXCEPT AS REQUIRED BY LAW, IMPLIED, INCLUDING THE IMPLIED
WARRANTY OR CONDITION OF QUALITY, MERCHANTABILITY OR FITNESS
FOR A PARTICULAR PURPOSE, AND SUCH IMPLIED WARRANTIES, IF ANY,
ARE LIMITED IN DURATION TO THE TERM OF THIS WARRANTY.
25
6
Information
1
2
3
4
Some states do not allow limitations on how long an implied warranty lasts, so
the above limitations may not apply to you.
IN NO EVENT SHALL BELKIN INTERNATIONAL, INC., BE LIABLE FOR
INCIDENTAL, SPECIAL, DIRECT, INDIRECT, CONSEQUENTIAL OR MULTIPLE
DAMAGES SUCH AS, BUT NOT LIMITED TO, LOST BUSINESS OR PROFITS
ARISING OUT OF THE SALE OR USE OF ANY BELKIN PRODUCT, EVEN IF
ADVISED OF THE POSSIBILITY OF SUCH DAMAGES.
This warranty gives you specific legal rights, and you may also have other rights,
which may vary from state to state. Some states do not allow the exclusion or
limitation of incidental, consequential, or other damages, so the above limitations
may not apply to you.
5
6
26
Cable-Free
USB Hub
Belkin Tech Support
US: 310-898-1100, ext. 2263
800-223-5546, ext. 2263
UK: 0845 607 77 87
Australia: 1800 235 546
New Zealand: 0800 235 546
Europe: www.belkin.com/support
Belkin International, Inc.
501 West Walnut Street
Los Angeles, CA 90220, USA
310-898-1100
310-898-1111 fax
Belkin B.V.
Boeing Avenue 333
1119 PH Schiphol-Rijk, The Netherlands
+31 (0) 20 654 7300
+31 (0) 20 654 7349 fax
Belkin Ltd.
4 Pioneer Avenue
Tuggerah Business Park
Tuggerah, NSW 2259, Australia
+61 (0) 2 4350 4600
+61 (0) 2 4350 4700 fax
Belkin Ltd.
Express Business Park, Shipton Way
Rushden, NN10 6GL, United Kingdom
+44 (0) 1933 35 2000
+44 (0) 1933 31 2000 fax
© 2007 Belkin International, Inc. All rights reserved. All trade names are
registered trademarks of respective manufacturers listed. Windows and
Microsoft are either registered trademarks or trademarks of Microsoft
Corporation in the United States and/or other countries.
P75325-A