1
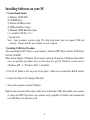
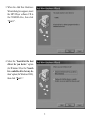
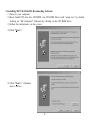
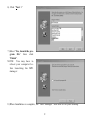
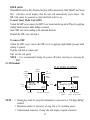
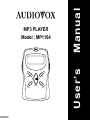
DOWN
PREV
128-6197
UP
ON/OFF
NEXT
Manual
User’s
MP3 PLAYER
Model : MP1164
This device complies with Part 15 of the FCC Rules. Operation is subject to the following two conditions:
(1) This device may not cause harmful interference, and (2) this device must accept any interference received,
including interference that may cause undesirable operation.
Warning: Change or modifications to this unit not expressly approved by the party responsible for compliance
could void the user’s authority to operate the equipment.
NOTE: This equipment has been tested and found to comply within the limits for a Class B digital device,
pursuant to Part 15 of the FCC Rules. These limits are designed to provide reasonable protection against
harmful interference in a residential installation. This equipment generates, uses and can radiate radio
frequency energy and, if not installed and used in accordance with the instruction, may cause harmful
interference to radio communications.
However, there is no guarantee that interference will not occur in a particular installation. If this equipment
does cause harmful interference to radio or television reception, which can be determined by tuning the
equipment off and on, the user is encouraged to try to correct the interference by one or more of the
following measures:
• Reorient or relocate the receiving antenna.
MP1164
• Increase the separation between the equipment and receiver.
Tested To Comply
• Connect the equipment into an outlet on a circuit different from
With FCC Standards
that to which the receiver is needed.
FOR HOME OR OFFICE USE
• Consult the dealer or an experienced radio / TV technician for help.
1
Introduction
The Audiovox MP3 is a personal, compact, non-mechanical player designed for clear, skip-free digital audio
playback. Download MP3 files from your PC hard drive into the player via USB Port, cable included. Its
On-board flash memory and optional 128 Megabyte Smart Media Card, lets you enjoy CD quality music, for
up to 6 hours. The single “AA” Alkaline battery lasts approximately ten hours. Other features include:
• Multi-Function Dot Matrix Text LCD
• Song title display capability
suppoting English Text
• Track/Playing Status Indicator
• Battery status indicator
• Auto Power-off
(in about 35 second under Stop and Pause Mode)
•
•
•
•
•
•
•
Bass and Treble Control
Track Skip / Search
Random Play
Repeat ALL / 1 track
Hold switch
Stereo Earphone Mini Jack
Instant Volume Up / Down Control
1. Specification
Built-in Flash Memory
: 64MB
External Card Slot
: Smart Media Card (not included)
Supporting SMC cards (3V) : Toshiba
16/32/64/128 MB
Samsung 16/32/64/128 MB
Sandisk
16/32/64 MB
Fuji
16/32 MB
PC Interface
: USB Port, USB V1.1
Computer Compatibility
: ACER, COMPAQ, DELL, IBM, SONY
Stereo Earphone Jack
: 3.5mm
Power Requirements
: “AA”/ “UM-3”/ “LR6” 1.5Volt x 1 Battery
(Alkaline recommended, not included)
Battery Life
: Approx.10 Hours
Frequency Range
: 20Hz ~ 20KHz
Maximum Output
: 5mW (32 ohm)
S/N Ratio
: 85dB
THD
: 0.1%
Unit Dimension inches (mm) : 3.18 (81) x 2.20 (56) x .86 (22) mm
2
2. Accessories Included
•
•
•
•
Earphones
USB Cable
Carry case with belt clip
MP3 Manager Software
3. Connecting Player to your PC
1) Connect one end (mini plug) of data transfer cable to the connector slot located on the left side of
Player.
2) Insert the opposite end of USB cable into the USB port of your PC.
Note : Please be sure to smoothly remove cable from Player by pushing on side buttons of connector.
Otherwise, it may cause a malfunction.
4. How to Change Battery
1) Lightly push up and slide the lock in an upward direction to unlock the battery lid.
2) Push down on battery lid and slide it in an outward direction.
3) Insert new battery into battery compartment and close battery lid.
4) Slide the lock in place to lock the battery lid.
5) Battery status indicator reading :
Complete
drain
Full Full
change
Complete
drain
Note: Battery must be full before transferring files.
3
Installing Software on your PC
1. System Requirements
1) Windows 98/ME/2000
2) CD ROM Drive
3) Pentium 100MHz or faster
4) 32MB of RAM or Greater
5) Minimum 10MB Hard Disc Space
6) 1 available USB Port, V1.1
7) Sound Card
Note: Some computer systems using VIA chip main board, may not support USB port
properly. Please read the user manual of your computer.
2. Installing USB DriverProcedure
After connecting the MP3 Player to your computer, install the MP3 Player software (USB driver)
from the CD-ROM.
Note: Screen displays of Windows 98 are used to represent all versions of Windows unless differences in operating procedure arise, in such cases the specific Windows version such as
“Windows ME” or “Windows 2000” is identified
1. Press PLAY button to turn on power of the player. (Make sure to unlock the HOLD switch.)
2. Connect the Player to PC through USB cable.
3. Turn on the computer, and start Windows.
Note: You do not need to follow steps 2 and 3 above in that order. USB cables enable you to connect
or remove the MP3 Player from your computer easily, regardless of whether your computer and
your MP3 Player are turned on or off.
4
3. When the Add New Hardware
Wizard dialog box appears, insert
the MP3 Player software CD in
the CD-ROM drive, then click
“Next >”.
4. Select the “Search for the best
driver for you device” option
(for Windows 98) or the “Search
for a suitable drive for my device” option (for Windows 2000),
then click “Next >”.
5
5. Select the CD-ROM drive, then
click “Next >”.
6. Follow the instructions on the
screen.
For Windows 2000 users:
When the following dialog box
appears, click “Yes” to continue.
Note: If you click “No” and stop
installation, your MP3 Player
will appear under Human Interface Devices with a question (!)
mark in the Device Manager
menu. You must reinstall MP3
Player driver.
6
7. Windows system has found the
driver, then click “Next >” to install MP3 Player driver.
8. When a dialog box similar to the
one shown below appears, click
“Finish”.
Note: If necessary, restart your computer.
7
3. Installing MP3 MANAGER Downloading Software
1) Turn on your computer
2) Insert Install CD disc into CD ROM, run CD ROM Drive with “setup exe.” by double
clicking on “My Computer” followed by clicking on the CD ROM drive.
3) Follow the instructions on the screen.
4) Click “Next >”
5) Click “Next >” if destination is correct.
8
6) Click “Next >”
7) Select “Yes, launch the program file” then click
“Finish”.
NOTE: You may have to
reboot your computer before launching the MP3
manager.
8) When Installation is complete, the “MP3 Manager” icon will be on your desktop.
9
THE DOWNLOADER PROGRAM
Using the MP3 Manager
The MP3 Manager is used to manage the files on your MP-1164. Use this program to transfer
files back and forth between your PC and your MP-1164, change the order of songs on your
MP-1164, and format the onboard and/or SMC memory. Start the program by clicking its icon
in the windows Start Menu:
START !
PROGRAMS
!
MP3MANAGER
Connected/Disconnected
View:
PC
View PC
and
andCard
Card
Window
Window
Upload
To
PC
Download
To
Clear All
Player And Format Trash
Uplist
Open Folder
Downlist
Explorer Window
PC File List
10
Built-in Memory
and
SMC Memory Window
If an error message appears stating “MP3 Player Not Detected on USB Port” please check the following:
1) The unit is properly connected to the USB Port through the supplied accessory cable.
2) The unit is powered on (press the Play button ( ) on the MP-1164.“
3) The MP-1164 is in normal mode (not Shuffle or Intro).
MP3 MANAGER
Explorer Window:
This window indicates the directory where your MP3 files are stored. Browse through the directories
on your hard drive and select the folder where your MP3 files are located.
PC File List Window:
Displays the contents of the folder selected in Explorer Window . The files in this window can
be transferred to and from your MP-1164.
Built-in /SMC Memory Window:
Displays the contents of the MP-1164 built-in memory, or SMC memory. This window indicates the directory where your MP3 files are stored. Browse through the directories on your
hard drive and select the folder where your MP3 files are located.
Downloading files to the MP-1164 from the computer:
1) Ensure that your MP-1164 is connected and powered on.
2) Display the selected files you wish to download in the PC File List Window.
3) Click the Download icon on the toolbar.
Uploading files to the computer to the MP-1164:
1) Ensure that your MP-1164 is connected and powered on.
2) Display the selected files you wish to upload in the MP-1164 or SMC Window.
3) Click on the selected file and click on the upload icon on the toolbar.
Note: 1) Within Windows filing system, some special characters and symbols of song file may
not work properly on upload, download and rename process.
2) Music Match Juke Box is a software program that can be downloaded for free and
may help you manage your music collection, turn your music collection in to MP3s,
and send music to your MP3 Player. Please visit www.musicmatch.com for details.
11
Changing the order of files on the MP-1164:
1) Select the file you wish to re-order from the built-in memory or SMC window.
2) Click, hold, and drag the file to its new position. Let go of the mouse button.
3) Your selected file should now be in its new position.
4) This may also be done by selecting the song and clicking on the uplist and downlist icons.
Deleting Files:
1) Select the file you wish to delete from either File List Window.
2) Click the Trash icon on toolbar to delete it.
Open Folder Icon :
Allows you to open another folder that may be on your PC but not shown in the Explorer
Window.
Connected/Disconnected Icon :
Click on this icon before disconnecting the MP-1164 from the USB cable. Click on this icon
to reconnect the MP-1164 to the USB cable.
Upload Icon :
Click on this icon to upload selected songs from your PC to the MP-1164 .
Download Icon :
Click on this icon to download selected songs from your PC to the MP-1164.
Uplist Icon/Downlist Icon :
Click on these icons to change the order of songs on your MP-1164.
Clear All and Format Icon :
Click on this icon to clear all music and format the built-in memory or smart media card.
12
Refomatting the MP-1164 :
Due to normal usage, some portions of space are lost in the Built-in and SMC memory of your
MP-1164. Use the format icon (deletes ALL data on the MP-1164) from time to time as a
maintenance measure to reclaim all free space on your unit.
Note: 1) When “Formatting”, all contents within Built-in Memory and SMC card will be erased.
2) It is recommended to use”L-Format Memory” and ”L-Format Card” under Action
Tab for first time to use this player or each time a new battery is replaced. In normal
use, click the “Clear All &Format” icon to perform higher speed formatting.
13
Volume Control (—)/
Menu Setting Down
button (4)
Volume Control (+) /
Menu Setting Up
button (5)
Perforation
LCD
Readout
Card Slot
Cover Lock
Smart Media
Card Cover
Earphone
Jack
Mode
Button (4)
M
DOWN
PREV
Skip Down /
Prev Menu
Button (2)
UP
ON/OFF
HOLD
PC
Interface
Hold
Switch
Smart Media
Card Latch
NEXT
Power On/Off
Play/Pause/Stop Button (1)
Skip Up /
Next Menu
Button (3)
Battery Cover
Lock
Battery Cover
Player Operation
1. How to use Control Buttons
(In order to make all control buttons active, be sure the hold switch is in the unlocked position.
Power ON and OFF :
Press and hold button (1) for 1 second --- Power ON.
Press and hold button (1) for 3 seconds --- Power OFF.
Play / Pause / Stop
Press button (1) once --- Play Mode.
Press button (1) again --- Pause Mode.
Press button (1) once again to resume Play.
Press and hold this button (1) for 2 seconds --- Stop Mode.
1
Skip Up, Skip Down:
Press button (2) or (3) to skip tracks forward or backward.
Fast Search:
During Play, press and hold button (2) or (3) to search within current track.
Mode :
Press button (4) once to display one of the following menus
Pressing button (2) or (3) can change the menu display :
1. MODE SET 2. BASS SET
3. TRBL SET 4. LCD SET
5. MEM VIEW 6. SMC VIEW 7. BAT VIEW
You may customize your setting in each menu (except #5, #6 & 7 by pressing (4) and
(5). See menu options below.
1. MODE SET
Normal
Repeat ONE
Repeat ALL
Random
(In Random mode, after all songs are played, will return to Stop mode.)
2. BASS SET
Bass
0 – 20
3. TRBL SET
Treble
0 – 20
4. LCD SET
Contrast 0 – 15
5. MEM VIEW
17/64 MB (means total on-board memory is 64 MB, 17MB is occupied).
6. SMC VIEW
20/64 MB (means total card memory is 64 MB, 20MB is occupied).
7. BAT VIEW
1.5 VOLT. (Battery voltage is 1.5V).
Volume control:
Press (5) button to increase Volume level shown from LCD.
Press (4) button to decrease Volume level shown from LCD.
NOTE : LCD will resume to normal display mode after 4 seconds, or by pressing the
PLAY button (1) to resume normal display mode manually.
14
HOLD switch
When HOLD switch is ON, all button functions will be deactivated. “KEY HOLD” and “Good
Bye” will show on the display, then the unit will automatically power down. The
MP-1164 cannot be powered on when the Hold switch is on.
To insert Smart Media Card (SMC)
Unlock the SMC cover, remove the SMC Cover located on the top side of Player by applying
slightly thumb pressure while sliding it outward.
Insert SMC into slot according to the indicated direction.
Reattach the SMC cover and lock it.
To remove SMC
Unlock the SMC cover, remove the SMC cover by applying slight thumb pressure while
sliding it upward.
Push the card latch to release card.
Take out the card gently.
NOTE : It is recommended turning the power off before inserting or removing the
SMC.
2. LCD Readout
PLAY MODE EXAMPLE
Repeat
Indicatior
Random
Indicatior
Lock
SMC Card
Battery
Indicator
Volume
Level
Current
track
Song Title
03/05
Total track
NOTE :
Total time for
current track
NOTE
04:22
Total time for current track
03
Song Title (04:22)
01:22
Audio Sound
Indicator
Play
Indicator
Elapsed time
for current track
1. During play mode the song title information is expressed in a “left digit shifting”
method.
2. Maximum number of characters of song title is 32, including spaces.
3. Undetermined characters of song title will display irregular characters.
15