1
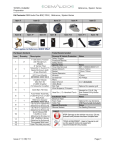
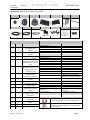
TOYOTA Preparation Scion xB REFERENCE 500CF Kit Contents: OEM Audio Plus Reference 500CF Item 1 Item 2 Item 8 Item 3 Item 9 Item 10 Item 4 Item 5 Item 11 Item 12 Hardware Content Recommended Tools Item Quantity Description Personal & Vehicle Protection Safety Goggles Seat Covers Floor Covers Protective Blanket Safety Gloves Special Tools Panel Clip Removal Socket Wrench Sockets Socket Extension Screwdriver Side Cutters Rivet Tool Drill 5/32” Drill Bit T25 Torx bit 5mm Hex Bit or Allen Wrench 1 2 2 2 3 2 4 2 1” Soft Dome Tweeter with Neodymium Magnet 6.5” Carbon Fiber Woofer 5.25” Carbon Fiber Coaxial rear Speaker 8” Carbon Fiber Subwoofer in Custom Fit Sealed Enclosure, Driver Side 8” Carbon Fiber Subwoofer in Custom Fit Sealed Enclosure, Passenger Side Amplifier Module (1) DSP Amplifier (2) Subwoofer Amplifier Long Arm for Amp Bracket Quick-Sync Harness Driver Side Subwoofer Umbilical cable Passenger Side Subwoofer Umbilical Cable Fuse Holder Assembly, (1) 30-Amp Fuse, (2) 20Amp Fuses 5 1 6 1 7 1 8 1 9 1 10 1 11 1 12 3 Brackets A, B ,C, D, and (8) Screws 13 12 Rivets 14 1 Corrugated Loom 15 10 Cable Ties (Not pictured) Issue A 10/05/11 Wire Strippers/Crimpers Heat Gun Installation Tools Masking Tape Foam Tape Cable Ties Special Chemicals Lubricant Silicone Sealant Personal & Vehicle Protection Item 6 Item 13 Item 7 Item 14 Notes Notes SST # 00002-06001-01 10mm, 12mm, 14mm 6” #2 Phillips Use 1/8'' Nose Needed for 12g & 14g butt Sealed-Crimp-Solder Connectors Needed for 12g & 14g Notes 10 Piece bundle Included Notes For Pulling Wire Through Grommet For Sealing Grommet Notes Legend STOP: Damage to the vehicle may occur. Do not proceed until process has been complied with. TOOLS & EQUIPMENT: Used in Figures to call out the specific tools and equipment recommended for the process. Page | 1 TOYOTA Preparation Scion xB REFERENCE 500CF Table of Contents I. Preparation ............................................................................................................................................................... 1-2 1. Table Of Contents ......................................................................................................................................... 2 II. Procedure ................................................................................................................................................................. 3-23 1. Vehicle Preparation ...................................................................................................................................... 3 2. Installation Prep for Amplifier Assembly.............................................................................................. 3 3. Installation Prep for Subwoofers.............................................................................................................. 3 4. Initial Vehicle Disassembly …………………………………………....................................................................... .3-5 5. Door Speaker Removal and Installation ................................................................................................6-7 6. Quick-Sync Harness Installation ……......................................................................................................... 8-10 7. Power Wire Installation………………............................................................................................................ 11-13 8. Install Subwoofer Umbilical Cables……………......................................................................................... 13-14 9. Amplifier Assembly Installation…………………………….................................................................................15-16 10. Loosen Driver and Passenger Seat......................................................................................................16-17 11. Subwoofer Enclosure Installation .........................................................................................................17-19 12. Fuse Installation ............................................................................................................................................ 20 13. Connect Battery Ground .....…....….………………………………………………................................................... 20 14. Set Clock to Correct Time ....................................................................................................................... 20 15. Verify Radio Setting …….............................................................................................................................. 21-22 16. Conclusion ...................................................................................................................................................... 22-23 Accessory Installation Practice (read before installation) Care must be taken when installing this accessory to ensure damage does not occur to the vehicle. The installation of this accessory should follow approved guidelines to ensure a quality installation. These guidelines can be found in the “Accessory Installation Practices” document. This document covers such items as: • Vehicle Protection (use of covers and blankets, cleaning chemicals, etc.) • Safety (eye protection, checking torque procedure, etc.) • Vehicle Disassembly/Reassembly (panel removal, part storage, etc.) • Electrical Component Disassembly/Reassembly (battery disconnection, connector removal, etc.) Please see your Toyota/Scion/Lexus dealer for a copy of this document. Revisions and other installation assets OEM Audio Plus is committed to providing components and instructions designed for seamless integration. Please visit oemaudioplus.com for the most up to date installation related documents and media, Important Warranty Information Failure to completely and properly fill out online Warranty Registration may result in possible reduction or complete denial of future warranty claims. Complete yours today at: oemaudioplus.com/registration or call: 855 OEM-ODIO for more details and alternative methods of system registration. Issue A 10/05/11 Page | 2 TOYOTA Procedure Scion xB REFERENCE 500CF 1. Vehicle Preparation a. Apply parking brake. b. Disconnect the negative (-) battery cable. c. Prepare a protective surface to place all vehicle components on. 2. Installation Prep for Amplifier Assembly a. Remove the Amplifier Assembly and bracket arm from the box. (Fig. 2-1) b. Using a T-25 Torx bit, remove the screw located at the bottom of the Assembly and install the bracket arm. (Fig. 2-2) c. Re-install the screw and tighten. 3. Installation Prep for Subwoofers a. Using a 5mm hex bit, install the subwoofer brackets to the subwoofer enclosures. The brackets and enclosures are marked “A”, “B”, “C”, and “D”. Install bracket “A” to location “A” on the enclosures, then “B” to “B”, and so forth. (Fig. 3-1) 4. Initial Vehicle Disassembly a. Remove Door Panels 1. Disengage the small trim panel behind the interior door handle using an appropriate panel tool. (Fig. 4-1) Issue A 10/05/11 Page | 3 TOYOTA Procedure Scion xB REFERENCE 500CF 2. Use a #2 Phillips screwdriver to remove the screw behind the trim panel. (Fig. 4-2) 3. Use a #2 Phillips screwdriver to remove the screw securing the power window/door lock controls. (Fig. 4-3) 4. Remove tweeter housing by pulling straight and away from door. Unplug tweeter connector and set aside. (Fig. 4-4) NOTE: For front doors only. 5. Use a panel tool to remove the window/door lock control panel. Insert tool between the front edge of the panel and then the sides to remove. (Fig. 4-5) 6. Disconnect window/door lock control connectors from the panel and re-install back in place. (Fig. 4-5) Issue A 10/05/11 Page | 4 TOYOTA Procedure Scion xB REFERENCE 500CF 7. Use panel tool to disengage the clips behind the door panel one at a time. Start at the bottom, then the sides and finish at the top. (Fig. 4-6) Note: Use gentle force to remove door panel. 8. Remove door latch assembly from door panel. (Fig. 4-7) 9. Carefully remove entire door panel and set aside on a protective blanket. Repeat this process for remaining doors. Note: Some door panel snaps may still be attached to the sheet metal. Remove the snaps using the forked end of your panel tool and place it back on the door panel. b. Remove Front Driver and Front Passenger Side Threshold Panel. Fig. 4-8) Note: Disengage both ends of the panel before pulling upward. c. Remove Driver and Passenger Kick Panel Trim by disengaging snaps and pulling away from position. (Fig. 4-9) Issue A 10/05/11 Page | 5 TOYOTA Procedure Scion xB REFERENCE 500CF 5. Door Speaker Removal and Installation a. Speaker Removal Note: Make sure to note speaker connector orientation then unplug speaker connector. (Fig. 5-1) 1. Use a 5/32" drill bit to remove the three rivets holding factory speaker. (Fig. 5-2) Note: Start by applying light drilling pressure and progressively increase force as necessary towards the end. 2. After drilling, remove rivet debris inside the door cavity. (Fig. 5-3) Repeat for remaining door. Note: Failure to remove debris may induce noise. b. Speaker Installation NOTE: Use the OEM Audio Plus 6.5-inch woofers for the front doors and the OEM Audio Plus 5.25-inch coaxial speakers for the rear doors. 1. Using a rivet tool, install supplied rivet fasteners to mount OEM Audio Plus speaker and connect speaker connector. Repeat for remaining doors. (Fig. 5-4) Issue A 10/05/11 Page | 6 TOYOTA Procedure Scion xB REFERENCE 500CF 2. Install door panels in the reverse order. c. Tweeter Removal and Installation 1. Carefully remove the factory tweeter from the sail panel by unlocking the three prongs one at a time. (Fig. 5-5) 2. Carefully push out the tweeter grill from the rear of the sail panel. (Fig. 5-6) Note: This is necessary to allow inspection of the tweeter installation. 3. Carefully apply pressure to the tweeter foam gasket and push outwards prior to installation. (Fig. 5-7) Note: This will prevent blockage of the tweeter during installation. 4. Insert the OEM Audio Plus Tweeter in place and make sure the foam gasket is not causing any blockage. (Fig. 5-8) 5. Reinstall the tweeter grill to sail panel, connect tweeter connector, and install tweeter housing to the door. Repeat for other door. Issue A 10/05/11 Page | 7 TOYOTA Procedure Scion xB REFERENCE 500CF 6. Quick-Sync Harness Installation a. Glove Box Removal 1. Open glove box and disengage the glove box damper on the right side. (Fig. 6-1) 2. Squeeze sides of glove box and pull down and out in one motion to remove. (Fig. 6-2) b. Radio Removal 1. Lay down protective blanket over climate controls and transmission area. 2. To remove the radio trim panel, open the two vents on the sides of the radio, reach your fingers inside the vents, and pull straight out. (Fig. 6-3) 3. Remove the small trim piece below the radio by pulling straight out. (Fig. 6-4) Issue A 10/05/11 Page | 8 TOYOTA Procedure Scion xB REFERENCE 500CF 4. Using a 10mm socket wrench, remove the four (4) bolts holding the radio in place. (Fig. 6-5) 5. Disconnect connectors and antenna lead. (Fig. 6-6) 6. Remove radio and store. c. Run the Passenger-side of Quick-Sync Harness and Driver-side Subwoofer Umbilical Cable. 1. Enter through the radio cavity and run harness together with the driver side subwoofer umbilical cable (white 4-pin connector first) through the space above the air conditioning unit in the direction of the passenger side kick panel. Run neatly and out of the way. Use cable ties as necessary. (Fig. 6-7) 2. Locate and remove the 10mm ground bolt located in the passenger side kick panel area. (Fig. 6-8) Issue A 10/05/11 Page | 9 TOYOTA Procedure Scion xB REFERENCE 500CF 3. Install the harness ground together with the factory ground. Note: Make sure harness ground terminal rests on top of the factory ground. 4. Re-install the 10mm bolt and tighten. (Fig. 6-9) d. Run driver side of Quick-Sync Harness and driver side subwoofer umbilical cable. 1. Enter through the radio cavity and run the yellow power wires together with the driver side subwoofer umbilical cable towards the accelerator pedal. (Fig. 6-10) 2. Lay the (3) yellow power wires on the floor. (Fig. 6-11) 3. Finish routing the driver side subwoofer umbilical cable above the accelerator pedal and steering column into the driver side kick panel. Run neatly and out of the way. Use cable ties as necessary. Leave the extra slack on the floor for now. (Fig. 6-12) Issue A 10/05/11 Page | 10 TOYOTA Procedure Scion xB REFERENCE 500CF 7. Power Wire Installation a. Under the hood. 1. Locate the grommet for the main factory wiring harness on the driver side of the firewall directly under the two (2) heater hoses. 2. Identify unused nipple and slice the tip off to create an opening for the power wire. (Fig. 7-1) b. Under dash area (Driver side) 1. Lubricate power wire with silicone spray or comparable substitute. 2. Run entire length through the grommet. Note: Avoid interference with accelerator and brake pedals. (Fig. 7-2) 3. Pull back approximately 6” of the wire and apply a small amount of silicone sealant on the wire to seal the grommet opening. 4. Push back entire length. Note: Inspect grommet from the engine compartment and verify seal. (Fig. 7-3) 5. Once the power wire installation is completed under the dash area, secure any wire slack to existing factory wiring. Use cable ties as necessary. c. Under hood wiring routing. 1. Install supplied high-temp corrugated split loom to cover the power wires and insulate against extreme temperature under the hood. (Fig. 7-4) Issue A 10/05/11 Page | 11 TOYOTA Procedure Scion xB REFERENCE 500CF 2. Run power wires to the battery by following the direction of the factory wiring harness to the ECU. (Fig. 7-5) 3. Continue in between the ECU and Air Filter Box and end by the battery. Secure using cable ties as necessary. d. Installation of the Fuse Holder 1. Remove the 1:mm bolt from the battery’s positive terminal and install the ring terminal of the fuse holder lead. Re-install the 10mm bolt and tighten. Note: Do not install fuses at this time! (Fig. 7-6) 2. Connect the power wires to the fuse holder using the pre-installed butt connectors. Use wire stripper and strip 3/8" off the end of each power wire. (Fig. 7-7) 3. Start with the (larger) 12 ga. power wire by inserting it into the Yellow butt connector. (Fig. 7-8) Note: Use appropriate Crimp Tool Issue A 10/05/11 Page | 12 TOYOTA Procedure Scion xB REFERENCE 500CF 4. Apply heat to activate the solder and heat shrink insulator for the best connection possible. (Fig. 7-9) 5. Insert 14 ga. wire into the Blue butt connector and crimp. (Fig. 7-10) Note: Use appropriate Crimp Tool 6. Apply heat to activate the solder and heat shrink insulator for the best connection possible. (Fig. 7-11) 7. Secure using cable ties as necessary. e. Repeat for the other 14 ga. Power wire. 8. Install Subwoofer Umbilical Cables (…continue from Section 6, Step D-3-pg. 10) a. Driver side subwoofer umbilical cable 1. Unfasten white plastic carpet clips along the threshold area and lift carpet edge to expose cable route. (Fig. 8-1) Issue A 10/05/11 Page | 13 TOYOTA Procedure Scion xB REFERENCE 500CF 2. Run the cable under the carpet and exit under the seat through the opening used by the existing factory wiring. (Fig 8-2) b. Passenger side subwoofer umbilical cable 1. Run the passenger side subwoofer umbilical cable (shorter cable) through the passenger side kick panel area with the white 4-pin connector first. (Fig. 8-3) 2. Unfasten white plastic carpet clips along the threshold area and lift carpet edge to expose cable route. (Fig. 8-4) 3. Run the cable under the carpet and exit under the seat through the opening used by the existing factory wiring. (Fig 8-5) Issue A 10/05/11 Page | 14 TOYOTA Procedure Scion xB REFERENCE 500CF 9. Amplifier Assembly Installation a. Connecting the DSP and Sub Amplifiers (Fig. 9-1) 1. Plug the White and Gray 22-pin connectors from the Quick-Sync Harness into their designated receptacles on the DSP Amplifier. 2. Plug the Black 10-pin connector from the Quick-Sync Harness into its designated receptacle on the Sub Amplifier. 3. Plug the 6-pin Gray connector from the Sub cable into its designated receptacle on the Sub Amplifier. 4. Repeat steps for the other sub amplifier. b. Mounting the Amplifier Assembly 1. Remove the outward-facing 10mm bolt used on the a/c blower unit. (Fig. 9-2) 2. Remove the lower side-facing 12mm bolt off the black chassis reinforcement bracket located above the passenger side kick panel. (Fig. 9-3) 3. Carefully insert Amplifier Assembly through the bottom opening underneath the glove box cavity. (Fig. 9-4) Note: Tilt Amplifier Assembly to the right to clear long mounting arm and slip into the designated mounting location. Issue A 10/05/11 Page | 15 TOYOTA Procedure Scion xB REFERENCE 500CF 4. Line up each bracket arm to their corresponding mounting positions. (Fig. 9-5) 5. Upper Short Arm to 10mm bolt location 6. Lower Long Arm to 12mm bolt location 7. Turn the bolt by hand initially. If binding occurs remove the bolt and repeats steps. 8. Use socket wrench to tighten. Note: It may help to push the lower arm towards the firewall while installing the 12mm bolt. c. Connect the Quick-Sync Harness into the Radio and factory harness using the designated connectors. (Fig. 9-6) d. Re-install radio, trim panels, and glove box in reverse order. Note: Refer to Pg 7, Step 7, Section B. 10. Loosen Driver and Passenger Seat a. Slide the seats forward and remove the trim panels covering the seat bolts on the rear side of the seats. Locate the slots in the trim covers and pry them off using the forked end of your trim tool. (Fig. 10-1) b. Using a 14mm socket with a 6” extension, remove the two rear 14mm seat bolts. (Fig. 10-2) Issue A 10/05/11 Page | 16 TOYOTA Procedure c. Scion xB REFERENCE 500CF Slide seats to the rear and remove the last two front 14mm seat bolts. (Fig. 10-3) d. Disconnect the two connectors underneath the seat and remove the cable mounting clip. (Fig 104) e. Tilt the seats towards the rear of the car. (Fig. 105) 11. Subwoofer Installation a. Remove the black metal cover under the driver seat. Note: For driver side only. 1. Use a 12mm socket to remove the two bolts holding the black metal cover under the driver’s seat. (Fig. 11-1) Issue A 10/05/11 Page | 17 TOYOTA Procedure Scion xB REFERENCE 500CF 2. Remove the black metal cover and re-install the two 12mm bolts. (Fig. 11-2) Note: The subwoofer enclosure will now act as a protective cover instead of the black metal cover. b. Install the Subwoofers 1. Install the Driver-side subwoofer on the floor with Bracket A facing the front of the car. Note: For driver side only. (Fig. 11-3) 2. Install the Passenger-side subwoofer on the floor with Bracket C facing the front of the car. Note: For passenger side only. (Fig.11-4) 3. Plug the subwoofer umbilical cables to the subwoofers. (Fig. 11-5) Issue A 10/05/11 Page | 18 TOYOTA Procedure Scion xB REFERENCE 500CF 4. Make sure that the enclosure is nestled in place and the holes on both brackets are lining up with the seat bolt holes in the car. (Fig. 11-6) 5. Very carefully return the seat back to its original position – After returning the seat back in place, confirm that the seat bolt holes are lining up. (Fig. 11-7) 6. Tighten the seat bolts by hand at first to ensure proper alignment. If there is too much resistance, start over again and double check the alignment. 7. Finish tightening all four seat bolts using your 14mm socket and ratchet. (Fig. 11-8) 8. Install the trim covers for the rear seat bolts. (Fig. 11-9) 9. Re-install carpet, kick panel cover, and threshold trim in reverse order. Issue A 10/05/11 Page | 19 TOYOTA Procedure Scion xB REFERENCE 500CF 12. Fuse Installation a. Insert the 20A fuses for the 14 ga. power wires (thinner wires) and the 30A fuse for the 12 ga. power wire. (Fig. 12-1) 13. Connect Battery ground (-). (Fig. 13-1) 14. Set Clock to correct time. 15. Verify Radio Settings. a. Pioneer Base Radio (PT546-00120) 1. Turn radio off then press and hold "settings" Select "Car Type" > "tC" in "Setup" (Fig. 15-1) (Pg 52 Radio owner’s manual) NOTE: Even though this car is an xB, this setting must be set at tC. Only the tC setting allows FULLRANGE OUTPUT. 2. Select "Natural" setting in the SSP Menu. (Fig. 15-2) (Pg 9 Radio owner’s manual) Issue A 10/05/11 Page | 20 TOYOTA Procedure b. Scion xB REFERENCE 500CF Pioneer Premium Radio (PT546-00121) 1. Turn radio on and select "Car Type" > "tC" in "System settings" (Fig. 15-3) (Pg 57 Radio owner manual) NOTE: Even though this car is an xB, this setting must be set at tC. Only the tC setting allows FULL-RANGE OUTPUT. 2. Select "Natural" setting in the "SSP Menu" (Fig. 15-4) (Pg 57 Radio owner manual) c. Aisin SNS 200 (NSDA-W10U) 1. Turn radio on and select "Off" setting in the "SSP Menu" (Fig. 15-5) (Pg 187 Radio owner manual) NOTE: This setting allows the purest sound quality. 2. Verify "Parametric EQ" is set to "Flat" (Fig. 15-6) (Pg 185 Radio owner manual) Issue A 10/05/11 Page | 21 TOYOTA Procedure Scion xB REFERENCE 500CF 3. Verify the Fader/Balance settings are centered. (Fig 15-7) 4. Verify the Focus settings are centered. (Fig. 15-8) 16. This concludes the OEM Audio Plus Reference 500CF Installation a. Start your engine. b. Turn on your radio. c. Enjoy! Issue A 10/05/11 Page | 22 TOYOTA Procedure Scion xB REFERENCE 500CF Checklist –These points MUST be checked to ensure a quality installation. Check: Power Windows Vehicle Function Detail: Verify power window controls are functioning properly. Power Door Locks Hazard Lights Verify power door lock controls are functioning properly. Verify hazard lights are functioning properly. Clock Verify proper time on clock. Radio Verify radio is functioning properly. Navigation (if applicable) Verify navigation system is functioning properly. Bluetooth (if Applicable) Verify Bluetooth is functioning properly. Revisions and other installation assets OEM Audio Plus is committed to providing components and instructions designed for seamless integration. Please visit oemaudioplus.com for the most up to date installation related documents and media, Important Warranty Information Failure to completely and properly fill out online Warranty Registration may result in possible reduction or complete denial of future warranty claims. Complete yours today at: oemaudioplus.com/registration or call: 855 OEM-ODIO for more details and alternative methods of system registration. Issue A 10/05/11 Page | 23