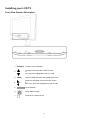
1
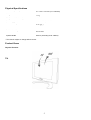
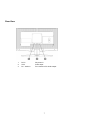
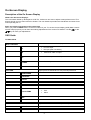
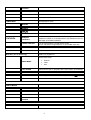
Table of Contents
Safety and Troubleshooting Information ....................................................................................................... 1
Safety precautions and maintenance...................................................................................................... 1
Installation Locations............................................................................................................................. 1
About This Manual ........................................................................................................................................ 2
About This Guide................................................................................................................................... 2
Notational Descriptions ......................................................................................................................... 2
Product Information ....................................................................................................................................... 3
Product Features..................................................................................................................................... 3
Technical Specifications* ...................................................................................................................... 3
Automatic Power Saving ....................................................................................................................... 4
Physical Specifications .......................................................................................................................... 5
Product Views........................................................................................................................................ 5
Installing your LCD TV................................................................................................................................. 6
Front View Product Description ............................................................................................................ 6
Rear View .............................................................................................................................................. 7
On-Screen Display ......................................................................................................................................... 8
Description of the On Screen Display ................................................................................................... 8
OSD Guide............................................................................................................................................. 8
TV Control ................................................................................................................................................... 12
Using Your Remote Control ................................................................................................................ 12
Troubleshooting ........................................................................................................................................... 14
Other Related Information ........................................................................................................................... 15
For units set at 115 V :......................................................................................................................... 15
Screen Modes ………………………………………………………………………………………...17
Connecting to Your TV Antenna, PC, DVD/VCR etc. ............................................................................... 17
Accessory Pack .................................................................................................................................... 17
Setting up and connecting your TV ..................................................................................................... 17
Using the Cable Management.............................................................................................................. 19
To attach and remove back cover ................................................................................................................ 20
To attach back cover ............................................................................................................................ 20
To remove back cover.......................................................................................................................... 20
VESA Wall Mounting.................................................................................................................................. 21
Using Other Menus ...................................................................................................................................... 22
Using the Remote Control ................................................................................................................... 22
Selecting a source input ....................................................................................................................... 22
Adjusting the picture preference.......................................................................................................... 22
Adjusting the sound preference ........................................................................................................... 22
Selecting a preferred OSD language.................................................................................................... 23
Locking the set / Parental Controls...................................................................................................... 23
Closed caption...................................................................................................................................... 26
Automatic tuning ................................................................................................................................. 26
Manual tuning (Fine tune) ................................................................................................................... 26
Skipping programs (Channel edit) ....................................................................................................... 27
Limited Warranty......................................................................................................................................... 28
French Version..............................................................................................................................................29
Safety and Troubleshooting Information
Safety precautions and maintenance
WARNING: Use of controls, adjustments or procedures other than those specified in this
documentation may result in exposure to shock, electrical hazards and/or mechanical hazards.
Read and follow these instructions when connecting and using your LCD TV:
• Unplug the TV if you are not going to use it for an extensive period of time.
• Unplug the TV if you need to clean it with a slightly damp cloth. The screen may be wiped with a dry cloth
when the power is off. However, never use alcohol, solvents or ammonia-based liquids.
• Consult a service technician if the TV does not operate normally when you have followed the instructions in
this manual.
• The casing cover should be opened only by qualified service personnel.
• Keep the TV out of direct sunlight and away from stoves or any other heat source.
• Remove any object that could fall into the vents or prevent proper cooling of the TV’s electronics.
• Do not block the ventilation holes on the cabinet.
• Keep the TV dry. To avoid electric shock, do not expose it to rain or excessive moisture.
• When positioning the TV, make sure the power plug and outlet are easily accessible.
• If turning off the TV by detaching the power cable or DC power cord, wait for 6 seconds before attach the
power cable or DC power cord for normal operation.
• To avoid the risk of shock or permanent damage to the set, do not expose the TV to rain or excessive
moisture.
• IMPORTANT: When using as a PC monitor, always activate a screen saver program during your application.
If a still image in high contrast remains on the screen for an extended period of time, it may leave an 'afterimage' or 'ghost image' on the front of the screen. This is a well-known phenomenon that is caused by the
shortcomings inherent in the LCD technology. In most cases, the after-image will disappear gradually over a
period of time after the power has been switched off. Be aware, that the after-image symptom cannot be
repaired and is not covered under warranty.
Consult a service technician if the TV does not operate normally when the operating instructions given in this
manual have been followed.
Installation Locations
•
•
•
Avoid exposure to heat and extreme cold
Do not store or use the product in locations exposed to heat, direct sunlight or extreme cold.
Avoid moving the product between locations with large temperature differences. Choose a site that falls
within the following temperature and humidity ranges.
o Temperature: 5-40°C 41-104°F
o Humidity: 20-80% RH
• Do not subject the product to severe vibration or high impact conditions. Do not place the product in the
trunk of a car.
• Take care not to mishandle this product by either knocking or dropping it during operation or transportation.
Do not store or use the product in locations where there is a high level of humidity or in dusty environments. Do not
allow water or other liquids to spill on or into the product.
1
About This Manual
About This Guide
This user's guide is intended for anyone who uses the Magnavox LCD TV. It describes the features, setup,
operation and other important information.
It includes the following sections:
•
•
•
•
•
Safety and Troubleshooting Information provides tips and solutions for common problems as well as other
related information you may need.
Product Information gives an overview of the monitor's features as well as the technical specifications for
this monitor.
Installing Your Monitor describes the initial setup process and gives an overview of how to use the monitor.
On-Screen Display provides information on adjusting the settings on your monitor.
TV Control provides information on adjusting the settings for your TV function.
Notational Descriptions
The following subsections describe notational conventions used in this document.
Notes, Cautions and Warnings
Throughout this guide, blocks of text may be accompanied by an icon and printed in bold or italic type. These blocks
contain notes, cautions or warnings. They are used as follows:
NOTE: This icon indicates important information and tips that help you make better use of
your computer system.
CAUTION: This icon indicates information that tells you how to avoid either potential
damage to hardware or loss of data.
WARNING: This icon indicates the potential for bodily harm and tells you
how to avoid the problem.
Some warnings may appear in alternate formats and may not be accompanied by an icon. In such cases, the
specific presentation of the warning is mandated by the relevant regulatory authority.
2
Product Information
Product Features
17MF200V
•
•
•
•
17-inch wide WXGA LCD TV with excellent display performance
Multiple video input allowing display of TV, PC, VCD, DVD and CamCorder
High definition panel (WXGA resolution)
DVD playback via S Video and composite video
Technical Specifications*
LCD PANEL
• Type
TFT LCD
• Screen size
17 wide
• Pixel Pitch
0.288 x 0.288mm
• LCD Panel type
1280 x 768 pixels
R.G.B. vertical stripe
Anti-glare polarizer
• Effective viewing area
(H) 369.6 x (V) 221.76mm
• Display Colors
16.7M colors
PC SCANNING
• Vertical refresh rate
56Hz-76Hz
• Horizontal frequency
30kHz-63kHz
PC VIDEO
• Video dot rate
110 MHz
• Input impedance
- Video
75 ohm
- Sync
4K7 ohm
• Input signal levels
0.7 Vpp
• Sync input signal
Separate sync
• Sync polarities
Positive and negative
• Input Frequency
WXGA
XGA
SVGA
VGA
• Video interface
D-sub, S-Video, TV-RF and composite video
Hsync
Hsync
Hsync
Hsync
48-60 kHZ,Vsync 60 - 75 Hz (N.I.)
48- 60 kHz, Vsync 60 - 75 Hz (N.I.)
37- 47 kHz, Vsync 60 - 75 Hz (N.I.)
31- 38 kHz, Vsync 60 - 75 Hz (N.I.)
AUDIO
• Input level for PC/SVHS
500 mV nominal
• Headphone out signal level
4mW max.
• Loudspeaker
5W Stereo Audio (2.5W/channel RMS x2,
200Hz~10kHz, 4 ohm, 10% THD)
3
OPTICAL CHARACTERISTICS
• Contrast ratio
600:1 (typ.)
• Brightness
450 cd/m2 (typ.)
• Peak contrast angle
6 o'clock
• White Chromaticity
x: 0.283 y: 0.297 (at 9300° K)
x: 0.313 y: 0.329 (at 6500° K)
x: 0.313 y: 0.329 (sRGB)
• Viewing Angle (C/R >5)
Upper >85° (typ.)
Lower >85° (typ.)
Left >85° (typ.)
Right >85° (typ.)
<=25ms (typ.)
• Response time
This data is subject to change without notice.
Resolution & Preset Modes
• Maximum
1280 x 768 at 75Hz
• Recommended
1280 x 768 at 60Hz
14 user definable modes
9 factory preset modes:
Resolution
PC
640*480
640*480
720*400
800*600
800*600
1024*768
1024*768
1280*768
1280*768
Video
Video
Video
Mode
H. freq (kHz)
V. freq (Hz)
VGA VESA 60
VGA VESA 75
IBM VGA 3H
SVGA VESA 60
SVGA VESA 75
XGA VESA 60
XGA VESA 75
WXGA VESA 60
WXGA VESA 60
31.469
37.500
31.468
37.879
46.875
48.363
60.023
47.700
60.100
59.940
75.000
70.087
60.317
75.000
60.004
75.029
60.000
75.000
60Hz
50Hz
15.734
15.625
59.940
50.000
Automatic Power Saving
If you have VESA DPMS compliance display card or software installed in your PC, the TV/Monitor can automatically
reduce its power consumption when not in use. If an input from a keyboard, mouse or other input device is detected,
the TV will then 'wake up' automatically. The following table shows the power consumption and signaling of this
automatic power saving feature:
Power Management Definition
VESA
Mode
ON
Video
H-sync
V-sync
Power Used
LED color
Active
Yes
Yes
Green
OFF
Blanked
No
No
55W (typ.)
110VAC < 1W
230VAC < 2W
4
Amber
Physical Specifications
• Dimension (WxHxD)
• Weight
517 x 364 x 199 mm (incl. Pedestal)
5.4 kg
• Tilt (Forward / Backward)
- 5° / 20°
• Power supply
100 - 240 VAC, 50/60 Hz
• Power consumption
• Temperature (operating)
• Relative humidity
• System MTBF
55 W (typ.)
5° C to 40° C
20% to 80%
50K hrs (excluding CCFL 40Khrs)
* This data is subject to change without notice.
Product Views
Physical Function
Tilt
5
Installing your LCD TV
Front View Product Description
1
SOURCE
TV/Video source selection
Increase or decrease the channel number
or
up or down the highlighted function in OSD
2
3
MENU
Open the OSD and select the highlighted function
4
VOL
Increase or decrease the level of audio volume
or
move up or down the highlighted function in OSD
5
Power indicator
6
Power switch On/Off
7
Receiver for 'remote control'
6
Rear View
1
DC in
DC power in
2
VGA
D-Sub input
3
PC - Audio in
For connect to PC Audio output
7
On-Screen Display
Description of the On Screen Display
What is the On-Screen Display?
This is a feature offered by all Magnavox LCD TVs. It allows an end user to adjust screen performance of TVs
directly through an on-screen instruction window. The user interface provides user-friendliness and ease-of-use
when operating the TV.
Basic and simple instruction on the control keys
When you press the MENU button on the front control of your TV, the On-Screen Display (OSD) Main Controls
window will pop up and you can then start making adjustments to the various TV features. Use the
or the
keys to make your adjustments.
OSD Guide
TV/Video Mode
INPUT SELECT
Select video source for main display:
PC
TV
AV
S-VIDEO
PICTURE
•
PC VGA input
•
HD input (See note below)
•
Antenna or cable TV input
•
CVBS composite video input
•
S-video input
Adjust picture characteristics to suit personal preference
BRIGHTNESS
CONTRAST
COLOR
SHARPNESS
TINT
COLOR TEMP
•
•
•
Normal
Cool
Warm
EXIT
SOUND
Adjust audio characteristics to suit personal preference
TREBLE
BASS
8
BALANCE
SURROUND (ON/OFF)
EXIT
LANGUAGE
Set language for OSD
ENGLISH
FEATURES
PARENTAL
CONTROLS
Set the password (0711) and block specific programs that are not
suitable for children. It is compliant with V-chip standard in the US.
(See page 24 for detail operation)
CLOSED CAPTION
Turn on/off and select a closed caption mode.
NOTE: The feature is applicable for TV and CVBS video only.
EXIT
INSTALL (for TV mode only)
Install a TV program list
Set the tuner mode:
TUNER MODE
•
•
•
antenna
cable
auto
AUTO STORE
Scan and store the TV programs at the user location automatically
FINETUNE
Fine tune and store the TV programs at the user location manually
CHANNEL EDIT
Set the skipped channel when accessing channel by
EXIT
VIDEO MODE
STANDARD MODE
4:3
FULL SCREEN
NONLINEAR
SCALING
EXIT
Exit from this menu
9
keys
PC Mode
INPUT SELECT
Select video source for main display:
PC
TV
AV
S-VIDEO
LANGUAGE
•
PC VGA input
•
Antenna or cable TV input
•
CVBS composite video input
•
S-video input
Set language for OSD
ENGLISH
ADJUST POSITION
Adjust positions to obtain optimum display location on the
screen
HORIZONTAL
VERTICAL
VIDEO MODE
Choose between 4:3 or 16:9 PC screen mode
FULL SCREEN
ASPECT RATIO 4:3
BRIGHTNESS & CONTRAST
Adjust brightness and contrast to obtain optimum display
BRIGHTNESS
CONTRAST
VIDEO NOISE
Adjust phase and clock to obtain stable and clear display
PHASE
CLOCK
ADJUST COLOR
Set color temperature to suit personal preference
ORIGINAL PANEL
10
COLOR
9300K FOR CAD/CAM
6500K FOR IMAGE
MANAGEMENT
sRGB
USER PRESET
RESET
RED
GREEN
BLUE
Reset the setting to default values
NO
YES
AUTO
Automatic adjustment of the display parameters to give optimum
display
EXIT
Exit from this menu
NOTE:
TV model 17MF200V/17 is capable of displaying High Definition (HD) 720P format signals via the VGA input
connection on the TV. A 720P HD source, such as a set top HD receiver, must have a VGA output to be able to
connect to the TV’s VGA input. Set the HD source to output 720P on its VGA output connection.
When using the VGA input of the TV, audio must be input to the “PC Audio Input” jack on the TV. To input audio to
the “PC Audio Input” a PC audio adaptor cable must be used.
Caution: If a1080i HD signal is input to the VGA input of the TV, the top, bottom and side edges of the picture could
be over scanned and some content cut off.
Note when the VGA input of the TV is being viewed, the TV can not be turned off by the remote control. The TV will
turn off automatically when the signal on the VGA input is removed, or by pressing the power button on the front of the
TV. Pressing the AV button once on the remote control, then pressing the power button can also turn off the TV.
11
TV Control
Using Your Remote Control
Remote Control Diagram
Standby
Numerical keys
Seleting TV programs
Closed Caption
A/CH
Volume
Mute
Menu
Cursor
Sleep timer
Status
AV source
Sound mode
12
1
Standby
3
4
Selecting TV
programs
Closed Caption
Volume
5
Menu
6
Cursor
7
Sleep timer
8
Sound mode
2
9 AV source
10 Status
11 Mute
12 A/CH
13 Numerical keys
To set the TV temporarily to standby mode. To switch on the TV set,
press Standby button or AV source button.
(The amber light indicates when set is in standby mode)
To move up or down a program.
To disable or enable closed caption function.
To adjust the sound level.
To turn on or off the OSD (On-Screen Display)
To return to last item in OSD and clear menu from screen.
To move the cursor up/down/right/left to scroll through a list of options:
Cursor Left/Right
To adjust the settings of the highlighted function in OSD
Cursor down
To select the next item on the menu, and return to last item with cursor
up
Up/down key also act as hot keys to switch video mode (Standard/
4:3/Full Screen/Nonlinear Scaling)
To select the period of time after which the set will switch automatically
to standby mode (up to 240 minutes)
To choose MONO, Stereo and SAP (2nd audio program) Sound
system
To select TV/Video/PC sources
To show OSD status.
To disable sound.
To restore sound, press button again.
To access the last program viewed.
For direct access to programs
For a 2-digit program number, the 2nd digit must be entered within 2
seconds.
13
Troubleshooting
This page deals with problems that can be corrected by the user. If the problem still persists after you have tried
these solutions, contact your nearest dealer.
Common Problems
Having this problem?
No Picture
(Power LED does not light up)
No Picture (Power LED is amber) (when
using as PC monitor)
Screen says
Check these items
•
Make sure the power cord is plugged into the
power outlet and into the back of the TV.
•
•
Make sure the computer is turned on.
Make sure the signal cable is properly
connected to your computer.
Check to see if the monitor cable has bent pins.
The Energy Saving feature may be activated.
•
•
•
•
•
Make sure the monitor cable is properly
connected to your computer.
Check to see if the monitor cable has bent pins.
Make sure the computer is turned on.
Imaging Problems
•
Press "MENU" key to select "ADJUST
POSITION" control at PC mode or press
"MENU" and "DOWN" hot keys at front control
together to automatically adjust the position.
•
Check that the signal cable is properly
connected to the graphics board or PC.
•
Press "MENU" and "DOWN" hot keys at front
control together to automatically adjust at PC
mode.
Press "MENU" key to select "AUTO".
Display position is incorrect
Image vibrates on the screen
Vertical flicker appears
•
Horizontal flicker appears
•
•
•
The screen is too bright or too dark
Press "MENU" and "DOWN" hot keys at front
control together to automatically adjust at PC
mode.
Press "MENU" key to select "AUTO".
Adjust the contrast and brightness in OSD Main
Controls. (The backlight of the product has a
fixed life span. When the screen becomes dark
or begins to flicker, please contact your dealer.)
14
•
If an image remains on the screen for an
extended period of time, it may be imprinted in
the screen and leave an afterimage. This
usually disappears after a few hours.
•
This is characteristic of liquid crystal and is not
caused by a malfunction or deterioration of the
liquid crystal. The afterimage will disappear after
a period of time.
•
The remaining dots are normal characteristic of
the liquid crystal used in today’s technology.
•
The proximity of mountains or high buildings
may be responsible for ghost pictures, echoing
or shadows. In this case, try manually adjusting
your pictures: see 'fine tuning' or adjust the
direction of the outside aerial.
•
Have you connected the aerial socket properly?
Have you chosen the right system? Poorly
connected aerial sockets are often the cause of
picture or sound problems (sometimes the
connectors can become half disconnected if the
TV set is moved or turned). Check all
connections.
•
Ensure that the audio cables are firmly
connected to both the audio input connectors on
your TV and audio output connectors on your
PC or Video player.
An after-image appears
An afterimage remains after the power
has been turned off.
Green, red, blue, dark and white dots
remain.
TV and Audio Problems
Poor TV signal reception
No TV picture
No sound
For further assistance, contact your local distributor.
Other Related Information
For units set at 115 V :
Use a UL Listed Cord Set consisting of a minimum 18 AWG, Type SVT or SJT three conductor cord a maximum of
15-feet long and a parallel blade, grounding type attachment plug rated 15 A, 125 V.
15
Screen modes
This menu allows you to set your screen display mode to match the input video aspect ratio.
1. Press MENU to activate the menu.
2. Use , to scroll the highlight VIDEO MODE, and then press MENU to activate the video mode menu.
3. Press , keys to highlight one mode:
Standard
mode
Display pictures of 16:9
aspect ratio (HD
broadcasting)
4:3 mode
Display pictures of
normal size (that is, a 4:3
aspect ratio)
Full screen
mode
Enlarge horizontally
extended pictures
equally in all directions to
maintain the aspect ratio
constant.
Nonlinear
mode
Ideal for displaying
vertically extended
pictures such as
squeezed pictures and
recorded HD programs.
4. Press MENU to select the mode.
5. Use , to highlight EXIT and then press MENU to exit from the menu.
16
Connecting to Your TV Antenna, PC, DVD/VCR etc.
Accessory Pack
Unpack all the parts.
Power cable
Remote control & batteries
Power adapter
Setting up and connecting your TV
Ensure that the power to the monitor/TV is switched off before the installation.
A) Connecting to PC computer
1. Connect the power cord to the DC IN power connector on the back of the monitor.
2. Connect the 15-pin D-SUB of the video signal cable to the VGA connector on the back of the monitor
Note: If you use an Apple MacitoshTM, you need to connect the special Mac adapter to one end of the
monitor signal cable.
3. Connect the stereo audio cable to PC AUDIO IN on the back of the monitor and the other end to AUDIO
OUT terminal of the sound card on your PC.
17
B) Connecting to a external A/V device such as a DVD/VCR/VCD
1.
2.
Connect RCA (Yellow) or S-VHS cable to an appropriate external AV device such as DVD/VCR.
Connect RCA audio cable to AUDIO (R) and AUDIO (L) terminal and the other ends to corresponding
audio out terminals on the AV device.
3. Headphone may be connected to the headphone output on the side of the monitor marked
the headphone is connected, the sound from the external speakers will be disable.
18
. While
C) Connecting to TV/CATV
Connect an antenna or CATV cable to the antenna port of tuner box.
Using the Cable Management
1. Remove the arm box's top cover. Press the center of the cap and open the cap from sides (Do not attempt
to open the cap from the top or the bottom)
2. Place the cables inside the arm box.
3. Replace top cover.
We recommend you follow intelligent cable management to reduce the electrical alternating
field to low level as not to burden the work environment with unnecessary factors.
19
To attach and remove back cover
To attach back cover
1) Line up in ventilation.
Before attempting to seal the cover,
make sure it is properly aligned with the
upper hooks.
2) Use hands to push and seal in place.
To remove back cover
1) Lift off the rear cover from the top
hooks at an angle of less than 30
degrees to avoid hook damage.
20
VESA Wall Mounting
A) Remove the base
1) Remove the arm box's top
cover.
2) Remove the hinge cape.
3) Remove the 4 screws and
then remove the base from the
LCD monitor.
B) Attaching a wall or arm mounting device.
Note: This monitor accepts a 100mmx100mm VESA-Compliant mounting interface.
The monitor supports VESA mounting standard for use with various VESA mounting devices.
To install any VESA mounting devices, please follow the instructions given.
21
Using Other Menus
Using the Remote Control
1.
2.
3.
4.
5.
6.
Press MENU to activate the control menu display.
Use , to scroll the highlighted item to be selected.
Use MENU to select the item to be changed.
Use , again to scroll the highlighted sub-item to be selected.
Use ,
to adjust the value of selected item. Or use MENU to select the desired option.
When the setting is fine, use , to highlight EXIT item and press MENU to exit from the menu. The menu
OSD will disappear.
7. Menu will disappear automatically after few seconds while no key was pressed.
Selecting a source input
1. Press MENU to activate the menu.
2. Use , to scroll the highlight INPUT SELECT, and then press MENU.
3. Use , to highlight the input source to be selected. There are 4 input sources:
• PC
• TV
• AV
• S-Video
4. Press MENU to select the input source.
Adjusting the picture preference
1. Press MENU to activate the menu.
2. Use , to scroll the highlight PICTURE, and then press MENU.
3. Use , to highlight the picture parameter to be adjusted. There are 6 parameters:
• BRIGHTNESS: alters the brightness of the image.
• CONTRAST: alters the variation between light and dark tones.
• COLOR: alters the color intensity.
• SHARPNESS: alters the crispness of the image.
• TINT: Adjusts tint.
• COLOR TEMP (color temperature): adjusts the color temperature of the picture. Three options are
available here:
COOL (blue white), NORMAL (balanced) or WARM (red white).
to adjust BRIGHTNESS, CONTRAST, COLOR, SHARPNESS. Or, press MENU to further
4. Press ,
change COLOR TEMP setting.
5. Use , to highlight EXIT and then press MENU to exit from the menu.
Adjusting the sound preference
1. Press MENU to activate the menu.
2. Use , to scroll the highlight SOUND, and then press MENU.
3. Use , to highlight the sound parameter to be adjusted. There are 4 parameters:
• TREBLE: alters the level of the high frequency sound.
• BASS: alters the level of the low frequency sound.
• BALANCE: to balance the sound between the left and right speakers.
• SURROUND ON/OFF: to turn the surrounding sound effect on or off.
to adjust the selected parameter.
4. Press ,
5. Use , to highlight EXIT and then press MENU to exit from the menu.
22
Selecting a preferred OSD language
1. Press MENU to activate the menu.
2. Use , to scroll the highlight LANGUAGE, and then press MENU.
3. Use , to highlight the language to be selected. There are 3 languages:
• ENGLISH
•
•
4. Press MENU to select the language.
5. Use , to highlight EXIT and then press MENU to exit from the menu.
Locking the set / Parental Controls
Understanding Parental Controls
The Parental Controls feature receives and processes the data that contains program content advice sent by the
broadcasters or other program providers. When programmed by the viewer, a TV with Parental Controls can
respond to the content advice and block any program content that may be considered unsuitable (such as offensive
language, violence, sexual situations, etc.). This is a great feature for censoring the type of programs children watch.
In the Parental Controls section you'll learn how to block channels and programs that are not rated, are unrated, or
have no rating. You will also find out how to turn these blocking features ON or OFF. Below brief explanations are
given of some terms and ratings relate to the Parental Controls feature.
Parental Controls offers a variety of Blocking Options:
BLOCKING
The BLOCKING control can be thought of as the 'master switch' for Parental Controls. This control implements the
settings you have selected in order to block programs in accordance with movie ratings or TV ratings, or to block
programs that have no rating or are unrated. When the BLOCKING control is OFF, the blocking or censoring of
programs is disabled. When the BLOCKING control is ON, programs will be blocked in accordance with the settings
you have chosen.
You can also block individual channels or block programs on the basis of the ratings of the MPAA and TV
broadcasters.
Movie Ratings (Motion Picture Association of America)
G: General Audience - All ages admitted. Most parents would find these programs suitable for all ages.
This type of program contains little or no violence, no strong language and little or no sexual dialogue or
sexual situations.
PG: Parental Guidance Suggested - These types of programs contain material that parents may find
unsuitable for younger children. It may contain one or more of the following: moderate violence, some
sexual situations, infrequent coarse language, or some suggestive dialog.
PG13: Parents Strongly Cautioned – These types of programs contain material that parents may find
unsuitable for children under the age of 13. It contains one or more of the following: violence, sexual
situations, coarse language, or suggestive dialog.
R: Restricted - This type of program has been designed specifically for adults. Anyone under the age of
consent should view these programs only with an accompanying parent or adult guardian. They will contain
one or more of the following: intense violence, explicit sexual situations, strong or coarse language, or
intensely suggestive dialogue.
NC17: No one under the age 17 will be admitted. These types of programs should be viewed by adults only.
They will contain graphic violence, explicit sex, or crude, indecent language.
X: Adults Only - These types of programs contain one or more of the following: very graphic violence, very
graphic and explicit or indecent sexual activity, very coarse and intensely suggestive language.
23
TV Parental Guidelines (TV Broadcasters)
TV-Y: (All children -- These programs have been designed to be appropriate for all children.) They are
intended for a very young audience, including children aged 2-6. This type of program is not expected to
frighten younger children.
TV-Y7: (Directed at Older Children -- These types of programs are designed for children aged 7 and
above.) They may be more appropriate for children who have acquired the development skills needed to
distinguish between make-believe and reality. These programs may include mild fantasy and comic
violence (FV).
TV-G: (General Audience -- Most parents would find these programs suitable for all ages.) These types of
programs contain little or no violence, no strong language, and little or no sexual dialogue or sexual
situations.
TV-PG: (Parental Guidance Suggested -- These types of programs contain material that parents may find
unsuitable for younger children.) They will contain one or more of the following: moderate violence (V),
some sexual situations (S), infrequent coarse language (L), or some suggestive dialogue (D).
TV-14: (Parents Strongly Cautioned -- These programs contain some material that many parents would
find unsuitable for children under 14 years of age.) These types of programs contain one or more of the
following: intense violence (V), intense sexual situations (S), strong, coarse language (L), or intensely
suggestive dialogue (D).
TV-MA: (Mature Audience Only -- These programs are intended specifically to be viewed by adults and
therefore may be unsuitable for children under 17.) They contain one or more of the following: graphic
violence (V), explicit sexual situations (S), or crude, indecent language (L).
Setting up the Access Code
Parental Controls allows parents to block out or 'censor' any channels they think children should not watch. A
channel blocked by the Parental Controls control cannot be viewed until a correct access code is used to unlock the
channel for viewing. First, let's set your Parental Controls access code.
1. Press MENU to activate the menu.
2. Use , to scroll the highlight FEATURE, and then press MENU.
3. Use , to highlight PARENTAL CONTROLS, and then press MENU.
4. Enter your confidential access code. The first time, enter the code 0711, Then INCORRECT will appear on
the screen.
5. Press 0711 on the remote control again. ENTER NEW CODE will appear on the screen.
6. Enter a new four-digit code using the number buttons. CONFIRM CODE will appear on the screen.
7. Enter your new four-digit code again. CORRECT will flash on the screen briefly and the highlight bar goes
back to Parental Controls.
Blocking Channels
After your personal access code has been set you are ready to select the channels or inputs you want to block out
or censor.
1. Press MENU to activate the menu.
2. Use , to scroll the highlight FEATURE, and then press MENU.
3. Use , to highlight PARENTAL CONTROLS, and then press MENU.
4. Enter your confidential access code. CORRECT will flash very briefly and the Parental Controls menu will
be shown.
5. Use , to highlight BLOCK CHANNEL, and then press MENU.
6. Press or keys to select the channel you want to block.
7. Press MENU to block the channel. A padlock image appears to the right of the channel number.
8. Repeat steps 6 and 7 for any channels you want to block so they cannot be viewed.
9. Use , to highlight EXIT and then press MENU to exit from the menu.
24
Blocking by Movie Rating
After your personal access code has been set you can select specific movie ratings that you want to censor.
1. Press MENU to activate the menu.
2. Use , to scroll the highlight FEATURE, and then press MENU.
3. Use , to highlight PARENTAL CONTROLS, and then press MENU.
4. Enter your confidential access code. CORRECT will flash very briefly and the Parental Controls menu will
be shown.
5. Use , to MOVIE RATING highlight, and then press MENU.
6. Press or to highlight each rating you want. (See Movie Ratings) Then press MENU to turn the rating
ON or OFF. Turning the rating ON will block programs with that rating so they cannot be viewed.
7. Use , to highlight EXIT and then press MENU to exit from the menu.
Blocking by TV Rating
You can also select specific TV ratings that you want to censor as follows:
1. Press MENU to activate the menu.
2. Use , to scroll the highlight FEATURE, and then press MENU.
3. Use , to highlight PARENTAL CONTROLS, and then press MENU.
4. Enter your confidential access code. CORRECT will flash very briefly and the Parental Controls menu will
be shown.
5. Use , to MOVIE RATING highlight, and then press MENU.
6. Press or to highlight each rating you want. (See TV Ratings) Then press MENU to turn the rating ON or
OFF. Turning the rating ON will block programs with that rating so they cannot be viewed.
NOTE: More specific sub ratings (for violence, sexual content, dialogue, or fantasy violence) are available
for TV-Y7, TV-PG, TV-14 and TV-MA.
7. To access these sub ratings, press . Press or to select the sub rating that you want to block or
unblock. Then press MENU to turn the block on the sub rating ON or OFF.
8. Use , to highlight EXIT and then press MENU to exit from the menu.
Turning Block ON or OFF
The BLOCKING control can be thought of as the 'master switch' for Parental Controls. This control affects the
settings you have chosen to block programs in accordance with movie ratings or TV ratings, or to block programs
that have no rating or are unrated. When the BLOCKING control is OFF, the blocking or censoring of programs is
disabled. When the BLOCKING control is ON, programs will be blocked in accordance with the settings you have
chosen. Follow these steps to toggle BLOCKING OFF or ON.
1. Press MENU to activate the menu.
2. Use , to scroll the highlight FEATURE, and then press MENU.
3. Use , to highlight PARENTAL CONTROLS, and then press MENU.
4. Enter your confidential access code. CORRECT will flash very briefly and the Parental Controls menu will
be shown.
5. Use , to highlight BLOCK OPTIONS, and then press MENU.
6. Use , to highlight BLOCKING.
7. Press ,
to toggle BLOCKING ON or OFF.
8. Use , to highlight EXIT and then press MENU to exit from the menu.
Viewing Blocked Programming
Various on-screen messages will appear when someone tries to programs that have been blocked. The message
depends on how the current program has been blocked. You may view the blocked program and turn OFF the
Parental Controls feature by clearing all blocking options or by entering your access code.
1. Press MENU to activate the menu.
2. Use , to scroll the highlight FEATURE, and then press MENU.
3. Use , to highlight PARENTAL CONTROLS, and then press MENU.
4. Enter your confidential access code. CORRECT will flash very briefly and the Parental Controls menu will
be shown.
25
5. Use , to highlight CLEAR ALL.
6. Press MENU to activate it. CLEARED will be shown for a while. All blocked channels and programs can
now be viewed.
7. Use , to highlight EXIT and then press MENU to exit from the menu. If you tune to a specific channel
that has been blocked by BLOCK CHANNEL or any of the Parental Controls RATING options, simply enter
your four-digit access code to view the channel.
NOTE: this will unblock ALL channels until the TV is switched OFF. When the power to the TV is switched
back ON, all previously blocked channels will be blocked again.
Closed caption
This menu allows you to turn the closed caption off or select a text mode. The feature is applicable for TV and
CVBS video only.
1. Press MENU to activate the menu.
2. Use , to scroll the highlight FEATURE, and then press MENU.
3. Use , to highlight CLOSED CAPTION, and then press MENU.
4. Use , to highlight the mode to be selected. There are 9 modes:
CC1, CC2, CC3, CC4, CC MUTE, TXT1, TXT2, TXT3 or TXT4
NOTE: The CC MUTE option can be used to set the TV to turn the CLOSED CAPTIONING mode ON
whenever the MUTE button is pressed.
5. Press MENU to select the desired mode.
6. Use , to highlight EXIT and then press MENU to exit from the menu.
NOTE: You also can press the CC button on the remote control to turn the CC Display ON or OFF.
NOTE: Not all TV programs and product commercials are broadcast with Closed Captioning (CC), nor are
all Closed Captioning MODEs (CAPTION 1-4 or TEXT 1-4) necessarily used by broadcast stations during
the transmission of a program offering Closed Captioning. Refer to your area's TV program listings for the
stations and times of programs to be broadcast with Closed Captioning.
Automatic tuning
This menu allows you to automatically search for all the programs available in your region (or on your cable
network).
1. Press MENU to activate the menu.
2. Use , to scroll the highlight INSTALL, and then press MENU.
3. Use , to scroll the highlight TUNER MODE, and then press MENU.
4. Press , keys to select your tuner:
• Antenna: your TV is connected to an antenna to receive air programs
• Cable: your TV is connected to a cable network
• Auto
5. Press MENU to return the install menu.
6. Use , to scroll the highlight AUTO STORE.
7. Press MENU to activate the automatic searching. After several minutes, the INSTALL menu reappears
automatically.
8. The programs found will be stored into memory list. Use the SKIP menu to enable or disable the programs
which you want it to be skipped. When you use CH+/CH- to access program, all disable programs will be
skipped.
Manual tuning (Fine tune)
This menu allows you to store the programs one by one by hand.
1. Press MENU to activate the menu.
2. Use , to scroll the highlight INSTALL, and then press MENU.
3. Use , to scroll the highlight FINE TUNE, and then press MENU.
or
key until get good picture.
4. Press
26
Skipping programs (Channel edit)
This menu allows you to set the skipped programs when you use , keys to access the program.
1. Press MENU to activate the menu.
2. Use , to scroll the highlight INSTALL, and then press MENU.
3. Use , to scroll the highlight CHANNEL EDIT.
4. Use , keys to view the program in the list.
5. Toggle skip or not skip using
or
keys.
6. Use , to highlight EXIT and then press MENU to exit from the menu.
27
MAGNAVOX LIMITED WARRANTY
Ninety (90) Days Free Product Exchange
MAGNAVOX warrants this product against defect in material
or workmanship, subject to any conditions set forth as follows:
PROOF OF PURCHASE:
You must have proof of the date of purchase to exchange the
product. A sales receipt or other document showing the product and the date that you purchased the product as well as the
authorized retailer included, is considered such proof.
COVERAGE:
Warranty coverage begins the day you buy the product. For a
period of ninety (90) days from the date of purchase, if the
product is determined to be defective, Magnavox will exchange
the defective product with a new or renewed product, at its
option, at no charge. The replacement product is covered only
for the warranty period of the original product. When the warranty on the original product expires, the warranty on all
replaced products also expires. When it is necessary for you to
ship the product to Magnavox for exchange, you will pay the
shipping cost for shipment to Magnavox. Magnavox will pay the
shipping costs when returning a product to you.
Note: The exchange model supplied will be the most comparable one in Magnavox current inventory. Shipping of your product to Magnavox implies intent to follow the specified requirements of the warranty and exchange program. Product received
by Magnavox cannot be returned. Replacement product can
only be sent if all warranty requirements are met. Failure to follow all requirements can result in delay of exchange process.
EXCLUDED FROM WARRANTY COVERAGE
Your warranty does not cover:
• Shipping charges to return defective product.
• Labor charges for installation or setup of the product, adjustment of customer controls on the product, and installation
or repair of antenna systems outside of the product.
• Product repair and/or part replacement because of improper
installation, connections to improper voltage supply, abuse,
neglect, misuse, accident, unauthorized repair or other cause
not within the control of Magnavox.
• A product that requires modification or adaptation to enable
it to operate in any country other than the country for
which it was designed, manufactured, approved and/or
authorized, or repair of products damaged by these modifications.
• Damage occurring to product during shipping when improperly packaged or cost associated with packaging.
• Product lost in shipment and no signature verification of
receipt can be provided.
• A product used for commercial or institutional purposes
(including but not limited to rental purposes).
• Product sold AS IS or RENEWED.
WHERE WARRANTY EXCHANGE IS AVAILABLE:
Exchange is available in all countries where Magnavox officially
distributes the product. In countries where Magnavox does not
distribute the product, the local Magnavox organization will
attempt to exchange the product, although there may be a
delay if the appropriate product is not readily available or special customs processes are implied.
FOR EXCHANGE IN THE U.S.A., PUERTO RICO, OR
U.S. VIRGIN ISLANDS…
Contact Magnavox Customer Care Center at:
1-800-705-2000
FOR EXCHANGE IN CANADA…
1-800-661-6162 (French Speaking)
1-800-705-2000 (English or Spanish Speaking)
REPLACEMENT AS PROVIDED UNDER THIS WARRANTY IS
THE EXCLUSIVE REMEDY FOR THE CONSUMER. MAGNAVOX SHALL NOT BE LIABLE FOR ANY INCIDENTAL OR
CONSEQUENTIAL DAMAGES FOR BREACH OF ANY
EXPRESS OR IMPLIED WARRANTY ON THIS PRODUCT.
EXCEPT TO THE EXTENT PROHIBITED BY APPLICABLE
LAW, ANY IMPLIED WARRANTY OF MERCHANTABILITY
OR FITNESS FOR A PARTICULAR PURPOSE ON THIS
PRODUCT IS LIMITED IN DURATION TO THE DURATION
OF THIS WARRANTY.
Some states do not allow the exclusions or limitation of incidental or consequential damages, or allow limitations on how
long an implied warranty lasts, so the above limitations or
exclusions may not apply to you. In addition, if you enter into a
service contract agreement with the MAGNAVOX partnership
within ninety (90) days of the date of sale, the limitation on
how long an implied warranty lasts does not apply.
This warranty gives you specific legal rights. You may have other rights which vary from state/province to state/province.
Magnavox, P.O. Box 671539, Marietta, GA. 30006-0026
(Warranty: 4835 710 27750)
3138 117 07621