1
DEClaser 5100 Printer
Ethernet Card User’s Guide
Addendum
Part Number: EK-DL5NW-AD. A01
Digital Equipment Corporation
Maynard, Massachusetts
March 1995
Digital Equipment Corporation makes no representations that the use of its products in the manner described in this
publication will not infringe on existing or future patent rights, nor do the descriptions contained in this publication
imply the granting of licenses to make, use, or sell equipment or software in accordance with the description.
Possession, use, or copying of the software described in this publication is authorized only pursuant to a valid
written license from Digital or an authorized sublicensor.
© Digital Equipment Corporation 1995. All rights reserved.
The following are trademarks of Digital Equipment Corporation: DEClaser, LAT, OpenVMS, PrintServer,
ThinWire, ULTRIX, VAX and the Digital logo.
All other trademarks and registered trademarks are the property of their respective holders.
Table of Contents
About This Addendum ................................................................................. v
Corrections.................................................................................................... 1
Documentation Errata ................................................................................................ 1
Known Limitations ..................................................................................................... 2
New Information............................................................................................ 3
Additional Information ............................................................................................... 3
The Cold Reset Procedure......................................................................................... 5
Moving a Printer ......................................................................................................... 6
Frame Types In the NetWare Environment ............................................................... 7
Using the Control Panel To Enable Status Pages .................................................... 7
Review of Resetting Operations................................................................................ 8
Replacement Documentation ...................................................................... 9
Section 3.1.8: File Servers in a NetWare WAN....................................................... 10
Section 7.2: NIC Status Page .................................................................................. 11
Chapter 5: TCP/IP Configuration ............................................................................ 14
iii
About This Addendum
This addendum provides additional and corrected information for the DEClaser 5000
Series Ethernet Card User's Guide (Part Number: EK-DL51C-UG. A01).
Digital recommends that you keep this addendum together with the documentation
that comes with your DEClaser 5100 printer and its options.
This addendum provides information on the following:
•
Corrections and additional information for the Ethernet Card User’s Guide
•
Documentation for new features of the NIC firmware Version 3.05:
−
Using the lpd and bootp utilities in TCP/IP environments
−
Resetting both the printer and the NIC to their factory defaults from the
Control Panel
−
Disabling/enabling the printer’s and NIC’s status pages
−
Setting up the NIC for use in LAT-only environments
The instructions in this document assume that you have installed the upgrade to the printer
and to the NIC, as described in the DEClaser 5100 Printer Ethernet Card Upgrade
Installation Guide, and are now running Version 2.53 of the printer firmware and Version
3.05 of the NIC firmware. Use the utilities for Version 3.05 of the NIC; older versions do
not support new features.
This addendum uses the same terms as the DEClaser 5000 Series Ethernet Card User's
Guide with the following exceptions:
•
The phrases “Ethernet card”, “Network Interface Card”, and “NIC” all refer to the
same item, the network interface controller that you insert into the printer.
•
The page printed each time the printer is turned on (unless this has been disabled) is
called the Start-Up page. This page shows the name of the printer and the Digital
logo. The Ethernet Card User’s Guide called this page the Power-On Report.
•
The page printed each time a printer with a NIC installed is turned on (unless this has
been disabled) is called the NIC Status page. The page shows the names of protocols.
The Ethernet Card User’s Guide called this the Status/Configuration Report.
v
Corrections
Documentation Errata
This section contains notes on the DEClaser 5000 Series Ethernet Card User's Guide. The
following information should have been included in the User’s Guide.
In section
Include the following information:
Section 1.3
The PSPrinter program is on the diskettes that come with the
printer, not with the NIC.
Page 2-5
The wrist strap shown in Step 3 is optional. To discharge static
electricity during an operation, touch a metal part of the printer.
Page 2-6
When you use a BNC T-connector to connect the NIC to the end
of the network, use a terminator on the remaining side of the Tconnector.
Page 2-6
The NIC shown in Step 4 should include the daughter card.
Chapter 3
When you use the nsconfig or NPmanage utilities to change
values, the changes are made to NVRAM and take effect when
the printer is powered off and on again or when the NIC is reset
using the NPmanage utility.
Section 4.1
The illustration shows an icon for the PSPrinter that may not be
the current one.
Continued
1
In section:
Correct the following information
Section 4.3.2
The NPmanage utility provides the ability to change the printer
name used by the EtherTalk protocol. The change does not
effect the name used by LocalTalk, if you are using both. The
default name is DEClaser 5100.
If you have more than one printer, Digital recommends that you
change the name to something of your own choice rather than
relying on the NIC to make the names unique. The NIC adds a
number to the default name, in the order in which the printers
are turned on. However, in the normal course of managing
printers, you turn printers off and on as necessary, with the
result that the NIC may assign a name again but to a different
printer. To avoid confusion, give each printer its own name.
When you change the name of a printer, be careful not to leave
the name blank. The NPmanage utility accepts a null name as
an authentic name but it would be difficult to identify and
manage this printer.
Section 4.3.2
In Step 2, the documentation describes a list of available
AppleTalk Zones. However, if you do not have multiple zones,
you do not see a list of zones. Your zone is already selected.
Section 6.1
The reference to Appendix E should refer to Appendix C.1.3.
Section 6.2
The reference to Appendix E should refer to Appendix C.2.
Known Limitations
The following items are not supported in this version of the product:
•
The NPmanage utility for the Apple platform does not include balloon help.
•
In a NetWare environment, the banner page cancels a PCL context because the banner
invokes the PostScript interpreter. This means that if you downloaded any PCL fonts,
they are lost when a print job uses a banner page. The workaround is to print without
banner pages.
2
New Information
Additional Information
This section provides more information on some of the features and functions described in
the Ethernet Card User’s Guide.
In this section
Add the following information:
Section 1.3
The diskette labeled “Novell NPmanage Program” contains the
Windows NT driver needed when you use this product with Intel
PCs running Windows NT 3.5 Intel (build 807). You do not need
to use this driver if you have a non-Intel Windows NT device, such
as a Digital Alpha system, or if you are using Digital’s Network
Printing Software for Windows NT, Version 5.0-19 or later.
The Windows NT driver is located in the WINNT subdirectory of
the diskette. The subdirectory also contains a README.1ST file
that provides instructions for installing and using the driver.
Section 3.3
The NPmanage utility contains the following functions:
Troubleshoot
Test Printer
Read error log
Report print server status
General Setup Options
Setup Power-On Status Report (the NIC Status page)
Setup protocols
Reset Unit to Factory Default Settings
Novell Print Server Setup
Set Print Server Name
Set Password to File Server
TCP/IP Setup
Specify the IP address, subnet mask, and gateway address
Continued
3
In this section
Add the following information:
Section 3.3
and
Section 4.3.1
Use the NPmanage utility’s Reset function to perform the same
procedure as occurs when you turn the printer off and on again.
The NIC disconnects from the printer, runs its start-up procedure
and then reconnects to the printer.
If you attempt other NPmanage functions before the procedure is
finished, you may get a message that the utility is unable to
communicate with the NIC. Wait for the Reset function to finish
before issuing new commands.
Section 7.3
If the printer is on and the NIC’s LED is not showing an error state,
use more than one network tool (for example, NPmanage and ping)
to look for the NIC. The card can be working properly on one
protocol but not others.
Section 7.4.2.2
If the NIC is not communicating with the NetWare network, check
the frame type shown on the NIC Status page. All NetWare clients
and servers must use the same frame type. The NIC can use only
one frame type for each protocol so if the NIC’s type is not the
same as the one being used by your host system, the NIC can not
communicate.
If your network includes a bridge or router that does not pass all
frame types, the difficulty in diagnosing the problem increases. For
example, you may be able to see the NIC from one side of the a
bridge but not from the other side. The solution is to bind both
frame types to the NetWare file server's NIC, or to reconfigure the
bridge or router to pass the appropriate frame type, or both.
Appendix B
Jumper 2, Link, works when Jumper 1 is set to TP mode. The Link
jumper has two positions: DI (Disabled) and EN (Enabled). The
default position is EN, suitable for most 10BaseT concentrator
hubs. However, if you have older equipment that does not support
the Link signal, change the Link jumper (JP2) to DI.
Jumper 4, Automatic/Manual is not supported. Leave this jumper
in its factory position, Manual.
4
The Cold Reset Procedure
The Cold Reset function is a procedure that performs the following actions:
•
Sets both the printer’s and the NIC’s settings to their factory default values by clearing
their non-volatile RAM (NVRAM). This action also clears any NIC information set
by a user, such as the AppleTalk name and zone, the IP address, subnet mask, and
gateway address, and the NetWare print server name.
•
Switches the NIC’s default state to the alternate set of protocols. The default state is
either “Enable only LAT protocol” or “Enable all protocols”. Each time you perform
the procedure, the NIC’s state toggles between these two states. The NIC Status page
shows you the NIC’s current state.
Because the Cold Reset procedure has such a widespread effect, use it when you are
planning to reconfigure both the printer and the NIC. For example, you might use the
procedure when you move the printer to a new site.
1.
Turn the printer off and then on again to print the status pages. If the pages have been
disabled, you must enable and print them before you continue.
__________________________ Note_____________________________
Always print a NIC Status page and a printer Start-Up page before you perform
the Cold Reset procedure. Also, print a PCL Menus page if you use PCL.
These pages are your only record of the custom values.
____________________________________________________________
2.
Turn the printer off.
3.
Press the On-Line button on the Control Panel and turn on the printer at the same
time. Keep pressing the On-Line button until the display reads COLD RESET. Then
release the button.
The printer prints a new NIC Status page. Notice that the NIC’s set of enabled
protocols has changed. For example, if your first NIC Status page shows that all
protocols enabled, the new NIC Status page now shows that only the LAT protocol is
enabled.
4.
If you want to return to the original set of protocols, turn off the printer and then
perform the Cold Reset function again: turn on the printer while holding the On-Line
button until the display reads COLD RESET.
5.
Follow the instructions in the manual as if the NIC were a new card being installed for
the first time. Use the information on the status pages from Step 1 to configure the
NIC to the same settings, if desired.
5
Moving a Printer
If the move is to a different location on the same portion of the network, just power off the
printer, disconnect it from the network, move it to its new location, and reconnect it to the
network.
If the move is to a different IP address, IP subnet, or AppleTalk zone, Digital recommends
that you reset the NIC to its factory default state so that it searches for a new IP address.
You then need to configure the NIC for its new location.
Before the Move
Because the Cold Reset procedure sets both the printer’s and NIC’s custom settings to
their factory default values, print a NIC Status page and a printer Start-Up page as a record
of the custom settings. Also, print a PCL Menus page if you are using PCL. The pages
are your only record of the custom settings.
__________________________ Note _____________________________
The Cold Reset function also changes the NIC’s enabled protocols. Each time
you perform a Cold Reset operation, the NIC toggles to its alternate set of
protocols: “Enable only LAT protocol” or “Enable all protocols”.
____________________________________________________________
At the New Site
After you have moved the printer, use the following procedure to set it up:
1.
Make sure the NIC is connected to the right Ethernet connector (10BaseT or
ThinWire) and check the NIC Status page to see which connection type is selected. If
the connection type at the new location is different from the one used at the previous
location, change the jumper on the card using the instructions on page 2-6 of the
DEClaser 5000 Series Ethernet Card User's Guide.
2.
Perform the Cold Reset procedure: turn on the printer while holding the On-Line
button until the display reads COLD RESET. Then release the button.
3.
Use the NIC Status page from the old location to recreate the old settings, if desired.
If you want to use the same set of protocols as used at the original site, perform the
Cold Reset procedure a second time.
6
Frame Types In the NetWare Environment
The NetWare V3.x file servers use the Novell IEEE 802.3 frame type by default. In a
NetWare environment, the NIC first checks for this frame type. If the NIC finds a frame
of this type, it uses that frame type for its NetWare communication.
If the NIC does not detect a Novell IEEE 802.3 frame type, it looks for other frame types
in the following order:
1.
Ethernet_II
2.
IEEE 802.2 SNAP on 802.3
3.
IEEE 802.2
When the NIC succeeds in finding a frame of the type it is searching for, it uses that frame
type for all of its communication on that network protocol.
If you are using more than one protocol, Digital recommends that you do not set up file
servers to use the Novell IEEE 802.3 frame type. Also, Digital recommends that you
select and use only one type of frame type for the NetWare protocol.
Using the Control Panel to Enable Status Pages
In previous versions of the NIC firmware, you used the NPmanage utility to enable/disable
the NIC Status page. In the current version, you can also use the printer’s Control Panel to
disable the NIC Status page. The Control Panel function Do Start Page (on the
Miscellaneous menu) now controls both the printer’s Start-Up page and the NIC Status
page. When you disable the printer’s Start-Up page, you also disable the NIC Status page.
You can also enable a disabled page from the Control Panel.
7
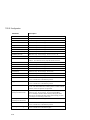
Review of Resetting Operations
Both the printer documentation and the NIC documentation describe several operations
that include a reset procedure. The following table summarizes these operations and their
effects on the NIC and on the printer.
8
Location
NIC
Printer
Reset Printer
Control Panel
No effect
Purges job information
Reset to Factory
Defaults
Control Panel
No effect
Resets NVRAM
Reset
NPmanage:
NetWare,
Macintosh
Same action as
powering the
printer off and on,
but allows you to
do so remotely.
No effect
Reset Unit to
Factory Default
NPmanage:
NetWare
Resets NVRAM
No effect
Cold Reset
Control Panel
Resets NVRAM
Resets NVRAM
Replacement Documentation
This section provides information that you substitute for the existing documentation in the
Ethernet Card User’s Guide. The following table summarizes the changes.
Section 3.1.8
This section has been expanded to describe the NIC’s search pattern.
Page 2-10 and
Section 7.2
In Step 8, the appearance of the NIC Status page has changed. This
section describes how to read the new NIC Status page.
Chapter 5
This chapter has been rewritten to include discussion of the lpd and
bootp utilities and options for installing the NIC in this environment.
9
Section 3.1.8: NetWare File Servers in a WAN
How the NIC Searches for File Servers
When you turn on the printer, the NIC checks all file servers within a 4-hop area to
determine if the NIC is identified as the file server’s print server device. The file servers
must have an assigned print queue and printer identified.
If there are no file servers on which the NIC is listed as a print server device within a 4hop area, the NIC continues the search on the entire network.
As soon as the NIC reaches the 4-hop limit, it prints the NIC Status page (if this page is
enabled), regardless of whether it has completed its search for file servers. The NIC Status
page is a snapshot of the state of the NIC at the instant the NIC reaches the 4-hop limit.
For example, the NIC Status page says "Novell inactive" when the actual case is that the
NIC is still searching for the Novell file server. Use the NPmanage utility’s Show
Attached File Servers function to monitor the NIC’s progress in attaching to file servers
beyond the 4-hop limit.
One consequence of the 4-hop limit is that if a file server within the limit were off-line
when the NIC was searching for it, the NIC may have already started searching the entire
network when the file server comes back on line. The NIC may not find the file server
immediately because it completes the search of the network before returning to the 4-hop
locus. You may want to interrupt the search and begin again by turning the printer off and
on again.
If your network has a file server within the 4-hop limit but the NIC does not attach to it,
check that the file server is configured completely and running properly. Then power the
printer off and on again. The NIC begins the search again.
Using a Primary File Server
In a large or complex network, the NIC could search a long time for its file servers. To
search more efficiently, designate a “primary file server”. The primary file server contains
a list of all file servers that recognize the NIC as a print server device.
Using a primary file server changes the NIC’s search. Instead of logging into and
checking every file server it finds, the NIC searches in that manner until it finds the
primary file server and then uses primary file server’s list to find and attach to the other
file servers. As long as the primary file server is within 4 hops, the file servers on the list
can be anywhere else on the network.
The list is exclusive; if a file server is not on the list, the NIC can not attach to it. If the
NIC has already attached to a file server and it is not on the list, the NIC logs out of that
file server.
10
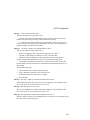
Section 7.2: NIC Status Page
If the NIC Status page has not been disabled, it prints after the printer is turned on.
However, when NetWare is enabled, the NIC Status page is delayed until the NIC attaches
to the primary file server or exceeds the 4-hop limit. This section explains how to read the
NIC Status Page. The following example of a NIC Status page shows the information as it
appears for a NIC with all protocols enabled.
Unit Serial No: 188365
Ì
Network Address: 00:40:af:16:fe:68
Network Topology: Ethernet
Î
Ï
Í
Version: 03.05
Ê
Connector: Thinnet
Ë
Network Speed: 10 Mega Bits
Novell Network Information
enabled
Novell Print Server Name: DEC_188365
Frame Type: Ethernet II
Ð
AppleTalk Network Information
Frame Type: 802.2 SNAP On 802.3
Protocol Address: Net Number 189
Preferred AppleTalk Zone: Default Zone
TCP/IP Network Information
Ñ
enabled
Node Number 19 Socket Number 129
enabled
Frame Type: Unknown FT
Subnet Mask: 255.0.0.0
LAT Network Information
Password Defined: No
Protocol Address:
Default Gateway: 0.0.0.0
Ò
enabled
Frame Type: Ethernet II
Novell Connection Information
Printer Name: finance
À
File Server: TRASHY
Queue: FINAN_Q
Á
Notify: SUPERVISOR
Â
AppleTalk Connection Information
Ã
Ä
Priority:
1
Attached: Yes
First:
1
Repeat:
30
AppleTalk Printer Name: DEClaser 5100 2
TCP Connection Information
Port Number: 10001
LAT Connection Information
Node name: LAT_0040af16fe68
Port name: PORT_1
11
The NIC Status page is divided into two sections. The top section is static; it shows how
the NIC has been configured. The bottom section is dynamic; it is a snapshot of the NIC's
status at the time the page is generated. The order of the protocols is Novell (NetWare),
AppleTalk, TCP/IP, and LAT.
Ê Version number: Version of the NIC firmware.
Ë Connector: The default is Thinnet, that is, the NIC uses the ThinWire port. If you
need 10BaseT, perform the procedure described on Page 2-6 of the User’s Guide.
Ì Unit Serial Number: Identification number for this NIC.
Í Network Address: Physical hardware address of the NIC. Use this number to install
and configure the NIC in the TCP/IP environment and to identify the unit in Ethernet
traces.
Î Network Topology: Ethernet
Network Speed: 10 MegaBits
The position of these items changes depending on which protocols are enabled. They are
listed immediately before the first enabled protocol.
To determine the NIC’s current set of enabled protocols, check the information to the right
of each protocol name. Each protocol is either enabled or disabled If a protocol is
disabled, you can not communicate with the NIC on that protocol. If the protocol is
enabled, the report includes additional items of information.
Ï Novell Network Information
Novell Print Server Name: The default is DEC_number where number is the
Unit Serial Number Ì. All file servers must be set up to use this name. If not, the NIC
can not attach to the file server.
Frame Type: The NIC’s frame type. The value is “Unknown FT” if the NIC did
not locate a file server when the NIC Status page was printed. The NIC can only attach to
file servers that share the same type. See the discussion of frame types on Page 7.
Ð AppleTalk Network Information
Frame Type: 802.2 SNAP on 802.3
Protocol Address: Net Number, Node Number, and Socket Number,
Preferred AppleTalk Zone: If the NIC cannot find the Preferred Zone, it uses
the Default Zone. You set the Preferred Zone using NPmanage.
Ñ TCP/IP Network Information
Frame Type: Unknown FT, when IP address is not assigned
Subnet Mask: Default value is 255.0.0.0
Protocol Address: Default is blank, that is, IP address is not assigned.
Default Gateway: Default is 0.0.0.0
Ò LAT Network Information:
Frame Type: Ethernet II
12
If a protocol is disabled, the bottom section of the NIC status page lists the protocol
followed by the word inactive. If a protocol is enabled, the report includes additional
items. If the NetWare protocol is enabled but listed as inactive, it can mean that the
protocol has been configured improperly, or the NIC has not yet connected to a file server.
À Novell Connection Information: Information on each file server and each queue that
the NIC has located, and the queue’s set up information:
Printer Name
File Server
Queue
Notify
Á AppleTalk Connection Information:
 AppleTalk Printer Name: Default name is DEClaser 5100. When you have
more than one printer, Digital recommends you change the name of the printer to
something of your own choice rather than relying on the NIC to create unique numbers.
à TCP Connection Information:
Port Number: 10001
Ä LAT Connection Information:
Node Name: LAT_address where address is
Port Number: PORT_1
Í Network Address
13
Chapter 5: TCP/IP Configuration
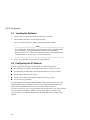
Table of Contents
5.1 Loading the Software
5-2
5.2 Configuring the IP Address
5-2
5.2.1 Using bootp
5-3
5.2.2 Using rarp
5-5
5.2.3 Using ping
5-6
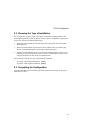
5.3 Choosing the Type of Installation
5-7
5.4 Completing the Installation
5-7
5.4.1 DEC ULTRIX and OSF/1
5-8
5.4.2 Solaris Version 1.1.3
5-10
5.4.3 Solaris Version 2.1 and SVR4
5-11
5.4.4 HP-UX
5-12
5.4.5 AIX RISC System/6000
5-13
5.4.6 SCO UNIX
5-15
5.5 Running NSCONFIG
5-16
5.6 After the Configuration
5-19
5.7 Error Messages from NSCONFIG
5-19
14
TCP/IP Configuration
5.
TCP/IP Configuration
If you will be printing from a UNIX system, use this section to configure the network
interface card for use with TCP/IP. After the NIC is configured, it provides standard
UNIX printing services so you can use the same filters and commands that you use now.
The NIC contains installation software for the following platforms:
•
DEC ULTRIX RISC 4.3 and 4.4
•
DEC OSF/1 2.0 and 3.0
•
Solaris 1.1.3 (SunOS 4.1.3) and 2.3 (SunOS 5.3)
•
HP-UX Series 700 and 800 9.01
•
IBM AIX 3.2.5
•
SCO UNIX 3.2
The NIC also contains source code that you can recompile for configuring the card for
other System V platforms.
The following general procedure enables TCP/IP printing:
1.
Load the NIC software.
2.
Configure the IP address.
3.
Run the appropriate installation script.
4.
Complete the configuration for your operating system.
5.
Run the nsconfig utility.
5-1
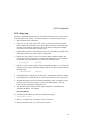
TCP/IP Configuration
5.1 Loading the Software
1.
Log in as superuser to the system that spools directly to the NIC.
2.
Insert the NIC's diskette for TCP/IP in the host drive.
3.
Go to or create the directory in which you want to install the software.
__________________________ Note _____________________________
If you already have a NIC printer at your site and you are now installing another
one, verify that the previous installer deleted the files in the installation
directory (not /usr/nic). If these files remain, they can prevent the installation of
a subsequent NIC or, in some cases, overwrite existing files.
____________________________________________________________
4.
Use the tar command to load the software from the diskette.
5.2 Configuring the IP Address
You can configure the IP address for the card in one of the following ways:
Use NPmanage for NetWare, as described in the Ethernet Card User's Guide.
Use NPmanage for EtherTalk, as described in the Ethernet Card User's Guide.
Use the Internet Boot Protocol (bootp).
Use the reverse ARP (rarp) capability (Ethernet II frame type only).
Use a reverse ping capability.
For each method, you provide the Ethernet address of the network interface card. The
Ethernet address is the 12-character code that you recorded at installation and is also
printed on the configuration status report each time the printer is turned on.
You can use the bootp, rarp, or ping procedures only when the NIC is in its factory default
state when it has no IP address. After the NIC has an IP address, you must use the
nsconfig utility or, for NetWare and EtherTalk, the NPmanage utility to change an IP
address.
5-2
TCP/IP Configuration
5.2.1 Using bootp
The bootp daemon is a native TCP/IP option for configuring the IP address of a diskless
network device. To store the IP address, use the following procedure:
1.
Turn off the DEClaser 5100 printer.
2.
Log in as superuser on a host on the same subnet as the NIC. However, if the server
resides on another subnet, complete this procedure to store the IP address in the NIC,
reconnect the NIC anywhere on the network, and then use the nsconfig utility to
change the IP address. See Section 5.5 for instructions on using nsconfig.
3.
Find the Ethernet address of the network interface card. The address is printed on the
configuration status report each time you turn the printer on.
4.
Edit the hosts file (usually /etc/hosts) or use NIS or DIS to add the IP address and
network interface card's node name. See the network administrator for the IP address.
For example, a network interface card named printfast with an IP address of
192.9.200.200 has the following entry:
5.
Stop the bootp daemon if it is running.
6.
Edit the /etc/bootptab file and add the following information:
192.9.200.200
printfast
nic_host:\
:ht = hardware type:\
:ha = ethernet address:\
:ip = IP address:\
:sm = subnet mask:\
:gw = gateway address:
For example, for an RFC 1048 system:
printfast:\
:ht = ether:\
:ha= 0040AF03AF6E:\
:ip = 192.9.200.200:\
:sm = 255.0.0.0:\
:gw =192.9.200.10:
The same information uses the following format on an RFC 951 system:
host
printfast
htype
1
haddr
00:40:af:03:af:6
iaddr
192.9.200.200
bootfile
defaultboot
6.
Start the bootp daemon by typing:
bootpd -s
7.
Check the printer to verify that the network interface card is connected to the network.
Turn on the printer.
5-3
TCP/IP Configuration
8.
Wait until the printer powers up and finishes initializing to allow enough time for the
IP address to become known and to be saved in non-volatile memory. After the
printer has powered up fully, turn the printer off.
9.
Turn the printer back on again and send a ping command to verify that the NIC
obtained its IP address. For example:
ping 192.9.200.200
If the NIC has the address, the result is a confirmation message:
192.9.200.200 is alive
10. Remove, or comment out, your changes to the /etc/bootptab file.
11. Stop the bootp daemon and, if you want it to run, restart it.
5-4
TCP/IP Configuration
5.2.2 Using rarp
The Reverse Address Resolution Protocol (rarp) allows network devices to query a server
for their IP addresses on startup. To store the IP address, use the following procedure:
1.
Turn off the DEClaser 5100 printer.
2.
Log in as superuser on the rarpd server. However, if the server resides on another
subnet, complete this procedure to store the IP address in the NIC, reconnect the NIC
anywhere on the network, and then use the nsconfig utility to change the IP address.
See Section 5.5 for instructions on using nsconfig.
3.
Find the Ethernet address of the network interface card. The address is printed on the
configuration status report when you power on the printer.
4.
Edit the hosts file (usually /etc/hosts) or use NIS or DIS to add the IP Address and
network interface card's node name. See the network administrator for the IP address.
For example, a NIC with the name of printfast has the following entry:
192.9.200.200
5.
printfast
Edit the /etc/ethers file or use NIS or DIS to add the Ethernet address. To continue the
example, for the printfast card with an Ethernet address of 00:40:c8:00:00:ff, make the
following entry:
00:40:c8:00:00:ff
printfast
6.
If the rarp daemon is running, stop it and restart it. Verify that the daemon is running.
7.
Check the printer to see that the NIC is connected to the network. Turn on the printer.
8.
Wait until the printer powers up and finishes initializing to allow enough time for the
IP address to become known and to be saved in non-volatile memory. After the
printer has powered up fully, turn the printer off.
9.
Turn the printer back on again and send a ping command to verify that the NIC
obtained its IP address. For example:
ping 192.9.200.200
10. If the NIC has the address, the result is a confirmation message:
192.9.200.200 is alive
11. Remove, or comment out, your changes to the /etc/ethers file.
12. Stop the rarp daemon and, if you want it to run, restart it.
5-5
TCP/IP Configuration
5.2.3 Using ping
Use the following procedure to enter the IP Address:
1.
Turn off the DEClaser 5100 printer.
2.
Log in as superuser on a host on the same subnet as the NIC. However, if the server
resides on another subnet, complete this procedure to store the IP address in the NIC,
reconnect the NIC anywhere on the network, and then use the nsconfig utility to
change the IP address. See Section 5.5 for instructions on using nsconfig.
3.
Find the Ethernet address of the network interface card. The address is printed on the
configuration status report each time you turn the printer on.
4.
Edit the hosts file (usually /etc/hosts) or use NIS or DIS to add the IP address and
NIC's node name. See the network administrator for the IP address. For example, a
NIC with a name of printfast and an IP address of 192.9.200.200 has the following
entry:
192.9.200.200
5.
printfast
Add an entry to the arp cache for the NIC's IP address and Ethernet address. For
example:
arp -s 192.9.200.200 0:40:c8:0:0:ff
6.
Check the printer to see that the NIC is connected to the network. Turn on the printer.
7.
Send a ping command the network interface card to verify it is running on the
network. For example:
ping 192.9.200.200
ping printfast
Although the network interface card cannot respond to the ping command, it can read
its own address from the packets.
8.
Turn the printer off and back on again and then send the ping command again to
verify that the NIC obtained its IP address. If the NIC has the address, the result is a
confirmation message:
192.9.200.200 is alive
5.
Remove the entry from the arp cache using the following command. Specify the NIC
either by its IP address or by its name. For example:
arp -d printfast
5-6
TCP/IP Configuration
5.3 Choosing the Type of Installation
For most operating systems, you have the option of using host-resident printing or NICresident printing which uses the line printer daemon. Choose a method that is appropriate
for your site, based on the following differences:
•
The host-resident method can report the status of the print queue; the NIC-resident
method does not.
•
The host-resident method can print the user name and file name on its banner page;
the NIC-resident method prints a banner page with the host's name.
•
The host-resident method requires you to repeat the configuration procedure on every
host that you want to be able to print jobs. The NIC-resident method requires you to
configure the printer one time, when you install the NIC.
After choosing a method, issue one of the following commands:
To perform a host-resident installation: nicinst
To perform a NIC-resident installation: lpdinst
5.4 Completing the Configuration
Go to the subsection for your operating system and follow the instructions for the type of
installation you chose.
5-7
TCP/IP Configuration
5.4.1 DEC ULTRIX and DEC OSF/1
These systems can use host-resident or NIC-resident installation.
NIC-Resident Installation
The lpdinst command creates the /usr/nic directory and copies some files. You then
run the lprsetup utility to make changes to the contents of the /etc/printcap file.
1.
Enter the following command:
lprsetup
2.
Select add and press Enter.
3.
Enter a name for your printer and press Enter.
4.
Press Enter at the prompt to see a list of supported printers.
5.
Enter remote as the printer type and press Enter.
6.
Either press Enter at the prompt to accept the default spooler directory or enter
the name of your directory and press Enter.
OSF/1 systems: At this point, the script prompts for an error log. Either press
Enter at the prompt to accept the default location and file name or enter the name
of your file location and name and press Enter.
7.
Enter the name of the remote system and press Enter.
8.
Enter PORT1 as the name of the printer on the remote system and press Enter.
9.
Enter Q and press Enter. The system displays its print configuration, based on
your responses. For example:
Printer_name
Symbol Type
lp
rm
rp
sd
Value
STR
STR
STR
STR
some_name
PORT1
/usr/spool/some_dir
OSF/1 systems: The list also includes the lf symbol and the file specification for the
error log.
10. Either enter Y at the prompt to confirm the configuration or press Enter to cancel
the changes.
11. You have the option of adding some text to further identify the printer. Press
Enter.
12. Select exit to save the configuration and press Enter.
5-8
TCP/IP Configuration
Go to Section 5.5 for instructions on running the nsconfig utility.
Host-Resident Installation
The nicinst command creates the /usr/nic directory and copies some files. It then starts a
script that prompts you for information. Your responses change the contents of the
/etc/printcap file.
1.
At the prompt, enter the IP node name of the NIC and press Enter.
2.
Enter a name for your printer and press Enter.
The system displays your responses and inquires if you want to accept this
configuration, based on your responses.
3.
Either enter Y at the prompt to confirm the configuration or enter N to cancel the
changes.
The system displays a printcap entry based on your responses and inquires if you want
to append the entry to the etc/printcap file.
4.
Either enter Y at the prompt to confirm or enter N to cancel the change.
The script creates a spool directory in /usr/spool for your printer.
Repeat the procedure on each system that you want to have access to the printer.
If you want to use a different filter than the one provided by the installation script, edit the
etc/printcap file. For example, to use the ln03rof filter on an Ultrix 4.3 system, change the
lines:
:if=/usr/nic/infilter|/usr/nic/nicfilter nodename 10001:\
:of=/usr/nic/outfilter:\
to
:if=/usr/lib/lpdfilters/ln03rof|/usr/nic/nicfilter nodename 10001:\
:of=/usr/lib/lpdfilters/ln03rof:\
where nodename is the IP node name of the NIC.
Go to Section 5.5 for instructions on running the nsconfig utility.
5-9
TCP/IP Configuration
5.4.2 Solaris 1.1.3 (SunOS 4.1.3)
The lpdinst command creates the /usr/nic directory and copies some files. You then edit
the /etc/printcap file to include the printer and its spooler directory. The printcap entry
causes the file to be printed on the printer that contains the NIC.
1.
Edit the /etc/printcap file and locate the entry for your printer at the end of the file.
2.
Add the capability codes for remote host and remote printer, rm and rp, respectively.
Specify the NIC as the remote host and PORT1 as the remote printer. For example:
3. your_printername|NICprinter:\
:lp=:\
:rm=your_nic:\
:rp=PORT1:\
:sd=/usr/spool/your_dir/your_printername:
4.
Exit from the file.
5.
Create the spooling directory. For example:
mkdir /usr/spool/your_dir/your_dir
Go to Section 5.5 for instructions on running the nsconfig utility.
5-10
TCP/IP Configuration
5.4.3 Solaris 2.3 (SunOS 5.3) and SVR4
The nicinst command creates the /usr/nic directory, copies some files, and starts a
command procedure. When it is completed, make the information available to the lp
utility by editing an interface program, usually a shell script. The default interface file is
called standard, but you can use an interface file customized for a particular type of
printer.
1.
Make a copy of the interface file in the directory /usr/nic for PORT1. For example:
cp /usr/spool/lp/model/standard /usr/nic/port1_interface
2.
Go to the directory /usr/nic and edit the interface file.
3.
Change the shell variable FILTER to invoke nicfilter. To accomplish this, search for
the line FILTER='${LPCAT} 0" and replace it with the following:
FILTER="/usr/nic/infilter | /usr/nic/nicfilter \
printer_name printer_port ${nobanner} \
${user_name} ${request_id} ${files}"
where printer_name and printer_port are the names specified in the file
/etc/hosts. The remaining arguments are optional and are used to create a banner that
includes sender name, job number, and filename. Omit the last four arguments to use
the default banner.
4.
If your interface file does not have the FILTER shell variable defined, you can
enclose the entire standard file in parentheses and piping it to nicfilter.
5.
Use the lpadmin command by typing the following commands:
lpadmin -p printer_name -v /dev/null -i interface_file
enable printer_name
accept printer_name
Repeat the procedure on each system that you want to have access to the printer.
Go to Section 5.5 for instructions on running the nsconfig utility.
5-11
TCP/IP Configuration
5.4.4 HP-UX
The nicinst command creates the /usr/nic directory and copies some files. It then starts a
script that prompts you for information. After you complete the script, you add the
information to the lp utility.
1.
Use the kill command to stop the scheduler process.
2.
Enter the following commands:
lpadmin -p printer_name -v/dev/nic/printer_name -mlaserjet
enable printer_name
accept printer_name
where printer_name is the name specified during the nicinst procedure. You can also
use the other options for the lpadmin command.
3.
Restart the scheduler with the following command:
/usr/lib/lpsched
Repeat the procedure on each system that you want to have access to the printer.
Go to Section 5.5 for instructions on running the nsconfig utility.
5-12
TCP/IP Configuration
5.4.5 AIX RISC System/6000
This operating systems can use either host-resident or NIC-resident installation.
The AIX operating system uses the qdaemon program and configuration information
stored in the /usr/lpd/qconfig file to handle printing services. The configuration
information includes entries for each virtual printer and physical device known to the
system.
You configure the NIC in a similar manner to configuring a local printer. The only
difference is the physical printer device must be a named pipe used by the NIC's print
daemon to route data.
NIC-Resident Installation
The lpdinst command creates the /usr/nic directory and copies some files. Then use the
following procedure:
1.
Enter the following at the system prompt:
smit spooler
2.
Select Manage Remote Printer System from the menu.
3.
Select Client Services from the menu.
4.
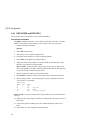
Select Remote Printer Queues from the menu.
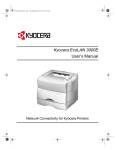
5.
Select Add a remote queue from the menu. A form to be fill out is displayed, as
shown in the example.
6.
Change the values displayed on the screen. You must replace the short form filter
and long form filter values.
7.
When you are finished, press Enter.
Go to Section 5.5 for instructions on running the nsconfig utility.
5-13
TCP/IP Configuration
Host-Resident Installation
The nicinst command creates the /usr/nic directory and copies some files. It then starts a
script that prompts you for information. Your responses change the contents of the
/etc/qconfig file.
1.
Shut down qdaemon using the command:
stopsrc -s qdaemon
2.
Invoke SMIT with the following command:
smit spooler
3.
Select Manage Local Printer Subsystem from the menu.
4.
Select Virtual Printers from the menu.
5.
Select Add a Virtual Printer from the menu.
6.
At the entry for printer type, type 1 and press Enter.
7.
At the entry for device name, type the name for the printer that you used during the
nicinst program and press Enter.
8.
From the list of printer models, find the model number of your printer. Enter the list
number (not the model number).
9.
At the prompts for header pages and trailer pages, type Y to enable these pages or N to
disable them.
10. Enter the queue name for your printer and the prompt and press Enter.
11. If you want this printer queue to be the default one, type Y at the prompt; otherwise,
type N. Press Enter.
12. Press Enter and then press Enter again to exit SMIT.
13. Edit the /etc/qconfig file. To search for your printer's name, type /printer_name and
press Enter. The command locates the following line:
printer_name
:
file = /dev/printer_name
14. Replace /dev with /dev/nic
15. Exit from the editor and save the file.
16. Restart the qdaemon process with the following command:
startsrc -s qdaemon
Repeat the procedure on each system that you want to have access to the printer.
Go to Section 5.5 for instructions on running the nsconfig utility.
5-14
TCP/IP Configuration
5.4.6 SCO UNIX
The nicinst command creates the /usr/nic directory and copies some files. It then starts a
script that prompts you for information. After you complete the script, you add the
information to the lp utility.
Enter the following commands:
lpadmin -P printer_name -v /dev/nic/printer_name
enable printer_name
accept printer_name
where printer_name is the name specified during the nicinst procedure. You can also use
the other options for the lpadmin command.
Repeat the procedure on each system that you want to have access to the printer.
Go to Section 5.5 for instructions on running the nsconfig utility.
5-15
TCP/IP Configuration
5.5
Running NSCONFIG
The nsconfig utility sends the nicprint.conf file to the NIC to define or update the
information stored in the card's NVRAM. Use the following procedure to run nsconfig:
1.
Change the current directory to /usr/nic.
2.
Copy the original nicprint.conf file to a safe location for future use. A sample file is
shown in this section. Because this file is used by several different Digital products,
not every parameter is relevant to the NIC. Also, the warning at the beginning of the
file does not apply to this NIC.
3.
Edit the nicprint.conf file with the information you want for your NIC. This section
contains a table that shows all the parameters and values. The entries that you can
change are in bold type. However, check all entries to make sure they are correct for
the NIC because if you are using a copy of a nicprint.conf that contains, for example,
the IP address of some other NIC, running your file affects the other NIC.
4.
Change the parameters to your new values. All fields must be filled, even if a
parameter does not apply to your NIC. The parameters are separated from the values
by the tab character.
5.
Exit from the editor and save the file.
6.
Run nsconfig with the NIC's IP address or its name ( as entered in /etc/hosts). For
example:
nsconfig 192.9.200.212
or
nsconfig printfast
7.
Turn the printer off and then on again.
You are now ready to print.
5-16
TCP/IP Configuration
###########################################################################
###
###
### NICPRINT.CONF :
###
###
###
### This file contains the configurable parameters to be used when
###
### initiating a communication with the N.I.C.
###
### This file can be altered manually. Remember to leave a tab
###
### between the description and the parameter.
###
###
###
###########################################################################
###
###
###
WARNING!
###
### This file includes protocol enable/disable parameters for Novell, ###
### Apple, and DEC LAT. Note that some units cannot support more than ###
### two active protocols in addition to TCP/IP. Ensure that, if you
###
### are configuring such a unit, no more than two of the three
###
### additional protocols are assigned "Y" parameter values. If more
###
### than the allowable number of protocols are enabled, the unit will ###
### revert to the protocols normally enabled on factory default.
###
###
###
###########################################################################
###########################################################################
#Description
Internet-Address
Netmask
Forwarding
Base-Port-Number
Keepalive
Max-Transmission-Unit
Broadcast
SNMP-System-Description
SNMP-System-ID
Ethernet
Default-Router-IP
Serial-Direction
Serial-Baud-Rate
Serial-Data-Bits
Serial-Stop-Bits-Fixed
Serial-Parity
Serial-DTR/DSR
Serial-XOn/XOff
Novell-Protocol
Apple-Protocol
Banners-ON/OFF
Parallel-port1-data-format
Serial-port2-data-format
Parallel-port-data-format
Parallel-port-data-format
LAT-Protocol
Powerup-Status-Page
Parameter
0.0.0.0
255.0.0.0
N
10000
Y
1500
0
Network printer
1.3.6.1.4.1.24
Y
0.0.0.0
OUT
19200
8
1
None
Enabled
Enabled
Y
Y
OFF
PCL PS OTHER
PCL PS OTHER
UNUSED
UNUSED
Y
ON
5-17
TCP/IP Configuration
Parameter
Description
Internet-Address
The TCP/IP address for the NIC
Netmask
The packet class on the network
Forwarding
Reference only. Do not change. Set to N
Base-Port-Number
Reference only. Do not change. Set to 1000
Keepalive
Reference only. Do not change. Set to Y.
Max-Transmission-Unit
Reference only. Do not change. Set to 1500.
Broadcast
Reference only. Do not change. Set to 0
SNMP-System-Description
Reference only. Do not change. Set to Network Printer
SNMP-System-ID
Reference only. Do not change. Set to 1.3.6.1.4.1.24
Ethernet
Reference only. Do not change. Set to Y.
Default-Router-IP
Router’s IP address; must be on the same subnet as the NIC’s IP
address. If no network router, keep the default of 0.0.0.0.
Serial-Direction
Reference only. Do not change. Set to OUT
Serial-Baud-Rate
Reference only. Do not change. Set to 19200
Serial-Data-Bits
Reference only. Do not change. Set to 8
Serial-Stop-Bits
Reference only. Do not change. Set to 1
Serial-Parity
Reference only. Do not change. Set to None
Serial-DTR/DSR
Reference only. Do not change. Set to Enabled
Serial-XOn/XOff
Reference only. Do not change. Set to Enabled
Novell-Protocol
Enables/disables the IPX protocol.
Use Y to enable or N to disable the protocol.
Apple-Protocol
Enables/disables the EtherTalk protocol.
Use Y to enable or N to disable the protocol.
Banners ON/OFF
Enables/disables the page at the start of each print job. Use On
or Off. This field affects NIC-resident printers. In host-resident
printers, use the -h option or its equivalent.
Parallel-port1-data-format
Serial-port2-data-format
Specifies the lpd filters used by the printer attached to the port.
Reference only. Do not change. Set to PCL PS OTHER.
Do not attempt to disallow data formats by editing this field.
The printer can distinguish data formats (auto-sensing) so there
is no danger of a file being misdirected.
Parallel-port-data-format
Parallel-port-data-format
Reference only. Do not change. Set to UNUSED.
LAT-Protocol
Enables/disables the LAT protocol.
Use Y to enable or N to disable the protocol.
Powerup Status Page
Enables/disables the printer’s Start-Up page.
Use Y to enable or N to disable the page.
5-18
TCP/IP Configuration
5.6
After the Configuration
Go to the directory from which you ran the nicinst or lpdinst procedure and delete the
NIC files. If you do not, these files might interfere with the configuration of any
subsequent NIC that you install.
Whenever you make changes to the configuration information, run the nsconfig utility and
then turn the printer off and on again.
If you have more than one NIC printer in your network, edit the nicprint.conf file each
time you use the nsconfig utility to specify the particular NIC you intend to modify. Or,
make a copy of the nicprint.conf file for each NIC printer, giving each copy a unique
name. When you use nsconfig, copy the unique file to the file name nicprint.conf.
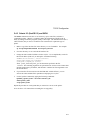
5.7
Error Messages From NSCONFIG
The nsconfig command uses the nicprint.conf file. The following errors cause the
command to quit.
Message: “usage: [-?] [-h] <internet address>”
This string is printed if the command line options are missing or invalid. Type in the
correct command line options.
Message: “Unable to open file.”
nicprint.conf file/directory permission not granted, file missing, or corrupted. Verify
permissions and status of nicprint.conf.
Message: “Invalid IP Address!”
An invalid IP address was supplied. Supply the correct IP address for nicprint.conf.
Message: “Reading in Internet Address from configuration file. Ensure that the
parameter is in the format A.B.C.D where A, B, C, and D are all numerical values between
and inclusive of 0-255.
An invalid IP address was supplied. Supply the correct IP address.
Message: “Reading in Netmask from configuration file. Ensure that the parameter is one
of the following: FF.0.0.0 or FF.FF.0.0 or FF.FF.FF.0.”
An invalid Netmask (subnet mask) parameter was supplied. Supply the correct
Netmask value for nicprint.conf.
Message: “Reading in Forwarding from configuration fil.e Ensure that the parameter is
one of the following : Y or y or N or N.”
An invalid Forwarding parameter was supplied. Use the correct Forwarding value in
nicprint.conf.
5-19
TCP/IP Configuration
Message: "Reading in Trailers from configuration file. Ensure that the parameter is one
of the following: Y or y or N or n."
An invalid Trailers parameter was supplied. Supply the correct value in nicprint.conf.
Message: “Reading in Base Port Number from configuration file. Ensure that the
parameter contains only numerical [0-9] values in its entry.”
An invalid Base Port Number parameter was supplied. Supply the correct Base Port
Number for nicprint.conf. Digital recommends that you do not change the default
parameter.
Message: “Reading in Keepalive from configuration file. Ensure that the parameter is
one of the following : Y or y or N or n.”
An invalid Keepalive parameter was supplied. Supply the correct value.
Message: “Reading in Max. Transmission Unit from configuration file. Ensure that the
parameter contains only numerical [0-9] values in its entry.”
An invalid Max. Transmission Unit parameter was supplied. Type only numerical
values for nicprint.conf.
Message: “Reading in Broadcast from configuration file. Ensure that the parameter is
one of the following: 1 or 0.”
An invalid Broadcast parameter was supplied. Type only 1 or 0 in nicprint.conf.
Message: “Reading in SNMP System Description from configuration file. Ensure that the
parameter has less than 80 characters (including white space).”
An invalid SNMP System Description parameter was supplied. Type less than 80
characters (including spaces) for nicprint.connf. Digital recommends hat you do not
change the default parameter.
Message: “Reading in SNMP System ID from configuration file. Ensure that the
parameter is in the format: XX.XX.XX.XX.”
An invalid SNMP System ID parameter was supplied. Supply the correct format of
SNMP System ID for nicprint.conf. Digital recommends that you do not change the
default parameter.
Message: “Reading in Ethernet from configuration file. Ensure that the parameter is one
of the following: Y or y or N or n.
An invalid Ethernet parameter was supplied. Type only Y or N (upper or lowercase is
accepted).
5-20
TCP/IP Configuration
Message “Can't connect with the server.”
This error message has two possible causes:
• The NIC's IP address has changed but the entry in the arp cache has not been
updated. Delete the entry in the arp cache and then run nsconfig.
• A connection was aborted without closing the channel. When you start a new
session, you get this message because the channel is still busy. Turn the printer off
and then on again to deallocate the channel.
Message: “Nsconfig: Couldn’t write Subnet Mask to socket.”
This error message has four possible causes:
• Broken or unplugged cable. Inspect cable and plug in or replace.
• The NIC is either hung, has crashed, or is slow. Reset the card.
• Packets are being corrupted by an intervening node (between the network
interface card and the workstation). Check for any failing intervening hosts.
• An attempt to communicate with the NIC is unsuccessful because TCP/IP has
been disabled or TCP/IP on the NIC has crashed but other installed protocols are up
and running.
Take the following steps:
1. Ensure that the NIC is actually running TCP/IP.
2. Ping to determine if the NIC can be reached via IP.
3. Determine if other NIC protocols are working.
4. Reset the NIC.
Message: “Nsconfig: Couldn’t read Acknowledgment from socket.”
The handshake from the NIC was never received. Supply the correct Netmask value,
FF.0.0.0 or FF.FF.0.0 or FF.FF.FF0, for nicprint.conf.
Message: “Nsconfig: Error on server end.”
The receiver handshake was not acknowledged. Supply the correct Netmask value,
FF.0.0.0 or FF.FF.0.0 or FF.FF.FF0, for nicprint.conf.
Message: “Nsconfig: Error reading Acknowledgment from server.”
The host cannot accept the server handshake, that is, the host received a response from
the NIC but the value is unexpected.
5-21