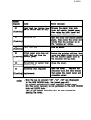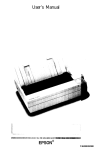
1
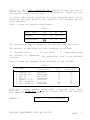
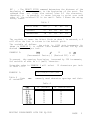
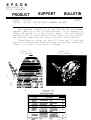
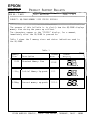
EPSON
EPSON AMERICA INC.
P RODUCT S UPPORT B ULLETIN
SERVICE
PSB NO.: P-0021
I PAGE:
I DATE: 06/15/88
1
of 1
SUBJECT: GQ-3500 MEMORY SIZE STATUS DISPLAY
The purpose of this bulletin is to clarify how the GQ-3500 displays
memory size during the power up selftest.
The characters appear on the "STATUS" display, for a moment,
immediately after the GQ-3500 is powered on.
Table 1 shows the 3 memory sizes and status indications used in
the GQ-3500.
Table 1
Memory
Size
512K
Description
Product
Status
DT o”o
pgl g/J.
Standard Memory Size
EIIMM
1.5Meg
Initial Memory Up-grade
5190
ril D”o
,=r @.I.
2.OMeg
Current memory up-grade
5192-A
InI D-8
DEi fia.
EPSON AMERICA SERVICE, 23610 TEL0 AVENUE, TORRANCE, CALIF. 90505
EPSON
EPSON AMERICA, INC.
P RODUCT S UPPORT B ULLETIN
SERVICE
DATE:
SUBJECT:
NUMBER:
Page 1 of 4
05-04-88
PRINTING SPREADSHEETS WITH THE GQ-3500
P-0019
PURPOSE
The purpose of this bulletin is to assist users of the GQ-3500 in
printing spreadsheet type documents. The printer codes highlighted
in this document will provide added versatility to your application
software. This bulletin contains all the information necessary to
create the printer set-up string codes; however, the GQ-3500 User's
Manual and your application software documentation should be
available for reference.
PREREQUISITES
The user of this document should know how to format and input
printer set-up strings into the spreadsheet application software.
The examples given will be those that can be used in LOTUS l-2-3.
LOTUS l-2-3 allows the user to input these codes before the document
or within a spreadsheet cell. The user should also have a basic
understanding of the printer codes used in the GQ-3500; however,
this knowledge is not critical in proper usage of these codes.
The GQ-3500 Interface Card must be set to the Page Printer mode for
these codes to work correctly. DIP switches 1 and 2 of switch bank 1
must be set to the OFF position. To access these switches, turn off
the printer, loosen the two knurled screws on the back of the
printer, and pull the board straight out.
SET-UP STRING PROCEDURES
The GQ-3500 offers several features in the page printer mode which
are beneficial in providing information-packed print-outs, that are
printed clearly enough to be easily read. These features can be
accessed with a printer set-up string that can be sent through the
application software.
EPSON AMERICA SERVICE, 23610 TEL0 AVENUE, TORRANCE, CALIF. 90505
ESC y - The SELECT CHARACTER SET command allows the user to
select the font that would permit the greatest legibility with
the desired characters per inch.
To select the desired character set first determine which of the
character set fonts would be best suited for the document and the
pitch selected.
Table 1 shows the set-up string format.
Table 1
ASCII code:
ESC
y
Decimal:
027
121
n1
n2
79
nl
n2
Hexidecimal:
n1
n2
The variables n1 and n2 designate the specific font selection.
The variable n1 specifies the font locations as follows:
0 = Internal fonts
1 = IC Card fonts
The variable n2 represents
location.
2 = Downloaded fonts
font in the selected
the particular
Table 2 shows the internal fonts available in the GQ-3500.
Table 2
I
No. Name
0
1
2
3
4
5
6
Courier 10
Courier 10
EDP 13
EDP 13
Modern 10 PS
Ext. Graphics
Ext. Graphics
Orientation
CPI
Point Size
10
10
13
13
-10
10
Portrait
Landscape
Portrait
Landscape
Portrait
Portrait
Landscape
10
10
7
7
10
12
12
LOTUS l-2-3 accepts printer set-up codes in decimal form. Using
the codes in EXAMPLE 1
below will select EDP 13, the smallest
font internal to the GQ-3500.
EXAMPLE 1:
EDP 13:
\027\121\000\003
PRINTING SPREADSHEETS WITH THE GQ-3500
PAGE
2
ESC , - The SELECT PITCH command determines the distance of the
beginning of one character to the beginning of the next. The
command does not alter the actual size of the character,
therefore, it is possible to cause letters to print over each
other if the selected CPI is too small. Table 3 shows the set-up
string format.
Table 3
ASCII Code:
ESC ,
n1
n2
n3
Decimal:
27
44
n1
n2
n3
Hexadecimal
1B
2C
n1
n2
n3
The variable n1 turns the Select Pitch on when 1 is entered, a 0
will allow the font to return to the default pitch.
The variable n2 defines the pitch in 1/300 inch increments. As
shown in EXAMPLE 2, to obtain this number divide 300 by the
desired characters per inch.
EXAMPLE 2:
15
(Incremental Factor) / (Desired CPI) = n2
To prevent the spacing from being increased by 256 increments,
the variable n3 must be a 0 (null) character.
Using the codes in EXAMPLE 3 will select
in LOTUS l-2-3.
EXAMPLE 3:
Table 4
lists
n2 variables.
15 characters per inch
\027\044\001\020\000
some
commonly used character spacings and their
Table 4
n2 (Decimal)
60
37
30
25
23
20
18
PRINTING SPREADSHEETS WITH THE GQ-3500
n2 (Hexidecimal)
3C
25
1E
19
17
14
12
PAGE
3
ESC o - The SET PRINT DIRECTION command enables the application
software to print sideways on the page, allowing more columns of
text to be printed. When in the landscape mode be sure to use the
landscape font. When in the portrait mode be sure to use the
portrait font. To assure proper printer function this command
should only be used in the printer set-up string and not within a
cell printer string. Table 5 shows the set-up string format.
Table 5
ASCII Code:
ESC
Decimal:
27
Hexidecimal:
1B
o
n
111 n
6F
n
The variable n selects the orientation. If n = 1, the page will
be printed in the landscape mode. If n = 0 the printer will be
reset to portrait.
To change the print orientation use the codes in EXAMPLE 4.
EXAMPLE 4:
PRINTING SPREADSHEETS WITH THE GQ-3500
PAGE
4
EPSON
SEWI&*
PRODUCT SUPPORT BULLETIN
11 November, 1987
DATE:
SUUJECWGQ-3500 PREVENTATIVE MAINTENANCE AND TROUBLESHOOTING
P-0014
NUMBER:
This bulletin is intended to supplement the GQ-3500 Users
Guide to maintain high quality copy.
Symptoms of degraded print quality can be manifested in many
ways, however, only problems which can be resolved with simple
cleaning or replacement of consumables will be addressed in this
bulletin.
OPERATIONAL CHARACTERISTICS
The GQ-3500 processing unit functions virtually the same
as an ordinary copier and contains many of the same components
The components discussed will include:
1. Print Drum (converts the laser scan into a latent
image and applies the image to the paper)
2. Developer Unit 4 applies the toner onto the drum
latent image)
3. Collector Unit (cleans and prepares the drum for the
next image scan)
4. Charge Corona (prepares the drum for the next image,
located in the collector unit)
5. Transfer Corona (assists in applying the image to the
paper, located directly under the drum)
1. PRINT DRUM
UNIT
3. COLLECTOR UNIT
5. TRANSFER CORONA
EPSON AMERICA SERVICE, 23610 TEL0 AVENUE, TORRANCE, CALIF. 90505
RECOMMENDED
ORUH
MAINTENANCE
CLEAIIIWG HETHOD
COMPOlElT
PRINT
PREVENTATIVE
_--.
OUST OFF EXCESS TONER
TOOLS USED
SOFT CLOTH OR
TISSUE
COLLECTOR
UNIT
DUST, WIPE OR VACUUM OFF
EXCESS TONER
SOFT BRUSH, TOWEL
OR VACUUM
DEVELOPER
UNIT
INSPECT TONER ROLLER FOR
UNEVEN TONER DISTRIBUTION
NONE
INNER
SURFACES
WIPE UP ACCUMULATED TONER
SOFT TOWEL
OR VACUUM
CHARGE/TRANSFER
CORONAS
INSPECT FOR BROKEN OR
MISSING CORONA WIRES
NONE
The proper cleaning and/or timely replacement of the above
items will insure a long and productive printer life.
CLEANING PROCEDURE
Turn off the power switch and open the printer clamshell case.
Remove the Drum/Collector. Grasp the two green tabs and lift.
Place the Drum/Collector on sheets of paper. AVOID STROM LIGHT.
Transfer Charger Wire Cleaning - Use the small cleaning tool
stored inside the printer. It is located at the front of the
printer to the right of the toner cartridge. Refer to page 5-16
of the GQ-3500 Users Manual for complete transfer charger wire
cleaning instructions.
Reinstall the Drum/Collector unit into the printer after
cleaning the transfer charger wire.
Collector Unit Cleaning - Separate the Print Drum from the
Collector unit. This is accomplished by compressing both of the
green spring loaded clamps on the Collector and lifting, leaving
the Print Drum in the Processing Tray. Cover the Drum with sheets
of paper to avoid excess exposure to light. Inspect the Collector
cleaning blades for excess toner which may clog the opening (the
blades contact the Print Drum when the Drum is attached).
Carefully shake or brush off excess toner into a waste basket. The
cleaning blades are fragile and will render the Collector useless
if damaged. Inspect the charge corona wire located above the metal
grid. Make sure it is not broken.
EPSON AMERICA SERVICE, 23610 TEL0 AVENUE, TORRANCE, CALIF. 90505
Print Drum Cleaning - Inspect the Drum for excess toner which
can be wiped off with a clean soft cloth. The Collector will remove
residual toner, so do not attempt to clean all toner from the Drum.
Over-enthusiastic cleaning subjects the Print Drum to the risk of
scratches.
Reattach the-Print Drum to the Collector in the Processing
Tray carefully realigning the units to each other.
Developer Unit - Can be removed by releasing the small blue
lever and lifting the developer. Inspect toner roller (this
contacts the drum when the developer is installed) for an even
silver/black surface. An uneven toner distribution should be
reported to your service technician for further inspection.
OTHER COPY QUALITY CONCERNS
Ghost Images On Page - Are usually the result of a clogged or
malfunctioning collector unit. Perform the cleaning procedure outlined above.
Light Copy Image - Is generally the result of a dirty or
broken transfer corona wire. Also, paper thickness in excess of
the recommended will prevent proper toner transfer.
Toner Smears On Page - Are the indication of either a dirty or
clogged collector or a defective developer. This can also be
manifested in toner splotches on the page. Perform the cleaning
and inspection procedure outlined above.
Bond Paper - Will possibly cause several types of poor print
quality symptoms. It is recommended to utilize paper intended for
use in laser printers. Generally smooth surfaced envelopes and
paper will provide better print.
Also, paper that has horizontal rather than vertical grain
will likely cause excessive paper curl upon exiting the printer.
Specify vertical grain when ordering paper for your printer.
EPSON AMERICA SERVICE, 23610 TEL0 AVENUE, TORRANCE, CALIF. gOSOS
EPSON
EPSON AMERICA,
SERVICE INC.
DATE:
SUBJECT:
NUMBER:
PRODUCT SUPPORT BULLETIN
9/22/87
c GQ-3500 and DisplayWrite 4
P-0011
This APPLICATION NOTE is intended to assist DisplayWrite 4
users utilizing the GQ-3500. The PRINTER FUNCTION TABLE contained
herein will assist the user in creating a custom printer driver
for the GQ-3500. Not all functions and capabilities will be
supported, however, most functions available through DW4 will
work.
The GQ-3500 should be equipped with a firmware revision of
m0231 or later (verify this by running a text self-test shown on
page 1-15 of the GQ-3500 users manual). The version number is
located at the lower right hand corner of the test printout.
These are some of the features supported by the created PFT.
Pica (10 pitch)
Elite (12 pitch)
Compressed (17 pitch)
Double Width (5 pitch)
8.5 pitch
15 pitch
17.1 pitch
Super/Subscript
Boldface
Underlining
Variable Line Spacing
Automatic Option Tray selection
Multiple Copies Variable Control
Landscape Paper Handling
IBM Graphic Character Set
(not avail. in all fonts)
The PFT installation is divided into 4 sections:
I . Install DW4
operating system
(Refer to DW4 users
manual).
II. Revise GQ-3500
PFT
(Follow
instructions contained
within).
III. Designate the GQ-3500 PFT within the SYSTEM or USER
DEFINED profile (Refer to DW4 users manual).
IV. Set GQ-3500 dip switches for page printer mode.
The installation procedure must be completed in it's entirety
to support the functions listed and work properly. The procedure
should take approximately 30-40 minuets to complete. The printer
(GQ-3500) must be connected and ready to print to complete the
creation and installation of the PFT.
EPSON AMERICA SERVICE, 23610 TEL0 AVENUE, TORRANCE,
CALIF. 90505
SECTION I.
To begin the creation of the
GQ-3500 File
Table the
installation of DisplayWrite 4 must be completed. In the PRINTER
SELECTION menu, select item "10. OTHER PRINTER" and enter GQ3500.
Refer to the DW4 users 'manual for specifics. If the program
installation has already been completed proceed to SECTION II.
SECTION II.
Upon completing the installation and accessing a working copy
of DisplayWrite 4 please follow these steps to access the create
file table:
. .i
NOTE
SOME FUNCTIONS REQUIRE A TEST TO BE RUN AFTER
ENTERING VALUES, THE RESPONSE TO EACH OF THESE
SHOULD BE "Y" REGARDLESS OF THE TEST RESULTS.
From the Main Menu, Select "9. Profiles.'
From the Profiles Menu, Select "6 Create Table."
From the Printer Function Table TasksDepressR."
From the Revise Printer Function Table Selection, Enter
Table Name -- "GQ3500."
5) From the Revise Printer Function Table (see figure below for
an example) we are ready to CREATE the control codes.
1)
2)
3)
4)
Create Printer Function Table
I
I
I
I
I
I
1.
2.
3.
4.
5.
6.
Initialization and Reset
Vertical/Horizontal Spacing
Highlighting
Paper/Page Options
Typestyles/Character Sets
User-defined Controls
I 7. Function Selection Tests
We will start with Il. and proceed down the menu. If a section
has been omitted it is to be left in the default setting.
Ml
Initialization and Reset
Start of Document Initialization
Control Sequence:
(blank)
[
End of Document Reset:
Control Sequence:
[
(blank)
12
Vertical/Horizontal Spacing
See Vertical/Horizontal Spacing menu below
Vertical/Horizontal
Spacing
Vertical Line Spacing:
I 1. Lines per Inch
I 2. Variable Line Spacing
I 3. Indexing Functions
Horizontal Character Spacing:
I 4. Pitches
I 5. Horizontal Motion Index
Horizontal Relative Movement:
I 6. Forward
I 7. Backward
12 I1
Lines per Inch
]
Set 6 Lines per inch
[
1B 32
]
1B 30
[
Set 8 Lines per inch
12
12
Variable Line Spacing
Control Sequence
[
1B 41 n ]
Maximum Value of n
128
[
]
Vertical Spacing increments
in (X / Y) Inches
[ 1 ]
/
[ 6 0 ]
12
13
Indexing Functions
Begin Superscript
1B 53 00
End Superscript
1B 54
End Subscript
Begin Subscript
42
N4
Pitches
Set 5 Pitch
[ 1B 2C 01 28 00
Set 8.55 Pitch
[ 1B 2C 01 24 00
Set 10 Pitch
[ 1B 2C 01 1E 00
Set 12 Pitch
[ 1B 2C 01 19 00
Set 15 Pitch
[ 1B 2C 01 14 00
Set 17.1 Pitch
[ 1B 2C 01 11 00
Highlighting
!agin Emphasis (Bold)
End Emphasis (Bold)
Begin Underline
End Underline
]
]
]
]
]
]
14
Paper/Page Options
See Paper/Page Options menu below
r
Paper/Page Options
I 1. Paper Handling
I 2. Paper Positioning
I
I
I
I
3.
4.
5.
6.
Set
Set
Set
Set
Page
Page
Left
Left
Length
Length
Margin
Margin
(Inches)
(Lines)
(Inches)
(Columns)
I 7. Carrier Return/Line Feed
For Page Printers Only:
8. Multiple Copies
I 9. Landscape Paper Handling
l
14 n 1
Paper Handling
Bottom Tray Select and Feed [ 1B 19 02 ]
Top Tray Select and Feed
[ 1B 19 01 ]
l
4 w2
Paper Positioning
For Continuous Forms:
Distance from Top Paper Edge (X/Y)
Distance from Left Paper Edge (X/Y)
For Manual Feed:
Distance from Top Paper Edge (X/Y)
Distance from Left Paper Edge (X/Y)
For Automatic Feed:
Distance from Top Paper Edge (X/Y)
Distance from Left Paper Edge (X/Y)
[2I/C161
[21/[161
WI/[161
C21/[161
[ 2 1 / C 16 1
[21/C161
14 13
Set Page Length (Inches)
Control Sequence
1B 43 00 n ]
[
n 4 14
Set page Length (Lines)
Control Sequence
1 1B 43 n
1
l 4 16
Set Left Margins Columns
Control Sequence
18 6C n ]
[
Maximum Value of Variable n [
255
1
n 4 18
Multiple Copies Control
Control Sequence
1
1B 60 n
Maximum Value of Variable n [
90
]
1
15
Typestyles/Character Sets
See Typestyles/Character Sets Menu below
&
Typestyles/Character Sets
Typestyle Definitions:
I 1. Default
E 2. Individual
R 3. Group
R 4. Character Set Redefinition
R 5. Slot Selection Definition
n 5 n 3
Group
Each Group Identifier is selected by a letter A-Z.
a?i
Group Identifier Comment
Type Styles
PC Character Set
Initial Control Sequence
[ COURIER 10 (INTERNAL FONT) ]
[ 1 66 154 211 240 250 260 ]
c 11
C 1B 79 00 00
]
mB
Group Identifier Comment
[ EDP 13N (INTERNAL FONTS) ]
Type Styles
[ 3 68 156 213 242 252 262 ]
Sequence
Initial Control
PC Character Set
ES1 1B 79 00 02
Ending Control Sequence
[ 1B 79 00 00
3
DC
Group Identifier Comment
[ MODERN PSN1O ]
Type Styles
E ; ;O 158 215 244 254 264 ]
PC Character Set
Ending Control Sequence
1B 79 00 04
]
1B
79
00
00
]
Initial Control Sequence
1
16
User-Defined Controls
Control Number 1 (Selects Portrait)
Control Sequence
1B 6F 00
[
1
Control
Sequence Filename
PORTRAIT.ORI
]
E
Control Number 2 (Selects Landscape)
Control Sequence
1B 6F 01
[
Control
Sequence Filename
1
LNDSCP.ORI
1
1
After inserting function codes, save the created PFT as
"GQ3500". Then, exit DisplayWrite 4 Printer Function Table and
proceed to SECTION III.
SECTION III.
After creating the PFT and saving, return to the DW4 main menu
and enter the PROFILES menu. Select the newly created GQ3500 PFT
for the Printer Function Table (Refer to DW4 users manual).
Complete and exit the PROFILES section saving changes made.
Proceed to SECTION IV.
SECTION IV.
This section deals with selection of the PAGE PRINTER MODE.
The dip switches are located on the GQ3500 interface board.
To access these switches, loosen the two thumbscrews and pull
the I/F board out firmly.
The switch settings are as follows:
DIP SWITCH l-l
OFF
1-2 OFF
The other DIP switches can be left in the factory settings for
most applications. Refer to the GQ-3500 USERS MANUAL for more
information.
IMPORTANT NOTES
FORMAT ERRORS
While this function table will work with most commands some
attempts to format a page will result in an error display from
DW4. These should not cause concern unless the printing is
incorrect. In that case, verify the commands in the document to
be printed before modifying the PFT.
FONT CARDS
If you have font cards these can be selected using the
Typestyles/ Character Set Group Definitions. The "ESC y" command
must first select the appropriate slot, then the desired font
residing in that card (e. g. 1B 79 01 00 will select slot no. 1
font no. 1). The hex commands needed are outlined in the GQ-3500
USER'S MANUAL.
DOWNLOADED FONTS
Once the fonts are downloaded to the GQ-3500 they are
selectable using the "ESC %" command from the Typestyles/
Character Set Group Definitions. Refer to the GQ-3500 USER'S
MANUAL for more information.
E P S O N
EPSON AMERICA INC.
SERVICE DEPARTMENT
PRODUCT
DATE: 7/21/87
SUBJECT: GQ-3500
SUPPORT
BULLETIN
P-0009
VERSION M0231 FIRMWARE GRAPHICS
When printing graphics on the GQ-3500 with the new firmware
upgrade, (M0231), in the LQ-1500 emulation, it is necessary to
disable dip switch 1-6 on the interface board. This will discard
characters when the print position moves beyond the right margin.
The Interface comes from the factory with this switch enabled.
Shown below is a print out from P.C. Paint ver. 2.0 with dip
switch 1-6 enabled and disabled using the LQ-1500 emulation.
Figure 3 is a table of dip switch 1 settings.
Figure (1)
(1-6 enabled)
Figure (2)
(1-6 disabled)
PRODUCT SUPPORT BULLETIN
NUMBER: P-0003
DATE: 2/10/87
SUBJECT: GQ-3500 Laser Printer Questions and Answers.
We received the following questions from the field and would like
to offer some solutions.
1. The data light blinks after a printout.
The GQ must be installed in much the same manner as the cut
sheet feeders and that is by reducing the number of lines
per page to 63 (this must be adjusted for in your software).
What is happening is that 2 or 3 blank lines are being
pushed onto the next page and are sitting in the buffer
waiting to be printed. Since the GQ only deals in whole
pages it will wait for the page to fill before printing. You
can clear the light by going off-line and pressing the Paper
Feed button. You will see a blank page but to the printer it
is not blank, it contains two lines of blank spaces.
2. I am getting line creep on multi-page documents.
This is caused by the same problem in #l, the need to set
number of lines per page to 63. The blank lines are being
pushed to the next page and there cause line creep.
3. My document won't print out.
The GQ deals in only whole pages and will not print unless
it sees a full page or a Form Feed. Most software that
supports laser printers will add a Form Feed at the end of
the data when you order a printout. If not the data will sit
in the buffer until you either manually force the page to be
printed or the page is full.
4. What software printer drivers should I select to support the
GQ?
Laser printers don't fall into any of the standard
categories that you are used to. If you are using standard
ASCII text only you can select almost any kind of dot-matrix
printer driver. (We recommend the LQ-1500 or the FX)
When you need to use some of the special features (fonts,
expanded, super/sub script, etc) you either need a printer
driver designed for the GQ, or you have to embed the escape
codes into the document. Embedded escape codes are usually
possible with word processing programs etc.
P-0003
For many spreadsheets and bit-image graphics programs the
escape codes must be part of the original program.
The optional Font cards can be selected by SelecType or
embedded codes.
If you use one of the IC printer emulation cards you can
select the appropriate printer driver in your software and
avoid the use of embedded escape codes.
NOTE: If you use an emulation card you will be limited to the
features of the emulated printer. You may loose some of
the GQs built-in features.
5. I am having problems with the LQ-1500 emulation.
The LQ-1500 emulation will support standard text but not the
graphics mode. Some features of the LQ will not work on the
GQ. Compressed print is only available if you have the IC
font card. The Emphasized and Double strike modes are hard
to see as different from standard characters due to the high
quality of the normal type. Bold type style can be selected
from the SelecType panel, but this effects the entire
document. Bold fonts will be available on the IC font cards.
6. The top of page margin is too large.
The top 1/4 inch of the paper is not a printable area. If
you set the top margin to 6 lines you will get about 9
lines. You will have to change the top margin to correct for
the 1/4 inch.
7. Display shows CH code when IC cards are used.
The Font IC cards can be used in either card slot but you
must always fill the "A" slot first. You can't use just one
card and put it in the "B" slot.
The Emulation IC cards can only be used in the "A" slot.
They can be used either with or without the Font cards.
If you put them in the wrong location you will get the CH
code.
8. The toner Out lamp is lit when there is still toner in the
developer unit.
The first time that toner is placed in the developer unit
the number of copies you can print out will be less than
with later refills. This is due to the fact that not all of
the toner is usable (some just stays in the unit).
P-0003
If you are moving the GQ from site to site you may cause the
toner to move to one end of its tray. If this happens you
will get a toner out light. TO correct the problem just
remove the developer unit and shake it side to side (along
the long axis) to distribute the toner again.
PRODUCT SUPPORT BULLETIN
P-0002
DATE: 2/10/87
SUBJECT: GQ-3500 LASER PRINTER DISPLAY CODE DEFINITIONS
The GQ-3500 provides trouble shooting codes via the display.
The following is an explanation of those codes:
P-0002
-
-
P-0002
P-0002
(8) - th fC.aKu.
(b)Sett)rICauddnaatA,
(c) Clem tb XC amd m&8& a
rs,8dlff~ICcsrd
P-0002
EPSON
EPSON AMERICA, INC.
SERVICE DIVISION
PRODUCT SUPPORT BULLETIN
DATE:
SUBJECT:
1/13/87
NUMBER:
P-0001
Using the GQ-3500 with WordStar
The GQ-3500 laser printer provides superior print quality, speed,
and quiet operation beyond current impact dot matrix and full
font printers. In page printer mode such features as double and
triple width/height characters are available along with a
selection of background patterns. To use these features with
WordStar only a few changes are needed using the WINSTALL.COM
program supplied with the word processor.
As an example the codes to use the following GQ-3500 features can
be installed:
*
Patterned backgrounds.
*
Alternate type styles.
*
Emphasized print.
*
Double sized characters.
In order to call these functions the key sequences for the
following WordStar features will be re-assigned:
*
User patches.
*
Alternate and normal print sizes.
*
Superscript and subscript.
*
Ribbon color select.
Page 1 of 4
PSB
P-0001
Using the section D, Custom Installation of Printers, of the
WINSTALL.COM program install:
0 - User-defined functions
-PQ
-pw
-PE
-PR
=
=
=
=
1Bh
1Bh
1Bh
1Bh
7Eh
7Eh
7Eh
7Eh
1h
2h
3h
0h
1h
1h
1h
1h
79h
79h
Oh
Oh
2h
Oh
2h
1h
2h
1h
Q- Character pitch
-PA =
-PN =
1Bh
1Bh
P - Carriage roll
-PT =
-'pv =
1Bh 45h
1Bh 46h
I - Ribbon selection
-PY =
*PY =
1Bh
1Bh
7Ah
7Ah
Assigning some of the key sequences to function keys in Wordstar
will facilitate their use.
After the new installation has been saved, produce a test
document in WordStar. Examples appear on pages 3 and 4. Page 3
shows what will appear on-screen, and page 4 shows the resulting
printout.
The same technique described above can be used to install
commands in LQ-1500 emulation mode (or with any other printer) if
desired. Refer to the User's Manual for the appropriate
commands, parameters, and their use.
Page 2 of 4
P-0001
PSB
INSERT ON
PAGE 3 LINE 1 COL 43
C:WSGQTST.TXT
L e-m- !----!----!----!----!----!----!----!----!----!----!--------R
^W
^YWordStar for the GQ-3500^Y
^YTest file^Y
December 5, 1986
^R
*
This is a test of text with different backgrounds
using:
^PQ - Background 1
^QABCDEFGHIJKLMNOPQRSTUVWXYZ
abcdefghijklmnopqrstuvwxyz^R
^PW - Background 2
^WABCDEFGHIJKLMNOPQRSTUVWXYZ
abcdefghijklmnopqrstuvwxyz^R
^PE - Background 3
^EABCDEFGHIJKLMNOPQRSTWWXYZ
abcdefghijklmnopqrstuvwxyz^R
^PR - Background 0
^RABCDEFGHIJKLMNOPQRSTUVWXYZ
abcdefghijklmnopqrstuvwxyz^R
Background 0 is available on PF9.
*
This is a test of the different typefaces:
^PA - Sans Serif 13
^AABCDEFGHIJKLMNOPQRSTWWXYZ^N
^Aabcdefghijklmnopqrstuvwxyz^N
^PN - Courier 10
ABCDEFGHIJKLMNOPQRSTUVWXYZ
abcdefghijklmnopqrstuvwxyz
These commands are available on PF7 and PF8
respectively.
*
<
<
<
<
<
<
<
<
<
<
<
<
<
<
<
<
<
C
<
<
<
<
<
<
<
<
<
<
<
<
This is a test using ^PT ^Tfor emphasized print and ^V ^PV
for normal weight print. These are available on PF3
and PF4 respectively.
^E
Note:
<
<
<
<
<
<
<
<
<
The heading was done in double high
double wide lettering using ^PY at each
end of the text.
^R
Page 3 of 4
<
<
<
<
<
.
.
P-0001
PSB
*
This is a test of text with different backgrounds
using:
^PQ - Backsround 1
^PW - Background 2
^PE - Background 3
^PR - Background 0
Background 0 is available on PF9.
*
This is a test of the different typefaces:
^PA - Sans Serif 13
ABCDEFGHIJKLMNOPQRSTUVWXYZ
8bcdafghi jklmnopqrstuvwxyz
^PN - Courier 10
ABCDEFGHIJKLMNOPQRSTUVWKYZ
abcdefghijklmnopqrstuvwxyz
These commands are available on PF7 and PF8
respectively.
*
Note:
This is a test using ^PT for emphasized print and ^PV
for normal weight print. These are available on PF3
and PF4 respectively.
The heading was done in double high
double wide lettering using ^PY at each
end of the text.
Page 4 of 4