1
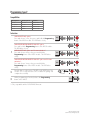
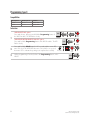
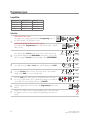
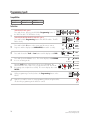
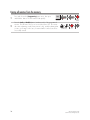
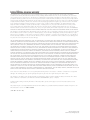
XL202
Programming Guide
This product is intended for installation by a professional
installer only! Attempts to install this product by a person
other than a trained professional may result in severe
damage to a vehicle’s electrical system and components.
© 2014 Directed, Vista, CA
DBALL2Pro 2014-12
Contents
Warning! Safety first........................................................................................................................ 3
Introduction..................................................................................................................................... 4
Compatibility & pairing options......................................................................................................... 4
Programming type 1......................................................................................................................... 6
Compatibilities........................................................................................................................... 6
Instructions................................................................................................................................ 6
Programming type 2......................................................................................................................... 7
Compatibilities........................................................................................................................... 7
Instructions................................................................................................................................ 7
Programming type 3......................................................................................................................... 8
Compatibilities........................................................................................................................... 8
Instructions................................................................................................................................ 8
Programming type 4......................................................................................................................... 9
Compatibilities........................................................................................................................... 9
Instructions................................................................................................................................ 9
Programming type 5....................................................................................................................... 10
Compatibilities......................................................................................................................... 10
Instructions.............................................................................................................................. 10
Programming type 6....................................................................................................................... 11
Compatibilities......................................................................................................................... 11
Instructions.............................................................................................................................. 11
Programming type 7....................................................................................................................... 12
Compatibilities......................................................................................................................... 12
Instructions.............................................................................................................................. 12
Programming type 8....................................................................................................................... 13
Compatibilities......................................................................................................................... 13
Instructions.............................................................................................................................. 13
Erasing all remotes from the memory................................................................................................ 14
Limited lifetime consumer warranty................................................................................................... 15
Warning! Safety first
The following safety warnings must be observed at all times:
• Due to the complexity of this system, installation of this product must only be performed by an authorized
Directed dealer.
• When properly installed, this system can start the vehicle via a command signal from the remote control.
Therefore, never operate the system in an area that does not have adequate ventilation.
The
•
•
•
following precautions are the sole responsibility of the user; however, authorized Directed dealers should:
Never use a test light or logic probe when installing this unit. Always use a multimeter.
Never operate the system in an enclosed or partially enclosed area without ventilation (such as a garage).
When parking in an enclosed or partially enclosed area or when having the vehicle serviced, the
remote start system must be disabled using the installed toggle switch. It is the user’s sole responsibility to
properly handle and keep out of reach from children all remote controls to assure that the system does not
unintentionally remote start the vehicle.
• USER MUST INSTALL A CARBON MONOXIDE DETECTOR IN OR ABOUT THE LIVING AREA ADJACENT
TO THE VEHICLE. ALL DOORS LEADING FROM ADJACENT LIVING AREAS TO THE ENCLOSED OR
PARTIALLY ENCLOSED VEHICLE STORAGE AREA MUST REMAIN CLOSED AT ALL TIMES.
Use of this product in a manner contrary to its intended mode of operation may result in property damage,
personal injury, or death. Except when performing the Safety Check outlined in this installation guide, (1) Never
remotely start the vehicle with the vehicle in gear, and (2) Never remotely start the vehicle with the keys in the
ignition. The user is responsible for having the neutral safety feature of the vehicle periodically checked, wherein
the vehicle must not remotely start while the car is in gear. This testing should be performed by an authorized
Directed dealer in accordance with the Safety Check outlined in this product installation guide. If the vehicle
starts in gear, cease remote start operation immediately and consult with the user to fix the problem immediately.
After the remote start module has been installed, test the remote start module in accordance with the Safety
Check outlined in this installation guide. If the vehicle starts when performing the Neutral Safety Shutdown Circuit
test, the remote start unit has not been properly installed. The remote start module must be removed or properly
reinstalled so that the vehicle does not start in gear. All installations must be performed by an authorized Directed
dealer.
OPERATION OF THE REMOTE START MODULE IF THE VEHICLE STARTS IN GEAR IS CONTRARY TO ITS
INTENDED MODE OF OPERATION. OPERATING THE REMOTE START SYSTEM UNDER THESE CONDITIONS
MAY RESULT IN PROPERTY DAMAGE OR PERSONAL INJURY. IMMEDIATELY CEASE THE USE OF THE UNIT
AND REPAIR OR DISCONNECT THE INSTALLED REMOTE START MODULE. DIRECTED WILL NOT BE HELD
RESPONSIBLE OR PAY FOR INSTALLATION OR REINSTALLATION COSTS.
Remote starters for manual transmission pose significant risks if not properly installed and operated. When testing
to ensure the installation is working properly, only remote start the vehicle in neutral gear, on a flat surface and
with a functional, fully engaged parking brake. Do not allow anyone to stand in front of or behind the vehicle.
This product should not be installed in any convertible vehicles, soft or hard top with a manual transmission.
Installation in such vehicles may pose certain risk.
3
XL202 Programming Guide
© 2014 Directed. All rights reserved.
Introduction
The XL202 is designed to convert RF data into D2D. It is used in conjunction with most of our
Xpresskit interface modules that are equipped with a D2D port and enables the connection
of almost any of our Directed RF kits. The main applications for the XL202 are to allow the
connection of Directed RF to RSR or RXT compatible kit, which allow the control of the OEM
(RXT) or aftermarket (RSR) remote starters.
Compatibility & pairing options
The XL202 offers multiple different firmware’s that enable it to work with legacy and current RF technology.
Before using the XL202 you must ensure that it has been flashed with the correct firmware and that the correct
settings have been selected at the interface module level.
Please reference the table below to determine what is the correct programming procedure (Pairing type).
4
Remote
Specifications
Brand
Remote
Specifications
Prog. type
1
Prog. type
1
Remote part #
ASRF-1510FBK
Remote part #
613-TX
Antenna part #
TW-130 HDR
Antenna part #
613-RX
Firmware
202.RFTDASEH
Firmware
202.RFKAFE
Prog. type
1
Prog. type
1
Remote part #
ASRF-3503BK
Remote part #
623-TX
Antenna part #
TW-130 HDR
Antenna part #
623-RX
Firmware
202.RFTDASEH
Firmware
202.RFKAFE
Prog. type
1
Prog. type
8
Remote part #
ASRF-3510BK
Remote part #
5225-TX
Antenna part #
TW-130 HDR
Antenna part #
5225-RX
Firmware
202.RFTDASEH
Firmware
202.RFKAFS
Prog. type
1
Prog. type
2
Remote part #
ASRA-2510FBK
Remote part #
721-TX
Antenna part #
SH 433-120 HDR
Antenna part #
721-RX
Firmware
202.RFKASRA
Firmware
202.RFKAFF1
Prog. type
7
Prog. type
1
Remote part #
ASRS-7503
Remote part #
615-TX
Antenna part #
6711T SST
Antenna part #
TW-130 HDR
Firmware
202.RFTDDEI
Firmware
202.RFTDASEH
Prog. type
7
Prog. type
1
Remote part #
ASRS-7504
Remote part #
625-TX
Antenna part #
TW-150 SST
Antenna part #
TW-130 HDR
Firmware
202.RFTDASNC
Firmware
202.RFTDASEH
AstroStart
Autostart
Brand
XL202 Programming Guide
© 2014 Directed. All rights reserved.
Automate
5
Remote
Specifications
Brand
Remote
Specifications
Prog. type
2
Prog. type
2
Remote part #
7111L
Remote part #
7211V/P/X
Antenna part #
6102T
Antenna part #
6212T
Firmware
202.RFKLQ0
Firmware
202.RFTDDEI1
Prog. type
1
Prog. type
5
Remote part #
7352L
Remote part #
7153V/P/X
Antenna part #
554N
Antenna part #
6211T
Firmware
202.RFTDKLQ1
Firmware
202.RFTDDEI
Prog. type
1
Prog. type
5
Remote part #
7143L
Remote part #
7251V/P/X
Antenna part #
554N
Antenna part #
6211T
Firmware
202.RFTDKLQ1
Firmware
202.RFTDDEI
Prog. type
3
Prog. type
6
Remote part #
7113A
Remote part #
7752V/P/X
Antenna part #
6211T
Antenna part #
6711T SST
Firmware
202.RFTDDEI
Firmware
202.RFTDDEI
Prog. type
3
Prog. type
6
Remote part #
7213A
Remote part #
7941V/P/X
Antenna part #
6211T
Antenna part #
6711T SST
Firmware
202.RFTDDEI
Firmware
202.RFTDDEI
Prog. type
4
Prog. type
5
Remote part #
7143A
Remote part #
7656V/X
Antenna part #
6211T
Antenna part #
6816T
Firmware
202.RFTDDEI
Firmware
202.RFTDDEI2
Prog. type
4
Prog. type
5
Remote part #
7243A
Remote part #
7856V/X
Antenna part #
6211T
Antenna part #
6816T
Firmware
202.RFTDDEI
Firmware
202.RFTDDEI2
Prog. type
6
Prog. type
6
Remote part #
7351A
Remote part #
7756V/X
Antenna part #
6211T
Antenna part #
6816T
Firmware
202.RFTDDEI
Firmware
202.RFTDDEI2
Prog. type
2
Remote part #
7111A
Antenna part #
6102T
Firmware
202.RFKLQ0
Prog. type
1
Remote part #
474A
Antenna part #
6102T
Firmware
202.RFTDKLQ1
Viper/Python/Clifford
Avital
Brand
XL202 Programming Guide
© 2014 Directed. All rights reserved.
Programming type 1
Compatibilities
Remote part #
Antenna part #
Firmware
ASRF-1510FBK
TW-130 HDR
202.RFTDASEH
ASRF-3503BK
TW-130 HDR
202.RFTDASEH
ASRF-3510FBK
TW-130 HDR
202.RFTDASEH
ASRA-2510FBK
SH 433-120 HDR
202.RFKASRA
613-TX
613-RX
202.RFKAFE
623-TX
623-RX
202.RFKAFE
615-TX
TW-130 HDR
202.RFTDASEH
625-TX
TW-130 HDR
202.RFTDASEH
7352L
554N
202.RFTDKLQ1
7143L
554N
202.RFTDKLQ1
474A
6102T
202.RFTDKLQ1
Instructions
XL202
1
Press and hold the Programming button of the XL202 module. The LED
flashes slowly.
2
Press the Lock button on the remote. The LED on the XL202 turns ON solid
for one second, then turns OFF to indicate the pairing was completed
successfully.
3
When programming is finished, release the Programming button on the
XL202.
6
XL202
Press & Hold
&
Press
&
Flashes
Slowly
&
Solid
AUX x1 sec
XL202
XL202
Off
Release
XL202 Programming Guide
© 2014 Directed. All rights reserved.
Programming type 2
Compatibilities
Remote part #
Antenna part #
Firmware
721-TX
721-RX
202.RFKAFF1
7211V/P/X
6212T
202.RFTDDEI1
7111A
6102T
202.RFKLQ0
7111L
6102T
202.RFKLQ0
Instructions
XL202
With UNLOCK ALL option:
Press and release 1 time, then press and hold the Programming
button of the XL202 module. The LED flashes slowly.
XL202
&
Press & Release
Press & Hold
Flashes
Slowly
With DRIVER DOOR PRIORITY UNLOCK option:
Press and hold the Programming button of the XL202 module.
The LED flashes slowly.
1
&
Press & Hold
&
Flashes
Slowly
XL202
With UNLOCK ALL option and 2x start activation*:
Press and release 4 times, then press and hold the
Programming button of the XL202 module. The LED flashes
slowly.
XL202
&
Press & Release
x4
Press & Hold
&
Flashes
Slowly
XL202
With DRIVER DOOR PRIORITY UNLOCK option and 2x start
activation*:
Press and release 3 times, then press and hold the
Programming button of the XL202 module. The LED flashes
slowly.
2
Press the button on the remote. The LED on the XL202 turns ON
solid for one second, then turns OFF to indicate the pairing was
completed successfully.
3
When programming is finished, release the Programming
button on the XL202.
XL202
&
Press & Release
x3
OR
Press & Hold
&
Flashes
Slowly
AUX
Press Button
&
XL202
&
Solid
x1 sec
XL202
Off
Release
* Only compatible with the 202.RFKLQ0 firmware.
7
XL202 Programming Guide
© 2014 Directed. All rights reserved.
Programming type 3
Compatibilities
Remote part #
Antenna part #
Firmware
7113A
6211T
202.RFTDDEI
7213A
6211T
202.RFTDDEI
Instructions
1
XL202
With UNLOCK ALL option:
Press and release, then press and hold the Programming button of
the XL202 module. The LED flashes slowly.
XL202
&
Press & Hold
&
XL202
With DRIVER DOOR PRIORITY UNLOCK option:
Press and hold the Programming button of the XL202 module. The LED
flashes slowly.
2
Press and hold the remote button for 15 sconds until the LED on the
XL202 turns ON solid for one second, then turns OFF to indicate the
pairing was completed successfully.
3
When programming is finished, release the Programming button on the
XL202.
8
Press & Release
XL202
Press & Hold
&
Press x15 sec
XL202
AUX
Solid
x1 sec
XL202
&
Flashes
Slowly
Flashes
Slowly
&
Off
Release
XL202 Programming Guide
© 2014 Directed. All rights reserved.
Programming type 4
Compatibilities
Remote part #
Antenna part #
Firmware
7143A
6211T
202.RFTDDEI
7243A
6211T
202.RFTDDEI
Instructions
1
2
3
9
XL202
With UNLOCK ALL option:
Press and release, then press and hold the Programming button of
the XL202 module. The LED flashes slowly.
XL202
Press & Release
&
Press & Hold
&
XL202
With DRIVER DOOR PRIORITY UNLOCK option:
Press and hold the Programming button of the XL202 module. The LED
flashes slowly.
XL202
Press and hold the Unlock button for 20 seconds until the remote LED
turns ON solid. The XL202 LED also turns ON solid for one second,
then turns OFF to indicate the pairing was completed successfully.
&
Press x20 sec
When programming is finished, release the Programming button on the
XL202.
Press & Hold
&
Solid
XL202
AUX
&
Flashes
Slowly
Flashes
Slowly
&
Solid
x1 sec
XL202
Off
Release
XL202 Programming Guide
© 2014 Directed. All rights reserved.
Programming type 5
Compatibilities
Remote part #
Antenna part #
Firmware
7153V/P/X
6211T
202.RFTDDEI
7251V/P/X
6211T
202.RFTDDEI
7656V/X
6816T
202.RFTDDEI2
7856V/X
6816T
202.RFTDDEI2
Instructions
1
XL202
With UNLOCK ALL option:
Press and release, then press and hold the Programming button of
the XL202 module. The LED flashes slowly.
XL202
&
Press & Hold
&
XL202
With DRIVER DOOR PRIORITY UNLOCK option:
Press and hold the Programming button of the XL202 module. The LED
flashes slowly.
XL202
&
Press & Hold
AUX
2
Hold the Function button on the remote until it emits a long beep
and its LED turns ON solid (approximately 12 seconds).
3
Press and hold the Start button until the remote beeps 3 times and its LED
turns ON solid.
4
Press the Lock button on the remote. Confirmation tones are heard
upon successful programming, and the XL202 LED turns ON solid for
one second, then turns OFF to indicate the pairing was completed
successfully.
5
When programming is finished, release the Programming button on the
XL202.
6
Wait 30 seconds for remote to exit programming. All remote lights will be
off when the programming mode has been exited.
10
Press & Release
&
Press &
Hold
&
Press &
Hold
&
AUX
Release
&
Confirmation
Tones x3
&
Press
Flashes
Slowly
Solid
Confirmation
Tones x1
&
&
Confirmation
AUXTones
XL202
Flashes
Slowly
Solid
&
Solid
x1 sec
XL202
Off
Release
Wait
30 secs.
XL202 Programming Guide
© 2014 Directed. All rights reserved.
AUX
Programming type 6
Compatibilities
Remote part #
Antenna part #
Firmware
7351A
6211T
202.RFTDDEI
7752V/P/X
6711T SST
202.RFTDDEI
7941V/P/X
6711T SST
202.RFTDDEI
7756V/X
6816T
202.RFTDDEI2
Instructions
1
2
XL202
With UNLOCK ALL option:
Press and release, then press and hold the Programming button of
the XL202 module. The LED flashes slowly.
XL202
&
Press & Release
&
Press & Hold
XL202
With DRIVER DOOR PRIORITY UNLOCK option:
Press and hold the Programming button of the XL202 module. The LED
flashes slowly.
Press and hold the Function button on the remote until it emits a long
beep and the display reads MAIN MENU (arround 8 to 12 seconds).
After releasing the Function button, the display reads SETUP REMOTE.
XL202
&
Press & Hold
AUX
Confirmation
Tones x1
&
& AUX MENU
Screen Display
SETUP
REMOTE
Screen Display
&
Release
3
Press and release the Aux or Start button until the display reads PAIR.
4
Press the Function button one time. The remote emits 3 tones and the
display reads PAIR. It is now in Pairing mode.
5
Press the Lock button on the remote. The XL202 LED turns ON solid
for one second, then turns OFF to indicate the pairing was completed
successfully. The remote display will also read PASSED.
OR
&
AUX
AUX
Press & Release
6
When programming is finished, release the Programming button on the
XL202.
7
Wait 30 seconds for remote to exit programming. The remote will return
the display to its home screen when the programming mode has been
exited.
11
AUX
Press
&
Confirmation
Tones x3
&
&
Solid
x1 sec
XL202
PAIR
Screen Display
&
Press x1
Flashes
Slowly
MAIN
&
Press & Hold
Flashes
Slowly
Screen Display
&
Off
PAIR
PASSED
Screen Display
AUX
XL202
Release
Wait
30 secs.
XL202 Programming Guide
© 2014 Directed. All rights reserved.
Programming type 7
Compatibilities
Remote part #
Antenna part #
Firmware
ASRS-7503
6711T SST
202.RFTDDEI
ASRS-7504
TW-150 SST
202.RFTDASNC
Instructions
1
XL202
With UNLOCK ALL option:
Press and release, then press and hold the Programming button of
the XL202 module. The LED flashes slowly.
XL202
&
Press & Release
Press & Hold
XL202
With DRIVER DOOR PRIORITY UNLOCK option:
Press and hold the Programming button of the XL202 module. The LED
flashes slowly.
2
Press and hold the Function button on the remote until it emits a
long beep and the display reads PAIR MODE.
3
Press and release the Lock button. The XL202 LED turns ON solid for
one second, then turns OFF to indicate the pairing was completed
successfully. The remote also plays a melody while the display reads LRN
OK.
XL202
12
When programming is finished, release the Programming button on the
XL202.
&
Press & Hold
AUX
&
&
Confirmation
Tones x1
Press & Hold
&
Press &
Release
Flashes
Slowly
Flashes
Slowly
PAIR
MODE
Screen Display
&
Solid
AUX x1 sec
&
&
Confirmation
Melody
4
&
XL202
XL202
Off
LRN OK
Screen Display
Release
XL202 Programming Guide
© 2014 Directed. All rights reserved.
Programming type 8
Compatibilities
Remote part #
Antenna part #
Firmware
5225-TX
5225-RX
202.RFKAFS
Instructions
1
XL202
With UNLOCK ALL option:
Press and release, then press and hold the Programming button of
the XL202 module. The LED flashes slowly.
XL202
&
Press & Hold
&
XL202
With DRIVER DOOR PRIORITY UNLOCK option:
Press and hold the Programming button of the XL202 module. The LED
flashes slowly.
2
Press and hold the P button on the remote until the remote emits a
long tone and the display reads MAIN MENU (arround 4 seconds).
3
Press and release the Trunk or Start button until the display reads PAIR.
4
Press and release the P button once. The remote display reads CODING.
It is now in Pairing mode.
5
Press the Lock button on the remote. Upon successful pairing, the
XL202 LED turns ON solid for one second, then turns OFF to indicate
the pairing was completed successfully. The remote display also reads
PASSED.
XL202
P
&
Press & Hold
&
Press &
Hold
&
Confirmation
Tones x1
OR
&
Press & Hold
&
Press & Release
&
Press
6
7
Wait 30 seconds for remote to exit programming. All remote lights will be
off when the programming mode has been exited.
&
Solid
x1 sec
Flashes
Slowly
Flashes
Slowly
MAIN
MENU
Screen Display
PAIR
Screen Display
P
When programming is finished, release the Programming button on the
XL202.
13
Press & Release
Screen Display
&
Off
CODING
PASSED
Screen Display
XL202
AUX
XL202
Release
Wait
30 secs.
XL202 Programming Guide
© 2014 Directed. All rights reserved.
Erasing all remotes from the memory
XL202
1
Press and release the Programming button twice, then press
and hold the button. The LED starts to flash quickly.
2
Press the Lock and Unlock buttons (simultaneously) of the programmed
remotes. The LED turns ON for one second, then turns OFF. The remote
also emits a buzzing sound (2-way remotes only), usually indicating that
you are out of range. In this case, it means that the remotes have been
successfully erased.
14
XL202
Press & Release
x2
&
Press & Hold
&
Flashes
Quickly
&
&
Press Buttons
Simultaneously
AUX
AUX
&
Solid
x1 sec
Off
XL202 Programming Guide
© 2014 Directed. All rights reserved.
Limited lifetime consumer warranty
Directed Electronics. (“Directed”) promises to the original purchaser to repair or replace (at Directed’s election) with a comparable
reconditioned model any Directed unit (hereafter the “unit”), excluding without limitation the siren, the remote transmitters, the associated
sensors and accessories, which proves to be defective in workmanship or material under reasonable use during the lifetime of the vehicle
provided the following conditions are met: the unit was purchased from an authorized Directed dealer, the unit was professionally installed
and serviced by an authorized Directed dealer; the unit will be professionally reinstalled in the vehicle in which it was originally installed by
an authorized Directed dealer; and the unit is returned to Directed, shipping prepaid with a legible copy of the bill of sale or other dated
proof of purchase bearing the following information: consumer’s name, telephone number and address; the authorized dealers name,
telephone number and address; complete product description, including accessories; the year, make and model of the vehicle; vehicle
license number and vehicle identification number. All components other than the unit, including without limitation the siren, the remote
transmitters and the associated sensors and accessories, carry a one-year warranty from the date of purchase of the same. ALL PRODUCTS
RECEIVED BY DIRECTED FOR WARRANTY REPAIR WITHOUT PROOF OF PURCHASE FROM AN AUTHORIZED DEALER WILL BE DENIED.
This warranty is non-transferable and is automatically void if: the unit’s date code or serial number is defaced, missing or altered; the unit has
been modified or used in a manner contrary to its intended purpose; the unit has been damaged by accident, unreasonable use, neglect,
improper service, installation or other causes not arising out of defects in materials or construction. The warranty does not cover damage to
the unit caused by installation or removal of the unit. Directed, in its sole discretion, will determine what constitutes excessive damage and
may refuse the return of any unit with excessive damage.
TO THE MAXIMUM EXTENT ALLOWED BY LAW, ALL WARRANTIES, INCLUDING BUT NOT LIMITED TO EXPRESS WARRANTY, IMPLIED
WARRANTY, WARRANTY OF MERCHANTABILITY, FITNESS FOR PARTICULAR PURPOSE AND WARRANTY OF NON-INFRINGEMENT OF
INTELLECTUAL PROPERTY, ARE EXPRESSLY EXCLUDED; AND DIRECTED NEITHER ASSUMES NOR AUTHORIZES ANY PERSON OR ENTITY
TO ASSUME FOR IT ANY DUTY, OBLIGATION OR LIABILITY IN CONNECTION WITH ITS PRODUCTS. DIRECTED DISCLAIMS AND
HAS ABSOLUTELY NO LIABILITY FOR ANY AND ALL ACTS OF THIRD PARTIES INCLUDING ITS AUTHORIZED DEALERS OR INSTALLERS.
DIRECTED SECURITY SYSTEMS, INCLUDING THIS UNIT, ARE DETERRENTS AGAINST POSSIBLE THEFT. DIRECTED IS NOT OFFERING A
GUARANTEE OR INSURANCE AGAINST VANDALISM, DAMAGE OR THEFT OF THE AUTOMOBILE, ITS PARTS OR CONTENTS; AND
HEREBY EXPRESSLY DISCLAIMS ANY LIABILITY WHATSOEVER, INCLUDING WITHOUT LIMITATION, LIABILITY FOR THEFT, DAMAGE
AND/OR VANDALISM. THIS WARRANTY DOES NOT COVER LABOR COSTS FOR MAINTENANCE, REMOVAL OR REINSTALLATION OF
THE UNIT OR ANY CONSEQUENTIAL DAMAGES OF ANY KIND. IN THE EVENT OF A CLAIM OR A DISPUTE INVOLVING DIRECTED
OR ITS SUBSIDIARY, THE VENUE SHALL BE SAN DIEGO COUNTY IN THE STATE OF CALIFORNIA. CALIFORNIA STATE LAWS AND
APPLICABLE FEDERAL LAWS SHALL APPLY AND GOVERN THE DISPUTE. THE MAXIMUM RECOVERY UNDER ANY CLAIM AGAINST
DIRECTED SHALL BE STRICTLY LIMITED TO THE AUTHORIZED DIRECTED DEALER’S PURCHASE PRICE OF THE UNIT. DIRECTED SHALL
NOT BE RESPONSIBLE FOR ANY DAMAGES WHATSOEVER, INCLUDING BUT NOT LIMITED TO, ANY CONSEQUENTIAL DAMAGES,
INCIDENTAL DAMAGES, DAMAGE TO VEHICLE, DAMAGES FOR THE LOSS OF TIME, LOSS OF EARNINGS, COMMERCIAL LOSS,
LOSS OF ECONOMIC OPPORTUNITY AND THE LIKE. NOTWITHSTANDING THE ABOVE, THE MANUFACTURER DOES OFFER A
LIMITED WARRANTY TO REPLACE OR REPAIR THE CONTROL MODULE SUBJECT TO THE CONDITIONS AS DESCRIBED HEREIN. THIS
WARRANTY IS VOID IF THE UNIT HAS NOT BEEN PURCHASED FROM DIRECTED, OR AN AUTHORIZED DIRECTED DEALER, OR IF THE
UNIT HAS BEEN DAMAGED BY ACCIDENT, UNREASONABLE USE, NEGLIGENCE, ACTS OF GOD, NEGLECT, IMPROPER SERVICE, OR
OTHER CAUSES NOT ARISING OUT OF DEFECT IN MATERIALS OR CONSTRUCTION.
Some states do not allow limitations on how long an implied warranty will last or the exclusion or limitation of incidental or consequential
damages. This warranty gives you specific legal rights and you may also have other rights that vary from State to State.
This warranty is only valid for sale of product(s) within the United States of America and in Canada. Product(s) sold outside of the United
States of America or Canada are sold “AS-IS” and shall have NO WARRANTY, express or implied.
For further details relating to warranty information of Directed products, please visit the support section of Directed’s website at: www.
directed.com.
This product may be covered by a Guaranteed Protection Plan (“GPP”). See your authorized Directed dealer for details of the plan or call
Directed Customer Service at 1-800-876-0800.
(920-10011-01 2011-06)
15
XL202 Programming Guide
© 2014 Directed. All rights reserved.


![[ Bedienungsanleitung ]](http://vs1.manualzilla.com/store/data/006735880_1-28334984de48ae2c5a8573c29f433271-150x150.png)