1
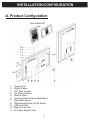
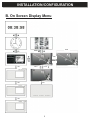
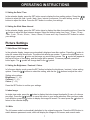
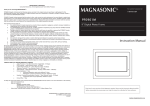
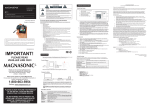
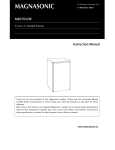
For Customer Assistance Call:
1-800-663-5954
07MS120
7" Digital Photo Frame
Instruction Manual
Thank you for your purchase of this Magnasonic product.
Please read this Instruction Manual carefully before using product
to ensure proper use. Keep this manual in a safe place for future
reference.
www.magnasonic.ca
TABLE OF CONTENTS
IMPORTANT SAFETY INFORMATION ...................................................................................................
PRODUCT INFORMATION ....................................................................................................................
Packaging Contents ..........................................................................................................................
Technical Specifications ...................................................................................................................
INSTALLATION/CONFIGURATION ........................................................................................................
A. Product Configuration ...............................................................................................................
B. On Screen Display Menu ...........................................................................................................
OPERATING INSTRUCTIONS ................................................................................................................
Basic Settings
1. Turn On/Off .....................................................................................................................
2. Insert a Memory Card or USB Flash Drive ........................................................................
3. Auto Image Rotation ........................................................................................................
4. Calendar / Clock Display ..................................................................................................
5. Setting the Date / Time ....................................................................................................
6. Setting the Slide Show Interval ........................................................................................
Picture Settings
7. Slide Show / Still Images ..................................................................................................
8. Setting the Brightness / Contrast / Colour .......................................................................
9. Index Image .....................................................................................................................
10. Wide .................................................................................................................................
TROUBLESHOOTING ............................................................................................................................
Recycling ..........................................................................................................................................
WARRANTY ..........................................................................................................................................
1
2
3
3
3
4-5
4
5
6-7
6
6
6
6
7
7
7
7
7
7
8
8
9
IMPORTANT SAFETY INFORMATION
CAUTION
RISK OF ELECTRIC SHOCK
DO NOT OPEN
CAUTION
The lightning flash with arrowhead symbol, within an equilateral triangle, is intended to alert
the user to the presence of uninsulated "dangerous voltage" within the products enclosure
that may be of sufficient magnitude to constitute a risk of electric shock to persons.
The exclamation point within an equilateral triangle is intended to alert the user to the
presence of important operating and maintenance (servicing) instructions in the literature
accompanying this Digital Photo Frame
WARNINGS:
To reduce the risk of fire or electric shock, do not expose this product to rain or moisture.
DO NOT REMOVE COVER or OPEN THE CABINET
Dangerous high voltages are present inside the enclosure. No user serviceable parts inside. Refer
servicing to qualified personnel only. Use of controls, adjustments or performance of procedures
other than those specified may result in hazardous radiation exposure.
CAUTION: RETAIN THIS MANUAL FOR FUTURE REFERENCE
This unit has been designed and manufactured to assure personal safety.
Improper use can result in electric shock or fire hazard. The safeguards incorporated in this unit will protect you if you
observe the following procedures for installation, use, and servicing. This unit does not contain any parts that can be
repaired by the user.
1. Read these instructions.
2. Keep these instructions.
3. Heed all warnings.
4. Follow all instructions.
5. Do not use this unit near water.
6. Clean only with a dry cloth.
7. Clean the screen only with a specified cleaning solution for use with products such as laptops and computer monitors.
These are available at most retail consumer electronics stores. Do not clean the inside of the unit.
8. Check that the power voltage stated on the power adaptor rating label corresponds to your local electricity supply.
9. Do not block any ventilation openings. Install in accordance with the manufacturers instructions.
10. Do not place near any heat sources such as radiators, heat registers, stoves or other apparatus (including amplifiers)
that produce heat.
11. Do not immerse the main unit, the power adapter or any accessories in water or any other liquid.
12. Unplug the power adaptor from the wall when the product is unused for a long period of time and during thunderstorms.
13. Only use attachments / accessories specified by the manufacturer.
14. Unwind and straighten the power adaptor before use.
15. Damage Requiring Service
Unplug the power adaptor and refer servicing to qualified service personnel under the following conditions:
A. If liquid has been spilled on or into the product.
B. If the product has been exposed to rain, water, or other liquids.
C. If the product does not operate normally by following the operating instructions. Adjust only those controls that
are covered by the operating instructions. Improper adjustment of other controls may result in damage and will
often require extensive work by a qualified technician to restore the product to its normal operation.
D. If the product has been dropped or damaged in any way.
E. When the product exhibits a distinct change in performance. It indicates a need for service.
16. Servicing
Do not attempt to service this product yourself as opening or removing covers may expose you to dangerous voltage or
other hazards. Refer all servicing to qualified service personnel.
17. Replacement Parts
When replacement parts are required, be sure the service technician has used replacement parts specified by the
manufacturer or have the same characteristics as the original parts. Unauthorized substitutions may result in fire, electric
shock, or other hazards.
18. Safety Check
Upon completion of any service or repairs to this product, ask the service technician to perform safety checks to
determine that the product is in proper operating condition.
2
PRODUCT INFORMATION
Package Contents
1.
2.
3.
4.
7" Digital Photo Frame
AC Power Adaptor
Removable Stand
Instruction Manual
Note: It is recommended only to use the
AC Power Adaptor included with this Digital Photo Frame
Technical Specifications
1.
2.
3.
4.
5.
6.
LCD Display: 7" TFT Active Matrix LCD Display
Resolution: 480 x 234
Memory Card Type: SD/SDHC, MMC, and MS
Image Format: JPEG
Power Supply: 5V
, 1.2A
Dimensions: 184 x 117 x 25 mm
Magnasonic assumes no responsibility for loss of data caused by
improper use of this product.
3
INSTALLATION/CONFIGURATION
A. Product Configuration
Auto Rotate 90o
5
4
3
6
2
1
B
US
ry
mo
d
Car
Me
11
1.
2.
3.
4.
5.
6.
7.
8.
9.
10.
11.
10
9
8
7
Power & Set
Right & Pause
Left, Time & Index
Up, Enter & Return
Down & Wide
Housing Holes for Removable Stand
Removable Stand
Wall-Mounted Holes (for #6 Screw)
USB Input Slot
Memory Card Slot
AC Power Adaptor Input
4
INSTALLATION/CONFIGURATION
B. On Screen Display Menu
WIDE
HOLD
WIDE
WIDE
SET
SET
HOLD
HOLD
SET
SET
5
OPERATING INSTRUCTIONS
Basic Settings
1. Turn On/Off
After plugging in the supplied AC adaptor, the Digital Photo Frame automatically turns on and displays
the calendar. To turn the calendar display off, hold down the
button until the photo frame turns off.
Press the
button again to turn the photo frame back on.
2. Inserting a Memory Card or USB Flash Drive
Gently insert an SD Memory Card, MMC Memory Card, or Memory Stick into the card slot with its
label side facing forward. It is normal for a portion of the Memory Card to remain outside of the Digital
Photo Frame. Please do not try to jam the memory card into the unit.
Gently insert a USB Flash Drive into the USB Input Slot. The USB Flash Drive will only fit in one
direction. Please do not force the USB Flash Drive into the slot; if it is not easily inserting, try inserting
it in the other direction.
Note: When a USB Flash Drive is inserted into this Digital Photo Frame, the USB Flash Drive takes
priority. For example: If you were to insert a Memory Card and a USB Flash Drive, this Digital Photo
Frame will only read the images on the USB Flash Drive.
3. Auto Image Rotation
While in the calendar display, press the SET button 3 times to display the Auto Rotation settings.
Press the
button to select Auto Rotation ON or OFF. This will activate or deactivate the auto rotation
feature.
Once activated, you can install the removable stand onto the Digital Photo Frame, orienting it in either
portrait or landscape mode. After adjusting the orientation, the Digital Photo Frame will automatically
adjust the single image on the display 90 degrees to its proper orientation.
Note: Auto Image Rotation is not available in the following modes: Settings Menu, Image Index,
Calendar Display, Slide Show, and Analog/Digital Clock.
There may be occasions when Auto Image Rotation may not properly orient your image. If this occurs,
try rotating the Digital Photo Frame in the opposite orientation, then rotating it back; or placing the
Digital Photo Frame down on a flat stable surface.
4. Calendar / Clock Display
This Digital Photo Frame automatically defaults to the calendar display with slide show images. Press
the
button to switch to the clock display. Continue pressing to toggle between the analog and digital
clock. Press the
button to return to the calendar display.
Note: In the calendar display, it is not possible to make the slide show images still images.
6
OPERATING INSTRUCTIONS
5. Setting the Date / Time
In the calendar display, press the SET button once to display the time setting options. Press the /
buttons to select the year / month / date / hour / minute in sequence. For each setting, use the /
buttons to adjust the value. Press the SET button to confirm your settings.
6. Setting the Slide Show Interval
In the calendar display, press the SET button twice to display the slide show setting options. Press the
button to adjust the time between images. Select the interval value from 3 sec., 10 sec., 30 sec.,
1 min., 5 min., 15 min., 30 min., 1 hour, 4 hours, 12 hours and 1 day. Press the SET button to confirm
your settings.
Picture Settings
7. Slide Show / Still Images
In the calendar display, images are automatically displayed one after another. Press the
button to
enter full screen slide show mode. The slide show effects are random. To pause the slide show on a
single image, press the
button on the image you would like to pause. The
symbol will appear in
the top left corner of the display, and the image will be paused. To resume playback, press the
button again. The symbol will change back to the
symbol.
8. Setting the Brightness / Contrast / Colour
In full screen display mode, press the SET button to display the brightness / contrast / colour setting
options. Press the / buttons to select the setting, and use the / buttons to adjust the value.
Setting value options:
Brightness (1 ~ 16)
Contrast (1 ~ 31)
Colour (1 ~ 31)
Press the SET button to confirm your settings.
9. Index Image
In single view mode, press the
button to display the index image thumbnails (2 rows x 4 columns
per page). Press the / buttons to move the cursor to your image selection. After you have made
your selection, press the
button to display the image full screen. To cancel press the
button to
return to the calendar display.
10. Wide
The full screen mode is automatically defaulted to the original image size. Press the WIDE button to
switch between panoramic mode, which will display the images in full screen, and normal mode.
7
TROUBLESHOOTING
Use the following list of troubleshooting guide if you are experiencing problems with your
Digital Photo Frame. Consult your local dealer, qualified service technician, or Magnasonic’s
customer support at 1-800-663-5954 if the problem persists.
Question / Problem
Answer / Solution
What kinds of Memory Cards
Cards into this Digital Photo
Frame?
Secure Digital Card (SD), Multimedia
Card (MMC), Memory Stick (MS), and
USB Flash Drive.
Can I insert several Memory
Cards into this Digital Photo
Frame?
No, only one Memory Card will fit inside
the Memory Card slot at a time.
However, you can insert a Memory Card
and USB Jump Drive at the same time.
What is the optimal resolution of
the display?
480 x 234 Pixels.
Can I adjust the colour of the
pictures?
Yes, you can adjust the brightness,
contrast, and colour of the display.
No picture/power.
Verify that the power cord is securely
connected, and that a Memory Card or
USB Jump Drive is inserted.
Picture is displayed distorted.
It is possible that the picture file is of
poor quality or a corrupted file. Re-save
the file, or check another file.
Recycling
This product bears the selective sorting symbol for electrical waste and
electronic equipment (WEEE).
When disposing of this product, please contact your local recycling centre
for further information and disposal instructions.
Please help to protect our environment.
8
WARRANTY
MAGNASONIC® WARRANTY
Consumer Electronics, Home Appliances and Home Office Products
Thank you for choosing MAGNASONIC®!
SYNNEX Canada Limited gives the following express warranty to the original consumer purchaser or gift recipient for this MAGNASONIC
product, when shipped in its original container and sold or distributed in Canada by SYNNEX Canada Limited or by an Authorized
MAGNASONIC Dealer:
SYNNEX Canada Limited warrants that this product is free, under normal use and maintenance, from any defects in material and
workmanship. If any such defects should be found in this product within the applicable warranty period, SYNNEX Canada Limited shall, at
its option, repair or replace the product as specified herein. Replacement parts furnished in connection with this warranty shall be warranted
for a period equal to the unexpired portion of the original equipment warranty.
This warranty shall not apply to:
a. Any defects caused or repairs required as a result of abusive operation, negligence, accident, improper installation or inappropriate
use as outlined in the owner's manual.
b. Any MAGNASONIC product tampered with, modified, adjusted or repaired by any party other than SYNNEX Canada Limited or
MAGNASONIC's Authorized Service Centres.
c. Damage caused or repairs required as a result of the use with items not specified or approved by SYNNEX Canada Limited,
including but not limited to head cleaning tapes and chemical cleaning agents.
d. Any replacement of accessories, glassware, consumable or peripheral items required through normal use of the product including
but not limited to earphones, remote controls, AC adapters, batteries, temperature probe, stylus, trays, filters, cables, paper,
cabinet, cabinet parts, knobs, buttons, baskets, stands, shelves, cookware and cooking utensils.
e. Any cosmetic damage to the surface or exterior that has been defaced or caused by normal wear and tear.
f. Any damage caused by external or environmental conditions, including but not limited to transmission line/power line voltage or
liquid spillage.
g. Any product received without appropriate model, serial number and CSA /cUL /cULus /cETL /cETLus markings.
h. Any products used for rental or commercial purposes.
i.
Any installation, setup and/or programming charges.
Should this MAGNASONIC product fail to operate during the warranty period, warranty service may be obtained upon delivery of the
MAGNASONIC product together with proof of purchase and a copy of this LIMITED WARRANTY statement to an Authorized
MAGNASONIC Service Centre. In-home warranty service may be provided at SYNNEX Canada Limited's discretion on any MAGNASONIC
television with the screen size of 27” or larger. This warranty constitutes the entire express warranty granted by SYNNEX Canada Limited
and no other dealer, service centre or their agent or employee is authorized to extend, enlarge or transfer this warranty on behalf of
SYNNEX Canada Limited. To the extent the law permits, SYNNEX Canada Limited disclaims any and all liability for direct or indirect
damages or losses or for any incidental, special or consequential damages or loss of profits resulting from a defect in material or
workmanship relating to the product, including damages for the loss of time or use of this MAGNASONIC product or the loss of information.
The purchaser will be responsible for any removal, reinstallation, transportation and insurance costs incurred. Correction of defects, in the
manner and period of time described herein, constitute complete fulfillment of all obligations and responsibilities of SYNNEX Canada
Limited to the purchaser with respect to the product and shall constitute full satisfaction of all claims, whether based on contract,
negligence, strict liability or otherwise.
CARRY-IN PARTS & LABOUR WARRANTY PERIODS:
? Audio Products: 1 Year (Remote Control, if applicable – 90 Days)
? DVD Products: 1 Year (Remote Control – 90 Days)
? LCD & Plasma Display TV: 1 Year (Remote Control – 90 Days)
? Television Products: 1 Year (Remote Control – 90 Days)
? VCR Products: 1 Year (Remote Control – 90 Days, Video Heads – 6 Months)
? Home Appliances: 1 Year
o Microwave Magnetron parts only additional 3 Years
o Refrigerator / Freezer Compressor parts only, additional 4 years
? Heating / Cooling & Humidification Products: 1 Year (Remote Control – 90 Days)
o Compressor parts only (if applicable), additional 4 years
? Home Office: 1 Year
To obtain the name and address of the nearest Authorized MAGNASONIC Service Centre or for more information on this warranty
Visit www.magnasonic.ca
Mail your inquiry to
SYNNEX Canada Limited
MAGNASONIC Customer Service
200 Ronson Drive, Toronto, ON M9W 5Z9; or
Call toll free 1-800-663-5954, Monday to Friday 9:00am – 5:00pm Eastern Time.
MAGNASONIC is a registered trade-mark
of SYNNEX Canada Limited
02.2009
9