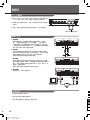
1
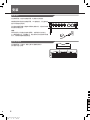
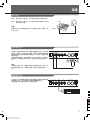
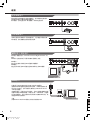
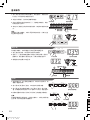
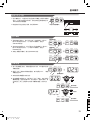
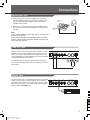
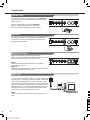
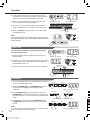
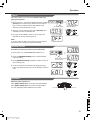
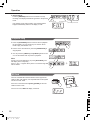
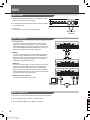
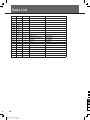
SP5100
便携式电钢琴
用户说明书
Owner’s Manual
100
95
75
25
5
中国总经销:美得理电子(深圳)有限公司
地址:深圳市燕南路404栋西3楼 邮编:518031
电话:(0755)83324175
传真:(0755)83323797
E-mail:[email protected]
aw_SP5100_manual_D01_101119
2010
11
20
16:25:33
0
注意事项!
警告
该产品的正常功能可能会遭受强电磁干扰。如果出现
这种情况,只需简单地按照用户手册将产品恢复初始
设置。当产品的功能无法恢复时,请在其他位置使用
本产品。
注意事项
请在操作使用前,首先仔细阅读以下内容 。
请将本使用手册妥善保管,以便将来随时查阅。
电源
请将指定的电源适配器连接到一个电压正确的电源插
座。
请勿使用电压与设备不匹配的电源。
设备不使用时,或在雷雨暴风期间,请断开电源。
连接
在将本设备连接到其他设备之前,请关闭所有设备的电
源开关。这将有效防止设备故障或防止损坏其他设备。
位置
请勿将设备放置于以下环境中,以免设备发生变形、变
色或其他更严重的损害:
装箱单
尊敬的用户,当您选购本乐器后,请检查以下物
品是否齐全:
琴体
DC 12V外接电源
琴谱架
说明书
售后保修证书
延音踏板
阳光直射处、暖气旁
多尘土、高温、高湿、可能产生强烈震动或冲击的位
置
接近磁场处
对其他设备的干扰
将此设备放置在电视机、收音机的周围可能引起干扰。
使用此设备时,请与电视机和收音机保持适当的距离。
维护保养
只能使用柔软的干布清洁此设备。
请勿使用涂料稀释剂、溶剂、清洁液或浸了化学物质的
抹布。
处理
请勿对开关或控制按钮用力过猛。
避免纸张、金属或其他杂物进入设备内部。如果发生此
类情况,请拔掉墙上电源插座中的插头。然后请具有资
格的维修人员对设备进行检查。
在移动设备之前,请断开所有的电源。
100
95
75
25
5
0
2
aw_SP5100_manual_D01_101119
2010
11
20
16:25:33
目录
面板描述
前面板.................................4
后面板.................................5
安装
电源接口...............................6
安装琴谱架.............................6
连接
耳机插孔...............................7
音频输出接口...........................7
音频输入接口...........................7
延音踏板接口...........................8
弱音踏板接口...........................8
MIDI输入/输出接口......................8
USB接口...............................8
MIDI
什么是MIDI............................18
MIDI连接..............................18
主要应用..............................18
MIDI控制器............................19
命 令 ..................................19
通 道 ..................................21
数 值 ..................................21
MIDI输出..............................22
规 格 ..................................23
附录
音色表................................24
节奏表................................25
歌曲表................................26
MIDI应用表 ...........................27
具体操作
电源开关和主音量调节...................9
音色及效果.............................9
双音色.................................9
键分离................................10
移 调 ..................................10
力 度 ..................................11
混响/合唱.............................11
明亮度................................11
古典音律..............................12
节拍器................................12
节奏控制..............................12
开始/停止播放节奏.....................13
插入A/B...............................13
伴奏音量..............................13
速 度 ..................................14
歌 曲 ..................................14
学习功能..............................15
录 音 ..................................15
录制歌曲..............................15
回放歌曲..............................16
SD卡 功 能 .............................16
100
95
75
25
5
0
3
aw_SP5100_manual_D01_101119
2010
11
20
16:25:33
面板控制及显示说明
前面板
15
拍 点 显 示
13
明亮度
2
明亮
柔和
音量
小
3
大
移调
启动/停止
伴奏音量
插入 A/B
速度
11
录音
回放/停止
4 5 6 7 8
音轨 1
数值
MIDI输出
命令
原声大钢琴
电钢琴 1
拨弦古钢琴
手摇风琴
手风琴
钢弦吉他
弦乐合奏
明亮钢琴
电钢琴 2
颤音琴
教堂管风琴
口琴
弦乐三重奏
慢速弦乐合奏
12
通道
音色
节奏
歌曲
MIDI 控 制
音轨 2
歌曲主旋律关闭
9
10
14
1
1. 电源开关
10. 音轨2按钮
2. 明亮度调节
11. 移调+/-按钮
3. 主音量调节
12. 速度 +/-按钮
4. 启动/停止按钮
5. 伴奏音量调节按钮
6. 插入A/插入B按钮
7. 录音按钮
8. 播放/停止按钮
13. MIDI控制按钮
MIDI输出
命令
数值
通道
14. 音色直选控制按钮
15. LED显示
(音色,节奏,乐曲)
100
9. 音轨1/歌曲主旋律关闭按钮
95
75
25
5
0
4
aw_SP5100_manual_D01_101119
2010
11
20
16:25:34
面板控制及显示说明
节奏
16
18
音色
19
歌曲
双音色
键分离
混 响/合 唱
力度
节拍器
存储
播放/停止
古典音律
小号
民谣萨克斯
爵士长笛
铜管乐合奏
双簧管
排箫
20
21 22 23 24 25
26
27
SD卡控制
古典音律根音设置
16. 节奏按钮
22. 键分离按钮
17. 音色按钮
23. 混响/合唱按钮
18. 歌曲按钮
24. 力度按钮
19. + 和 -按钮
25. 节拍器按钮
20. 古典音律按钮
26. SD卡控制按钮
播放
存储
21. 双音色按钮
27. SD卡插口
Rear Panel
12V
AUX IN
AUX OUT
L/MONO
PEDAL
SUSTAIN
R
MIDI IN
MIDI OUT
USB
SOFT
Rear View
100
95
12V
AUX IN
AUX OUT
PEDAL
MIDI IN
MIDI OUT
USB
75
28
28. 电源接口
29. 音频输出 左/单声道
30. 音频输出 右
31. 音频输入
L/MONO
R
29
30
31
SUSTAIN
SOFT
32
33
34
35
25
32. 延音踏板接口
33. 弱音踏板接口
34. MIDI输入输出接口
35. USB接口
5
0
5
aw_SP5100_manual_D01_101119
2010
11
20
16:25:34
安装
电源接口
此电钢琴配有一特定的电源适配器,电源接口在后面板。
请确保使用本琴特定的电源适配器,12V直流输出,并注意电源
插头中间极性是否匹配。
在您将电源适配器插入插座和本琴的电源接口前,请务必将本琴
的电源开关设置为关。
12V
AUX IN
AUX OUT
L/MONO
R
PEDAL
SUSTAIN
MIDI IN
MIDI OUT
USB
SOFT
注意:
如果您使用了其他类型的电源适配器,可能导致火灾和电击。
为了确保使用安全,在雷暴天气,或者很长时间不使用本琴的情
况下,请将电源适配器拔出插座。
安装乐谱架
此电钢琴配有一乐谱架,请将它插入后面板的插孔中。
按右图所示进行安装。
100
95
75
25
5
0
6
aw_SP5100_manual_D01_101119
2010
11
20
16:25:36
连接
耳机插孔
插孔1: 将插头插入此插孔后,耳机和扬声器中都可以听到声音。
插孔2: 将插头插入此插孔后,会自动切断乐器的扬声器。声音只
能从耳机中听到。
耳机插孔1
注意:
请避免长时间以高音量使用耳机,否则可能会引起人耳疲劳,甚
至听力损伤。
耳机插孔2
音频输出接口
后面板上的音频输出插孔可以用以连接到音量放大器、立体声音
响系统、调音台、录音机或其他设备。请参考示意图使用音频线
将音频设备连接到后面板的音频输出插孔,并将另一端连接至音
频输入插孔。
(如果是单声道回放,请将音频线插入左/单声道插孔。如果是立
体声回放,请将音频线分别插入左/单声道和右的音频输出插
孔)
12V
AUX IN
AUX OUT
L/MONO
PEDAL
SUSTAIN
R
MIDI IN
MIDI OUT
USB
SOFT
注意:
在连接其它设备之前,请确保已关闭所有设备的电源。同时,在
打开设备的电源之前,请确定已将各个部分的音量设置为最小
值。
音频输入接口
可以将iPod/CD播放器或其他音源的音频输出连接到后面板的辅
助音频输入插孔。此功能使您更自如的演奏各种曲目。
外部音频输入的音量也可使用主音量旋钮调节。
12V
AUX IN
AUX OUT
L/MONO
R
PEDAL
SUSTAIN
MIDI IN
MIDI OUT
USB
SOFT
100
95
75
25
5
0
7
aw_SP5100_manual_D01_101119
2010
11
20
16:25:36
连接
延音踏板接口
将如右图所示的踏板插入延音踏板插孔,进行键盘的延音控制。
此踏板功能类似于钢琴的延音踏板功能。
踩下踏板,打开延音效果,释放踏板,则关闭延音效果。
12V
AUX IN
AUX OUT
L/MONO
PEDAL
SUSTAIN
R
MIDI IN
MIDI OUT
USB
MIDI IN
MIDI OUT
USB
SOFT
弱音踏板接口
将如右图所示的踏板插入弱音踏板插孔,进行键盘的弱音控制。
踩下踏板,所有演奏的音符将有弱音效果。
12V
AUX IN
AUX OUT
L/MONO
PEDAL
SUSTAIN
R
SOFT
MIDI 输入/输出接口
MIDI是乐器数字接口(Musical Instrument Digital Interface)的
缩写。
MIDI的产生使各种电子乐器间的相互通信成为可能。
MIDI输入:
通过此接口接收来自其他MIDI设备的传输数据。
MIDI输出:
通过此接口向其他MIDI设备发送本电钢琴产生的MIDI数据。
12V
AUX IN
AUX OUT
L/MONO
R
PEDAL
SUSTAIN
MIDI IN
MIDI OUT
USB
SOFT
USB接口
此接口用于连接电脑或者支持USB Audio的USB设备。
使用标准的USB连接线连接电脑和电钢琴。如果电脑安装的是
Windows XP系统,会自动将此电钢识别为USB Audio Device
(USB 音频设备)。
当电脑通知您,设备已经正常安装后,您可以在控制面板的音频
设备中找到此USB音频设备,如若您打开一个MIDI软件,并选择
此USB音频设备,那么电脑将可以接收来自电钢的MIDI信息,或
者发送MIDI信息给电钢。
注意:
只有Windows XP和Vista系统可以识别本电钢的USB。
100
95
75
25
5
0
8
aw_SP5100_manual_D01_101119
2010
11
20
16:25:37
基本操作
电源开关和主音量调节
1.按下[电源]开关,LED灯点亮。
2.向右滑动[音量]推杆,主音量增大;向左滑动[音量] 推杆,
主音量减小。
音色
3.同时按下[+]和[-]键开机,将复位所有的参数和删除录音数据。
节奏
歌曲
音量
小
注意:
当打开电源开关时,LED没有点亮,请检查一下电源供电。
大
音量减小
音量增大
如果打开电源后,弹奏无声音,请检查一下主音量是否被调节到最
小。
+
同时按下
音色和效果
本琴有20种音色。(具体参见附录音色表)
节奏
音色
1. 音色选择
当打开电源,LED点亮如右图所示的音色标记,并显示音色
号:001.
音色
3. 按下[双音色]按钮进入双音色模式,LED显示右手音色2的序
号。
双音色
键分离
混响/合唱
力度
4.您可以使用音色直选按钮或者[+]/[-] 键来选择当前的音色。
音色
使用直选按钮选择音色
本琴有10个直选按钮,用于选择20种不同音色。每个直选按钮可
以选择两种不同的音色。
反复按下同一个音色直选按钮,音色将在上层直选音色和下层直
选音色中反复切换。
当选择的是上层音色,相应的指示灯点亮。
当选择下层音色时,上层音色的指示灯熄灭,下层音色的指示灯
点亮。
歌曲
显示右手音色1
歌曲
2. 按下[音色]按钮进入音色模式,LED显示右手音色1的序号。
节奏
节奏
歌曲
显示右手音色2
选择音色
按第一次选择原声钢琴
原声大钢琴
电钢琴 1
拨弦古钢琴
手摇风琴
手风琴
钢弦吉他
弦乐合奏
小号
民谣萨克斯
爵士长笛
明亮钢琴
电钢琴 2
颤音琴
教堂管风琴
口琴
弦乐三重奏
慢速弦乐合奏
铜管乐合奏
双簧管
排箫
按第二次选择明亮钢琴
原声大钢琴
电钢琴 1
拨弦古钢琴
手摇风琴
手风琴
钢弦吉他
弦乐合奏
小号
民谣萨克斯
爵士长笛
明亮钢琴
电钢琴 2
颤音琴
教堂管风琴
口琴
弦乐三重奏
慢速弦乐合奏
铜管乐合奏
双簧管
排箫
100
95
双音色
75
当您打开双音色时,您可以同时演奏两种音色。
25
5
0
9
aw_SP5100_manual_D01_101119
2010
11
20
16:25:37
基本操作
双音色
键分离
混响/合唱
力度
1. 按下[双音色]按钮打开双音色模式,如右图所示,双音色指示
灯点亮,LED显示当前双音色的序号。
2. 当您按下琴键时,您将同时演奏两种音色。
3. 您可以使用音色直选按钮或者[+]/[-]键来选择双音色。缺省
的双音色序号为017。
音色
节奏
歌曲
音色标志点亮
打开双音色
4. 再次按下[双音色]按钮关闭双音色模式,相应的双音色标志熄
灭。
例:原声大钢琴
弦乐三重奏
注意:
当键盘处于键分离模式,只有右手区域响应双音色。分离点左边
的区域不响应双音色。
两种音色将同时发声
节奏
音色
节奏
双音色
键分离
键分离
混 响/合 唱
歌曲
混响/合唱
力度
音色
歌曲
选择双音色
键分离
双音色
力度
打开键分离模式,可以将键盘分为和弦区域和旋律区域。
1. 按下[键分离]按钮,LED显示当前的分离点参数。
2. 使用[+]/[-]按钮或者键盘都可以改变此分离点参数。退出设
置模式后,新设置的分类点将生效。分离点的缺省值为34.
音色
标志闪烁
节奏
节奏
歌曲
显示分离点参数
3. 新设置的分离点属于和弦区域。
音色
节奏
音色
歌曲
歌曲
改变分离点
默认分离点
F#3
和弦区域
旋律区域
移调
1. 使用移调功能,您无需改变弹奏方式,即可以半音为单位,调
整整个键盘的音高。
移调
速度
2. 按下[移调+]或[移调-]按钮,LED显示当前的移调值。
音色
3. 按下[移调+]按钮增加移调值,按下[移调-]按钮,减小移调
值,移调值的调节范围为-12个半音到+12个半音,缺省值为0。
4.在移调设置时同时按下[移调+]和[移调-]按钮将复位移调值。
节奏
歌曲
显示当前的移调值
移调
100
移调
95
注意:
移调设置模式属于暂显状态,当您在此模式下,不做任何操作超
过2秒钟,将自动退出移调设置模式。
75
增加移调值
移调
减小移调值
速度
25
音色
节奏
歌曲
显示缺省的移调值
10
aw_SP5100_manual_D01_101119
2010
11
20
16:25:37
5
0
基本操作
力度
1. 开机默认为力度键盘,相应的指示灯点亮。按下[力度]按钮,
LED暂显当前键盘力度曲线值,连续按[力度]按钮选择不同的
力度曲线。相应指示灯闪烁,LED显示您选择的力度曲线值。
双音色
键分离
混响/合唱
力度
2. 此琴有3种力度曲线可选择,缺省值为2(默认)
音色
3. 当选择“OFF”时,表示设置键盘为无力度状态,相应的指示
灯熄灭。
注意:
力度调节模式属于暂显状态,当您在此模式下,不做任何操作超
过2秒钟,将自动退出此模式。
标志闪烁
节奏
音色
音色
节奏
歌曲
节奏
节奏
歌曲
显示力度曲线值
音色
歌曲
选择力度曲线
歌曲
混响/合唱
混响/合唱效果将丰富您的演奏。
双音色
键分离
混响/合唱
1. 混响/合唱效果,在开机后默认打开。相应的指示灯点亮。
音色
节奏
歌曲
音色
节奏
歌曲
2. 按下[混响/合唱]按钮进入DSP设置模式,相应的指示灯闪烁。
显示混响/合唱标志
3. 此模式下,按下[混响/合唱]按钮切换混响和合唱设置模式。
4. 按下[+]或[-]调节混响或合唱效果量。本琴有32档效果量可调
节,默认的混响效果量为08,默认的合唱效果量为00。
调节结束2秒后,退出调节状态,返回到音色或节奏状态,相应
指示灯灯停止闪烁
节奏
音色
节奏
歌曲
音色
歌曲
节奏
音色
节奏
音色
歌曲
歌曲
明亮度
您可以根据您的需要调节音色明亮度:
向右移动[明亮度]推杆,音色变明亮;向左移动[明亮度]推
杆,音色变柔和。
明亮度
柔和
音色变柔和
明亮
音色变明亮
100
95
75
25
5
0
11
aw_SP5100_manual_D01_101119
2010
11
20
16:25:38
基本操作
古典音律
现在音乐是普遍使用平均律(调律法只有一种,且适用于键盘乐
器),以此音律为前提,作曲和演奏。特别是钢琴,自从采用平均
律后钢琴本身广泛普及,且平均律被视为理所当然,但采用平均律
之前是有几种调律法,并根据古典音律作曲和演奏。
古典音律
1. 按下[古典音律]按钮打开古典音律,[古典音律]按钮上指示灯
点亮,默认为:001 Pythagor音律。
2. 本琴有6种古典音律
序号
1
2
3
名称
Pythagor
Major
Minor
音色
进入古典音律模式,
相应指示灯点亮
节奏
歌曲
显示古典音律类型
序号
4
5
6
名称
MeanTone
Werckmei
Kirnberg
古典音律
古典音律
3. 再次按下[古典音律]按钮退出古典音律模式,相应的指示灯熄
灭。
长按古典音律按钮进入类型
选择模式,相应的指示灯闪烁
4. 长按[古典音律]按钮两秒后,进入古典音律类型选择状态。古
典音律相应的指示灯闪烁,LED显示当前的古典音律类型。
节奏
音色
5. 使用[+]或[-]选择古典音律类型,用键盘上的C7-B7选择根音。
音色
例子:需要选择“Minor”的古典音律,并且设置根音为“G”。
1. 长按[古典音律]按钮两秒后,进入古典音律选择状态。
2. 按下[+]按钮选择003号古典音律,LED将显示003。
3. 按下G7设置古典音律根音,LED显示“G”。
节奏
歌曲
C7
歌曲
B7
音色
节奏
歌曲
节拍器
双音色
键分离
混 响/合 唱
力度
节拍器
1. 按下[节拍器]按钮打开节拍器。
2. 再次按下[节拍器]按钮关闭节拍器。
3. 节拍器和节奏可以共同打开。节奏停止播放时,打开节拍器,
拍点种类跟随节拍数。若节奏播放过程中,打开节拍器,则在
下一小节开始才响应节拍声,拍点数跟随节奏改变。若先打开
节拍器,再按下节奏播放钮,则在节奏第一拍响起的同时调整
节拍器,使之与节奏相匹配。
4个拍点显示当前节拍状态
拍 点 显 示
MIDI输出
数值
命令
通道
音色
MIDI 控 制
节奏
歌曲
节奏控制
本琴共20种内置钢琴节奏。(具体请参见附录节奏表)
100
节奏
音色
95
节奏选择
1. 按下[节奏]按钮进入节奏模式,LED上的节奏标记点亮,并显
示当前的节奏序号。
75
音色
节奏序号
歌曲
2. 您可以使用[+]或[-]按钮选择节奏。
节奏
歌曲
节奏标记
25
节奏
音色
5
0
音色
12
aw_SP5100_manual_D01_101119
2010
11
20
16:25:38
节奏
歌曲
歌曲
基本操作
启动/停止节奏
启动/停止
伴奏音量
START
/STOP
ACC
VOL
1. 在节奏停止时,可按[启动/停止]钮启动节奏进入同步启动模式
状态,4个拍点LED灯同时闪烁,此时按和弦区琴键即可打开
ABC同时启动节奏播放。
插入 A/B
Chord area
2.再按[启动/停止]钮停止节奏,同时关闭ABC。
进入同步启动模式
拍 点 显 示
数值
命令
MIDI输出
通道
MIDI 控 制
插入A/B
1. 在NORMAL状态下,按下[插入A/B] 按钮将插入一段FILL,
插入A/B的指示灯闪烁,一小节的FILL结束后,将进入
VARIATION状态。
2. 在VARIATION状态下,按下[插入A/B]按钮将插入一段FILL,
插入A/B的指示灯闪烁,一小节的FILL结束后,将进入
NORMAL状态。
3. 开机正常播放节奏时,默认为NORMAL状态。
节奏未播放时:
启动/停止
伴奏音量
START
/STOP
ACC
VOL
插入 A/B
启动/停止
伴奏音量
START
/STOP
ACC
VOL
启动/停止
伴奏音量
START
/STOP
ACC
VOL
启动/停止
伴奏音量
START
/STOP
ACC
VOL
插入 A/B
节奏播放时:
启动/停止
伴奏音量
START
/STOP
ACC
VOL
启动/停止
伴奏音量
START
/STOP
插入 A/B
插入 A/B
ACC
VOL
插入 A/B
插入 A/B
伴奏音量
1. 按下[伴奏音量]按钮,伴奏音量指示灯闪烁,LED显示当前的
伴奏音量值。
启动/停止
START
/STOP
伴奏音量
插入 A/B
ACC
VOL
2. 使用[+]或[-]按钮调节伴奏音量值,调节范围为0-31。(缺省
伴奏音量为24)
音色
节奏
歌曲
指示灯点闪烁
3. 开机默认伴奏音量指示灯点亮。
节奏
4. 在伴奏音量调节状态下,同时按下[+]和[-]按钮,可以关闭节
奏伴奏音量,显示屏暂显OFF,在此状态下,指示灯熄灭,再
次同时按[+]和[-]按钮则可以打开节奏伴奏音量,指示灯点
亮。
音色
节奏
音色
歌曲
歌曲
启动/停止
START
/STOP
伴奏音量
插入 A/B
指示灯闪烁
ACC
VOL
节奏
音色
同时按下
音色
节奏
歌曲
启动/停止
START
/STOP
100
95
歌曲
伴奏音量
ACC
VOL
插入 A/B
75
指示灯熄灭
25
5
0
13
aw_SP5100_manual_D01_101119
2010
11
20
16:25:38
基本操作
速度
1. 可通过连续按[速度+]或[速度-]钮调节速度,速度的调节
范围为30-280,LED显示当前速度值。
移调
速度
2. 同时按[速度+]和[速度-]钮,速度恢复至当前节奏的预设值。
音色
3. 在节奏停止时选择节奏,速度自动设定为当前节奏的预设值,
若在节奏播放时切换节奏,则速度保持不变。
节奏
歌曲
显示当前速度值
移调
速度
音色
节奏
歌曲
显示缺省速度值
同时按下
歌曲
本琴共有60首歌曲。(具体参见附录歌曲表 )
节奏
音色
1. 播放一首歌曲:
按下[歌曲]按钮进入歌曲模式,LED上歌曲的标记点亮。此时
开始大循环播放所有歌曲。
音色
按下[启动/停止]按钮停止播放乐曲但不退出歌曲模式。
再次按下[启动/停止]按钮则小循环播放当前歌曲。
歌曲
启动/停止
插入 A/B
伴奏音量
节奏
歌曲
歌曲标记点亮
2. 选择一首歌曲:
可用[+]或者[-]按钮选择歌曲。如果选择新的歌曲,LED上暂
显歌曲的序号,然后显示引导拍和小节数。
3. 引导拍:
歌曲播放时在前奏部分,小节计数以负值开始,当小节计数为
1时旋律部分开始演奏。
拍 点 显 示
MIDI输出
节奏
数值
命令
音色
通道
音色
MIDI 控 制
节奏
歌曲
歌曲
4. 按下[音轨1]按钮打开或者关闭歌曲的主旋律,当主旋律关闭
时,您可以尝试着跟着伴奏练习弹奏主旋律。
选择歌曲
拍点
启动/停止
伴奏音量
插入 A/B
5. 歌曲停止时,按[音色]或者[节奏]按钮都可退出歌曲状态。
音色
录音
回放/停止
音轨 1
音轨 2
节奏
歌曲
显示小节数
歌曲主旋律关闭
LED指示灯点亮.
100
节奏
音色
95
75
歌曲
25
5
0
14
aw_SP5100_manual_D01_101119
2010
11
20
16:25:38
基本操作
学习功能
1. 在歌曲模式下,你可以按[音轨1]按钮进入歌曲学习模式,此
时音轨1的指示灯点亮。
节奏
音色
录音
回放/停止
音轨 1
音轨 2
2. 在歌曲的学习模式下,歌曲的主旋律被消隐,此时,您可以弹
奏键盘来学习相应的歌曲主旋律。
3. 在歌曲学习模式下,再次按[音轨1]按钮退出歌曲学习模式,此
时音轨1的指示灯熄灭。
歌曲
注意:
在歌曲的学习模式下,歌曲小循环播放。
录音
回放/停止
音轨 1
音轨 2
录音
本琴可录制1首用户歌曲,包括2个音轨。
注意:
关机后所录内容保留。
同时按住[+]和[-]按钮开机,清除所有录音数据。
录制歌曲
录音
回放/停止
音轨 1
音轨 2
1. 录音准备:
按下[录音]按钮,录音的指示灯闪烁,并且4个拍点指示灯闪
烁,表明进入录音准备状态。
此时,空的音轨将自动选中录制,相应的音轨指示灯闪烁。
(默认录制次序为,音轨1,音轨2,即当两个音轨都没有数据的
时候,默认先从音轨1开始录制)
拍 点 显 示
MIDI输出
数值
命令
通道
音色
MIDI 控 制
您可以按[音轨1]或者[音轨2]按钮选择您所要录制的音轨。音
轨1和音轨2不能同时录音,当音轨1或音轨2已有数据,再次录
音时,将覆盖上一次的录音内容。
录音
回放/停止
音轨 1
节奏
歌曲
音轨 2
2. 开始录音:
在录音准备状态下(四个拍点闪烁),如果直接按下琴键,即
开始录音。录音指示灯和音轨指示灯点亮,音轨指示灯闪
烁)。
在录音准备状态下(四个拍点闪烁),按下[启动/停止]按钮,
则打开和弦,并启动录音,但不启动节奏。
再按下左手区琴键,即同步启动节奏,钢琴节奏的数据也将被
录制到相应的音轨中。
录音
如果2个音轨都录入节奏数据,则最后录入的那一轨节奏数据有
效,另一轨无效。
注意:
只要开始录音了,选择录制音轨中的原有数据将丢失。
回放/停止
音轨 1
音轨 2
100
录音指示灯点亮.
启动/停止
伴奏音量
95
音轨2指示灯闪烁
插入 A/B
75
START
/STOP
ACC
VOL
打开A.B.C并开始录音
25
5
Chord area
0
15
aw_SP5100_manual_D01_101119
2010
11
20
16:25:38
基本操作
录音
3. 停止录音:
在录音状态下,按下[录音按钮]将停止录音。相应的指示灯熄
灭,LED回到进入录音前的模式。
如果在录音时,内存录满,录音也将自动停止,同时LED暂显
“FUL”5秒后回到以前状态。
回放/停止
音轨 1
音轨 2
音色
录音指示灯关闭.
节奏
歌曲
音轨2指示灯闪烁
回到主模式
音色
节奏
歌曲
回放歌曲
录音
回放/停止
音轨 1
音轨 2
1. 按下[播放/停止]按钮,相应的指示灯点亮,回放录制的歌
曲。您可以选择任意一轨单独播放,也可以2轨同时播放。
2. 回放录音时,按下[播放/停止]按钮停止用户歌曲的回放。
录音
回放/停止
音轨 1
音轨 2
录音
回放/停止
音轨 1
音轨 2
3. 播放过程中,您也可以按下[音轨1]和[音轨2]按钮来打开或者
关闭此两个音轨的回放。
注意:
如果没有录音内容,此时按下[播放/停止]按钮,LED显示
NUL。
同时按住[+]和[-]按钮开机,清除所有录音数据。
录音
回放/停止
音轨 1
音轨 2
音色
节奏
歌曲
SD卡功能
本琴支持16M-2G的SD卡,支持fat16和fat32文件系统,不支持
SD卡分区。
按2个功能按钮中的任意一个进入相应SD卡操作菜单。
如果没有插入SD卡,"ERR"将暂显两秒提示。
存储
播放/停止
SD卡控制
SD 插槽
100
音色
节奏
歌曲
95
75
25
5
0
16
aw_SP5100_manual_D01_101119
2010
11
20
16:25:38
基本操作
SD卡功能按钮
[播放]按钮:可以播放SD中根目录下的midi,支持
format0/format1格式的midi文件播放。
存储
播放/停止
SD卡控制
[存储]按钮:将在本琴上录音数据转换成MIDI文件格式保存到SD卡
根目录下。该MIDI文件可以放到MIDI播放器上进行播
放。
播放根目录下的midi文件
将用户歌曲存于根目录下
SD卡模式下,除了[音色],[节奏],[歌曲]按钮有效外,其他按
钮都不响应。
播放MIDI文件
在待机状态下,按下SD卡功能按钮[播放]键,即可启动SD卡根目
录下MIDI文件的大循环播放,同时相应的LED灯点亮。
播放所有midi文件,相应指示灯电流
存储
在SD停止或播放状态下可以选择SD卡内MIDI文件的序号。
LED上默认显示的MIDI文件序号为001(默认为第一首),可以用
[+]或[-]按钮选择要播放的MIDI文件的序号。
播放/停止
SD卡控制
音色
如在MIDI播放时,按[播放]按钮或[启动/停止]按钮可以停止
MIDI文件的播放,再次按下[启动/停止]按钮,启动当前MIDI文件
的小循环播放。
按下[播放]按钮时,如果SD卡内没有MIDI文件,LED将显示
"noC",2秒后回到之前模式。
节奏
节奏
音色
节奏
歌曲
歌曲
音色
歌曲
选择播放的midi文件
停止播放
存储
播放/停止
启动/停止
伴奏音量
START
/STOP
ACC
VOL
插入 A/B
SD卡控制
开始或者停止播放midi文件
SD卡中没有midi文件
存储
存储
在待机状态下,按下SD卡功能按钮[存储]键,进入SD卡的存储状
态,同时[存储]按钮上的指示灯点亮。
如果SD卡存满,自动停止存储,显示“FUL”2秒后,自动回到
之前模式。
如果本琴未录制用户歌曲,按下[存储]按钮,LED将显示
"NoF",提示用户没有录音数据。
播放/停止
SD卡控制
存储
节奏
歌曲
音色
节奏
歌曲
播放/停止
SD卡控制
进入存储状态,
相应指示灯点亮
系统自动产生midi文件名称
如果SD卡被写保护,LED将显示 "Loc"。
存储结束后,[存储]按钮的指示灯熄灭,LED显示“End”说明存
储结束并成功。
音色
存储
播放/停止
100
SD卡控制
音色
节奏
歌曲
95
存储完成后,相应指示灯熄灭
75
25
5
0
17
aw_SP5100_manual_D01_101119
2010
11
20
16:25:39
MIDI
什么是 MIDI
1. MIDI(Musical Instrument Digital Interface)即乐器数字接
口,是一种用于电子乐器与计算机之间通讯的标准接口。
2. 本琴配备了标准MIDI接口,包括一MIDI输入接口和一MIDI输
出接口。
12V
AUX IN
AUX OUT
L/MONO
R
PEDAL
SUSTAIN
MIDI IN
MIDI OUT
USB
SOFT
3. 连接:本琴可连接电脑或者其他MIDI设备,详见下面描述。
MIDI 输入/输出终端
MIDI 连接
1. 连接规则
在MIDI的连接中,控制其他装置的设备通常称为“主控设
备”,而被控装置则被定义为“从属设备”。主控设备的
MIDI输出接口与从属设备的MIDI输入接口相连接。不能将同
一设备的两个MIDI接口连接在一起。不能连接两个设备的相同
端口(如两个输入或两个输出相连接)。
2. MIDI输入
通过标准的MIDI电缆来连接设备(计算机或外部音源)的MIDI
OUT端口与琴的MIDI IN端口。通过MIDI输入,本琴可接受来
自其他设备的MIDI信息,如开关音,音色改变等等。
可接收的MIDI信息请参见附录四应用表。
MIDI输出
通过标准的MIDI电缆来连接本琴的MIDI OUT端口与(计算机
或外部音源)的MIDI IN端口。当弹奏琴键或者使用MIDI控制功
能时,将向外部设备发送相应的MIDI信息。譬如:开关音,音
色改变,控制码等等。
可发送的MIDI信息请参见附录四MIDI应用表。
3. 连接举例
按右图所示,将琴于电脑相连。
主要应用
1. 控制外部音源或其他乐器。
2. 通过其他MIDI设备来控制本琴。
100
95
75
3. 用计算机录制本琴上的演奏,编辑后回放。
25
5
0
18
aw_SP5100_manual_D01_101119
2010
11
20
16:25:39
MIDI
MIDI 控制器
概述
在待机模式下,按[命令],[数值],[通道]和[MIDI输出]按钮可进
入MIDI控制器状态,此状态下,除了[+]/[-],数字键,[音
色],[节奏],[歌曲]按钮之外,其他按钮无效。
节奏
音色
拍 点 显 示
MIDI输出
数值
命令
通道
MIDI 控 制
如果按[MIDI输出]按钮进入MIDI控制器操作状态,将直接发出一
组默认的命令。按下[音色]/[节奏]/[歌曲]按钮,可以退出
MIDI控制器的操作状态,返回到音色/节奏/歌曲模式。
歌曲
+
拍 点 显 示
COMMAND(命令):按下此按钮,指示灯点亮,通过[+]/[-]或
数字键,可以选择相关命令(详细参考后面说明)。
MIDI输出
数值
命令
通道
MIDI 控 制
拍 点 显 示
MIDIOUT(发送):按下此按钮,指示灯点亮并发送命令,发送时
指示灯闪烁,命令发送完,指示灯熄灭。
MIDI输出
数值
命令
拍 点 显 示
通道
MIDI输出
命令
MIDI 控 制
MIDI 控 制
拍 点 显 示
VALUE(数值):按下此按钮,指示灯亮,通过[+]/[-]或数字
键,可以选择相应的数值。(详细参考后面说明)。
MIDI输出
数值
命令
通道
MIDI 控 制
CHANNEL(通道):按下此按钮,指示灯点亮,通过[+]/[-]
或数字键,可以在1-16通道进行选择Channel。
拍 点 显 示
MIDI输出
数值
命令
通道
MIDI 控 制
命令
1. 按下此按钮,相应的指示灯点亮,表明进入命令设置状态。
拍 点 显 示
2. LED显示001(默认的命令),通过[+]/[-]或数字键进行
MIDI控制信息选择,同时LED上显示选择的值XXX,该值作
为下表对应的命令值。可设置131种MIDI功能(0-130),超
出该范围无效,缺省值为1。
MIDI输出
命令
数值
通道
音色
节奏
歌曲
MIDI 控 制
127
100
音色
数值
0-127
命令
音色选择(cn)
129
通道触后(dn )
130
弯音控制(en )
歌曲
95
128
标准MIDI控制 (bn)
128
节奏
音色
节奏
歌曲
音色
节奏
歌曲
音色
节奏
歌曲
75
129
25
130
5
0
19
aw_SP5100_manual_D01_101119
2010
11
20
16:25:41
MIDI
3. 选定值在LED上显示出来(128时显示Cn,129时显示Dn,
130时显示En)用[+]/[-]调节该数值时,可以循环选择;当用
数字键调节该数值时,按第一位数字后,指示灯闪烁,等待按
第二位数字,按完第二位数字,如果还允许按第三位数字,指
示灯继续闪烁,等待按第三个数字,否则不再闪烁,当然按完
第三个数字也停止闪烁,如果在按一位数字或两位数字后,
2秒内什么都不做,闪烁停止,显示该数值。
原声大钢琴
电钢琴 1
拨弦古钢琴
手摇风琴
手风琴
钢弦吉他
弦乐合奏
小号
民谣萨克斯
爵士长笛
明亮钢琴
电钢琴 2
颤音琴
教堂管风琴
口琴
弦乐三重奏
慢速弦乐合奏
铜管乐合奏
双簧管
排箫
拍 点 显 示
MIDI输出
命令
如果该数字在0-127范围内,该数值作为Bn命令的DATA1的
值,DATA2的值由[数值]按钮来选择;
通道
MIDI 控 制
如果该数字等于128,作为Cn命令,DATA其值由[数值]按钮
来选择;
如果该数字等于129,作为Dn命令,DATA其值由[数值]按钮
来选择;
数值
音色
节奏
歌曲
音色
节奏
歌曲
音色
节奏
歌曲
音色
节奏
歌曲
音色
节奏
歌曲
音色
节奏
歌曲
拍 点 显 示
MIDI输出
命令
数值
通道
MIDI 控 制
如果该数字等于130,作为En命令,DATA2其值由[数值]按钮
来选择;
当DATA1=DATA2=0时,表明pitchbend处于最低;
DATA1=0,DATA2=64时,表明pitchbend处于中位;
DATA1=127,DATA2=127时,表明pitchbend处于最高。
4. 在COMMAND(命令)设定状态下,若按[数值]/[通道]按
钮,自动转换到相应按钮的相应状态,对应指示灯点亮,
COMMAND(命令)的指示灯熄灭。
拍 点 显 示
MIDI输出
命令
数值
通道
5. 若按[MIDI输出]按钮,进入发送状态。
MIDI 控 制
6. 连续按[命令]按钮,可以直接选择COMMAND命令组的下一
组命令(如下表)
序号
调节值
显示
命令类型
1
2
0-127
128
129
130
001
Cn
Dn
En
Bn
Cn
Dn
En
3
4
第1次
命令
第2次
第3次
连续按[命令]按钮
第4次
100
95
75
25
5
0
20
aw_SP5100_manual_D01_101119
2010
11
20
16:25:41
MIDI
通道
1. 此按钮用于改变MIDI通道,范围:1~16。
2. 按下该按钮,进入通道设定状态,LED显示屏暂显当前默认通
道XX,[通道]按钮指示灯亮。
拍 点 显 示
MIDI输出
数值
命令
3. 可通过[+]/[-]按钮及数字键来调节CHANNEL通道。
用[+]/[-]按钮调节该数值时,可循环调节允许设定值;
用数字键调节该数值时,按第一位数字后,指示灯闪烁,等待
按第二位数字,否则指示灯不再闪烁,当然,按完第二位个数
字也停止闪烁,如果在按一位数字后,2秒内什么都不做,闪
烁停止显示该数值。
通道
MIDI 控 制
音色
节奏
歌曲
音色
节奏
歌曲
4. 若按[命令]/[数值]按钮,将自动退出通道设定状态,进入按
键相应状态,同时该按钮的指示灯熄灭。
5. 若按[MIDI输出]按钮,进入发送状态。改变该通道值,将改变
外发信息的通道值。
原声大钢琴
电钢琴 1
拨弦古钢琴
手摇风琴
手风琴
钢弦吉他
弦乐合奏
小号
民谣萨克斯
爵士长笛
明亮钢琴
电钢琴 2
颤音琴
教堂管风琴
口琴
弦乐三重奏
慢速弦乐合奏
铜管乐合奏
双簧管
排箫
音色
节奏
歌曲
数值
1. 按下该按钮,进入数值选择状态,相应指示灯点亮,LED将显
示默认的数值64。
2. 可通过[+]/[-]按钮及数字键来调节数值,调节范围0-127。
用[+]/[-]按钮调节该数值时,可循环调节。
用数字键调节该数值时,按第一位数字后,指示灯闪烁,等待
按第二位数字,否则指示灯不再闪烁,当然,按完第二位个数
字也停止闪烁,如果在按一位数字后,2秒内什么都不做,闪
烁停止显示该数值。
拍 点 显 示
MIDI输出
数值
命令
通道
音色
节奏
歌曲
音色
节奏
歌曲
MIDI 控 制
3. 若按[命令]/[通道]按钮,将自动退出数值设定状态,进入按
钮相应状态,同时该按钮的指示灯熄灭。
4. 若按[MIDI输出]按钮,进入发送状态。
原声大钢琴
电钢琴 1
拨弦古钢琴
手摇风琴
手风琴
钢弦吉他
弦乐合奏
小号
民谣萨克斯
爵士长笛
明亮钢琴
电钢琴 2
颤音琴
教堂管风琴
口琴
弦乐三重奏
慢速弦乐合奏
铜管乐合奏
双簧管
排箫
100
95
音色
节奏
歌曲
75
25
5
0
21
aw_SP5100_manual_D01_101119
2010
11
20
16:25:41
MIDI
MIDI 输出
按下[MIDI输出]按钮,发送一组MIDI控制信息。
1. 按下按键,该键对应指示灯亮并闪烁2秒,发送完MIDI信息后,
对应指示灯熄灭。
拍 点 显 示
MIDI输出
2. 按下该键发送设置好MIDI信息后,发送时不改变原有的状态。连
续按下[MIDI输出]按钮,将重复发生设置好的MIDI控制信息。
命令
数值
通道
MIDI 控 制
100
95
75
25
5
0
22
aw_SP5100_manual_D01_101119
2010
11
20
16:25:41
规格
键盘
88键,3种力度曲线
音色
20个音色
节奏
20个钢琴节奏
歌曲
60首歌曲
显示
LED显示
开关和按钮
电源开关,音量调节,双音色,混响/合唱,力度,录音,音轨1,音轨2,播放/停止,
键分离,节拍器,移调+/-,速度+/-,SD卡控制,歌曲,音色,节奏,明亮度,
MIDI输出,命令,数值,通道,古典音律,启动/停止,伴奏音量,插入A/B
移调
+12半音
踏板
弱音,延音
接口
电源,耳机,音频输入,音频输出,MIDI输入/输出,踏板,USB
尺寸
1360(L)x370(W)x143(H)mm
净重量
19.5kg
100
95
75
25
5
0
23
aw_SP5100_manual_D01_101119
2010
11
20
16:25:41
音色表
序号
001
002
003
004
005
006
007
008
009
010
011
012
013
014
015
016
017
018
019
020
PRG
0
4
6
16
21
25
48
56
66
73
1
5
11
19
22
40
49
61
68
75
BANK
0
8
0
0
0
8
8
8
8
0
0
8
8
0
0
8
0
0
0
0
音色名称
Acoustic Grand Piano
Epiano1
Harpsichord
Hammond Organ
Accordion
Steel Guitar
String
Trumpet
Folk Sax
Jazz Flute
Bright Acoustic Piano
Epiano2
Vibes
Church Organ
Harmonica
Strings Trio
Slow String
Brass Section
Oboe
Pan Flute
丝印名称
原声大钢琴
电钢琴1
拨弦古钢琴
手摇风琴
手风琴
钢弦吉他
弦乐合奏
小号
民谣萨克斯
爵士长笛
明亮钢琴
电钢琴2
颤音琴
教堂管风琴
口琴
弦乐三重奏
慢速弦乐合奏
铜管乐合奏
双簧管
排箫
100
95
75
25
5
0
24
aw_SP5100_manual_D01_101119
2010
11
20
16:25:41
节奏表
序号
001
002
003
004
005
006
007
008
009
010
011
012
013
014
015
016
017
018
019
020
名称
钢琴家
8拍
16拍
民谣
流行钢琴
布基
慢摇滚
摇摆舞
爵士
爵士华尔兹
摇摆狐步舞
滑步舞
扭扭舞
乡村民谣
波沙诺瓦
拉丁
进行曲
6/8拍进行曲
华尔兹
慢步华尔兹
英文名称
Pianist
8 Beat
16 Beat
Ballad
Pop Piano
Boogie
Slow Rock
Swing
Jazz
Jazz Waltz
Swing Fox
Shuffle
Twist
Country Ballad
Bossa Nova
Latin
March
6/8 March
Waltz
Slow Waltz
100
95
75
25
5
0
25
aw_SP5100_manual_D01_101119
2010
11
20
16:25:41
歌曲表
序号 歌曲名称
钢琴
001 致爱丽丝
002 哈巴涅拉
003 四小天鹅
004 莫塞塔舞曲
005 德国舞曲
006 土耳其进行曲
007 进行曲
008 马槽歌
009 筷子
010 二部创意曲
011
012
013
014
015
016
017
018
019
020
021
022
023
024
025
026
027
028
029
030
民谣与乡村
乡村乐
什锦菜
苏珊娜
桥
国颂之战
老灰马
美国巡逻兵
在雨中
森林中的狗熊
今夜寂寞吗
金曲与流行
只有你
世界末日
日升之屋
铃兰
虹的一端
美丽的寻梦人
雪绒花
我的太阳
平安夜
圣母颂
英文名称
Piano
Fur Elise
Habanera
Four Little Swans
Moseta Dance
Germanic Dance
Turkish March
March
Away In A Manger
Chopsticks
2-Part Invention #
13 In A Minor.B.W. Iii
Folk & Country
Country
Jambalaya
Susanna
Bridge
Battle Hymne Of The Republic
The Old Gray Mare
American Patrol
In The Rain
Sippin`Cider Through A Straw
Are You Lonesome Tonight
Golden & Pop
Only You
End Of The World
House Of Rising Sun
The Blue-Bells Of Scotland
Over The Rainbow
Beautiful Dreamer
Edelweiss
O Sole Mio
Silent Night
Ave Maria
序号
031
032
033
歌曲名称
五百英里
新年好
更似圣诞
034
棕发的珍妮
035
036
037
038
039
040
我的鲍尼
采珠人之歌
驿站马车
娱乐者
安妮的月桂树
情歌迷死人
041
042
夏日最后的玫瑰
老国王
爵士与融合
枫叶拉格
六月的桑巴
芬克
我会
海涛
吉他与萨克斯
HIP HOP之夜
忧郁的午餐
蛛丝
酒
爵士老人
深眸的眼睛
卡洛丝
忧伤
爵士
中国民歌
南泥湾
送你一枝玫瑰花
小河淌水
043
044
045
046
047
048
049
050
051
052
053
054
055
056
057
058
059
060
英文名称
Five Hundred Miles
Happy New Year
It`S Beginning To Look A
Lot Like Christmas
Jeanie With The Light
Brown Hair
My Bonnie
Song Of The Pearlfisher
The Stage Coach
Entertainer
Annie Laurie
Killing Me Softly With His
Song
Last Rose Of Summer
The Old King Cole
Jazz & fusion
Maple Leaf Rag
June Samba
Funk
I Can......
Sea Shore
Guitar&Saxphone
The Hip Hop's Night
Blue Lunch
Cobweb
Wine
Jazz Old Man
Dark Eyes
Carlos
Sad
The Jazz
Chinese
South Mud Bay
Give You A Rose
Flowing Rill
100
95
75
25
5
0
26
aw_SP5100_manual_D01_101119
2010
11
20
16:25:41
MIDI 应用表
功
基本通道
能
缺省值
变化值
传
缺省值
信 息
改变值
模式
音 符 号:
输
接
1ch
1-16ch
1-16ch
1-16ch
×
3
×
×
注
释
×
***********
实际音色
收
09-120
***********
力度
键触后
开音码
关音码
琴键
通道
9nH,V=1 -127
弯音
控制变化
程 序 改变 :
: 实际编号
×
× (9nH,V=0; 8nH,V=0- 127)
×
×
×
〇
×
〇
○
○
×
○
×
○
○
○
○
○
×
○
×
○
○
○
×
○
×
○
○
○
×
○
×
○
×
○
×
○
×
○
×
○
○
○
×
×××××××
系 统 专 用 信息
×
:乐曲位置
系 统 共 有信息 :乐曲选择
:调性
×
×
×
×
×
×
系 统 实时 信 息 : 时钟
:命令
:本机开/关
辅助信息
:关闭全部音符
:激活检测
:复位
×
× *1
×
× *1
×
×
备注:
方式1:全开,复音
方式3:全关,复音
库选择
颤音
滑音时 间
数据输 入
音量
相位
表情
延音踏 板
滑音开/关
后延音 踏 板
弱音踏 板
混响程 序
合唱程 序
混响深 度
合唱深 度
停止全 部 声音
全部控 制器 复位
关闭全部 音符
100
95
×
×
×
75
*1
当启动伴奏时,发出一个FAH信息。当停止伴奏时,发出一个FCH信息。
当收到一个FAH信息时,会启动伴奏。当收到一个FCH信息时,会停止伴奏。
方式2:全开,单音
方式2:全关,单音
25
5
〇 :可 以
× :不 可以
0
27
aw_SP5100_manual_D01_101119
2010
11
20
16:25:41
100
95
75
25
5
0
SP5100_D01
aw_SP5100_manual_D01_101119
2010
11
20
16:25:41
STAGE PIANO
100
95
75
25
5
0
aw_SP5100_manual_G02_101110
2010
11
20
15:59:12
INFORMATION FOR YOUR SAFETY!
THE FCC REGULATION WARNING (for USA)
This equipment has been tested and found to comply with
the limits for a Class B digital device, pursuant to Part 15 of
the FCC Rules.
These limits are designed to provide reasonable protection
against harmful interference in a residential installation. This
equipment generates, uses, and can radiate radio frequency
energy and, if not installed and used in accordance with the
instructions, may cause harmful interference to radio
communications. However, there is no guarantee that
interference will not occur in a particular installation.
If this equipment does cause harmful interference to radio or
television reception, which can be determined by turning the
equipment off and on, the user is encouraged to try to
correct the interference by one or more of the following
measures:
Reorient or relocate the receiving antenna.
Increase the separation between the equipment and
receiver.
Connect the equipment into an outlet on a circuit different
from that to which the receiver is connected.
Consult the dealer or an experienced radio/TV technician
for help.
Unauthorized changes or modification to this system can
void the user’s authority to operate this equipment.
CAUTION
The normal function of the product may be disturbed by
Strong Electro Magnetic Interference. If so, simply reset
the product to resume normal operation by following the
owner’s manual. In case the function could not resume,
please use the product in other location.
PRECAUTIONS
PLEASE READ CAREFULLY BEFORE PROCEEDING
Please keep this manual in a safe place for future reference.
Power Supply
Please connect the designated AC adaptor to an AC outlet
of the correct voltage.
Do not connect it to an AC outlet of voltage other than that
for which your instrument is intended.
Unplug the AC power adaptor when not using the
instrument, or during electrical storms.
Connections
Before connecting the instrument to other devices, turn off
the power to all units. This will help prevent malfunction and
/ or damage to other devices.
Location
Do not expose the instrument to the following conditions to
avoid deformation, discoloration, or more serious damage:
Direct sunlight
Extreme temperature or humidity
Excessive dusty or dirty location
Strong vibrations or shocks
Close to magnetic fields
Interference with other electrical devices
Radios and televisions placed nearby may experience
reception interference. Operate this unit at a suitable
distance from radios and televisions.
Cleaning
Clean only with a soft, dry cloth.
Do not use paint thinners, solvents, cleaning fluids, or
chemical-impregnated wiping cloths.
Handling
Do not apply excessive force to the switches or controls.
Do not let paper, metallic, or other objects into the
instrument. If this happens, unplug the AC adaptor from the
wall outlet. Then have the instrument inspected by qualified
service personnel.
Disconnect all cables before moving the instrument.
100
95
75
25
5
0
2
aw_SP5100_manual_G02_101110
2010
11
20
15:59:13
Contents
Panel Description
MIDI
Front Panel..................................................................4
Rear Panel..................................................................5
What is MIDI..............................................................18
MIDI Connection........................................................18
Major Application.......................................................18
MIDI Controller...........................................................19
Command..................................................................19
Channel.....................................................................21
Value..........................................................................21
MIDI OUT...................................................................22
Setup
Power Jack..................................................................6
Setting Music Rest......................................................6
Connections
Headphones Jack.......................................................7
AUX OUT Jack............................................................7
AUX IN Jack................................................................7
Sustain Jack................................................................8
Soft Jack.....................................................................8
MIDI IN/OUT Jack.......................................................8
USB Jack....................................................................8
Operation
Specifications......................................................23
Appendices
Voice List...................................................................24
Style List....................................................................25
Song List....................................................................26
MIDI Implementation Chart........................................27
Power on & Master Volume.........................................9
Voices and Effects.......................................................9
Dual.............................................................................9
Split Point..................................................................10
Transpose.................................................................10
Touch.........................................................................11
Reverb/Chorus..........................................................11
Brilliance....................................................................11
Scale.........................................................................12
Metronome................................................................12
Style Control..............................................................12
Start/Stop The Style..................................................13
FILL IN A/B................................................................13
Accomp Volume........................................................13
Tempo.......................................................................14
Song..........................................................................14
Lesson.......................................................................15
Record.......................................................................15
Record Song.............................................................15
Playback Song..........................................................16
SD Card....................................................................16
100
95
75
25
5
0
3
aw_SP5100_manual_G02_101110
2010
11
20
15:59:13
Panel Description
Front Panel
2
3
13
11
4 5 6 7 8
15
12
9
10
14
1
1. POWER SWITCH
10.TRACK 2
2. BRILLANCE
11. TRANSPOSE +/-
3. MASTER VOLUME
12. TEMPO +/-
4. START/STOP
6. FILL A/FILL B
13. MIDI CONTROL
MIDI OUT
COMMAND
VALUE
CHANNEL
7. RECORD
14. VOICE DIRECT SELECT BUTTONS
8. PLAY/STOP
15. LED DISPLAY
( VOICE, STYLE, SONG)
5. ACC.VOL
9. TRACK 1/SONG MELODY OFF
100
95
75
25
5
0
4
aw_SP5100_manual_G02_101110
2010
11
20
15:59:14
Panel Description
19
16
18
20
21 22 23 24 25
26
27
16. STYLE
22. SPLIT
17. VOICE
23. REVERB/CHORUS
18. SONG
24. TOUCH
19. + & -
25. METRONOME
20. SCALE
26. SD CONTROL
PLAY
STORE
27 SD SLOT
21. DUAL
Rear Panel
12V
AUX IN
AUX OUT
L/MONO
PEDAL
SUSTAIN
R
MIDI IN
MIDI OUT
USB
SOFT
Rear View
100
95
12V
AUX IN
AUX OUT
PEDAL
MIDI IN
MIDI OUT
USB
75
28
L/MONO
R
29
30
28. POWER JACK
29. AUX OUT L / MONO
30. AUX OUT R
31. AUX IN
aw_SP5100_manual_G02_101110
2010
11
20
15:59:14
31
SUSTAIN
SOFT
32
33
34
35
32. SUSTAIN PEDAL JACK
33. SOFT PEDAL JACK
34. MIDI IN/OUT JACKS
35. USB JACK
25
5
0
5
Setup
Power Jack
This piano can be powered from a standard household wall
outlet by using the specified AC adaptor. The power jack is
located on the rear panel of the piano body.
Make sure that only the AC adaptor specified for this piano is
used. The adaptor shall be 12V DC output, and center positive
type. Make sure to turn off the piano before you connect the
adaptor into the AC wall outlet and the cord into the unit.
12V
AUX IN
AUX OUT
L/MONO
R
PEDAL
SUSTAIN
MIDI IN
MIDI OUT
USB
SOFT
Notes:
Use of another type of adaptor creates a danger of fire and
electrical shock. For safety sake, make sure to unplug the AC
adaptor from the wall outlet whenever leaving the piano
unattended for a long time or during a thunderstorm.
Setting Music Rest
The piano is supplied with a music rest that can be
attached to the instrument by inserting it into slot at the
rear of the control panel.
Please set up the music rest as shown.
100
95
75
25
5
0
6
aw_SP5100_manual_G02_101110
2010
11
20
15:59:15
Connections
Headphones Jack
1. When an optional set of stereo headphones is connected
with the headphones jack 2, the sound from speakers will
switch off automatically resulting in only the sound from
headphone to be heard.
Headphones
Jack 1
2. When jack 1 is connected with the stereo headphones, the
sound can be heard from both headphones and speakers of
the piano.
Headphones
Jack 2
Note:
Never use the headphone with high volume, as it may hurt
your sense of hearing.
To prevent the damage of the speakers, ensure that the
volume is set to the minimum level before connecting the
power and other devices.
AUX OUT Jack
When you want to listen to the voice with an amplifier, connect
amplifiers to the AUX OUT L/MONO and R jacks on the rear
panel. The volume is adjusted with the VOLUME button. (For
monaural playback, use the L/MONO jack. For stereo playback,
connect both L/MONO and R jacks.)
12V
AUX IN
AUX OUT
L/MONO
PEDAL
SUSTAIN
R
MIDI IN
MIDI OUT
USB
SOFT
To avoid damaging the speakers, please ensure that volume
has set to the minimum level before connecting the power and
other devices.
AUX IN Jack
The audio output from a CD player/iPod connected to the AUX
IN jack on the rear panel can be mixed with the sound of the
piano brain. This function is convenient when you want to play
along with a favorite song. The volume of the externa signal is
adjusted with the VOLUME button.
12V
AUX IN
AUX OUT
L/MONO
R
PEDAL
SUSTAIN
MIDI IN
MIDI OUT
USB
SOFT
100
95
75
25
5
0
7
aw_SP5100_manual_G02_101110
2010
11
20
15:59:15
Connections
Sustain Jack
An optional footswitch can be plugged into the SUSTAIN jack
for sustain control. The foots witch function is like the sustain
pedal on a piano.
12V
L/MONO
Step the sustain pedal on to open the SUSTAIN
function, it will apply SUSTAIN effect to the piano,
then release the sustain pedal to turn off the effect.
AUX IN
AUX OUT
PEDAL
SUSTAIN
R
MIDI IN
MIDI OUT
USB
MIDI IN
MIDI OUT
USB
SOFT
Soft Jack
An optional foot switch can be plugged into the SOFT jack for
soft control. Step on the soft pedal, all notes played on the
keyboard have a soft effect.
12V
AUX IN
AUX OUT
L/MONO
PEDAL
SUSTAIN
R
SOFT
MIDI IN/OUT Jack
MIDI stand for Musical Instrument Digital Interface.
MIDI is a world wide standard that makes it possible for various
electronic musical instruments and other devices.
MIDI IN:
Data transmitted from other MIDI instrument via MIDI is
received by this terminal.
MIDI OUT:
Data produced by the Digital Piano is transmitted to other MIDI
instruments via MIDI from this terminal.
12V
AUX IN
AUX OUT
L/MONO
R
PEDAL
SUSTAIN
MIDI IN
MIDI OUT
USB
SOFT
USB Jack
Connect PC or other USB host devices that support USB Audio.
You can simply connect the PC and the piano with a USB cable.
For PC that has installed Windows XP, the USB driver for the
piano would be automatically installed as a USB Audio Device.
After the PC informed you that the driver for the piano has been
properly installed, you can choose the USB Audio Device in the
audio device menu of the control panel or the MIDI software
you are using to transfer MIDI data to the piano.
100
Note:
USB connection can only be detected with Windows XP and
Vista.
95
75
25
5
0
8
aw_SP5100_manual_G02_101110
2010
11
20
15:59:16
Operation
Power on & Master Volume
1. Press the [POWER] switch. The LED display lightens up.
2. Slide the [VOLUME] bar rightwards, the whole volume
increase, slide it leftwards, the whole volume decreases.
VOICE
3. Press the [+] and the [-] button synchronously, and then
STYLE
SONG
VOLUME
MIN
MAX
power on the piano. It can reset all the setting to the default
value and erase the record data.
The level decreases
The level increases
Note:
+
If the LED display has not lightened up after you power on the
piano, please check the power supply.
If the piano is silent, the volume may be set to its minimum
level.
Press together
Although Mains switch is in OFF position, the piano is not
disconnected from the power supply completely!
Voices and Effects
There are 20 voices in total (See Appendix 1).
STYLE
VOICE
1. Voice Select
When power is on, LED lightens the VOICE flag and displays
the 001 voice number.
VOICE
STYLE
SONG
Display VOICE R1
SONG
2. Press the [VOICE] button to enter the voice mode, LED
displays the VOICE R1 number.
3. Press the [DUAL] button to enter the dual voice mode, LED
displays the VOICE R2 number.
VOICE
4. You can select other voice by pressing the [+] and the [-] or
voice Direct Select buttons.
STYLE
SONG
Display VOICE R2
Select a voice
Use Direct Select buttons to select
There are 10 voices Direct Select buttons to select 20 voices. Each
Direct Select button can be used to choose 2 different voices.
Press the first time to select GRD.PIANO
Press the first time to select upper layer voice, press the second time
to select the lower layer voice.
When you select the upper layer voice, the upper layer indicator turns
on.
Press the second time to select BRT.PIANO
When you select the lower layer voice, the lower layer indicator turns
on and the upper layer indicator turns off.
100
95
75
Dual
You can have a second layer of sound by turning on the
Dual voice.
25
5
0
9
aw_SP5100_manual_G02_101110
2010
11
20
15:59:16
Operation
1. Press the [DUAL] button to turn on the DUAL mode, the
VOICE flag on the LED and the indicator are both lightened.
The dual voice number is also displayed on the LED.
VOICE
2. Then, you can get two different sounds at the same time
STYLE
SONG
Voice flag is lightened
Turn on the DUAL voice
when you press one key on the keyboard.
3. Use the [+] / [-] button and voice Direct Select buttons to
select your desired voice. The default voice number is 007.
Eg. Piano
STR. TRIO
4. Press the [DUAL] button again to turn off the DUAL mode,
Two voices will sound
at the same time.
the indicator goes off.
Note:
While the keyboard is in split mode, only the right hand area
can respond the dual voice, the left hand not below split point
would respond.
VOICE
STYLE
SONG
Select a dual voice
Split Point
You can split the keyboard to melody and chord area by
turning on the Split mode.
VOICE
1. Press the [SPLIT] button, LED displays the current split
parameter XXX .
STYLE
SONG
Display split parameter
The indicator is flashing.
2. Use the [+] / [-] button or Keyboard to change it, after exit the
setting mode the new value becomes to the new split point,
the split default value is 34.
VOICE
STYLE
SONG
Change split point
Default split
point F#3
3. The new split point belongs to the left area of the keyboard.
Chord
area
Melody
area
Transpose
1. You can change the pitch of the entire keyboard by semitone
steps with TRANSPOSE function.
- TRANSPOSE +
-
TEMPO
+
2. Press the [TRANSPOSE +] or [TRANSPOSE -] button for
the first time, LED displays current transpose value
temporarily.
3. Press [TRANSPOSE +] to increase the value and Press
VOICE
STYLE
SONG
Display current transpose value
- TRANSPOSE +
100
- TRANSPOSE +
[TRANSPOSE -] to decrease the value, the maximal range
to be adjusted is from -12 to +12 semitones, the default value
is 000.
95
75
increase the value
Decrease the value
4. In TRANSPOSE setting, press the [TRANSPOSE +] and
[TRANSPOSE -] button simultaneously to set the value to
default.
Note:
10
aw_SP5100_manual_G02_101110
11
20
-
TEMPO
+
25
VOICE
If you don't press any button for 2 seconds in transpose setting
mode, it will quit this mode automatically.
2010
- TRANSPOSE +
15:59:16
STYLE
SONG
Display default transpose value
5
0
Operation
Touch
This function allows you to turn on the dynamic level when
playing the keyboard.
1. When power is on, the TOUCH indicator lightened. Press the
[TOUCH] button continuously to select the touch response
type, the TOUCH indicator flashes and displays touch
response type 00X temporarily on LED.
VOICE
The indicator flashes
STYLE
SONG
Display touch value
2. There are 3 touch response types. Press [TOUCH] button
repeatedly to select, the default is 002.
3. If the type is set as OFF, it means no touch response to
VOICE
STYLE
SONG
Select touch response type
keyboard, the TOUCH indicator goes off.
Note:
If you don't press any button for 2 seconds in touch response
type select mode, it will quit this mode automatically.
VOICE
STYLE
SONG
Reverb/Chorus
Reverb/chorus effect will enhances your performance.
1. When power is on, the Reverb/chorus indicator is on.
VOICE
STYLE
SONG
VOICE
STYLE
SONG
2. Press the [REVERB/CHORUS] button to switch the DSP
response setting.
Display Reverb /Chorus
value on the LED
3. Press [REVERB/CHORUS] repeatedly to switch to reverb or
chorus setting mode.
4. There are 32 level to be selected by pressing [+] and [-]
button. The default chorus level is 00, the default reverb level
is 08.
VOICE
STYLE
SONG
VOICE
STYLE
SONG
Brilliance
When the piano is power on:
Move [BRILLANCE] splider bar to right, it sounds brighter;
Move [BRILLANCE] splider bar to left, it sounds mellow.
You can change the piano brilliance as your wish.
For a mellower sound
For a brighter sound
100
95
75
25
5
0
11
aw_SP5100_manual_G02_101110
2010
11
20
15:59:16
Operation
Scale
This function allows you to experience different scales when
you play certain genres of music that is not comp-osed based
on twelve equal interval.
1. Press [SCALE] button to enter into scale mode and the
button indicator lights up; The default scale is 001 Pythagor.
VOICE
Enter scale mode and
the indicator lights up.
2. There are 6 types of scale to select:
STYLE
SONG
Display scale type.
Pythagor, Major, Minor, Meantone, Werckmei, kirnberg.
Types of scale :
Number
1
2
3
Name
Pythagor
Major
Minor
Number
4
5
6
Name
MeanTone
Werckmei
Kirnberg
3. Press [SCALE] button again to exit scale mode and the
Press and hold the button for
2 seconds to enter scale select
status. The indicator is flashing.
button indicator goes off.
4. Hold and press [SCALE] for 2 seconds to enter into SCALE
select status. The scale now flashes and the scale number
displayed on LED.
5. Use [+] or [-] to select the scale type, play the key from
VOICE
C7~B7 to select scale root.
STYLE
SONG
C7
B7
For Example, to select the scale named "Minor" and set the
root key to "G", Press "+" till "003" is displayed on the LED, then
press the G7 key for 3 seconds to set the root, LED displays
"G", "G" stands for "Scale Root".
VOICE
STYLE
SONG
Metronome
1. Press the [METRO] button to turn on the metronome.
2. Press the button again to turn off the metronome.
3. When the style stops to play, the beat type follows 4/4 after
turning on the metronome. When the style begins to play, the
beat type follows the current style.
Metronome can be turned on
together with the style.
4. Metronome can be turned on together with the style. If the
style plays at first, then to turn on the metronome, the
metronome will respond next measure. If the metronome
plays at first, then to start to play the style, the metronome
responds at once to the first beat of the style.
VOICE
STYLE
SONG
Style Control
There are 20 styles in total. (See APPENDIX 2).
100
STYLE
VOICE
STYLE SELECT
1. Press the [STYLE] button to enter style mode, the style
number and style flag on the LED are both lightened.
95
75
VOICE
STYLE
SONG
Style number Style flag
SONG
25
2. You can use the [+] / [-] button to select the style you want.
5
0
VOICE
12
aw_SP5100_manual_G02_101110
2010
11
20
15:59:17
STYLE
SONG
Operation
Start/Stop The Style
1. When the style is not playing, you can press the
START
/STOP
[START/STOP] button to enter "SYNC START" mode, the
beat point are flashing at the same time, now the style will be
start with A.B.C. on if you press the key in the chord area on
Piano.
ACC
VOL
Chord area
Enter " SYNC START " mode
2. Press the [START/STOP] button again to stop style play and
turn off the A.B.C. function at the same time.
FILL IN A/B
1. In NORMAL mode, press the [Fill A / Fill B] button to insert
Style is not playing:
1 measure fill and the Fill A / Fill B indicator is flashing, after
one measure is over, VARIATION Style will be returned.
START
/STOP
ACC
VOL
START
/STOP
ACC
VOL
2. In Variation mode, press the [Fill A / Fill B] button to insert 1
measure fill and the Fill A / Fill B indicator is flashing, after
one measure is over, NORMAL style will be returned.
Style is playing:
START
/STOP
ACC
VOL
START
/STOP
ACC
VOL
START
/STOP
ACC
VOL
START
/STOP
ACC
VOL
3. When power is on, the preset style mode is NORMAL mode.
Accomp Volume
1. Press the [ACC VOL] button, LED displays the current
volume temporarily.
START
/STOP
ACC
VOL
2. You can use the [+] / [-] button to adjust the volume from
0 ~ 31. (Default Accomp Value is 24) The ACC VOL indicator
is flashing at the same time.
VOICE
STYLE
SONG
The indicator is on.
3. When power is on, the ACC VOL indicator is on.
VOICE
STYLE
SONG
START
/STOP
ACC
VOL
The indicator
is flashing.
Press them
together.
4. In ACC VOL mode, press the [+] and [-] buttons
synchronously can mute the accompaniment, the ACC VOL
indicator goes off at the same time; If you press the [+] and [-]
buttons again synchronously can open the accompaniment,
the ACC VOL indicator is lightened at the same time.
VOICE
STYLE
100
SONG
START
/STOP
95
ACC
VOL
75
The indicator
goes off.
25
5
0
13
aw_SP5100_manual_G02_101110
2010
11
20
15:59:17
Operation
Tempo
1. Use the [TEMPO+] or [TEMPO-] button to select the tempo
- TRANSPOSE +
-
TEMPO
+
from 30 to 280.
2. Press the [TEMPO+] and [TEMPO-] synchronously to set to
VOICE
the default tempo.
STYLE
SONG
Adjust the tempo from 30~280. Display current tempo
3. When the style is not playing, it will take out the default
- TRANSPOSE +
-
TEMPO
+
tempo of the style if you select the style.
When the style is playing, it will keep the current tempo once
you change the style.
VOICE
Press them
together.
STYLE
SONG
Display default tempo.
Song
There are 60 songs in total. (See Appendix 3 ).
STYLE
VOICE
1. PLAY a song:
Press the [SONG] button to enter the song mode, the SONG
flag on LED is lightened. It will play all songs repeatedly in a
cycle.
VOICE
STYLE
SONG
SONG
Song flag
is lightened
Press the [START/STOP] button to stop playing the song,
but it will not quit the song mode. The 2nd time you start
playing the song by pressing the [START/STOP] button, it
will play current song repeatedly.
2. SELECT a song:
Use the [+] or [-] button to select the song you want. If you
select the new song, LED will display it's number at first and
then display introductory beat and the measure count.
3. INTRODUCTORY BEAT:
After pressing [START/STOP], the measure count begins
from negative value to 1, and then begins to play the song.
VOICE
STYLE
SONG
Select a song
The beat LED indicators
are lightened in turn.
VOICE
STYLE
SONG
Display the measure count
4. Press the [TRACK 1] button to turn on or off the melody of
the song, you can try to play along with the accompaniments.
The LED indicator is lightened.
100
5. When the song is not playing, you can press the [VOICE]
STYLE
VOICE
95
and the [STYLE] button to exit.
75
SONG
25
5
0
14
aw_SP5100_manual_G02_101110
2010
11
20
15:59:17
Operation
Lesson
1. In song mode, press the [TRACK1] button to enter the
STYLE
VOICE
lesson mode.
2. When you press the [TRACK1] button, the [TRACK1]
indicator turns on, it will mute the melody of the song, then
you can play the Piano to practise the song you want.
SONG
3. Press [TRACK1] again and melody will save, the [TRACK1]
indicator again goes off.
Record
There is one user song can be recorded, include 2 Melody
Tracks.
Note:
The recorded data will not be lost when you turn off the power.
Hold on the [+] and [-] button together and power on the piano,
it will erase all the recorded data.
Record Song
1. Waiting for recording:
Press the [RECORD] button for the first time to enter the
record mode.
The RECORD indicator flashes, four beats flashes
synchronously to indicate waiting for recording.
At the same time an empty track will be selected to be
recorded automatically and relative track flag flashes (the
selection order is Track 1, Track 2, the Track 1 will be
selected while neither the tracks is empty )
VOICE
STYLE
SONG
You also can press the [TRACK 1] or [TRACK 2] button to
select the track you want to record.
2. Start recording:
When 4 beats flashes on LED, you can play the keyboard
directly to start recording, the RECORD indicator and track
flag that you select both flashes.
100
When 4 beats flashes, you can also press the [START/STOP]
button, open the A.B.C. and start record.
Press the key in the left area and sync start style, then style
data are recorded to the correspond track.
95
The indicator turns on.
START
/STOP
The indicator will still flash.
75
ACC
VOL
If the two tracks all have style data, it will be overwrited by the
new data.
25
Open A.B.C. and start record
Note:
5
when entering record mode, the old data of the selected track will
lost.
Chord area
0
15
aw_SP5100_manual_G02_101110
2010
11
20
15:59:17
Operation
3. Stop recording:
Press the [RECORD] button for the second time to stop
recording. LED display and indicator get back to the previous
mode.
VOICE
The indicator is off.
If the capacity is full while recording, the recording will be
stopped automatically with the FUL display on LED.
VOICE
STYLE
SONG
The indicator turns on.
Get back to previous mode.
STYLE
SONG
Playback Song
1. Press the [PLAY/STOP] button for the first time to playback
the record data, you can choose any one track or all two
tracks to play, the indicator is on.
2. Press it for the second time or press the [START/STOP] to
stop playback.
3. You can press the [TRACK 1] and [TRACK 2] button to turn
on or off the relative track in process of playback.
Note:
If there is no record data when you press [PLAY/STOP] LCD
will display "NUL" temporarily.
Press "+" and "-" together when power is on and the song data
will be cleared.
VOICE
STYLE
SONG
SD Card
There is a standard SD external interface which supports the
cards of 16M ~ 2G capacity. It is compatible with the file system
format of the FAT 16/32.
Press one of the 2 SD buttons [PLAY], [STORE] to enter the
relative function mode.
SD SLOT
If there is no card, "ERR" will display 2 seconds.
100
VOICE
STYLE
SONG
95
75
25
5
0
16
aw_SP5100_manual_G02_101110
2010
11
20
15:59:17
Operation
SD card function
PLAY can play midi file at the root directory in SD, support
format 0 and format 1.
STORE can save the recorded data to SD root directory as midi
file which can be played on MIDI player.
Play midi file at the root directory in SD.
Save the recorded data to SD root
directory as midi file.
SD button
In the SD mode, it won't respond to the other button except
[VOICE], [STYLE], [SONG].
It can play MIDI file and save recorded data at the root directory.
Play all files and indicator is on.
Play
When power is on, press the [PLAY] button to play all files at
the root directory in SD card and the PLAY indicator is on.
VOICE
STYLE
SONG
In the SD mode, you can select the midi file with [+] or [-] button.
The default file number is 001.
When playing the midi file, you can press the [PLAY] or the
[START/STOP] button to stop playing.
Press the [START/STOP] button again to start to play it
repeatedly.
VOICE
STYLE
SONG
Select the midi file to play.
Stop playing.
Press the [PLAY] button when there is no midi file in the SD
card, LED display "noC", then the display will get back to
previous mode in 2 seconds.
START
/STOP
ACC
VOL
Start or stop playing the midi file.
No midi file in the SD
VOICE
STYLE
SONG
VOICE
STYLE
SONG
Store
Please add the following in the "Store" Section, after "If the SD
card capacity is full, it will stop saving auto matically and display
"Ful".Then exit the store mode and return to the previous mode."
If there's no MIDI files in the root directory of the card, "NoF"
will display on the LED, meaning there's no recorded user song
to be saved to the card.
Enter store mode and
indicator is on.
The midi file name is generated
by system automatically.
If the card is write-protected, "Loc" will display on the LED.
100
VOICE
STYLE
SONG
95
After saving, indicator goes off.
75
25
5
0
17
aw_SP5100_manual_G02_101110
2010
11
20
15:59:17
MIDI
What is MIDI
1. Musical Instrument Digital Interface. The standard interface
between PC and Electronic instrument.
12V
2. It is equipped with standard MIDI interface, including 1 MIDI
AUX IN
AUX OUT
L/MONO
R
PEDAL
SUSTAIN
MIDI IN
MIDI OUT
USB
SOFT
IN and 1 MIDI OUT.
3. Connection
It can connect with PC or other MIDI equipment.
MIDI IN/OUT
Terminals
MIDI Connection
1. Connection rule
In midi connection, the equipment which controls another
equipment is called Host Equipment. Another equipment is
called Affiliated Equipment. The host equipment's MIDI OUT
connect with affiliated equipment's MIDI IN. Do not connect
MIDI OUT with MIDI IN on the same equipment.
2. MIDI IN
You can use a MIDI cable to connect the MIDI IN terminal of
system to another MIDI OUT terminal of compatible MIDI
electronic instrument. Use MIDI IN, system can receive midi
data such as note, program and touch etc. in order to be
handled by another MIDI instrument.
MIDI OUT
You can use a MIDI cable to connect the MIDI OUT terminal
of system to another MIDI IN terminal of compatible MIDI
electronic instrument. Midi data of system can be sent by
MIDI OUT, when a note is generated, the relative message
will be transmitted. System can control other midi instrument
by sending program change messages
3. Sample Connection Method
Connect the MIDI interface with your PC.
Major Application
1. The piano can control other equipments or electronic instruments.
2. Some equipments can be used to control the piano.
100
95
75
3. PC recorded data (MIDI) can be played on the piano.
25
5
0
18
aw_SP5100_manual_G02_101110
2010
11
20
15:59:18
MIDI
MIDI Controller
Summarize
Under MIDI controller mode, other buttons all have no effect
except four MIDI controller, [+]/[-] numeric button, the
VOICE/STYLE/SONG button.
When power on the piano, press one of the [COMMAND],
[VALUE], [CHANNEL] and [MIDIOUT] MIDI controller to enter
into MIDI controller mode. When in other mode, press the
[MIDIOUT] button to send out a set of default midi control
command. Press the [VOICE ]/[STYLE ]/[SONG] button, can
exit the MIDI controller mode, return to voice, style or song
mode.
into midi controller mode
+
Command
Press this button, the command indicator is on, you can choose
the related command by pressing the [+] / [-] or numeric button.
MIDI OUT
Press this button, the MIDIOUT indicator turns on and it send
out a set of midi control command, the indicator flashes in the
process of sending out, when it finish sen ding out, the indicator
go off.
Value
Press this button, the value indicator is on, you can set the
value by pressing the [+], [-] or numeric button.
Channel
Press this button, the channel indicator is on, you can select
any channel that you want from 1-16 by pressing the [+], [-] or
numeric button.
Command
1.When the button is pressed, the indicator of the button
lighter.
2. The LED display 001 (default command), you can select
MIDI CTRL information by the numeric button, the [ + ]
button or the [ - ] button and“XXX,”will displayed on
LED. You can set 131 MIDI command (0 -130), the
default number is 1.
Number
0-127
Command
Program Change(cn)
129
Channel Pressure(dn)
130
Pitch Bend(en)
STYLE
VOICE
STYLE
SONG
127
100
SONG
95
128
Standard MIDI Control(bn)
128
VOICE
75
VOICE
STYLE
SONG
VOICE
STYLE
SONG
VOICE
STYLE
SONG
129
130
25
5
0
19
aw_SP5100_manual_G02_101110
2010
11
20
15:59:18
MIDI
3. The command you select is shown on the LED. (Once you
set 128, Cn will be displayed, you set 129, Dn will be
displayed, you set 130, En be displayed), you can select
number allowed circlularly by pressing the [ + ] button or the
[ - ] button; While setting number with the numeric button,
after you press the first number, the command indicator
flashes and wait for press the second number, finish
pressing the second, if still allow press the third number, the
indicator continues to flash, waiting for press the third
number, when you finish pressing the third number, it will
stop flash. If you does not press any button in 2 seconds, it
will exit the number setting status automatically.
If the number you set is from 0-127, that represent as the
DATA1 of Bn order, and the value of DATA2 can be set by
pressing [VALUE] button.
VOICE
STYLE
SONG
VOICE
STYLE
SONG
VOICE
STYLE
SONG
VOICE
STYLE
SONG
If the number you set is 128, that means Cn command be
selected, the value of DATA can be set by pressing the
[VALUE] button.
If the number you set is 129, that means Dn command be
selected, the value of DATA can be set by pressing the
[VALUE] button.
If the number you set is 130, that means En command be
selected, the value of DATA can be set by pressing the
[VALUE] button.
When the value you set is 0H, that means to bend the
note down to the lowest;
When the value you set is 40H, that means to bend the
note to the normal value;
When the value you set is 7FH, that means to bend the
note up to the highest.
4. In COMMAND mode, press the [VALUE]/[CHANNEL]
button to enter into VALUE and CHANNEL setting mode,
corresponding button indicator turn on, the COMMAND
indicator go off.
5. If you press the [MIDIOUT] button, it will enter into midiout
mode and send out midi control message.
6. Press the [COMMAND] button continuously to select the
once
next command type (as follows).
twice
NO.
1
2
Adjustdigit value
0-127
128
129
130
3
4
100
Display(default) Commandtype name
001
Cn
Dn
En
Bn
Cn
Dn
En
95
thrice
Press the 【COMMAND】
button continuously
75
VOICE
STYLE
SONG
VOICE
STYLE
SONG
quartic
25
5
0
20
aw_SP5100_manual_G02_101110
2010
11
20
15:59:18
MIDI
Channel
1. The button is used to choose the MIDI CTRL channel,
from:1~16.
2. Pressing this button to get into CHANNEL setting mode, the
LED display the current default channel value XX, the
CHANNEL button indicator light up.
VOICE
STYLE
SONG
VOICE
STYLE
SONG
VOICE
STYLE
SONG
VOICE
STYLE
SONG
VOICE
STYLE
SONG
3. Use the [ + ] button, the [ - ] button or numeric button to
choose CHANNEL.
You can choose channel allowed circlularly by pressing the
[ + ] or the [ - ] button.
You can also set channel with the numeric button, after press
the first number, channel indicator flashes and wait for press
the second number, when you finish pressing the second
number, it will stop flash. If you does not press any button in
2 seconds, it will exit the number setting status automatically.
4. If you press the [COMMAND] button or [VALUE] button, it
will get into correspond mode, and the indicator of the
corresponding button indicator turn on, the CHANNEL
indicator go off.
5. If you press the [MIDIOUT] button, it will get into midiout
mode.
Value
1. Press this button to enter into VALUE setting mode, the
indicator is on, the LED will show the default VALUE as 064.
2. Use the [ + ] button, the [ - ] button or numeric button to set
VALUE value from 0-127.you can set value allowed circlularly
by pressing the [ + ] button or the [ - ] button. You can also
set value with the numeric button, after you press the first
number, the value indicator flashes and wait for press the
second number, finish pressing the second, if still allow press
the third number, the indicator continues to flash, waiting for
press the third number, when you finish pressing the third
number, it will stop flash.If you does not press any button in
2 seconds, it will exit the number setting status automatically.
3. If you press the [COMMAND] button or the [CHANNEL]
button, it will get into correspond mode and its button
indicator turn on, the VALUE indicator go off.
100
4. If you press the [MIDIOUT] button, it will get into MIDIOUT
mode.
95
VOICE
STYLE
SONG
75
25
5
0
21
aw_SP5100_manual_G02_101110
2010
11
20
15:59:19
MIDI
MIDI OUT
Press [MIDIOUT] button to sent out a set of MIDI control message.
1. Press this button, the indicator of that button flash within 2
seconds, when finish sending out MIDI CONTROL message,
the indicator go off.
2. Press this button doesn't change current mode after sending out
MIDI CONTRO Lessage. Continuous pressing the [MIDIOUT]
button, it will send out same MIDI CONTROL message.
100
95
75
25
5
0
22
aw_SP5100_manual_G02_101110
2010
11
20
15:59:19
Specifications
Keyboard
88 keys, 3 kinds of touch level.
Voice
20 voices.
Style
20 piano styles.
Song
60 songs.
Display
LED display.
Switch and Buttons
POWER SWITCH, VOLUME SWITCH, DUAL, REVERB/CHORUS,
TOUCH, RECORD, TRACK 1, TRACK 2, PLAY/STOP, SPLIT, METRO,
TRANSPOSE +/-, TEMPO +/-, SD CONTROL, SONG, VOICE, STYLE,
BRILLIANCE,MIDIOUT,COMMAND,VALUE, CHANNEL,SCALE,
START/STOP, ACC VOL, FILL A/FILL B
Transpose
-+12 semi tones
Pedals
Soft, Sustain
Connectors
AC POWER, HEADPHONES, AUX IN/OUT, MIDI IN/OUT, PEDALS,USB
Dimension
1360(L)x370(W)x143(H)mm
Weight
19.5kg
* All specifications and appearances are subject to change without notice.
100
95
75
25
5
0
23
aw_SP5100_manual_G02_101110
2010
11
20
15:59:19
Voice List
No
001
002
003
004
005
006
007
008
009
010
011
012
013
014
015
016
017
018
019
020
PRG
0
4
6
16
21
25
48
56
66
73
1
5
11
19
22
40
49
61
68
75
BANK
0
8
0
0
0
8
8
8
8
0
0
8
8
0
0
8
0
0
0
0
Name of Voice
Name of Voice on Panel
Acoustic Grand Piano
Epiano1
Harpsichord
Hammond Organ
Accordion
Steel Guitar
String
Trumpet
Folk Sax
Jazz Flute
Bright Acoustic Piano
Epiano2
Vibes
Church Organ
Harmonica
Strings Trio
Slow String
Brass Section
Oboe
Pan Flute
GRDPIANO
EPIANO1
HARPSICD
DRAWBAR
ACORDION
STGUITAR
STRING
TRUMPET
FOLK SAX
JZ.FLUTE
BRTPIANO
EPIANO2
VIBES
CHRORGAN
HAMONICA
STRTRIO
SLOWSTR
BRASS
OBOE
PANFLUTE
100
95
75
25
5
0
24
aw_SP5100_manual_G02_101110
2010
11
20
15:59:19
Style List
No
001
002
003
004
005
006
007
008
009
010
011
012
013
014
015
016
017
018
019
020
Name of Style
Pianist
8 Beat
16 Beat
Ballad
Pop Piano
Boogie
Slow Rock
Swing
Jazz
Jazz Waltz
Swing Fox
Shuffle
Twist
Country Ballad
Bossa Nova
Latin
March
6/8 March
Waltz
Slow Waltz
100
95
75
25
5
0
25
aw_SP5100_manual_G02_101110
2010
11
20
15:59:19
Song List
No
Name of Song
Piano
001
002
003
004
005
006
007
008
009
010
Fur Elise
Habanera
Four Little Swans
Moseta Dance
Germanic Dance
Turkish March
March
Away In A Manger
Chopsticks
2-Part Invention #13 In A Minor.B.W. Iii
Folk & Country
011
012
013
014
015
016
017
018
019
020
Country
Jambalaya
Susanna
Bridge
Battle Hymne Of The Republic
The Old Gray Mare
American Patrol
In The Rain
Sippin`Cider Through A Straw
Are You Lonesome Tonight
Golden & Pop
021
022
023
024
025
026
027
028
029
030
Only You
End Of The World
House Of Rising Sun
The Blue-Bells Of Scotland
Over The Rainbow
Beautiful Dreamer
Edelweiss
O Sole Mio
Silent Night
Ave Maria
No
Name of Song
031
032
033
034
035
036
037
038
039
040
041
042
Five Hundred Miles
Happy New Year
043
044
045
046
047
048
049
050
051
052
053
054
055
056
057
It`S Beginning To Look A Lot Like Christmas
Jeanie With The Light Brown Hair
My Bonnie
Song Of The Pearlfisher
The Stage Coach
Entertainer
Annie Laurie
Killing Me Softly With His Song
Last Rose Of Summer
The Old King Cole
Jazz & fusion
Maple Leaf Rag
June Samba
Funk
I Can......
Sea Shore
Guitar&Saxphone
The Hip Hop's Night
Blue Lunch
Cobweb
Wine
Jazz Old Man
Dark Eyes
Carlos
Sad
The Jazz
Chinese
058
059
060
South Mud Bay
Give You A Rose
Flowing Rill
100
95
75
25
5
0
26
aw_SP5100_manual_G02_101110
2010
11
20
15:59:19
MIDI Implementation Chart
1ch
1-16ch
1-16ch
1-16ch
×
3
×
×
×
***********
09-120
***********
9nH,V=1 -127
×
× (9nH,V=0; 8nH,V=0- 127)
×
×
×
〇
×
〇
○
○
×
○
×
○
○
○
○
○
×
○
×
○
○
○
×
○
×
○
○
○
×
○
×
○
×
○
×
○
×
○
×
○
○
○
×
×××××××
×
×
×
×
×
×
×
×
× *1
×
× *1
×
×
100
95
×
×
×
75
*1
When the accompaniment is started, an FAH message is transmitted. When
accompaniment is stoped, an FCH message is transmitted. When an FAH
message is
received, accompaniment is started. When an FCH message is received,
Mode 1: OMNI ON , POLY
Mode 3: OMNI OFF , POLY
aw_SP5100_manual_G02_101110
2010
11
20
15:59:19
Mode 2 : OMNI ON , MONO
Mode 4 : OMNI OFF , MONO
〇 : YES
× : NO
25
5
0
27
100
95
75
25
5
0
aw_SP5100_manual_G02_101110
2010
11
20
15:59:19