1
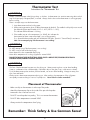
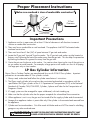
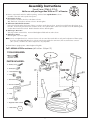
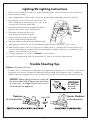
SAFETY ALERTS
ASSEMBLY INSTRUCTIONS
CARE AND USE MANUAL
Model #3066 and #3016
THIS INSTRUCTION MANUAL CONTAINS IMPORTANT INFORMATION
NECESSARY FOR THE PROPER ASSEMBLY AND SAFE USE OF THIS APPLIANCE.
Read and follow all warnings and instructions before
assembling and using the appliance.
Follow all warnings and instructions when using the appliance.
KEEP THIS MANUAL FOR FUTURE REFERENCE.
For Questions and Information call us at:
1-800-864-6194
Monday - Friday (8:00am - 5:00pm CST)
Barbour International, Inc.
101Cypress Way
Brandon, MS 39042
www.thebayou.com
DANGER
If you smell gas:
1. Shut off gas to the appliance.
2. Extinguish any open flame.
3. If odor continues, keep away from the appliance and immediately
call your fire department.
FAILURE TO FOLLOW THESE INSTRUCTIONS COULD RESULT IN FIRE OR EXPLOSION WHICH
COULD CAUSE PROPERTY DAMAGE, PERSONAL INJURY OR DEATH.
DANGER
1. Never operate this appliance unattended.
2. Never operate this appliance within 10 feet (3.05m)r of any other gas cylinder.
3. Never operate this appliance within 25 feet (7.5m) of any flammable liquid.
4. Do not fill cooking vessel beyond maximum fill line.
5. Never allow oil or grease to get hotter than 400˚F or 200˚C. If the temperature
exceeds 400˚F (200˚C) or if oil begins to smoke, immediately turn the burner
or gas supply OFF.
6. Heated liquids remain at scalding temperatures long after the cooking process.
Never touch cooking appliance until liquids have cooled to 115˚F (45˚C) or less.
7. If a fire should occur, keep away from the appliance and immediately call
your fire department. Do not attempt to extinguish an oil or grease fire with water.
FAILURE TO FOLLOW THESE INSTRUCTIONS COULD RESULT IN FIRE, EXPLOSION OR BURN
HAZARD, WHICH COULD CAUSE PROPERTY DAMAGE, PERSONAL INJURY OR DEATH.
1. This instruction manual contains important information necessary for the proper assembly
and safe use of the appliance.
2. Read and follow all warnings and instructions before assembling and using the appliance.
3. Follow all warnings and instructions when using the appliance.
4. Keep this manual for future reference.
1
WARNING
Read and understand this manual before using this product.
1. Sober adult operation ONLY! Read and understand this manual before using the product. The use
of alcohol, prescription or nonprescription drugs may impair your ability to properly assemble or
safely operate this appliance.
2. This cooker, like any gas appliance, can be extremely dangerous! It can burn you, scald you with
hot oil or water, or start a fire. Misuse of an outdoor cooker can result in serious personal injury
or property damage. The warnings and safety instructions in this manual must be followed to provide
reasonable safety and efficiency in using this unit.
3. LP (propane) gas is colorless, tasteless, heavier than air, and is both flammable and explosive.
Combustion of propane consumes oxygen and produces carbon monoxide (a poisonous gas).
Therefore, never operate an outdoor cooker inside a building or confined area where ventilation
may be restricted. Make sure the LP Cylinder and the appliance is placed in an open area. Do
not obstruct the flow of combustion and ventilation air.
4. Never leave cooker unattended. Most accidents occur as a result of leaving the cooker unattended.
When Frying... a cooker left unattended may eventually over heat, resulting in a serious grease fire.
When Boiling... a cooker left unattended may eventually boil over. Water can splash down on the
burner and put out the fire resulting in propane gas being released out into the cooking area.
When Steaming... a cooker left unattended may eventually evaporate all the water inside the steam
pot. If water is allowed to evaporate completely, the heat from this cooker will melt a hole into the
bottom of the pot, resulting in a loss of the pot and the food inside.
5. This is an ATTENDED appliance. Do NOT leave this appliance unattended while heating oil, grease
or water, cooking food or when hot after use [oil, grease or water above 100°F(38°C)]. Heated
liquid can remain at scalding temperatures long after cooking has ended.
6. Use ONLY on a level, stable non-combustibles surface like brick, concrete or dirt. Do NOT use this
appliance on any surface that will burn or melt like wood, asphalt, vinyl, or plastic.
7. This appliance is for OUTDOOR use only. Do NOT use in a building, garage or any other enclosed
area. Do NOT use on wooden decks, under roof overhangs, on porches, carports or at garage
door openings. This appliance is NOT intended to be installed in or on recreational vechiles and/or
boats. This appliance is not intended for and should NEVER be used as a heater.
8. Do NOT locate this appliance under ANY overhead construction. Keep a minimum clearance of
10 feet from the sides, front and back of the appliance to ANY construction. Keep the area clear
and free of any combustible material such as household chemicals, paint, gasoline and other
flammable vapors and liquids.
9. Keep the fuel supply hose away from any heated surfaces.
2
WARNING
10. Clean and inspect the hose before each use of the appliance. If there is evidence of abrasion,
wear, cuts or leaks, the hose must be replaced prior to the appliance being put into operation.
Replacement hose assemblies for Bayou Classic Cookers are:
Single Burner Cookers - Model #5HPR & #7950, Double & Triple Burner Cookers - Model #3HPH,
and Jet Cookers - Model #5HPR-1.
11. Keep children and pets away from the appliance at all times. Avoid bumping of or impact with
the appliance to prevent spillage or splashing of hot liquid.
12. Do NOT move the appliance when in use. Allow the cooking vessel to cool to 115°F (46°C)
before moving or storing.
DO NOT LEAVE UNATTENDED WHILE COOKER IS IN USE OR IS STILL HOT! (Above 100°F)
13. When cooking with oil or grease, the thermometer provided MUST be used. Follow instructions
in this manual for proper installation and use of thermometer. Follow instructions to make sure
thermometer is working properly. If the thermometer supplied with this cooker has been lost or
damaged, a replacement thermometer must be one supplied by the appliance manufacturer.
14. NEVER let the oil or grease temperature get hotter than 350°F (177°C). If the temperature goes
above 400°F (200°C) or if oil begins to smoke, IMMEDIATELY turn burner OFF. Wait for the
temperature to decrease to less than 350°F (177°C) before relighting burner. If there is a lid or
cover, do not remove. After reaching 450°F (230°C), oil or grease temperature can rapidly increase
to its point of spontaneous combustion... a serious grease fire. Therefore, never leave cooker
unattended, always monitor the thermometer.
15. When cooking with oil or grease have a type BC or ABC fire extinguisher readily available. In
the event of an oil or grease fire do NOT attempt to extinguish with water. Turn off the gas at the
supply cylinder. Immediately call the fire department. A Type BC or ABC fire extinguisher may, in
some circumstances contain the fire.
16. NEVER overfill the cooking pot with oil, grease or water. Follow instructions in this manual for
establishing proper oil, grease or water levels.
17. Failure to completely thaw and dry food may cause oil or grease to overflow. When frying with
oil or grease, all foods products MUST be completely thawed and towel dried to remove excess
water. Follow instructions in this manual for frying foods.
18. In the event of rain, snow, hail,sleet or other forms of precipitation while cooking with oil or grease,
cover the cooking vessel immediately and turn off burner(s) and gas supply. Do NOT attempt to
move the appliance or the cooking vessel.
19. Do NOT place an empty cooking vessel on the appliance while in operation. The intense heat will
melt an empty pot. Use caution when placing anything on the cooking vessel.
20. Never use a cooking vessel larger than the capacity and diameter recommended by the manufacturer.
3
WARNING
21. In sunlight or other bright light, the flame may be almost invisible. Use extreme caution keeping
hands, hair and clothing away from the cooker. Never put face or hands over burner while lighting.
Make sure to turn cooker off when not in use. Always wear cooking mitts when handling the
cooker, cookware, cooking utensils and accessories.
22. Use only D.O.T. certified (US Department of Transportation) LP gas cylinders or the National Standard
of Canada, CAN/CSA-B339, Cylinders, Spheres, and Tubes for the Transportation of Dangerous
Goods. Always close LP cylinder valve after use. Always use and store LP cylinder in an upright
position. Never store or transport LP cylinders in occupied enclosures. Carefully read and follow
instructions on LP cylinder.
22.a. Do not store a spare LP gas cylinder under or near this appliance.
23. Never fill the Cylinder beyond 80% full. All LP Cylinders in excess of 2.2 lbs(1.0 Kg.) propane
capacity, must include a collar to protect the cylinder valve.
24. The valve on the propane tank is the "ON/OFF" valve. When finished cooking, or in case of an
emergency, turn the tank valve clockwise to the "OFF" position. Be sure to close the tank valve
before disconnecting the hose. Caution - The valve on the hose and regulator assembly controls
the flame intensity only. It is not an "ON/OFF" valve.
25. Always check for gas leaks before lighting. (See section for Leak Test Instructions.)
26. Follow lighting procedures as stated in this manual. Use a fireplace match or gas appliance
butane lighter.
27. This appliance will be hot during and after use. Use insulated oven mitts or gloves for protection
from hot surfaces or splatter from hot cooking liquids. Always wear shoes while cooking.
28. Use Bayou Classic appliances only in accordance with state and local ordinances and codes.
In the absence of local codes, installation must conform with the National Fuel Gas Code,
ANSI Z223.1/NFPA 54, Storage and Handling of Liquefied Petroleum Gases, ANSI/NFPA 58 or
CSA B149.1, Natural Gas and Propane Installation Code.
29. Bayou Classic gas appliances are not intended for use in a Commercial Setting.
30. Bayou Classic appliances are designed for use with propane gas using ONLY the hose and regulator
assembly supplied with the product. For replacement parts call: 1800-864-6194. Accessories not
recommended by Bayou Classic must not be used with Bayou Classic Appliances. Never use with
natural gas.
31. Carefully read and follow instructions for assembly, checking for gas leaks, lighting,
checking accuracy of a thermometer and cooking.
Failure to comply with these warnings and instructions can result in
property damage, personal injury and death.
4
Thermometer Test
Instructions for Thermometer Test
WARNING
- Always use a thermometer when frying turkeys or chickens. A thermometer is a sensitive measuring device which
may work improperly if dropped, bent, or twisted. Always check to be sure the thermometer is working properly
before cooking.
- There is a simple way to test the thermometer:
1. Insert thermometer end into boiling water.
2. While wearing protective gloves, hold the thermometer by the dial. The needle should quickly move around
the dial and register approximately 212˚F +\- 20˚F (100˚C +\- 10˚C).
This indicates the thermometer is working.
3. If the needle stops at a low temperature (i.e. 200°F); this indicates the
thermometer has been compromised and is not working properly.
If so, discard the thermometer and call 1-800-864-6194 (8am - 5pm M - F Central Time) for assistance.
Note: Do not attempt frying if the thermometer is not working!
WARNING
-
Do NOT attempt frying if the thermometer is not working!
Do NOT cover pot with a lid when frying!
Never leave the cooker unattended when frying.
Never allow temperature of cooking oil/grease to exceed 350°F.
FAILURE TO FOLLOW THESE INSTRUCTIONS COULD CAUSE A GREASE FIRE/EXPLOSION RESULTING IN
PERSONAL INJURY, PROPERTY DAMAGE OR DEATH.
WARNING
- The face of the thermometer becomes very hot during use. Wear protective gloves or mitts when handling.
- Sweat or condensation from cold beverages, if allowed to drip on the glass cover, could cause it to break.
- Tip of the thermometer probe can be a puncture hazard, use caution when handling. Keep point away from
eyes, face and hands.
- Always monitor thermometer temperature during use. After reaching the temperature of the oil/grease
can rapidly increase resulting in a serious fire/explosion. Never leave the cooker unattended!
Placement of Thermometer
- Make sure clip on thermometer is at the top of the probe.
- Attach the thermometer clip on the inside of the pot with the probe
immersed in the oil at least one inch.
- Do NOT insert the probe into poultry. This is not a meat thermometer.
- Do NOT allow temperature to exceed 350°F.
- Always monitor the temperature when frying.
Remember: Think Safety & Use Common Sense!
5
Proper Placement Instructions
Make sure overhead is clear of combustible construction!
et
Fe n c e
0
a
r
1 a
e
Cl
10 Feet
Clearance
10 Feet
Clearance
et
Fe n c e
10 ara
e
Cl
24"
Minimum
Wind Direction
Important Precautions
1. Appliance must be in open area with at least 10 feet of clearance in all directions to nearest
structure or combustible construction.
2. There must be no combustibles or roof overhead. The appliance shall NOT be located under
overhead construction.
3. There must be at least 2 feet (24") of space between LP gas tank and cooker.
4. Locate the LP gas tank "upwind" from the cooker. The LP gas tank and cooker must be located so
that any wind is blowing the heat of the cooker away from the gas tank. This also helps fire prevention
by blowing the flames of a grease fire away from the gas tank.
5. Center the pot over the burner on the cooker. Use caution when choosing the size of the pot to use
on you cooker to avoid hazards. For example, a large pot on a tall cooker runs the risk of tipping.
Use large pots only on short cookers.
LP Gas Cylinder Information
Bayou Classic Outdoor Cookers are manufactured for use with 20 lb LP Gas cylinders. Important
precautions to remember about LP Gas cylinders include:
1. Always read, understand and follow the cylinder manufacturer's instructions.
2. The LP-gas supply cylinder to be used must be constructed and marked in accordance with the
specifications for LP-gas cylinders of the U.S. Department of Transportation (DOT) or the National
Standards of Canada, CAN/CSA-B339, Cylinders, Spheres and Tubes for the Transportation of
Dangerous Goods.
3. LP supply system must be arranged for vapor withdrawal, with tank standing up.
4. Make sure that the cylinder valve has the proper receptacle for a handwheel hose connection.
5. When appliance is not in use, the gas must be turned off at the supply cylinder and disconnected.
6. Storage of an appliance indoors is permissible only if the cylinder is disconnected and removed from
the appliance.
7. Cylinder must be stored outdoors. Out of the reach of children and must NOT be stored in a building,
garage or any other enclosed area.
WARNING
FAILURE TO FOLLOW THESE INSTRUCTIONS EXACTLY, MAY
CAUSE A FIRE RESULTING IN SERIOUS INJURY OR DEATH.
6
Assembly Instructions
Round Frame (3066 & 3016)
Not for use with pots larger than 30-Qts or 12" in Diameter.
1. Remove components from the box and their packing. Turn base frame upside down as shown.
Assemble cooker while in this upside down position.
2. Mount Burner Crossbar
Line up holes in crossbar to the holes in the frame as shown.
2a). Attach bolts, lock-washers and nuts as shown. Wrench tighten.
3. Attach Burner/Heat Shield to Cross-Bar
Remove bolt and lock-washers from bottom of burner. Turn burner upside down as shown. Position long end of burner above large 'U' in
the frame. Position body of burner below crossbar as shown. Line up burner bolt to center hole in crossbar. Insert the bolt through the
crossbar. Place heat shield over bolt. Attach lockwasher and nut. Wrench tighten.
4. Attach Legs to Base Frame
Slide legs on frame to match holes. Insert and hand tighten all bolts and nuts where shown.
5. Attach Hose to Burner
Wrench tighten... but not too tight!
Note: Do not over tighten brass hose connector to burner. The air control disc must be able to easily turn for adjustment of flame quality.
If you have over tightened the brass hose connector to the burner and the disc cannot turn, then unscrew the brass connector
1/4 to 1/2 turn, or until the disc can be easily turned... Very important!
6. Return frame to upright position. Wrench tighten all leg bolts.
Call 1-800-864-6194 for assistance. (M-F 8:00am - 5:00pm CST)
TOOLS REQUIRED:
5
Adjustable Wrench
3
PARTS INCLUDED:
2
3 - Bolts (1 3/4")
4 - Bolts (3/4")
Frame sets
inside here
7 - Lock Washers
7 - Nuts
4
1 - BG10 burner
1 - Burner Crossbar
1 - Frame
3 - Legs
1 - Shutter
1
1- Regulator Valve & Hose
1 - Heat Shield
7
Hose Attachment Instructions on All Models
The hose and regulator is a pre-assembled unit. Do not take apart. Simply connect the hose and regulator assembly to
the LP gas cylinder and to the cooker. An adjustable wrench is needed when attaching the hose to the gas cooker.
If there is evidence of abrasion, wear, cuts or leaks, the hose must be replaced prior to the appliance
being put into operation. Call 1-800-864-6194 for hose replacement. M-F 8:00-5:00 CST.
1. Make sure the valve on the LP cylinder is clean. Connect the hose to the cylinder valve by turning the handwheel
to the right. Hand tighten. (figure #1) ~ Handwheel Connector conforms to new standards regulating propane tanks ~
PRESET REGULATOR WITH SIDE VALVE
Decrease
Gas Flow
Increase
Gas Flow
ADJUSTABLE REGULATOR
Figure #1
Connect to Tank
(Clockwise)
Decrease
Gas Flow
Increase
Gas Flow
or
Caution: The Control Valve
Controls the "Volume" of Gas Only.
Use the Valve on the Propane Tank
to turn Gas Supply "ON" or "OFF".
Handwheel Connects Hose
Assembly to Propane Tank
Disconnect from Tank
(Counter-Clockwise)
Connect to Tank
(Clockwise)
Disconnect from Tank
(Counter-Clockwise)
2. Attach hose with fitting to the burner as shown.
All Single Burner Cookers
(except Jet Cookers)
Turn Air Control Shutter to
adjust flame quality
Figure #2
Turn Clockwise
Wrench Tighten
(but not too tight)
Turn Air Control Shutter to
adjust flame quality
Turn Clockwise
Wrench Tighten
(but not too tight)
or
IMPORTANT:
Must be able to turn
Air Control Shutter...
do NOT over tighten!
Final Assembly
IMPORTANT:
Must be able to turn
Air Control Shutter...
do NOT over tighten!
Check For Gas Leaks
1. Close the regulator control valve on the hose. This shuts off
the flow of gas from the regulator to the burner.
2. Open LP cylinder valve by 1/8 to 1/4 turn. This allows gas
into the regulator and stops it at the closed
regulator valve.
Spray ALL connections
with a soapy liquid to
check for gas leaks.
Appearance of bubbles
indicates a leak.
3. Using a small brush or spray bottle, splash on a soapy liquid
Figure #3
(ex. Dishwashing liquid and water, or 50% non-ammonia
soap and 50% water) on the connections around the regulator and cylinder connection. (Figure #3)
Any bubbles that appear indicate a gas leak. If so, turn off the gas and tighten the fittings some more.
Do Not use cooker if gas leak can not be stopped. Call 1-800-864-6194 for assistance. M-F 8:00-5:00 CST.
4. After you are certain there are no leaks, turn tank valve and regulator valve to "OFF" position. Wait 5 minutes for any
gas fumes to go away before lighting the burner.
Lighting/Re-Lighting Instructions
1. When you are sure there are no leaks, turn cylinder valve and regulator control valve on hose to the closed position.
2. Reopen cylinder valve fully.
3. Have a standard match, fireplace match or long-nosed propane lighter lit and ready to place over the burner.
4. Before lighting, Turn air control shutter on the burner to an
almost closed position. After lighting, turn air control shutter
to open position to achieve a better flame.
Light
Burner
Here!
5. Light the burner from the bottom, keeping hands and face
away from the top of the cooker. (See Illustration)
6. Place lighter over the burner, then slowly
open regulator valve until burner ignites.
7. Adjust air shutter on burner for a blue flame.
(In direct sunlight, flame may appear clear.)
8. Adjust the regulator control valve for desired flame height.
9. When lighting for the first time, you will smell paint burning at the top for a few minutes... This is normal.
10. When finished using the cooker, turn off gas from the cylinder valve first. It will take a few seconds for the fire to go
out and for the propane gas to "bleed" from the hose and regulator assembly. After the fire is completely out, turn
regulator control valve to the "OFF" position.
11. To re-light, repeat steps 1-8. Always use CAUTION as cooker will be hot.
12. If flame is accidentally extinguished, turn propane tank off. Wait 30 seconds, then repeat steps 2-8.
Trouble Shooting Tips
Problems with proper Gas Flow:
This Bayou Classic cooker and most propane tanks are equipped with a safety device to shut off the flow of gas should
the hose be cut or severed. Sometimes this safety device may be tripped when lighting the cooker. To prevent this,
ALWAYS make sure the regulator valve is in the closed position (Figure #6) before opening the valve on the LP gas tank.
CAUTION: Before lighting the burner, check that
the venturi tube is free of obstruction and insects
or insect nests. A clogged venturi may result in
a fire beneath the appliance.
Clockwise
to closed position
Figure #6
or
9
WARNING:
Do NOT light
burner at
air intake.
Counter-Clockwise
to closed position
Whole Fried Turkey & Chicken
Preparation & Cooking
Instructions for safely performing cooking operations, as applicable to the appliance.
WARNING: Allow poultry to thaw completely. . .Very Important!
Never, never insert frozen or partially frozen poultry into hot oil!
Doing so will cause a violent boil over and grease fire!
Always test the thermometer to insure it is working properly! (See Page #5)
Preparation
- Clean and dry poultry inside & out, removing giblets and neck, and trimming away all excess fat and skin.
Make sure opening around the neck cavity is wide and clear. . .very important!
- Make a 1-inch cut in the skin at the leg-thigh joints. This allows oil to drain when poultry is done...
very important!
- Rub poultry with seasonings. (use poultry seasoning, cajun seasonings or salt & pepper)
Optional: If using a liquid marinade, inject into poultry at various points on the breast, thighs, and drumstick.
(Figure #1 & #2)
Hint: When using a dry powder marinade, mix with Orange Juice instead of water. Acidity in the Orange
Juice enhances the marinade plus acts as a meat tenderizer. Hint: Try injecting your favorite beer, wine,
or sherry mixed with worcestershire into chickens prior to frying or grilling. The results are spectacular!
- Push plunger down slowly while pulling injector out of meat to give even distribution of seasoning.
Liquid marinades
are available at
most Grocery
Stores.
Inject marinades
or beer at
various points as
shown.
Figure #1
Figure #2
- Place turkey upside down on rack, with legs facing up, no batter required. Remember, poultry legs
facing up.
Frying Instructions
- Pour peanut oil into pot and attach thermometer to the top edge, making sure the stem of the thermometer
is in the oil at least one inch... very important! Typical oil amounts are: 30-Qt. - - - - - - - - 3 Gallons
- Following instructions, light the gas cooker and set at a low flame.
- Carefully place the pot on the cooker and adjust the flame higher.
- Heat oil to 325 – 350°F. Depending on the amount of oil used & weather conditions, it may take from
15 to 25 minutes for the oil to reach 325°F. Optimum frying temperature is 350°F.
- When oil reaches 350°F, reduce heat by turning regulator valve.
- Attach grab hook to the top loop of the rack. Never drop food or accessories into hot cooking liquid.
- Wearing gloves, very slowly & carefully lower food into the cooking liquid in order to prevent splashing
or overflow. When removing food from the appliance care shall be taken to avoid burns from hot cooking
liquid. It may take 60-90 seconds to completely lower food into the oil! (Figure #3)
WARNING: Do not drop the turkey into the oil! This could cause a boil-over resulting in a serious
grease fire! Remember ...slowly...lower the poultry into the oil.
10
Whole Fried Turkey & Chicken... cont'd
- After turkey is completely in the oil, remove grab hook from rack. (Figure #4)
- Inserting the poultry will reduce the temperature of the oil. Slowly increase the heat so that the temperature
of the oil will come back to 325-350°F This will take several minutes. Monitor the thermometer to maintain
this temperature. (Chilly conditions may prevent the temperature from returning to 350°F If so, just add
3-4 minutes to overall cooking time.)
- Fry turkey for 3 to 3 1/2 minutes per pound or until golden brown. (Ex: a 15 pound turkey will take
between 45 and 50 minutes to cook.) Turkeys over 18 pounds typically take 60 minutes.
- Fry a single chicken for about 18 minutes. When using Bayou Classic detachable Skewer Set, fry up to
3 chickens in about 20 minutes.
Note: Cooking time begins when poultry is completely inserted into the pot.
(sold separately)
Figure #3
Figure #4
WARNING:
Using skewers
fry up to 3 chickens
When poultry is lowered into hot oil, it will cause the oil to splatter from a furious boil. This can cause severe
burns; therefore, we recommended wearing gloves, a long-sleeved shirt, shoes and safety goggles.
- After passing 450°F, cooking oil can heat up rapidly to its flashpoint of spontaneous combustion, which is
a serious grease fire! Therefore, never leave cooker unattended!
- After cooking temperature is achieved, reduce the flame in order to maintain a constant temperature
while cooking.
- Control frying temperature by turning the valve on the hose & regulator assembly. Constantly monitor
the thermometer!
Figure #5
- When poultry is done, turn cooker off at the tank. Leaving pot on cooker, place
grab hook through top Loop of the rack and very carefully remove rack with
poultry from pot. (Figure #3)
- Place rack with poultry on absorbent paper and allow to drain for few minutes.
(Figure #5)
- Carefully remove poultry from rack and place on platter.
WARNINGS WORTH REPEATING...
...Cool, Carve & Enjoy!
Make sure poultry is completely thawed!
Do Not insert frozen or partially frozen poultry into hot oil!
Slowly lower poultry into the hot oil. This may take 60 to 90 seconds.
Do Not DROP poultry into the hot oil!
Cooking must be monitored at all times. Do not permit cooking temperature to exceed 350˚F.
Do Not leave pot and cooker unattended! Always monitor the thermometer!
Always test thermometer prior to cooking!
Do Not use lid when frying. Use lid only when the pot is being used for other types of cooking such as boiling
soups, stews, gumbos; or steaming vegetables and seafood.
This unit gets very hot! Do Not touch! Keep children and pets at a safe distance while cooking
and afterwards during the cool down period.
Allow 2 hours for the oil to cool down before handling or cleanup.
11
Frequently Asked Questions About Frying
1. How much cooking oil do I use? How to determine the maximum fill level when using a
pot without a maximum fill line?
a. Place the poultry on the rack.
b. Place the poultry and rack into the empty pot.
c. Fill the pot with water just until the poultry is completely submerged. There must be
a minimum of 3 inches (8cm) between the water level and top of pot.
d. Remove the poultry from the pot and either mark the water level on the side of the
pot or measure the amount of water in the pot.
e. Remove the water and completely dry the pot and the poultry.
f. This is the amount of cooking oil the pot is to be filled with to cook the poultry.
2. How large of a turkey will fit inside the pot?
30-Qt. – up to 20-lb.
3. The temperature on the thermometer stops at about 225°F and does not move!
a. The thermometer could be stuck into the poultry meat. This is wrong! Make sure end of
thermometer sets in the cooking oil only.
b. The thermometer may not be properly inserted into the oil. Make sure the thermometer is
in the oil at least one inch down.
c. The thermometer may have been damaged, and is not working properly. Retest the
thermometer by holding the pointed stem over the flame. The needle should quickly move around
the dial. If not, the thermometer is damaged. To test the accuracy of your thermometer, place
inside oven set at 350°F. The dial on the thermometer should eventually show the same
reading. (plus or minus 5°F) If not, call 1-800-864-6194 for assistance. M - F 8am – 5pm (CST)
WARNING: Do Not attempt to fry a turkey or chickens without a thermometer.
WARNING: Over heating cooking oil can result in a spontaneous fire. Always check the
accuracy of the thermometer. Constantly monitor the thermometer during use.
4. How much time is needed to heat the oil to 325 – 350°F?
Depends on the size of the pot and the amount of cooking oil used.
Also depends on wind and outside temperature.
Example: A 30-Qt. pot with three gallons of cooking oil could take 15 minutes on a
calm hot day or up to 25 minutes on a windy, cold day.
WARNING: After passing 450°F cooking oil can heat up rapidly to is flashpoint of spontaneous
combustion. Constantly monitor the thermometer.
5. Do I stick the thermometer inside the poultry?
NO! Place the tip of the thermometer at least one inch down into the cooking oil when
frying. Optional: When the turkey or chicken is done, you can use a meat thermometer to
check the internal temperature of the turkey. According to the FDA, the turkey is done when
the internal temperature reaches 180°F for 15 seconds.
[FDA 1999 Food Code 3-401.11 (A) (3)]
6. What is the best cooking oil to use when frying turkeys or chicken?
Peanut oil is recommended because it contains no cholesterol and can be reused more
frequently. Peanut Oil is safer because of a higher flashpoint (which reduces the risk of a
grease fire). Also available are blends of peanut and soybean oil. This, too, is acceptable.
12
If peanut oil is not available or cannot be used due to allergic reactions, then any
vegetable oil may be used.
7. How long can cooking oil be stored?
If refrigerated, cooking oil can be stored up to one year. If not refrigerated, store in a dark,
cool place. Clean, unrefrigerated oil can be stored 3 to 6 months. Store cooking oil in
original container. Do not store inside the cooking pot or in metal containers.
8. How do I clean & strain cooking oil for storage?
Typically, the upper portion will remain clean and clear. After the
oil has cooled, simply dip a large measuring cup (or any container
with a pour spout) into the cooking oil and pour it into the original
container. (as shown) Hint: use a funnel or hold the container
above the pot to collect any spills.
When nearing the bottom of the pot, you have options:
a. Discard all remaining oil and residue.
b. Use funnel and small cheese cloth to separate the remaining oil from the residue.
CAUTION: Cooking oil remains hot for a very long time. Always allow 2 hours or more
for the cooking oil to cool down before straining and storing. Place the lid on the pot during
the cool-down period.
9. How do I dispose of used cooking oil?
Help keep local waterways clean! When disposing of used cooking oil, never pour it down
the drain! Fats, oil and grease can cause problems further down the sewer pipe. Instead,
pour used cooking oil in the same container it was purchased in (or any container with a
lid) and dispose of it in the garbage.
10. How do I season a turkey or chicken?
No batter is required when deep frying whole turkeys or chickens. Typically, a generous
portion of poultry seasoning is sprinkled and rubbed onto or under the skin and interior
cavity. Hint: salt & pepper or any dry rub-on seasoning may be used. Any injection
marinade may be used as long as it is a thin-based liquid. Hint: certain marinades contain
large bits of onion, pepper, etc. which can clog the needle of the injector. Make sure to
use a thin-base liquid marinade. Powder-based marinades may also be used. Hint: for
best results, mix orange juice with warm water, then dissolve the powder into the liquid.
Note: Orange juice enhances the marinade flavor plus acts as a meat tenderizer.
Warm liquids more readily dissolve powder marinades. For best results, season poultry
and place in refrigerator overnight or at least 3 hours prior to frying.
Hint: try injecting your favorite brand of beer, wine, or sherry mixed with worcestershire
into the chickens prior to frying or grilling. The results are spectacular!
Remember the operator of the cooker must remain completely sober during use.
11. How much marinade or seasoning do I use?
A generous portion of rub-on seasoning is recommended; use your own preference.
Liquid marinade: 1 1/2 - 2 oz. per pound. Let your taste buds be your guide.
12. At what temperature and how long do I fry whole turkeys and chickens?
Optimum frying temperature is 350°F. Control frying temperature by adjusting regulator
valve. Whole turkeys typically require 3 – 3 1/2 minutes per pound. Cold, windy conditions
may require a few more minutes overall. A single whole chicken takes about 18 minutes.
Three chickens on skewers take about 20 minutes. Turkey breasts and most other foods
require about 3 – 3 1/2 minutes per pound.
13
General Maintenance & Storage
Intense heat from the cooker will burn away paint from parts of the frame and windscreen flashing. This will cause a slight
'odor' for a few minutes during the initial use. The exposed steel will rust. Occasional care must be taken to prolong the
life of your cooker.
1. Store cooker in a cool dry place. Do not store outside exposed to weather. Storage of an appliance indoors is
permissible only if the cylinder is disconnected. If storing cooker indoors, detach and leave LP cylinder outdoors.
LP cylinders must NOT be stored in a building, garage or any other enclosed area.
2. Occasionally spray paint on affected areas.
3. Spray WD-40 on the burner grid after it has cooled.
4. For long term storage, cover the cast iron burner and the hose and regulator assembly in a plastic bag.
5. Spiders and small insects have been known to spin webs inside the venturi tube of the cast iron burner. Obstructions
in the venturi tube interfere with the flow of air and gas through the burner. A clogged venturi may result in a fire
beneath the appliance. If this happens, remove the cast burner from the frame and clean the venturi tube with a stiff,
bent wire or screwdriver. We also advise cleaning inside the top ports as well.
6. Do not tamper with or attempt repairs on the burners, frames, valves, or LP cylinders. Allow only qualified LP gas
dealers to make repairs. For replacement parts call: 1-800-864-6194.
7. Always close LP cylinder valve first after use. Always use and store LP cylinder in an upright position. Store out of the
reach of children. Never store or transport LP cylinders in occupied enclosures. If storing cooker indoors, detach and
leave LP cylinder outdoors.
Care & Use Instructions for Cookware
Polished Aluminum Pots
1. It is recommended that you season the pot before use. Pour a small amount of vegetable oil inside and spread it
with a paper towel until the entire bottom and sides are coated. Let it stand for 10 minutes. Wash out the interior
of the pot, and it will be ready to use. (DO NOT apply to flame during any of this process) CAUTION: Empty
aluminum pots will melt if placed over an open flame.
2. After cooking, let pans and lids cool gradually. Do not pour cold water into a hot pan. This can cause the bottom
of the pan to warp, and it can cause grease to splatter. Always wash the pans thoroughly in hot, soapy detergent
after each use to remove all traces of food, salt, or grease particles that will burn causing stains when the pan is
reheated.
3. Seasoning the pots will make cleaning easier. Scouring pads and aluminum cleaners are okay for the interior of
the pots, but will scratch the exterior.
4. Polished aluminum pots will tarnish and discolor with normal use. Occasional use of "Cream of Tartar" will bring
back some of the luster. However, aluminum pots will tarnish and become dull with normal use.
Boiling with large quantities of salt is very corrosive and can cause ‘pits’ in the pots and baskets. To reduce the
chance of this occurring, do not allow salt water to remain in the pot for a long period of time after the pot has cooled.
The basket and pot should be thoroughly cleaned after each use. Do Not store cooking oil inside the pots. Salt and
seasonings will settle to the bottom and can cause pits to form at the bottom of the pot.
Stainless Steel Cookware
1. Before using for the first time, wash in hot soapy water. Dry immediately to prevent water spots. To prevent scratches,
avoid using sharp utensils when cooking.
2. Discoloration of the stainless steel will result if the pieces are allowed to overheat excessively. For hard-to-clean stains
or discoloration of the stainless steel, use a nonabrasive stainless steel cleaner. Follow the directions on the container
using a clean, damp sponge or cloth. Do Not scrub finish with a soap-filled steel wool pad or harsh abrasive
cleanser as scratching will occur.
Seasoning Instructions (seasoning prevents rust & keeps food from sticking)
1.
2.
3.
4.
Wash cast iron cookware in warm soapy water to remove the Paraffin wax coating.
Rinse and dry thoroughly.
Coat the entire surface of the cast iron cookware with solid vegetable shortening. Place in 300˚F oven for one hour.
Remove from oven, pour out excess grease, and wipe with a paper towel. Properly seasoned cast iron cookware
will turn black after repeated use. This is normal.
14
Other Products by Bayou Classic
4020, 2024, 4034, 4042, 4060
Steam • Boil • Fry
SP10
High Pressure Cooker
SQ14
Outdoor Patio Stove™
DB375
Dual Burner Outdoor Patio Stove™
0880
O994
Stainless Steel ChickCAN Rack
Stainless Steel TurkCAN Rack
15
Stainless Steel and
Aluminum Stockpots
24-Qt. - 162-Qt.
Cast Iron Skillets
6", 8", 10", 12", 14" & 20"
Cast Iron Dutch Ovens
8.5-Qt. - 20-Qt.
7428
Cast Iron
Reversible Griddle
400-402
Fold & Go Charcoal Grill
300-301
Cypress Series
Solid Steel Charcoal Grill
7414
Cast Iron
Reversible Griddle
For a free catalog or information call:
1-800-864-6194
KAB5
20 PSI Banjo Cooker
17” x 17” Cooking Surface
Jambalaya Pots
2.75-Gal. up to 30-Gal.
16
Safety Precautions & Warnings
WARNING
Failure to follow these instructions could result in fire or explosion
which could cause property damage, personal injury or death!
ALWAYS
operate in a clear open
area away from buildings,
trees and shrubs.
NEVER
use on decks, boats or
any combustible surface!
NEVER!
No barefeet or sandals
when cooking.
OUTDOOR USE ONLY!
Do not operate inside
garages or carports.
NEVER
NEVER
LEAVE COOKER
UNATTENDED!
NEVER
place flammable or
combustible materials
within 25-ft of cooker.
cover pot with lid when
preheating oil or frying.
HOT!
ALWAYS
Unit is extremely hot during and wear protective mitts, gloves,
goggles and long sleeve
after use. Allow 2 hours for unit
clothing when cooking.
to cool down before touching.
NEVER
use under any
roof or overhang.
NEVER!
let children or pets near
the cooking area
during and after use.
ALWAYS
use an accurate thermometer
to monitor temperature when
preheating oil or frying.
Remember: Think Safety and Use Common Sense!