1
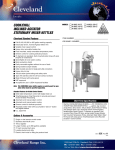
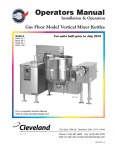
COOK/CHILL HORIZONTAL AGITATOR STATIONARY MIXER KETTLES MODELS: HA-MKDL-60-CC HA-MKDL-100-CC HA-MKDL-150-CC Cleveland Standard Features ITEM NUMBER __________________________________________ ■ ■ ■ ■ ■ ■ ■ ■ ■ ■ ■ ■ ■ ■ ■ ■ ■ ■ Full 60, 100, 150, 200 or 300 gallon working capacity Electrically driven, Horizontal Agitator Mixer Arm Variable mixer speed control Spring loaded blades scrape entire heated surface area Internal mixing fins for most efficient, uniform mixing, heating and cooling Flush mounted, easily removable temperature probe Simmer control for cooking delicate products 3” diameter air operated, flush mounted piston draw-off valve (requires air compressor) Spiral flights for even water cooling Easily removable agitator without the use of tools Spring assist, one piece cover (bifold cover with counterweight for 300 gallon model) Heavy duty rim bar 100 psi steam jacket rating and safety valve Type 316 stainless steel for all food contact surfaces Water fill faucet with swing spout Kettle mounted valve box for single point utility connections NSF approved Accepted for use in USDA inspected facilities Cook/Chill Systems JOB NAME / NUMBER __________________________________ Note: This COOK/CHILL mixer kettle requires a control panel for operation. (Please specify remote mounted control center or kettle mounted control center.) Short Form Specifications Standard Features for Kettle Control Center: ■ Solid State temperature control with digital read-out ■ Time/Temperature Chart Recorder to provide permanent record of Batch Processing ■ Automatic and manual steam control ■ Automatic and manual jacket water cooling ■ Simmer control for delicate products ■ Automatic water meter with accumulative “add on” button and digital readout ■ U.L. approved Options & Accessories ❐ ❐ ❐ ❐ Single or dual remote control center Kettle mounted control center (100 gal. and larger) Dolly for horizontal agitator Stainless steel bifold hinged cover Cleveland Range Inc. HA-MKDL-200-CC HA-MKDL-300-CC Shall be CLEVELAND Model HA-MKDL-___-CC; COOK/CHILL STATIONARY HORIZONTAL MIXER KETTLE, ___ gallons; leg mounted; 2/3 jacketed, direct steam;100 psi Steam Jacket Pressure Rating; 316 Stainless Steel Liner; electrically driven Horizontal Agitator; Variable Mixer Speed Control; 3" diameter air operated, flush mounted Piston Draw-Off Valve; spring loaded Scraper Blades; flush mounted Temperature Probe; Automatic Water Meter with Digital Readout; Water Fill Faucet with swing spout; Time/Temperature Chart Recorder (located in Control Center); Spring Assist, one piece Cover (bifold cover with counterweight for 300 gallon model). ❐ ❐ ❐ ❐ ❐ Tilting models 3” flush mounted ball valve Loading bucket and dolly Jacket pressure ratings other than standard Electric chain hoist for lifting the product load SECT. XIV 7 PAGE 1201 1333 East 179th St., Cleveland, Ohio, U.S.A. 44110 Ph: 1-216-481-4900 Fx: 1-216-481-3782 Visit our Web Site at www.clevelandrange.com & ) !! & ' ! ( % & ' ! ( MINIMUM CLEARANCE FOR KETTLES FRONT SIDE REAR 36" 12" 12" ! ## ELECTRICAL POWER TO AND FROM CONTROL PANEL • CONTRACTOR MUST CUT ENTRY HOLE • TOP OR BOTTOM POWER ENTRY RECOMMENDED • MUST USE PROPER CONNECTIONS TO MAINTAIN U.L. LISTING $ ## " ! DIMENSIONS MODEL HA-MKDL-60-CC HA-MKDL-100-CC HA-MKDL-150-CC HA-MKDL-200-CC HA-MKDL-300-CC A B C D E F 32 1/2" 38 5/16" 43" 48" 53" 50 3/4" 57" 62" 65 3/4" 76 3/8" 47" 52" 57 1/2" 62" 67 1/2" 83" 93" 101" 111" 100" 29 1/2" 35" 40" 45" 50" 8" 9" 9" 9" 11" ELECTRICAL PER KETTLE 208V/ 3PH/60Hz 12 AMPS 15 AMPS 25 AMPS 25 AMPS 30 AMPS R.P.M. 4-25 3-22 3-20 3-20 3-17 UTILITY CONNECTIONS MODEL HA-MKDL-60-CC HA-MKDL-100-CC HA-MKDL-150-CC HA-MKDL-200-CC HA-MKDL-300-CC CHILLED WATER INLET CHILLED WATER RETURN COLD POTABLE WATER ** HOT WATER 3/4" 15 GPM 1" 20 GPM 1 1/4" 20 GPM 1 1/4" 25 GPM 1 1/2" 30 GPM 3/4" 1/2" 15 GPM 3/4" 20 GPM 3/4" 20 GPM 3/4" 20 GPM 3/4" 20 GPM 1/2" 15 GPM 3/4" 20 GPM 3/4" 20 GPM 3/4" 20 GPM 3/4" 20 GPM 1" 1 1/4" 1 1/4" 1 1/2" ** HOT FILL WATER IS OPTIONAL 65 PSI STEAM OPERATING PRESSURE IS RECOMMENDED CONDENSATE RETURN DRAIN 1/2" 3/4" 3/4" 1" 1" 1 1/4" 1" 1 1/4" 1" 1 1/2" AIR INLET STEAM 1/2" 1 CFM 1/2" 1 CFM 1/2" 1 CFM 1/2" 1 CFM 1/2" 1 CFM 3/4" 320 lbs/hr 1" 525 lbs/hr 1 1/4" 780 lbs/hr 1 1/4" 1050 lbs/hr 1 1/2" 1575 lbs/hr (NOT TO SCALE) SECT. Cleveland Range reserves right of design improvement or modification, as warranted. XIV 8 PAGE 1201 Litho in USA Cleveland Range, LLC. 1333 East 179th Street Cleveland, OH 44110 Phone: (216) 481-4900 Fax: (216) 481-3782 http://www.clevelandrange.com MIXER KETTLES Kettle Placement Level Centered on hoist rail All legs bolted to floor Gear box properly supported Proper clearance Pasta basket and batch bucket clearances Floor drains and poor paths Electrical Requirements Voltage Phase Amp draw Wire Size Check motor rotation Water requirements 1. Hot and cold water supply (Potable) Line size Maximum water pressure Line strainers Pressure regulator Water quality 2. Chilled Water Line sizes (in and out) Locate and inspect line strainer Check for leaks Steam Requirements Locate steam source Line sizes (in and out) Steam pressure Steam gauge Check safety valve operation Check for leaks Air Requirements Line size Pressures Check lubricator Check for leaks CLEVELAND RANGE, LLC. Model no._______________ Serial no.________________ Comments: _______________________________________________________________________ _ HORIZONTAL AGITATOR KETTLE OPERATIONS AND CLEANING INSTRUCTIONS CLEANING INSTRUCTIONS As with all equipment that has electrical components, care must be exercised when using water and chemicals to clean food service equipment. Use a mild detergent following instructions of the chemical manufacturer. Do not spray water on electrical control panel or components. Do not use harsh or caustic chemicals, especially on o-rings and gaskets. 1. 2. 3. 4. 5. 6. Rinse out food debris from the kettle and flush through the metering filling station (MFS or food pump) if they are still connected. If the kettle is not connected to the food pump, open the valve and allow rinse water to flush into the floor drain. Remove agitator arm: a. Rotate the agitator until the quick release pull pin is on the top. b. Turn power to OFF as a safety precaution. c. Pull pin out. d. Slide coupling toward side of kettle. e. Carefully lift end of agitator, pull back and lift out. f. Remove bushing from shaft holder. g. Remove scraper blades from agitator by using the spring removal tool provided with the kettle. h. Wash agitator arm, scraper blades, and springs with mild dish detergent or in dish machine. Air dry. Wash the inside of the kettle with a mild dish detergent as you would any pot or pan. Flush liquid through MFS or by opening the valve. Rinse thoroughly. Remove the valve and tee from the bottom of the kettle by removing the clamp. Remove o-rings. Wash and dry thoroughly. When re-installing the valve, apply USDA approved food grade grease (Chesterton 622 or equal) to o-rings. Gently push tee and valve body in place and secure with clamps. Clean outer drive shaft seal on the side of the kettle by removing thumb screws. Slide seal retainer plate and quad ring away from the kettle or shaft housing. Clean the shaft, seal and quad ring. Before re-installing, apply a liberal amount of USDA approved food grade grease to the opening around the shaft and slide quad ring back in place. Push the seal retainer place back in place and tighten with thumb screws. Remove temperature sensor probe by removing clamp. Slide sensor out of seal holder. Remove o-rings. Clean sensor, seal and o-rings. Before re-installing, apply a liberal amount of USDA approved food grade grease on o-rings. _______________________________________________________________________ _ DAILY PRE-START UP 1. The operator must check the kettle, springs and scraper blades for proper installation before turning kettle on. 2. Make sure the connecting coupling from the drive shaft to the agitator is properly installed with the quick release pin fully engaged. 3. Label and place clean chart on chart recorder. If the above cannot be achieved, call your maintenance supervisor or service contractor before proceeding. OPERATING INSTRUCTIONS HORIZONTAL MIXER KETTLE Your kettle has been equipped with a control panel that has some or all of the following functions: 1. 2. 3. 4. 5. 6. 7. 8. 9. 10. 11. Main POWER switch Temperature control 24 hour chart recorder KETTLE RUN push button Agitator speed control with variable settings Agitator STOP/START Potable water meter with OFF/ON switch and push button to add water Manual COOL water switch Kettle selector switch for CONTINUOUS, OFF, COOK SIMMER switch Product VALVE OPEN/CLOSED Operating the Kettle 1. To operate the system the main power switch on the control panel must be turned on. The temperature control computer will run through its diagnostics for about one minute. 2. To set desired temperature, turn switch to COOK. This activates the temperature controller. The temperature displayer and the actual temperature will appear. To change the temperature set point, press the push button with “+” to raise or increase the temperature or press the button with “-“ to decrease or lower the temperature. 3. Push the button marked KETTLE RUN and the steam will come on to heat the kettle and its contents until the set point temperature is reached. It will cycle off and on to maintain the set point temperature. 4. To start the agitator, press the button marked AGITATOR START and a green light will indicate the agitator is on. 5. To stop the agitator, press the red AGITATOR STOP mushroom button. 6. To change the speed of the agitator, turn the SPEED CONTROL knob to the right to increase the speed or to the left to decrease the speed. As a safety precaution, always turn the speed to “0” when kettle is not in use and before use. _______________________________________________________________________ _ 7. To add ingredients to the kettle, push AGITATOR STOP button. Steam heating will continue in the jacket and the agitator must be started again as soon as possible or product might burn on the surface of the kettle. 8. CONTINUOUS STEAM is a manual override allowing steam into the kettle but with no temperature control. 9. SIMMER allows maintenance to the set point temperature but gently introduces heat into the kettle. Ready to pump food out of kettle 1. Foods must be cooked to a minimum of 165°F to kill dangerous pathogens and must be at least this temperature when it casings are filled. Set temperature on the control panel to at least 165°F before pumping. 2. Pump food through MFS to heat hoses and MFS parts until at least 165°F can be maintained when product exits the MFS. Product may be poured back into the kettle for reheating before pumping. 3. Put down cover of kettle to maintain heat and to maintain a moist atmosphere in the kettle which will make cleaning easier. 4. Empty the kettle as quickly as possible to prevent over-cooking of product and to maintain quality, consistency and temperature. 5. Temperature may be turned OFF or placed on SIMMER when kettle product reaches the steam jacketed area to reduce chances of burning while pumping. To cool and blend products without heat 1. 2. 3. Turn the main power switch to ON. Turn the MANUAL WATER COOLING switch to ON. This will start the flow of cold water from the ice builder into the jacket of the kettle. When in this mode the temperature controller will read the temperature of the product only and serve no other function. When cooking a product that is too hot, MANUAL COOLING can be used. Turn on MANUAL COOLING. When sufficient cooling has been achieved, turn the switch off. The kettle jacket will drain and steam will automatically come on to continue cooking if the set point has not been lowered. To add Potable water to the kettle 1. 2. 3. 4. 5. Faucet handle must be completely open and the main power must be on. Set point the volume of water needed by changing the digits on the meter. Turn METERED WATER switch to ON. Water will begin filling the desired number of gallons and stop automatically. The amount of water that has been metered can be read above the set point. Additional water may be metered by resetting meter and will accumulate on the meter as long as it is not turned off. Additional water may be added by pressing the black button marked PUSH TO ADD MORE WATER. _______________________________________________________________________ _ PREVENTIVE MAINTENANCE COOK/CHILL MIXER & PASTA KETTLES A. AUTOMATIC DUMP VALVE Weekly Check air collector regulator for moister, dirt, and proper pressure Check all orings and seals and gaskets Check valve operation Lubricate with light oil when needed Check air hose for leaks or signs of wear B. TILT MECHANISM ( Hydraulic Tilt ) Weekly Check for leaks Check for smooth operation Check switches Yearly Change hydraulic fluid every two years. (1 1/2 gallons of FOOD GRADE hydraulic fluid) ( Shell Telis #5 ) ( Electric Tilt ) Weekly Check for smooth operation Check switches Monthly Check for movement in mechanism Grease trunnions monthly ( Food Grade Grease ) C. AIR PRESSURE Weekly 45 psi dump valve - 15 psi for jacket purge Air must be clean and dry Check all air lines & fittings for leaks D. STEAM TRAP Monthly Check proper operation _______________________________________________________________________ _ PREVENTIVE MAINTENANCE COOK/CHILL MIXER & PASTA KETTLES (continued) E. SAFETY VALVE Weekly Check for leakage Steam pressure 65 psi. max. Safety set at 100 psi. F. LEAKS Weekly Check for leaks of any type ( water - steam - hydraulic ) ( Leaks take away from performance and will lead to costly repair ) G. Control Panels Weekly Signs of water damage Check operation of all controls Water meter operation Temp read outs Temp charting Temp controlling RTD adjustments Mixer operation & speed control Gentle heat operation product valve operation ________________________________________________________________________ HAMKDL- 60 – CC-T • • • • • • • • • • • • • • • • • • • • • • • • • • • • • • • • • Make sure kettle is level, equipment can move as floors settle Make sure kettle is bolted securely to floor, bolts may loosen after time Check the incoming power and amp draws (per rating plate) Check incoming air pressure (_” line 1cfm @ 90psi.) Check air pressure regulator/collector for draw off valve (45psi.) Check air pressure regulator for kettle jacket purge (15psi.) Check air collector regulator for moister, dirt (Must be clean & dry) Check all o-rings and shaft seal for wear and proper lubrication Check the installation 3” Flush Piston Draw Off Valve Check all air hoses for leaks and signs of wear Check incoming steam pressure (3/4”line / 320PPM / 65psi.) Check the steam trap for proper operation (clean or replace if needed) Check the operation of safety valve 100psi. rating Check for steam leaks (Inlets and Returns) Check for the proper clearance where drive shaft penetrates the kettle Make sure temperature sensor is properly installed Check chill water supply and return lines for leaks. Check the control panel for any signs of corrosion moisture Check the complete operation of all kettle controls Check the mixer operation (Speed control, Emergency stop) Check the idler bearing and idler busing for wear Check the kettle tilt (up and down) Check hydraulic fluid level Check hydraulic lines for leaks and signs of wear Change hydraulic fluid yearly (ISO 46 20 weight Food Grade) Grease tilt mechanism monthly (Food grade grease) Check the operation of 3” Flush Piston Draw Off Valve Check water meter operation Make sure the Partlow chart recorder/controller is controlling, reading, and charting correctly Check the cooking operation in both automatic and in manual modes Check the operation of gentle heat mode Check the operation of the chill mode Check kettle cover hinge tension and fasteners ________________________________________________________________________ HA-MKDL-100-CC-T • • • • • • • • • • • • • • • • • • • • • • • • • • • • • • • • • Make sure kettle is level, equipment can move as floors settle Make sure kettle is bolted securely to floor, bolts may loosen after time Check the incoming power and amp draws (per rating plate) Check incoming air pressure (_” line 1cfm @ 90psi.) Check air pressure regulator/collector for draw off valve (45psi.) Check air pressure regulator for kettle jacket purge (15psi.) Check air collector regulator for moister, dirt (Must be clean & dry) Check all o-rings and shaft seal for wear and proper lubrication Check the installation 3” Flush Piston Draw Off Valve Check all air hoses for leaks and signs of wear Check incoming steam pressure (3/4”line / 320PPM / 65psi.) Check the steam trap for proper operation (clean or replace if needed) Check the operation of safety valve 100psi. rating Check for steam leaks (Inlets and Returns) Check for the proper clearance where drive shaft penetrates the kettle Make sure temperature sensor is properly installed Check chill water supply and return lines for leaks. Check the control panel for any signs of corrosion moisture Check the complete operation of all kettle controls Check the mixer operation (Speed control, Emergency stop) Check the idler bearing and idler busing for wear Check the kettle tilt (up and down) Check hydraulic fluid level Check hydraulic lines for leaks and signs of wear Change hydraulic fluid yearly (ISO 46 20 weight Food Grade) Grease tilt mechanism monthly (Food grade grease) Check the operation of 3” Flush Piston Draw Off Valve Check water meter operation Make sure the Partlow chart recorder/controller is (controlling, reading, and charting correctly) Check the cooking operation in both automatic and in manual modes Check the operation of gentle heat mode Check the operation of the chill mode Check kettle cover hinge tension and fasteners ________________________________________________________________________ HA-MKDL-200-CC-T • • • • • • • • • • • • • • • • • • • • • • • • • • • • • • • • • Make sure kettle is level, equipment can move as floors settle Make sure kettle is bolted securely to floor, bolts may loosen after time Check the incoming power and amp draws (per rating plate) Check incoming air pressure (_” line 1cfm @ 90psi.) Check air pressure regulator/collector for draw off valve (45psi.) Check air pressure regulator for kettle jacket purge (15psi.) Check air collector regulator for moister, dirt (Must be clean & dry) Check all o-rings and shaft seal for wear and proper lubrication Check the installation 3” Flush Piston Draw Off Valve Check all air hoses for leaks and signs of wear Check incoming steam pressure (3/4”line / 320PPM / 65psi.) Check the steam trap for proper operation (clean or replace if needed) Check the operation of safety valve 100psi. rating Check for steam leaks (Inlets and Returns) Check for the proper clearance where drive shaft penetrates the kettle Make sure temperature sensor is properly installed Check chill water supply and return lines for leaks. Check the control panel for any signs of corrosion moisture Check the complete operation of all kettle controls Check the mixer operation (Speed control, Emergency stop) Check the idler bearing and idler busing for wear Check the kettle tilt (up and down) Check hydraulic fluid level Check hydraulic lines for leaks and signs of wear Change hydraulic fluid yearly (ISO 46 20 weight Food Grade) Grease tilt mechanism monthly (Food grade grease) Check the operation of 3” Flush Piston Draw Off Valve Check water meter operation Make sure the Partlow chart recorder/controller is (controlling, reading, and charting correctly) Check the cooking operation in both automatic and in manual modes Check the operation of gentle heat mode Check the operation of the chill mode Check kettle cover hinge tension and fasteners ________________________________________________________________________ HA-MKDL-300-CC-T • • • • • • • • • • • • • • • • • • • • • • • • • • • • • • • • • Make sure kettle is level, equipment can move as floors settle Make sure kettle is bolted securely to floor, bolts may loosen after time Check the incoming power and amp draws (per rating plate) Check incoming air pressure (_” line 1cfm @ 90psi.) Check air pressure regulator/collector for draw off valve (45psi.) Check air pressure regulator for kettle jacket purge (15psi.) Check air collector regulator for moister, dirt (Must be clean & dry) Check all o-rings and shaft seal for wear and proper lubrication Check the installation 3” Flush Piston Draw Off Valve Check all air hoses for leaks and signs of wear Check incoming steam pressure (3/4”line / 320PPM / 65psi.) Check the steam trap for proper operation (clean or replace if needed) Check the operation of safety valve 100psi. rating Check for steam leaks (Inlets and Returns) Check for the proper clearance where drive shaft penetrates the kettle Make sure temperature sensor is properly installed Check chill water supply and return lines for leaks. Check the control panel for any signs of corrosion moisture Check the complete operation of all kettle controls Check the mixer operation (Speed control, Emergency stop) Check the idler bearing and idler busing for wear Check the kettle tilt (up and down) Check hydraulic fluid level Check hydraulic lines for leaks and signs of wear Change hydraulic fluid yearly (ISO 46 20 weight Food Grade) Grease tilt mechanism monthly (Food grade grease) Check the operation of 3” Flush Piston Draw Off Valve Check water meter operation Make sure the Partlow chart recorder/controller is(controlling, reading, and charting correctly) Check the cooking operation in both automatic and in manual modes Check the operation of gentle heat mode Check the operation of the chill mode Check kettle cover hinge tension and fasteners