1
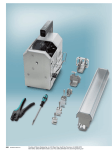
Folding Proofer
Instructions & Recipes
Model FP-101
www.brodandtaylor.com
For your safety, read this instruction manual before using product.
Congratulations on your purchase of a
Brød & Taylor Folding Proofer!
Bread
Ideal environment for
fermenting and rising
Yogurt
Easily make
up to 2 gallons/8 litres
Chocolate
and more
No-hassle melting
Accomplished cooks know that the secret to many kitchen processes —
from rising bread to making yogurt to tempering chocolate for dessert to
making healthy probiotic foods — is accurate, reliable low temperature
control. That’s why professionals invest thousands of dollars in spaceconsuming commercial proofing ovens, tempering machines, and commercial fermenters. Until now, there has been no comparable product for
home kitchens. Professional bakers have the ability to control fermentation
temperatures to produce the best flavors in their loaves. Now you have
the same reliability and control as the pros with a counter top Proofer that
folds flat for storage. The Folding Proofer makes wholesome bread baking
easier than ever with an optimal proofing environment plus easy storage.
Set the digital temperature control lower for a long, slow rise or
pre-fermentation. Turn up the heat to give yeast a boost on a cold day,
ferment sourdough or rye at warm temperatures, or for refrigerated dough.
A large window provides a view of the spacious interior where a bowl or
two full-sized loaves fit easily. No need to cover the dough as the included
water tray keeps humidity at an optimum level.
Also use this multi-functional kitchen appliance to make yogurt and creme
fraiche, melt and hold tempered chocolate, soften butter, and aid other low
temperature kitchen processes.
Page 2
IMPORTANT
SAFEGUARDS
When using electrical appliances,
basic safety precautions should
always be followed including the
following:
1. Read all instructions.
2. Do not touch hot surfaces. Use
handles or knobs.
3. To protect against electrical
shock do not immerse cord, plugs,
or main housing in water or other
liquid.
4. Close supervision is necessary
when appliance is used by or near
children.
5. Unplug from outlet when not in
use and before cleaning. Allow to
cool before putting on or taking off
parts.
6. Do not operate any appliance
with a damaged cord or plug or
after the appliance malfunctions or
has been damaged in any manner.
Return appliance to the nearest authorized service facility for examination, repair, or adjustment.
7. The use of accessory attachments not recommended by the
appliance manufacturer may cause
injuries.
8. Do not use outdoors.
9. Do not let cord hang over edge
of table or counter, or touch hot
surfaces.
10.Do not place on or near a
hot gas or electric burner, or in a
heated oven.
11.Extreme caution must be used
when moving an appliance containing hot oil or other hot liquids.
12.Always attach plug to appliance
first, then plug cord into the wall
outlet. To disconnect, set control
to “Off”, then remove plug from wall
outlet.
13.Do not use appliance for other
than intended use.
14.This appliance is for household
use only.
15.Do not store any materials,
other than manufacturer’s recommended accessories, in the Proofer
when not in use.
16.This appliance is not intended
for use by persons (including children) with reduced physical, sensory or mental capabilities, or lack of
experience and knowledge, unless
they have been given supervision
or instruction concerning use of the
appliance by a person responsible
for their safety.
17.Children should be supervised
to ensure that they do not play with
the appliance.
18.If the supply cord is damaged, it
must be replaced by the manufacturer, its service agent or similarly
qualified persons in order to avoid
a hazard.
Page 3
SAVE THESE
INSTRUCTIONS
Please read and keep these instructions to obtain the best results
from your Folding Proofer.
ized plug (one blade is wider than
the other). As a safety feature, this
plug will fit in a polarized outlet only
one way. If the plug does not fit
fully in the outlet, reverse the plug.
If it still does not fit, contact a qualified electrician. Do not attempt to
modify the plug in any way.
SPECIAL
USE WITH AC
CORDSET
INVERTERS
INSTRUCTIONS
A short power supply cord is provided to reduce the risks resulting
from becoming entangled in
or tripping over a longer cord.
Longer extension cords are available and may be used if care is
exercised in their use. If a long
extension cord is used, the marked
electrical rating of the extension
cord must be at least as great as
the electrical rating of the
appliance and the longer cord
should be arranged so that it will
not drape over the countertop or
tabletop where it can be pulled on
by children or tripped over unintentionally.
NOTICE
This appliance is for household
use only. Use on Alternate Current
(50/60 Hertz) only with voltage as
indicated on the manufacturer type
plate. This appliance has a polar-
Page 4
Exercise caution when using this
appliance with DC to AC inverters.
Inverters may be used to convert
DC power to AC in RVs, boats
and solar power installations.
Inexpensive or older inverters may
use a technology described as
“modified sine-wave” AC power.
This type of inverter should not
be used and may damage this
appliance. Contact a qualified
electrician if you have questions
about your inverter.
FOR
HOUSEHOLD
USE ONLY
NOT INTENDED FOR
COMMERCIAL USE
1
6
2
ON OFF
85 F
ER
POW
HEAT
5
3
4
7
HEATING
NOTE: The display may be configured to display in °F or
°C. To switch between modes, press and hold both the “UP”
button and the “DOWN” button for two seconds.
8
POWER
Features
ON OFF
9
1. Lid
2. Expanding box section
3. Base
4. Control Panel
5. Power cord receptacle
6. Clear window
Accessories
Wire Rack
Water Tray
Power Cord
DOWN
10
UP
11
12
Control Panel
7. Heating Indicator
8. Power Indicator
9. ON/OFF button
10. Temperature DOWN
Press and hold 3 seconds to
scroll numbers quickly.
11. Temperature Display
12. Temperature UP
Press and hold 3 seconds to
scroll numbers quickly.
Page 5
GENERAL OPERATING
INSTRUCTIONS
Set Up
Open the lid by lifting the front edge of the Proofer. Allow the lid to rest in
a vertical position. Remove the wire rack, power cord and water tray. Lift
the expanding box section from the front edge, fold it open and fit into the
base.
Place the water tray into the center of the heating plate. Place the wire
rack into the enclosure with feet down. Lift the lid straight up from the
rear hinges and place onto the top of the expanded box. Lower the lid to
a closed position. Plug the power cord into the Proofer and then into an
appropriate receptacle.
Pre-Heat
For best results, the Proofer should be pre-heated for 5-10 minutes.
Operation
Plug the Proofer in. Press the ON/OFF button once and ensure that
the POWER light is illuminated. Depress the UP or DOWN buttons
to adjust to the desired temperature. Press and hold either the UP or
DOWN button for three seconds to quickly scroll through the temperature
settings.
The HEATING light will illuminate indicating that the heat plate is warming
up. When the Proofer reaches its temperature set point the HEATING
light will go off. It is normal for the HEATING light to flash on and off as
the Proofer maintains its temperature during use.
Page 6
Select Celsius or Fahrenheit
The display on the control panel indicates the temperature set point.
The display may be configured to display in °F or °C. To switch between
modes, press and hold both the “Temperature UP” button and the
“Temperature DOWN” button for two seconds.
Humidity Control
The Proofer may be operated in a dry or humid condition. To create a
humid condition in the Proofer, pour approximately ¼ cup (50ml) of water
into the water tray. DO NOT overfill the tray. For best results, warm or hot
tap water may be used.
Prepare for storage
If the Proofer is ON, press the ON/OFF button once to turn the Proofer
off. Ensure that the green POWER light is not on. Remove the lid and rest
it in the rear hinges in an upright position. Unplug power cord from the
wall receptacle and the Proofer.
NOTE: The power cord must be unplugged before folding the Proofer and
closing the lid.
If the Proofer is warm, let it sit with the lid removed until the heating plate
reaches room temperature. Remove the wire rack. Carefully remove the
water tray, dispose of remaining water and set aside. If necessary wipe
surfaces of the Proofer with a damp cloth to remove any water residue.
Make sure the Proofer is dry before folding for storage. Lift the expanding
box section slightly from the front, then fold by pushing gently in on the
sides and folding the unit towards the back. Lower the folded section into
the base. Place the water tray into the front section of the base. Orient
the wire rack with feet up and place it on the base. Remove the power
cord from the Proofer, fold and place on the rear section of the wire rack.
Lower the lid closed and press on the front to ensure that the latch is
engaged.
Rack upside down
(feet up)
Power cord
in rear
Page 7
CLEANING AND USER
MAINTENANCE
1. This appliance is virtually maintenance free, no lubrication is needed.
If the cord or the appliance is damaged or does not operate properly, return it to service for repair. This appliance has no user serviceable parts.
No repairs should be attempted by the user.
2. Always disconnect from the socket and completely cool down before
cleaning.
3. Do not leave water in the water tray for long periods. Wait until the
heating plate has cooled before emptying the tray.
4. If necessary, wipe the housing and metal heating plate with a damp
cloth or moistened with a mild detergent solution. Do not use chemical or
abrasive cleaners, polishers, etc. Do not immerse the appliance in water
or place it under running water.
5. Wash all removable parts and accessories with care in warm soapy
water if necessary, or simply wipe with a soft cloth moistened with a mild
detergent solution.
6. After cleaning, wait until completely dry and cooled down before folding up the appliance for storage. The wire rack, water tray and detachable
power cord can be put inside for self-storage.
Page 8
RECIPES
General Guidelines
16
Rustic Pizza Crust17
Golden Three-Wheat Boule
20
Cranberry Pecan Boule
24
Country Wheat Sandwich Bread
26
Brød & Taylor Sourdough
27
Yogurt, Custard Style & Greek
30
Strawberry Frozen Yogurt
32
Yogurt, Lactose-Free34
Yogurt-Making Notes
37
Tempering Chocolate39
Page 15
General Guidelines for Rising and
Fermenting Bread Dough in the Proofer
Prepare the Proofer. For bread dough, the Proofer should always have
the water tray filled one-third to one-half full with clean water, and the
tray should be placed in the center of the warming plate. The wire rack
goes on top of the water tray. With the sides in place and the lid on top,
set the thermostat and allow the Proofer 5-10 minutes to come up to
temperature.
Selecting a Temperature. There is a range of temperatures that work
well for bread dough, and if the recipe or book you are using specifies a
temperature, consider using that.
Sourdough often benefits from fermenting at a temperature of
80-85F/27-30C in order to give the wild yeast a boost.
Commercial yeast is more vigorous, so doughs made with it
benefit from a lower temperature that promotes flavor development,
75-78F/24-26C.
Rye flour has weaker gluten and higher enzyme activity, so higher
Proofer temperatures are appropriate (80-85F/27-30C) to shorten
fermentation time and keep the enzymes from degrading the dough
too quickly.
Cold dough that has been retarded in the refrigerator often needs an
extra hour (or more) per pound/500g of dough added to its rising time
to allow the dough to come up to temperature. Ideally, frozen dough
should be thawed in the refrigerator before proofing.
In a hurry? Mix the dough with lukewarm (90-100F/32-38C) water
and ferment at up to 85F/30C. However, we do not recommend going
over that temperature as the yeast can produce off flavors.
Covering the Dough. Most doughs and shaped loaves will not need to
be covered while in the Proofer, as the water tray will provide the ideal
humidity to keep the dough from forming a crust. However, if using the
Proofer for an extended fermentation, such as an overnight (12 hours)
biga or pre-ferment, it is safest to cover the bowl or container.
Page 16
Rustic Pizza Crust
This easy recipe is our favorite pizza crust. The soft dough is a pleasure
to work with and forms a nicely raised border with a crisp crust and open
crumb. The dough can be mixed any time the day before, or on the
morning of making the pizzas. Mix the night before, then divide and proof
the next day after lunch.
Makes about 15 oz of dough, enough for two 10-12 inch thin crust pizzas.
Pizza Dough
Volume
Grams
Ounces
Baker’s
Percentage
Unbleached AP flour*
2 cups,
spooned
234 g
8.25 oz
92.9%
Whole wheat flour
2 Tblsp
18 g
0.65 oz
7.1%
Water, ice cold
3/4 cup
179 g
6.30 oz
71.0%
Instant yeast
1/2 tsp
1.6 g
0.6%
1 tsp
5.6 g
2.2%
Salt, preferably sea salt
Olive oil, for kneading and coating containers
Semolina, for coating the underside of the pizza (optional)
*Preferably an unbleached all-purpose flour with 10-10.5% protein and
containing malted barley flour, such as Gold Medal Unbleached AP or
Hecker’s Unbleached AP.
Equipment: Brød & Taylor Proofer, pizza stone.
Mix Ingredients. Before measuring the water, add ice and allow to chill.
While the water is chilling, mix the dry ingredients in a medium bowl,
being careful to put the yeast and salt in separate areas of the bowl.
Whisk or stir until well combined. Measure or weigh the chilled water, add
to dry mixture and mix with a spoon until all the flour is moistened but the
dough is still rough and shaggy. Cover and place in the refrigerator for 20
minutes to hydrate the flour and begin chilling the dough.
Develop Structure. Lightly oil a clean bowl, your hands, and the
kneading surface with olive oil. Turn the dough out and stretch into a
rectangle. Fold the rectangle like a business letter, then rotate the dough
and stretch and fold again, so that all four sides of the dough have been
folded to the center. Do this a second time, stretching the dough and
folding all four sides to the center. The dough should feel noticeably
firmer and smoother.
Page 17
Retard the Dough. Place the dough in the oiled bowl and turn it over
so that it is lightly coated with oil. Cover and chill in the refrigerator for at
least six hours, or up to 30 hours.
Choose a Timetable. From the chart below, choose a fermentation
temperature and its corresponding time to remove the dough from the
refrigerator. For example, if you would like to bake the pizzas at 6pm,
then setting the Proofer to 75F/24C would mean taking the dough out of
the refrigerator 4.5 hours ahead of baking, at about 1:30pm.
Proofer
Temperature
Approximate Time
in Proofer
When to Take the Dough
out of the Refrigerator
70F
4 hrs 30 min
5 hrs 30 min before baking
75F
3 hrs 20 min
4 hrs 20 min before baking
80F
2 hrs 30 min
3 hrs 30 min before baking
85F
2 hrs 10 min
3 hrs 10 min before baking
85F, Quick Pizza
Variation
1 hr 10 min
no refrigerator time
Pre-shape the Pizzas. Set up the Proofer with water in the tray and
the rack in place. Set the thermostat and allow the Proofer to come to
temperature.
Remove the dough from the refrigerator, scrape it out onto a lightly oiled
surface and cut it into two pieces with a sharp knife. Shape each piece
into a ball by drawing all the edges up, then pressing seams gently to
close. Place the dough balls seam side down in a lightly oiled container,
such as a 9×13”/23x33cm pan, or put each ball into a bowl.
Proof the Pre-shaped Crusts. Set the container(s) with the dough
balls in the Proofer and allow the dough to relax and ferment until about
doubled in size. A gentle poke with your finger should produce an indent
that remains. If the dough was mixed with ice water and thoroughly
chilled, it should generally follow the guidelines listed below.
Preheat the Oven. One hour before baking, place a pizza stone in the
lower third of the oven and preheat to 500F/260C. The goal is for the
underside of the crust to be crisp and browned at the same time that
the topping ingredients are cooked. If the pizzas are done on top but
not browned enough underneath, next time move the stone to a lower
position. And if they are getting too done on the bottom before the tops
are finished, move the stone to a higher rack.
Shape the Crusts. Sprinkle semolina over a 12”/30cm round piece of
parchment, leaving the outer portion of the circle bare. Even though it
Page 18
isn’t necessary for creating a non-stick surface, we use a little semolina
with parchment because it creates a crisp and delicious crust. If shaping
on a peel, use a more generous layer of semolina so the pizza won’t
stick. Shaping on parchment is easier than a peel, because the dough
will stick to the parchment and not spring back when stretched, yet once
the pizza is baked for a minute or so, the non-stick properties of the
parchment kick in and the pizza slides off the paper effortlessly.
Keep the crust not being worked on covered. Place a dough ball seam
side down in the semolina, and with oiled fingertips tap the dough down
to form a disc. Gently stretch the dough into shape, leaving a thicker rim
at the edge and focus on stretching rather than pressing down. This can
be done either by stretching with oiled fingers from the top of the dough,
or by sliding the underside of the dough over the backs of floured hands
and stretching gently from side to side. When finished, cover with an
inverted pan or bowl and work on the other pizza.
Top and Bake the Pizzas. If desired, cover the crusts and allow to proof
for 30 minutes on the counter in order to create the most open crumb
possible in the border of the pizzas (this is optional, but is built into the
timetable). If the pizzas were shaped on a peel, it is best to omit the 30min rise to help avoid sticking to the peel. Add toppings and bake on the
pizza stone for 8-10 minutes, using a peel or the back of a sheet pan to
transfer the pizzas to the oven. About half way through the baking, rotate
the pizzas to promote even browning and slide out the parchment so the
pizza finishes baking directly on the stone.
Variation- Quick Pizza Crust
This method creates a warmer dough that is ready to bake in just two
hours. The flavor is still good, though not as rich and fully developed as
the mix-ahead version. With flavorful toppings the pizzas are delicious.
Use the same ingredients and procedure as above, except use lukewarm
(100F/38C) water. Let rest at room temperature for only ten minutes, and
omit the refrigerator time. Directly after stretching and folding the dough,
divide it in half, round into balls and transfer to a pan or bowls. Proof the
pre-shaped crusts at 85F/29C for about one hour and ten minutes, then
shape and bake.
If the optional 30 minute rise after the crust is stretched to its final shape
is omitted, the pizzas can be ready to bake about two hours after mixing
the dough.
Page 19
Golden Three-Wheat Boule
This bread has a beautiful golden crumb, a sweet, complex aroma and a
rustic crust. Bread flour from hard red winter wheat forms the backbone
of the bread, while durum wheat and whole grain “white” wheat contribute
wonderful flavor. We use King Arthur® whole grain flour made from
white wheat, which has a sweeter, less bitter bran layer than traditional
red wheat. The flour is sifted to remove the larger bran flakes, creating
a high-extraction flour that won’t compromise the bread’s structure like
whole grain flour can. The bran is then used to coat the outside of the
boule, creating a textured, rustic crust. This bread is equally at home
with olive oil or butter and pairs wonderfully with soups or roasts. It’s also
great with Manchego cheese or for making Panini.
Plan Ahead: The poolish needs to ferment for 12 hours (overnight)
before mixing the dough.
Poolish
Volume
Grams
Ounces
Unbleached flour with about 12% protein,
5/8 cup,
such as King Arthur All-Purpose or Gold
spooned
Medal Better for Bread
79 g
2.8 oz
Semolina (coarse durum) flour
1/4 cup,
spooned
39 g
1.4 oz
Instant yeast
1/16 tsp
Water, ice cold
1/2 cup
118 g
4.2 oz
Equipment: Fine strainer or sifter, Brød & Taylor Proofer. A mixer with a
bread hook is convenient for kneading, and a Dutch oven works well to
create a steam chamber for the bread as it bakes.
Mix and Ferment the Poolish. Before weighing or measuring the water,
add ice cubes and allow to chill. (Ice water helps produce a predictable,
consistent fermentation, and also allows the pre-ferment to spend a
controlled amount of time moving through cooler temperatures to promote
enzyme activity and flavor development.) Set up the Proofer with the
water tray in the middle of the warming plate and fill the tray half full with
water. Put the rack in place and the lid on, then set the thermostat to
75F/24C and allow it to warm.
If you don’t have a 1/16 tsp measuring spoon, pour out 1/8 teaspoon of
instant yeast onto a clean surface or plate, forming a little mound. With a
table knife, divide the mound into two equal portions. Add one portion to
the poolish flours and reserve the other for the main dough.
Page 20
Put the flours and yeast in a medium bowl and whisk to combine.
Measure or weigh the ice water, add to the bowl and whisk vigorously
until very smooth and lump free, about one minute. Scrape down the
sides of the bowl, cover, and ferment in the Proofer for 12 hours at
75F/24C. When the poolish is ripe, it will have doubled in size and the
surface will be covered with bubbles (you may see some pop) and a few
wrinkles or dents. It should not yet be receding and leaving a “high-water”
mark on the sides of the container.
Main Dough
Volume
Grams
Ounces
Unbleached flour with about 12% protein,
such as King Arthur All-Purpose® or Gold
Medal Better for Bread®
1 cup,
spooned
127 g
4.5 oz
Whole-grain white wheat flour (sifted to
remove some of the bran)
3/4 cup,
spooned
86 g
3.0 oz
1/4 tsp
0.8 g
1/2 liquid cup
118 g
1 1/8 tsp
6.4 g
Poolish, all from above
Instant yeast
Water, warm room temp (75F)
Salt, preferably sea salt
4.2 oz
Prepare the Whole Wheat Flour. Before measuring or weighing, remove
the larger bran particles from the whole grain flour by tapping it through
a fine strainer or sifter. You’ll create a mound of golden high-extraction
wheat flour and have coarser bran left in the strainer. Reserve the bran
for coating the outside of the boule.
Mix the Dough. Add the flours, yeast and warm room temperature
(75F/24C) water to the poolish and mix just until all the flour is moistened.
Cover and let rest for 20-30 minutes (the longer autolyse is helpful for
hand kneading). Add the salt and knead in a stand mixer with the dough
hook for 4 minutes on medium-low (speed 3 on a Kitchen Aid stand
mixer). The dough should pull away from the sides of the bowl during
mixing but will still be very sticky and soft.
This is a higher-hydration dough that works well in the mixer. If kneading
by hand, a teaspoon or two of olive oil may be used on hands and
kneading surface, but avoid adding more flour. Knead for about 5 minutes
using a stretch-and-fold action. The dough will be soft and sticky and
should form a delicate windowpane that tears when stretched.
Ferment the Dough. Transfer the dough to an oiled container (olive
oil works well) with a capacity of about 6 cups (1.5 quarts)/1.5 litres
and turn to coat the dough with oil. Allow the dough to ferment in the
Proofer for a total of 2 hours at 78F/26C. During the first hour, stretch
Page 21
and fold the dough three times, at 20, 40 and 60 minutes. To stretch and
fold, gently stretch one side of the dough with oiled fingers, then fold it
towards the center and repeat on the opposite side, creating a business
letter fold. Repeat with the other two sides, forming a square package
in which all four sides have been stretched and folded to the center. It is
not necessary to press down on the dough to degas it, that will happen
naturally during the stretch and fold. After three stretch/folds, leave the
dough undisturbed for the remaining hour, until it doubles in size (to about
four cups volume). A gentle indent made with an oiled finger should fill in
slowly.
Shape and Proof the Boule. Cut an oval of parchment about 12”/30cm
long (the longer ends will serve as handles to lower the bread into the
Dutch oven) and set aside. Cover a circular area about 7 or 8”/18-20cm
in diameter with a thick layer of the reserved white wheat bran, then turn
the dough out onto the bran, smooth (top) side down. Being careful to
maintain as much air in the dough as possible, gently fold all four sides of
the dough to the center to form a square package. Then pull the corners
up and towards the center, just enough to round the shape and focusing
on gentle stretching of the bottom surface of the dough (be careful not to
compress the air out of the center of the boule). Gently flip the boule over
onto the oval parchment and set it on a quarter sheet pan or plate for
support. Set the proofing temperature to 78F/26C and proof uncovered
for 60 minutes. Depending on how tight the shaping is, the loaf may
spread sideways a little as it proofs, but it will still rise nicely in the oven.
Preheat the Oven and Bake the Bread. While the boule is proofing,
place a rack in the lower third of the oven and preheat to 450F/230C. If
using a Dutch oven, also preheat the base (the lid may be left cool). The
bread will develop a somewhat more open crumb in the Dutch oven (due
to steam from the dough remaining in the sealed bread chamber), but
other methods of producing steam also work well, such as adding hot
water or ice to a pre-heated sheet pan. If using a cast iron Dutch oven,
preheat the pan for only 20 minutes to avoid scorching the bottom crust.
Gently score the bread with a very sharp knife or baker’s lame, dipping
the blade in water before each cut. Place the boule in the preheated
Dutch oven, still on its parchment (use the parchment to lower it into the
hot pan). Place the lid on top and bake for 20 minutes. Remove the lid,
rotate the bread to facilitate even browning and bake for an additional
20 minutes, until well browned. The internal temperature should be
205-210F/96-99C. Remove the bread from the pan, slide it off the
parchment and allow to cool on a rack about 2 hours before slicing.
Page 22
Overall Bread Formula
Grams
Ounces
Baker’s
Percentage
Unbleached flour, 11.7% – 12.3% protein
206 g
7.3 oz
62.5%
Whole grain white wheat flour
(sifted to remove bran)
86 g
3.0 oz
25.9%
Semolina flour
39 g
1.4 oz
11.7%
Instant yeast
1.0 g
0.04 oz
0.3%
Water
236 g
8.3 oz
71.5%
Salt
6.4 g
0.23 oz
1.9%
Proportion of total flour that is pre-fermented: 36%
King Arthur All-Purpose Flour and Gold Medal Better for Bread Flour
are registered trademarks of their respective companies.
Page 23
Cranberry Pecan Boule
This delicious boule is studded with toasted pecans and tart cranberries,
and has the wholesome goodness of whole wheat.
Poolish
Volume
Grams
Ounces
Unbleached bread flour
3/4 cup
118 g
4.4 oz
Instant yeast
1/4 tsp
Water, 70-78F
1/2 cup
118 g
4.4 oz
Mix and Ferment the Poolish. Set the Proofer to 74F/23C and put the
water tray in the middle of the warming plate with ¼ cup/60 ml of water in
it. Place the rack on top of the tray. Mix all the ingredients for the poolish
in a large mixing bowl. The mixture will resemble a thick batter. Place
the bowl in the Proofer for 4 hours, until it inflates into a bubbly, soft, and
sweet-smelling sponge.
Main Dough
Volume
Grams
Ounces
Water, warm room temp (75-85F)
1 cup
236 g
8.3 oz
Instant yeast
1 tsp
3.2 g
0.11 oz
2 1/4 cups
284 g
10.0 oz
3/4 cup
102 g
3.6 oz
2 tsp
11.4 g
0.20 oz
Dried cranberries
1/2 cup
72 g
2.5 oz
Pecans, toasted and coarsely
chopped
1/2 cup
57 g
2.0 oz
Poolish, all from above
Unbleached bread flour
Stone ground wheat flour
Salt
Equipment: Brød & Taylor Proofer, colander or banneton, pizza stone.
Mix and Knead the Dough. Set the Proofer temperature to 80F/27C
degrees and check to see that there is still water in the tray. Add the
water to the poolish and stir it around to loosen it up. Then add the
yeast, flours, and salt, and stir until a rough dough forms. Lightly dust a
kneading surface with flour and turn the dough out. Knead by hand until
a smooth and elastic dough forms, about 10 minutes, or 7-8 minutes
using a stand mixer with a dough hook attachment on speed 4. Add
the cranberries and pecans and work them into the dough until they are
evenly distributed.
Page 24
Ferment the Dough. Put the dough into a lightly oiled bowl and place
back in the Proofer at 80F/27C. Let the dough rise for 60-90 minutes or
until it has doubled in volume. The dough is somewhat heavy due to the
addition of cranberries and nuts so it does take a little while to rise fully.
Shape and Proof the Boule. Turn the dough out onto a lightly floured
counter and shape the dough into a tight round ball. Place the dough ball
seam side up into a well floured dough rising basket or a bowl/colander
lined with a heavily floured linen cloth. Dust the exposed surface of the
loaf lightly with flour and place back into the Proofer. Let the dough rise
for 1 hour, or until it has almost doubled in bulk. A gentle depression
made with a floured finger should spring back slowly.
Preheat the Oven. Prepare the oven an hour before baking. Place a
baking stone on the middle rack and a cast-iron skillet at the bottom of
the oven. Preheat the oven to 500F/260C degrees.
Score and Bake the Boule. Turn the dough out onto a baking peel or
inverted baking sheet lined with parchment. Using a very sharp knife
or baker’s lame, score the top of the loaf and quickly place onto the hot
baking stone. Being careful to keep your face away from the oven and
using oven mitts to protect your hands, add ½ cup/120 ml of water to the
cast-iron skillet and quickly close the door. Bake for 5 minutes, then lower
the temperature to 450F/232C and continue to bake for 25-30 minutes or
until the loaf is a deep brown color and sounds hollow when tapped on
the bottom. The internal temperature should be about 205F/96C. Allow
the loaf to cool completely before slicing.
Overall Bread Formula
Grams
Ounces
Baker's
Percentage
Unbleached bread flour
402
14.2
79.8%
Stone ground wheat flour
102
3.6
20.2%
Water
354
12.5
70.2%
Instant yeast
4.0
0.14
0.8%
Salt
11.4
0.40
2.3%
Recipe courtesy of Melissa Langenback, thebakersguide.com
Page 25
Country Wheat Sandwich Bread
This soft sandwich loaf is made with 22% whole wheat flour and is
enriched with a touch of butter and milk for delicious flavor.
Unbleached bread flour
Volume
Grams
Ounces
Baker’s
Percentage
3 1/2 cups
446 g
15.75 oz
81.7%
Whole wheat flour
3/4 cup
100 g
3.5 oz
18.3%
Sugar
2 Tblsp
25 g
0.88 oz
4.6%
Unsalted butter, soft
2 Tblsp
28 g
1.0 oz
4.6%
Salt
1 1/2 tsp
8.4 g
0.29 oz
1.5%
Instant yeast
1 1/2 tsp
4.8 g
0.17 oz
0.9%
Water, 75-80F
1 1/4 cups
295 g
10.4 oz
54.0%
1/4 cup
61 g
2.1 oz
11.2%
Whole milk
Equipment: Brød & Taylor Proofer, 9” x 5”/23x13cm loaf pan.
Mix and Knead the Dough. Set the Proofer to 85F/29C and put the
water tray in the middle of the warming plate with ¼ cup/60 ml of water in
it. Place the rack on top of the tray.
In a large bowl, combine all of the ingredients and mix until a rough dough
forms. Turn the dough out onto a lightly floured surface and knead for 7-10
minutes by hand or 5-6 minutes using a stand mixer with a dough hook
attachment, until the dough becomes smooth and elastic. Add as little flour
as possible during kneading so that the bread doesn’t become dry or tough.
Ferment the Dough. Form the dough into a ball and transfer to a lightly
oiled bowl. Allow the dough to ferment in the Proofer at 85F/29C for 1- 1
½ hours, or until the dough has doubled in volume.
Shape and Proof the Loaf. Shape the loaf by turning the dough out
onto a lightly floured counter and gently pressing it into a rectangle. Roll the
dough up into a tight log, starting from the short side. Place the loaf into an
oiled loaf pan, seam side down. Place the shaped loaf into the Proofer (still
set at 85F/29C), and allow the dough to rise until top of the dough domes
over the rim of the pan by 1 inch/2.5cm. This will take about 45-60 minutes.
Preheat the Oven and Bake the Loaf. About 45 minutes before baking,
preheat the oven to 350F/177C. Bake the loaf about 35-45 minutes until
it is a deep golden brown. It should sound hollow when tapped on the
bottom or register an internal temperature of 200F/93C. Let the loaf cool
completely before slicing.
Recipe courtesy of Melissa Langenback, thebakersguide.com
Page 26
Brød & Taylor Sourdough
This rustic bread gets complex flavor and a mild, delicious tang from a
little dark rye in the sourdough starter. It has enough whole wheat and rye
to give it a robust, earthy flavor, yet still retains a moist and open crumb
with a bit of chew.
Timing: Mix the starter the night before baking and plan on mixing the
final dough about 12 hours after the starter.
Equipment: Brød & Taylor Folding Proofer, pizza stone, and pans for
your favorite steaming method. A thermometer can be helpful for gauging
water, dough and internal baked bread temperature.
Sourdough Starter
Volume
Firm sourdough starter*
Unbleached flour, about 12% protein
Whole grain rye flour**
Water
Grams
Ounces
1 Tb
14
0.5
5 1/2 Tbs
50
1.8
3 Tbs
20
0.7
2 1/2 Tbs
42
1.5
*Ideally a mature, active white starter with 50-60% hydration.
**If dark rye flour is unavailable, medium rye, whole wheat or unbleached flour
can be substituted.
Build the Starter. Mix all the ingredients in a bowl to form a rough dough.
Knead to incorporate air and evenly distribute the seed culture, about
4-5 minutes. Transfer to a clean jar or container and cover. Ferment at
72F/22C for 10-12 hours in the Proofer, until domed and risen by at least
2.5x (if all white flour was used in the starter, it should rise to at least 3x).
Ideally the starter should be used before the dome deflates.
Main Dough
Unbleached flour, about 12% protein
Whole grain rye flour
Water
Salt
Volume
Grams
Ounces
2 3/8 cups
341
12
3/8 cup
55
1.9
1 cup + 3Tbs
281
9.9
1 1/2 tsp
8.6
0.3
Page 27
Mix and Autolyse the Main Dough. Warm the water to about 85-90F/2932C (cooler if room temp is over 74F/23C). Measure or weigh the
flours into a bowl, add the lukewarm water, and mix until all the flour is
moistened. Cover and let sit for 30 minutes. While the dough is resting,
set up the Proofer with water in the tray and the thermostat at 78F/26C.
Knead in the Salt, then the Starter. If kneading by hand, very lightly oil
the work surface and avoid adding more flour. Add the salt to the flour
and water mixture and knead until incorporated, about 2 minutes. Add the
starter and knead until structure is fairly well developed, about 10 more
minutes by hand (or about 8 minutes in a stand mixer). Ideally, the dough
temperature after kneading should be 76-78F/24-26C. Transfer to a lightly
oiled container with a volume of at least four cups (1 quart)/1 litre.
Ferment the Dough at 78F/26C. Set the dough in the Proofer and
ferment for about 2.5 - 3.5 hours. Perform a four-way stretch and fold (all
four sides get stretched and folded to the center) after the first 60 minutes
and again at 120 minutes. Then leave the dough undisturbed until it
reaches a volume of 4 cups/1 litre.
After the dough reaches 4 cups/1 litre, give it one last stretch and fold
to create a square package, then cover and let rest on the counter for
about 15 minutes before shaping. While the dough is resting, prepare a
9x13”/23x33 cm sheet pan or proofing basket with baker’s linen or a wellfloured kitchen towel.
Shape into an Oval or Round. Place the dough smooth side down on a
lightly floured surface and shape into a plump oval about 8”/20 cm long
(or a round boule). For the oval, fold the square package in half with the
seam at the edge closest to you. Seal the seam by pressing towards
the work surface. Flip the loaf over with the top side down and the seam
centered and facing up, and place it on the linen-lined sheet pan.
Proof the Loaf. Place the loaf in the Proofer, still set to 78F/26C, for 2 - 2.5
hours, until visibly larger but still able to spring back slowly when gently
pressed with a finger.
Page 28
Prepare to Bake. About an hour before baking, place a pizza stone in the
middle of the oven and preheat to 450F/232C. Prepare to steam the oven
using your regular method (such as tossing ice on a preheated sheet
pan) or set out a deep, oven-proof rectangular pan to cover the loaf and
create a steam chamber.
Slash and Bake with Steam at 450F/232C. Gently invert the loaf onto
parchment or a floured peel. Brush excess flour from the top and sides of
the loaf. Using a baker’s lame or serrated knife, slash in two long, slightly
angled lines.
Slide the bread onto the hot pizza stone and steam the oven or cover the
loaf. Bake for about 40 minutes, until the crust turns deep golden brown
and the internal temperature reaches at least 200F/93C. After 20 minutes
of baking, turn the loaf 180° to facilitate even browning and remove the
cover or steam pan. Cool before slicing.
Overall Formula
Unbleached flour, about 12% protein
Grams
Ounces
Baker’s %
400
14.1
84.3%
Whole wheat flour
55
1.9
11.6%
Whole rye flour
20
0.7
4.1%
Water
328
0.3
69.1%
Salt
8.6
0.3
1.8%
Page 29
Making Yogurt:
Custard-Style, Greek or Classic
This recipe details all the steps for making thick, creamy “custard-style”
yogurt, plus straining instructions for Greek yogurt.
Custard-Style Yogurt
This method highlights two techniques for creating thick yogurt: holding
milk at 195F/90C for ten minutes before culturing, and allowing the
yogurt to thicken at a lower temperature. This “custard” style of yogurt
is delicious and is also the best recipe to make frozen yogurt. Feel free
to scale up or down from the batch sizes listed below, the Proofer has a
capacity of 8 quarts (or about 8 liters).
Milk
(whole,
low fat
or skim)
4 cups
(1 quart/
968g/
1 litre)
8 cups
(1/2 gallon/
1.94kg/
2 litres )
16 cups
(1 gallon/ 3.88kg /
4 litres)
32 cups
(2 gallons/
7.74kg /
8 litres)
Live
culture
plain
yogurt*
2 Tbs
(31 g/
20ml)
4 Tbs
or 1/4 cup
(62g/40 ml)
8 Tbs
or 1/2 cup
(124g/ 80 ml)
16 Tbs
or 1 cup
(248g/ 160 ml)
*Either store-bought or reserved from a previous batch of yogurt. We chose a
plain yogurt from the store with active cultures of S. Thermophilus, L. Bulgaricus,
L. Acidophilus, and Bifidus.
Equipment: Brød & Taylor Proofer, thermometer, glass mason jars or
other heat-proof containers with a capacity of one quart/one liter or less.
Everything that will touch the milk should be scrupulously clean and dry.
Step One: Heat Milk to 195F/90C and Hold for 10 Minutes. Heat the
milk over medium heat, stirring or whisking frequently to prevent the milk
from sticking to the bottom of the pan or scorching. Using a pan with a
heavy bottom will reduce risk of scorching. Whisk the surface of the milk
to cover completely with bubbles (this prevents a skin from forming), then
heat to about 195F/90C. Stir occasionally and re-whisk to cover with
foam if necessary. Foam will last much longer when the milk is hot. When
the milk reaches 195F/90C, lower the heat, set a timer for ten minutes,
continue stirring and monitor temperature, maintaining 195-200F/90-93C.
Step Two: Pre-heat Proofer and Jars. Set up the Proofer and set the
temperature to 120F/49. Make sure to use the rack. The water tray is
not required. Place glass jars in the Proofer to warm. Put the lid on the
Proofer and allow it to come to temperature.
Page 30
Step Three: Cool Milk to 115F/46C and Innoculate with Live Culture.
Remove the hot milk from the heat. Placing the pan in cold water will
speed cooling. Wait until the milk reaches 115F/46. To inoculate the milk,
add a cup/240 ml of the warm milk to a small bowl. Add the appropriate
amount of yogurt with live cultures (1Tb for every 2 cups/30g for every 1
litre) and stir until smooth. Then add this liquefied culture back into the large
pan of milk and stir gently to distribute. Pour or ladle the milk into the prewarmed jars and place them back into Proofer to culture. Arrange the jars so
that they are not directly over the center of the Proofer, to allow proper heat
circulation and ensuring the most accurate culturing temperature.
Step Four: Culture at 120F/49C for an Hour, then Lower the Heat
to 86F/30C. Set a kitchen timer for one hour, then after that hour turn
the Proofer down to 86F/30. It’s important not to let the yogurt remain at
120F/49C for more than an hour in order to avoid whey separation and
lumpy texture.
The “High-Low” method will culture faster and produce a more stable
yogurt than other methods. But alternatively, you can also set the Proofer
to 110F/43C for the entire culturing period, normally about 4-6 hours.
Step Five: Check the Yogurt after Two Hours. Check the yogurt by
gently tilting a jar a little to the side to see if the milk is still in a liquid state
or if it has solidified enough to not flow when tilted. If you have used a
higher protein milk or a fast-acting culture, it may be ready in just 2 hours
(one hour at 120F/49C plus one at 86F/30C). Most milks or longer-acting
cultures take 4 hours or more. When the yogurt passes the tilt test, put
it into the refrigerator and allow it to chill thoroughly. Once the yogurt is
chilled, reserve enough to start your next batch.
Greek Yogurt
Strain the yogurt. Line a colander or strainer with several layers of
cheesecloth or one layer of paper coffee filters. Set over a bowl and
spoon in the yogurt. Cover and refrigerate. Allow it to strain for 1-3 hours,
or until desired thickness is reached. For the frozen yogurt recipe below,
strain the yogurt overnight.
Classic Yogurt
Heat Milk to 160-165F/71-74C. Heating milk to different temperatures before
culturing creates different styles of yogurt. Our custard-style method (above)
makes yogurt that is noticeably thicker and tastes a little creamy/nutty from
the cooked milk. Yogurt made from milk kept below 170F/77C is thinner and
tastes fresh, a little fruity and more tart. To make this classic style of yogurt,
heat the milk to 165F/74C, being careful not to exceed 170F/77C. Then cool
and culture according to steps two through five, above.
Page 31
Strawberry Frozen Yogurt
Making Creamy Frozen Yogurt. To keep the texture creamy, limit the
water content so that large ice crystals are less likely to form. Both milk
and strawberries have plenty of water, so we strain the yogurt and reduce
the juices that drain from the berries. It’s also best to denature the whey
proteins in dairy with heat according to the custard-style method detailed
above. The whey proteins will remain in the yogurt after straining and in
their denatured state they are more effective at keeping ice crystal size
small and the texture of the frozen dessert creamy.
Makes about 3 cups/.7 litres of pre-mix, or about 4-5 cups/1-1.2 litres
of frozen yogurt.
4 cups whole milk yogurt*, strained overnight to create extra-thick yogurt
10 oz (284 g) frozen strawberries
6 tablespoons (3/8 cup / 75g / 2.6 oz) sugar, or more to taste
1/2 tsp vanilla extract
1/8 tsp almond extract (optional)
Optional: fresh strawberries for garnish
*Made in the custard style detailed in our recipe, including holding the
milk at 195F/91C for ten minutes before culturing. The exact volume of
the strained yogurt will depend on the protein content of the milk, but will
be about 1.5 – 2 cups/.35-.5 litres.
Equipment: An ice cream freezer, and either two (2-cup/.5 litre capacity)
or four (1-cup/.25 litre capacity) pre-frozen containers. Pre-freezing the
containers and dividing the frozen yogurt up into smaller portions allows
the fastest freezing, so that ice crystals don’t have as much time to grow
large and make the texture grainy.
Prepare the Strawberries. In a medium bowl, sprinkle the sugar over the
frozen strawberries and allow them to thaw and give off juice. Drain the
juice (our berries gave off about 3/8 cup/90 ml of juice) and boil the juice
in the microwave or stovetop until reduced to 1/4 cup/60 ml. Pour over
strawberries and stir to dissolve any remaining sugar. Puree strawberries
and their reduced juice in the blender, or, for a more chunky texture, chop
the berries into pieces small enough to easily pass through the gaps in
your ice cream maker blades.
Page 32
Make and Chill the Pre-Mix. Fold the fruit into the extra-thick yogurt and
stir in the extracts. Taste and correct for sugar (the mixture will seem a
little less sweet after freezing). Chill the pre-mix thoroughly, then freeze
according to your ice cream maker’s instructions.
After freezing and mixing in the ice cream maker, transfer to the prefrozen containers and allow to freeze until a little firmer, about 30 minutes.
If desired, serve with chunks of fresh strawberry and top with a whole
strawberry.
Once the yogurt freezes for several hours it may be too firm to scoop.Let
it rest on the countertop for 5 to 10 minutes to soften for serving.
Page 33
Lactose-Free Yogurt
Make lactose-free yogurt without the high sugar levels and additives that
are often found in commercial products. Regular milk and classic live
cultures create a delicious, pure yogurt. The ability to set the Proofer to
exact temperatures and customize the culture timing so that lactose is
eliminated is an important differentiator among yogurt makers.
Heating milk to a higher temperature than other recipes denatures protein
and creates a thicker texture. Our “High-Low” temperature method works
beautifully in the Brød and Taylor Folding Proofer to create a smoother
yogurt than automatic machines that only culture at one constant
temperature. To make lactose-free yogurt, a long, carefully controlled
culture in the Proofer allows beneficial bacteria enough time to consume
all of the lactose in regular milk.
Milk
(whole,
low fat
or skim)
4 cups
(1 quart/
968g/
1 litre)
8 cups
(1/2 gallon/
1.94kg/
2 litres )
16 cups
(1 gallon/ 3.88kg /
4 litres)
32 cups
(2 gallons/
7.74kg /
8 litres)
Live
culture
plain
yogurt*
2 Tbs
(31 g/
20ml)
4 Tbs
or 1/4 cup
(62g/40 ml)
8 Tbs
or 1/2 cup
(124g/ 80 ml)
16 Tbs
or 1 cup
(248g/ 160 ml)
*Either store-bought or reserved from a previous batch of yogurt. We chose a
plain yogurt from the store with active cultures of S. Thermophilus, L. Bulgaricus,
L. Acidophilus, and Bifidus.
Equipment: Brød & Taylor Folding Proofer, thermometer, glass mason
jars or other heat-proof containers for culturing, with a capacity of one
quart or less. Everything that will touch the milk should be thoroughly
clean and dry.
Step One: Scald the Milk. Using either the microwave or stovetop, heat
the milk to 200F/93C. Stir frequently to prevent scorching on the bottom
of the pan. Watch the milk carefully as it approaches a boil to avoid
boiling over. Once milk reaches 200F, remove from heat. Immediately
cover for ten minutes.
Tip: Whisking the milk to cover the surface with bubbles will prevent the
milk from forming a skin during heating and cooling.
Step Two: Cool Milk to 115F. Uncover the milk and allow it to cool slowly
until it reaches about 170F/77C, which allows maximum denaturing of the
proteins. Then if you would like to speed the second stage of cooling, set
the container of milk into a pan of cold water and cool to 115F/ 46C.
Page 34
Set up the Proofer. While the milk is cooling, set up the Proofer and
adjust the temperature to 120F/49C. Make sure to use the rack, but the
water tray is not required. Place glass jars in the Proofer to warm. Put the
lid on the Proofer and allow it to come to temperature.
Step Three: Inoculate with a Live Culture. To inoculate the milk, add
the yogurt with live cultures to a small bowl. When the milk drops below
115F/46C, add one cup of the milk to the yogurt to thin it, and stir so that
it is dispersed evenly and has no lumps. Then add the liquefied culture
back into the larger container of milk and stir gently to combine. Pour the
milk into your culturing jars, cover the jars and set in the Proofer.
Tip: Arrange the jars so that they are not directly over the centered
aluminum tray to allow proper heat circulation and ensure the most
accurate culturing temperature.
Step Four: Culture at 120F/49C for an Hour, then Lower the Heat to
86F/30C. Set a kitchen timer for one hour, then turn the heat down to
86F/30C. It’s important not to let the yogurt remain at 120F/49C for more
than an hour in order to avoid the whey separation and lumpy texture that
can come from culturing at too high a temperature.
Step Five: Set Aside Yogurt to Make Your Next Batch. After about
three hours (one hour at 120F/49C plus two at 86F/30C), remove enough
yogurt to serve as the starting culture for your next batch of yogurt.
Store it in the refrigerator and consider labeling it “contains lactose”. It is
important to remove some yogurt early so that your culture will still have
enough food (lactose) to last until it is time to make your next batch. The
starter will be good for 7-10 days.
Tip: It is convenient to include one small container among your larger
culturing jars, so that it can be easily removed early to serve as the seed
culture for your next batch of yogurt.
Step Six: Culture for a Total of 19 Hours. In order to allow the yogurt
cultures to consume all of the lactose in the milk, culture for a total of at
least 19 hours (one hour at 120F/49C and 18 hours at 86F/30C). This
is the point at which our tests showed that acidity stopped increasing,
indicating that all of the available lactose had been consumed by the
culture. When the culturing is complete, chill the yogurt thoroughly in the
refrigerator.
Page 35
Making Lactose-Free Honey-Vanilla Yogurt
The 19-hour culture creates a lactose-free yogurt that is thick and creamy
but quite tart. To create a mild, lightly sweetened honey-vanilla yogurt,
first stir in the baking soda and allow to sit for a few minutes while some
of the acid is neutralized. Then stir in the vanilla and honey (or sugar)
to taste. The yogurt will thin slightly after stirring. This is mild enough to
appeal to kids. You may strain the yogurt before sweetening.
Plain lactose-free yogurt
1 cup (8 oz/ 250 ml)
Baking soda
1/4 teaspoon
Vanilla extract
1/4 teaspoon
Honey (or sugar)
2-3 teaspoons, or to taste
For a mild, naturally sweet yogurt without added sugar, another option is
to make our original custard-style yogurt recipe using lactose-free milk
and lactose-free, live culture yogurt to start the culture. That will create a
mild, naturally sweet yogurt with a subtle “cooked sugar” taste. The extra
sweetness comes from the lactose-free milk, in which lactase enzymes
break down lactose into other sugars (glucose and galactose), which
have a sweeter taste than lactose.
Page 36
Yogurt-Making Notes
Which Culture Should I Use? Our testing showed that store-bought
yogurts are not all created equal—some make dramatically better
starter cultures than others. While all the brands of plain “live culture”
supermarket yogurt will work, some produce thinner textures while others
are thicker, and a few produce yogurts that firm much more quickly than
others. Some are more susceptible to the lumpy texture that comes from
culturing too long or too hot. It’s worthwhile to test several different brands
of yogurt until you find a favorite culture.
Does Boiling Before Culturing Ruin the Yogurt? No. The casein
proteins and whey proteins do not coagulate when heated unless acid is
also present, and the integrity of the fat in milk is actually strengthened by
boiling. To test this, we made yogurt from milk that had been simmered
long enough to reduce the volume by 25%. The result is a thick, smooth
creamy yogurt with the strongest “custard” taste of any of the yogurts we
tested. We didn’t choose this method for our custard-style yogurt because
the cooked milk/custard taste is so prominent that it starts to seem like
something other than yogurt. But it was a favorite among some of our
tasters, and it’s good to know that if you accidentally heat the milk hot
enough to produce a few bubbles, nothing bad will happen to your yogurt.
The Folding Proofer Consistently Makes Thick, Smooth Yogurt
Automatic yogurt makers operate on a pre-programmed, automatic cycle
which do not allow you to control results. With the Folding Proofer, you
can alter timing and temperature settings to produce yogurt to your taste.
Protein is Key to Thickening. The casein (protein) clusters in milk
thicken yogurt by unraveling and forming a three-dimensional mesh
when exposed to the lactic acid created by culturing. Heating milk above
172F/78C before culturing denatures one of the main whey proteins,
lactoglobulin, which allows it to join in the mesh (instead of remaining
inactive) and effectively increases the amount of protein in the milk
that will be available to thicken the yogurt. The reaction takes time, so
milk needs to be held at 195F/90C for ten minutes to denature most of
the lactoglobulin. A little evaporation during this heating also aids the
thickening benefits of this procedure. When available, higher-protein
milks like Jersey or Guernsey make wonderful yogurt.
Culturing Temperature Affects Texture. In addition to the quantity
of protein available to form a mesh, the stability of that mesh is also
important, determined by the temperature at which the mesh forms. The
Page 37
yogurt will be more likely to leak whey when it thickens at temperatures
above 104F/40C, and less likely to leak whey below 104F/40C. At lower
temperatures there is also a longer window of opportunity to stop the
culturing before the yogurt turns lumpy.
Our “High-Low” culturing method (one hour at 120F/40C, then lower
the temperature to 86F/30C) produces smooth yogurt that is less
likely to leak whey, yet is faster and more food-safe than culturing
below 100F/38C for the entire period. At 120F/40C, the yogurt speeds
through the earlier stages of culturing, and the higher heat is more
hospitable to the beneficial lactic acid-producing bacteria and less
favorable to undesirable microbes. Then as culturing progresses, rising
acidity begins to inhibit any potentially problematic microbes. Reducing
the temperature to 86F/30C after one hour is a method that works well,
and completes the culturing process in just 2-4 hours.
Sweeten after Chilling. If sweeteners are needed, add them after the
yogurt has chilled. It is best not to add sweeteners before culturing
to avoid feeding any undesirable bacteria. The beneficial lactic-acid
producing bacteria are well-equipped to feed on lactose, while other less
desirable bacteria are not. Adding non-lactose sugars to the milk could
feed any undesirable bacteria that accidentally end up in the milk through
equipment or inadequate heating. Eventually these will be inhibited by
lactic acid, but we prefer to avoid growing undesirable bacteria with nonlactose sugars during the early stages of culturing. And honey has antibacterial qualities that could retard the culturing process.
Page 38
Tempering Chocolate
Tempering allows the right crystal structure to form from the cocoa butter
in chocolate, making the texture smooth, shiny and crisp.
Step One: Melt the Chocolate. Set up the Proofer with wire rack in
place and the thermostat at 115F/46C. The water tray may be placed
underneath the rack, but make sure it is completely dry. The entire
Proofer should be dry to prevent the chocolate from seizing.
Place about 3/4 of the chocolate in a heat-proof bowl, setting aside the
other 1/4 to use as “seed” chocolate. Your chocolate can be white, milk
or dark, but it should be real chocolate containing cocoa butter, not palm
oil or other non-chocolate fats (candy melts or some brands of white
chocolate should not be used for tempering). It is not necessary to chop
the chocolate, but smaller pieces will melt faster.
Place the bowl on the wire rack in the Proofer and allow the chocolate to
melt slowly and safely. Four ounces (113g) of chocolate will be completely
melted in 60 minutes or less, larger quantities may take longer.
Step Two: Adjust the Proofer Temperature. When the chocolate is
completely melted, remove it from the Proofer and lower the thermostat
to the correct holding temperature, normally about 90F/32C for dark
chocolate or 86F/30C for milk or white chocolate. Leave the top open
briefly so the Proofer will cool.
Step Three: Seed the Chocolate. While the Proofer is cooling, add
a piece (or pieces) of the reserved, un-melted chocolate to the bowl to
provide seed crystals for the cooling chocolate. Stir continuously as the
seed chocolate melts, and continue stirring until the temperature of the
chocolate cools to 91F/33C for dark chocolate or 87F/30C for milk or
white chocolate.
To check if the chocolate is tempered, dip a spoon into the melted
chocolate and place in the refrigerator until firm. The chocolate should
be hard and smooth with no streaking. If this test is a success, place
the chocolate back into the Proofer to hold at the right temperature to
maintain the temper. If the chocolate is streaked, the tempering process
may need to be repeated.
Page 39
NOTES:
Page 40
Warranty Information
Limited One Year Warranty
Model FP-101
Berkshire Innovations, LLC warrants that your Brød & Taylor Folding Proofer will be free of defects in
materials or workmanship under normal home use for one year from the date of purchase. We will, at
our option, repair or replace the Proofer that is determined to be defective without charge. This warranty does not apply to commercial use or product damage through abuse, negligence or inappropriate power supply. If a replacement Folding Proofer is required to honor this warranty, the replacement
Folding Proofer may be new or reconditioned.
THIS WARRANTY DOES NOT COVER CONSEQUENTIAL OR INCIDENTAL DAMAGES SUCH AS
PROPERTY DAMAGE AND DOES NOT COVER INCIDENTAL COSTS AND EXPENSES RESULTING FROM ANY BREACH OF THIS WARRANTY, EVEN IF FORESEEABLE.
THIS WARRANTY IS EXCLUSIVE AND IS IN LIEU OF ANY OTHER EXPRESS WARRANTY,
WHETHER WRITTEN OR ORAL. THE DURATION OF ANY IMPLIED WARRANTIES, INCLUDING
BUT NOT LIMITED TO ANY IMPLIED WARRANTIES OF MERCHANTABILITY OR FITNESS FOR
A PARTICULAR PURPOSE, IS EXPRESSLY LIMITED TO THE PERIOD OF DURATION OF THIS
LIMITED WARRANTY. Some states do not allow limitations on how long an implied warranty lasts and
some states do not allow the exclusion or limitations of incidental or consequential damages, so the
above limitations or exclusions may not apply to you. This Limited Warranty gives you specific legal
rights, and you may also have other rights which vary from state to state.
Should the need arise for warranty servicing, please contact Brød & Taylor
Customer Service. You may contact us by one of the following methods:
E-mail: [email protected]
Phone: (800) 768-7064
Mail: Brød & Taylor, P.O. Box 712, Williamstown, MA 01267
Please describe the product defect and provide proof of purchase date. If proof of
purchase date is not provided or available, the date of manufacture will be used
in lieu of purchase date. Be sure to include your name and e-mail address or telephone number. If a Brød & Taylor Customer Service Representative determines
that the product is defective, you will receive a Return Material Authorization
(RMA) number and instructions for returning. Please do not return a product without an RMA number. Products returned to Brød & Taylor without an RMA number
will be returned to the sender without servicing.
This warranty applies only to NORMAL HOUSEHOLD USE of the Brød & Taylor
Folding Proofer and is void for commercial or industrial use.
Copyright 2011-13
All Rights Reserved.
Berkshire Innovations, LLC
P.O. Box 712
Williamstown, MA 01267
www.brodandtaylor.com
Page 41
Warranty Information
Limited One Year Warranty
Model FP-101
Berkshire Innovations, LLC warrants that your Brød & Taylor Folding Proofer will be free of defects in
materials or workmanship under normal home use for one year from the date of purchase. We will, at
our option, repair or replace the Proofer that is determined to be defective without charge. This warranty does not apply to commercial use or product damage through abuse, negligence or inappropriate power supply. If a replacement Folding Proofer is required to honor this warranty, the replacement
Folding Proofer may be new or reconditioned.
THIS WARRANTY DOES NOT COVER CONSEQUENTIAL OR INCIDENTAL DAMAGES SUCH AS
PROPERTY DAMAGE AND DOES NOT COVER INCIDENTAL COSTS AND EXPENSES RESULTING FROM ANY BREACH OF THIS WARRANTY, EVEN IF FORESEEABLE.
THIS WARRANTY IS EXCLUSIVE AND IS IN LIEU OF ANY OTHER EXPRESS WARRANTY,
WHETHER WRITTEN OR ORAL. THE DURATION OF ANY IMPLIED WARRANTIES, INCLUDING
BUT NOT LIMITED TO ANY IMPLIED WARRANTIES OF MERCHANTABILITY OR FITNESS FOR
A PARTICULAR PURPOSE, IS EXPRESSLY LIMITED TO THE PERIOD OF DURATION OF THIS
LIMITED WARRANTY. Some states do not allow limitations on how long an implied warranty lasts
and some states do not allow the exclusion or limitations of incidental or consequential damages, so
the above limitations or exclusions may not apply to you. This Limited Warranty gives you specific
legal rights, and you may also have other rights which vary from state to state.
En cas de besoin pour les services de garantie, veuillez contacter le service clients de Brød & Taylor. Vous pouvez nous joindre en utilisant l’une des méthodes
suivantes:
E-mail: [email protected]
Téléphone: (800) 768-7064
Adresse: Brød & Taylor, P.O. Box 712, Williamstown, MA, 01267
Veuillez décrire le produit défectueux et fournir la preuve de la date d’achat. Si
la preuve de la date d’achat n’est pas fournie ou n’est pas disponible, la date
de fabrication sera utilisée à la place de la date d’achat. Assurez-vous d’inclure
vos noms et adresse e-mail ou numéro de téléphone. Si un représentant du
service client de Brød & Taylor détermine que le produit est défectueux, vous
recevrez un numéro d’autorisation de retour du matériel (RMA) et des instructions concernant le retour. Veuillez ne pas retourner un produit sans le numéro
RMA. Les produits retournés à Brød & Taylor sans le RMA seront retournés à
l’envoyeur sans aucune réparation.Cette garantie s’applique seulement à l’usage
domestique normal de four à pain pliable de Brød & Taylor et s’annule en cas
d’utilisation commercial ou industrielle.
Copyright 2011-13
All Rights Reserved.
Berkshire Innovations, LLC
P.O. Box 712
Williamstown, MA 01267
www.brodandtaylor.com
Page 42
SPECIFICATIONS
FP-101
Dimensions:
Model: FP-101
Dimensions:
•
•
•
•
•
•
Inside box (open):
14.75” x 12.5” x 8” high
Outside body (open):
18” x 14.5” x 10.5” high
Outside body (closed):
18” x 14.5” x 2.75” high
Intérieur du caisson(ouvert) :
12.5’’ x 14.75’’ x 8’’ haut
Corps extérieur (ouvert) :
18’’ x 14.5’’ x 10.5’’ haut
Corps extérieur (fermé) :
18’’ x 14.5’’ x 2.75’’ haut
Temperature Range:
70 - 120°F (21 - 49°C)
Plage de Température :
70 - 120°F (21 - 49°C)
Maximum capacity: Two “large” loaves
– approximately 2 lb. dough each (4 lb.
total) from recipes with about 3-4 cups
of flour per loaf.
Capacité maximum : Deux ‘’grands’’
pains - approximativement 0,9 kg. de
pâte chacune (1,8 kg. Au total) à partir
de recettes avec environ 250-375
grammes de farine par pain.
This product is intended for interior
household use only, in an operating
environment of 60F (16C) or greater.
Voltage: 120VAC, 60 Hz (200W)
Ce produit est destiné à un usage
domestique uniquement, à l’intérieur
de la maison, dans un environnement
approprié : 16C (60F) ou plus.
Voltage: 120VAC, 60 Hz (200W)
Folding Proofer
Berkshire Innovations, LLC
P.O. Box 712
Williamstown, MA 01267
(800) 768-7064
www.brodandtaylor.com
Copyright 2010-13
All Rights Reserved.
Rev.0813.1