1
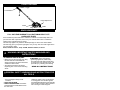
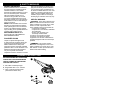
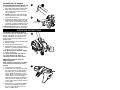
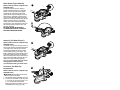
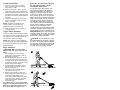
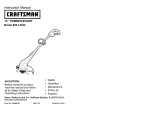
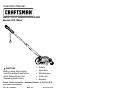
Instruction Manual
HEAVY DUTY LANDSCAPE EDGER
Models 900.79654
CAUTION:
Before using this product,
read this manual and follow
all its Safety Rules and
Operating Instructions.
•
•
•
•
•
Safety
Operation
Maintenance
Parts List
Español
Sears, Roebuck and Co., Hoffman Estates, IL 60179 U.S.A.
www.sears.com/craftsman
Form No. 244105-00
SEPT. ‘02
Printed in U.S.A.
EDGER DIAGRAM
Trigger
Cord Retainer
Height Adjustment
Guard
Edge Guide
Blade
SEARS WARRANTY
FULL ONE YEAR WARRANTY ON CRAFTSMAN HEAVY DUTY
LANDSCAPE EDGER
If this Craftsman product fails due to a defect in material or workmanship within one
year from the date of purchase, return it to your nearest Sears store or Craftsman
outlet to have it replaced free of charge.
This warranty applies only while this landscape edger is used in the United States.
This warranty gives you specific legal rights, and you may also have other rights which
vary from state to state.
Sears, Roebuck and Co., Dept. 817WA, Hoffman Estates, IL 60179
WARNING: IMPORTANT SAFETY WARNINGS AND
INSTRUCTIONS
TO REDUCE RISK OF INJURY:
WARNING: When using electric
gardening appliances, basic safety
precautions should always be followed
to reduce risk of fire, electric shock, and
personal injury, including the following:
• Before any use, be sure everyone using
this tool reads and understands all
safety instructions and other information
contained in this manual.
• Save these instructions and review
frequently prior to use and in instructing
others.
READ ALL INSTRUCTIONS.
GENERAL SAFETY WARNINGS AND INSTRUCTIONS FOR
ALL TOOLS
• AVOID DANGEROUS ENVIRONMENT
- Don’t use edger in damp or wet
locations.
• DON’T USE IN RAIN.
• KEEP CHILDREN AWAY - All visitors
should be kept at a safe distance from
the work area.
• DRESS PROPERLY - Don’t wear loose
clothing or jewelry. They can be caught
in moving parts. Use of rubber gloves
and substantial footwear is recommended
when working outdoors. Wear protective
hair covering to contain long hair.
2
• WEAR SAFETY GLASSES or other eye
protection. Also use face or dustmask if
operation is dusty.
• GROUND FAULT CIRCUIT
INTERRUPTER (GFCI) protection
should be provided on the circuit(s) or
outlet(s) to be used for the landscape
edger. Receptacles are available having
built-in GFCI protection and may be used
for this measure of safety.
• USE RIGHT APPLIANCE - Do not use
appliance for any job except that for
which it is intended.
WARNING: To reduce the risk of electric
shock use only with an extension cord
intended for outdoor use, such as SW-A,
S0W-A, STW-A, STOW-A, SJW-A,
SJOW-A, SJTW-A or SJTOW-A.
• EXTENSION CORD. Make sure your
extension cord is in good condition.
When using an extension cord be sure it
is heavy enough to carry the current your
product will draw. An undersized
extension cord will cause a drop in line
voltage resulting in loss of power and
overheating. The following table shows
the correct size to use depending on cord
length and nameplate ampere rating. If in
doubt, use the next heavier gage. The
smaller the gage number, the heavier the
cord.
• DO NOT ATTEMPT to remove cut
material or hold material to be cut when
blades are moving. Make sure edger
switch is off when clearing jammed
material from blades. Do not grasp the
exposed cutting blades or cutting edges
when picking up or holding the edger.
CAUTION: Blades coast after turn off.
DANGER: Risk of cut. Keep hands away
from blades. Keep both hands on
handles when power is on.
• DON’T FORCE EDGER - It will do the
job better and with less likelihood of a
risk of injury at the rate for which it was
designed.
• DON’T OVERREACH - Keep proper
footing and balance at all times.
• STAY ALERT - Watch what you are
doing. Use common sense. Do not
operate edger when you are tired.
• DISCONNECT EDGER from the power
supply when not in use or when servicing
or cleaning.
• STORE IDLE EDGER INDOORS - When
not in use, edger should be stored
indoors in a dry and high or locked-up
place - out of reach of children.
• KEEP GUARD in place.
• KEEP BLADE area clean.
DANGER: Risk of injury. Keep hands
and feet away from blade and cutting area.
Minimum Gage for Extension Cords (AWG)
120 VAC Tools
Total Cord Length 0-25 26-50 51-100 105-150
Amp Rating AWG AWG AWG AWG
More than 0
18
16
16
14
Not More than 6
More than 6
18
16
14
12
Not More than 10
More than 10
16
16
14
12
Not more than 12
More than 12
14
12
Not
Not more than 16
Recommended
When using the edger, stones, pieces of
metal and other objects can be thrown out
at high speed by the blade. The tool and
guard are designed to reduce the danger.
• MAKE SURE that other persons and
pets are at least 100 feet away.
• ALWAYS STAND to left side of main
handle.
• BEFORE LANDSCAPING OR
TRENCHING, check for buried electrical
cables.
• TO REDUCE the risk of rebound
(ricochet) injury, work going away from
any nearby solid object such as a wall,
steps, large stone, tree, etc. Use great
care when working close to solid objects
or into the wind, and, where necessary,
do edging or trimming by hand.
• AVOID UNINTENTIONAL STARTING Don’t carry plugged in edger with finger
on switch. Be sure switch is off when
plugging in.
• DON’T ABUSE CORD - Never carry
landscape edger by cord or yank it to
disconnect from receptacle. Keep cord
from heat, oil, and sharp edges.
3
SAFETY WARNINGS
DOUBLE INSULATION
large and small blade slot widths. If the
plug does not fit fully into the extension
cord, reverse the plug. If it still does not
fit, obtain a suitable extension cord. If the
extension cord does not fit fully into the
outlet, contact a qualified electrician to
install the proper outlet. Do not change
the tool plug or extension cord in any way.
Double insulated tools are constructed
throughout with two separate layers of
electrical insulation or one double
thickness of insulation between you and
the tool’s electrical system. Tools built
with this insulation system are not
intended to be grounded. As a result,
your tool is equipped with a two prong
plug which permits you to use extension
cords without concern for maintaining a
ground connection.
NOTE: Double insulation does not take
the place of normal safety precautions
when operating this tool. The insulation
system is for added protection against
injury resulting from a possible electrical
insulation failure within the tool.
REPLACEMENT PARTS: When
servicing all tools, USE IDENTICAL
REPLACEMENT PARTS.
SPECIFIC WARNING
WARNING: Some dust created by this
product contains chemicals known to the
State of California to cause cancer, birth
defects or other reproductive harm.
Some examples of these chemicals are:
• compounds in fertilizers
• compounds in insecticides, herbicides
and pesticides
• arsenic and chromium from
chemically treated lumber
To reduce your exposure to these
chemicals, wear approved safety
equipment such as dust masks that are
specially designed to filter out microscopic
particles.
POLARIZED PLUGS
Repair or replace damaged cords.
To reduce the risk of electric shock, this
equipment has a polarized plug (one
blade is wider than the other). This
equipment must be used with a suitable
polarized 2 wire or 3 wire extension cord.
Polarized connections will fit together
only one way. Make sure that the
receptacle end of the extension cord has
WARNING: This product contains
chemicals, including lead, known to the
State of California to cause cancer, and
birth defects or other reproductive harm.
Wash hands after handling.
ASSEMBLY INSTRUCTIONS
BEFORE ASSEMBLING YOUR EDGER,
CHECK THAT YOU HAVE RECEIVED
THE FOLLOWING IN THE SHIPPING
CARTON. SEE FIGURE 1.
1A
A. 900.79654 Landscape Edger
B. Edger blade with nut, 2 washers
C. Tube connecting bolt and knob
(assembled to lower tube)
1B
4
1C
ASSEMBLING THE HANDLE
Assemble Handle Tubes (Figure 2 & 3)
2
1. Remove knob and curved head bolt
from lower handle tube mounting holes.
2. Slide upper handle tube down into
lower handle tube so that holes will
line up (Figure 3).
3. NOTE: Ensure the wire cable moves
smoothly down into the lower handle
tube while assembling.
4. Fasten handle tubes together with the
knob and curved head bolt. Note that
when you first insert the bolt it may be
necessary to wiggle it carefully to get it
past the jacketed wire inside the tube.
CAUTION: NEVER use a sharp object
to move jacketed wires out of the way.
3
OPERATING INSTRUCTIONS
Cut Depth Adjustment (Figure 4)
4
The front wheel can be adjusted to allow a
deeper or shallower cut, and to increase
the life of the blade. To change the cut
depth from the shipping position to your
desired depth:
1. Wait for blade to come to complete stop.
2. UNPLUG TOOL!
3. Loosen the Cut Depth Knob.
4. Adjust wheel depth, using the depth
indicator on the wheel bracket and the
marking on the front housing.
Note: Recommend 1” depth for edging.
5. Tighten Knob firmly.
Tip: Thick overgrowth may drag on
the guard. Reduce cut depth to
minimum to help reduce this effect.
Attaching Extension Cord To
Edger (Figure 5 )
Note: Check the extension cord safety
instructions provided earlier in this
manual.
1. Insert plug into cord socket.
2. An extension cord retainer is built into
the switch handle to reduce strain on
the power cord. To use this feature,
simply double the extension cord as
shown, about a foot from the end, and
insert it into the end of the handle.
Hook the loop formed by doubling the
cord over the tab. Gently tug on the
cord to ensure that it is firmly retained
in the handle.
3. Keep extension cord clear of operator,
unit, and any obstacles at all times.
Do not expose the cord to heat, oil,
water, or sharp edges.
5
5
Blade Guard (Figure 6A & 6B)
6A
Wait for blade to come to complete stop!
UNPLUG TOOL!
The guard swings open for cleaning
inside of blade housing or for changing
blades. To open guard turn the guard
release knob clockwise (facing blade
guard side of tool) until it stops (a turn of
about 90˚) fig. 6A detail; pull the knob to
open the door (fig. 6B). When closing the
guard turn the knob clockwise 90˚ (fig. 6A
detail) and push the door completely
closed. The knob should automatically
lock the door. If the knob doesn’t return to
the locked position press the door until
the knob engages.
BE SURE GUARD IS PROPERLY
CLOSED AND KNOB IS LOCKING IT
BEFORE OPERATING EDGER.
6B
Attaching The Blade (Figure 7)
Wait for blade to come to complete stop!
UNPLUG TOOL!
The blade, two spacers and hex head nut
with conical washer should be attached to
your edger in the order shown. Please
check that the blade has been properly
mounted before using your edger. The
Edger blade has two wear indicators that
show when blade needs to be replaced.
When the blade wears to the small hole at
each end of the blade it will give only 1/4"
depth of cut and should be replaced.
Tip: To increase blade life, keep initial
cutting depth at minimum and
increase depth setting as blade wears.
7A
To Remove The Blade For
Replacement:
7B
Wait for blade to come to complete stop!
UNPLUG TOOL!
CAUTION: Blade rotates momentarily
after the switch is released.
1. Turn knob and open guard door. (Fig. 7A)
2. Loosen the hex head nut (9/16”). Use
a 1" wrench on the outer spacer, or a
2” x 4” wood block between the
blade and guard if necessary to hold
the blade from turning. (Fig. 7B)
6
To Attach New Blade:
grass side. This will require lifting up
the edge guide and may require
reducing the depth of cut.
For the first edging each season, it is
best to move forward slowly because
grass is thickest then. On subsequent
edgings you should be able to move
forward more rapidly. If the tool slows
down, back it up an inch or two until the
blade comes up to normal speed. During
edging some sparks may be generated
from hitting stones. This is normal. Do
not attempt to edge when the grass or
soil is wet or moist—for electrical safety
and to prevent clogging of the blade
chamber. If you must edge under
conditions that cause the blade chamber
to become clogged, release trigger and
wait for blade to come to complete stop!
UNPLUG TOOL! Open door and remove
clogged material with a stick. To continue
to operate the tool in a clogged condition
will seriously overload the motor.
1. Ensure inner spacer is on shaft—
"flats" in spacer hole must engage
with "flats" on shaft.
2. Holding the spacer in place, put the
blade on the shaft, as shown (Figure 7B).
3. Hold the blade against the spacer and
install the outer spacer, again aligning
the flats in the spacer with the flats on
the shaft.
4. Install the hex head nut and conical
washer, then tighten with a wrench
(140 in. pounds).
NOTE: Replace hex head nut and
conical washer only with identical
replacement parts; see Parts List.
5. Close guard door; knob must be in
locking position.
Trigger Switch Operation
To turn tool ON, squeeze the trigger switch.
The trigger has been designed so that it is
very easy to hold in the ON position. To
turn tool OFF, release the trigger.
NOTE: The edger is a major appliance
and should not be operated simultaneously
with other major appliances on the same
household circuit.
CAUTION: Do not attempt to unclog
the blade chamber by dropping or tapping
the tool on the ground. This can damage
the unit. Keep hands clear of edge guide
and blade when cleaning as these wear
to a very sharp point during edging.
Edger Operation
WARNING: Make sure that other
persons and pets are at least 100 feet
away.
1. Set cut depth at 1” and set edge
guide to the down position, refer to
Assembly Instructions.
2. Before starting the edger, line up the
tool so the edge guide rests against
the edge of the paved surface (Figure
8). Both rear wheels should be on the
paved surface when edging.
3. To avoid kickback of edger, tilt the
handle down so the blade is above
the ground (Figure 9).
4. Turn switch ON and allow blade to
spin without moving tool.
5. Slowly lift the handle to lower the
blade, finding the edge of the paved
surface and start edging. Then
move tool forward slowly along edge
of paved surface, keeping the edge
guide pressed lightly against the
pavement edge.
Tip: When there is heavy overgrowth
of grass over the paved surface it may
drag on the guard. An initial cut may
be required with the edger on the
8
9
7
Landscaping/Trenching
Storage
WARNING: Before Landscaping or
Trenching, inspect and ensure there are
no objects that may create a hazard or
interfere with operating the edger. Do not
overload. If tool slows, pull back slightly
and wait until blade comes up to normal
speed.
WARNING! Be sure the tool is
unplugged.
Remove and clean any debris from the
outside of the edger and inside of guard
before storage. See Cleaning.
CAUTION: DO NOT HANG EDGER
ON THE SWITCH TRIGGER OR POWER
CORD!
WARNING: DO NOT use the edger
with any type of accessory or attachment.
Such usage might be hazardous.
Note: Do not store the tool on or adjacent
to fertilizers or chemicals. Such storage
can cause rapid corrosion.
MAINTENANCE
When cleaning, DO NOT immerse tool in
water or squirt it with a hose.
IMPORTANT: To assure product SAFETY
and RELIABILITY, repairs, should be
performed by qualified service organizations.
Use only identical replacement parts.
Inspect and thoroughly clean your edger
at the beginning of each edging season
for longer life and better performance.
Preventing Corrosion
Fertilizers and other garden chemicals
contain agents that greatly accelerate the
corrosion of metals. If you use the tool in
areas where fertilizers or chemicals have
been used, the tool should be cleaned
immediately afterwards. Do not store the
tool on or adjacent to fertilizers or
chemicals.
Wipe all exposed parts with a damp cloth.
You may lubricate only metal parts with a
light petroleum based oil.
The cutting blades are made from high
quality, hardened steel and with normal
use, they will not require resharpening.
However, if you accidentally hit a wire
fence, stones, glass or other hard objects,
you may put a nick in the blade. There is
no need to remove this nick as long as it
does not interfere with the movement of
the blade. If it does interfere, unplug unit
and use a fine toothed file or sharpening
stone to remove the nick.
If you drop the edger, carefully inspect it
for damage. If the blade is bent, housing
cracked, or handles broken or if you see
any other condition that may affect the
edger’s operation, contact your local
Sears Service Center for repairs before
putting it back into use.
Cleaning
With the unit unplugged, use only mild
soap and a damp cloth to clean the tool.
Never let any liquid get inside the tool;
never immerse any part of the tool into
a liquid.
8
9
Parts List
10
Get it fixed, at your home or ours!
Your Home
For repair - in your home - of all major brand appliances,
lawn and garden equipment, or heating and cooling systems,
no matter who made it, no matter who sold it!
For the replacement parts, accessories and
ownerís manuals that you need to do-it-yourself.
For Sears professional installation of home appliances
and items like garage door openers and water heaters.
1-800-4-MY-HOME®
(1-800-469-4663)
www.sears.com
Anytime, day or night
(U.S.A. and Canada)
www.sears.ca
Our Home
For repair of carry-in products like vacuums, lawn equipment,
and electronics, call or go on-line for the nearest
Sears Parts and Repair Center.
1-800-488-1222 Anytime, day or night (U.S.A. only)
www.sears.com
To purchase a protection agreement (U.S.A.)
or maintenance agreement (Canada) on a product serviced by Sears:
1-800-827-6655 (U.S.A.)
1-800-361-6665 (Canada)
Para pedir servicio de reparación
a domicilio, y para ordenar piezas:
1-888-SU-HOGARSM
Au Canada pour service en français:
1-800-LE-FOYERMC
(1-800-533-6937)
www.sears.ca
(1-888-784-6427)
© Sears, Roebuck and Co.
® Registered Trademark / TM Trademark / SM Service Mark of Sears, Roebuck and Co.
® Marca Registrada / TM Marca de Fábrica / SM Marca de Servicio de Sears, Roebuck and Co.
MC
Marque de commerce / MD Marque déposée de Sears, Roebuck and Co.
11