1
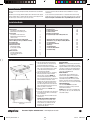
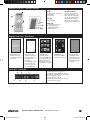
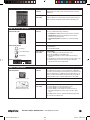
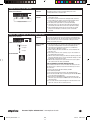
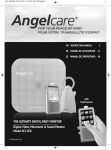
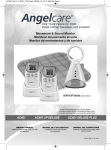
Video, Movement & Sound Monitor
AC1100
Pre-p
ro
monit grammed
or so
to
move und and
ment.
Senso
rP
a
d
no mo
will a
la
v
Refer ement is d rm if
to Ma
e
nual to tected.
chang
settin
e
gs.
Please check if all parts are present before installing the Angelcare Baby Monitor
1 x Parent Unit with
Charging Cradle
1 x Nursery Unit
1 x SensorPad
3 x AAA rechargeable
batteries
(for Parent Unit)
2 x AC Adaptors 7.5v
You will also need:
• 3 x AAA standard batteries for Nursery Unit power back-up (see Step 2a)
• Piece of plywood to support SensorPad (see Step 1)
The Angelcare Baby Monitor is a Personal Care Product.
Please DO NOT return it to the store, but contact us initially for advice and assistance:
Angelcare Helpline 0845 009 1789; Monday to Friday, 10am - 3pm
Website: www.angelcare-uk.co.uk; Email: [email protected]
Consumer Helpline: 0845 009 1789 | www.angelcare-uk.co.uk
AC1100_Manual.indd 1
19/5/11 2:38:49 pm
Getting Started
Thank you for choosing an Angelcare Video, Movement and Sound Monitor
AC1100.
For ease of use the Instruction Manual has been divided into 15 easy to
follow Steps.
We want you to be happy with this baby monitor and therefore we suggest
that you take the time to read through the instructions thoroughly. This will
ensure that you set the monitor up to suit your needs.
If you encounter any problems there is a comprehensive trouble-shooting
guide at the end of this manual. For all further information please contact the
Angelcare Helpline on 0845 009 1789 or [email protected].
Installation Guide
PAGES No.
CONTENTS
1. Installation of the SensorPad
2. Nursery Unit:
a. Installation of the Nursery Unit
b. Overview Functions Nursery Unit
3. Parent Unit:
a. Installation of the Parent Unit
b. Overview Functions Parent Unit
c. Main Screens
4. Testing your Angelcare Baby Monitor
5. How to Change & Save your Monitor Settings
6. Sound Function
7. Sound Transmission
8. Movement Function:
a. Movement Settings
b. SensorPad Sensitivity
c. Tic Function
9. Video Function:
a. Power Saving Function
b. Zoom & Rotate Function
c. Night Vision
2
3
3
3
4
4
5
5
6
6
7
7
8
PAGES No.
CONTENTS
10. Alarm Type Settings
11. Hold Function
12. Temperature Control
13. Timer Function
14. Battery Level Indicator
15. Signal Strength & Out of Range Indicator
9
9
10
10
11
11
•
•
•
•
•
•
•
•
12
12
12
12
13
14
14
14
Monitoring more than one baby (e.g. twins)
Maintenance of your Angelcare Baby Monitor
Factory Settings
Technical Specifications
Warnings
Limited Warranty
Protect the Environment
Troubleshooting
8
8
9
Step 1: Installation of the SensorPad
Mattress
Positioning of SensorPad under the mattress
Positioning and Installation of SensorPad and
Nursery Unit
1. The SensorPad works with all baby bed
sizes and all mattresses, except memory
foam and hollow frame mattresses
2. Position the SensorPad in the middle of the
bed on top of the mattress base as shown
on the left, with the printed side of the
SensorPad facing upwards
3. The SensorPad must rest on a completely
flat and rigid surface. We recommend
placing a piece of plywood UNDER the
SensorPad if the baby bed has a slatted
base. The plywood will push the SensorPad
into the mattress and ensures contact
between the SensorPad and the mattress
at all times. The plywood needs to be at
least 10cm larger than the SensorPad and
approx. 6mm thick. Drill a few holes in the
plywood to allow air circulation
4. Place the mattress back ON TOP of the
SensorPad
5. Secure the SensorPad wire to the bed using
a tie wrap. Keep the wire out of the baby’s
reach at all times.
6. The Sensitivity of the SensorPad has been
set at level 3
DO NOT ADJUST UNLESS NECESSARY
The sensitivity of the SensorPad can be
adjusted to ensure optimal performance
in any situation (e.g. mattress size and
thickness). See Step 4: Testing your
Angelcare Baby Monitor.
Consumer Helpline: 0845 009 1789 | www.angelcare-uk.co.uk
AC1100_Manual.indd 2
MULTIPLE BABIES
NEVER use the Angelcare Video, Movement &
Sound Monitor if multiple babies are sleeping
together in ONE bed. For monitoring more than
one baby (e.g. twins) you need two Angelcare
Movement & Sound Monitors and the babies
need to be in SEPARATE beds.
MOSES BASKETS
The SensorPad can be used with moses
baskets, but the plywood is not required in
this specific situation. ALWAYS place the
SensorPad directly under the moses basket
mattress and ensure the lead is fed through a
hole in the base so it is out of reach from baby.
ADULT MATTRESSES
The SensorPad CANNOT be used with
mattresses for adults or memory foam and
hollow frame mattresses.
DO NOT attach any moving or vibrating items
(e.g. mobiles) to the cot, as this will affect the
SensorPad readings.
2
19/5/11 2:38:56 pm
Step 2a: Nursery Unit - Installation
• Position the Nursery
Unit facing the cot bed
• Dial to adjust vertical
camera angle
Location of the
Nursery Unit
SensorPad
1. Remove the battery cover (by removing the 2 screws) on the bottom of the Nursery Unit
and insert 3 x AAA regular batteries (not included) into the battery compartment (for battery
backup in case of power failure).
ALWAYS MAKE SURE TO CHECK IF THE BATTERIES ARE INSERTED CORRECTLY!
2. Connect the AC adaptor to the Nursery Unit and plug the adaptor into the mains in the baby’s
room
3. Place the Nursery Unit at least 50cm from the baby’s bed on a higher level to ensure the video
camera can capture the baby’s bed. If necessary, a tripod (not included) can be connected to
the bottom of the Nursery Unit.
4. If necessary, adjust the vertical angle of the camera by turning the dial on the back of the
Nursery Unit
5. Connect the plug of the SensorPad into the dedicated socket on the back of the Nursery Unit
6. If two Angelcare Baby Monitors are used in the same room, please ensure there is at least 1
metre between both Nursery Units
7. Push back and hold the LEFT WING of the Nursery Unit for 2 seconds to turn ON the Nursery
Unit
Secure the SensorPad
cord
Step 2b: Nursery Unit - Overview Functions
1
2
3
4
5
8
FRONT
1. Nightlight
2. PUSH button for HOLD Function
3. Power ON/OFF
4. Nightlight ON/OFF
5. Video Camera
6. Power Indicator:
Green – Power
Red – Low Battery Indicator
7. Microphone
8. Infrared LED’s for Night Vision
9
10
BACK
9. Loudspeaker
10. SensorPad socket
11. AC adaptor socket
12. Dial to adjust vertical camera angle
13. Battery compartment
11
6
7
12
13
Step 3a: Parent Unit – Installation
Location of battery compartment
and AC adaptor socket
1. The Parent Unit is portable and fully rechargeable
2. Remove the belt clip to remove the battery cover (by removing the single screw) on the back
of the Parent Unit and insert 3 x AAA NIMH rechargeable batteries (included) into the battery
compartment. NEVER USE REGULAR ALKALINE BATTERIES as these batteries are not suitable
and might explode
ALWAYS MAKE SURE TO CHECK IF THE BATTERIES ARE INSERTED CORRECTLY!
3. Connect the AC adapter to the charger and plug the adapter into the mains
PLACE THE PARENT UNIT IN THE CHARGER AND CHARGE THE BATTERIES FOR 16 HOURS
BEFORE FIRST USE!
4. Place the charger in a convenient place in your home, e.g. your living room. The maximum
distance between the Parent Unit and the Nursery Unit is approx. 100 metres indoors and 200
metres outdoors
Consumer Helpline: 0845 009 1789 | www.angelcare-uk.co.uk
AC1100_Manual.indd 3
3
19/5/11 2:38:58 pm
Step 3b: Parent Unit - Overview Functions
FRONT
1. LCD Full Colour Touch screen
2. Microphone
3. Loudspeaker
1
4
LEFT SIDE
4. Power ON/OFF
2
5
6
3
7
TALK BACK FUNCTION
Press and hold the Talk Back
button to talk directly to your
baby. Please talk clearly in the
microphone on the Parent Unit,
whilst holding the Talk Back
button. Release the Talk Back
button to stop the communication.
RIGHT SIDE
5. Loudspeaker Volume UP(+)
6. Loudspeaker Volume
DOWN(-)/MUTE Function
7. Talk Back Function
Step 3c: Parent Unit - Main Screen
A. Press and hold the
POWER button on the
Parent Unit until a blue
screen with the Angelcare
logo appears
B. The Parent Unit screen
will show the video
capture from the Nursery
Unit in the baby’s room,
if the Nursery Unit is
turned ON
Press the MENU Icon on
the bottom right of the
touch screen to access
the (sub) MENU screen
C. Press any of the
FUNCTION Icons to
change the settings.
Press the SETTINGS Icon
on the bottom right of the
MENU screen to access
the SETTINGS screen or
press OK to save changes
D. Press any of the specific
FUNCTIONS Icons to
change the SETTINGS or
press OK to save changes
E. If the Nursery Unit is OFF
when the Parent Unit
is turned ON, a blank
screen will appear and
the Parent Unit will turn
OFF automatically after
1.5 minutes
Parent Unit - Setting Bar
2
1
4
3
6
5
7
1. Temperature Indicator (see Step 12)
2. Temperature Control ON/OFF (see Step 12)
3. Pendulum - Movement Indicator (see Step 8)
4. Sound Setting (see Step 6)
5. Alarm Setting (see Step 10)
6. Transmission Signal Strength (see Step 15)
7. Battery Level (see Step 14)
Consumer Helpline: 0845 009 1789 | www.angelcare-uk.co.uk
AC1100_Manual.indd 4
4
19/5/11 2:39:02 pm
Step 4: Testing your Angelcare Baby Monitor
TO TEST THE SOUND FUNCTION
Switch both the Parent and Nursery unit ON. Have someone speak into the
Nursery Unit or play music in the baby’s room. You should hear sound from
the Parent Unit. If there is no sound, please refer to the Troubleshooting
section. You can increase/decrease the sound volume using the ARROWS UP
and DOWN on the right hand side of Parent Unit.
TO TEST THE MOVEMENT FUNCTION
1. Make sure the SensorPad is installed correctly and turn both units ON
2. Gently move your hand on top and in the middle of the mattress. This will
simulate your baby’s movements
3. If movement is detected, the pendulum in the Parent Unit Settings Bar will
‘swing’ from left to right
4. After approx. 1 minute remove your hand from the mattress. Do not lean
against the baby’s bed!
5. Due to the lack of movement, the pendulum on the Parent Unit Settings
Bar stops swinging. After 15 seconds a loud ‘pre-alarm’ beep will sound,
and 5 seconds later the alarm will go off (continuous beeping sound)
6. Follow the same process for all four corners of the mattress to ensure that
the SensorPad is covering the complete mattress. The area covered by the
SensorPad can be increased by adjusting the sensitivity (see below)
7. If the alarm does not sound, the SensorPad may be detecting a continuous
vibration from (e.g.) the floor, a strong draught or vibrating items (e.g. cot
mobiles), or the baby’s bed is being touched
8. DO NOT touch baby’s bed whilst testing the monitor. Place baby’s bed
near a solid supporting wall and away from strong drafts
TO ADJUST THE SENSITIVITY OF THE SENSORPAD
1. The factory setting is level 3, which is suitable for most baby and
children’s bed sizes and types of mattress. DO NOT ADJUST UNLESS
NECESSARY
2. The sensitivity of the SensorPad can be increased (highest level 5, suitable
for larger beds or thicker mattresses) or decreased (lowest level 1, suitable
for smaller beds and if there a possibility of external vibrations). See Step 8
on how to adjust the SensorPad sensitivity
3. By increasing the sensitivity the SensorPad will cover a larger area (e.g.
bigger beds or thicker mattresses), BUT it could also detect vibrations
from outside the baby’s bed, e.g. mobiles, etc
4. It is important to find the right balance for your situation to ensure optimal
performance of the SensorPad
5. ALWAYS test the performance after moving and reinstalling the Angelcare
Baby Monitor in a different place or when the bed or mattress has
changed
6. NEVER USE THE SENSORPAD WITH AN ADULT MATTRESS, A MEMORY
FOAM OR HOLLOW FRAME MATTRESS!
TO TEST STOPPING THE MOVEMENT ALARM
To stop the alarm:
1. Place your hand on the mattress again so that the SensorPad starts
detecting movement
2. Turn the Nursery Unit OFF (then restart the monitor by turning the Nursery
Unit ON again)
3. Press the Alarm Icon on the Parent Unit screen or press and hold the top
button on the Nursery Unit
TO TEST THE BATTERY MODE
Always check if the battery mode is functioning correctly by operating both
units without the AC adaptors. If the Battery LED is red on the Nursery Unit,
the batteries need to be replaced. If the display on the Parent Unit does not
appear, the Parent Unit needs to be recharged in the Charging Cradle.
IMPORTANT!
The Movement Function is activated as a factory setting. This means
that the Movement Alarm will most likely sound if both the Parent
Unit and Nursery Unit are turned ON for the first time. This is probably
because the SensorPad has not been connected yet or no movement
has been detected, e.g. there is no baby in the (cot) bed yet. This is
normal and shows your Angelcare Baby Monitor works correctly.
Please see Steps 1 to 4 for correct installation and testing of your
Angelcare Baby Monitor to ensure optimal performance.
Step 5: How to Change & Save your Baby Monitor Settings
MENU ICON:
Access to MENU screen
SETTINGS ICON:
Access to SETTINGS screen
OK ICON:
Save new/changed monitor
settings
IMPORTANT
1. Both the Parent Unit and Nursery Unit have to be turned ON to change monitor settings in the
MENU or SETTINGS screen on the Parent Unit
2. Press the MENU Icon on the Parent Unit screen (see screen B in Step 3c)
3. Press the SETTINGS Icon in the MENU screen to access further settings (see screen C in Step
3c)
4. Change the monitor settings to reflect personal preferences (see Step 6 to 15)
5. Save the new/changed settings in the MENU or SETTINGS screen on the Parent Unit by
pressing the OK Icon. After pressing the OK Icon, the screen will return to the video capture
screen
6. The Parent Unit screen will return to the video capture screen if no changes have been
recorded in the MENU or SETTINGS screen for 1 minute. Any changes to settings will not be
saved
7. The sound transmission will be temporarily deactivated when monitor settings are being
viewed or changed in the MENU or SETTINGS screen on the Parent Unit. The movement
detection remains activated as normal
IMPORTANT!
• If the Icon is illuminated, the relevant Function is activated/ON
• If the Icon is dimmed, the relevant Function is deactivated/OFF
Consumer Helpline: 0845 009 1789 | www.angelcare-uk.co.uk
AC1100_Manual.indd 5
5
19/5/11 2:39:04 pm
Step 6: Sound Function
SOUND FUNCTION ICON:
Sound ON
Function:
Activates the sound transmission between the Parent Unit and the
Nursery Unit.
Factory Settings:
ON
Options:
ON, OFF or MUTE
How to change
this setting:
Sound Function
1. Press the MENU Icon on the Parent Unit touch screen
2. Press the Sound Function Icon ON or OFF
3. Increase Sound Volume Level by pressing the UP(+)/DOWN(-) buttons
on the right side of the Parent Unit
4. The Sound Volume Level Indicator will appear in the Parent Unit screen
5. Press OK to save changes and return to the video capture screen
6. The Speaker Icon in the Parent Unit Settings Bar will show the
activated setting
Sound OFF
Adjust Sound Volume
Level
Sound Volume
Level Indicator
Mute Function
1. Press and hold the DOWN(-) button for at least 2 seconds to MUTE
(deactivate) the Sound transmission
2. Press and hold DOWN(-) button for at least 2 seconds again to
reactivate the Sound transmission
PARENT UNIT SETTINGS BAR:
Sound ON
Sound OFF or MUTE
(blinking)
Step 7: Sound Transmission
SOUND TRANSMISSION ICON:
Function:
The sound transmission can be set either to CONTINUOUS SOUND (OFF)
or SOUND ACTIVATED (ON).
Continuous Sound: the sound transmission between Nursery Unit and
Parent Unit is always active and open, so all sounds in the baby’s rooms
are transmitted.
Sound Activated: the sound transmission between the Nursery Unit
and Parent Unit is only activated if the Nursery Unit registers a certain
volume level of sound, e.g. crying. The sound transmission will turn
itself off again if no continuous sound is registered. The sensitivity of the
microphone is adjustable.
ON - Sound activated
transmission
OFF - Continuous
sound transmission
Factory Settings:
OFF – Continuous sound transmission
Options:
ON – Sound activated transmission
OFF – Continuous sound transmission
How to change
this setting:
Sound Transmission
1. Press the MENU Icon on the Parent Unit touch screen
2. Press the Sound Transmission Icon ON or OFF
3. Press OK to save changes and return to the video capture screen
MICROPHONE SENSITIVITY ICON:
Adjust Microphone
Sensitivity Level
Microphone Sensitivity Adjustment
1. Press the MENU Icon on the Parent Unit touch screen
2. Press the SETTINGS Icon in the MENU screen
3. Press the Microphone Sensitivity Icon until the preferred level (1 to 4
bars) is selected
4. Press OK twice to save changes and return to the video capture screen
Consumer Helpline: 0845 009 1789 | www.angelcare-uk.co.uk
AC1100_Manual.indd 6
6
19/5/11 2:39:06 pm
Step 8a: Movement Function - Settings
MOVEMENT FUNCTION ICON:
Movement ON
Function:
Movement Function: Activates the SensorPad. It will detect your baby’s
movements and sound an alarm when there is no movement detected
after 20 seconds. Please ensure the SensorPad has been installed and
tested according to the instructions in Step 4.
Factory Settings:
ON
Options:
ON or OFF
How to change
this setting:
Movement Function
1. Press the MENU Icon on the Parent Unit touch screen
2. Press the Movement Function Icon ON or OFF
3. Press OK to save changes and return to the video capture screen
4. The Movement Icon (pendulum) in the Parent Unit Settings Bar will
show the activated setting
5. When the Movement Function is activated and movement is being
detected, the Movement Icon (pendulum) will swing from left to right
Movement OFF
PARENT UNIT SETTINGS BAR:
Movement icon will swing when
movement is being detected
Step 8b: Movement Function - Sensorpad Sensitivity
SETTINGS ICON:
Function:
SensorPad Sensitivity: To adjust the sensitivity of the SensorPad to
ensure optimal performance of the Movement Function.
Factory Settings:
ON
Options:
1 (low sensitivity) to 5 (high sensitivity)
How to change
this setting:
SensorPad Sensitivity Adjustment
1. Press the MENU Icon on the Parent Unit touch screen
2. Press the SETTINGS Icon in the MENU screen
3. Press the SensorPad Sensitivity Icon until the preferred level (1 to 5
bars) is selected
4. Press OK twice to save changes and return to the video capture screen
IMPORTANT
The factory setting (level 3) is suitable for most bed sizes and types of
mattress. DO NOT ADJUST UNLESS NECESSARY!
The sensitivity of the SensorPad can be increased (highest level 5,
suitable for larger beds or thicker mattresses) or decreased (lowest
level 1, suitable for smaller beds and if there a possibility of external
vibrations).
By increasing the sensitivity the SensorPad will cover a larger area (e.g.
bigger beds or thicker mattresses), BUT it could also detect vibrations
from outside the baby’s bed, e.g. mobiles, etc.
It is important to find the right balance for your situation to ensure
optimal performance of the SensorPad.
ALWAYS test the performance after moving and reinstalling the Angelcare
Monitor in a different place or when the bed or mattress has changed.
NEVER USE THE SENSORPAD WITH A MEMORY FOAM OR HOLLOW
FRAME MATTRESS!
See Steps 1 to 4 for correct installation and testing of your Angelcare
Baby Monitor.
MOVEMENT ALARM
• This alarm is triggered when no movement is detected by the
SensorPad for 20 seconds
• The Parent Unit and Nursery Unit will sound a loud audible alarm
• The Parent Unit screen will show the Alarm Icon
• IF THIS ALARM SOUNDS, CHECK YOUR BABY IMMEDIATELY!
• To stop the Movement Alarm: press the Movement Alarm Icon on the
Parent Unit screen or press and hold the top button of the Nursery
Unit. This activates the HOLD Function, which deactivates both the
Sound & Movement Function temporarily (see Step 11 for further
details)
• Press the HOLD Icon on the Parent Unit screen to reactivate the Sound
& Movement Function
Access to SETTINGS screen
SENSORPAD SENSITIVITY ICON:
SensorPad Sensitivity Level
MOVEMENT ALARM ICON:
Press Movement Alarm Icon on Parent Unit
or top button on Nursery Unit to stop alarm
HOLD FUNCTION ICON:
Consumer Helpline: 0845 009 1789 | www.angelcare-uk.co.uk
AC1100_Manual.indd 7
7
19/5/11 2:39:09 pm
Step 8c: Movement Function - Tic Function
Tic ON
Function:
The ‘Tic’ function provides a regular ‘ticking’ sound that indicates that
the SensorPad is detecting movements. The ‘Tic’ function can only be
selected if the Movement Function is activated.
Factory Settings:
OFF
Options:
ON or OFF
How to change
this setting:
Tic Function
1. Press the MENU Icon on the Parent Unit touch screen
2. Press the Tic Function Icon ON or OFF
3. Press OK to save changes and return to the video capture screen
Tic OFF
Step 9a: Video: Power Saving Function
TURN VIDEO ON/OFF:
Function:
To minimise energy consumption the video screen can be turned OFF
(and back ON) by briefly pushing the ON/OFF button on the left hand side
of the Parent Unit.
It is also possible to activate the POWER SAVING mode, which turns
OFF the video screen automatically after 5, 10, 15 or 20 seconds
(programmable).
Press ON button briefly to turn
OFF video screen
POWER SAVING ICON:
Factory Settings:
OFF
Options:
ON or OFF
How to change
this setting:
Power Saving Function
1. Press the MENU button on the Parent Unit touch screen
2. Press the SETTINGS button in the MENU screen
3. Press ‘+’ and ‘-’ Icons next to the Power Saving Icon until the
preferred Power Saving setting is selected (OFF, 5, 10, 15 or 20
seconds)
4. Press OK twice to save changes and return to the video capture screen
Press ‘+’ and ‘-’ until the preferred
Power Saving setting is selected
IMPORTANT
Always leave the Parent Unit in the Charging Cradle (mains power)
if the video screen is turned ON continuously, to ensure the Parent
Unit with video capture screen stays ON at all times.
If the Parent Unit is running on batteries only, it is possible that the
Parent Unit will turn itself OFF due to shortage of power after a relatively
short time.
Step 9b: Video: Zoom & Rotate Function
Zoom icon
Function:
It is possible to Zoom and Rotate the video camera view on the Nursery
Unit, using the ZOOM and ROTATE Function on the Parent Unit.
How to change
this setting:
1. Press the ZOOM Icon on the Parent Unit touch screen
2. The video camera will now enter the ZOOM mode and display the
video capture 100% enlarged
3. Use the ARROWS UP/DOWN/LEFT/RIGHT to rotate the video camera to
the required position
4. The video capture remains in this position until the ZOOM Icon is
pressed again, after which the video capture returns to normal
Consumer Helpline: 0845 009 1789 | www.angelcare-uk.co.uk
AC1100_Manual.indd 8
8
19/5/11 2:39:13 pm
Step 9c: Video: Night Vision
Function:
During darkness, the video camera automatically switches to Infrared
Night Vision.
How to change
this setting:
During darkness, the video camera on the Nursery Unit will automatically
switch to Night Vision, using Infrared technology for video transmission.
When activated 4 red LED lights will be visible from the Nursery Unit.
Step 10: Alarm Type Options
ALARM SETTINGS ICON:
Function:
There are 3 different Alarm Type combinations:
• Sound Alarm: An audible alarm will sound if an alarm is activated
• Vibrating Alarm: The Parent Unit will vibrate only if an alarm is
activated, no sound will be heard
• Sound & Vibrating Alarm: Combination of a sound and vibrating
alarm
ALARM SETTINGS OPTIONS:
Factory Settings:
Sound & Vibration Alarm
Options:
1. Sound Alarm
2. Vibrating Alarm
3. Sound & Vibrating Alarm
How to change
this setting:
Alarm Settings
1. Press the MENU Icon on the Parent Unit touch screen
2. Press the SETTINGS Icon in the MENU screen
3. Press the Alarm Settings Icon until the preferred alarm setting is
selected
4. Press OK twice to save changes and return to the video capture screen
5. The Alarm Setting Icon (see Icons on the left) in the Parent Unit
Settings Bar will show the activated setting
Function:
The HOLD Function allows you to put the Baby Monitor on HOLD when
you need to pick up the baby out of his/her bed for a short period of time.
When the Baby Monitor is on HOLD, the Movement Alarm will not go off
and no sound is being transmitted. The Parent Unit will sound a TRIPLE
BEEP every 30 seconds to confirm the Baby Monitor is still on HOLD.
Factory Settings:
OFF
Options:
ON or OFF
How to change
this setting:
Hold Function
1. Press the MENU Icon on the Parent Unit touch screen
2. Press the HOLD Icon to activate the Hold Function
3. Press the HOLD Icon in the middle of the Parent Unit screen to
deactivate the HOLD Function and to return to the video capture
screen
Sound Alarm
Sound & Vibrating Alarm
Vibrating Alarm
PARENT UNIT SETTINGS BAR
Step 11: Hold Function
HOLD FUNCTION ICON:
Hold ON or OFF on Nursery Unit
Hold ON or OFF on Nursery Unit
The HOLD Function can also be activated and deactivated by pressing
the top button on the Nursery Unit.
Consumer Helpline: 0845 009 1789 | www.angelcare-uk.co.uk
AC1100_Manual.indd 9
9
19/5/11 2:39:15 pm
Step 12: Temperature Control
TEMPERATURE CONTROL ICON:
Function:
Your Angelcare Baby Monitor can be used to monitor the temperature
in your baby’s room and sound an alarm if the temperature is either too
high or too low. A triple beep will sound if the temperature is outside the
programmed range.
The temperature sensor in the Nursery Unit is very sensitive and
readings can be affected by (e.g.) cold or warm draughts, placement next
to a cold window or above a heating radiator.
Access to Temperature Control
Menu
ALWAYS use a 2nd separate digital thermometer placed in a different
part of the room to achieve an accurate reading of the temperature in the
baby’s room.
Factory Settings:
OFF
Options:
ON or OFF and variable temperature levels
How to change
this setting:
Temperature Control
1. Press the MENU Icon on the Parent Unit touch screen
2. Press the Temperature Control Icon to access menu
3. Press the ‘+’ and ‘-’ Icons next to the red thermometer to set the
HIGH temperature alarm level (high temperature alarm range: 22°C to
40°C/72°F to 104°F)
4. Press the ‘+’ and ‘-’ Icons next to the blue thermometer to set the
LOW temperature alarm level (high temperature alarm range: 5°C to
19°C/41°F to 66°F)
5. Press °C/°F Icon to switch the temperature indication to Fahrenheit or
Celsius
6. Press the Alarm Icon to turn Temperature Control ON or OFF
7. Press OK twice to save changes and return to the video capture screen
8. The Temperature Icon (thermometer) in the Parent Unit Settings Bar
will show the activated setting
Temperature Control Menu
PARENT UNIT SETTINGS BAR:
Temperature Alarm
The Temperature Alarm is triggered when the temperature detected by
the Nursery Unit reaches the set high or low temperature limits. The
Parent Unit will sound 4 consecutive beeps every 5 seconds and the
Temperature Alarm Icon will be displayed in Parent Unit screen.
Temperature Alarm
Step 13: Timer Function
TIMER ICON:
Timer ON
Function:
The timer is a useful tool to time certain events during day or night, e.g.
the time between two feeds or timing naps.
Factory Settings:
OFF
Options:
ON or OFF
How to change
this setting:
Timer Function
1. Press the MENU Icon on the Parent Unit touch screen
2. Press the TIMER Icon ON or OFF
3. The monitor will automatically return to the video capture screen and
the TIMER is shown at the bottom of the screen, starting from 0 hours;
0 seconds
4. The TIMER is limited to 5 hours; 59 minutes and will stop and
disappear automatically after this limit has been reached
5. The TIMER will be reset and turned OFF if the Parent Unit is turned OFF
Timer OFF
Timer in Parent Unit Screen
Consumer Helpline: 0845 009 1789 | www.angelcare-uk.co.uk
AC1100_Manual.indd 10
10
19/5/11 2:39:17 pm
Step 14: Battery Level Indicator
PARENT UNIT SETTINGS BAR:
Function:
The Battery Indicator shows the remaining battery level of the
rechargeable batteries of the Parent Unit.
How to use this
function:
1. Install and charge the rechargeable batteries in the Parent Unit as
instructed in Step 3a
2. If possible, keep the Parent Unit in the Charging Cradle at all times
3. If using battery power, always ensure the minimum battery level is
25% full to maintain optimal performance of the monitor
4. If the battery level goes below 25%, recharge immediately
5. The Battery Level Icon in the Parent Unit Settings Bar will show the
actual battery level and will move from left to right whilst charging
6. Fully charged batteries will last up to 6 hours based upon normal
usage, but considerably less if the video screen is turned ON
constantly
Charging the batteries
Step 15: Signal Strength & Out of Range Indicator
PARENT UNIT SETTINGS BAR:
Function:
The Signal Strength Indicator shows the strength of signal between the
Parent Unit and Nursery Unit. The Out of Range Indicator will alarm when
the two units have lost connection and the Out of Range Icon will be
visible in the Parent Unit screen.
How to use this
function:
1. The Signal Strength Icon in the Parent Unit Settings Bar will show the
actual signal strength between the Parent Unit and Nursery Unit
2. The maximum range between the two units is up to 100 metres
indoors and up to 200 metres outdoors
3. An Out of Range alarm will sound when the connection between the
two units is lost
4. Out of Range situations can be caused by (e.g.) too much distance or
thick walls between the two units
5. When the units are Out of Range you will hear a Triple Beep and/or the
Parent Unit will vibrate every 5 seconds and the Out of Range Icon will
be displayed on the Parent Unit screen
6. When the Out of Range alarm sounds move the units closer together
until communication has been (re)established.
SIGNAL STRENGTH OPTIONS:
Good Signal
Low Signal
No Signal
OUT OF RANGE ICON:
HOW TO RECONNECT THE PARENT AND NURSERY UNIT
In the unlikely event that the connection between the Nursery Unit and
the Parents Unit is completely lost, please follow these steps to restore
the connection:
1. Turn both the Parents Unit and the Nursery Unit OFF
2. Turn the Nursery Unit ON
3. Press and release the left wing 4 times. The nightlight will flash.
4. Turn the Parent Unit ON. A blue screen will appear with the NO SIGNAL
icon in the Parent Unit Settings Bar
5. While pressing the TALK BACK button on the right hand side of the
Parent Unit, press and release the POWER button on the left hand side
of the Parent Unit
6. If successful, the video capture will appear on the Parent Unit’s screen
again. The connection was successfully restored
Consumer Helpline: 0845 009 1789 | www.angelcare-uk.co.uk
AC1100_Manual.indd 11
11
19/5/11 2:39:19 pm
Monitoring more than one baby
NEVER use the Angelcare Movement & Sound Monitor (or any
movement monitor) if multiple babies are sleeping together in ONE bed!
If you are using two Angelcare monitors it is essential that:
For monitoring more than one baby (e.g. twins) you need two Angelcare
Movement & Sound Monitors and the babies need to be in SEPARATE
beds.
• The distance between the two Nursery Units is at least 1 metre
• Each monitor is set to a different channel
• The distance between the Parent Units is at least 1 metre
Please see website for more information.
Maintenance of your Angelcare Baby Monitor
RETAIN INSTRUCTIONS: Always keep this Instructions Manual for future
reference.
WATER, MOISTURE AND HEAT DAMAGE: Keep all monitor components
away from water (sink, bath tub, swimming pool) and places that emit heat
(stove, radiator).
VENTILATION: ALWAYS place both units on a flat surface in an upright
position to ensure free air circulation around the units. The SensorPad is
made of plastic and does not permit the air to circulate. Therefore, mildew
build-up could develop underneath the mattress in the SensorPad area.
We suggest rotating the mattress regularly (as per the manufacturer’s
instructions) to prevent any mildew.
AC POWER SOURCE: Use only the AC adaptors supplied with the Angelcare
Baby Monitor.
WIRES PROTECTION: Avoid damage to the wires of the SensorPad and AC
adaptors. Route wires so that they are not likely to be walked on or pinched
by items placed upon or against them.
CLEANING: Disconnect all units before cleaning. DO NOT immerse in water.
Use a dry cloth to keep monitor free from dust. DO NOT spray with cleaning
products or solvents. Wipe SensorPad with a cloth moistened very slightly
with an antiseptic or mild detergent.
OBJECTS AND LIQUIDS: Always ensure that no objects or liquids are
pushed or spilled into any openings of the Parent Unit, Nursery Unit and/or
SensorPad.
NON-USE PERIODS: When not using the baby monitor for any long period,
remove the batteries from both units and disconnect the AC adaptors from
the mains power.
Factory settings
• Sound Function
ON
• Movement Function
ON
• Tic Function
OFF
• Sound Transmission
Continuous Sound
• Sound Transmission - Microphone Sensitivity (if applicable)
Level 2 of 4
• Alarm Type Setting
Sound Alarm
• Parent Unit Speaker Volume
Level 3 of 6
• SensorPad Sensitivity
Level 3 of 5
• Video Screen - Power Saving Function
OFF
• Temperature Scale
°Celsius
• Temperature Alarm
OFF
• High Temperature Alarm
30 °Celsius
• Low Temperature Alarm
19 °Celsius
• Timer
OFF
Technical specifications
Video Camera: Full colour CMOS Video Sensor (240 x 320 pixels, 15 fps)
with Infrared Night Vision
Batteries:
Screen: 2.75” LCD full colour digital touch screen
Range: up to 200 metres (655 feet)
• Do not mix alkaline, standard (carbon-zinc), or rechargeable (NI-CAD,
NI-MH, etc) batteries
Number of Channels: 64 channels
Transmission:
Power Supply: 3 x AAA (LR03) alkaline batteries (not included) or 7.5V AC
adaptor for Nursery Unit. 3 x AAA (LR03) rechargeable batteries (included)
and 7.5V AC adaptor for Charging Base for the Parent Unit.
Data transmission between the Parent Unit and Nursery Unit is on the
2.4GHz frequency.
• Do not mix old and new batteries
CAUTION: To reduce the risk of electric shock, do not expose this product
to rain or moisture. Danger of explosion if batteries are incorrectly
replaced. The included batteries are 3 x AAA NIMH rechargeable batteries
manufactured by GPI International Limited, GN60AAAHC, 1.2V 600mAh.
THE SUPPLIED BATTERIES CAN ONLY BE REPLACED BY 3 X AAA NIMH
RECHARGEABLE BATTERIES.
Consumer Helpline: 0845 009 1789 | www.angelcare-uk.co.uk
AC1100_Manual.indd 12
12
19/5/11 2:39:20 pm
Warnings
FAILURE TO FOLLOW THESE WARNINGS AND THE ASSEMBLY
INSTRUCTIONS COULD RESULT IN SERIOUS INJURY OR DEATH.
Do not use the Nursery Unit if:
THIS PRODUCT IS NOT A MEDICAL DEVICE DESIGNED TO PREVENT
CASES OF SUDDEN INFANT DEATH SYNDROME (SIDS OR COT DEATH).
• The unit has been exposed to liquids
THIS PRODUCT IS NOT A SUBSTITUTE FOR DIRECT SUPERVISION OF
YOUR BABY. CHECK YOUR BABY’S ACTIVITIES AT REGULAR INTERVALS.
MONITORING OF PREMATURE BABIES, OR BABIES CONSIDERED TO BE
AT RISK, SHOULD BE CARRIED OUT ONLY UNDER THE SUPERVISION OF A
DOCTOR OR HEALTH PROFESSIONAL.
ALWAYS CHECK YOUR BABY IMMEDIATELY WHEN THE ALARM SOUNDS.
WARNING: THIS PRODUCT IS NOT A TOY.
Please read Step 1 (Installation of SensorPad), Step 4 (Testing your Baby
Monitor) and the Troubleshooting section to ensure your Angelcare Baby
Monitor is installed correctly.
DO NOT put the Parent Unit near wireless devices or a microwave oven.
Such devices can disrupt the transmission of the alarm signal.
The Angelcare Baby Monitor is perfectly safe. The SensorPad and its cord are
entirely passive. They carry no electrical current and do not radiate any form
of energy. The Nursery Unit emits only very low power radio signals through
its antenna.
These signals do not present a safety hazard.
The SensorPad may detect movement from many sources from both inside
and outside your baby’s room, e.g. washing machine, loud music, etc. Make
sure that all vibration sources are eliminated before using the Angelcare
Baby Monitor. When the monitor is in use, DO NOT use a crib mobile or other
crib accessories that produce vibrations. This can prevent the movement
alarm from working properly as the monitor will still be detecting movement.
Please do not touch the baby’s bed when the monitor is in use.
Your Angelcare Baby Monitor can be used in any crib that is stationary and
designed to safely hold a baby. If your crib has a spring or slatted base you
will need to place a piece of plywood under the SensorPad. Please see Step
1 for correct installation of the SensorPad. Only use your Angelcare Baby
Monitor in a stationary sleeping environment such as a cot (bed) or moses
basket where the SensorPad can rest on a completely flat, firm surface.
You may experience false alarms for several reasons. The most common
reason is the Nursery Unit has not been turned off after you have removed
your baby from the crib. Another reason is if the SensorPad has not been
placed under the mattress properly. Be sure the SensorPad is placed on a
flat, firm surface with the printed side facing up. The sensitivity level may
also need to be adjusted. Please see Step 1 for the correct installation of the
SensorPad.
If the monitor has been stored or has been exposed to hot or cold
temperatures, it may take up to one hour before the temperature displayed
on the Parent Unit is accurate.
ALWAYS place the Parent and Nursery Units on a flat surface in an upright
position, away from baby’s reach.
Allow for proper ventilation when units are in use. Do not cover the Nursery
Unit or Parent Units with any object such as a blanket. Do not place it in a
drawer or in any location which would muffle the sound or interfere with the
normal flow of air.
• The AC adaptor wire or plugs have been damaged
• The unit has been dropped or is damaged
DO NOT DISASSEMBLE the Nursery Unit, Parent Unit, Parent Unit base,
SensorPad or AC Adaptors. There are no user-serviceable parts inside. Risk
of electrical shock, fire or death.
The antenna used for this transmitter must be installed least 20cm (7.9”)
away from all human beings and must not be collocated or operating in
conjunction with any other antenna or transmitter.
IMPORTANT: You must use only rechargeable batteries in the Parent Unit. DO
NOT use alkaline batteries or you will severely damage the unit. Charge the
batteries for 16 hours prior to first use. Be sure to have the monitor in the
OFF position during this period. Only use the AC adaptors included with your
monitor.
DO NOT use these adapters with any other equipment. When unplugging the
AC adapter from the Nursery Unit, be sure it is switched to the OFF position.
If this is not the case, the unit will revert to battery mode if batteries are
installed.
You can use rechargeable batteries in the Nursery Unit, however, they will
not be recharged by plugging in the AC adaptor.
To recharge, remove the batteries and use an external charger.
ONLY use AAA (LR03) rechargeable batteries and/or the AC adaptor provided
for the Parent Unit.
FCC WARNINGS
Modifications not authorised by the manufacturer may void users’ authority
to operate this device.
NOTE: This equipment has been tested and found to comply with the
limits for a Class B digital device, pursuant to Part 15 of the FCC Rules.
These limits are designed to provide reasonable protection against harmful
interference in a residential installation. This equipment generates, uses
and can radiate radio frequency energy and, if not installed and used in
accordance with the instructions, may cause harmful interference to radio
communications. However, there is no guarantee that interference will
not occur in a particular installation. If this equipment does cause harmful
interference to radio or television reception, which can be determined by
turning the equipment off and on, the user is encouraged to try to correct the
interference by one or more of the following measures:
• Reorient or relocate the receiving antenna
• Increase the separation between the equipment and receiver
• Connect the equipment into an outlet on a circuit different from that to
which the receiver is connected
• Consult the dealer or an experienced radio/TV technician for help
This device complies with part 15 of the FCC Rules.
Operation is subject to the following two conditions:
1. This device may not cause harmful interference, and
Plug the AC adaptor into a convenient accessible mains socket outlet.
2. This device must accept any interference received, including interference
that may cause undesired operation
Keep all wires out of baby’s reach as this could cause a possible
entanglement or strangulation injury.
ErP COMPLIANCE - UK
DO NOT touch the end of the AC adaptor cord when it is plugged into the
mains.
ONLY USE ORIGINAL ANGELCARE AC ADAPTORS, MODEL NO.
T07505B001.
The Angelcare Baby Monitor uses public airwaves to transmit signals. The
Parent Unit may pick up signals or interference from other baby monitors
in your area. Your monitor may also be picked up by receivers in other
households. To protect your privacy, make sure both units are in the OFF
position when not in use and change the channels regularly.
Consumer Helpline: 0845 009 1789 | www.angelcare-uk.co.uk
AC1100_Manual.indd 13
13
19/5/11 2:39:20 pm
Limited Warranty
IMPORTANT! THE ANGELCARE BABY MONITOR IS A PERSONAL CARE
PRODUCT. PLEASE DO NOT RETURN THIS PRODUCT TO THE RETAILER
YOU BOUGHT IT FROM. IF YOU HAVE QUESTIONS OR NEED HELP, PLEASE
CALL THE ANGELCARE HELPLINE ON 0845 009 1789 OR EMAIL TO
[email protected].
Angelcare warrants to the original owner of this product that the Angelcare
Video, Movement and Sound Monitor (model AC1100) is free from any
material and workmanship defects, for a period of one (1) year from the
date of the original purchase. f this monitoring system fails to function
properly when used as directed under normal conditions within the oneyear period, Angelcare will either repair or replace the product, at our
discretion, free of charge. Please contact the Angelcare Helpline on 0845
009 1789 or email to [email protected]. The product must be
accompanied by a proof of purchase, either a bill of sale or other proof that
the monitoring system is within the warranty period. Angelcare will bear
the cost of repairing or replacing the product and shipping it back to you.
This warranty does not apply to a product which has been damaged as a
result of improper maintenance, an accident, improper voltage supply or
any other form of misuse. The warranty is also void if the owner repairs or
modifies the product in any way. Angelcare is not liable for any incidental
or consequential damages with regard to this product. The warranty also
excludes any liability other than what is stated above. No other warranty is
given.
LEGAL RIGHTS VARY FROM COUNTRY TO COUNTRY. SOME COUNTRIES
DO NOT ALLOW THE EXCLUSION OR LIMITATION OF INCIDENTAL OR
CONSEQUENTIAL DAMAGES, SO THE ABOVE LIMITATIONS MAY NOT
APPLY TO YOU. WE ARE NOT IN ANY WAY RESPONSIBLE FOR ANY
OUTCOME RESULTING FROM THE USE OF THIS PRODUCT.
NOTE: The included rechargeable batteries are NOT covered by the warranty.
Protect the environment
This electronic equipment contains reusable material and must not be
disposed with domestic waste. Please take it to a collection point for electric
and electronic equipment (ask your local authorities for details).
Troubleshooting
DESCRIPTION
POSSIBLE CAUSES
SOLUTIONS
The SensorPad is
giving false alarms
Baby was removed from his/her bed and Nursery
Unit was not switched OFF.
Turn off the Nursery Unit.
The SensorPad plug is not connected properly to
the Nursery Unit.
Verify the connection between the SensorPad and Nursery Unit. Unplug
and reconnect the plug of the SensorPad to the Nursery Unit.
The SensorPad is not in full contact with baby’s
mattress and/or the mattress is not resting on a
completely flat or rigid surface.
Make sure there is no bedding between mattress and SensorPad. The
SensorPad must rest on a completely flat and rigid surface. Place a
piece of 6mm thick plywood under the SensorPad. Please follow the
instructions in Step 1.
The sensitivity setting of the SensorPad is too low,
e.g. level 1.
If the sensitivity level is too low, the SensorPad may not detect your
baby’s movements. The standard setting of the SensorPad sensitivity is
level 3. This level works for most baby (cot) bed sizes and mattresses
and can be adjusted with the dial on the back of the Nursery Unit.
ALWAYS install and test the SensorPad according to the instructions in
Steps 1 and 4.
The mattress is not suitable for use with the
SensorPad.
NEVER use the SensorPad with adult mattresses, memory foam or hollow
frame mattresses.
The SensorPad alarm
does not go off
The Nursery Unit is detecting external movement
or vibrations when baby’s (cot) bed is being
touched.
Avoid contact with the (cot) bed or moses basket when the monitor is
ON.
No sound is being
transmitted
The sound transmission is set to ‘Voice Activated’
and the sound in the baby’s room is not loud
enough to activate the transmission.
Increase the microphone sensitivity if you would like to keep
Voice Activated Sound transmission or activate Continuous Sound
transmission. Please see Step 7 for further instructions.
One of the units is turned OFF, due to low or
incorrect installed batteries.
Check/replace the batteries in both units and/or recharge the Parent Unit
(see Step 2a and 3a).
One of the units is OFF, due to the AC adaptors not
being connected properly or the mains switch is
turned off.
Check if all AC adaptors are working correctly and if the mains switch is
turned ON.
One of the units is turned OFF.
Ensure both units are ON.
The Volume Level on the Parent Unit is OFF.
Increase the Volume Level on the Parent Unit using the UP/DOWN buttons
on the right hand side of the Parent Unit (see Step 3b).
Consumer Helpline: 0845 009 1789 | www.angelcare-uk.co.uk
AC1100_Manual.indd 14
14
19/5/11 2:39:20 pm
Troubleshooting (continued)
The sound
transmission is
intermittent
The sound transmission is set to Voice Activated
and will only transmit if the microphone on the
Nursery Unit detects a certain level of sound.
Increase the microphone sensitivity if you would like to keep Voice
Activated sound transmission or activate Continuous Sound transmission.
Please see Step 7 for further instructions.
The power ON
indicator on the
Nursery Unit does
not light up
The AC adaptors are not connected properly or the
mains socket is out of order or not switched on.
Check the connections and/or change to another electrical socket.
The Nursery unit is not turned ON.
Press and hold the left wing backwards for 2 seconds to turn ON the
Nursery Unit (see Step 2a).
There is very weak
reception
The Parent and Nursery Units are too far apart
and the ‘Out of Range’ indicator is OFF.
Reduce the distance between the two units until communication is
established. Ensure both units are ON. Turn the Out of Range function ON
to avoid this in the future (see Step 15).
One or both units are placed near a large metal
construction which obstructs the transmission.
Reduce the distance between the two units until communication is
established. Ensure both units are ON. Turn the Out of Range function ON
to avoid this in the future (see Step 15).
One or both units are not in the upright position.
Place both units on a flat surface away from baby’s reach.
The batteries are low.
Check/replace the batteries or recharge the Parent Unit (see Step 3a).
Check if all AC adaptors are working correctly and if the mains socket is
turned ON.
There is interference
or noise coming
from the Parent Unit
(e.g. interference
from other monitors,
wireless phones and
networks, walkietalkies, etc.)
The Parent Unit is located near motorized devices,
fluorescent lights, televisions, etc.
Keep the Parent Unit and the Nursery Unit away from any devices that
can be a source of interference.
There is ‘feedback’
coming from the
Parent Unit (loud
howling noise)
The Parent Unit and the Nursery Unit are too close
together.
Keep the Parent and Nursery Units at least 3 metres/10 feet apart.
Decrease the volume level on the Parent Unit using the UP and DOWN
buttons on the right hand side of the Parent Unit.
The mattress has
become mouldy
There is not enough air circulation under the
mattress.
If you have placed a large piece of plywood under the SensorPad as
instructed, please drill holes in the plywood to allow air circulation. The
SensorPad is a passive device and does not radiate any form of energy
or heat.
There is no video
transmission
The video screen has been turned OFF.
The Power Save Function has been activated.
• Press the ON/OFF button on the left hand side of the Parent Unit to
start the video transmission.
• Press the video screen to start the video transmission.
• Deactivate the Power Save Function.
• For further instructions, see Step 9.
Consumer Helpline: 0845 009 1789 | www.angelcare-uk.co.uk
AC1100_Manual.indd 15
15
19/5/11 2:39:21 pm
The Angelcare Baby Monitor is a Personal Care Product.
Please DO NOT return it to the store, but contact us initially for advice and assistance:
Angelcare Helpline 0845 009 1789; Monday to Friday, 10am - 3pm
Website: www.angelcare-uk.co.uk; Email: [email protected]
Consumer Helpline: 0845 009 1789 | www.angelcare-uk.co.uk
AC1100_Manual.indd 16
19/5/11 2:39:21 pm