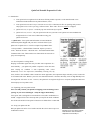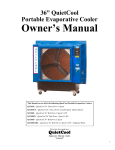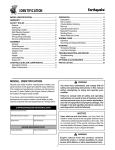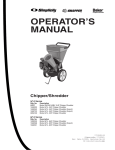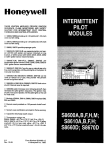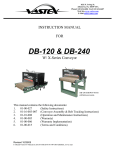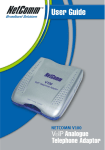
1
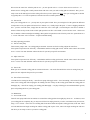
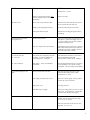
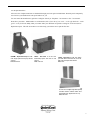
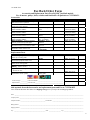
4. Fill the QuietCool reservoir
with water
Once your water hose is
securely connected – open the
water
flow
control
handle
(located on the front of your
unit) 1 1/4 turns. This water flow
control
handle
adjusts
the
amount of water going to the
unit’s reservoir. Turn-on water
and fill the reservoir. Listen
Open water flow valve 1 ¼
turns to allow water to fill
reservoir.
carefully. You can hear water
filling the reservoir. Check your water connection – make sure there is no
dripping. Once the reservoir is filled the float valve will automatically shutoff the water source. Once the water shuts off – you know that the float
valve is fully operational.
48” Quick Start
5. Turn-on the water pump
Flip the toggle switch for the water pump to “On”. Toggle switch is located
on front side of unit. The water pump will now begin pumping water to the
top / back of the unit so that gravity will allow the water to run down the
Carefully examine your QuietCool shipping carton. If your carton is
backside of unit onto and into the cooling pads. Allow water to run for 10
damaged – notify the shipper immediately! (There may be damage to unit).
– 15 minutes on new cooling pads to totally saturate them with water.
Once your units cooling pads are saturated – then, you are ready to turn
on fan and begin to feel the cooling effect from your new QuietCool.
1. Unpack your new QuietCool unit
Your QC48B2” unit was shipped on a wooden skid strapped to a cardboard
cover with lid. First remove the straps from the base where cardboard meets the
skid – then you may lift the whole cardboard box (and lid) off the unit and skid.
Note: After your cooling pads are broken in (typically 1 -2 weeks) it will
take less time to fully saturate cooling pads for initial start-up.
6. Turn-on Fan
Lift your QuietCool unit off the wooden skid. Now roll your QuietCool unit to a
Once your pads are wet – you may turn your QuietCool unit on high. Now
level surface and lock the casters to prevent accidental movement.
you can begin to feel the QuietCool difference in temperature. After your
2. Connect the water supply
QuietCool has run for 5 minutes or so, visually inspect the pads – if water
Connect standard water hose to female fitting on the right side of your QuietCool
(fan blade side). If your water pressure is above 60 psi you must use a pressure
regulator (found at your local hardware store). Note: Do not connect to water
source exceeding 60 psi – this can cause
is dripping outside the unit – you have too much water, simply turn the
flow valve handle to the right 1/4 turn and inspect water flow in another 5
minutes. If you see dry streaks in the cooling pads – open the flow valve
handle 1/4 turn to increase water flow to the cooling pads – check water
flow in another 5 minutes and adjust accordingly. Most QuietCool units
damage to your unit.
work effectively with valve opened between 1 – 1 1/4 turns.
3. Connect the electrical supply
Note: Back your QuietCool unit up to a fresh air source like an open door
Your QuietCool model requires a regular 3
or window so the unit can pull in fresh air from the outside. Next, make
prongs, ground with 120 volt power supply.
sure you have a natural exhaust at the opposite end of the room, such as
Plug electrical cord into receptacle. To be
a window or door. This will ensure maximum efficiency from your unit.
safe – make sure no other equipment is
plugged into the same circuit. Your
Quietaire Cooling Inc.
QuietCool will run smoothly on a standard
A Subsidiary of Quietaire Corporation
20 amp, 120 volt, 60 Hz circuit. If you need
to use an extension cord – use a 12 gauge
3 prong extension cord.
Connect water hose to unit,
then plug into standard 120
Volt electrical 20 Amp source.
Telephone: 713.228.9421 Fax: 713.228.9425
505 North Hutcheson Houston, Texas 77003
www.Quietaire.com
48” QuietCool
Portable Evaporative Cooler
Owner’s Manual
Optional Cover for storage protection.
See section 9.0 for details and a
convenient Fax Back Order form.
This Manual covers the QC48B2 QuietCool Portable Evaporative Cooler.
QC48B2 – QuietCool 48” Belt Drive 2 Speed
1
File this owner’s manual in a safe place for future reference. It contains operating procedures – maintenance procedures –
trouble shooting guide – replacement parts guide – order form – and contact information. You will need this!
Warnings and Cautions
Read before operating QuietCool Portable Evaporative Cooler
ELECTRICAL
WARNING
Do not use a 3 prong to 2 prong adapter on the electrical power cord. Use 12 gauge extension cord only.
WARNING
Do not remove the grounding lug from the electrical power cord plug.
Use only 3 prong, grounded receptacles.
WARNING
Disconnect the QuietCool Portable Evaporative Cooler from your electrical power source before performing
any service action.
WARNING
Your QuietCool unit must be plugged into a fused or circuit breaker protected 20 Amp, 120 Volt, 60 Hz circuit
– unless specifically manufactured for another voltage / frequency configuration. See manufacturer’s label on
cooler. A ground fault circuit interrupter protected circuit is strongly recommended.
WARNING
Check your units electric power cord for insulation breaks, cracks or fraying. If any of these conditions are
found DO NOT USE. See your distributor for immediate service replacement parts.
WARNING
Some electric motors require periodic oiling. Check your model for oil fill holes. A couple drops of light oil
per year normally will be sufficient. Heavy usage may require additional oil.
WARNING
To reduce the risk of fire or electrical shock, DO NOT USE with any solid-state speed control device.
WARNING
To reduce the risk of electrical shock or injury to persons, DO NOT USE cooler in a window.
WATER
WARNING
Do not connect your QuietCool Portable Evaporative Cooler to any water source where water pressure exceeds
60 p.s.i. If your water source is above 60 p.s.i. you must use a pressure regulator (which can be found
at your local hardware store).
2
QuietCool Portable Evaporative Cooler
Table of Contents
1.0
Introduction
1.1 Quick Start
1.2 Operate unit for 2 weeks before adding Evap-O-Matic Tablets
2.0
How Evaporative Cooling Works
3.0
Unpacking your new QuietCool unit
4.0
Set-up your QuietCool unit
4.1 Connecting the electrical supply
4.2 Connecting the water supply
5.0
Operating procedures
5.1 Filling the units reservoir with water
5.2 Turn-on pump
5.3 Adjust water flow
5.4 Turn-on Fan
6.0
Daily Operating procedures
6.1 Turn-on pump
6.2 Adjust water flow
6.3 Turn-on fan
6.4 Turn-off unit
7.0
Maintenance
7.1 Access inside of unit
7.2 Removing the cooling media
7.3 Daily maintenance
7.4 Periodic maintenance
7.5 QuietCool Trouble Shooting Guide
8.0
Storage
9.0
Accessories
10.0
Replacement Parts and – Order form
11.0
Wiring Diagrams for the 48” unit
12.0
Warranty
File this owner’s manual in a safe place for future reference. It contains operating procedures – maintenance procedures –
trouble shooting guide – replacement parts guide – order form – and contact information. You will need this!
3
QuietCool Portable Evaporative Cooler
1.0 Introduction
•
Your QuietCool was engineered to be the most efficient portable evaporative cooler manufactured. It was
manufactured and assembled at our plant in Houston, Texas.
•
Your QuietCool was tested 3 ways. Your unit was tested for 1. Maximum air flow at operating static pressure.
Only QuietCool is tested in operating conditions with 2. Water and 3. Electricity before it is shipped.
•
QuietCool is easy to operate – needs only tap water and electricity to operate.
•
QuietCool is easy to move – roll your QuietCool to the area you want to cool. QuietCool comes standard with
straight and swivel / lock casters which make moving your
QuietCool a breeze.
1.1 Quick Start – Your Quick Start Information is located inside the
information packet shipped with your unit. Look on the front of your
QuietCool in a plastic sleeve. Look for a sample Evap-O-Matic tablet.
1.2 Evap-O-Matic – Chemical Water Treatment. Operate your unit 2
weeks - flush out old water – add clean water – then add Chemical Water
Treatment tablet. Note: Tablet makes water foam which can cause unit to
spray water temporarily.
2.0 How Evaporative Cooling Works
Keeping in mind that regular fans only circulate same temperature air same humidity – your QuietCool portable evaporative cooler takes that
same existing air, combines it with evaporating water (which
dramatically lowers the temperature) immediately relieving hot, dry
areas, similar to the conditions when a natural rain storm approaches, the temperature drops noticeably cooler, because the
air is saturated with water. Because your air is now saturated with water it becomes noticeably cooler. In high humidity areas
the temperature will not be as cool – however, the QuietCool was engineered efficient to evaporate perspiration and sweat
from employees to keep them cooler.
3.0 Unpacking your new QuietCool unit
Note: Carefully examine your QuietCool shipping carton for damage before
opening. If your carton is damaged – notify the shipper immediately!
Your QC48” unit was shipped on a wooden skid covered with a cardboard cover
and lid – strapped. First remove the straps then you may lift the whole cardboard
box off the unit and skid. Your QuietCool must now be lifted off the wooden skid.
4.0 Set-up your QuietCool unit.
Roll your QuietCool unit to a level surface and lock the swivel casters to prevent
accidental movement.
Electrical cord for 120V, 20Amp connection.
Note: Standard ¾” water connection for
utility water source under 60 p.s.i.
4
4.1 Connecting the electrical supply
All QuietCool models require regular 3 prongs, ground with 120 volt power supply. Plug electrical cord into receptacle. If
using an extension cord be sure it is rated for at least 20 amps for the distance your cord is running. To be safe – make
sure no other equipment is plugged into the same circuit. The QuietCool should run smoothly on 20 amp, 120 volt, and 60
Hz circuit.
4.2 Connecting the water supply
Connect standard water hose to female fitting on the right side of your QuietCool (looking at the fan blade side). If your
water pressure is above 60 pounds per square inch (p.s.i) you must use a pressure regulator (which can be found at your
local hardware store). If you have purchased our optional QR60 gallon reservoir tank – simply attach the garden hose from
the tank to the cooler. Note: Do not connect to water source exceeding 60 p.s.i. – this can cause damage to your QuietCool.
5.0 Operating procedures
Back your QuietCool unit up to a fresh air source
such as an open door or window so the unit can
pull in fresh air from the outside. Next, make sure
you have a natural exhaust at the opposite end of
the room, bay or building such as a window, door
or bay door. This will ensure maximum efficiency
from your unit. Finally make sure there are no
QC48” Air Flow Pattern.
obstructions between your QuietCool and the
people / area you need to cool.
5.1 Filling the units reservoir with water
Once your water hose is connected – open the water flow valve (located on the front of your unit) only one and a quarter (1
1/4) turns. This water flow valve adjusts the amount of water to the unit. Next, turn water on and fill the reservoir with water.
Listen carefully. You can hear water filling the reservoir. Check your water connection – make sure there is no dripping.
Once the reservoir is filled with water the float valve will automatically shut off the water source. When you no longer hear
the water running – you know that the float valve is fully
operational (the water turns off automatically) and you are now ready to turn on the
water pump. Warning! Do not run water pump without water in the reservoir.
5.2 Turn-on pump
To turn-on the water pump - flip the toggle switch for the water pump to on. Switch is
located on front side of unit. Warning! Do not run water pump without water in the
reservoir. The water pump will now begin pumping water to the top of the unit so that
gravity will allow the water to run down the backside of unit inside and on the cooling
pads. (If the water is dripping off of the pads on to the floor – close the flow valve a
Top: Water control valve – controls water to
to units water reservoir. Open 1 ¼ turns. 5
Bottom: Water hook-up for cleaning and
flushing water reservoir.
little to slow the water flow. After the pads are wet – you can open the valve to 1 ¼ turn. Allow water to run for 10 – 15
minutes on new cooling pads to totally saturate them with water. Once your units cooling pads are saturated – then, you are
ready to turn on fan and begin to feel the cooling effect from your new QuietCool. Note: After your cooling pads are broken
in (typically takes 1 -2 weeks in operation) it will take less time to saturate pads for start-up.
5.4 Turn-on Fan
Once your cooling pads are wet – you may turn on your QuietCool unit. Now you can begin to feel the QuietCool difference
in temperature. After your QuietCool has run for 5 minutes or so, visually inspect the pads – if water is dripping outside the
unit – you have too much water, simply turn the water flow valve to the right ½ turn and inspect water flow in another 5
minutes. If there are dry streaks in the cel deck pads open the water flow valve handle ½ turn to increase water – check water
flow in another 5 minutes and adjust accordingly. Most QuietCool operations work effectively with valve opened between 1
½ - 2 turns. This water valve is efficient – it requires minimal turning.
6.0 Daily Operating procedures
6.1 Turn-on water pump
Turn on water pump to unit – let cooling pads get saturated – then turn on fan for cooling. Adjust the water flow –
Your QuietCool operates most efficiently – and maintains uniform cooling pad wetness with the water control valve turned
on at 1 ¼ turns. You must determine what works best for you and your specific environment.
6.2 Adjust water flow
Your QuietCool operates most efficiently – and maintains uniform cooling pad wetness with the water control valve turned
on at 1 ¼ turns. You must determine what works best for you and your specific environment.
6.2 Turn on fan
When you can see that the cooling pads are saturated with water – turn on the fan and feel the cooler air coming from your
QuietCool unit. Adjust the fan speed for your comfort.
6.4 Turn-off unit at end of day
15 minutes before closing for the day – turn off water pump with toggle switch – leave fan running – this action will shut-off
water to the cooling pads while keeping the fan running. The fan will dry out the cooling pads. When the cooling pads are
thoroughly dry – turn off fan. Drying your cooling pads thoroughly - everyday will help prevent mold and mildew growth,
plus it will prolong the life of your cooling pads.
7.0 Maintenance
7.1 Access inside of unit
Turn-off water pump and let the fan continue to run until the cooling pads are thoroughly dry (about 10 – 15 minutes). Once
your cooling pads are completely dry you may turn-off fan. Now unplug electricity to unit to avoid unnecessary shock. Next,
using a 7/16” wrench – remove the two retaining bolts from the backside and topside (cooling pad side) of the unit. These
two bolts hold the metal angle retaining bar and the cooling pads in place. Next, remove the angle retaining bar and set to
side. Now you are ready to remove your unit’s cooling pads.
6
7.2 Removing the cooling pads
Before your start, make a note of the direction of the angle of the pads flutes (see side
of pads). You must put pads back in correct order for your unit to function
effectively. (Note: Install steep side 45° angle flute to the back of unit.)
Once the retaining angle bar is removed from the top of your QuietCool unit, reach to the
top of the dry cooling pad to the left and gently take hold of the top of the pad and gently
pull back and slightly down – this action will loosen the pad from the unit. Look at the direction of the angle of the pad
flutes (side of pads). Remove the cooling pad and proceed to the next pad. Then, remove all cooling pads and gently set in a
safe place. Note: this is a good time to take the cooling deck pads outside and run clean water over the pads to remove any
accumulated dirt and debris. Do not use high pressure hose – this will damage pads and their ability to function effectively.
Make sure the pads are thoroughly dry before placing back inside the unit. Full exposure to the sunlight is a good way to dry
the pads while helping remove mold and mildew.
7.3 Daily maintenance
15 minutes before quitting time – turn off the water pump and let the fan run 10 – 15 minutes – to dry out the cooling pads
before leaving. Inspect the cooling pads to make sure they are thoroughly dry (this action helps to reduce mold and mildew)
when pads are completely dry then turn-off fan.
7.4 Periodic maintenance
Depending upon your environment and how often you operate your QuietCool will depend on how dirty your water gets in
the reservoir and how often you will need to clean it. If you begin to detect an algae smell coming from your unit – it’s time
to flush your QuietCool reservoir with fresh water. Refer to and follow the steps above in 7.2 and you will only need to
remove 1 or 2 of the cooling pads from the left side of the unit to gain access to your water reservoir. Take a small sponge
and clean out your water reservoir with a light cleaner and wipe it down completely and let the unit dry. (You may want to
use a wet / dry shop vacuum to clean out unit). When unit is clean replace your cooling pads (make sure flutes are facing
correct direction) retaining bar and bolts and add fresh, clean water back to the units’ water reservoir. Note: If smell
continues after restarting the unit you may want to add QC Tabs (which help to reduce algae, mold and mildew) you can get
the QC Tabs by ordering from the QuietCool order form found in section 9.0. Simply follow instructions on the label. You
may want to consider a Water Stabilizer to remove harmful calcium, scale build-up and algae – see section 9.0.
Note: You may want to remove most of water from water reservoir by attaching a garden hose to the drain valve and place
the end of the garden hose into a drain then, running pump until sump is dry – shutting off pump immediately.
Warning! Do not run pump without water in the reservoir. This action will burn up your QuietCool’s water pump.
7.5 QuietCool Trouble Shooting Guide
Problem
Cause
Solution
1. Water on the Floor
A. Front of unit . . .
Too much water.
Reduce the water flow with the water control
valve located on the front of the unit. Note:
Close the valve all the way – then open 1 ¼
turns. QuietCool units usually operate at peak
7
Problem (continued)
Cause (continued)
Solution (continued)
performance at 1 ¼ turns.
Damage to polyethylene housing. Note:
Check for possible cracks in the blue
polyethylene.
Repair as necessary.
Excess water at top or bottom of pads.
Reduce the water flow with the water control
valve located on the front of the unit.
Damage to blue polyethylene housing.
Search for leaks and repair as necessary.
Leaking from bottom of pads.
Push bottom of cooling pads gently inside to
stop leaking.
Excessive water pressure.
Check you pressure. Max water pressure is 413
KPA (60 p.s.i.), adjust water supply valve to
1 ¼ turns or install a water pressure regulator
found at local hardware store.
Float valve maybe stuck in open position.
Contaminants in water; drain cooler, sump and
refill. If float remains stuck remove pads and
examine float for debris or damage. Wash out
debris and replace float. Continue.
3. Foul odor from fan
A. New Unit . . .
New pad may have a temporary odor (this
is normal) – you may be smelling the
thermosetting resin – it will pass.
Drain and refill several times in first week to
remove thermosetting resin smell.
Add QC Tablets to reduce smell – and algae.
B. After normal use . . .
Water quality – check your immediate
environment.
Water should be drained about once a month or
sooner depending on your specific working
environment – the water quality and conditions.
4. No water running over the
pads . . .
Check your water flow valve first.
Make sure your water flow valve is open.
QuietCool units usually operate at peak
performance at 1 ¼ turns.
Water supply off at main valve source.
Open water valve at supply. You may wish to
keep this valve open at all times.
Pump switch is off.
Turn pump switch on.
Water filter may be clogged.
Remove the cooling pads see section 6.2. Open
back of unit – open water filter – pull out filter
screen and clean. Replace and try again.
Hard water with excessive mineral content.
Use Evapo-O-Matic Tablets or add a Water
Stabilizer at the discharge side of the pump.
See Accessories section 9.0.
B. Back of unit
2. Found water on floor after
overnight shut off.
5. Scale build-up on cooling pads.
Flush water from unit’s water reservoir more
frequently. See section 7.4.
8
8.0 Storage
Remove pads as described above in 7.2 and rinse pads clean with fresh water. Dry cooling pads in sunlight. Drain water
reservoir completely and wipe dry. Replace dry cooling pads. Replace top angle bar to hold pads in place. Store QuietCool
in dry, clean area and cover (you can order a QCCover for your unit – see section 9.0) to prevent dust build up to have unit
ready for the next hot season. Note: Make a list of accessories and needed parts – purchase off-season to save money.
9
9.0 Accessories
QuietCool accessories and parts
were engineered to always fit your
QuietCool unit – no matter how
old. When you need a part – we
have it in stock – if we don’t have
it – we’ll make it.
QC48PM – Intake Pre-Filter for 48” unit. A
must for environments with air-borne
particles like sawdust or lint. (Shown with
Guard) Suggest 2 intake filters. When one
gets dirty – replace with second – clean first
filter so it’s ready when second gets dirty.
Simply remove retaining bar at top to hold
pre-filter in place.
List $ 48.00 each.
QC48CC – Protective Cooler Cover for 36”
unit. Plastic cover for unit to protect during
storage. Helps keep unit clean during offseasons.
List $ 160.00 each.
Evapo-O-Matic Tablets for all QuietCool Portable Evaporative Coolers. Evapo-OMatic is the chemical water treatment tablets that stops scale and calcium deposits
associated with hard water. Adds life to vital cooler equipment – increases cooling
efficiency and ends swampy odors. Treatment: 2 tablets for 36” units. EPA registered
protection from harmful air-borne organisms found in cooler equipment.
QCTAB1 – Single tablet pack. List $ 16.00. NSN-4130-01-507-7080
QCTAB2 – Double tablet pack. List $ 25.00 (12.50 ea.) NSN-4130-01-507-7081
QCTAB12 – Jar of 12 tablets. List $ 99.00 (8.25 ea.) NSN-4130-01-507-7082
Case of QCTAB12 – 12 Jars of 12 tablets each. (Best buy at 6.93 each). List $ 998.00
QCG1001 – Water Stabilizer for 48” unit. The water
stabilizer removes harmful calcium, scale build-up and algae
by keeping it from collecting anywhere within your unit. The
calcium and scale is flushed out of your unit when you flush
out the sump – extending the life of your cooling pads and all
internal water working parts. (The water stabilizer must be
connected inside the cooler at the discharge side of the water
pump).
List $290.00.
QRT60 – Quietaire Portable Water
Reservoir for units where there is no access
to water. Constructed with medium density
polyethylene and a stand made of
galvanized steel with 4” casters for easy
moving. Has connection for standard water
hose with valve.
List $ 605.00 each.
NSN-4130-01-449-4618
QC10W –10” Semi-Pneumatic Rough
Terrain Wheels designed for U.S. Military
for use on rugged terrain.
Also available for general public use too.
Complete set of 4 Wheels. List $ 694.00
NSN-4130-01-507-7061
10
10.0 Replacement Parts
All Accessories / Replacement Parts are obtainable through your local QuietCool distributor. Should a part be temporarily
out of stock at your distributor he can special order it for you.
You can contact the manufacturer, Quietaire Cooling Inc. directly at: Telephone: 713.228.9421 or Fax: 713.228.9425.
Please have your units 1. Model number 2. Serial number (look at front side of your cooler - on the right hand side – inside
guard - on the fan shroud) handy when you contact either your distributor or Quietaire Cooling Inc. for all Accessories /
Replacement parts. This will assure that we are able to help you with the correct part the first time.
QCPUMP – Replacement Pump for all 48”
units. Simply replace the new pump with the
old pump.
List $ 168.00 each.
TR798 – Float Valve for all 48” units.
Automatically adjusts water level in units
reservoir.
List $ 16.00 each.
12Filter – Inline Filter for all 48” units. Simply
open water filter located inside unit, remove old
filter screen and replace with new filter.
List $ 23.00.
6-CD60612– Cooling Media Replacement for
48” unit. Cross corrugated angle fluted specially
formulated cellulose material treated with a
thermosetting resin. (Replacement set of 5).
List $ 387.00 set.
11
11.0 Order form
Fax Back Order Form
Accessories and Replacement Parts For all QC48” fan blade models.
For all motors, pulleys, belts, switches and fan blades call Quietaire at 713.228.9421.
Accessories
Description
Intake Pre-Filter – protects cooling
pads from air-borne particles.
Part Number
QC48PM
Amount
List $ 48.00 each
Protective Cooler Cover – protects
cooler during long storage.
Evapo-O-Matic Tablets – Chemical
water treatment tablets.
QC48CC
List $ 160.00 each
QCTAB1 – Single
Tablet
QCTAB2 – 2 Tablets
List $ 16.00 each
(16.00 per tablet)
List $ 25.00
(12.50 per tablet)
List $ 99.00
(8.25 per tablet)
List $ 998.00
(6.93 per tablet)
List $ 290.00 each
Evapo-O-Matic Tablets – Chemical
water treatment tablets.
Evapo-O-Matic Tablets – Chemical
water treatment tablets.
QCTAB12 – Jar of 12
Tablets
Evapo-O-Matic Tablets – Chemical
water treatment tablets.
Case of QCTAB12 12
Jars - 12 Tablets
Water Stabilizer – Removes harmful
calcium, scale build-up and algae.
Portable Water Reservoir – For use in
field where there is no access to water.
Rough Terrain Wheels – 10” SemiPneumatic wheels. Sold as set
QCG1001 – Water
Stabilizer
QRT60 – Water
Reservoir
2-QC10x3RC
2-QC10x3SC
Quantity
Price
List $ 605.00 each
List $ 694.00 set
Replacement Parts
Description
Water Pump Replacement – Pumps
water up to cooling pads.
Part Number
QCPUMP
Amount
List $ 168.00 each
Float Valve Replacement –
Automatically adjusts water level.
Inline filter – Catches large debris in
water line to cooling pads.
Replacement Caster (Straight
Wheel) – Sold in set of 2.
Replacement Caster (Swivel Wheel)
– Sold in set of 2.
Cooling Pad Replacement –
Replacement set of 5 pads.
TR798
List $ 16.00 each
12Filter
List $ 23.00 each
QC4X1RC - 2 Wheels
List $ 11.00 set
QC4X1SC - 2 Wheels
List $ 12.00 set
6 -CD60612 – Set of 6
cooling pads
List $ 387.00 set
Quantity
Credit Card Type: ___________ Credit Card Number: __________________________________________
Expiration Date: _____________ Name On Card: _______________________________________________
Price
Sub Total
$
Texas Sales Tax
$
Total
$
Add up totals for needed accessories and replacement parts and Fax to: 713.228.9425
Texas residents add .0825 State Sales Tax. Shipping Charges: Fax your Zip Code and Shipping Address.
Name: ____________________________________________________________________________________________________________________
Company Name: ____________________________________________________________________________________________________________
Telephone Number: __________________________________________ Fax Number: ____________________________________________________
Billing Address: ____________________________________________________________________________________________________________
Shipping Address: __________________________________________________________________________________________________________
City: _____________________________________________________ State: ____________________ Zip: _________________________________
12
12.0 Wiring Diagrams for the 48” unit
13
13.0 Warranty
WARRANTY
WARRANTY AND DISCLAIMER: Quietaire Cooling extends this limited warranty to the original buyer and warrants that products
manufactured by Quietaire Cooling shall be free from original defects in workmanship and material for one year from date of shipment,
provided same have been properly stored, installed, service, maintained and operated. This warranty shall not apply to products which have
been altered or repaired in any way so as to effect its performance, without Quietaire Cooling's express authorization, or altered or reliability,
nor which have been improperly installed or subjected to misuse, negligence, or accident, or incorrectly used in combination with other
substances. The Buyer assumes all risks and liability for results of; use for the products. Warranties on purchased parts, such as electric motor
and controls are limited to the terms of warranty extended by our supplier.
LIMITATION OF REMEDY AND DAMAGES: All claims under this warranty must be made in writing and delivered to Quietaire Cooling
505 N. Hutcheson, Houston, Texas, 77003 within 15 days after discovery of the defect and prior to the expiration of one year from the date of
shipment by Quietaire Cooling of the product claimed defective, and Buyer shall be barred from any remedy if Buyer fails to make such claims
within such period.
Within 30 days after receipt of a timely claim, Quietaire Cooling shall have the option either to inspect the product while in Buyer's possession
or to request Buyer to return the product to Quietaire Cooling at Buyer's expense for inspection by Quietaire Cooling. Quietaire Cooling shall
replace, or at its option repair, free of charge, any product it determines to be defective, and it shall ship the repaired or replacement product to
Buyer F.O.B. point of shipment; provided, however, if circumstanced are such as Quietaire Cooling judgment to prohibit repair of replacement
to remedy the warranted defects, the buyer's sole and exclusive remedy shall be a refund to the buyer of any part of the invoice price, paid to
Quietaire Cooling for the defective product or part.
Quietaire Cooling is not responsible for the cost of removal of the defective product or part, damages due to removal, or any expenses incurred
in shipping the product of part to or from Quietaire Cooling plant, or the installation of the repaired or replaced product or part.
Implied warranties, when applicable, shall commence upon the same date as the express warranty provided above, and shall except for
warranties of title, extend only for the duration of the express warranty provided above. Some states do not allow limitations on how long an
implied warranty lasts, so the above limitation may not apply to you. The only remedy provided to you under an applicable implies warranty
and the express warranty shall be the remedy provided under the express warranty, subject to terms and conditions contained therein. Quietaire
Cooling shall not be liable for incidental and consequential losses and damages under the express warranty, any applicable implied warranty, or
claims for negligence, except to the extent that his limitation is found to be unenforceable under applicable state law. Some states do not allow
exclusion or limitation of incidental or consequential damages, so the above limitation or exclusion may not apply to you. The warranty gives
you specific legal rights, and you may also have other rights which vary from state to state.
No employee, agent, dealer, or other person is authorized to give any warranties on behalf of Quietaire Cooling or to assume for Quietaire
Cooling any other liability in connection with any of its products except in writing and signed by an officer of Quietaire Cooling.
TECHNICAL ADVICE AND RECOMMENDATION, DISCLAIMER: Notwithstanding any past practice or dealings or any custom of the
trade, sales shall not include the furnishing of technical advice or assistance or system design, any such assistance shall be at Quietaire Cooling
sole option and may be subject to additional charge.
Quietaire Cooling assumes no obligation or liability on account of any recommendations, opinions, or advice as to the choice, installation or
use of products, Any such recommendations, opinions or advice are given and shall be accepted at your own risk and shall not constitute any
warranty or guarantee of such products or their performance.
QUIETAIRE COOLING INC.
505 NORTH HUTCHESON STREET
HOUSTON, TEXAS 77003
TELEPHONE: 713.228.9421 FAX: 713.228.9425
Visit us online at: www.Quietaire.com Click on QuietCool
14