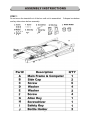
1
TR1120
OWNER’S MANUAL
IMPORTANT:
For maximum effectiveness and safety, please read this owner’s manual
before using your BodyCraft treadmill. Retain this owner’s manual for
future reference.
1. It is the responsibility of the owner to be sure that all users of this
treadmill are informed of all warnings and precautions.
2. Keep the treadmill indoors, away from moisture and dust. Do not put the
treadmill in a garage or covered patio, outdoors or near water.
3. Keep pets and small children away from the treadmill at all times.
4. Never start the treadmill while you are standing on the walking belt.
5. Always hold the handrails while using the treadmill.
6. The treadmill is capable of high speeds. To avoid sudden jumps in speed,
adjust the speed in small increments.
7. Regularly inspect and tighten all parts of the treadmill.
from all moving parts.
Keep hands away
8. When folding or moving the treadmill, make sure that the safety lock is fully
engaged. Please refer to the folding instructions pages of this manual for
safety lock operation.
9. Always unplug the power cord before performing the maintenance and
adjustment procedures described in this manual. Do not remove the motor
cover unless instructed to do so by an authorized service representative.
Servicing other than the procedures in this manual should be performed by an
authorized service representative only.
10. Keep all electrical components, such as the motor and power cord, away from
water or other liquids to prevent shock. Do not set anything on the handrail,
computer console or belt. Never place liquids on any part of the unit.
11. Always insert the safety key and attach the clip to your clothing at your waist
before beginning your workout. If you should encounter problems and need to
stop the motor quickly, simply pull on the cord to disengage the safety key from
the console. To continue operation, simply reinsert the safety key into the
console.
1
12. Remove the safety key and store it away in a safe place when the treadmill is
not in use. Keep the safety key away from children.
13. Wear the proper exercise clothing and shoes for your workout. Do not
wear loose clothing or shoes with leather soles or heels. Be sure to tie
long hair back.
14. Keep all loose clothing and towels away from running surface. The belt will
not stop immediately if an object becomes caught in the rollers or belt.
Should an object become caught, turn the unit off immediately.
15. Proceed with caution when getting on or off the treadmill. Use the handrails
whenever possible. Only step onto the running surface only when the treadmill
is running at a very low speed. Do not step off the treadmill while the belt is
moving.
16. To get on or off the running surface, straddle the running surface by standing
on the right and left plastic platforms on each side of the belt. Use this
procedure before starting the belt (to begin your workout) and after it has
stopped (at the end of your workout).
17. Never attempt to turn around while on the treadmill with the belt running.
Keep your head and body facing forward at all times.
18. Never turn on the treadmill while someone is standing on the running surface.
19. Do not rock the treadmill, stand on the handrails or computer console at any time.
20. Be careful not to over exert yourself during your workout. Stop your workout
immediately, if you feel any pain or discomfort. Consult your physician
immediately.
21. Do not modify or attempt any service on the treadmill yourself other than
assembly and maintenance described in this manual.
2
STEP 1
Do not move the treadmill out of the box until unit is assembled. Collapse box bottom
and lay sides down before assembly.
3
STEP 2
Lift up the upright handlebar, then fasten the screws (C) and washer (D, E) tightly at the
bottom of the upright handlebar. (Figure 2)
FIGURE 2
4
STEP 3
1. Attach the console to the upright by pressing both handlebars down.
Place the washers (D) and screws (C) on the handlebar as shown in Figure 3.
2. Place 2 Bottle Holders into left and right consoles.
FIGURE 3
5
STEP 4
Attach upright side cap (B) with screws (D) at the bottom of the upright handlebar, and
tighten them well. (Figure 4)
FIGURE 4
6
FOLDING
After assembly is complete, you may fold the
machine into the upright position for storage.
To fold the machine, raise the deck and turn the
knob until it locks into position.
NOTE! Make sure you hear the click sound of the
deck locking into position. This is to ensure the
deck is locked in place and will not drop back
down.
NOTE! Make sure the treadmill’s elevation is at
lowest position before folding the deck. If the
elevation is not at lowest position, folding will
damage the mechanism.
TO RELEASE THE DECK
1. PULL AND TURN THE KNOB.
2. CAREFULLY LOWER THE DECK TO THE
FLOOR.
NOTE! This machine has a built-in safety
unfolding feature to help the deck lower slowly.
Please make sure there are no children or other
things under the deck when you lower it.
TO MOVE THE TREADMILL
Before moving the treadmill, be sure the power
cord is unplugged from the wall and the treadmill.
Fold up the deck until it is locked and push the
treadmill on the transportation wheels. Hold the
handlebars to move the treadmill.
To prevent malfunction of the treadmill, store it in
a dry place with as little temperature variation as
possible, protected against dust. Always unplug
the treadmill from the electrical outlet when not in
use.
7
*** THE TREADMILL CIRCUIT BREAKER WILL SHUT OFF POWER
WHEN THE ELECTRIC CURRENT IS OVERLOADED.
A. Pull out the plug from the electrical socket on the front of the treadmill.
B. Push in the circuit breaker switch.
C. Insert the plug back into the electrical socket.
Note:Do not push in the circuit breaker switch before you pull out the plug from the
treadmill.
8
NOTICE
:
The treadmill should be placed on a level surface. If the treadmill is not level, the
belt will continuously track to low side of the treadmill.
WALKING BELT TENSION
As walking belts tend to stretch slightly with use, the belt may occasionally need to be
tightened. If belt is too loose, you may find the belt stops while running or walking,
while the motor continues to run. DO NOT OVERTIGHTEN THE BELT. This will
cause reduced motor performance and roller damage.
When properly tensioned, you should be
able to lift the side of the belt about 2-3
inches (5-7.5 centimeters). A quick test for
belt tension: you should be able to fit three
fingers under the edge of the belt.
To tighten belt:
Using the hex key provided with the treadmill,
place it in the hole in the left rear end cap and
into the socket of the adjustment screw. Turn
one full turn clockwise. Then place the hex key
in the hole in the right rear end cap and turn one
full turn clockwise. Check the tension of the
belt. Continue to do this until the belt is at the
correct tension. Make sure to adjust both sides
equally to ensure correct belt alignment.
9
WALKING BELT CENTERING
The walking belt may occasionally need to be centered. First be certain that the
belt is tensioned properly. Start the treadmill and run it at about 4 mph. Place the
hex key through the hole in the left rear end cap and into the socket of the
adjustment screw. (See picture below)
1. If belt has moved too far to the right:
Turn the left adjustment screw ½ turn counter clockwise. Let the treadmill run for
30 seconds and the belt should move to the left. If it still is too far to the right, turn
the left adjustment screw an additional ½ turn. Repeat as needed.
2. If belt has moved too far to the left:
Turn the left adjustment screw ½ turn clockwise. Let the treadmill run for 30
seconds and the belt should move to the right. If it still is too far to the left, turn
the left adjustment screw an additional ½ turn. Repeat as needed.
Continue to run the treadmill 3 minutes to ensure the belt has been centered.
Make any adjustments as needed.
10
WARNING: ALWAYS UNPLUG THE TREADMILL FROM THE ELECTRICAL
OUTLET BEFORE CLEANING, LUBRICATING OR SERVICING THE UNIT.
CLEANING
General cleaning of the treadmill will prolong its life and improve performance. Keep
the unit clean by dusting regularly. Be sure to dust the exposed part of the deck on
either side of the walking belt and also the side rails.
For best performance, we recommend your treadmill be placed on a treadmill mat.
Along with reducing noise, a treadmill mat will help to keep dust debris away from your
treadmill's critical components. Clean the top of the belt with a wet, soapy cloth. Be
careful to keep liquid away from inside the motorized treadmill frame or underneath the
belt.
WARNING: ALWAYS UNPLUG THE TREADMILL FROM THE ELECTRICAL
OUTLET BEFORE REMOVING THE MOTOR COVER. At least once a year remove
the motor cover and vacuum under the motor cover with caution.
• Walking Belt and Deck
Lubrication
It’s important to take good care of
your treadmill deck (the walking
surface underneath the belt),
because the belt/deck friction may
affect the function and life of your
treadmill and requires periodic
lubrication.
Use the following timetable as a guide to lubricate the deck.
Type of User
Exercising hours per
week
Number of times
Light
Less than 3 hours
Annually
Medium
3-5 hours
Every six months
Heavy
More than 5 hours
Every three months
11
BEFORE STARTING
Straddle the belt and stand on the plastic side rails. Place the safety key onto the
circle on the overlay and attach the rope to your clothing. Do not stand on the walking
belt while starting or stopping the treadmill. If you are a new user, stay at a slow
speed and hold onto the handrails until you become comfortable.
KEY FUNCTIONS
Safety Key: The monitor can be operated only with the key attached to the
treadmill. The monitor shuts off and the treadmill stops when this key is removed.
Major Function Keys:
INCLINE +:
Increases the incline.
This button is also used to scroll the programs.
INCLINE -:
Decreases the incline.
This button is also used to scroll the programs.
START/STOP:
Starts or stops the treadmill belt.
ENTER/SELECT:
Enters your desired program or value. During the operation, switches the
display windows from INCLINE and TIME to CALORIES and PROGRAMS.
12
SPEED +:
Increases the speed. Pressing once increases the speed 0.1 mph.
Pressing and holding for two seconds will increase the speed faster. This
button is also used to scroll the programs.
SPEED -:
Decreases the speed. Pressing once decreases the speed 0.1 mph.
Pressing and holding for two seconds will decrease the speed faster. This
button is also used to scroll the programs.
SPEED HOT KEYS 2/4/6 MPH:
Change the speed to the selected speed.
INCLINE HOT KEYS 3/6/9 %:
Change the incline to the selected value.
LED INDICATORS & DISPLAY WINDOWS
2 LED Indicators: Indicates what is being displayed in the
INCLINE/CALORIES/AGE window and the TIME/PROGRAM/BODY FAT
window.
TIME/PROGRAM/BODY FAT: Press the ENTER/SELECT botton will
toggle the information in this window between TIME and PROGRAM.
display Body Fat in the BODY FAT program.
It will
SPEED: Displays the speed the treadmill is moving.
DISTANCE: Displays the distance the treadmill belt had travelled in the
current workout.
INCLINE/CALORIES: The default value is INCLINE. Press
SELECT/ENTER button to switch from INCLINE to CALORIES. Displays the
number of calories consumed during the workout.
PULSE: Displays your heart beat rate in beats per minute. To get an
accurate heart rate reading grip the heart rate sensors with both hands and
straddle the belt. It is difficult to get an accurate reading while walking or
jogging.
13
OPERATION INSTRUCTION (PLEASE READ CAREFULLY BEFORE USING):
BEFORE STARTING
Straddle the belt and stand on the plastic side rail. Place the Safety Key onto the
circle on the overlay and attach the rope to your clothing. Do not stand on the walking
belt while starting or stopping the treadmill. If you are a new user, stay at a slow
speed and hole on to the handrail until you become comfortable.
Programs:
There are 10 programs including 1 manual program, 4 speed programs, 4 incline
programs, and 1 Body Fat program.
Exercising with A Specific Goal:
In any program the default time and calories start at 0 and count up. You may
select a specific exercise time or the number of calories you want to expend during
program selection and the program count down from the number of minutes or
calories you entered. The treadmill will stop when it counts down to 0.
Heart Rate:
Measuer your heart rate by placing both hands around the metal sensors on each
handrail. Heart rate will display in the “PULSE/HEIGHT” window. Hold on to the
sensors for 30 seconds to get a stable reading.
OPERATION
Insert the Safety Key.
DISTANCE window will display 1 and SPEED window will display maximum speed.
CALORIES window will display incline value.
If power is on and safety key is inserted, incline will go back to the lowest level.
Press SELECT/ENTER button to enter the setting mode.
Press START button to enter the manual program.
Press INCLINE + - or SPEED + - buttons to select from Program 2 through 10.
14
P1 Manual Program:
Press ENTER button to enter this program. SPEED window will flash.
Use INCLINE + - or SPEED + - to set the desired speed. Press ENTER.
TIME window will flash. Use INCLINE + - or SPEED + - to set up the desired time.
Press ENTER.
DISTANCE window will flash. Use INCLINE + - or SPEED + - to set up the desired
distance. Press ENTER.
CALORIES window will flash. Use INCLINE + - or SPEED + - to set the number of
calories to be burned. Press ENTER.
Press START to begin exercise.
NOTE: If you would not like to select any special target to reach, just press START
after entering the program.
Program 2 through 9:
Program 2, 3, 4, 5 are Incline programs. The incline will change automatically
during the program. Program 6, 7, 8, 9 are Speed programs. The speed will
change automatically during the program.
Press ENTER button to enter your desired program after selecting it with SPEED + keys.
SPEED window will flash. Use INCLINE + - or SPEED + - buttons to set speed if
desired. Press ENTER.
TIME window will flash. Use INCLINE + - or SPEED + - buttons to set time if
desired. Press ENTER.
DISTANCE window will flash. Use INCLINE + - or SPEED + - buttons to set
distance if desired. Press ENTER.
CALORIES window will flash. Use INCLINE + - or SPEED + - buttons to set
calories to be consumed if desired. Press ENTER.
Press START to start the program.
P10 Body Fat Measurement:
Press ENTER button after selecting P10. AGE window will flash.
Use INCLINE + - or SPEED + - buttons to set age. Press ENTER.
Sex window will falsh. Use INCLINE + - or SPEED + - buttons to set sex: Male is 0;
Female is 1. Press ENTER.
WEIGHT window will flash. Use INCLINE + - or SPEED + - buttons to set weight.
Press ENTER. Press START.
Hold the heart rate sensors with both hands for approximately 20 seconds.
Your Body Fat precentage will display in the Body Fat window.
15
Engineering Mode
With power ON position, press and hold “SPEED –“ button then press “INCLINE +”
button to enter the Engineer Mode.
PULSE window shows software version.
INCLINE window shows year.
TIME window shows date.
DISTANCE window shows diameter of roller.
SPEED window shows “st” for Metric and “En” for Imperial.
Press ENTER button to enter KM/MILE switch mode, Press SPEED + - or INCLINE
+ - to select “0” for KM or “1” for MILE.
Press ENTER button, window shows total distance.
Press ENTER button , window shows total hours.
Press ENTER button to exit.
Testing Mode
With power ON position, press and hold “SPEED –“ button then press “INCLINE –“ to
enter Testing Mode.
1. LED scan mode.
2. Press ENTER button to scan DATA LINE.
3. Press ENTER button to scan SCAN LINE.
4. Press ENTER button to scan LED light.
5. Press ENTER button to scan TIME window shows “test”, then goes to keypad
test mode.
6. Press ENTER button goes to IO test mode which is elevation test.
(Press START to test RELAY and then press INCLINE + for 2 seconds to
increase the incline to 10%. Press INCLINE – to decrease the elevation to
minimum precentage – 0%. Press SPEED + to increase speed value, press
SPEED – to decrease speed value.)
7. Press ENTER to repeat above test or press and hold “SPEED –“ and then
“INCLINE –“ to exit.
16
17
18
19
20
21
22
]
23
24
25