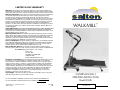
1
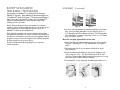
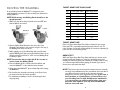
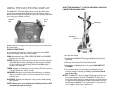
LIMITED 90-DAY WARRANTY
Warranty: This product is warranted by Salton, Inc. to be free from defects in
materials or workmanship for a period of 90 Days from the original purchase date.
This product warranty covers only the original consumer purchaser of the product.
Warranty Coverage: This warranty is void if the product has been damaged by
accident in shipment, unreasonable use, misuse, neglect, improper service,
commercial use, repairs by unauthorized personnel, normal wear and tear,
improper assembly, installation or maintenance abuse or other causes not arising
out of defects in materials or workmanship. This warranty is effective only if the
product is purchased and operated in the USA, and does not extend to any units
which have been used in violation of written instructions furnished with the
product or to units which have been altered or modified or to damage to products
or parts thereof which have had the serial number removed, altered, defaced or
rendered illegible.
Implied Warranties: ANY IMPLIED WARRANTIES WHICH THE PURCHASER MAY
HAVE ARE LIMITED IN DURATION TO 90 DAYS FROM THE DATE OF PURCHASE.
Some states do not allow limitations on how long an implied warranty lasts, so the
above limitation may not apply to you.
Warranty Performance: During the above 90-Day Warranty period, a product
with a defect will be either repaired or replaced with a reconditioned comparable
model (at our option) when the product is returned to the Repair Center. The
repaired or replacement product will be in warranty for the balance of the 90-Day
warranty period and an additional one-month period.
Service and Repair: Should the appliance malfunction, you should first call tollfree 1 (800) 934-7455 between the hours of 9:00 am and 5:00 pm Central Standard
Time and ask for CONSUMER SERVICE stating that you are a consumer with a
problem. Please refer to model number WALK1 when you call.
Out-of Warranty Service: A flat rate charge by model is made for out-ofwarranty service. Call Consumer Service for Instructions, toll-free 1-(800)934-7455.
To contact us, please write to, call, or email:
Salton, Inc.
P.O. Box 1637
Columbia, MO 65205-1637
1(800) 934-7455
Email: [email protected]
Limitation of Remedies: No representative or person is authorized to assume
for Salton, Inc. any other liability in connection with the sale of our products.
There shall be no claims for defects or failure of performance or product failure
under any theory of tort, contract or commercial law including, but not limited to
negligence, gross negligence, strict liability, breach of warranty and breach of
contract. Repair, replacement or refund shall be the sole remedy of the purchaser
under this warranty, and in no event shall Salton be liable for any incidental or
consequential damages, losses or expenses. Some states do not allow the
exclusion or limitation of incidental or consequential damages, so the above
limitation or exclusion may not apply to you.
Legal Rights: This warranty gives you specific legal rights, and you may also
have other rights which vary from state to state.
For more information on Walkmill™ products: visit our website: www.Walkmill.com
OWNER’S MANUAL &
OPERATING INSTRUCTIONS
Model WALK1
For more information on Salton products: visit our website: www.eSalton.com
©2003 Salton, Inc. All rights reserved.
Made in China
WALKMILL™
P/N 61302
4/03
FITNESS
IMPORTANT SAFEGUARDS
When using an electrical appliance, basic safety precautions should
always be followed, including the following:
Read all instructions before using the Walkmill.™
DANGER - To reduce the risk of electric shock:
1. Always unplug this appliance from the electrical outlet immediately
after using and before cleaning.
WARNING - To reduce the risk of burns, fire, electric shock or injury
to persons:
1. An appliance should never be left unattended when plugged in.
Unplug from outlet when not in use, and before putting on or
taking off parts.
2. Do not operate under a blanket or pillow. Excessive heating can
occur and cause fire, electric shock, or injury to persons.
3. Close supervision is necessary when this appliance is used by, on, or
near children, invalids, or disabled persons.
4. Use this appliance only for its intended use as described in this
manual. Do not use attachments not recommended by the
manufacturer.
5. Never operate this appliance if it has a damaged cord or plug, if it
is not working properly, if it has been dropped or damaged, or
dropped into water. Return the appliance to a service center for
examination and repair.
6. Do not carry this appliance by its supply cord or use the cord as
a handle.
7. Keep the cord away from heated surfaces.
8. Never operate the appliance with the air openings blocked. Keep
the air openings free of lint, hair and the like.
9. Never drop or insert any object into any opening.
10. Do not operate where aerosol (spray) products are being used or
where oxygen is being administered.
11.To disconnect, turn all controls to the OFF position, then remove plug
from outlet.
SAVE THESE INSTRUCTIONS
FOR HOUSEHOLD USE ONLY
1
NOTES:
CLEANING
Care has been taken to assure that the Walkmill™ has been
properly adjusted and lubricated during production. It is not
recommended that the user attempt service on the internal
components. However, from regular use the outer surface may
appear dull or dirty, following the instructions listed below will
restore and preserve the original finish.
NOTE: Always unplug the Walkmill™ prior to cleaning.
Cleaning metal surfaces may be accomplished by using a soft
cotton or terry cloth rag with light application of car wax. Do not
use aerosol sprays or pump bottles as they may deposit wax on the
walking surface.
STORAGE
1. Keep the Walkmill™ unplugged when not in use.
2. Keep all the power sources turned OFF.
3. Store Magnetic Safety Clip out of reach of children.
4. Store with the Handgrips towards the wall and Wheels locked.
Please do not perform or attempt any customizing, adjustments,
repair or maintenance that is not described in this manual. If you
experience any difficulty, please contact our website at:
www.walkmill.com.
ADDITIONAL IMPORTANT
SAFEGUARDS
1. Set up the Walkmill™ on a flat, level surface and clear the area
around it, so you can get on and off freely and safely.
2. Always lock all 4 Wheels into place prior to operation.
3. Keeps pets a safe distance from the Walkmill.™
4. Make sure that the Walkmill™ has come to a complete STOP and
has been turned OFF before getting on or off.
5. This product is to be used by only one person at a time.
6. Parental supervision is advised if the device is used by children.
The Walkmill™ is not recommended for children under 10 years
of age.
7. Always wear athletic shoes and proper clothing when on the
Walkmill.™
8. Use care and firmly hold the Hand Grips while exercising.
The Walkmill™ is not intended for running.
9. Consult your physician before beginning this or any
exercise program.
10. Do not put more than 300 lbs. of pressure on the Walkmill.™
11. Read this entire manual before using the Walkmill.™
12. NOTE: This product must be grounded. No plug adapter
should be used. Improper connection of the
equipment - grounding conductor can result
in a risk of electrical shock.
GROUNDED 3-CONDUCTOR PLUG
This appliance is equipped with a grounded-type 3-wire cord (3-prong
plug).This plug will only fit into an electrical outlet made for a 3-prong
plug. This is a safety feature. If the plug should fail to fit the outlet,
contact an electrician to replace the obsolete outlet. Do not attempt to
defeat this safety feature.
17
2
GROUNDING INSTRUCTIONS
This product must be grounded. If it should malfunction or break down,
grounding provides a path of least resistance for the current, and will
reduce the risk of electrical shock.The plug must be plugged into an
appropriate outlet that is properly installed and grounded in
accordance with all local codes and ordinances.
DANGER! Improper connection of the equipment-grounding
conductor can result in a risk of electric shock. Check with a qualified
electrician or serviceman if you are in doubt as to whether the product
is properly grounded. Do not modify the Plug provided with the product
— if it will not fit the outlet, have a proper outlet installed by a
qualified electrician.
Adapter
Grounded
Outlet
Metal
Screw
Grounding
Pin
Figure A
Figure B
Adapter
This product is for use on a normal 120-volt
circuit and has a grounding plug that looks like
the plug illustrated in the Figure A. However, a
temporary adapter that looks like the adapter
illustrated in Figures B and C may be used to
connect this plug to a 2-pole receptacle as
shown in Figure B if a properly grounded outlet
is not available.The temporary adapter should
be used only until a properly grounded outlet
(Figure A) can be installed by a qualified
electrician.The green colored rigid ear, lug or
the like extending from the adapter must be
connected to a permanent ground such as a
properly grounded outlet box cover. Whenever
the adapter is used, it must be held in place by
a metal screw.
3
LUBRICATING THE WALKING BELT
The Walkmill™ requires little maintenance other then periodically
applying lubricant. Lubricating under the Walking Belt will ensure
superior performance and extend the working life of the Walkmill.™
To check for proper lubrication, lift one side of the Walking Belt and feel
the top of surface of the Walking Deck. If the surface is slick to the
touch, then no further lubrication is necessary. If the surface is dry to
the touch, apply a half of a bottle of the lubricant that is included with
your Walkmill.™
To apply lubricant, lift one side
of the Walking Belt and pour
1/2 the bottle of lubricant under
the center of the Walking Belt
on the top surface of the
Walking Deck.Then walk on the
Walkmill™ at a slow speed for
3 to 5 minutes to evenly
distribute the lubricant.
NOTE: Do not over
lubricate the Walking
Deck. Be sure to wipe
off any excess lubricant
that comes out from
under the Walking Belt.
Be careful not to spill
lubricant on your floor
or carpet.
For Grounding
Screw
Figure C
16
RESET SWITCH
If the Walkmill™ loses power or will not start, check the Reset Switch
located on the front of the Motor Cover. If the white tab of the Reset
Switch is showing, then the Reset Switch has been tripped.
To Reset: Remove the Safety Clip on the Console; press the white tab
of the Reset Switch in until it snaps back into place. If the Reset
Switch continues to trip, refer to ADJUSTING THE WALKING BELT
and LUBRICATING THE WALKING BELT sections of this manual.
Congratulations on owning the Walkmill™ by Salton,® the
worlds finest totally portable Treadmill.You've just taken the first step
towards a healthier lifestyle. If used routinely, the Walkmill™ may make
a positive difference in your weight, mood, stress level, blood pressure
and risk of disease. It may sound too good to be true, but... good
health is only a walk away!
Magnetic Safety
Button and Clip
Electronic
Display
TROUBLE SHOOTING
Please refer to the following trouble shooting guidelines or to
Hand Grips
www.walkmill.com.
(Troubleshoot in order of suggested corrections)
Problem: Walkmill™ will not start.
Correction:
1. Make sure the unit is plugged into a 3-prong outlet.
2. Make sure the master ON/OFF Button is in the ON position.
3. Make sure the Speed Dial is turned all the way OFF before starting.
4. Make sure the unit is plugged directly into wall.
5. If needed reset the Walkmill™ Reset Switch.
6. Make sure the Magnetic Safety Clip is in place.
Problem: Walkmill™ stops or shuts OFF by itself.
Correction: if needed reset the Walkmill™ Reset Switch.
See RESET SWITCH.
Problem: Walking Belt does not run center.
Correction: See ADJUSTING THE WALKING BELT.
Master
ON/OFF
Switch
Walking Deck
Elevation
Readout
Reset
Switch
Handrail
Supporter
Walking
Belt
Locking
Wheels
Figure 1
Problem: Walking Belt slips.
Correction: See ADJUSTING THE WALKING BELT.
Problem: Walkmill™ hesitates while being stepped on.
Correction: See LUBRICATING THE WALKING BELT.
15
4
Belt
Adjusting Bolt
PARTS
7.
5.
1.
3.
2.
4.
8.
6.
1. Safety Clip (P/N 50549)
2. Two 5/16” x 1-1/2" Round Bolts (P/N 50550)
3. Four 5/16” x 3/4" Round Bolts (P/N 50551)
4. Four Circle Washers (P/N 50552)
5. 1/4" x 1-3/4" Round Bolt (P/N 50553)
6. MS Allen Wrench (P/N 50554)
7. 5/16” Nut (P/N 50555)
8. Lubricant (P/N 50556)
9. Water Bottle Bracket (not shown) (P/N 50557)
10. Water Bottle (not shown) (P/N 50558)
USER MAINTENANCE
INSTRUCTIONS
ADJUSTING THE WALKING BELT
The Walkmill's™ Walking Belt has been pre-adjusted at the factory;
however if the Belt begins to slip during use, please follow the following
instructions for adjustment:
ONLY 1/4
TURN AT A
TIME
Counter Clockwise
Clockwise
1. Locate Rear Adjusting Bolts.
ASSEMBLY
1. Carefully remove Walkmill™ and all parts from carton.
2. Insert Right Handrail into the Handrail Supporter in the Frame
Base. Using the Allen Wrench, secure the Right Handrail to the
unit using the 5/16" x 1-1/2" Round Bolt and Circle Washer, and
5/16” x 3/4" Round Bolt.The Circle Washer should be used with
the 5/16" x 1-1/2” Round Bolt. (See Figures 2 and 3.)
NOTE: Do not fully tighten Bolts at this time.
NOTE: Be sure not to pinch the wire connecting the
Handrail to the Unit.
2. Using the Allen Wrench provided, turn each Bolt equally 1/4 turn
clockwise.
3. Be sure to adjust both sides equally to avoid the Belt from shifting
to one side or the other.
IF THE BELT HAS SHIFTED TOO FAR TO THE RIGHT
1. Turn on the Walkmill™ and set the speed to 2 miles per hour.
2. Turn the Right Adjusting Bolt 1/4 turn clockwise.
3. Wait 20 seconds and if no change, turn Left Adjusting Bolt
1/4 turn counterclockwise.
IF THE BELT HAS SHIFTED TOO FAR TO THE LEFT
1. Turn on the Walkmill™ and set the speed to 2 miles per hour.
2. Turn the Left Adjusting Bolt 1/4 turn clockwise.
3. Wait 20 seconds and if no change, turn Right Adjusting Bolt
1/4 turn counter clockwise.
Figure 2
Figure 3
5
NOTE: Do not overtighten Walking Belt.
NOTE: Do not make any adjustments to the Walking Belt
with anyone walking on the unit.
14
KATHY'S EXCLUSIVE
WALKMILL ™ PROGRAMS
Included with your Walkmill™ are Kathy Kaehler's Executive
Walkmill™ Programs: “Wave Walking for Maximum Weight Loss”;
“The Walkmill™ Quick Fix Program”,“The Easiest and Healthiest
Way To Lose Up To 10 Pounds In A Hurry” and “The Walkmill™
Superstar Total Body Workout”, which includes Kathy's body
sculpting secrets to the stars.
Kathy's Exclusive Programs have been included in a separate
manual as well as a separate flip chart for ease of use during your
exercise program. For more information please refer to the
Walkmill™ website at: www.walkmill.com.
Each of Kathy's programs have separate beginner, intermediate
and advanced levels. Please be sure to start with the program that
best fits your current fitness level. If you are just beginning a fitness
program, be sure to start at the beginner level of Kathy's programs
to allow yourself time to get up to speed.
Consult your Physician before beginning these or any other
exercise programs.
ASSEMBLY (Continued)
Figure 4
3. Insert the Left Handrail into the Handrail Supporter in the Frame
Base. Secure the Right Handrail to the unit using the 5/16" x 11/2" Round Bolt and Circle Washer, and 5/16” x 3/4" Round Bolt.
The Circle Washer should be used with the 5/16" x 1-1/2” Round
Bolt. (See Figures 4 and 5.)
Note: Do not fully tighten Bolts at this time.
4. Attach the Right and Left Handrails together and secure together
using the 2 remaining 5/16" x 3/4" Round Bolts. (See Figures 6
and 7.)
5. Finish tightening, but do not overtighten, all Bolts from Step 2
through Step 4.
6. Attach the Water Bottle Bracket on the Console Supporter and
secure using the 1/4" x 1 3/4" Round Bolt and the 5/16" Nut.
(See Figure 8) Water Bottle Bracket should be snug, but not so snug
that it cannot be rotated around the Handrail.
7. Your Walkmill™ is now completely assembled and ready to use.
Figure 6
13
Figure 5
Figure 7
6
Figure 8
TARGET HEART RATE ZONE CHART
MOVING THE WALKMILL
In its portable position the Walkmill™ is designed to move
easily throughout your home. For best results please follow these
simple guidelines:
NOTE:While moving, the Walking Deck should be in the
upright position.
1. Make sure that all the Power Controls are turned OFF and
that the Wheels are locked.
Locked
Unlocked
2. Move the Water Bottle Bracket to the other side of the
Handrail. If the Bracket is not moved, it will get in the way of
the Walking Deck when it is raised.
3. While gripping one of the Hand Grips with your left hand,
grip the Walking Deck with your right hand and raise it to the
upright position.You will hear a “click" once the Walking Deck
is securely in place.
NOTE:You must be able to safely lift 45 lbs. in order to
raise or lower the Walking Deck.
4. Once the Walking Deck is raised, unlock the Wheels and
move the Walkmill™ to the desired workout location.
5. Always grasp the Walkmill™ by the Hand Grips while moving
the Walkmill.™
6. Do not allow the electrical cord to drag on the floor. Secure
the electrical cord to the Hooks provided.
7. For maximum portability it is best to avoid deep pile and
shag carpeting.
7
Age
20
Lower Limit (60%)
120
Upper Limit (85%)
170
25
30
117
114
166
162
35
40
111
108
161
153
45
50
55
105
102
99
149
145
145
60
65+
98
93
138
132
TARGET HEART RATE
Please see Target Heart Rate Zone Chart to determine your target
heart rate.This is especially important for people who are over 35
years old, have a preexisting health problem or have been sedentary for
some time. Do not overexert yourself.
BREATH TEST
While the Target Heart Rate Zone Chart will help you exercise at the
proper intensity, the "breath test" helps you determine when you're
working too hard.Throughout your workout you should be able to carry
on a normal conversation without gasping for breath. If you start to
become short of breath, slow down.
NOTE: These heart rates are theoretical estimates based on scientific
research. Some individuals may have a maximum heart rate that is
very different from the estimate in this chart and it may be
dangerous to exercise at the suggested heart rates. If you have a
heart problem, or a family history of heart disease, or if
you are taking heart or high blood pressure medications,
it is essential that you obtain medical advice from your
physician with regard to your safe and recommended
exercise heart rate zone.
12
USING THE ELECTRONIC DISPLAY
The Walkmill's™ Electronic Display allows you to vary and monitor
your workout with immediate feedback on speed, elevation, calories
burned and time elapsed. Designed for ease of use, the large dials allow
you to vary your workouts on the go.
Elevation
Dial
ONCE THE WALKMILL™ IS IN THE DESIRED LOCATION,
LOWER THE WALKING DECK
Speed
Dial
Hand Grips
Deck Release
Knob
Always stand close enough to the Console so that you can easily reach
the Control Dials.
DISPLAY FUNCTIONS
To scroll between the Display's 5 various settings press the MODE
button until Display shows the desired readout:
SCAN: Automatically scans TIME, SPEED, DISTANCE and CALORIES
burned every 6 seconds.
SPEED: Displays your current speed in miles per hour.There may be a
slight delay from dialing to attaining your desired speed, therefore
be sure to adjust you speed slowly and allow the Walking Belt 1
second or 2 to catch up.
TIMER: Displays the elapsed time of your workout.The Timer will reset
to 0 after 99 minutes and 59 seconds.
CALORIES: Displays the total calories burned during your workout.
Please note that the calorie count is an estimate, to be used as a
reference only.
DISTANCE: Displays total distance in miles you have walked during
your workout.
NOTE: When not in use, the Electronic Display will turn OFF
automatically after 4 minutes.
11
Locking
Wheels
1. Re-lock all 4 Wheels.
2. Standing behind Walkmill,™firmly grip Walking Deck with your
right hand.
3. With your left hand, pull the Deck Release Knob.
4. Slowly lower the Walking Deck to the ground. DO NOT LET
IT DROP!
5. To avoid back injury, raise and lower yourself with your legs
whenever raising or lowering the Walking Deck. Do not bend
over at the hips.
NOTE: The Walkmill™ has been designed and engineered for easy
movement throughout the home.The Walkmill™ allows you to
move your workout where you want, whenever you want. However,
it is highly recommended that you utilize professional movers for
transporting the Walkmill™ up or down stairs, or if you feel the
size or weight is beyond your comfort level.
8
SAFETY CLIP
OPERATING INSTRUCTIONS
The Walkmill™ is equipped with a Magnetic Safety Button and Clip.
For safety purposes always attach the Clip to yourself prior to using the
Walkmill.™ The unit will not operate if the Magnetic Safety Button is
not in place, and will shut down if the Magnetic Safety Button is
removed during use. It is recommended that you store the Safety Clip
out of reach of children so the Walkmill™ cannot be operated without
supervision.
NOTE: Hold onto the Hand Grips at all times to ensure
proper balance.
WARNING: Stop exercising immediately and consult your
physician before continuing if you experience any of the
following symptoms: pain or tightness in your chest, an
irregular heartbeat, lightheadedness, nausea, dizziness or
lower back pain.
ELEVATION
The Dial on the left controls the Walkmill's™ elevation.Turn the Dial
forward (away from you) to increase the elevation, and towards you to
lower the elevation.The Elevation Motor is located at the rear of the
Walkmill™; therefore the back of the Walking Deck will raise and
lower instead of the front.
NOTE: The Walkmill™ is shipped in the elevated position.
NOTE: CONSECUTIVE OVERUSE OF THE ELEVATION
FEATURE MAY CAUSE THE UNIT TO OVERHEAT.
Therefore, after approximately 5 minutes of constant raising and
lowering of the Walking Deck, a thermal overload circuit will
activate and shut down the Walkmill™ and reset it to the normal
position.The Walkmill™can be reactivated as soon as it has
cooled down.
OPERATING INSTRUCTIONS
1. Make sure unit is in the OFF position.
2. Plug unit into an AC electrical outlet.
3. Turn ON the Power Switch on the front of the unit.
4. Step onto unit and place feet on the Foot Rests.
IMPORTANT: Do not activate the unit while you are standing on the
Walking Belt.
5. Attach yourself to the Safety Clip
6. To activate unit, slowly turn the SPEED Dial forward (away from
you). After a slight delay, the Walking Belt will start to move.
NOTE: For safety purposes the Power/Speed Dial must
always be reset to the OFF position prior to starting the
unit; otherwise the Walkmill™ will not start.
7. Step on to the Walking Belt and begin walking at a slow,
comfortable speed.
9
(Continued)
WARM UP
Allow yourself time to get up to speed. A 3 to 5-minute slow-paced
walk is recommended prior to stepping up the pace and elevation.
COOL DOWN
After your routine, allow yourself 3-5 minutes at a slow pace without
elevation to lower your heart rate and ensure your muscles a proper
cool down.
8. When finished, slow the Walking Belt to 2 miles per hour. Once unit
has slowed to 2 miles per hour, continue gripping the Hand Grips,
step back on to the Foot Rests and turn the SPEED Dial to OFF.
You can also stop your workout at any time by simply pressing the
STOP Button or by pulling the Magnetic Safety Button.
ENDING YOUR WALK
9. Once unit has stopped moving, step off and unplug unit.
AFTER YOUR WALKOUT
When your workout is done and you've stepped off the Walkmill,™
take a minute or 2 to gently stretch your legs and lower back.Your
muscles will be warmed up and loose and at their most receptive
towards a healthy stretch.This will also go a long way towards avoiding
any soreness or stiffness.
10
USING THE ELECTRONIC DISPLAY
The Walkmill's™ Electronic Display allows you to vary and monitor
your workout with immediate feedback on speed, elevation, calories
burned and time elapsed. Designed for ease of use, the large dials allow
you to vary your workouts on the go.
Elevation
Dial
ONCE THE WALKMILL™ IS IN THE DESIRED LOCATION,
LOWER THE WALKING DECK
Speed
Dial
Hand Grips
Deck Release
Knob
Always stand close enough to the Console so that you can easily reach
the Control Dials.
DISPLAY FUNCTIONS
To scroll between the Display's 5 various settings press the MODE
button until Display shows the desired readout:
SCAN: Automatically scans TIME, SPEED, DISTANCE and CALORIES
burned every 6 seconds.
SPEED: Displays your current speed in miles per hour.There may be a
slight delay from dialing to attaining your desired speed, therefore
be sure to adjust you speed slowly and allow the Walking Belt 1
second or 2 to catch up.
TIMER: Displays the elapsed time of your workout.The Timer will reset
to 0 after 99 minutes and 59 seconds.
CALORIES: Displays the total calories burned during your workout.
Please note that the calorie count is an estimate, to be used as a
reference only.
DISTANCE: Displays total distance in miles you have walked during
your workout.
NOTE: When not in use, the Electronic Display will turn OFF
automatically after 4 minutes.
11
Locking
Wheels
1. Re-lock all 4 Wheels.
2. Standing behind Walkmill,™firmly grip Walking Deck with your
right hand.
3. With your left hand, pull the Deck Release Knob.
4. Slowly lower the Walking Deck to the ground. DO NOT LET
IT DROP!
5. To avoid back injury, raise and lower yourself with your legs
whenever raising or lowering the Walking Deck. Do not bend
over at the hips.
NOTE: The Walkmill™ has been designed and engineered for easy
movement throughout the home.The Walkmill™ allows you to
move your workout where you want, whenever you want. However,
it is highly recommended that you utilize professional movers for
transporting the Walkmill™ up or down stairs, or if you feel the
size or weight is beyond your comfort level.
8
TARGET HEART RATE ZONE CHART
MOVING THE WALKMILL
In its portable position the Walkmill™ is designed to move
easily throughout your home. For best results please follow these
simple guidelines:
NOTE:While moving, the Walking Deck should be in the
upright position.
1. Make sure that all the Power Controls are turned OFF and
that the Wheels are locked.
Locked
Unlocked
2. Move the Water Bottle Bracket to the other side of the
Handrail. If the Bracket is not moved, it will get in the way of
the Walking Deck when it is raised.
3. While gripping one of the Hand Grips with your left hand,
grip the Walking Deck with your right hand and raise it to the
upright position.You will hear a “click" once the Walking Deck
is securely in place.
NOTE:You must be able to safely lift 45 lbs. in order to
raise or lower the Walking Deck.
4. Once the Walking Deck is raised, unlock the Wheels and
move the Walkmill™ to the desired workout location.
5. Always grasp the Walkmill™ by the Hand Grips while moving
the Walkmill.™
6. Do not allow the electrical cord to drag on the floor. Secure
the electrical cord to the Hooks provided.
7. For maximum portability it is best to avoid deep pile and
shag carpeting.
7
Age
20
Lower Limit (60%)
120
Upper Limit (85%)
170
25
30
117
114
166
162
35
40
111
108
161
153
45
50
55
105
102
99
149
145
145
60
65+
98
93
138
132
TARGET HEART RATE
Please see Target Heart Rate Zone Chart to determine your target
heart rate.This is especially important for people who are over 35
years old, have a preexisting health problem or have been sedentary for
some time. Do not overexert yourself.
BREATH TEST
While the Target Heart Rate Zone Chart will help you exercise at the
proper intensity, the "breath test" helps you determine when you're
working too hard.Throughout your workout you should be able to carry
on a normal conversation without gasping for breath. If you start to
become short of breath, slow down.
NOTE: These heart rates are theoretical estimates based on scientific
research. Some individuals may have a maximum heart rate that is
very different from the estimate in this chart and it may be
dangerous to exercise at the suggested heart rates. If you have a
heart problem, or a family history of heart disease, or if
you are taking heart or high blood pressure medications,
it is essential that you obtain medical advice from your
physician with regard to your safe and recommended
exercise heart rate zone.
12
KATHY'S EXCLUSIVE
WALKMILL ™ PROGRAMS
Included with your Walkmill™ are Kathy Kaehler's Executive
Walkmill™ Programs: “Wave Walking for Maximum Weight Loss”;
“The Walkmill™ Quick Fix Program”,“The Easiest and Healthiest
Way To Lose Up To 10 Pounds In A Hurry” and “The Walkmill™
Superstar Total Body Workout”, which includes Kathy's body
sculpting secrets to the stars.
Kathy's Exclusive Programs have been included in a separate
manual as well as a separate flip chart for ease of use during your
exercise program. For more information please refer to the
Walkmill™ website at: www.walkmill.com.
Each of Kathy's programs have separate beginner, intermediate
and advanced levels. Please be sure to start with the program that
best fits your current fitness level. If you are just beginning a fitness
program, be sure to start at the beginner level of Kathy's programs
to allow yourself time to get up to speed.
Consult your Physician before beginning these or any other
exercise programs.
ASSEMBLY (Continued)
Figure 4
3. Insert the Left Handrail into the Handrail Supporter in the Frame
Base. Secure the Right Handrail to the unit using the 5/16" x 11/2" Round Bolt and Circle Washer, and 5/16” x 3/4" Round Bolt.
The Circle Washer should be used with the 5/16" x 1-1/2” Round
Bolt. (See Figures 4 and 5.)
Note: Do not fully tighten Bolts at this time.
4. Attach the Right and Left Handrails together and secure together
using the 2 remaining 5/16" x 3/4" Round Bolts. (See Figures 6
and 7.)
5. Finish tightening, but do not overtighten, all Bolts from Step 2
through Step 4.
6. Attach the Water Bottle Bracket on the Console Supporter and
secure using the 1/4" x 1 3/4" Round Bolt and the 5/16" Nut.
(See Figure 8) Water Bottle Bracket should be snug, but not so snug
that it cannot be rotated around the Handrail.
7. Your Walkmill™ is now completely assembled and ready to use.
Figure 6
13
Figure 5
Figure 7
6
Figure 8
PARTS
7.
5.
1.
3.
2.
4.
8.
6.
1. Safety Clip (P/N 50549)
2. Two 5/16” x 1-1/2" Round Bolts (P/N 50550)
3. Four 5/16” x 3/4" Round Bolts (P/N 50551)
4. Four Circle Washers (P/N 50552)
5. 1/4" x 1-3/4" Round Bolt (P/N 50553)
6. MS Allen Wrench (P/N 50554)
7. 5/16” Nut (P/N 50555)
8. Lubricant (P/N 50556)
9. Water Bottle Bracket (not shown) (P/N 50557)
10. Water Bottle (not shown) (P/N 50558)
USER MAINTENANCE
INSTRUCTIONS
ADJUSTING THE WALKING BELT
The Walkmill's™ Walking Belt has been pre-adjusted at the factory;
however if the Belt begins to slip during use, please follow the following
instructions for adjustment:
ONLY 1/4
TURN AT A
TIME
Counter Clockwise
Clockwise
1. Locate Rear Adjusting Bolts.
ASSEMBLY
1. Carefully remove Walkmill™ and all parts from carton.
2. Insert Right Handrail into the Handrail Supporter in the Frame
Base. Using the Allen Wrench, secure the Right Handrail to the
unit using the 5/16" x 1-1/2" Round Bolt and Circle Washer, and
5/16” x 3/4" Round Bolt.The Circle Washer should be used with
the 5/16" x 1-1/2” Round Bolt. (See Figures 2 and 3.)
NOTE: Do not fully tighten Bolts at this time.
NOTE: Be sure not to pinch the wire connecting the
Handrail to the Unit.
2. Using the Allen Wrench provided, turn each Bolt equally 1/4 turn
clockwise.
3. Be sure to adjust both sides equally to avoid the Belt from shifting
to one side or the other.
IF THE BELT HAS SHIFTED TOO FAR TO THE RIGHT
1. Turn on the Walkmill™ and set the speed to 2 miles per hour.
2. Turn the Right Adjusting Bolt 1/4 turn clockwise.
3. Wait 20 seconds and if no change, turn Left Adjusting Bolt
1/4 turn counterclockwise.
IF THE BELT HAS SHIFTED TOO FAR TO THE LEFT
1. Turn on the Walkmill™ and set the speed to 2 miles per hour.
2. Turn the Left Adjusting Bolt 1/4 turn clockwise.
3. Wait 20 seconds and if no change, turn Right Adjusting Bolt
1/4 turn counter clockwise.
Figure 2
Figure 3
5
NOTE: Do not overtighten Walking Belt.
NOTE: Do not make any adjustments to the Walking Belt
with anyone walking on the unit.
14
RESET SWITCH
If the Walkmill™ loses power or will not start, check the Reset Switch
located on the front of the Motor Cover. If the white tab of the Reset
Switch is showing, then the Reset Switch has been tripped.
To Reset: Remove the Safety Clip on the Console; press the white tab
of the Reset Switch in until it snaps back into place. If the Reset
Switch continues to trip, refer to ADJUSTING THE WALKING BELT
and LUBRICATING THE WALKING BELT sections of this manual.
Congratulations on owning the Walkmill™ by Salton,® the
worlds finest totally portable Treadmill.You've just taken the first step
towards a healthier lifestyle. If used routinely, the Walkmill™ may make
a positive difference in your weight, mood, stress level, blood pressure
and risk of disease. It may sound too good to be true, but... good
health is only a walk away!
Magnetic Safety
Button and Clip
Electronic
Display
TROUBLE SHOOTING
Please refer to the following trouble shooting guidelines or to
Hand Grips
www.walkmill.com.
(Troubleshoot in order of suggested corrections)
Problem: Walkmill™ will not start.
Correction:
1. Make sure the unit is plugged into a 3-prong outlet.
2. Make sure the master ON/OFF Button is in the ON position.
3. Make sure the Speed Dial is turned all the way OFF before starting.
4. Make sure the unit is plugged directly into wall.
5. If needed reset the Walkmill™ Reset Switch.
6. Make sure the Magnetic Safety Clip is in place.
Problem: Walkmill™ stops or shuts OFF by itself.
Correction: if needed reset the Walkmill™ Reset Switch.
See RESET SWITCH.
Problem: Walking Belt does not run center.
Correction: See ADJUSTING THE WALKING BELT.
Master
ON/OFF
Switch
Walking Deck
Elevation
Readout
Reset
Switch
Handrail
Supporter
Walking
Belt
Locking
Wheels
Figure 1
Problem: Walking Belt slips.
Correction: See ADJUSTING THE WALKING BELT.
Problem: Walkmill™ hesitates while being stepped on.
Correction: See LUBRICATING THE WALKING BELT.
15
4
Belt
Adjusting Bolt
GROUNDING INSTRUCTIONS
This product must be grounded. If it should malfunction or break down,
grounding provides a path of least resistance for the current, and will
reduce the risk of electrical shock.The plug must be plugged into an
appropriate outlet that is properly installed and grounded in
accordance with all local codes and ordinances.
DANGER! Improper connection of the equipment-grounding
conductor can result in a risk of electric shock. Check with a qualified
electrician or serviceman if you are in doubt as to whether the product
is properly grounded. Do not modify the Plug provided with the product
— if it will not fit the outlet, have a proper outlet installed by a
qualified electrician.
Adapter
Grounded
Outlet
Metal
Screw
Grounding
Pin
Figure A
Figure B
Adapter
This product is for use on a normal 120-volt
circuit and has a grounding plug that looks like
the plug illustrated in the Figure A. However, a
temporary adapter that looks like the adapter
illustrated in Figures B and C may be used to
connect this plug to a 2-pole receptacle as
shown in Figure B if a properly grounded outlet
is not available.The temporary adapter should
be used only until a properly grounded outlet
(Figure A) can be installed by a qualified
electrician.The green colored rigid ear, lug or
the like extending from the adapter must be
connected to a permanent ground such as a
properly grounded outlet box cover. Whenever
the adapter is used, it must be held in place by
a metal screw.
3
LUBRICATING THE WALKING BELT
The Walkmill™ requires little maintenance other then periodically
applying lubricant. Lubricating under the Walking Belt will ensure
superior performance and extend the working life of the Walkmill.™
To check for proper lubrication, lift one side of the Walking Belt and feel
the top of surface of the Walking Deck. If the surface is slick to the
touch, then no further lubrication is necessary. If the surface is dry to
the touch, apply a half of a bottle of the lubricant that is included with
your Walkmill.™
To apply lubricant, lift one side
of the Walking Belt and pour
1/2 the bottle of lubricant under
the center of the Walking Belt
on the top surface of the
Walking Deck.Then walk on the
Walkmill™ at a slow speed for
3 to 5 minutes to evenly
distribute the lubricant.
NOTE: Do not over
lubricate the Walking
Deck. Be sure to wipe
off any excess lubricant
that comes out from
under the Walking Belt.
Be careful not to spill
lubricant on your floor
or carpet.
For Grounding
Screw
Figure C
16
CLEANING
Care has been taken to assure that the Walkmill™ has been
properly adjusted and lubricated during production. It is not
recommended that the user attempt service on the internal
components. However, from regular use the outer surface may
appear dull or dirty, following the instructions listed below will
restore and preserve the original finish.
NOTE: Always unplug the Walkmill™ prior to cleaning.
Cleaning metal surfaces may be accomplished by using a soft
cotton or terry cloth rag with light application of car wax. Do not
use aerosol sprays or pump bottles as they may deposit wax on the
walking surface.
STORAGE
1. Keep the Walkmill™ unplugged when not in use.
2. Keep all the power sources turned OFF.
3. Store Magnetic Safety Clip out of reach of children.
4. Store with the Handgrips towards the wall and Wheels locked.
Please do not perform or attempt any customizing, adjustments,
repair or maintenance that is not described in this manual. If you
experience any difficulty, please contact our website at:
www.walkmill.com.
ADDITIONAL IMPORTANT
SAFEGUARDS
1. Set up the Walkmill™ on a flat, level surface and clear the area
around it, so you can get on and off freely and safely.
2. Always lock all 4 Wheels into place prior to operation.
3. Keeps pets a safe distance from the Walkmill.™
4. Make sure that the Walkmill™ has come to a complete STOP and
has been turned OFF before getting on or off.
5. This product is to be used by only one person at a time.
6. Parental supervision is advised if the device is used by children.
The Walkmill™ is not recommended for children under 10 years
of age.
7. Always wear athletic shoes and proper clothing when on the
Walkmill.™
8. Use care and firmly hold the Hand Grips while exercising.
The Walkmill™ is not intended for running.
9. Consult your physician before beginning this or any
exercise program.
10. Do not put more than 300 lbs. of pressure on the Walkmill.™
11. Read this entire manual before using the Walkmill.™
12. NOTE: This product must be grounded. No plug adapter
should be used. Improper connection of the
equipment - grounding conductor can result
in a risk of electrical shock.
GROUNDED 3-CONDUCTOR PLUG
This appliance is equipped with a grounded-type 3-wire cord (3-prong
plug).This plug will only fit into an electrical outlet made for a 3-prong
plug. This is a safety feature. If the plug should fail to fit the outlet,
contact an electrician to replace the obsolete outlet. Do not attempt to
defeat this safety feature.
17
2
IMPORTANT SAFEGUARDS
When using an electrical appliance, basic safety precautions should
always be followed, including the following:
Read all instructions before using the Walkmill.™
DANGER - To reduce the risk of electric shock:
1. Always unplug this appliance from the electrical outlet immediately
after using and before cleaning.
WARNING - To reduce the risk of burns, fire, electric shock or injury
to persons:
1. An appliance should never be left unattended when plugged in.
Unplug from outlet when not in use, and before putting on or
taking off parts.
2. Do not operate under a blanket or pillow. Excessive heating can
occur and cause fire, electric shock, or injury to persons.
3. Close supervision is necessary when this appliance is used by, on, or
near children, invalids, or disabled persons.
4. Use this appliance only for its intended use as described in this
manual. Do not use attachments not recommended by the
manufacturer.
5. Never operate this appliance if it has a damaged cord or plug, if it
is not working properly, if it has been dropped or damaged, or
dropped into water. Return the appliance to a service center for
examination and repair.
6. Do not carry this appliance by its supply cord or use the cord as
a handle.
7. Keep the cord away from heated surfaces.
8. Never operate the appliance with the air openings blocked. Keep
the air openings free of lint, hair and the like.
9. Never drop or insert any object into any opening.
10. Do not operate where aerosol (spray) products are being used or
where oxygen is being administered.
11.To disconnect, turn all controls to the OFF position, then remove plug
from outlet.
SAVE THESE INSTRUCTIONS
FOR HOUSEHOLD USE ONLY
1
NOTES:
LIMITED 90-DAY WARRANTY
Warranty: This product is warranted by Salton, Inc. to be free from defects in
materials or workmanship for a period of 90 Days from the original purchase date.
This product warranty covers only the original consumer purchaser of the product.
Warranty Coverage: This warranty is void if the product has been damaged by
accident in shipment, unreasonable use, misuse, neglect, improper service,
commercial use, repairs by unauthorized personnel, normal wear and tear,
improper assembly, installation or maintenance abuse or other causes not arising
out of defects in materials or workmanship. This warranty is effective only if the
product is purchased and operated in the USA, and does not extend to any units
which have been used in violation of written instructions furnished with the
product or to units which have been altered or modified or to damage to products
or parts thereof which have had the serial number removed, altered, defaced or
rendered illegible.
Implied Warranties: ANY IMPLIED WARRANTIES WHICH THE PURCHASER MAY
HAVE ARE LIMITED IN DURATION TO 90 DAYS FROM THE DATE OF PURCHASE.
Some states do not allow limitations on how long an implied warranty lasts, so the
above limitation may not apply to you.
Warranty Performance: During the above 90-Day Warranty period, a product
with a defect will be either repaired or replaced with a reconditioned comparable
model (at our option) when the product is returned to the Repair Center. The
repaired or replacement product will be in warranty for the balance of the 90-Day
warranty period and an additional one-month period.
Service and Repair: Should the appliance malfunction, you should first call tollfree 1 (800) 934-7455 between the hours of 9:00 am and 5:00 pm Central Standard
Time and ask for CONSUMER SERVICE stating that you are a consumer with a
problem. Please refer to model number WALK1 when you call.
Out-of Warranty Service: A flat rate charge by model is made for out-ofwarranty service. Call Consumer Service for Instructions, toll-free 1-(800)934-7455.
To contact us, please write to, call, or email:
Salton, Inc.
P.O. Box 1637
Columbia, MO 65205-1637
1(800) 934-7455
Email: [email protected]
Limitation of Remedies: No representative or person is authorized to assume
for Salton, Inc. any other liability in connection with the sale of our products.
There shall be no claims for defects or failure of performance or product failure
under any theory of tort, contract or commercial law including, but not limited to
negligence, gross negligence, strict liability, breach of warranty and breach of
contract. Repair, replacement or refund shall be the sole remedy of the purchaser
under this warranty, and in no event shall Salton be liable for any incidental or
consequential damages, losses or expenses. Some states do not allow the
exclusion or limitation of incidental or consequential damages, so the above
limitation or exclusion may not apply to you.
Legal Rights: This warranty gives you specific legal rights, and you may also
have other rights which vary from state to state.
For more information on Walkmill™ products: visit our website: www.Walkmill.com
OWNER’S MANUAL &
OPERATING INSTRUCTIONS
Model WALK1
For more information on Salton products: visit our website: www.eSalton.com
©2003 Salton, Inc. All rights reserved.
Made in China
WALKMILL™
P/N 61302
4/03
FITNESS