1
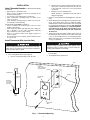
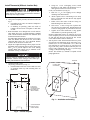
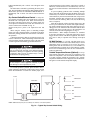
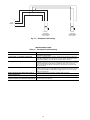
50QE900
Aquazone™ Water Source Heat Pump
Flush-Mounted FlatStat
Commercial Programmable Thermostat
Installation and Operating Instructions
Part Number 50QE900-250FS
CONTENTS
Page
SAFETY CONSIDERATIONS . . . . . . . . . . . . . . . . . . . . . . 1
GENERAL . . . . . . . . . . . . . . . . . . . . . . . . . . . . . . . . . . . . . . . . 1
INSTALLATION . . . . . . . . . . . . . . . . . . . . . . . . . . . . . . . . . 2-8
Select Thermostat Location . . . . . . . . . . . . . . . . . . . . . . 2
Install Thermostat (With Junction Box) . . . . . . . . . . . 2
Install Thermostat (Without Junction Box) . . . . . . . 4
Set Clock. . . . . . . . . . . . . . . . . . . . . . . . . . . . . . . . . . . . . . . . . 5
Configure Advanced Setup. . . . . . . . . . . . . . . . . . . . . . . 5
Install Accessories . . . . . . . . . . . . . . . . . . . . . . . . . . . . . . . 6
Program Thermostat Schedules. . . . . . . . . . . . . . . . . . 6
Factory Defaults . . . . . . . . . . . . . . . . . . . . . . . . . . . . . . . . . 8
Calibrate Sensor . . . . . . . . . . . . . . . . . . . . . . . . . . . . . . . . . 8
Check Thermostat Operation. . . . . . . . . . . . . . . . . . . . . 8
Final Checklist . . . . . . . . . . . . . . . . . . . . . . . . . . . . . . . . . . . 8
OPERATION . . . . . . . . . . . . . . . . . . . . . . . . . . . . . . . . . . . 8-10
Auto-Changeover . . . . . . . . . . . . . . . . . . . . . . . . . . . . . . . . 8
Two-Stage Operation . . . . . . . . . . . . . . . . . . . . . . . . . . . . . 8
Clock Backup . . . . . . . . . . . . . . . . . . . . . . . . . . . . . . . . . . . . 8
Fan Operation . . . . . . . . . . . . . . . . . . . . . . . . . . . . . . . . . . . . 8
Emergency Heat . . . . . . . . . . . . . . . . . . . . . . . . . . . . . . . . . 8
Holiday Mode . . . . . . . . . . . . . . . . . . . . . . . . . . . . . . . . . . . . 8
Remote Temperature Sensor . . . . . . . . . . . . . . . . . . . . . 8
Keypad Lock . . . . . . . . . . . . . . . . . . . . . . . . . . . . . . . . . . . . . 8
Dry Contact Switch/External Control . . . . . . . . . . . . . 9
10-Watt Resistor . . . . . . . . . . . . . . . . . . . . . . . . . . . . . . . . . 9
Outside Temperature Sensor (Optional) . . . . . . . . . . 9
TROUBLESHOOTING. . . . . . . . . . . . . . . . . . . . . . . . . . . . 10
or in the instruction manual, be alert to the potential for personal injury.
Understand the signal words DANGER, WARNING, and
CAUTION. These words are used with the safety alert symbol.
DANGER identifies the most serious hazards which will result
in severe personal injury or death. WARNING signifies a hazard which could result in personal injury or death. CAUTION
is used to identify unsafe practices which would result in minor
personal injury or property damage.
GENERAL
The commercial, 7-day, programmable thermostats are
wall-mounted, low-voltage thermostats which maintain room
temperature by controlling the operation of an HVAC (heating,
cooling and ventilation) system. Separate heating and cooling
set points and auto-changeover capability allow 4 different programming time periods for energy savings.
All thermostats allow up to 4 time/temperature settings to
be programmed per 24-hour period. Each thermostat stores
programs for 7 independent days. Batteries are not required.
During power interruption the internal NEVERLOST™
memory stores programmed schedules for an unlimited time
while the clock continues to run for at least 48 hours.
The thermostat can be configured to accept several different
equipment configurations, and is provided for heat pump
operation.
NOTE: The 50QE900-250FS thermostats have wiring connections for a remote room sensor.
PACKAGE CONTENTS
IMPORTANT: Read entire instructions before starting
the installation.
SAFETY CONSIDERATIONS
Read and follow manufacturer instructions carefully. Follow all local electrical codes during installation. All wiring
must conform to local and national electrical codes. Improper
wiring or installation may damage thermostat.
Recognize safety information. This is the safety alert symbol . When the safety alert symbol is present on equipment
ITEM
Thermostat
Cutout Template
1-in. Screws (Junction Box Installation)
11/2-in. Self-Tapping Screws
(Non-Junction Box Installation)
Plastic Tabs
Power Resistor (270 ohm, 10 Watt)
QUANTITY
1
1
2
2
2
1
Manufacturer reserves the right to discontinue, or change at any time, specifications or designs without notice and without incurring obligations.
PC 111
Catalog No. 535-00106
Printed in U.S.A.
Form 50QE-5SI
Pg 1
6-03
Replaces: New
Book 1
4
Tab 5a 5a
INSTALLATION
b. Disconnect wires from existing thermostat. Do not
allow wires to fall back into the wall. As each wire
is disconnected, record wire color and terminal
connection.
c. Discard or recycle old thermostat.
NOTE: Mercury is a hazardous waste and must be
disposed of properly.
3. Install 2 x 4-in. junction box (field-supplied) in wall. See
Fig. 1.
4. Route thermostat wires through back of junction box. Remove outer sheath from wires for added flexibility.
Standard solid or multi-conductor thermostat wire should
be used from the thermostat to the unit. Size and length
considerations are as follows: for a maximum distance
from unit of 36 ft, use 22 AWG (American Wire Gage)
wire; for a maximum distance from unit of 100 ft, use
18 AWG wire.
5. Adjust wire length and routing to allow proper closure of
the thermostat. Strip each wire at the end no more than
1/ -in. to prevent adjacent wires from shorting together.
4
Match and connect wires to terminals on the thermostat.
See Fig. 2-5 and Table 1.
Select Thermostat Location — The thermostat should
be mounted:
• approximately 5 ft from the floor
• close to or in a frequently used room, preferably on an
inside partitioning wall
• on a section of wall without pipes or ductwork
• where temperature operating limits are within 32 to
122 F (0° to 50 C)
• where humidity operating range is within 0 to 95% relative humidity, non-condensing
The thermostat should NOT be mounted:
• close to a window, on an outside wall, or next to a door
leading to the outside
• where exposed to direct light and heat from a lamp, the
sun, a fireplace, or any other temperature-radiating
object which may cause a false reading
• close to or in direct airflow from supply registers or
return air grilles
• in areas with poor air circulation (such as behind a door
or in an alcove)
Install Thermostat (With Junction Box)
Improper wiring or installation may cause damage to the
thermostat. Check to ensure wiring is correct before proceeding with installation of thermostat.
Before installing thermostat, turn off all power to the unit.
There may be more than one power disconnect. Electrical
shock can cause injury or death.
6. Push excess wiring into wall. Seal hole in junction box to
prevent drafts.
7. Attach thermostat to junction box.
1. Turn off all power to unit.
2. If an existing thermostat is being replaced:
a. Remove existing thermostat from the wall.
WALL
WALL
2 x 4-in.
STANDARD
FIELD-SUPPLIED
JUNCTION BOX
THERMOSTAT
WIRING
JUNCTION
BOX
MOUNTING
HOLE
.366”
WALL
EXTENDS
LESS THAN
3/8” FROM
THE WALL
SIDE
VIEW
MOUNTING
HOLE
Fig. 1 — Thermostat Mounting
2
8. Turn on power to unit. The thermostat will receive power
from the unit. The thermostat will be powered by 24 v,
nominal (18 to 30 vac). Terminals R (+ 24 v), O/W1 (first
stage heat or reversing valve), Y1 (first stage cooling),
G (fan relay), and C (common) will always be connected.
Some applications will use Y2 (second stage cooling) or
W2 (second stage heating).
NOTE: The common (C) hook up is required on heat pump
applications.
B
O
W2 Y2 R W1 Y1 G
C
Thermostat
COMPLETE C
24 vac common
C
Fan
Compressor
G
Cooling
O
Y
W
24 vac return
Fig. 3 — Water Source Heat Pumps Equipped
with 1 Complete C Control Board
for Single-Stage Operation
CK1
GND
RS
RS+5
W2
Y2
C
G
Y1
W1-O-B
R
R
B
O
W2 Y2 R W1 Y1 G
C
Thermostat
COMPLETE C1 COMPLETE C2
C
CK1
G
GND
—
—
—
—
RS
RS+5
R
W1-O-B
W2
Y1
Y2
—
—
—
—
—
—
—
LEGEND
24 VAC Transformer Common
Dry Contact Switch
Fan
Remote Sensor or Dry Contact Switch
Ground
Remote Sensor Signal
Remote Sensor (+5 vdc)
24 VAC Transformer Power
First-Stage Heat or Reversing Valve
Second-Stage Heat
First-Stage Compressor
Second-Stage Compressor
C
C
Fan
Compressor
G
G
Y
Y
Cooling
O
O
W
W
R
R
24 vac return
Compressor 2
Fig. 4 — Water Source Heat Pumps Equipped
with 2 Complete C Control Boards
for Two-Stage Operation
Fig. 2 — Thermostat Wiring
B
O
W2 Y2 R W1 Y1 G
Table 1 — Thermostat Wiring Terminations
EXISTING
WIRE
DESIGNATION
G or F
Y1, Y, or C
W1, W, or H
Rh, R, M, Vr, or A
C
O/B
Y2
W2
RS+5
RS
GND
CK1
24 vac common
FUNCTION
TERMINAL
CONNECTION
Fan
Cooling
Heating
Power (24 v)
Common
Reversing Valve
Second Stage Cooling
Second Stage Heating
Remote Sensor (5 vdc)
Remote Sensor Signal
Remote Sensor Ground
Dry Contact Switch
G
Y1
W1-O-B
R
C
W1-O-B
Y2
W2
RS+5
RS
GND
CK1
C
Thermostat
DELUXE D
24 vac common
C
Fan
Compressor 1
G
Cooling
Y1
O/W2
W1
24 vac return
Compressor 2
R
Y2
Fig. 5 — Water Source Heat Pumps Equipped
with Deluxe D Control Board(s)
for Single or Two Stage Operation
3
Install Thermostat (Without Junction Box)
b. Using two 11/2-in. self-tapping screws, attach
thermostat to wall. Make sure thermostat cover is
flush against wall and covers hole in wall.
On dry wall installations (see Fig. 8):
a. Push two 11/2-in. self tapping screws through
mounting holes in thermostat.
b. Attach 2 plastic tabs to 2 mounting screws. Only
turn 3 or 4 threads into tabs. Do not fully tighten
tabs onto screws.
c. Rotate screws short sides of tabs are facing out.
Push thermostat into hole in wall.
d. Turn screws 1/2 turn so long side of plastic tabs
face out away from thermostat. Pull thermostat out
so tabs are snug against dry wall and will not turn.
e. Tighten screws until thermostat is snug against
wall and tabs are pressed against dry wall.
NOTE: If thermostat needs to be removed, do not unscrew completely. If screws are removed from tabs inside
of wall, tabs may drop into wall and be lost. Loosen
screws and turn tabs to remove thermostat.
6. Turn on power to unit. The thermostat will receive power
from the unit. The thermostat will be powered by 24 v,
nominal (18 to 30 vac). Terminals R (+24 v), W1-O-B
(first stage heat or reversing valve), Y1 (first stage cooling), G (fan relay), and C (common) will always be connected. Some applications will use Y2 (second stage
cooling), or W2 (second stage heating).
NOTE: The common (C) terminal is required on heat
pump applications.
Before installing thermostat, turn off all power to unit.
There may be more than one power disconnect. Electrical
shock may cause injury or death.
1. Turn off all power to unit.
2. Using cutout template provided, cut hole into wall. See
Fig. 6.
a. If installing on dry wall, use outside of template to
mark hole on wall.
b. If installing on paneling, punch out inside of
template and use inside of template to mark hole
on wall.
3. Route thermostat wires through hole in wall. Remove
outer sheath from wires for added flexibility. Standard
solid or multi-conductor thermostat wire should be used
from the thermostat to the unit.
Size and length considerations are as follows: for a maximum wire distance from the unit of 36 ft, use 22 AWG
(American Wire Gage) wire; for a maximum distance
from the unit of 100 ft, use 18 AWG wire.
4. Adjust wire length and routing to allow proper fit of the
thermostat on the wall. Strip each wire at the end no more
than 1/4-in. to prevent adjacent wires from shorting
together. Match and connect wires to terminals on the
thermostat. See Fig. 2-5 and Table 1.
Improper wiring or installation may cause damage to the
thermostat. Check to ensure wiring is correct before proceeding with installation of the thermostat.
PANELING
5. Attach thermostat to wall.
On paneling installations (see Fig. 7):
a. Push thermostat into hole in wall. Make sure tabs
on paneling match up with mounting holes on
thermostat.
CUTOUT HOLE
IN PANELING
WIRING
2 3/8”
7/8”
3/16”
3/16”
1/4”
9/16”
PUNCH OUT
CENTER AND
USE INSIDE EDGE
FOR PANELING
INSTALLATIONS
3 3/4”
Fig. 7 — Installation on Paneling
USE OTHER EDGE
FOR DRY WALL
INSTALLATIONS
Fig. 6 — Cutout Template
4
Table 2 — Advanced Setup Configuration
DRY WALL
1 1/2” SCREW
STEP
PLASTIC TAB
THERMOSTAT
COVER
3 3/4-in. (TEMPLATE)
Time of Day
2
Day of the Week
3
4
Fan Operation
Heat Pump
Reversing Valve
Polarity
Deadband
Forced Minimum
Temperature Difference
Cycles per Hour
Fan Purge Timer
Thermoglow™ Backlight
Reset Service
Filter Icon
Service Filter
Run Time
Soft Start
Temperature Units
Outside/Duct Sensor
Security Level
Maximum Allowable
Heat Set Point
Minimum Allowable
Cooling Set Point
5
6
1 1/2” SCREW
PLASTIC TAB
WIRING
7
8
9
10
DRY WALL
Fig. 8 — Installation on Dry Wall (Side View)
11
Set Clock — The Set Clock function allows the user to
12
change the time and day displayed on the thermostat. Press and
hold the Mode and Override buttons at the same time until the
display changes. The display will show the Setup annunciator.
The current time will blink on and off. Press the UP ARROW
and DOWN ARROW buttons until the correct time is shown.
Hold down the buttons to quickly move through the time display. The AM and PM annunciators will automatically change.
To scroll through by hours instead of minutes, hold down the
Override button while pressing UP ARROW or DOWN ARROW. To ensure the schedules are properly followed, make
sure that AM or PM is correct for the time chosen. When the
correct time is shown, press the Mode button to modify the day
of the week. The current day will blink on and off. Press the UP
ARROW and DOWN ARROW buttons until the correct day is
shown. Press the and hold the Mode and Override buttons at
the same time again to exit the Set Clock mode.
DESCRIPTION
1
13
14
15
16
17
18
RANGE
12:00 AM 11:59 PM
Sunday through
Saturday
Auto/On
Off/On
DEFAULT
O/B
O
1-6F
2F
0-6F
2F
d, d1, 2 - 6
0:00 - 3:00
Off/On
6
0:00
On
—
—
0-1950 hrs
500 hrs
0 - 99
F/C
Yes/No
0-3
0
F
No
0
35 - 99 F
80 F
35 - 99 F
65 F
12:00 AM
Monday
Auto
On
DEADBAND (Step 6) — The deadband is the difference in
temperature above the cooling set point or below the heating
set point that the thermostat will wait before turning on the first
stage of heating or cooling. For example, if the cooling set
point is 82 F (28 C) and the deadband is 2 degrees, the first
stage of cooling will not be energized until the temperature
reaches 84 F (30 C). The range of values is 1 to 6 degrees. The
default is 2 degrees.
SET POINT MINIMUM DIFFERENCE (Step 7) — The minimum difference between heating and cooling set points can be
user-configured. The range is from 0 to 6 degrees. The default
is 2 degrees. The minimum difference is enforced during
Auto-changeover and Program On operation.
CYCLES PER HOUR LIMIT (Step 8) — The number of
times that heating or cooling can be energized per hour can be
configured. Set the variable to ‘‘d’’ for no limit. Set the variable
to ‘‘d1’’ to disable the 5-minute compressor lockout. The variable can also be set from 2 to 6 cycles per hour. The default is
6 cycles per hour.
Configure Advanced Setup — To enter the advanced setup screens of the thermostat, press the Mode and
Override buttons simultaneously. The display will change.
Continue to hold down the buttons for 5 more seconds. If only
Advanced Setup Steps 1 and 2 are accessible, then the buttons
were not held down long enough. The Advanced Setup Step
number is shown in the top right corner of the thermostat
screen. Use the Mode button to advance through the steps.
There are 19 Advanced Setup Steps. See Table 2. Press the
Mode and Override buttons at the same time to exit the
Advanced Setup mode.
NOTE: Refer to the Set Clock section for Advanced Setup
Steps 1 and 2.
FAN CONFIGURATION (Step 3) — The fan configuration
can be set to On or Auto. When the configuration is set to On,
the fan will run continuously during the occupied schedule and
all other modes except OFF. The fan will be off during the unoccupied schedule except during heating or cooling operation.
If Auto is selected, the fan will run only during heating or
cooling operation. The default is Auto.
HEAT PUMP CONFIGURATION (Steps 4 and 5) — The
thermostat is provided from the factory in heat pump mode. To
set the thermostat for heat pump operation, Advanced Setup
Step 4 must be configured to ON. Use the UP and DOWN
ARROW buttons to configure the step. The default is ON.
Press the mode button to continue to Step 5. Step 5 is used to
set the reversing valve polarity for the heat pump. The variable
can be set to either ‘‘B’’ or ‘‘O.’’ Set the reversing valve polarity to the correct value depending on the application. The default is ‘‘O.’’
NOTE: Step 5 will appear only if Step 4 is set to ON.
Damage to compressor could result if 5-minute compressor
lockout is disabled or compressor is allowed unlimited
cycles. Do not set thermostat Advanced Setup Step 8 to
‘‘d’’ or ‘‘dl’’ unless specifically recommended for the
application.
PRE-OCCUPANCY PURGE TIMER (Step 9) — The preoccupancy purge allows fresh outside air to be brought into the
space before the Occupied 1 time period. The timer limits the
amount of time that the purge can operate. The timer can be set
from 0 to 3 hours with 15-minute intervals. The default is
0 hours (disabled).
BACKLIGHT DISPLAY (Step 10) — The display backlight
can be set to ON (always on) or OFF (turn off 8 seconds after
usage). The default is ON.
5
Refer to the accessory installation instructions for each
accessory for more information.
REMOTE TEMPERATURE SENSOR — A remote temperature sensor may be provided to read the temperature from a
space. If a remote temperature sensor is connected, the thermostat will ignore the reading of its internal sensor. When the thermostat is using a reading from a remote sensor, the degree symbol above the temperature reading will blink.
NOTE: An outdoor temperature sensor or a duct temperature
sensor can be used with the remote temperature sensor wiring
connections instead of a remote temperature sensor. However,
no matter which sensor is used, the thermostat will ignore the
reading of its internal sensor and control to the accessory sensor reading, unless the Sensor Type configuration is set to yes.
SERVICE FILTER (Steps 11 and 12) — Step 11 allows the
user to reset the Service Filter counter to zero and remove the
‘‘SERVICE FILTER’’ icon (if displayed on the thermostat
screen). Press the Override button while in Setup Step 11 and
the counter is reset to zero. Press the Mode button to adjust the
number of hours the blower will run before the ‘‘SERVICE
FILTER’’ icon is displayed. The range is 0 to 1950 hours. Set
the variable to 0 to disable this function. The default is
500 hours.
SOFT START (Step 13) — The soft start is used when multiple units are used in an application. The soft start staggers the
start-up times of the units in the event of power loss and restart.
Each unit should be assigned a unit ID number. The 30-second
delay time is multiplied the unit ID number to get the total soft
start delay time for each unit. For example, if the unit ID
number is 10, set the Soft Start function to 10, the start-up
delay time is 30 seconds x 10 = 300 seconds (5 minutes). The
range is 0 to 99 (ID numbers). A value of 0 disables the function. The default is 0 (ID number).
FAHRENHEIT/CELSIUS OPERATION (Step 14) — The
thermostat can be set to operate in Fahrenheit or Celsius degrees. Set the variable to ‘‘F’’ for Fahrenheit operation. Set the
variable to ‘‘C’’ for Celsius operation.
SENSOR TYPE CONFIGURATION (Step 15) — The sensor type configuration can be set to YES or NO. If it is set to
NO, any sensor wired to the RS and RS+5 terminals will be automatically detected and used as a remote temperature sensor
(thermostat controls to sensor temperature reading). If the sensor type configuration is set to YES, any sensor wired to the RS
and RS+5 terminals will be used as an outside or duct sensor
(thermostat will not control to sensor temperature reading). The
default is NO.
SECURITY LEVEL (Steps 16 to 18) — The Security Level
limits the actions that the user can perform at the thermostat.
There are 4 security levels. When the security level is set to
‘‘0,’’ no security will be in effect. When the security level is set
to ‘‘1,’’ the set point range is limited by the settings of Steps 17
and 18. When the security level is set to ‘‘2,’’ the set point
range is limited by the settings of Steps 17 and 18 and the Program thermostat operation mode is always in effect. When the
security level is set to ‘‘3,’’ the set point range is limited by the
settings of Steps 17 and 18, the Program On mode is always in
effect, and set point changes are prohibited. The default is 0.
NOTE: The Fan button is ignored when Security levels 2 or 3
are in effect.
Security Maximum Heat Set Point (Step 17) — If the Security Level is not set to 0, the maximum heating set point will be
in effect. The user will not be allowed to set the heating set
point over the specified value. The range of values is 35 to 99 F
(1 to 37 C). The default is 80 F (27 C).
Security Minimum Cool Set Point (Step 18) — If the Security Level is not set to 0, the minimum cooling set point will be
in effect. The user will not be allowed to set the cooling set
point below the specified value. The range of values is 35 to
99 F (1 to 37 C). The default is 65 F (18 C).
Program Thermostat Schedules — Before programming the thermostat, plan the thermostat daily schedule.
The schedule is divided into 7 days (Monday through Sunday).
Each day has from 2 to 4 time periods (Occupied 1, Occupied
2, Occupied 3, Unoccupied) depending on the configuration of
the thermostat. Each occupied time period has a start time, stop
time, heating set point, and cooling set point. The unoccupied
time period has a heating set point and a cooling set point. The
unoccupied time period is active when ever an occupied time
period is not active. Fill in Table 3 as an aid to programming
the daily schedules.
PROGRAMMING MODE — To program the daily schedules, perform the following procedure:
1. Enter Programming mode by pressing and holding the
Mode and UP ARROW buttons. The Occupied 1 annunciator will appear on the thermostat display. Use the UP
ARROW and DOWN ARROW buttons to set the maximum number of Occupied periods for each day. The thermostat can be set to 1, 2, or 3. After the number of Occupied periods has been selected, press the Mode button.
See Fig. 9.
2. The cooling set point for Occupied 1 will be displayed.
Use the UP ARROW and DOWN ARROW buttons to
raise or lower the cooling set point until the desired temperature is shown. The range of acceptable values is 35 to
99 F (1 to 37 C). Press the Mode button to continue. See
Fig. 9.
3. The heating set point for Occupied 1 will be displayed.
Use the UP ARROW and DOWN ARROW buttons to
raise or lower the heating set point until the desired temperature is shown. The range of acceptable values is 35 to
99 F (1 to 37 C). Press the Mode button to continue. See
Fig. 9.
Install Accessories — The following accessories can
be used with this thermostat:
• remote temperature sensor with override
(33CSSEN-WB)
• wireless remote sensor (33CSRFS-RE,
33CSRFS-RC, transmitter)
• duct-mounted sensor (33CSSEN-DS)
receiver;
Fig. 9 — Setting Occupied 1 Set Points
6
If YES was selected, the schedule will be copied to the
4. The cooling set point for Unoccupied will be displayed.
next day. The schedule copy may be repeated until SunUse the UP ARROW and DOWN ARROW buttons to
day is reached. The Sunday schedule cannot be copied to
raise or lower the cooling set point until the desired temMonday.
perature is shown. The range of acceptable values is 35 to
99 F (1 to 37 C) or ‘‘OF’’ (no unoccupied cooling). To
12. After all the times and set points for each day have been
configure the Unoccupied Cooling set point to OF, press
entered, press and hold the Mode and UP ARROW butthe UP ARROW button until 99 F is displayed. Press the
tons to exit Programming mode.
UP ARROW button again to display OF. Press the Mode
NOTE:
The thermostat will continue to follow the schedule
button to continue.
until a new one is entered.
5. The heating set point for Unoccupied will be displayed.
If only one occupied schedule is selected, the Occupied 2
Use the UP ARROW and DOWN ARROW buttons to
and 3 schedules are skipped. If the start time is set later in the
raise or lower the heating set point until the desired temday than the stop time, the program will run from midnight of
perature is shown. The range of acceptable values is 35 to
that day to the stop time and then from the start time to mid99 F (1 to 37 C) or ‘‘OF’’ (no unoccupied heating). To
night. If the same start and stop times are programmed for an
configure the Unoccupied Heating set point to OF, press
occupancy schedule, the thermostat will be in Occupied mode
the DOWN ARROW button until 35 F is displayed. Press
for 24 hours. If one occupied period starts or stops within anthe DOWN ARROW button again to display OF. Press
other occupied period, the lower numbered schedule has priorithe Mode button to continue.
ty. For example, if schedule Occupied 3 is running for 24 hours
6. The day of the week will be shown. Use the UP ARROW
and Occupied 2 schedule comes on from 1 to 3 PM, the set
and DOWN ARROW buttons to change the day of the
points from Occupied 2 are in effect from 1 to 3 PM.
week until the desired starting day is shown. Possible
OVERRIDING THE SCHEDULE — The schedule can be
choices are M (Monday) through S (Sunday). Press the
overridden by pressing the UP or DOWN ARROW buttons to
Mode button when the desired day is shown.
change the desired temperature. The thermostat will use the
7. The Start Time for Occupied 1 will be displayed. Use the
new set point until the next scheduled time period starts.
UP ARROW and DOWN ARROW buttons to raise or
lower the time until the desired Start Time is shown.
Press the Mode button to continue. See Fig. 10.
8. The Stop Time for Occupied 1 will be displayed. Use the
UP ARROW and DOWN ARROW buttons to raise or
lower the time until the desired Stop Time is shown. Press
the Mode button to continue.
9. The On/Off icon will be displayed. Use the UP ARROW
to turn the Occupied 1 period ON for this day. Use the
DOWN ARROW to turn the Occupied 1 period OFF for
this day.
10. Repeat Steps 2 through 9 to program the remaining
Fig. 10 — Start Time Display
schedule for Occupied periods 2 and 3.
11. The Copy command can be used to copy the previous
day’s schedule if the schedules are the same. The copy
command becomes available after all the occupied periods are programmed in a day. Use the UP ARROW to
change the copy command to YES. Use the DOWNARROW to change the copy command to NO. Press the
Mode button when the choice has been made. See
Fig. 11.
If NO was selected, the schedule will automatically
change to the next day and the user must enter the occupied and unoccupied schedules for that day.
NOTE: Occupied 1 schedule heating and cooling set
Fig. 11 — Copy Command Display
points are the same for each day. Occupied 2 and 3 set
points may be set to different values for each day of the
week.
Table 3 — Daily Schedule Planner
DAY
OF THE
WEEK
Occupied 1
Start / Stop / Heat / Cool
SCHEDULE
Occupied 2
Start / Stop / Heat / Cool
Occupied 3
Start / Stop / Heat / Cool
Unoccupied
Heat / Cool
Monday
/
/
/
/
/
/
/
/
/
/
Tuesday
/
/
/
/
/
/
/
/
/
/
Wednesday
/
/
/
/
/
/
/
/
/
/
Thursday
/
/
/
/
/
/
/
/
/
/
Friday
/
/
/
/
/
/
/
/
/
/
Saturday
/
/
/
/
/
/
/
/
/
/
Sunday
/
/
/
/
/
/
/
/
/
/
NOTE: The cooling temperature set point must be higher than the heating temperature set point. (The temperature difference may be changed in
the advanced setup configuration.)
7
Factory Defaults — If the thermostat needs to be reset to
factory default settings, perform the following procedure:
1. Hold down the Mode button and press the DOWN
ARROW button simultaneously for 5 seconds. All of the
icons on the display screen will appear.
2. Press and hold the Override button until Fd (factory defaults) appears on the screen.
3. Press the Mode button twice to return to normal display.
NOTE: The occupied and unoccupied schedules will be reset.
The schedule will need to be re-entered.
Two-Stage Operation — The second stage of heat or
cool is turned on when the first stage has been on for a minimum of 2 minutes and the temperature differential from the set
point is equal to or greater than the set point plus the deadband
plus 2 degrees.
Clock Backup — In the event of a power loss, the thermostat will keep time for a minimum of 48 hours without external power or batteries.
Fan Operation — If Fan On is selected, the fan will run
continuously during occupied schedule and Heat, Cool, and
Auto modes. The fan will be off during unoccupied schedule
except during heating or cooling operation.
If Fan On is not selected, the fan will only operate during
heating or cooling operation.
NOTE: The Fan button is ignored when Security levels 2 or 3
are in effect.
Calibrate Sensor — Every thermostat is factory calibrated. Under normal circumstances there will never be a need
to re-calibrate the thermostat. If re-calibration must be done,
perform the following procedure:
1. Hold down the Mode and DOWN ARROW buttons for
5 seconds. All of the icons on the display screen will
appear. Release the buttons.
2. Press the Mode button. The current temperature will be
displayed.
3. Use an accurate thermometer to measure room temperature. Press the UP or DOWN ARROW buttons until the
flashing number equals room temperature.
4. Press the Mode button again to return to normal
operation.
Check Thermostat Operation — To check thermostat operation, perform the following procedure:
1. Press the Mode button repeatedly until the Heat icon appears on the display. The thermostat is now in Heating
mode.
2. Press the UP ARROW button until the heating set point is
10 F (6 C) higher than the current room temperature.
Heating and fan should be energized.
3. Press the Mode button repeatedly until the Cool icon appears on the display. The thermostat is now in Cooling
mode.
4. Press the DOWN ARROW button until the cooling set
point is 10 F lower than the current room temperature.
Cooling and fan should be energized.
5. If heating, cooling, or fan operation do not energize,
check wiring and consult Table 4.
Emergency Heat — Emergency heat is available for
heat pump applications. To turn on emergency heat, press and
hold the Override button. While holding the Override button,
press the UP button. An ‘‘EH’’ will be displayed. During emergency heat, the fan will operate and the second stage of heat
will be energized (locking out the first stage compressor). To
exit emergency heat, press and hold the Override button. While
holding the Override button, press the UP button. During emergency heat, only OFF and HEAT modes are available.
Holiday Mode — When the thermostat is in Holiday
mode, the thermostat will operate under Unoccupied set points.
To configure and activate the Holiday mode, press the Mode
and UP ARROW buttons simultaneously to enter into Programming mode. Press the Override button to enter into Holiday Programming mode. The ‘‘HOL’’ icon will be displayed
along with the remaining days of Holiday mode operation.
Press the UP or DOWN ARROWS to select the number of
days that the holiday schedule will be in effect. A value of 0
disables Holiday mode. The duration can be set from 1 to 99
days. The thermostat will enter Holiday mode on midnight of
the next day after the mode has been activated. Holiday mode
will remain in effect until midnight of the last configured day.
If the Holiday mode is in effect, the number of days remaining will blink on and off and the ‘‘Unoccupied’’ icon will be
displayed. The Override button will be active during Holiday
mode. The Dry Contact Switch is ignored.
To turn off the Holiday mode before the remaining configured days have passed, press the Mode and UP ARROW buttons simultaneously to enter into Programming mode. Press the
Override button to enter into Holiday Programming mode.
Press the DOWN ARROW to set the number of days to zero.
Holiday mode will be disabled.
Final Checklist
1. Put away tools and instruments. Clean up debris and
packaging.
2. Review Owner’s Guide with occupant or owner.
3. Leave the manuals with owner.
OPERATION
Remote Temperature Sensor — A remote temper-
The Mode button selects the operating mode of the thermostat. If OFF is selected, the thermostat will not enter Heating or
Cooling mode. If HEAT is selected, the thermostat will only
enter Heating mode (if the room temperature is below the heating set point). If COOL is selected, the thermostat will only enter Cooling mode (if the room temperature is above the cooling
set point). If AUTO is selected, the thermostat will enter Heating or Cooling mode based on the room temperature and the
heating and cooling set points. If PROGRAM ON is selected,
the stored schedule is enabled and the thermostat will follow
the Occupied and Unoccupied schedules stored in its memory.
Auto-Changeover — When the thermostat mode is set
to AUTO, the thermostat will provide automatic changeover
from Heating to Cooling mode and Cooling to Heating mode
when required. The thermostat will automatically switch to
maintain the desired temperature setting. The thermostat does
not need to be manually changed from heating to cooling or
cooling to heating operation.
ature sensor is available to read the temperature from a space.
If a remote temperature sensor is connected, the thermostat will
ignore the reading of its internal sensor. When the thermostat is
using a reading from a remote sensor, the degree symbol above
the temperature reading will blink.
NOTE: An outdoor-rated temperature sensor or a duct temperature sensor can be used with the remote temperature sensor
wiring connections instead of a remote temperature sensor.
However, no matter which sensor is used, the thermostat will
ignore the reading of its internal sensor and control to the
accessory sensor reading unless the Sensor Type configuration
is set to yes.
Keypad Lock — To prevent unauthorized use of the thermostat, the front panel buttons can be disabled. To disable or
lock the keypad, press and hold the Mode button. While holding down the Mode button, press the UP and DOWN ARROW
8
separate transformer for the auxiliary control device (usually a
timeclock). Connect the device to an isolation relay coil. Connect one set of isolated contacts to each thermostat at CK1 and
GND.
To prevent phasing problems when controlling multiple
HVAC units with one thermostat, phase the HVAC units or use
isolation relays to isolate the unit transformers. One unit will be
connected directly to the thermostat and the unit will power the
thermostat. All other units will require one set of isolated contacts for each of the following: Heat, Cool, Fan, and Reversing
Valve (if required).
Units that are phased will have the high voltage legs to the
24 VAC power transformer in common. This requires identifying which terminals from the high voltage input lugs are providing power to the transformer. Do not assume that the same
terminals will always provide power to the transformer. For
each unit, check the unit wiring diagram. See Fig. 13.
SOFT START — When multiple thermostats are controlled
by the same external device, a Soft Start option can be used to
stagger the turn on times of the HVAC equipment. This feature
may cause a delay in operation after entering Unoccupied
mode.
buttons simultaneously. The ‘‘Locked’’ icon will appear on the
display.
The thermostat is unlocked by performing the same procedure. Press and hold the Mode button. While holding down the
Mode button, press the UP and DOWN ARROW buttons simultaneously. The ‘‘Locked’’ icon will be removed from the
display.
Dry Contact Switch/External Control — A dry contact switch is provided to allow an external device to force the
thermostat into Unoccupied mode. When the thermostat is
forced into Unoccupied mode via the dry contact closure, the
Unoccupied icon will blink each second. The external device is
wired to contacts CK1 and GND. See Fig. 12.
NOTE: Twenty-four v power is not required for CK1 and
GND.
When using the auxiliary input or controlling multiple
HVAC units with a single thermostat, it is possible to encounter
transformer phasing problems that will interfere with thermostat operation.
Connecting transformers that are not phased correctly may
result in a direct short, which could damage transformers and/
or the thermostat. Phasing problems are likely if the units share
a common ground with secondary grounded transformers.
10-Watt Resistor — A 10-watt, 270-ohm resistor is provided with the thermostat. This resistor should only be used in
applications where it is necessary to use 4 wires in a powerstealing mode when the common wire (C) is not available. It is
recommended that a common wire be used whenever possible.
Refer to the Troubleshooting section for more information on
resistor use and wiring.
Determining proper phasing can be difficult without the
help of an electrician (especially across different building
transformers). Damage to equipment can result if phasing
is improperly done. The use of isolation relays is recommended before attempting phasing.
Outside Temperature Sensor (Optional) — An optional outside temperature sensor may be provided to sense
outdoor-air temperature. Press and hold the Mode button for
5 seconds to display outdoor-air temperature. The “outside”
temperature annunciator will be displayed. Press the Mode button again to exit the Outside Temperature display.
Do not attempt to rewire equipment internally to phase
units. Damage to unit components may occur.
To avoid this problem, if possible, phase all HVAC units together. If phasing is impractical, isolation relays may be used to
isolate the transformers. To isolate the auxiliary input, use a
CK1
110 VAC
THERMOSTAT
TIMECLOCK
ISOLATION
RELAY
COIL
GND
CK1
THERMOSTAT
GND
CK1
THERMOSTAT
GND
TRANSFORMER
NOTE: Additional relays may be used. Relay coils must be connected in parallel.
Fig. 12 — Typical Dry Contact Switch Wiring
9
A
L1
L2
L3
L1
L2
L3
SITE
B
POWER
C
24 VAC
24 VAC
UNIT WITH
TRANSFORMER
ON L2 AND L 3
UNIT WITH
TRANSFORMER
ON L1 AND L 2
Fig. 13 — Example of Unit Phasing
TROUBLESHOOTING
Table 4 — Thermostat Troubleshooting
PROBLEM
Display on thermostat not illuminated
‘‘Service Filter’’ is displayed on thermostat
Cooling will not energize
Heating will not energize
SOLUTION
Check for 24 vac at the R terminal connection. Terminal R must be connected for
proper thermostat operation.
After the configured number of blower operating hours, the Service Filter message will be displayed. This reminds the owner to replace the filter. Reset the
Service Filter feature to reset the blower operation timer to 0 hours.
Select Cooling mode. Decrease cooling set point to 10 degrees below room
temperature. Check for 24 vac at Y1 terminal. If present, thermostat is operating
correctly and problem is with wiring or equipment. If 24 vac is not present,
replace the thermostat. Check for Compressor Cycle per Hour Limit. Cooling
may be locked out.
Select Heating mode. Increase heating set point to 10 degrees above room temperature. Check for 24 vac at W1-O-B terminal. If present, thermostat is operating correctly and problem is with wiring or equipment. If 24 vac is not present,
replace the thermostat.
Configure thermostat for heat pump operation (Table 2, Step 4).
When controlling a heat pump, heat comes on
during cooling cycle.
The thermostat temperature display rises to 99 F. There is not enough voltage to the thermostat. Check wiring and power supply.
The thermostat has been wired incorrectly and the circuit board is burned out.
The resistor labeled “L3” on the thermostat is
burned out and brown. Thermostat will not work. Thermostat must be replaced.
10
Copyright 2003 Carrier Corporation
Manufacturer reserves the right to discontinue, or change at any time, specifications or designs without notice and without incurring obligations.
PC 111
Catalog No. 535-00106
Printed in U.S.A.
Form 50QE-5SI
Pg 12
6-03
Replaces: New
Book 1
4
Tab 5a 5a