1
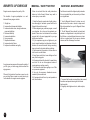
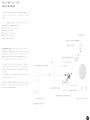
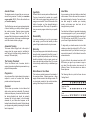
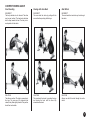
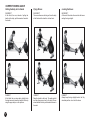
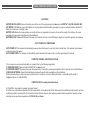
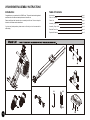
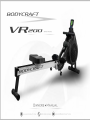
INTRODUCTION TABLE OF CONTENTS Congratulations! INTRODUCTION -------------------------------------------------------TABLE OF CONTENTS -----------------------------------------------BENEFITS OF EXERCISE -------------------------------------------MEDICAL/SAFETY NOTICE -----------------------------------------CARE AND MAINTENANCE -----------------------------------------FEATURES OF THE VR200 ROWER---------------------------------TRAINING TIPS -----------------------------------------TRAINING GUIDELINES -----------------------------------------SETTING UP YOUR ROWER ----------------------------------------CORRECT ROWING GUIDE -----------------------------------------STRETCHING ------------------------------------------------------------ Welcome to the world of the Air Magnetic Rower. The VR200 Rower is one of the finest and most comprehensive rowing machines available. We know as we have been designing rowing machines for over a decade. By choosing the VR200 Rower, you have made a decision that will improve the health and fitness and well being for you and your family. Being fit and healthy will improve your energy levels and your quality of life. Cardiovascular training is vital for all ages and the Air Magnetic Rower provides a more effective workout, producing better results and will encourage you to reach your fitness goals and maintain the body you have always wanted. All you need to do is to spend 15 to 30 minutes three times a week to start seeing the benefits of a regular exercise program on the Air Magnetic Rower. We want you to enjoy the full benefits of your exercise program and so we recommend that you read this manual thoroughly and by doing so you will: Save valuable exercise time in the long run. Exercise safely and more effectively. Learn proper techniques. Be able to better define your fitness goals. 1 1 2 2 2 3 4 4-6 7-8 9-10 11 1 BENEFITS OF EXERCISE Regular exercise improves the quality of life. The benefits of regular participation in a wellbalanced fitness program include: 1. Weight loss 2. Improved body shape and definition 3. Increased muscle mass, strength, endurance, power and definition 4. Enhanced flexibility 5. Increased metabolism 6. Injury prevention 7. Improved self-esteem 8. Improved aerobic fitness 9. Improved coordination and agility A regular exercise program will improve the quality of your life, give you more energy and slow down the aging process. Fifteen to thirty minutes, three times a week, or only one and a half hours a week is a small price to pay for the benefits of a regular exercise program. 2 MEDICAL / SAFETY NOTICE CARE AND MAINTENANCE Failure to read and follow the safety instructions below and in the Owner’s Manual may result in serious injury or even death. Your Rower is made of the highest quality materials. It is very important that you take care of your Rower on a regular basis. 1. Read the Owner’s manual and all safety instructions thoroughly to familiarize yourself with the Air Magnetic Rower before using it. 2. Before beginning any exercise program, consult your physician. He or she can help evaluate your present fitness level and determine the exercise program that is the most appropriate for your age and physical condition. 3. If you experience any pain or tightness in your chest, irregular heartbeat, and shortness of breath, faintness or unusual discomfort during exercising, stop and consult a physician before continuing. 4. Adult supervision is required at all times when a child is on or near the Rower. 5. Keep fingers and limbs, loose clothing and hair away from moving parts. 6. All equipment should be checked for wear before each use. Do not use this equipment unless all moving parts are working correctly. 7. Care should be taken when getting on or off this or any exercise equipment 8. Use only the accessory attachments recommended by the manufacturer. 9. All equipment should be set up and operated on solid, level surfaces. 1. Your Air Magnetic Rower is for indoor use only and should not be used or stored in damp areas. Wipe all perspiration from your Air Magnetic Rower after each use. 2. The Air Magnetic Rower should be dusted and cleaned on a regular basis to stop build-up of dust. Use Windex or an alcohol-based cleaner on a clean cloth on a regular basis. Do not use any abrasive cleaners, as this will damage the surface. 3. To ensure that the seat runs smoothly on the monorail, the rollers need special cleaning with a oil based furniture polish. 4. Regularly check tightness of nuts, bolts and pins, etc. TRAINING TIPS TRAINING GUIDELINES Rowing machines have been around for many years and where perhaps one of the first indoor exercise machines on the market. EXERCISE Exercise is one of the most important factors in the overall health of an individual. Listed among its benefits are: Increased capacity for physical work(strength endurance) Increased cardiovascular (heart and arteries / veins) and respiratory efficiency. Decreased risk of coronary heart disease changes in body metabolism, e.g. losing weight. Delaying the physiological effects of age physiological effects, e.g. reduction in stress, increase in self-confidence, etc. Your Rower’s unique design provides an excellent opportunity for a high level of overall fitness. Almost everyone knows how to row on one of these machines and there is very little one can do wrong. However, there are few pointers we can give you to reduce strain on your back and other joints and muscles. Rowing, more than any other aerobic exercise, utilizes the back muscles and the spine to transfer the pulling force from the arms (holding the handle) to the legs (providing most the pulling power). To reduce exercisive strain on the back muscles, spine, shoulders, arms and wrists we strongly suggest taht you to keep your back straight throughout the entire rowing action. When moving forward to the start position bend at the hips, don’t overreach (trying to stretch forward too much) and keep your arms straight. Pull the handle to your stomach, not your chest and keep your elbows in at your sides during the entire stroke with your wirists straight. Basic Components of Physical Fitness There are four all-encompassing components of physical fitness and we need to briefly define each and clarify its role. Strength is the capacity of a muscle to exert a force against resistance. Strength contributes to power and speed and is of great importance to a majority of sports people. Muscular Endurance is the capacity to exert a force repeatedly over a period of time, e.g. it is the capacity of your legs to carry you 0 km without stopping. Flexibility is the range of motion about a joint. Improving flexibility involves the stretching of muscles and tendons to maintain or increase suppleness, and provides increased resistance to muscle injury or soreness. Cardio-Respiratory Endurance is the most essential component of physical fitness. It is the efficient functioning of the heart and lungs. 4 What to wear Wear clothing that will not restrict your movement in any way while exercising. Clothes should be light enough to allow the body to cool. Excessive clothing that causes you to perspire more than you normally would while exercising, gives you no advantage. The extra weight you lose is body fluid and will be replaced with the next glass of water you drink. It is advisable to wear a pair of gym or running shoes or “sneakers”. Breathing During Exercise Do not hold your breath while exercising. Breathe normally as much as possible. Remember, breathing involves the intake and distribution of oxygen, which feeds the working muscles. Rest Periods Once you start your exercise program, you should continue through to the end. Do not break off halfway through and then restart at the same place later on without going through the warm-up stage again. The rest period required between strength training exercises may vary from person to person. This will depend mostly on your level of fitness and the program you have chosen. Rest between exercises by all means. Most people manage with half minute to one-minute rest periods. Aerobic Fitness The largest amount of oxygen that you can use per minute during exercise is called your maximum oxygen uptake (MVO2). This is often refered to as your aerobic capacity. The effort that you can exert over a prolonged period of time is limited by your ability to deliver oxygen to the working muscles. Regular vigorous exercise produces a training effect that can 30%. An increased Mov2 indicates an increased ability of the heart to pump blood, of the lungs to ventilate oxygen and of the muscles to take up oxygen. Anaerobic Training This means “without oxygen” and is the output of energy when the oxygen supply is insufficient to meet the body’s long-term energy demands. (For example, 100-meter sprint). The Training Threshold This is the minimum level of exercise, which is required to produce significant improvements in any physical fitness parameter. Progression As you become fitter, a higher intensity of exercise is required to create an overload and therefore provides continued improvement. Overload This is where you exercise at a level above that which can be carried out comfortably. The intensity, duration and frequency of exercise should be above the training threshold and should be gradually increased as the body adapts to the increasing demands. As your fitness level improves, so the training threshold should be raised. Working through your program and gradually increasing the overload factor is important. Specificity Heart Rate Reversibility Your initial level of fitness is important in developing an exercise program for you. If you are starting off, you can get a good training effect with a heart rate of 110-120 beats per minute (BPM). If you are fitter, you will need a higher threshold of stimulation. Different forms of exercise produce different results. The type of exercise that is carried out is specific both to the muscle groups being used and to the energy source involved. There is little transfer of the effects of exercise, e.g. from strength training to cardiovascular fitness. That is why it is important to have an exercise program tailored to your specific needs. If you stop exercising or do not do your program often enough, you will lose the benefits you have gained. Regular workouts are the key to success. Warm Up Every exercise program should start with a warm up where the body is prepared for the effort to come. It should be gentle and preferably use the Stretching should be included in both your warm up and cool down, and should be performed after 3~5 minutes of low intensity aerobic activity or callisthenic type exercise. Warm Down or Cool Down This involves a gradual decrease in the intensity of the exercise session. Following exercise, a large supply of blood remains in the working muscles. If it is not returned promptly to the central circulation, pooling of blood may occur in the muscles. As you exercise, so the rate at which your heart beat also increases. This is often used as a measure of the required intensity of exercise. You need to exercise hard enough to condition your circulatory system, and increase your heart rate, but not enough to strain your heart. To begin with, you should exercise at a level that elevates your heart rate to about 65 to 70% of your maximum heart rate. If you find this is too easy, you may want to increase it, but it is better to lean on the conservative side. As a rule of thumb, the maximum heart rate is 220 BPM minus your age. As you increase in age, so your heart, like other muscles, loses some of its efficiency. Some of its nature loss is won back as fitness improves. The following table is a quide for those who are “starting fitness”. Age Target Heart Rate 10 Second Count Beats per Minute 5 Pulse Count Endurance Circuit Training The target is not a magic number, but a general guide. If you are above average fitness, you may work quite comfortably a little above that suggested for your age group. Periodization The pulse count (on your wrist or carotid artery in the neck, taken with two index fingers) is done for ten seconds, taken a few seconds after you stop exercising. This is for two reasons: (a) 10 seconds is long enough for accuracy, (b) the pulse count is to approximate your BMP rate at the time you are exercising. Since heart rate slows as you recover, a longer count isn’t as accurate. The following table is a guide to those who are keeping fit. Here we are working at about 80% of maximum. Age Target Heart Rate 10 Second Count Beats per Minute Don’t push yourself too hard to reach the figures on this table. It can be very uncomfortable if you overdo it. Let it happen naturally as you work through your program. Remember, the target is a guide, not a rule, a little above or below is just fine. Two final comments: (1) don’t be concerned with day to day variations in your pulse rate, being under pressure or not enough sleep can affect it; (2) your pulse rate is a guide, don’t become a slave to it. 6 Cardiovascular endurance, muscle strength, flexibility and coordination are all necessary for maximum fitness. The principle behind circuit training is to give a person all the essentials at one time by going through your exercise program moving as fast as possible between each exercise. This increases the heart rate and sustains it, which circuit training effect until you have reached an advantaged program stage. This is the term used to vary your exercise program for both physiological and psychological benefits. In your overall program, you should vary the workload, frequency and intensity. The body responds better to variety and so do you. In addition, when you feel yourself getting “stale”, bring in periods of lighter exercise to allow the body to recuperate and restore its reserves. You will enjoy your program more and feel better for it. Muscle Soreness For the first week or so, this may be the only indication you have that you are on exercise program. This, of course, does depend on your overall fitness level. A confirmation that you are on the correct program is a very slight soreness in most major muscle groups. This is quite normal and will disappear in a matter of days. If you experience major discomfort, you may be on a program that is too advanced or you have increased your program too rapidly. If you experience PAIN during or after exercise, your body is telling you something. Stop exercising and consult your doctor. SETTING UP YOUR ROWER Unfolding Folding Transportation Warning : To avoid serious injury, keep fingers/hands/feet away from the folding hinge when unfolding and folding the Rower. 1. Step on the PIVOT LOCK BAR HANDLE with one hand supporting the ALUMINUM BEAM. 1. Hold the PIVOT HANDLE with right hand and raise up the ALUMINUM BEAM. 2. Push down the PIVOT LOCK BAR HANDLE with left hand to release the folding hinge and slowly let the TRANSPORTION WHEELS reach the ground. Your Rower has transportation wheels located at the middle. This enables you easily move the Rower from room to room. 2. Slightly put the ALUMINUM BEAM down on the ground. 3. Lift up the ALUMINUM BEAM by pulling up the PIVOT HANDLE until “CLICK” sound is heard. 4. Ensure the PIVOT LOCK BAR HANDLE at the correct position. 3. Pull the ALUMINUM BEAM up to the folding position until “CLICK” sound is heard. 4. Ensure the PIVOT LOCK BAR HANDLE at the correct position. Do not attempt to transport the Rower without the PIVOT LOCK BAR firmly engaged. IMPORTANT: Clear a workout area 3' x 8' before setting-up your Air Magnetic Rower. Ensure the floor is solid and level. 7 SETTING UP YOUR ROWER Getting on Safely Foot Strap Release Computer Angle Adjustment Getting on safely is a simple procedure. Just be careful that the SEAT is directly underneath you before sitting down. The foot pedals are equipped with quick releasing foot strap that are easy to adjust. Loosen the Velcro straps and adjust your feet accordingly. Pull on the strap to tighten the strap around your feet. Secure the Velcro down as shown in the diagram below. The COMPUTER is designed to rotate and giving you angle adjustment. NOTE: For safety reasons, whilst exercising avoid the DRIVE STRAP ASSEMBLY touching the COMPUTER . 1. Straddle the ALUMINUM BEAM . 2. Correctly position the SEAT beneath you. 3. Sit down taking care that the SEAT has not moved. 8 “Air” is the principal resistance of the rower. On level 1 the resistance is 100% air. As you rotate the resistance knob clockwise you gradually start to introduce the magnetic system in varying degrees according to the setting. On level 6 the resistance is approximately 30% air and 70% magnetic. CORRECT ROWING GUIDE Over Reaching Rowing with Arms Bent Bent Wrists INCORRECT The body stretches too far forward. The shins may be past vertical. The head and shoulders tend to drop towards the feet. The body is in a weak position for the stroke. INCORRECT The user starts the stroke by pulling with the arms rather than pushing with the legs. INCORRECT The user bends their wrists at any time through the stroke. SOLUTION The shins are vertical. The body is pressed up to the legs. The arms are fully extended and relaxed, body tilted slightly forward. This position should feel comfortable. SOLUTION The user starts the stroke by pushing the legs and bracing the back with the arms fully extended and relaxed. SOLUTION Always row with flat wrists through the entire stroke. 9 CORRECT ROWING GUIDE Pulling the Body to the Handle Flying Elbows Locking the Knees INCORRECT At the finish, the user, instead of pulling the handle to the body, pulls themselves forward to the handle. INCORRECT The users elbows are sticking out from the body at the finish and the handle is at chest level. INCORRECT At the end of the stroke the user locks the knees making the legs straight. CORRECT At the finish the user leans back slightly, holds the legs down and draws the handle to the body using the upper body as a firm platform. CORRECT Draw the handle to the body. The wrists are flat and the elbows pass close to the body. Elbows extend behind the body as the handle is drawn to the waist. CORRECT Always keep the legs slightly bend in the fully extended position..do not lock the knees. 10 VR200 COMPUTER INSTRUCTION BATTERIES BATTERY INSTALLATION: Remove the battery cover at the rear of the computer and install two pieces of SIZE"AA", LR6, FR6, R6, AM3, UM3, HP7, MN1500, 1.5V batteries. Insure the batteries are correctly positioned and the battery springs are in proper contact with batteries. Replace the battery cover and insure it is tightly closed. BATTERY LIFE: Battery life is approximately six months of home use, depending on frequency of use and the quality of the batteries. To ensure long battery life we suggest using alkaline or lithium batteries. BATTERIES LOW: Replace both Batteries if the keys do not respond correctly or the LCD Display is illegible or only partial segments are displayed. AUTO POWER UP & POWER DOWN AUTO POWER UP: The computer will automatically power up when the Rower is in use. Note, there is a brief delay. The computer will also power up when any keys are pressed. AUTO POWER DOWN: The computer will automatically power down when the Rower is not in use after approximately 75 seconds. COMPUTER TROUBLE SHOOTING SOLUTIONS If for any reason you are having trouble with your computer then try the following suggestions: 1) COMPUTER RESET: Press and hold the RESET KEY for two seconds. 2) COMPUTER REBOOT: Disconnect the power for approximately 15 seconds by removing the batteries. Wait 15 seconds, then reinstall batteries. 3) REPLACE BATTERIES: Discard the old batteries and replace them with fresh new alkaline or lithium batteries. If after troubleshooting you continue to have a problem with your computer, contact your Bodycraft Dealer, or contact Bodycraft directly at [email protected] or 1-800-990-5556. COMPUTER FAQ (Frequently Asked Questions) Q: CALORIES ~ How does this computer calculate Calories ? A: As there are no international standards for Calorie expenditure, and combined with the fact that everybody's metabolism, height, weight, age & sex are different makes it extremely difficult to accurately calculate Calories.However, after analyzing extensive Calorie expenditure research we have calculated an average Calorie expenditure of 0.0126 K/CAL per Stroke. STRETCHING Stretching should be included in both your warm up and cool down, and should be performed after 3-5 minutes of low intensity aerobic activity or calisthenic type exercise. Movements should be performed slowly and smoothly, with no bouncing or jerking. Move into the stretch until slight tension, not pain, is felt in the muscle and hold for 20-30 seconds. Breathing should be slow, rhythmical and under control, making sure never to hold your breath. 1. Quadriceps Stretch Reach behind body with one hand, grasp top of foot and pull heel toward buttocks while maintaining an erect and upright posture. Hold for 20-30 seconds and release. Repeat for opposite leg. 2. Calf, Achilles Stretch Keeping back leg straight and foot flat on floor with toes pointed straight ahead, move hips forward by bending knee on the front leg. Hold for 20-30 seconds and release. Repeat for opposite leg. 3.Back Stretch With arms extended and hips directly over feet, lower upper body below hand level by bending at the knees. Hold for 20-30 seconds and release. 4.Rear Upper Arm Stretch Grasp elbow and pull hand toward midline of the body while maintaining an erect and upright posture. Hold for 20-30 seconds. Repeat for opposite leg. 5.Hamstring, Lower Back Stretch Holding thigh against upper body, extend leg toward ceiling. Hold for 20-30 seconds. Repeat for opposite leg. 6.Buttocks,Hips, Abdominal Stretch While keeping both shoulders in contact With the ground, gently pull knee toward the ground. Hold for 20-30 seconds and release. Repeat for opposite side. 7.Inner Thigh Stretch With soles of feet together, lean forward from the waist while applying downward pressure to the inside of the knees. Hold for 20-30 seconds and release. 8.Chest, Shoulder, Upper Arm Stretch Move buttocks forward away from arms while keeping arms extended back and palms on ground. Hold for 20-30 seconds and release. 11 1 VR200 ROWER ASSEMBLY INSTRUCTIONS Introduction Table of Contents Congratulations on your purchase of the VR200 Rower . This product has been designed and manufactured to meet the needs and requirements of domestic use. Introduction page 1 Ta b l e o f C o n te n ts page 1 Please carefully read the instructions prior to assembly and first use. Be sure to keep the instructions for reference and/or maintenance. Check List page 1 A s s e m b l y S te p s 1 ~7 page 2 If you have any further questions, please contact us. We wish you lots of success and fun while training. A s s e m b l y S te p s 8 ~1 0 page 3 D e t a i l e d P a r ts L i st page 4 E x p l o d e d D ra w i n g page 5 M6 R L 1 M13 M14 VR200 ROWER ASSEMBLY INSTRUCTIONS STEP 1 Clear a 6.5' x 8' working space before unpacking your VR200 Rower. STEP 2 STEP 4 Assemble the STABILIZER - REAR [007] and the ALUMINUM BEAM [001] with 4X BOLT [300] and 4X WASHER [401] and REAR THREADED PLATE [007A] . Open the carton as shown in the diagram below. NOTE: To protect the VR200 Rower while assembling we suggest that you do not remove the protective Packing Material until it is absolutely necessary. STEP 6 Assemble the STABILIZER - FRONT [005] with 2 X BOLT [306A] and 2 X NUT [201A] and 2 X WASHER [403] . CABLE TIE TOOL 007 001 300 401 306A 002 201A 403 007A 007A 005 306A STEP 3 a) Reverse the ALUMINUM BEAM [001] . b) Remove 4 x BOLT [300] from SEAT [045] with the TOOL provided. c) Assemble the SEAT [045] and the ALUMINUM BEAM [001] with 4X BOLT [300] . STEP 7 STEP 5 Assemble the ALI END CAP[116] and the ALUMINUM BEAM [001] with BOLT [301] . CABLE TIE TOOL 001 300 001 a) Push down the PIVOT LOCK BAR HANDLE[028A] and then lift up the PIVOT BRACKET [003] until “CLICK” sound is heard. b) Assemble the TRANSPORTATION BRACKET [004A] and the MAIN FRAME [002] with 2 X BOLT [305] and 2 X WASHER [401] and 2 X NUT [200] . 003 002 028A 116 045 301 305 004A 401 2 200 VR200 ROWER ASSEMBLY INSTRUCTIONS STEP 8 a) Remove 1 X NUT [200] and 1 X WASHER [401] from RIGHT FOOT PEDAL [021] is marked "R" with the TOOL provided. b) Assemble the RIGHT FOOT PEDAL [021] to MAIN FRAME [002] with same 1 X NUT [200] and 1 X WASHER [401] ,Slide the RIGHT FOOT PEDAL BAR [012A] with 1X WASHER [402] through MAIN FRAME [002] with 1 X NUT [200] and 1 X WASHER [401] as shown in the diagram below and tighten firmly. c) Repeat procedure for Left side FOOT PEDAL [021] marked "L" STEP 9 a) Remove 6 X BOLT [300] and 6 X WASHER [401] and 2 X SEAT CARRIAGE STOPPER [124] and 2 X WASHER [402] from PIVOT BRACKET [003]. b) Assemble the ALUMINUM BEAM [001] and the PIVOT BRACKET [003] with same 6 X BOLT [300] and 6 X WASHER [401] and 2 X WASHER [402] and 2 X SEAT CARRIAGE STOPPER [124] . NOTE: When assembling the ALUMINUM BEAM [001] with the PIVOT BRACKET [003], make sure the HANDLE [003A] is not touching the PIVOT BRACKET [003] in order to avoid the HANDLE [003A] being scratched by the ALUMINUM BEAM [001]. STEP 10 a) Push down the PIVOT LOCK BAR HANDLE [028A] and then put down the ALUMINUM BEAM [001]. Lift up the ALUMINUM BEAM [001] by pulling up the PIVOT HANDLE [003A] until “CLICK” sound is heard. b) Assemble the COMPUTER [714] with Battery . c) Trim the ALUMINUM BEAM [001] CABLE TIE . 001 028A 021 001 002 402 012A 200 003A 402 124 402 402 021 300 401 401 200 401 003 003A 002 714 CABLE TIE 200 401 3 402 401 VR200 PARTS LIST PART DESCRIPTION 4 Q'TY No. PART DESCRIPTION 001 ALUMINUM BEAM 1 123 FOAM GRIP 002 MAIN FRAME 1 123A 003 PIVOT BRACKET 1 003A PIVOT HANDLE 004A 005 Q'TY No. PART DESCRIPTION Q'TY No. 402 WASHER 6 PIVOT LOCK BAR HANDLE COVER 1 403A WASHER 1 124 SEAT CARRIAGE STOPPER 4 403 WASHER 2 1 129 SENSOR HOLDER 1 404 SPRING WASHER 2 TRANSPORTATION BRACKET 1 130 RESISTANCE HUB 1 405 WASHER 2 STABILIZER - FRONT 1 132 STRAP SLOT TRIM 1 405A WASHER 2 POLY "V" DRIVE BELT 1 2 006A PIVOT LOCK BAR 1 134 409A SPACER 2 007 STABILIZER - REAR 1 136A STRAP DRUM + DRIVE PULLEY SET 1 501 SCREW 4 007A REAR THREADED PLATE 1 139A RETURN SPRING SET 1 502 SCREW 9 008 ALI HANDLE BAR 1 140 FAN SET 1 702 COMPUTER SENSOR CABLE 2 009 SEAT CARRIAGE - SIDE PLATE 2 142 RESISTANCE ADJUSTER 1 708A PIVOT LOCK BAR SPRING 1 010A SEAT CARRIAGE - SHAFT 2 153 COMPUTER PIVOT KNOB - BOLT 1 709 DRIVE STRAP ASSEMBLY 1 COMPUTER 1 011 BELT ADJUSTMENT BOLT 2 154 COMPUTER PIVOT KNOB - NUT 1 714 012 BELT ADJUSTMENT PLATE 2 200 NUT 12 800 BALL BEARING 2 012A FOOT PEDAL BAR 2 201A NUT 2 806 BALL BEARING 6 014A STANDARD CAP 4 204 NUT 1 020 FOOT STRAP 2 204A NUT 2 021 FOOT PEDAL 2 207 NUT 2 026 SEAT CARRIAGE STOPPER BRACKET 1 212 NUT 4 028 FLYWHEEL SHAFT 1 300 BOLT 16 028A PIVOT LOCK BAR HANDLE 1 301 BOLT 2 045 SEAT 1 301A BOLT 1 111 MAIN COVER - LEFT 1 302A BOLT 2 112 MAIN COVER - RIGHT 1 303 BOLT 2 113 TRANSPORTATION WHEEL 2 305 BOLT 4 116 ALI END CAP 1 306A BOLT 2 117 COVER VENT 1 312 BOLT 1 118 SEAT CARRIAGE - ROLLER 4 313 BOLT 2 118A SEAT CARRIAGE - GUIDE ROLLER 2 315A BOLT 1 120A STRAP COVER 2 401 WASHER 24 122 PLUG 2 401A WASHER 12 VR200 EXPLODED DRAWING 714 154 501 134 502 111 045 303 405 409A 200 401009 003A 409A 405 300 402 401 003 402 401 124 300 401 300 401A 305 010A 118 401A 305 806 806 401A 118 401A 009 010A 401A 401 118 200 806 401A 401A 303 021 142 200 402 401 300 402 301 123 120A 008 014A 007 5 401 300 014A 006A 120A 315A 123 212 014A 200 200 301A 403A 401 212 113 708A 153 005 113 401 709 405A 011 207 204A 012 020 021 302A 122 124 112 502 012A 004A 026 007A 116 130 401 200 402 001 312 002 201A 403 301 305 800 404 313 501 139A 028 212 117 302A 124 402 204 140 405A 011 204A 207 012 020 012A 702 313 132 124 118A 401A 401A 806 806 118 118A 300 404 136A 800 129 300 401 306A 306A 014A 123A 028A 212 122 VR200 2013 September The BodyCraft VR200 WARRANTY BODYCRAFT warrants its products to be free of defects in material and workmanship for the time stated below to the original purchaser. This warranty is valid only in accordance with the following conditions: * The warranty begins on the original date of purchase at retail and ends when the original owner disposes of it, either through sale, gift, or otherwise. * This warranty is available only for purchases made within the USA and Canada, and currently residing in the USA or Canada. * In order for the warranty to be valid for the terms listed below, the product must be registered with BodyCraft within 30 days of purchase. * The warranty is not transferable and does not cover normal maintenance. * This warranty applies to Residential and Light Commercial use only and is void when used in a Full Commercial environment. * This warranty does not cover damage resulting from accident, misuse, water, tampering, unreasonable use, unauthorized repairs, improper repairs, alterations or normal wear and tear. * If the item exhibits such a defect, BODYCRAFT will, at its option, repair or replace it without cost for parts. Shipping and handling charges may apply. (BODYCRAFT may request a return of the part(s) or photographic evidence of the damaged part(s) prior to replacement at the owners expense). * Proof of purchase must be supplied to validate warranty and the product must have been registered with BodyCraft via the included warranty card or online at www.bodycraft.com. * This warranty is in lieu of all warranties, expressed or implied, and/or all other obligations or liabilities on our part and we neither assume nor authorize any person to assume for us any other obligation or liability in connection with the sale of the BodyCraft VR200. Under no circumstances shall we be liable by virtue of this warranty or otherwise for damage to any person or property whatsoever for any special,indirect, incidental, secondary or consequential damage of any nature whatsoever arising out of the use or inability to use the BodyCraft VR200. * Residential Warranty: Lifetime Frame, 2 Years Parts, 1 Year Wear Items and 1 Years Labor. * Light Commercial Warranty**: 10 Year Frame, 1 Years Parts, 1 Year Wear Items and 90 Days Labor.