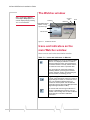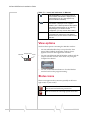
1
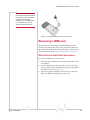
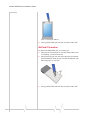
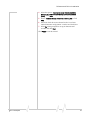
AirCard® 800 Series Wireless Network Cards Installation Guide 2130623 Rev 3.6 Preface Limitation of Liability The information in this manual is subject to change without notice and does not represent a commitment on the part of Sierra Wireless or its affiliates. SIERRA WIRELESS AND ITS AFFILIATES SPECIFICALLY DISCLAIM LIABILITY FOR ANY AND ALL DIRECT, INDIRECT, SPECIAL, GENERAL, INCIDENTAL, CONSEQUENTIAL, PUNITIVE OR EXEMPLARY DAMAGES INCLUDING, BUT NOT LIMITED TO, LOSS OF PROFITS OR REVENUE OR ANTICIPATED PROFITS OR REVENUE ARISING OUT OF THE USE OR INABILITY TO USE ANY SIERRA WIRELESS PRODUCT, EVEN IF SIERRA WIRELESS AND/OR ITS AFFILIATES HAVE BEEN ADVISED OF THE POSSIBILITY OF SUCH DAMAGES OR THEY ARE FORESEEABLE OR FOR CLAIMS BY ANY THIRD PARTY. NOTWITHSTANDING THE FOREGOING, IN NO EVENT SHALL SIERRA WIRELESS AND/OR ITS AFFILIATES’ AGGREGATE LIABILITY ARISING UNDER OR IN CONNECTION WITH THE SIERRA WIRELESS PRODUCT, REGARDLESS OF THE NUMBER OF EVENTS, OCCURRENCES OR CLAIMS GIVING RISE TO LIABILITY, BE IN EXCESS OF THE PRICE PAID BY THE PURCHASER FOR THE SIERRA WIRELESS PRODUCT. Patents Portions of this product may be covered by some or all of the following US patents: 5,515,013 5,629,960 5,845,216 5,847,553 5,878,234 5,890,057 5,929,815 6,169,884 6,191,741 6,199,168 6,339,405 6,359,591 6,400,336 6,516,204 6,561,851 6,643,501 6,653,979 6,697,030 6,785,830 6,845,249 6,847,830 6,876,697 6,879,585 6,886,049 6,968,171 6,985,757 7,023,878 D442,170 D459,303 and other patents pending. This product includes technology licensed from: Licensed by QUALCOMM Incorporated under one or more of the following United States patents and/or their counterparts in other nations: 4,901,307 5,056,109 5,101,501 5,109,390 5,228,054 5,267,261 5,267,262 5,337,338 5,414,796 5,416,797 5,490,165 5,504,773 5,506,865 5,511,073 5,535,239 5,544,196 5,568,483 5,600,754 5,657,420 5,659,569 5,710,784 5,778,338 Manufactured or sold by Sierra Wireless or its licensees under one or more patents licensed from InterDigital Group. Copyright Rev 3.6 Sep.06 © 2006 Sierra Wireless. All rights reserved. 3 AirCard 800 Series Installation Guide Trademarks AirCard modem® and Heart of the Wireless Machine® are registered trademarks of Sierra Wireless. Sierra Wireless, the Sierra Wireless logo, the red wave design, the red-tipped antenna, and Watcher are trademarks of Sierra Wireless. Other trademarks are the property of the respective owners. All product specifications are subject to change without notice. Contact Information Sales Desk: Phone: 1-604-232-1488 Hours: 8:00 AM to 5:00 PM Pacific Time E-mail: [email protected] Post: Sierra Wireless 13811 Wireless Way Richmond, BC Canada V6V 3A4 Fax: 1-604-231-1109 Web: www.sierrawireless.com Consult our website for up-to-date product descriptions, documentation, application notes, firmware upgrades, trouble shooting tips, and press releases: www.sierrawireless.com 4 2130623 Table of Contents Introducing the AirCard 800 Series Wireless Network Cards . . .7 AirCard 800 Series wireless network cards . . . . . . . . . . . . . . . . . . . . . . . . . . . . . Supported operating systems . . . . . . . . . . . . . . . . . . . . . . . . . . . . . . . . . . . . The AirCard modem as a network card . . . . . . . . . . . . . . . . . . . . . . . . . . . . HSDPA, UMTS, EDGE, and GPRS service support . . . . . . . . . . . . . . . . . . . Frequency band support . . . . . . . . . . . . . . . . . . . . . . . . . . . . . . . . . . . . . . . . . 7 7 7 8 8 Your account and coverage area. . . . . . . . . . . . . . . . . . . . . . . . . . . . . . . . . . . . . . 9 AirCard modem software . . . . . . . . . . . . . . . . . . . . . . . . . . . . . . . . . . . . . . . . . . . 10 Before you can begin using the AirCard modem . . . . . . . . . . . . . . . . . . . . . . . 10 Package contents . . . . . . . . . . . . . . . . . . . . . . . . . . . . . . . . . . . . . . . . . . . . . . . . . 11 The SIM Card and Your Account . . . . . . . . . . . . . . . . . . . . . . . . . . .13 Inserting a SIM card into your AirCard modem . . . . . . . . . . . . . . . . . . . . . . . . 13 AirCard 850 and AirCard 860 modems . . . . . . . . . . . . . . . . . . . . . . . . . . . . 14 AirCard 875 modem . . . . . . . . . . . . . . . . . . . . . . . . . . . . . . . . . . . . . . . . . . . . 14 Removing a SIM card . . . . . . . . . . . . . . . . . . . . . . . . . . . . . . . . . . . . . . . . . . . . . . 15 AirCard 850 and AirCard 860 modems . . . . . . . . . . . . . . . . . . . . . . . . . . . . 15 AirCard 875 modem . . . . . . . . . . . . . . . . . . . . . . . . . . . . . . . . . . . . . . . . . . . . 16 Attaching the antenna to your AirCard modem . . . . . . . . . . . . . . . . . . . . . . . . 17 Software and Driver Installation . . . . . . . . . . . . . . . . . . . . . . . . . . . .19 System requirements . . . . . . . . . . . . . . . . . . . . . . . . . . . . . . . . . . . . . . . . . . . . . . 19 Installation on Windows XP and 2000 . . . . . . . . . . . . . . . . . . . . . . . . . . . . . . . . 19 Setting Internet Explorer to use the AirCard modem . . . . . . . . . . . . . . . . . . . 20 Configuring Your Account . . . . . . . . . . . . . . . . . . . . . . . . . . . . . . . . .23 Setting up a profile . . . . . . . . . . . . . . . . . . . . . . . . . . . . . . . . . . . . . . . . . . . . . . . . 24 Rev 3.6 Sep.06 5 AirCard 800 Series Installation Guide Care and Maintenance of Your Network Card . . . . . . . . . . . . . . . 27 Stopping and ejecting the AirCard modem . . . . . . . . . . . . . . . . . . . . . . . . . . . 28 Technical Specifications . . . . . . . . . . . . . . . . . . . . . . . . . . . . . . . . . . 29 LED operation . . . . . . . . . . . . . . . . . . . . . . . . . . . . . . . . . . . . . . . . . . . . . . . . . . . . 29 Radio frequency and electrical specifications . . . . . . . . . . . . . . . . . . . . . . . . . 31 Environmental specifications . . . . . . . . . . . . . . . . . . . . . . . . . . . . . . . . . . . . . . . 32 Sending GSM commands to the network . . . . . . . . . . . . . . . . . . . . . . . . . . . . . 32 Watcher Basics . . . . . . . . . . . . . . . . . . . . . . . . . . . . . . . . . . . . . . . . . . . 33 Launching Watcher. . . . . . . . . . . . . . . . . . . . . . . . . . . . . . . . . . . . . . . . . . . . . . . . 33 The Watcher window . . . . . . . . . . . . . . . . . . . . . . . . . . . . . . . . . . . . . . . . . . . . . . 34 Icons and indicators on the main Watcher window . . . . . . . . . . . . . . . . . . . . 34 View options . . . . . . . . . . . . . . . . . . . . . . . . . . . . . . . . . . . . . . . . . . . . . . . . . . . . . 36 Status icons . . . . . . . . . . . . . . . . . . . . . . . . . . . . . . . . . . . . . . . . . . . . . . . . . . . . . . 36 Turning the radio on and off . . . . . . . . . . . . . . . . . . . . . . . . . . . . . . . . . . . . . 37 Frequency band and network selection. . . . . . . . . . . . . . . . . . . . . . . . . . . . . . . 37 Frequency band selection . . . . . . . . . . . . . . . . . . . . . . . . . . . . . . . . . . . . . . . 37 Network selection . . . . . . . . . . . . . . . . . . . . . . . . . . . . . . . . . . . . . . . . . . . . . 38 Regulatory and Safety Information . . . . . . . . . . . . . . . . . . . . . . . . . . . . . . . . . . . . . . . . . . . . . . 39 Important notice . . . . . . . . . . . . . . . . . . . . . . . . . . . . . . . . . . . . . . . . . . . . . . . . . . 39 Safety and hazards . . . . . . . . . . . . . . . . . . . . . . . . . . . . . . . . . . . . . . . . . . . . . 39 Important safety/compliance information for North American users. . . . . . 40 Information pertaining to OEM customers . . . . . . . . . . . . . . . . . . . . . . . . . 41 EU regulatory conformity . . . . . . . . . . . . . . . . . . . . . . . . . . . . . . . . . . . . . . . . . . . 43 6 2130623 1: Introducing the AirCard 800 Series Wireless Network Cards • AirCard 800 Series wireless network cards • Your account and coverage area • AirCard modem software • Before you can begin using the AirCard modem • Package contents Caution: Do not insert your AirCard modem into your PC Card slot before installing the software. 1 AirCard 800 Series wireless network cards The AirCard 800 Series 3G wireless network cards are modems for your PC that allow you to connect to the Internet, send and receive e-mail, connect to a corporate network/VPN, or view streaming video, without the need of a network cable or phone line. The AirCard modem fits into the standard (Type II) PC Card slot available on most notebook PCs. Supported operating systems The AirCard modem works in notebook PCs running Windows® XP or 2000. Windows Vista will be supported when it is commercially available. For information on using the AirCard modem with Window NT, 98, or Me, contact Sierra Wireless Technical Support ([email protected]). The AirCard modem as a network card The AirCard modem can be configured to provide the “always-on” data connection that an Ethernet card or other wired LAN card provides. That is, you can set options in Watcher™ (a program that comes with the AirCard modem) that causes the AirCard modem to establish a network connection whenever you insert it, assuming GSM, GPRS, EDGE, UMTS, or HSDPA service is available. (See “HSDPA, Rev 3.6 Sep.06 7 AirCard 800 Series Installation Guide UMTS, EDGE, and GPRS service support” on page 8.) Otherwise, you can configure Watcher to connect only when you click the Connect button. The AirCard modem connection provides access to the Internet. Once the connection is established, you can open your browser and connect to any web site available on the Internet, or access other Internet services (such as e-mail). HSDPA, UMTS, EDGE, and GPRS service support GPRS, EDGE, UMTS, and HSDPA are add-on data services to GSM mobile phone networks. The maximum theoretical data speeds when connected on these services are: • GPRS (General Packet Radio Service)—56 kbps (kilobits per second) • EDGE (Enhanced Data GSM Environment)—236 kbps for the AirCard 875 modem; 216 kbps for the AirCard 850 and 860 modems • UMTS (Universal Mobile Telecommunications System)— 384 kbps • HSDPA (High Speed Download Packet Access)—up to 3.6 Mbps (Megabits per second) on the downlink (receive) for the AirCard 875 modem; 1.8 Mbps for the AirCard 850 and 860 modems. GPRS and EDGE are 2G (second generation) data services. UMTS and HSDPA are 3G (third generation) data services. When establishing a connection, your AirCard modem uses the fastest available service. If, for example, you are using an AirCard modem in an area that has GPRS and EDGE service but not UMTS or HSDPA service, the AirCard modem connects using EDGE service. Once the connection is established, you have access to all Internet services. Frequency band support Every GSM network operates on one of these radio frequency bands, in providing 2G (GPRS or EDGE) service: • 850 MHz band—(also called the cellular band) used by some North American service providers • 900 MHz band—used by some European service providers • 1800 MHz band—used by some European and Asian service providers 8 2130623 Introducing the AirCard 800 Series Wireless Network Cards • 1900 MHz band—(also called the PCS band) used by many North American service providers Every network that offers 3G UMTS/HSDPA service does so on one of these bands: • WCDMA 850—used by North American service providers • WCDMA 1900—used by North American service providers • WCDMA 2100—used by European, Asian, and Australian service providers The AirCard 850 modem and AirCard 860 modem support all of the 2G bands. The AirCard 850 modem supports the WCDMA 2100 3G band (for use outside of North America). The AirCard 860 modem supports the WCDMA 850 and WCDMA 1900 bands (for North American use). The AirCard 875 modem supports quad-band 850 / 900 / 1800 / 1900 MHz GSM / GPRS / EGPRS, and tri-band 850 / 1900 / 2100 MHz WCDMA / HSDPA frequency bands. Your account and coverage area Note: If you purchased the AirCard modem from a GSM service provider, you may already have an account. Otherwise, your retailer should be able to provide you with the names of companies that provide this service. Companies that operate GSM networks and provide access to those networks are called service providers. You must have an account with a GSM service provider that offers HSDPA or UMTS service to use the AirCard modem’s 3G capability. (The AirCard modem is backward compatible to 2G service.) When you obtain your account, you are given a SIM card, also called a “smart card” or “smart chip”. (Depending on how you purchased your AirCard modem, you may already have an account, and your SIM card may have been included in your package.) The SIM card contains account information and must be inserted in the AirCard modem anytime you use it. Before you can use the AirCard modem, you must install the AirCard modem software and ensure that your AirCard modem is configured to use your account. Instructions on completing these steps are provided in the chapters that follow. Once installed and configured, you can connect to the Internet with the AirCard modem in any area in which you can obtain GPRS, EDGE, UMTS, or HSDPA service. Rev 3.6 Sep.06 9 AirCard 800 Series Installation Guide Your ability to obtain service depends on these factors: Note: The fee for service is usually higher when you are “roaming” (connected to a network other than the one belonging to your service provider). • Proximity to a GSM network—You must be within the coverage area of a GSM network in order to use the AirCard modem. • Service provider—If you are within the coverage area of a network that is not operated by your own service provider, you can only obtain service if there is a roaming agreement between your service provider and the network operator. • Account provisions—Your account may restrict your usage to certain networks or limit the amount of time you can use the network. • Frequency band—You cannot connect to networks operating in bands not supported by your AirCard modem, regardless of roaming agreements or account provisions. Most service providers have coverage maps on their web sites. AirCard modem software The AirCard modem comes with this software (made by Sierra Wireless): • The Watcher program that you use to manage the AirCard modem and monitor your connections • The driver software that forms the interface between the network card and your Windows operating system Before you can begin using the AirCard modem Before you can use the AirCard modem for the first time you must: 1. Install the AirCard modem software: Watcher and the AirCard modem driver. 2. If you have an AirCard 850 modem or an AirCard 860 modem, attach the antenna. 3. Insert the SIM into the AirCard modem. When instructed to do so by the install wizard, insert the AirCard modem into your PC Card slot. (Do not insert the AirCard modem before installing the software.) 4. Obtain a GSM account (if this wasn’t done when you purchased the AirCard modem). 10 2130623 Introducing the AirCard 800 Series Wireless Network Cards 5. Configure the AirCard modem to use your account (unless it was pre-configured.) 6. If your Internet browser is configured to use a dial-up modem, you may need to set it to use a network card. The next chapters guide you through this process. Package contents Your AirCard modem package contains the following: • AirCard modem • Hinged antenna (AirCard 850 modem and AirCard 860 modem only) • Installation CD containing the AirCard modem software and this installation guide • Quick start guide Rev 3.6 Sep.06 11 AirCard 800 Series Installation Guide 12 2130623 2: The SIM Card and Your Account 2 • Inserting a SIM card into your AirCard modem • Removing a SIM card • Attaching the antenna to your AirCard modem Note: Without a valid SIM card and a valid account, your AirCard modem will not work. You require a GSM account and a SIM (Subscriber Identity Module) card to use the AirCard modem. The SIM card is a small chip (about the size of a postage stamp) that you insert into the AirCard modem. The SIM contains account infor mation used by the network to validate your access. Depending on how you purchased your AirCard modem, you may already have an account. In this case, the SIM should be included in your package. Otherwise, your retailer should direct you to a local company that provides GSM service. To activate an account, the service provider needs from you: • Billing information (such as a credit card number) used to collect payment for your network usage • Possibly the IMEI (International Mobile Equipment Identity), depending on your service provider. This number, printed on the AirCard modem box and on the AirCard modem label, identifies your device (AirCard modem model) on the GSM network. Note: Keep a written record, in a secure place, of the account information that your service provider gives you. Instructions on creating a profile are in the section “Configuring Your Account” on page 23. Your AirCard modem must be configured to use your account. If purchased from a service provider, your AirCard modem may have been pre-configured. Otherwise, you must set up a profile in Watcher. Instructions on setting up a profile are described in Chapter 4. If you change GSM service providers (such as if you move to a new city), you will need a new SIM card from your new service provider. You will also need to set up a new profile. Inserting a SIM card into your AirCard modem The procedure for inserting the SIM card depends on the model of AirCard modem you have. If you have an AirCard 850 / 860 modem, follow the instructions below. If you have an AirCard 875 modem, see “AirCard 875 modem” on page 14. Rev 3.6 Sep.06 13 AirCard 800 Series Installation Guide AirCard 850 and AirCard 860 modems To install your SIM card into the AirCard modem, follow these steps: 1. If your SIM is attached to a card, detach it and remove any fragments of the card stuck to the SIM. 2. Hold the AirCard modem with the label on top and the antenna closest to you. 3. Locate the thin SIM card slot on the left side of the AirCard modem PC Card’s antenna end. 4. Orient the SIM card, as shown in the diagram on the bottom side of the AirCard modem. Note: To prevent the SIM from becoming jammed in the AirCard modem slot, ensure the edge of the SIM is smooth before inserting it. Do not attach labels to your SIM as this may also cause it to become jammed. 5. Insert the end of the SIM card into the slot, and gently push it until it is fully inserted. Figure 2-1: Inserting the SIM card into the AirCard modem SIM card slot Once the SIM card is properly inserted, it should not extend beyond the end of the card. AirCard 875 modem To install your SIM/USIM card into the AirCard modem, follow these steps: 1. If your SIM is attached to a card, detach it and remove any fragments of the card stuck to the SIM. 2. Hold the AirCard modem face down. 3. Locate the thin SIM card slot on the side of the AirCard modem. 4. Insert the SIM card into the slot as shown in the following illustration, and gently push it until it is fully inserted. 14 2130623 The SIM Card and Your Account Note: To prevent the SIM from becoming jammed in the AirCard modem slot, ensure the edge of the SIM is smooth before inserting it. Do not attach labels to your SIM as this may also cause it to become jammed. Figure 2-2: Inserting the SIM card into the AirCard modem Removing a SIM card The procedure for removing the SIM card depends on the model of AirCard modem you have. If you have an AirCard 850 / 860 modem, follow the instructions below. If you have an AirCard 875 modem, see “AirCard 875 modem” on page 14. AirCard 850 and AirCard 860 modems To remove the SIM card, you need a pen. 1. Place the AirCard modem on a smooth, hard surface such as a tabletop. 2. Position the pen above the eject hole, which is on the top surface of the AirCard modem housing, just to the right of the SIM card slot. (See Figure 2-3.) 3. Press down gently (without excessive force) on the eject hole. The SIM card should pop out of its slot. Rev 3.6 Sep.06 15 AirCard 800 Series Installation Guide Figure 2-3: Ejecting the SIM card 4. Gently pull the SIM card from the slot until it slides free. AirCard 875 modem To remove the SIM/USIM card, you need a pen. 1. Place the AirCard modem on a smooth, hard surface such as a tabletop, or hold it face down. 2. Gently insert the pen into the end of the eject slot farthest from the SIM slot. Slide the pen towards the SIM slot. The SIM card pops out of its slot. Figure 2-4: Ejecting the SIM card 3. 16 Gently pull the SIM card from the slot until it slides free. 2130623 The SIM Card and Your Account Attaching the antenna to your AirCard modem Note: This section applies only to the AirCard 850 modem and AirCard 860 modem. If your AirCard modem has an external antenna, the antenna attaches to the gold-plated connector on the end of the AirCard modem. Figure 2-5: Attaching the antenna to the AirCard modem Rev 3.6 Sep.06 17 AirCard 800 Series Installation Guide 18 2130623 3: Software and Driver Installation 3 • System requirements • Installation on Windows XP and 2000 • Setting Internet Explorer to use the AirCard modem System requirements The AirCard modem is supported on: • Windows XP (Home and Professional versions) • Windows 2000 • Windows Vista (when commercially available) For information on using the AirCard modem with Windows NT, 98, or Me, contact Sierra Wireless Technical Support ([email protected]). To install the AirCard modem, you require these system resources: Table 3-1: System resource requirements Card slots 1 Type II PCMCIA (PC Card) slot Disk drive CD-ROM I/O resources 1 IRQ, 40 bytes I/O space Memory 32 MB Installation on Windows XP and 2000 Note: Users of Windows 2000 must be logged in with adminis trative privileges. Users of Windows XP may require admin istrative privileges. Note: If you are running Windows 2000, Windows Installer Redistrib utable 2.0 must be installed. This is available on the Microsoft web site, www.microsoft.com. Note: You may require your Windows CD. Ensure you have the CD before proceeding. 1. If the AirCard modem CD is not already in your CD-ROM drive, insert it. The CD should autostart and display a menu. If the CD does not autostart, select Start > Run and enter d:\setup.exe where d is the drive letter of your CD-ROM drive. Rev 3.6 Sep.06 19 AirCard 800 Series Installation Guide 2. From the CD start-up menu, select your language, then notebook installation, and then the link under notebook software installation to launch the installer. 3. Use the Next and Back buttons to navigate through the installer. 4. If the SIM is not already inserted in your AirCard modem, insert it. (See page 13.) 5. For the AirCard 850 modem / AirCard 860 modem: If the antenna is not yet attached, attach it. (See page 17.) 6. With the label facing up, insert the AirCard modem into your PC Card slot. Note: Do not forcefully insert the AirCard modem. This may damage connector pins. If you have more than one PC Card slot, you may obtain better signal strength using the top slot. Figure 3-1: Inserting the AirCard modem To close the CD start-up menu, click the exit option in the lower right corner of the window. Watcher should launch automatically when the AirCard modem is inserted. If your AirCard modem has not yet been configured to use your account, you are prompted to do so. See “Setting up a profile” on page 24. Setting Internet Explorer to use the AirCard modem If you are using Internet Explorer as your browser, and it is set to connect to the Internet through a dial-up modem, you must set it to use a LAN (local area network) card. To set Internet Explorer version 5 or 6 to use a LAN, follow these steps: 1. In Internet Explorer, select Tools > Internet Options. 2. Click the Connections tab. 3. Click Setup to run the Internet Connection wizard. 20 2130623 Software and Driver Installation 4. Select the option “I want to set up my Internet connection manually, or I want to connect through a local area network (LAN).” Click Next. 5. Select “I connect through a local area network (LAN)”. Click Next. 6. Ensure no check boxes are selected in the “Local area network Internet configuration” window and click Next. 7. Select No when prompted to set up an Internet mail account and click Next. Click Finish to exit the wizard. Rev 3.6 Sep.06 21 AirCard 800 Series Installation Guide 22 2130623 4: Configuring Your Account • Setting up a profile 4 Profiles contain account information used by the AirCard modem to establish connections. At least one profile must be set up on the AirCard modem before you can use it. The profile(s) may have been stored on the AirCard modem before you purchased it. Otherwise, your service provider should give you all the information you need to set up the profile(s) you require. Depending on your service provider, some or all of this infor mation must be entered into your profile: • User Name • Password • APN (Access Point Name) • IP (Internet Protocol) Address (if the address is not automatically assigned by the network) • Use of IP header compression • DNS (Domain Name Server) address or addresses Your service provider may give you only one APN in which case you require only one profile. Some service providers assign separate APNs for separate purposes. For example, some service providers supply one APN to use for Internet browsing and a different APN to use with a VPN. In this case you must set up multiple profiles. The AirCard modem allows for up to sixteen profiles. Most service providers have one or two standard profiles that all or most of their subscribers are expected to use. Most of these standard profiles have been pre-defined in Watcher, allowing you to select a standard profile, rather than creating it manually. One of your profiles must be set as the “default” profile. This is the one that is used if you select the Connect button without selecting a profile. The default profile is also used if you set the AirCard modem to autoconnect. If you are using the AirCard modem to access a network that requires you to provide a password each time you connect, you must set the connection mode for your profile to prompt for password (in which case you must connect manually). Rev 3.6 Sep.06 23 AirCard 800 Series Installation Guide Setting up a profile Note: You cannot set up a profile before installing the software. (See page 19.) To determine whether you have a profile: 1. Insert the SIM into the AirCard modem if it is not already inserted. (See page 13.) 2. Insert the AirCard modem into the PC Card slot if it is not already inserted. (See page 20.) 3. If Watcher is not running, start Watcher by selecting Start > Programs > Sierra Wireless >3G Watcher > 3G Watcher or double-clicking the desktop shortcut . If Watcher detects that no profile has been set up, you are prompted, “Would you like to configure a profile now?” Select Yes. If this prompt does not appear, your AirCard modem may have been preconfigured. You can verify that you have a profile by selecting Tools > Connections to access the AirCard modem tab of the Connections window, which lists all profiles. To create a profile: 1. On the Connections window, Click the add button click WWAN profile. and 2. If you want to use a pre-defined profile, in the Profile Name field, select the profile from the drop-down list. Then skip to Step 5. 3. Complete the fields in the Profile window by entering a Profile Name (any meaningful description of the profile, such as the name of your service provider) and User Name, Password, and/or APN, if applicable. 4. Select whether you want to make connections automati cally or manually, or whether you are required to provide a password each time you make a connection: · If you select Autoconnect, a connection is established automatically whenever you insert the AirCard modem. · If you select Manual, you must select the Connect button on the main Watcher window to make a connection. · If you select Prompt for Password, you must select Connect and enter a password to make a connection. Use this option if you have an external device that provides a time-scheduled secure password for your corporate network. 5. If you want to set Watcher to launch your Internet browser, VPN, or any other program automatically, or if your service provider specified an IP address, or DNS 24 2130623 Configuring Your Account address(es), select the Advanced folder. Otherwise, click OK and skip to Step 10. 6. Select the Launch after connecting field, and from the dropdown list, select which application, if any, you want Watcher to automatically launch when a connection is established with this profile: · None—No application is autolaunched. · Browser—Watcher autolaunches your default Internet browser. · MS VPN—Watcher autolaunches a Virtual Private Network (VPN) connection. · Application—Watcher autolaunches an installed VPN program, or any other program. 7. Complete the appropriate field, depending on the option you chose in the Launch after connecting field: · If you selected Browser—in the URL field, type the URL for the web site you want to view on connection (such as www.sierrawireless.com). · If you selected Microsoft VPN—in the Microsoft VPN (PPTP) connection field, select the VPN connection from the drop-down list. · If you selected Application—in the Application field, enter the path to the program or use the browse button to locate the .exe file for the software application you want to autolaunch. 8. If your service provider has given you an IP address, in the Advanced folder, click TCP/IP. Select Static IP and enter the address in the field below. Otherwise select Dynamic IP. (This is the default because most networks use dynamic IP addressing.) Use the data compression or IP header compression fields if supported by your service provider. Note: The Use IP header compression field should NOT be used unless your service provider is using this compression. The AirCard modem cannot maintain a connection if this is enabled but not supported on the network. 9. If you have a DNS address or addresses, click DNS Settings and enter the address(es). (In most cases, it is not necessary to enter a DNS address.) 10. If you have more than one profile, select Profiles, and in the Default Profile field, choose the default profile from the drop-down list. (The “default” profile is the one used by the autoconnect feature and is used if you click Connect without selecting a profile.) Rev 3.6 Sep.06 25 AirCard 800 Series Installation Guide 11. Click Apply to save the change without exiting the window, or, click OK to save the change and exit the window. 26 2130623 5: Care and Maintenance of Your Network Card 5 You can ensure reliable operation and long life of your AirCard modem by adhering to these guidelines in storage and use: • Do not apply adhesive labels to the AirCard modem or SIM. This may cause the AirCard modem or SIM to become jammed inside the slot, or prevent it from being inserted properly. • When not installed in your computer, store the AirCard modem and SIM in a safe place. Note: Do not insert the AirCard modem before installing the software. See “Software and Driver Installation” on page 19. • Protect the card from liquids, dust, and excessive heat (see “Environmental specifications” on page 32 for details). • The AirCard modem should fit easily into your computer’s PC Card slot. Forcing the AirCard modem into the slot may damage the connector pins. • For AirCard modems with external antennas, optimal signal strength is usually obtained when the antenna is pointing straight up. The antenna should bend easily at the hinge. Do not forcefully bend the antenna. Figure 5-1: Proper positioning of the AirCard modem antenna for AirCard 850 modem / AirCard 860 modem When you insert the AirCard modem in a notebook PC, Watcher launches (unless the autolaunch option is disabled). Rev 3.6 Sep.06 27 AirCard 800 Series Installation Guide Stopping and ejecting the AirCard modem To remove the AirCard modem: 1. Close Watcher if it is open. 2. Click the PC Card icon in the status area to display the option to stop the card. 3. Click the appropriate option, depending on your operating system and the model of AirCard modem: For the AirCard 850 or AirCard 860 modem: · Windows 2000—“Stop Sierra Wireless AirCard 3G Adapter Parent” · Windows XP—“Safely remove Sierra Wireless AirCard 3G Adapter Parent” For the AirCard 875 modem: · Windows 2000 or XP—“Safely remove NEC PCI to USB Open Host Controller” 4. If a dialog box appears notifying you that it is safe to remove the card, click OK. 5. Push the PC Card eject button beside the PC Card slot on your computer to eject the card. 6. Grasp the AirCard modem and remove it from the slot. 28 2130623 6: Technical Specifications • LED operation • Radio frequency and electrical specifications • Environmental specifications • Sending GSM commands to the network 6 This chapter describes the operation of the LED and provides technical data for the AirCard modem. LED operation The number and function of the LEDs depends on the type of AirCard modem you have. If the AirCard modem has a single LED on the antenna end of the card beneath the SIM slot, use the following table to determine the status of the AirCard modem: Table 6-1: LEDs for AirCard 850 / 860 modem LED state How to interpret Solid amber a The AirCard modem is powering up, or a firmware download is in progress. Blinking amber The AirCard modem is scanning for service. Blinking green The AirCard modem is in service and registered on the network. Solid green A voice call is in progress. Solid / blinking red There is a hardware problem. Off The AirCard modem is powered down. a. The LED is red/green. The amber color occurs when both red and green are lit. If the AirCard modem has four LEDs on the top of the modem, use the following table to determine the status of the AirCard modem: Rev 3.6 Sep.06 29 AirCard 800 Series Installation Guide Table 6-2: LEDs for AirCard 875 modem Symbol LED State Power Off Indicates one of the following: • The card is not inserted in the computer. • The computer is off or in “suspend and resume” mode. • The AirCard modem radio has been turned off using Watcher (Tools > Turn Radio Off). Blue The power is on, the AirCard modem is working normally, and the firmware is not being updated. Blinking Blue The firmware is being updated. Do not remove the AirCard modem until the firmware update is complete. (The blue LED stops flashing.) Amber The AirCard modem has detected a 2G network (EDGE / GPRS /GSM) and is ready to connect. Blue The AirCard modem is connected to a 2G network and is able to send and receive data. Amber The AirCard modem has detected a 3G network (UMTS / HSDPA) and is ready to connect. Blue The AirCard modem is connected to a 3G network and is able to send and receive data. Roaming AirCard modem status This indicator shows your roaming status. (Depending on your service provider, this indicator may not be activated on your modem.) Off The AirCard modem is connected to the home network (not roaming). Blue The AirCard modem is connected to a network other than that of the local service provider (roaming). Amber Only applies to voice-enabled AirCard modems. An amber roaming symbol indicates that you can make calls to emergency numbers such as 911, 112, etc. even though 2G / 3G service is not available. Note: If you are roaming, the roaming icon also appears in the Watcher main window. 30 2130623 Technical Specifications Radio frequency and electrical specifications Table 6-3: Radio frequency and electrical specifications for AirCard 850 / 860 /875 modems Compliance GSM Release 5 Transmit PCS: 1850 to 1910 MHz DCS1800: 1710 to 1785 MHz EGSM900: 880 to 915 MHz GSM850: 824 to 849 MHz WCDMA2100: (AirCard 850 modem and AirCard 875 modem) 1920 to 1980 MHz WCDMA850: (AirCard 860 modem and AirCard 875 modem) 824 to 849 MHz WCDMA1900: (AirCard 860 modem and AirCard 875 modem) 1850 to 1910 MHz Receive PCS: 1930 to 1990 MHz DDCS1800: 1805 to 1880 MHz EGSM900: 925 to 960 MHz GSM850: 869 to 894 MHz WCDMA2100: (AirCard 850 modem and AirCard 875 modem) 2110 to 2170 MHz WCDMA850: (AirCard 860 modem and AirCard 875 modem) 869 to 894 MHz WCDMA1900: (AirCard 860 modem and AirCard 875 modem) 1930 to 1990 MHz Channel spacing 200 kHz (GSM) 5 MHz (WCDMA) Channel raster 200 kHz Frequency stability 0.1 ppm Rev 3.6 Sep.06 31 AirCard 800 Series Installation Guide Environmental specifications Table 6-4: Environmental specifications Operating temperature -20 to +60 °C (ambient, outside PCMCIA enclosure) Storage temperature -30 to +85 °C Humidity 95%, non-condensing Vibration 15 g peak 10 to 2000 Hz (non-operating) Sending GSM commands to the network GSM commands are used to: • Access network services • Display network and device parameters • Provide account status information (for example, indicate whether a subscribed service is available to you) If your service provider asks you to enter a specific command: 1. Using your keyboard, type the command. If the command was valid and accepted by the network, the results are displayed in the Watcher window. Other wise, the message “Invalid GSM Command” is displayed. For example, enter *#06#. This command displays the IMEI1. You can send GSM commands even when a data transfer is in progress. 1. IMEI—International Mobile Equipment Identity—a number that uniquely identifies your device (AirCard modem) on the GSM network 32 2130623 7: Watcher Basics • Launching Watcher • The Watcher window • Icons and indicators on the main Watcher window • View options • Status icons • Turning the radio on and off • Frequency band and network selection 7 Watcher is the program you use to manage and monitor your AirCard modem connections. Watcher allows you to: • Create an account profile. (This is explained under “The SIM Card and Your Account” on page 13.) • Determine signal strength, roaming status, GPRS/EDGE/ UMTS/HSDPA availability, and other network connection parameters • Monitor the status of the AirCard modem and GSM service • Initiate data connections • Enable or disable SIM security that prevents others from using your SIM card if it is lost or stolen • Set options related to notifications and the Watcher window Note: It takes up to 20 seconds for Watcher to become fully functional after launch. If you set your account profile to autoconnect (see page 24), you do not need to run Watcher when you use the AirCard modem, but Watcher does provide useful status information. Launching Watcher Unless the feature has been disabled, Watcher launches automatically anytime you insert the AirCard modem. You can also launch Watcher by: • Double-clicking the desktop shortcut, or • Selecting Start > Programs > Sierra Wireless > 3G Watcher > 3G Watcher Depending on how your profile is configured, your browser, VPN, or other program may launch automatically anytime you launch Watcher. See page 25. Rev 3.6 Sep.06 33 AirCard 800 Series Installation Guide The Watcher window Note: To get help in Watcher, select Help > Help Topics. You can also display help by pressing <F1> in most windows. Roaming Compact view Minimize Close GPRS/EDGE/UMTS/ HSDPA coverage Signal strength Indicator area Profile drop-down list Figure 7-1: The Watcher window. Icons and indicators on the main Watcher window These icons are used on the main Watcher window: Table 7-1: Icons and indicators in Watcher Device status. If an icon of the AirCard modem with an “X” is displayed, Watcher is unable to detect the AirCard modem. This indicates that the AirCard modem is not fully inserted into the PC Card slot or the device is powered down. You may be able to resolve this problem by restarting Watcher, powering up the AirCard modem, stopping, ejecting, and reinserting the AirCard modem, or restarting your PC. Signal strength and service status. The number of bars beside the antenna increases as signal strength increases, to a maximum of five bars. The ToolTip that displays when you position the mouse pointer over this indicator shows the numeric value of the RSSI (Received Signal Strength Indication in dBm). An antenna with a line through it indicates no service is available (Not in Service). You are outside of the coverage area or have insufficient signal strength to maintain a GSM data connection. 34 2130623 Watcher Basics Table 7-1: Icons and indicators in Watcher Coverage. The icon shows the fastest service available: • GPRS icon—GPRS is the fastest service available in your current coverage area. • EDGE icon—EDGE is the fastest service available in your current coverage area. (supported on EDGE AirCard modems) • 3G icon—UMTS is the fastest service available in your current coverage area. (supported on UMTS AirCard modems) • HS icon—HSDPA is the fastest service available in your current coverage area. (supported on HSDPA AirCard modems) When only the letters are displayed, (for example ), you are within the coverage area, but have not yet acquired the service. When the indicator has an outline ( ), you have acquired service and are able to establish a data connection. When the indicator is filled ( ), you have a data connection on the wireless service. Roaming. You are connected to a network other than your local service provider's. There may be a surcharge for roaming service. (This service may not be available.) New SMS message. Click the icon to open the SMS Express window and read your messages. When your SIM becomes full, this icon flashes and turns red. (Supported only on selected devices.) Headset. If your AirCard modem is voice- enabled and the headset is supported, this indicator is displayed when a headset is attached. Missed call. If your AirCard modem is voiceenabled, this indicator is displayed when you fail to answer an incoming call. Click the icon to open the call history and view the numbers of the calls you missed (assuming you have caller ID service with your account). Voice mail. If your AirCard modem is voiceenabled, this indicator is displayed when you have a new voice message. Click the icon to access your voice mail box (assuming you have voice mail service with your account). Rev 3.6 Sep.06 35 AirCard 800 Series Installation Guide Table 7-1: Icons and indicators in Watcher Call forwarding. If your AirCard modem is voice-enabled, this indicator is displayed when call forwarding is in use. (This appears only when all calls are forwarded.) TTY. If your AirCard modem is voice-enabled, this indicator is displayed if TTY support is enabled. (TTY or TeleTYpe devices allow speech and hearing impaired people to use a phone). (Depending on your AirCard modem configuration, you may not have this indicator.) Data transmission. When the modem is connected to the network, the main Watcher window shows you the amount of data received and sent. View options You have these options concerning the Watcher window: • You can enable/disable always on top from the View menu. When enabled, the Watcher window always appears in front of other application windows. Compact View Minimize Close • You can switch between the full Watcher window and the compact window from the View menu or by using the Compact View button: • You can use the Minimize button to close the Watcher window but leave the program running. Status icons These icons appear in the system tray (usually in the lower right corner of your screen). Watcher cannot detect the AirCard modem. Ensure that the AirCard modem is powered on. You do not have an active high-speed connection. 36 2130623 Watcher Basics You have an active high-speed connection. You have new (unread) SMS messages. Turning the radio on and off This option allows you to conserve your computer’s battery by turning off the AirCard modem radio transmitter/receiver when you are not using it. To turn off the radio: 1. Select Tools > Turn Radio Off. When the radio is turned off, the menu option switches to Turn Radio On and the message, “Radio is off” is displayed in the Watcher window. To turn on the radio: 1. Select Tools > Turn Radio On. Frequency band and network selection Watcher has two options that affect your ability to obtain GPRS, EDGE, UMTS, or HSDPA service in any given area. You can select: • The frequency band you want to use • The network you want to use, if you are within the coverage area of more than one network Frequency band selection Every GSM network operates on one set of frequency bands. (See “Frequency band selection” on page 37.) The AirCard modem is designed to change frequency bands automatically as required to obtain network service. You can also change frequency bands manually from the Network tab of the Options window (Tools > Options... > Network). Note: Unless your service provider specifies otherwise, it is recom mended that you use the Auto setting. Rev 3.6 Sep.06 37 AirCard 800 Series Installation Guide Network selection Depending on your location, you may be within the coverage area of several networks. Your ability to obtain service on each network is dependent on your account. Your options for network selection are: • Automatic—The AirCard modem automatically selects a network based on your account and network availability. • Manual—The AirCard modem scans the area and displays a list of detected GSM networks. You can then choose from a list of available networks. If you select a network on which you cannot obtain service, the message, “Failed to register with network” appears. You should then choose a different network. This option is set on the Network tab of the Options window (Tools > Options... > Network). 38 2130623 8: Regulatory and Safety Information • Important notice • Important safety/ compliance information for North American users • EU regulatory conformity 8 Important notice Because of the nature of wireless communications, trans mission and reception of data can never be guaranteed. Data may be delayed, corrupted (that is, have errors) or be totally lost. Although significant delays or losses of data are rare when wireless devices such as the Sierra Wireless network card are used in a normal manner with a well-constructed network, the Sierra Wireless network card should not be used in situations where failure to transmit or receive data could result in damage of any kind to the user or any other party, including but not limited to personal injury, death, or loss of property. Sierra Wireless and its affiliates accept no responsi bility for damages of any kind resulting from delays or errors in data transmitted or received using the Sierra Wireless network card, or for failure of the Sierra Wireless network card to transmit or receive such data. Safety and hazards Do not operate your AirCard modem: • In areas where blasting is in progress • Where explosive atmospheres may be present including refuelling points, fuel depots, and chemical plants • Near medical equipment • Near life support equipment, or any equipment which may be susceptible to any form of radio interference. In such areas, the AirCard modem MUST BE POWERED OFF. Otherwise, the AirCard modem can transmit signals that could interfere with this equipment. In an aircraft, the AirCard modem MUST BE POWERED OFF. Otherwise, the AirCard modem can transmit signals that could interfere with various onboard systems and may be dangerous to the operation of the aircraft or disrupt the cellular network. Use of a cellular phone in an aircraft is illegal in some jurisdi- Rev 3.6 Sep.06 39 AirCard 800 Series Installation Guide cations. Failure to observe this instruction may lead to suspension or denial of cellular telephone services to the offender, or legal action or both. Some airlines may permit the use of cellular phones while the aircraft is on the ground and the door is open. The AirCard modem may be used normally at this time. Important safety/compliance information for North American users CAUTION: Unauthorized modifications or changes not expressly approved by Sierra Wireless, Inc. could void compliance with regulatory rules, and thereby your authority to use this equipment. The design of the AirCard 850 / 860 / 875 modem complies with U.S. Federal Communications Commission (FCC) and Industry Canada (IC) guidelines respecting safety levels of radio frequency (RF) exposure for portable devices, which in turn are consistent with the following safety standards previ ously set by Canadian, U.S. and international standards bodies: • ANSI / IEEE C95.1-1999, IEEE Standard for Safety Levels with Respect to Human Exposure to Radio Frequency Electro magnetic Fields, 3kHz to 300 GHz • National Council on Radiation Protection and Measure ments (NCRP) Report 86, -1986, Biological Effects and Exposure Criteria for Radio Frequency Electromagnetic Fields • Health Canada, Safety Code 6, 1999, Limits of Human Exposure to Radio frequency Electromagnetic Fields in the Frequency Range from 3 kHz to 300 GHz • International Commission on Non-Ionising Radiation Protection (ICNIRP) 1998, Guidelines for limiting exposure to time-varying electric, magnetic, and electromagnetic fields (up to 300 GHz) These devices are only authorized to be used in laptop computers that are identical or substantially similar to those in its grant application. These devices comply with Part 15 of the FCC Rules. Operation is subject to the condition that these devices do not cause harmful interference. 40 2130623 Regulatory and Safety Information Where appropriate, the use of the equipment is subject to the following conditions: WARNING (EMI) – United States FCC Information – This equipment has been tested and found to comply with the limits pursuant to Part 15 of the FCC Rules. These limits are designed to provide reasonable protection against harmful interference in an appropriate installation. This equipment generates, uses, and can radiate radio frequency energy and, if not installed and used in accordance with the instructions, may cause harmful interference to radio communication. However, there is no guarantee that interference will not occur in a particular installation. If this equipment does cause harmful interference to radio or television reception, which can be determined by turning the equipment off and on, the user is encouraged to try to correct the interference by one or more of the following measures: • Reorient or relocate the receiving antenna • Increase the separation between the equipment and receiver • Connect the equipment into an outlet on a circuit different from that to which the receiver is connected • Consult the dealer or an experienced radio/TV technician for help If you have purchased this product under a United States Government contract, it shall be subject to restrictions as set forth in subparagraph (c)(1)(ii) of Defense Federal Acquisitions Regulations (DFARs) Section 252.227-7013 for Department of Defense contracts, and as set forth in Federal Acquisitions Regulations (FARs) Section 52.227-19 for civilian agency contracts or any successor regulations. If further government regulations apply, it is your responsibility to ensure compliance with such regulations. Information pertaining to OEM customers The AirCard 850 / 860 / 875 wireless network cards have been granted modular approval for mobile applications. Integrators may use the AirCard 850 / 860 / 875 wireless network cards in their final products without additional FCC / IC certification if they meet the following conditions. Otherwise, additional FCC / IC approvals must be obtained. 1. At least 20 cm separation distance between the antenna and the user’s body must be maintained at all times. 2. To comply with FCC / IC regulations limiting both maximum RF output power and human exposure to RF Rev 3.6 Sep.06 41 AirCard 800 Series Installation Guide radiation, the maximum antenna gain must not exceed 8 dBi in the Cellular band and 4 dBi in the PCS band. 3. The AirCard 850 / 860 / 875 wireless network cards and their antennas must not be colocated with any other trans mitter or antenna within a host device. 4. A label must be affixed to the outside of the end product into which the AirCard wireless network card is incorpo rated, with a statement similar to the following: • For an end product with an embedded AirCard 850 wireless network card: This device contains FCC ID: N7NAC850. This equipment contains equipment certified under IC: 2417C-AC850. • For an end product with an embedded AirCard 860 wireless network card: This device contains FCC ID: N7NAC860. This equipment contains equipment certified under IC: 2417C-AC860. • For an end product with an embedded AirCard 875 wireless network card: This device contains FCC ID: N7NAC875. This equipment contains equipment certified under IC: 2417C-AC875. 5. A user manual with the end product must clearly indicate the operating requirements and conditions that must be observed to ensure compliance with current FCC / IC RF exposure guidelines. The end product with an embedded AirCard 850 / 860 / 875 wireless network card must pass the unintentional emission testing and properly authorized per FCC Part 15 requirements. Note: If these wireless network cards are intended for use in a portable device, you are responsible for separate approval to satisfy the SAR requirements of FCC Part 2.1093 and IC RSS-102. 42 2130623 Regulatory and Safety Information EU regulatory conformity Sierra Wireless hereby declares that the AirCard 850 / 875 wireless network cards conform to all the essential require ments of Directive 1999/5/EC: AirCard 875 wireless network card AirCard 850 wireless network card The Declaration of Conformity made under Directive 1999/5/ EC is available for viewing at the following location in the EU community: Sierra Wireless (UK), Limited Lakeside House 1 Furzeground Way, Stockley Park East Uxbridge, Middlesex UB11 1BD England Rev 3.6 Sep.06 43 AirCard 800 Series Installation Guide 44 2130623 Index Numerics driver 10 1800 MHz band 8 1900 MHz band 8 850 MHz band 8 900 MHz band 8 E A account 9 always-on data connection 7 antenna attaching 17, 20 icon 34 APN 23 application, launch automatically on high-speed connec tion 25 autoconnect 24 autolaunch application on high-speed connection 25 browser on high-speed connection 25 VPN on high-speed connection 25 B browser, launch automatically on high-speed connection 25 C call forwarding indicator 36 call, missed 35 care and maintenance 27 channel raster 31 channel spacing 31 compact view 36 connect automatically 24 copyright information 3 coverage 35 EDGE 35 GPRS 35 HSDPA 35 UMTS 35 coverage area 9 D data transmission 36 device not available 34 device not responding 34 DNS 23 DNS settings, entering 25 Rev 3.6 Sep.06 EDGE connection status 35 indicator 35 ejecting a SIM card 15, 16 ejecting the AirCard modem 28 electrical specifications 31 envelope icon main window 35 system tray 37 environmental specifications 32 F frequencies receive 31 transmit 31 frequency bands overview 8 selection 37 frequency stability 31 G GPRS connection status 35 indicator 35 GSM commands, sending to the network 32 networks supported 8 H headset, indicator 35 HSDPA connection status 35 indicator 35 humidity 32 I I/O space (input/output space) 19 icon antenna 34 call forwarding 36 device status 34 headset 35 missed call 35 45 AirCard 800 Series Installation Guide roaming 35 signal strength 34 SMS message 35 TTY 36 voice mail 35 IMEI 13 indicator call forwarding 36 device status 34 EDGE coverage 35 GPRS coverage 35 headset 35 HSDPA coverage 35 missed call 35 roaming 35 signal strength 34 SMS message 35 status 36 TTY 36 UMTS coverage 35 voice mail 35 inserting AirCard modem Windows 98, 2000, Me 20 SIM card 14 installation 19–20 Internet Explorer, setting to use the card 20 IP address 23 entering static IP address 25 IRQ (interrupt request) 19 L installing software 19–20 removing the AirCard modem 28 system requirements 19 O online help notebook PCs 34 operating systems supported 7 P package contents 11 password overview 23 prompt for 24 PC Card slots required 19 PCS frequency band 8 phone call, missed 35 platforms supported 7 power options, power up/down 37 profile creating 24 default 23 determining if one is set up 24 overview 23 setting default 25 prompt for password 24 Q quad-band 8 launch application automatically on high-speed connec tion 25 browser automatically on high-speed connection 25 VPN automatically on high-speed connection 25 launching Watcher 33 LED operation 29 liability, limitation of 3 M maintenance 27 memory required 19 missed call indicator 35 N network overview 9 selection 38 send GSM commands to 32 networks supported 7 notebook PC inserting AirCard modem 20 46 R radio frequency specifications 31 radio, turning on and off 37 receive frequencies 31 regulatory information 39 removing AirCard modem 28 SIM card 15, 16 RF specifications 31 roaming 10 roaming indicator 35 RSSI 34 S safety notice 39 service EDGE 35 GPRS 35 HSDPA 35 UMTS 35 signal strength indicator 34 SIM card 2130623 inserting 14 removing 15, 16 SMS messages indicator 35 status 37 software installation 19–20 specifications 29–32 electrical 31 environmental 32 radio frequency 31 status call forwarding 36 connection 36 data transmission 36 device 34 EDGE connection 35 EDGE service 35 GPRS connection 35 GPRS service 35 headset 35 HSDPA connection 35 HSDPA service 35 roaming 35 signal strength 34 SMS messages 35, 37 system tray icons 36 TTY 36 UMTS connection 35 UMTS service 35 voice mail 35 storage temperature 32 when not using card 27 system requirements, notebook PCs 19 system tray icons 36 T technical specifications 29–32 temperature 32 Rev 3.6 Sep.06 time-scheduled password 24 trademarks 4 transmit frequencies 31 triangle icon 35 tri-band 8 TTY indicator 36 turning radio on and off 37 U UMTS connection status 35 UMTS indicator 35 user name 23 V vibration 32 voice call, missed 35 voice mail indicator 35 VPN, launch on high-speed connection 25 W Watcher compact view 36 icons and indicators 34 introduction 33 launching 33 main window 34 Windows 2000 as a supported operating system, service pack 19 inserting the card 20 Windows 98 as a supported operating system 19 inserting AirCard modem 20 Windows Me inserting the card 20 Windows, operating systems supported 7 wireless networks supported 7 47 AirCard 800 Series Installation Guide 48 2130623