1
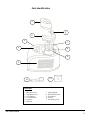
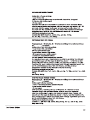
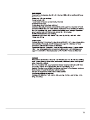
Ice Cream Maker ICM301SS Owner’s Manual For more information on other great EdgeStar products on the web, go to http://www.edgestar.com Edgestar Important Safety Information Improper handling can cause serious damage to the EdgeStar ice cream maker and/or injury to the user. This ice Cream maker is designed for domestic indoor use only. Do not use this unit for industrial or commercial use. Any other use may invalidate the warranty. Please review the ratings label located on the rear panel of the unit for electrical and other technical data related to this unit. This unit must be used in a properly grounded wall outlet. Please read and follow the safety information listed below to reduce the risk of fire, electric shock or injury. Electrical Safety Do not exceed the power outlet ratings. It is recommended that the ice cream maker be connected on its own circuit. A standard electrical supply (115 V, 60Hz), that is properly grounded in accordance with the National Electrical Code and local codes and ordinances is required. Use outlets that cannot be turned off by a switch or pull chain. Always turn the unit off and unplug it from the outlet when cleaning. Unplug the unit if it is not going to be used for an extended period of time. Do not operate the unit with a power plug that is missing the ground plug, a damaged cord or a loose socket. Be sure the ice cream maker is properly grounded. Never plug or unplug the unit with wet hands. Do not bypass, cut or remove the grounding plug. Do not use extension cords or power strips with this unit. You may need to contact your electrician if it is necessary to use a longer cord or if you do not have a grounded outlet. Do not modify the power cord’s length or share the outlet with other appliances. If you must use an extension cord, use No.14AWG minimum size and rated no less than 1875 watts. Do not start or stop the unit by switching the circuit’s power on and off. If the power cord is damaged, it must be replaced by the manufacturer or a qualified technician. Never repair the unit while it is plugged in. Immediately unplug the unit if it makes strange sounds, emits an odor or smoke comes out of it, and contact customer service. Do not remove any part of the casing unless instructed by an authorized technician. You should never attempt to repair the unit yourself. Contact EdgeStar Support if the unit needs repair service. Do not tip the unit over while the power is on. i General Safety Install the ice cream maker in a well ventilated area where the ambient temperature is above 50°F and below 90°F. This unit is designed to be used indoors, and protected from rain, sleet, snow, etc. Do not use your ice cream maker outdoors. Place the ice-maker away from direct sunlight. This unit is not intended to be used by children and should be supervised to ensure that they do not play with this product. Do not use this appliance near flammable gas or combustibles, such as gasoline, benzene, thinner, etc. Do not place the unit near heat sources such as ovens and grills. Only use in an upright position on a flat, level surface and provide proper ventilation. If the unit has not been used for an extended period, thoroughly clean it before using it. Do not leave any cleaning solutions in or on the unit Do not use solvent-based cleaning agents or abrasive solutions on the interior as they may transmit taste to the ice cream and damage the interior. Do not clean the unit with flammable fluids. The fumes can create a fire hazard or cause an explosion. This appliance is not intended for use by persons, including children, with reduced physical, sensory or mental capabilities, unless they have been given supervision or instruction concerning the use of the appliance by the person(s) responsible for their safety. Transfer Ice Cream Recipes Introduction Thank you for purchasing this EdgeStar ice cream maker. We are glad you chose us. We believe that your purchase of this product opens a relationship between you and EdgeStar. We will provide the customer support needed to nurture that relationship. This manual contains important information regarding the proper installation, use and maintenance of your ice cream maker. Following this manual will ensure that your product will work at its peak performance and efficiency. Please save the original product packaging in case you need to safely transport your portable ice cream maker. For Your Records: Please write down the model number and serial number below for future reference. Both numbers are located on the ratings label on the back of your unit and are needed to obtain warranty service. You may also want to staple your receipt to this manual as it is the proof of your purchase, and is also needed for service under your warranty. Model Number: Serial Number: Date of Purchase: To better serve you, please do the following before contacting customer service: 1 If you received a damaged product, immediately contact the dealer that sold you the product. Read and follow this instruction manual carefully to help you install, use and maintain your ice cream maker. Read the troubleshooting section of this manual as it will help you diagnose and solve common issues. Visit us on the web at http://www.edgestar.com to register your product, download product manuals, and access additional troubleshooting resources and up-to-date information. If you need warranty service, our friendly customer service representatives are available via email at [email protected] or by telephone at 1 (866) 319-5473. Parts Identification 1 6 2 3 7 4 8 9 5 10 11 PARTS KEY 1. 2. 3. 4. 5. 6. Blender Motor Transparent Lid LCD Display Control Panel Air Vent Refill Lid 7. Mixing Blade 8. Removable Bowl 9. Fixed Bowl 10. Scoop 11. Measuring Cup Ice Cream Maker 2 Before you Begin: Preparing the Ice Cream Maker for Use IMPORTANT: Do not remove any safety, warning, or product information labels from your ice cream maker. Unpacking the Ice Cream Maker Carefully remove the packaging materials. Remove any shipping tape and glue from your ice cream maker before using. Do not use sharp instruments, rubbing alcohol, flammable fluids, or abrasive cleaners to remove tape or glue. These products can damage the surface of your ice cream maker. Check to make sure the bowl, mixing blade, spoon and measuring cup are included. If any parts are missing, please contact our customer service. Put the ice cream maker on a level and flat surface away from direct sunlight and other sources of heat such as a stove, furnace, radiator, etc. The appliance must be positioned so that the power plug is accessible. Cleaning the Ice Cream Maker Follow the Cleaning and Maintenance section to clean the ice cream maker. Installation Requirements The ice cream maker has been designed for free-standing installation which will allow you to install the unit in almost any place you desire provided you level the unit and follow the instructions for clearance and electrical requirements. Clearance and Environment Requirements • Choose a well ventilated indoor area. • This unit MUST be placed in an area protected from the elements, e.g., wind, rain, water spray or drips. The ice cream maker should not be located next to ovens, grills or other high heat sources. • The unit should be located on a firm and level surface Electrical Requirements Read all safety precautions listed at the beginning of this manual. It is recommended that a separate circuit serving only your ice cream maker be provided. Use receptacles that cannot be turned off by a switch or pull chain. WARNING! Do not, under any circumstances, cut or remove the third (ground) prong from the power cord. The ice cream maker is equipped with a power supply cord having a 3-prong grounding plug. To minimize possible shock hazard, the cord must be plugged into a mating 3-pronged and grounding-type wall receptacle providing 110 120V, 60Hz, grounded in accordance with the National Electrical Code and local codes and ordinances. If a mating wall receptacle is not available, it is the personal responsibility of the customer to have a properly grounded, 3-prong wall receptacle installed by a certified electrician. • Important: Always place the Ice Cream Maker upright on a flat surface in order that the built-in compressor can provide best performance. 3 Operation Using Your Ice Cream Maker Before using your ice cream maker it is strongly recommended to clean it thoroughly. Read and follow the Cleaning and Maintenance section of the manual before proceeding. Follow the steps below to start using your ice cream maker. 1. 2. Place the removable mixing bowl into the fixed bowl. Insert the mixing blade into the removable mixing bowl. 3. Place the transparent lid on top of both the fixed and removable bowls and keep the mixing blade fitted in the center of the transparent lid. 4. Insert the refill lid onto the transparent lid. 5. Lastly mount the blender motor onto the transparent lid and be sure that the motor axis is fitted into the hole on top of the mixing blade. Connect to the Electricity CAUTION: Do not use voltage different from the recommended one. Check voltage indicated on the rating label, make sure it matches with the National Electric Code and local code, then plug into the socket. Using the Control Panel [POWER] Button: Press this button to turn appliance on. Default operating time “60:00” minutes will be shown on LCD display. [TIMER] Button: Press this button to change time for the desired setting. [START/STOP] Button: Press this button to start/stop the appliance. Ice Cream Maker 4 (power on with no operation). Transfer Transfer ICE CREAM RECIPES Turn the machine ON, Turn the machine ON, marinade Turn the machine ON, marinade marinade marinade. Turn the machine ON, PINA Turn the machine ON, 13 14 15 EdgeStar Products 500 N. Capital of TX Hwy, Bldg 5 Austin, TX 78746 Toll Free: 1-866-319-5473 Web: http://www.edgestar.com E-mail: [email protected] Register your product, download owner’s manuals, access additional troubleshooting resources, and obtain more information on other great EdgeStar products on the web at: http://www.edgestar.com Product contents and specifications may change without notice. Copyright © 2011 Living Direct, Inc. All rights reserved.