1
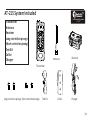
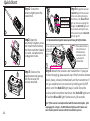
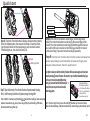
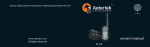
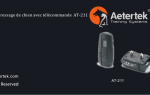
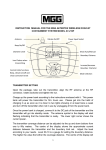
R
AT-215
Owner'
s Manual
Owner’s Manual for Professional Remote Dog Trainer AT-215
www.aetertek.com
System Included------------------------------------------1
Quick Start--------------------------------------------------------2,3
Trouble Shooting----------------------------------------------- 4,5
Training Tips--------------------------------------------------6
Safety Guidance---------------------------------------------------7
Information for Terms of Use & Limitation of Liability--------8
Warranty Card--------------------------------------------------9,10
AT-215 System Included
R
Professional Dog Trainer
AT-215
Transmitter
Antenna
Receiver
Long correction prongs
Short correction prongs
Test Kit
Collar
Charger
Antenna
Receiver
Transmitter
Long correction prongs Short correction prongs
Test Kit
Collar
Charger
-01-
Quick Start
1
b
2
Step2: Open the
transmitter's battery cover,
and install the 9V battery
into the transmitter. Match
the + and - on batteries to
the diagram inside
5
appropriate metal prongs
onto the receiver till
securely attached.
-02-
A:Press and hold on On/Off
button until
the Red LED
light stay in
solid.
a
Step 3: Screw in the
3
Step 4: Charge the receiver.
A Red LED light of the receiver
will turn on during charging .
Charge port
When done, the Blue LED will
Blue LED light light up. Once you unplug the
Red LED light charger, the Red LED light will
stay on solid-waiting for sync,
at the same time, the Blue LED
4
light will go off.
Tip 1: Recommend to charge the receiver up to 3 hours for the first 3 times .
or
or
Step 1: Screw the
antenna tightly onto the
transmitter.
b:Press down Shock,
strong Shock or
Vibrate button,
receiver will be
synced with
transmitter.
On/Off Button
Step 5: Match the receiver and transmitter. If you just
finished charging, please push any of the function button
(shock, beep, vibrate) immediately on the transmitter. If
not, you need to turn on receiver by holding on On/Off
button until the Red LED light stay in solid. Once the
receiver and transmitter matched, the Red LED light turns
off and the Blue LED light flashes every 10 seconds.
Tip 2: If the receiver is already matched with the transmitter before , after
unplugging the charger , the RED LED won't light up which means user
don’t need to pair the receiver with the transmitter any more .
Quick Start
The 1st dog
Both dogs
The 2nd dog
Step 6: Check the Function buttons (vibrate, shock and strong shock).
Press the Vibrate button, the receiver will vibrate. To test the shock,
Cap the shock test kit on the metal prongs, push the shock button.
If the bulb lights up, the shock function is ok.
Shock
Strong shock
Step7: Adjust shock intensity. Press the shock button will produce weaker shocking
effect, while the strong shock button will produce stronger shocking effect.
Step 8: Press the three buttons under dog A, the first dog will be
trained; Press the three buttons under dog B, the second dog will be
trained; Press the two buttons under dog AB, both dog will be trained.
You need to define one receiver as the first dog, and another receiver
as the second dog if you need to train two dogs Separately.
Step 9: Start to train. Put the collar into the receiver and wear the
receiver around dog’s neck. Remember to leave one finger place
between collar and neck, then it’s ready to train.
Tip 4: After receiver sync with transmitter, if receiver still have power supply and have been
manually turned off, just turn it back on. No need to re sync it with he transmitter. But if you
need to sync the receiver under different dog
Reset Button
system, just press and hold the Reset button for 1
Press and hold
second, then you can sync the receiver under
on Reset button
for 1 second will
another dog system.
cancel the
previous sync.
Tip 3:After 3 minutes of inactivity, transmitter will go into sleeping
Tip 5: To do a self-test,press the On/Off button of receiver three
mode. To wake it up, just press any of the function key (Vibrate,
times it should beep, vibrate and shock, indicating a functional unit.
Shock and Strong Shock).
-03-
Trouble Shooting
A:Transmitter /Receiver runs out of batteries quickly.
1:Make sure the charger and Transmitter/Receiver are securely connected.
2:Charge it up to 3 hours or above.
B:Transmitter doesn't work.
R
Professional Dog Trainer
AT-211
Replace the 9v dry battery with a new one or recharge the Transmitter.
C:Transmitter can't match Receiver successfully.
1:Make sure the intensity level is not on ZERO.
2:Check whether the antenna is installed correctly or not.
3:Ensure the receiver is turned on and in sync waiting status.
D:Receiver doesn't response to Transmitter.
1:Make sure the intensity level is not on ZERO.
2:Make sure Receiver had been synced with Transmitter and Transmitter is in the right dog system. Never change dog system after
the system had been synced!
3:Make sure the Receiver and Transmitter have enough power.
E:The training system has no effect on my dog.
1:Make sure the Receiver is working and the shocking prongs touch dog's skin closely.
2:Try increasing the intensity level.
F:Transmitter can't remotely control 1-2 or 1-3 Receivers.
1:Make sure you sync different Receiver separately.
2:Only in the right dog system, can you operate the corresponding Receiver or dog.
3:Whenever the Receiver/Transmitter out of power and recharged, you need to sync them once again.
G:The training system is only available in short range.
1:Check whether the antenna is installed correctly.
2:Make sure there didn't have strong signal interference from your surroundings.
3:Remote control range could be fluctuated along with surroundings, obstacles, or even the weather.
4:As to AT-919, make sure the collar had been put through the antenna pole in the back side of Receiver.
-04-
Trouble Shooting
R
H: What's the rubber cap outside of charging port for?
It prevent dust or water from coming into the charging port effectively. You need to plug the cap into the
charging port tightly when charging is done.
Professional Dog Trainer
AT-215
AT-211
I:How to turn on/off anti bark feature?
For 218, press and hold on the flash light button, then quick press down Beep button will turn on/off anti bark feature;
For 219, press and hold on the microphone button for three seconds will turn on/off anti bark feature;
For 918, press and hold on dog selection button on the side of Transmitter will turn on/off anti bark feature;
For 919, quick press the flash light button on the back side of Transmitter will turn on/off anti bark feature;
J:Receiver beep/vibrate/shock by itself all the time or occasionally .
1:Make sure anti bark feature is turned off. For 219, the default setting is on while 218/918/919 is off. After auto mode feature had
been turned off, for 218 and 918, auto mode LED light will go off; for 219, auto mode icon (MICROPHONE will disappear); for 919, auto
mode incon (SPEAKER) will be hollowed;
2:Make sure Receiver has enough power, because Receiver will alarm when it runs out of power.
3:Make sure any buttons of Transmitter has not been touched.
4:Sync Receiver with Transmitter once again.
K:When buying individual Receiver or Transmitter, why do I need to double-check the edition?
Aetertek updated all machines frequency from 433.92 MHz to 915 MHz, so every time you need to buy individual Receive or Transmitter,
you must make sure which frequency you actually need. Otherwise they will not be compatible.
l:After unplugging charger, the red LED light in Receiver stayed in solid to wait for sync, however it can never be
synced by Transmitter.
Please turn off your Receiver and re-sync it.
M:My Receiver seems to work by itself without the operation of Transmitter.
Check whether the auto anti bark function is on. If so, you can turn it off.
N:Auto anti bark is not work properly.
Make sure auto anti bark feature had been turned on, then you can test the function by scratching the shocking prongs on the surface of
a desk, qualified Receiver will start to beep and vibrate.
-05-
Training Tips
R
This product is intended to support behavioral training and is not designed to be used without
necessary interaction. Always praise your dog for good behavior. Verbal commands with
positive reinforcement will contribute to be success of your training and will achieve the
fastest, most desirable results possible.
Professional Dog Trainer
AT-215
The recommended age for training is a minimum of 6 months, provided that dog has the attention span and capability
to lean basic commands. And it should not be used on aggressive or elderly animals in poor health or animals
otherwise unable to withstand the stimulus.
Use verbal commands first, and supplement with a corrective stimulus only as needed. Be consistent with your verbal
commands, using the same words every time. Work with your pet on one behavior at a time to avoid confusion and
frustration. Use as little stimulus as possible and only to reinforce verbal commands when necessary. Do not over
correct your dog.
For example, use the beeps as warning by pressing Beep button. The dog will become conditioned to the beep
preceding the corrective stimulus and will soon learn to recognize the beep as a warning along with your verbal
command. Do not rely on this product solely to train your dog. Some dogs will not respond to this product. Aetertek
cannot guarantee the effectiveness of this or any trainer on your dog. If your dog shows signs of growling, snarling,
biting or aggression while using the collar, discontinue use immediately and contact a professional trainer for advice.
.
-06-
Safety Guidance
R
1. It is forbidden to open the receiver in case of breakage of the machine or harm the waterproof
Professional Dog Trainer
AT-215
feature. Otherwise it will violate warranty rules.
2. In order to guarantee submersible feature, the waterproof rubber charging lid should be plugged in tightly.
3. Only use the supplied adaptor to charge the receiver, otherwise the receiver will probably be damaged.
4. Users are NOT suggested to touch the mental prongs on the receiver, otherwise it will harm human body in case of
shocking operation. To test shock correction, please use the supplied test kit.
5.If there is water in the charging hole, please dry it before charge the receiver
6. Any collar worn for extended periods can cause a condition similar to bedsores, know as Pressure Necrosis. To reduce
the possibility, you must do the followings:
a. Never leave the collar on dog for more than 12 hours per day;
b. Examine the dog’s neck daily for any signs of a rash or sore;
c. Supervise your dog during the first 2 days of training;
d. Check the fit to prevent excessive pressure. you should be able to insert one finger between the collar strap and your
dog’s skin;
e. Wash the dog’s neck area and the correction poles as often as needed to keep the area and poles clean.
If signs of skin irritation are noticed, immediately discontinue use and apply antibiotic ointment to help and sooth the area.
-07-
Information for Terms of Use & Limitation of Liability
1. Terms of Use
This product is offered to you conditioned upon your acceptance without modification of the
terms, conditions, notices contained herein. Usage of this product implies acceptance of all
such terms, conditions, and notices.
R
Professional Dog Trainer
AT-215
2. Proper Use
This product is designed for use with dogs where training is desired. The specific temperament of your dog may not
work with this product. We recommend that you not use this product if your dog is less than 8 pounds or if your dog is
aggressive. If you are unsure whether this is appropriate for your dog, please consult your veterinarian, certified
trainer or contact our customer support.
3. No Unlawful or Prohibited Use
This product is designed for use with dogs only. This dog training device is not intended to harm, injure, or provoke.
Using this product in a way that is not intended could result in violation of Federal, State or local laws.
4.Limitation of Liability
In no event shall Aetertek be liable for any direct, indirect, punitive, incidental, special or consequential damages, or
any damages whatsoever arising out of or connected with the use or misuse of this product. Buyer assumes all risks
and liability from the use of this product.
5. As agreed by related parts, the seller is responsible for after-sale service, and Aetertek company only provide
technical support. So if you have any problems related to quality warranty, please contact the seller.
6. Modification of Terms and Conditions
Aetertek reserves the right to change the terms, conditions, and notices under which this product is offered.
-08-
Warranty Card
Thank you for purchasing our dog trainer, one of the best training systems available for training your dog. Aetertek
warrant the product to be free from defects in material and workmanship, arising under normal use for a period of 1
year from the date of original purchase when brand new. Misuse, loss or improper handling is not covered. Aetertek
will not pay for transport/insurance costs incurred in returning the product to our authorized Reseller, such as loss of
time, inconvenience, loss of use of your product, loss of your product and any incidental or consequential damages.
To be entitled for 1 year international limited warranty of our dog trainer, please fill in the warranty card and keep it
safe together with your proof of purchase. Failure to provide documentation will void warranty. This warranty extends
only to original purchaser and is non-transferable.
Statements for Warranty:
1: Please fill in the following form carefully. Information and signature of authorized distributor/reseller you
purchased from are also required.
For Aetertek to Fill in:
Series No:
Authorized distributor/reseller’s signature:
For original purchaser to Fill in:
Date purchased:
Name:
Tel No:
Address:
Authorized distributor/reseller you purchased from:
Item No:
Model NO.(e.g. AT-216)
-09-
2. If defected machine have been proven out of warranty for following reasons, we will charge maintenance/repair
fee:
A: Warranty time expires.
B: Damages caused by injudicious operation or some irresistible external forces (such as : flood, fires, earthquakes,
lighting, typhoon, etc.).
C: Damages caused by not abiding the clauses for operation, maintenance or storing the product in the user's
manual.
D: Repaired, re-assembled, or changed components or circuits by user.
E: Opened the collar receiver or torn up the series number sticker or altered the warranty card's clauses by user
F: Other misuse or improper handling.
To help us solve the problems, please tick the relevant box/boxes:
NO
1
2
3
4
5
6
7
8
9
10
Descriptions of Defects
Appearance damage, need to replace shell or other components
Receiver cannot be turned on
LED light does not turn on
Shock correction is not working properly, intensity level is not strong enough
Vibration correction is not working properly, intensity level is not strong enough
Beep correction is not working properly, intensity level is not strong enough
LCD display cannot be turned on, back light cannot be turned on
Buttons on transmitter do not work properly
Collar cannot be charged properly
Receiver cannot communicate with transmitter, transmitter does not send out signal
Please Tick
Yes
Yes
Yes
Yes
Yes
Yes
Yes
Yes
Yes
Yes
If not listed above, please state here:
As agreed by related parts, the seller is responsible for after-sale service, and Aetertek company only provide technical support.
So if you have any problems related to quality warranty, please contact the seller.
We reserve the rights to alter or cancel the warranty program at any time without prior notice.
-10-