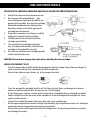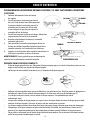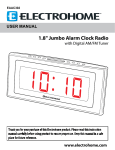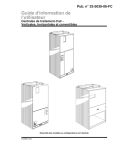
1
WELLINGTON™ RETRO
MUSIC SYSTEM
INSTRUCTION MANUAL
Thank you for your purchase of this Electrohome® product. Please read this instruction manual carefully before
using product to ensure proper use. Keep this manual in a safe place for future reference.
www.electrohome.com
IMPORTANT SAFETY INSTRUCTIONS
TO PREVENT FIRE OR SHOCK HAZARD, DO NOT USE THIS PLUG WITH AN EXTENSION CORD, RECEPTACLE OR OTHER OUTLET
UNLESS THE BLADES CAN BE FULLY INSERTED TO PREVENT BLADE EXPOSURE. TO PREVENT FIRE OR SHOCK HAZARD, DO NOT
EXPOSE THIS APPLIANCE TO RAIN OR MOISTURE.
CAUTION
RISK OF ELECTRIC SHOCK
DO NOT OPEN
The lightning flash with arrowhead
symbol within an equilateral triangle
is intended to alert the user to the
presence of uninsulated dangerous
voltage within the product’s enclosure
that may be of sufficient magnitude
to constitute a risk of electric shock to
persons.
1.
2.
3.
4.
5.
6.
7.
8.
9.
10.
11.
12.
13.
14.
15.
16.
17.
18.
WARNING:TO REDUCE THE RISK OF
ELECTRIC SHOCK DO NOT REMOVE
COVER (OR BACK), NO USER
SERVICEABLE PARTS INSIDE REFER
SERVICING TO QUALIFIED SERVICE
PERSONNEL.
The exclamation point within an
equilateral triangle is intended
to alert the user to the presence
of important operating and
maintenance (servicing) instructions
in the literature accompanying the
appliance.
Read these instructions.
Keep these instructions.
Heed all warnings.
Follow all instructions.
Do not use this apparatus near water.
Clean only with dry cloth.
Do not block any ventilation openings. Install in accordance with the manufacturer’s instructions.
Do not install near any heat sources such as radiators, heat registers, stoves, or other apparatus (including amplifiers)
that produce heat.
Do not defeat the safety purpose of the polarized or grounding type plug. A polarized plug has two blades with
one wider than the other. A grounding type plug has two blades and a third grounding prong. The wide blade or
the third prong is provided for your safety. If the provided plug does not fit into you outlet, consult an electrician for
replacement of the obsolete outlet.
Protect the power cord from being walked on or pinched particularly at plugs, convenience receptacles, and point
where they exit from the apparatus.
Only use attachments / accessories specified by the manufacturer.
Unplug this apparatus during lightning storms or when unused for long periods of time.
Refer all servicing to qualified service personnel. Servicing is required when the apparatus has been damaged in any
way, such as power-supply cord or plug is damaged, liquid has been spilled or objects have fallen into the apparatus,
the apparatus has been exposed to rain or moisture, does not operate normally, or has been dropped.
This appliance shall not be exposed to dripping or splashing water and no object filled with liquids such as vases shall
be placed on the apparatus.
Do not overload wall outlet. Use only power source as indicated.
Use replacement parts as specified by the manufacturer.
The product may be mounted to a wall only if recommended by the manufacturer.
Upon completion of any service or repairs to this product, ask the service technician to perform safety checks.
-2-
IMPORTANT SAFETY INSTRUCTIONS
• Avoid installing this unit in places exposed to direct sunlight or close to heat radiating appliances such as electric
heaters, on top of other stereo equipment that radiates too much heat, places lacking ventilation or dusty areas,
places subject to constant vibration and/or humid or moist areas.
• Do not attempt to clean this unit with chemical solvents as this might damage the finish. Use a clean dry cloth.
• Operate controls and switches as described in the manual. Before turning on the power, make certain that power
cord is properly installed.
• Store your CDs in a cool area to avoid damage from heat.
• When moving the set, be sure to first disconnect the power cord.
CLASS 1
LASER PRODUCT
APPAREIL À LASER DE CLASSE 1
PRODUCTO LASER DE CLASE 1
CAUTION
INVISIBLE LASER RADIATION
WHEN OPEN AND INTERLOCKS DEFEATED.
AVOID EXPOSURE TO BEAM
FCC INFORMATION:
This equipment has been tested and found to comply with the limits for a Class B digital device, pursuant to Part 15 of
the FCC Rules. These limits are designed to provide reasonable protection against harmful interference in a residential
installation. This equipment generates, uses and can radiate radio frequency energy and, if not installed and used in
accordance with the instructions, may cause harmful interference to radio communications. However, there is no
guarantee that interference will not occur in a particular installation. If this equipment does cause harmful interference to
radio or television reception, which can be determined by turning the equipment off and on, the user is encouraged to try
to correct the interference by one or more of the following measures:
• Re-orient or relocate the receiving antenna.
• Increase the separation between the equipment and receiver.
• Connect the equipment into an outlet on a circuit different from that to which the receiver is connected.
• Consult the dealer or an experienced radio/TV technician for help.
This device complies with Part 15 of the FCC Rules. Operation is subject to the following two conditions:
(1) This device may not cause harmful interference, and
(2) This device must accept any interference received, including interference that may cause undesired operation.
IMPORTANT
Since digital circuitry may cause interference to other radio or television tuners nearby, switch this unit off when not in
use or move it away from the affected radio/television tuner.
NOTE: This digital apparatus does not exceed the Class B limits for radio noise emissions from digital apparatus as set
out in the Radio Interference Regulations of Industry Canada. These limits are designed to provide reasonable protection
against harmful interference in a residential installation. This equipment generates, uses and can radiate radio frequency
energy and, if not installed and used in accordance with the instructions, may cause harmful interference to radio
communications. However, there is no guarantee that interference will not occur in a particular installation. If this
equipment does cause harmful interference to radio or television operation (which can be determined by turning the
equipment off), the user is encouraged to try to correct the interference by one or more of the following measures:
• Reorient or relocate the receiving antenna.
• Increase the separation between the equipment and receiver.
• Connect the equipment into an outlet on a circuit different from that to which the receiver is connected.
• Consult the dealer or an experienced radio/TV technician for help.
-3-
TABLE OF CONTENTS
Important Safety Instructions ........................................................................................................................................2
What’s Included..............................................................................................................................................................4
Features..........................................................................................................................................................................4
Buttons and Connections................................................................................................................................................5
Preparation for Use.........................................................................................................................................................7
Unpacking and Setup.............................................................................................................................................7
Power Source..........................................................................................................................................................7
Battery Installation (Remote Control)....................................................................................................................7
Raising and Lowering the Lid.................................................................................................................................8
Protect Your Furniture............................................................................................................................................8
Headphones...........................................................................................................................................................8
Operation........................................................................................................................................................................8
Listening to the Radio............................................................................................................................................8
AUX IN Operation....................................................................................................................................................9
Inserting and Playing a CD.....................................................................................................................................9
Random Playback...................................................................................................................................................9
Repeat Playback...................................................................................................................................................10
Programmed Playback.........................................................................................................................................10
Playing Records....................................................................................................................................................11
Inserting and Playing Files From USB ..................................................................................................................11
MP3 Files/Folders.................................................................................................................................................12
Recording From a CD to a USB Device...................................................................................................................12
Program Recording From a CD to a USB Device.....................................................................................................12
Recording From a Phonograph to a USB Device....................................................................................................12
Deleting Files From a USB Device..........................................................................................................................13
Removing the USB Device....................................................................................................................................13
Changing the Stylus.............................................................................................................................................13
Care and Maintenance..................................................................................................................................................15
Tone Arm Adjustment...................................................................................................................................................16
Electrohome Warranty..................................................................................................................................................17
WHAT’S INCLUDED
•
•
•
•
•
Wellington™ Retro Music System
Remote Control
Instruction Manual
1 Year Warranty
Live Customer Support
FEATURES
•
•
Plays Vinyl Records, CDs, AM/FM Radio & MP3s
via USB/AUX Input
Convert Your Vinyl & CD Collection to USB
•
•
•
-4-
High Performance Dynamic Speakers
Full Size 3-Speed Record Player
Elegant Real Wood Finish
BUTTONS AND CONNECTIONS
Main Unit
1
2
3
Control Panel
4
5
6
7
8
9
10
11
12
13
14
15
16
17
18
19
20
21
22
23
24
Back of Unit
Remote
25
Turntable
30
31
26
27
28 29
32
37
43
38
44
39
45
40
33
34
35
36
41
46
42
47
48
-5-
BUTTONS AND CONNECTIONS
1.
Phonograph Lid
Lift to reveal turntable
2.
Phonograph Lid Support Stand
Lift and clip into place to hold
up lid
3.Speakers
Plays sounds from radio, cd,
or record
4.
FM Dial Scale
Indicates the FM channels
5.
FM Stereo Indicator
Indicates FM stereo is ON
6.
Tuning Control
Indicates which station is
being played
7.
Random Button
Shuffle and play songs randomly
8.
Repeat Button
Repeat 1 or all songs on a CD
9.
AM-FM-PH-CD-AUX Function Switch
Changes the player function
10. Program Button
Program a set of songs to play
11. USB Connection
12. Play/Pause Button
Plays/Pauses playback
13. Stop Button
Stops playback
14. Skip Reverse Button
Skip back one track
15. AM Dial Scale
Shows the AM stations
16. CD Track Display
Displays the track currently being played
17. Record Button
Record CD to USB or Album to USB
18.Folder+/+10
19. Volume Control
Control the volume of playback
20.Folder–/–10
21. Headphone Jack
Plug your headphones in here
22. Open/Close Button
Opens and closes the CD tray
23. Skip Forward Button
Skip to next track
24. CD Disc Tray
Holds the CD in the unit
25. Service Sticker
Allows access to adjustment screw
26. AUX IN Input
Connect your MP3 player
or smartphone to play to music
27. ON/OFF Switch
Turns power ON and OFF
28. FM Antenna Wire
Improves FM reception
29. AC Power Cord
Plug AC power cord into any wall outlet
30.Turntable
Place vinyl record here
31. 45 RPM Adapter
Place in centre of turntable to accomodate 45 RPM
records
32. Transit Screw
Tighten during transportation
33. Cue Lever
Raise or lower tone arm
34. Speed Selector (33/45/78 RPM)
Select speed record should be played at
35. Tone Arm Lock
Locks stylus arm
36. Tone Arm with Stylus
Plays records
37. Open/Close Button
Opens and closes the CD tray
38. Repeat Button
Repeat 1 or all songs on a CD
39. DN/FB (Skip Reverse)
Skip back one track
40. Stop Button
Stops playback
41. Track -10
42. Random Button
Shuffle and play songs randomly
43. Record Button
44. Play/Pause Button
Plays/Pauses playback
45. UP/FF (Skip Forward)
Skip to next track
46. Track +10
47. Delete Button
48. Program Button
Program a set of songs to play
NOTE: All of the buttons on the remote control have
the same function as the buttons on the main unit.
-6-
PREPARATION FOR USE
UNPACKING AND SETUP
Transit Screw
• Carefully remove the unit from the display carton
and remove all packing material from the unit
• Unwind the AC power cord and extend it to its full
length
• Unwind the FM Antenna wire and extend it to its
full length
• Place the unit on a stable, level surface, close to
an AC outlet, out of direct sunlight, and away from
sources of excess heat, dust, moisture, humidity, or
strong magnetic fields
• Raise the lid to expose the phonograph. The phonograph has been secured for shipment with a transit
screw. Use a coin or screwdriver to TURN THE TRANSIT SCREW CLOCKWISE. This will allow the turntable
to “float” and turn freely.
• Remove the opaque white plastic stylus cover from the
Stylus
Tone Arm
phonograph stylus by sliding it in the direction of the arrow.
Cover
Lock Lever
• Discard the stylus cover.
• Remove the twist-tie that was used to secure the tone
arm during shipment.
• Release the tone arm lock lever.
• Connect the plug to your AC outlet, as shown below.
BATTERY INSTALLATION OF REMOTE CONTROL
• The remote control requires one CR2025 (3V)
lithium battery.
• Hold level pressing the clasp with the
thumb in the right direction of the arrow
in the illustration, and take out the battery
compartment by sliding with forefinger in
the direction to yourself. Take out the battery
compartment from the remote control.
Install a lithium battery (CR-2025) in the
compartment with the positive polarity
turned up. Hold level and push the battery
compartment into the remote control lightly.
It is okay once you hear a click.
POWER SOURCE
This system is designed to operate on normal 120V
60Hz AC only. Attempting to operate this system
from any other power source may cause damage to
the system, and such damage is not covered by your warranty.
Note: This system is equipped with a polarized
AC power plug having one blade wider than the
other. This is a safety feature. If this plug does not
fit into your existing AC outlet, do not try to defeat
this safety feature by altering the wide blade to
make it fit into your outlet. If this plug will not fit
into your outlet, you probably have an outdated
non-polarized AC outlet. Have the obsolete outlet
changed by a qualified licensed electrician.
-7-
PREPARATION FOR USE
RAISING AND LOWERING THE LID IMPORTANT:
the back
To open the lid, raise it as far as it will go until the lid support bracket ‘locks’ in the open position. To close the
lid, lift it upward slightly until the lid support bracket ‘unlocks’ , and then gently lower the lid.
TO AVOID DAMAGING THE CABINET OR THE LID, NEVER FORCE THE LID CLOSED. ALWAYS RAISE
THE LID TO RELEASE THE LID SUPPORT BRACKET.
PROTECT YOUR FURNITURE
This model is equipped with non-skid rubber ‘feet’ to prevent the product from moving when you operate
the controls. These ‘feet’ are made from non-migrating rubber material specially formulated to avoid
leaving any marks or stains on your furniture. However, certain types of oil based furniture polishes, wood
preservatives, or cleaning sprays may cause the rubber ‘feet’ to soften, and leave marks or a rubber residue
on the furniture. To prevent any damage to your furniture we strongly recommend that you purchase small
self-adhesive felt pads, available at hardware stores and home improvement centers everywhere, and
apply these pads to the bottom of the rubber ‘feet’ before you place the product on fine wooden furniture.
HEADPHONES
For private listening, plug headphones (not included) into the headphone jack on the front panel of the
player. The speakers will be disconnected when headphones are plugged in.
OPERATION
LISTENING TO THE RADIO
1. Flip the ON/OFF switch to the “–” position to turn the unit on. The LED power
indicator will light.
2. Rotate the AM-FM-PH-CD-AUX switch to the AM or FM position as desired.
The backlight behind the AM/FM dial will light.
3. Rotate the tuning control to select a station. If tuned to a strong FM station,
the FM Stereo indicator will light and the sound will be in stereo.
4. Rotate the VOLUME control to set the volume as desired.
5. To turn the unit OFF, flip the switch to the “o” position.
ON - OFF
AM Note:
The AM antenna is inside the cabinet. If reception is unsatisfactory try repositioning the cabinet
slightly for the strongest signal.
FM Note:
The wire antenna is located on the back cabinet. If necessary adjust the position and direction of this
antenna for the best reception.
-8-
OPERATION
AUX IN OPERATION
Listen to music via the AUX IN input by connecting your MP3 player or smartphone. Rotate the AM-FM-PHCD-AUX switch to AUX mode. Insert the 3.5mm Aux cable (not included) into the corresponding AUX IN Input
at the back of your system. Connect the other end of the cable to your device. Adjust the volume using the
VOLUME CONTROL knob on the system’s control panel.
Navigate your music files using your device.
Disconnect your device when not in use.
INSERTING AND PLAYING A CD
1. Flip the ON/OFF switch to the “–” position to turn the unit on. The LED power indicator will light.
2. Rotate the AM-FM-PH-CD-AUX switch to the CD position. ‘- -’ will appear in the display.
3. Press the OPEN/CLOSE button to open the CD tray. Place a CD in the tray, with the printed label facing up.
Press the OPEN/CLOSE button again to close the CD tray.
4. The disc will spin for a few seconds while the player is reading the disc and the total track number will
appear in the display. Press the PLAY/PAUSE button to start playing the first track of the disc. Adjust the
VOLUME control to set the volume as desired.
5. To skip forward or backward through the tracks on the disc, press the SKIP REV or SKIP FWD buttons. To
search forward or backward through the tracks, press and hold the SKIP REV or SKIP FWD button.
6. Press the PLAY/PAUSE button to pause playback. The PLAY/PAUSE indicator will blink in the display. Press
again to resume playback. When the disc is through playing, it will stop rotating.
7. To stop playback entirely, press the STOP button.
• As each track is played, the track number is shown in the display.
• The PLAY/PAUSE indicator will appear in the display when CD is playing.
RANDOM PLAYBACK
During CD-R/RW stop mode, press the RANDOM button once; the random indicator will light and the unit will
then play the tracks in a random order. Press the STOP button to cancel the random setting and the random
indicator will turn off.
• During RANDOM playback, press the REPEAT button once to activate repeat 1 playback. The REPEAT
LED indicator will blink and the RANDOM LED indicator will light solid.
• The player will play your selected track repeatedly until you cancel the REPEAT function by pressing
the REPEAT button twice, the repeat LED indicator will go out.
• RANDOM function cannot be used during repeat 1 mode.
-9-
OPERATION
REPEAT PLAYBACK
1. To repeat a single track, press the REPEAT button once, the repeat LED indicator will blink, press the
SKIP REV button or SKIP FWD button to select the desired track, press the PLAY/PAUSE button to begin
repeat playback of the selected track.
2. To repeat all of the tracks on a disc continuously, press the REPEAT button twice, the repeat LED
indicator will light solid. Press the PLAY/PAUSE button to begin repeat playback of the entire disc.
3. To cancel repeat playback, press the REPEAT button until the repeat LED indicator turns off.
4. Repeat playback is also canceled by pressing the STOP button, or setting the AM-FM-PH-CD-AUX switch
the to the AM, FM or PH position.
PROGRAMMED PLAYBACK
The CD player in this unit has a 20 - track programmable memory that allows you to program the disc to
playback songs in any desired order.
1. While in STOP mode of CD playback, press the PROGRAM button; “0” will appear in the display and the
program LED indicator will blink.
2. Select the first track to be programmed using the SKIP REV or SKIP FWD button.
3. Press the PROGRAM button again to confirm it, when the desired track appears in the display. Repeats
steps 2 and 3 to program up to 20 tracks. You may program the same track more than once.
4. Press the PLAY/PAUSE button to begin programmed playback; the program LED indicator will blink.
Player will begin with the first track you programmed and will continue until the last programmed
track has played.
5. Press the SKIP REV or SKIP FW button to select a specific track in the programmed tracks. After the last
track has played, the player will stop. However, the program sequence remains in the memory. The
program indicator will turn off.
6. To repeat the programmed sequence, press the PROGRAM button and then press the PLAY/PAUSE
button. The programmed sequence may be cancelled by pressing the STOP button while in stop mode.
•
•
•
•
Programming is the ability to pre-select the order in which a series of tracks will be played
The CD player will stop after all programmed tracks have been played or the STOP button is pressed
“--“ and the program indicator will blink when you have programmed 20 tracks
During PROGRAMMED playback, press REPEAT button twice to activate repeat all feature.
The REPEAT inidcator will light and all tracks in your programmed sequence will be repeated
continuously. To cancel programmed repeat playback press the STOP button until both the program
and repeat LED indicator go out
- 10 -
OPERATION
PLAYING RECORDS
This system includes a full-size, 3-speed, belt-drive turntable that plays 33,45 and 78 RPM records.
Be sure to disconnect any devices (MP3 player or smartphone) before using the Record player.
1. With the unit on, rotate the AM-FM-PH-CD-AUX switch to the PH position. Make sure that you have
removed the stylus cover from the stylus and have released the Tone Arm Lock (See Page 7)
2. Set the turntable speed switch to the appropriate speed: 33, 45, or 78 RPM. Set the record onto the
turntable. If you are playing 45 RPM singles, place the 45 RPM adapter on the center spindle.
3. Raise the cue lever to lift the tone arm off its rest. Move the tone arm to the outer-edge of the record.
The turntable will start automatically. Use the cue lever to gently lower the tone arm onto the record.
• Adjust the VOLUME control to set the volume as desired.
• IMPORTANT: Make sure that you have removed the stylus cover from the stylus and have released
the Tone Arm Lock (see page 7).
• Do not turn or stop the turntable manually. Moving or jarring the turntable without securing the
tone arm clamp could result in damage to the tone arm or stylus.
INSERTING AND PLAYING FILES FROM A USB
Press and hold the PLAY/PAUSE button for 2 seconds to change the playing mode between
CD and USB. The default after turning on the system is CD mode, the total tracks number
will be shown on the display if the disc is in the CD drawer, “NOd” will be shown if there is
no disc. If there is no disc in the CD drawer during CD mode, put the USB drive into the USB
socket, the player will play the USB automatically.
1. Flip the ON/OFF switch to the “–” position to turn the unit on. The LED power indicator will light.
2. Rotate the AM-FM-PH-CD-AUX switch to the CD position.
3. Plug the USB drive into the USB socket. Press and hold the PLAY/PAUSE button to select USB; “USb” will
briefly appear in the display. ‘NOU’ will appear in the display if no USB drive is inserted into the USB
socket. “NOF” will show on the display if there are no tracks on the USB.
4. The player will read the USB drive and start playing automatically. This could take a little while,
depending on the USB files. The track number, “USb” and the folder name will cycle in the display.
Adjust the VOLUME control to set the volume as desired.
5. To skip forward or backward through the tracks on the USB drive, press the SKIP REV or FWD button.
See note below for playing MP3’s. To search forward or backward through the tracks, press and hold the
SKIP REV or FWD button.
6. Press the PLAY/PAUSE button to pause playback. The track number will blink in the display. Press again
to resume playback. When the USB drive is through playing, it will stop automatically. Press the STOP
button to stop the USB drive before it is finished.
- 11 -
OPERATION
MP3 FILES/FOLDER: During playback, repeatedly press the FOLDER +/+10 or FOLDER -/-10 buttons to skip
the files +10 or -10. When in the Stop mode, repeatedly press the FOLDER +/+10 or FOLDER-/-10 buttons
on the remote to skip to a higher or lower numbered folder (if folders are recorded onto the USB drive).
RECORDING FROM A CD ONTO THE USB DEVICE
1. With the unit on and a USB drive inserted, rotate the AM-FM- PH-CD-AUX switch to the CD position
and insert the desired CD; playback will start automatically.
2. Select a track using the SKIP REV or FWD button. Press the RECORD button once; “rEC” will appear in
the display.
3. Press the RECORD button a second time; “rAd” (Ready) will briefly appear in the display and then
the player will restart the selected track and start recording. It will continue recording until the Stop
button is pressed.
• The Record indicator will blink when recording.
• Press the STOP button once to cancel the record function and twice to stop the playback.
PROGRAM RECORDING FROM A CD ONTO THE USB DEVICE
1. Perform steps 1 through 3 on page 10 to program the memory. Press the PLAY/ PAUSE button to start
program playback.
2. Select a track using the SKIP REV or FWD button, if desired. Press the RECORD button once; “rEC” will
appear in the display.
3. Press the RECORD button a second time; “rAd” (Ready) will briefly appear in the display and then
the player will restart the selected track and start recording. It will continue recording until the Stop
button is pressed.
• The Record indicator will blink when recording.
• Press the STOP button once to cancel the record function and twice to stop the playback.
RECORDING FROM A PHONOGRAPH ONTO THE USB DEVICE
1. With the unit on and a USB drive inserted, rotate the AMFM-PH-CD-AUX switch to the PH position.
2. Press the RECORD button once; “rEC” will appear in the display. Press the RECORD button a second
time; “rAd” (Ready) will briefly appear in the display.
3. Place a record on the turntable and start playback. The recording from the PHONO will begin after ‘rAd’
disappears from the display.
- 12 -
OPERATION
• The Record indicator and ‘rEC’ will blink when recording.
• Press the STOP button once to cancel the record function.
• When recording (regardless of the source), the position of the volume will not affect the recording, as
the recording volume is preset.
• When you insert the USB drive with folders recorded by this system into the computer and then open,
the time will be always shown as ‘2006-3-23 4:05’ for all of recording folders. It is not an error, the
recording time and date is just a reference date of the USB recording system only and not reflex to the
actual current recording date & time.
DELETING FILES FROM THE USB DEVICE
1. Rotate the AM-FM-PH-CD-AUX switch to the CD position. Plug the USB drive into the USB socket. Press
and hold the PLAY/PAUSE button to select USB; “USb” will briefly appear in the display.
2. Select a file to delete using the SKIP REV or FWD button. Repeatedly press the FOLDER +/+10 or
FOLDER -/-10 buttons on the remote to skip to a higher or lower numbered folder (if folders are
recorded onto the USB drive).
3. Press and hold the DELETE button on the remote once and the file will be deleted. IMPORTANT: Once
you press and hold the DELETE button, the selected file will be deleted immediately. “dEL” will show on
the display to confirm the track was deleted successfully.
REMOVING THE USB DRIVE: Make sure to stop the playback and turn the unit off before removing the USB
drive to avoid damage to the USB and the system.
CHANGING THE STYLUS
The jeweled stylus that was installed in your turntable at the time of purchase will last for up to 300 hours
of playback with 33 RPM albums or 45 RPM singles. If you are playing older 78 RPM records, which are made
from a much harder material, the stylus life expectancy may be reduced.
When the playback sound becomes distorted and unsatisfactory, first check to see if any dust or lint has
accumulated on the stylus. If you see any visible matter on the tip of the stylus, remove it very carefully with
a soft stylus-cleaning brush.
If there is no visible foreign matter on the stylus and the sound is still unsatisfactory, the stylus is worn and
needs to be replaced. If you continue playing your records with a worn stylus, you may eventually cause
damage to the records themselves.
- 13 -
OPERATION
Replacing the stylus:
IMPORTANT: Avoid touching the stylus itself.
1. Lift the tone arm off the tone arm rest.
2. At the front end of the tone arm, place the tip of your fingernail between the red stylus holder and
the black cartridge housing as shown, press down on the red stylus holder until it separates from the
cartridge housing.
3. Completely remove the red stylus holder with worn stylus and discard it.
4. Place the new red stylus holder with stylus under the cartridge housing. First, press upward on the back
side of the stylus holder, and then press up on the front edge of the stylus holder until it snaps into place
on the cartridge housing.
IMPORTANT!
To protect the turntable from damage during transportation, a silver transit screw is located at
the upper right of the turntable platform.
1. Before playing, please use a screwdriver to turn the transit screw in
clockwise direction (screw going down) completely to unlock the turntable.
2. To lock the turntable again for transportation, please turn screw in
counter-clockwise direction.
- 14 -
CARE AND MAINTENANCE
TO REPLACE THE CARTRIDGE FROM TONE ARM PLEASE FOLLOW THE PROCEDURES BELOW:
1. Gently lift the tone arm from the tone arm rest.
2. By using your left hand to hold the tone
arm and using your right hand to hold the rear
portion of the cartridge. Then push the cartridge
backwards and downwards according to the
direction as shown to the left to separate the
cartridge from the tone arm.
3. Using either a tweezer or your fingers, carefully
unplug the terminals from the cartridge.
4. Carefully connect the terminals to the new
cartridge (not included).
5. To re-install the new cartridge to the tone
arm. First please lock the front end of the new
cartridge on the hook of the tone arm.
6. Press the rear side of the new cartridge upwards
to lock it on to the tone arm.
CAUTION: Please do not damage the stylus when installing the new cartridge.
CARING FOR COMPACT DISCS
• Treat the compact disc carefully. Handle the compact disc only by its edges. Never allow your fingers to
come in contact with the shiny, unprinted side of the compact disc.
• Do not attach adhesive tape, stickers, etc. to the compact disc label.
•
•
•
•
•
•
Clean the compact disc periodically with a soft, lint-free, dry cloth. Never use detergents or abrasive
cleaners to clean the compact disc. If necessary, use a CD cleaning kit.
If a disc skips or gets stuck on a section of the compact disc, it is probably dirty or damaged (scratched).
Wipe in straight lines from the center of the compact disc to the outer edge of the compact disc. Never
wipe in circular motions.
Compact Discs should be stored in their cases after each use to avoid damage.
Do not expose compact discs to direct sunlight, high humidity, high temperatures or dust, etc. Prolonged
exposure or extreme temperatures can warp the compact disc.
Do not stick or write anything on either side of the compact disc. Sharp writing instruments, or the ink,
may damage the surface.
- 15 -
POWER
ON/OFF
OS501/EANOS502
CAREOPERATION
AND MAINTENANCEDIFFERENCE
1, Press the power ON/OFF button on the ba
of the unit to the position’-’ to
TONE ARM ADJUSTMENT
The auto-return point of theturn
tone armon
has been
preset
by the factory, however, if the tone arm auto-returns before
the
unit;
OFFthe end of the album please make the following adjustments.
You willON/OFF
need a small
Phillips
screwdriver.
Turn the
EANOS501/EANOS502
OPERATION
DIFFERENCE
2, Press the power
button
on
the ba
adjustment
screw
clockwise
¼
turn
and
test
auto-return.
Please
make
further
adjustments
as
needed.
power ON/OFF button
on
the
back
of the unit to the poistion’0’to
he position’-’ toturn off the unit;
Peel off the Service sticker
nit; 1 Plug in unit
power ON/OFF button on the back
he poistion’0’to
nit;
POWER ON/OFF
1, Press the power ON/OFF button on the back
of the unit to the position’-’ to
turn on the unit;
2, Press the power ON/OFF button on the back
of the unit to the poistion’0’to
turn off the unit;
Service
sticker
EANOS501/EANOS502 OPERATION DIFFERENCEEANOS501/EANOS502 OPERATION DIFFERENCE
POWER ON/OFF
1, Press the power ON/OFF button on the back
of the unit to the position’-’ to
turn on the unit; Adjustment screw
2, Press the power ON/OFF button on the back
of the unit to the poistion’0’to
turn off the unit;
POWER ON/OFF
1, Press the power ON/OFF button on the back
of the unit to the position’-’ to
turn on
unit; Turn unit ON
AUX
IN the
OPERATION
2, Pressthe
the
power ON/OFF button
on the back
Rotate
AM/FM/CD/PH/AUX
to ‘AUX’
of the unit
to connect
the poistion’0’to
position
and
your MP3 player
turn
off the unit;with the ‘AUX IN’ input
or
smartphone
at the back side of the unit via an aux in
cable.
ON - OFF
MARCHE - ARRÊT
AUX IN OPERATION
Rotate the AM/FM/CD/PH/AUX to ‘AUX’
position and connect your MP3 player
or smartphone with the ‘AUX IN’ input
at the back side of the unit via an aux in
cable.
AUX IN OPERATION
Rotate the AM/FM/CD/PH/AUX to ‘AUX’
position and connect your MP3 player
or smartphone with the ‘AUX IN’ input
at the back side of the unit via an aux in
cable.
AUX IN OPERATION
Rotate the AM/FM/CD/PH/AUX to ‘AUX’
MAKING THE ADJUSTMENT
position and connect your MP3 player
Lock Tone Arm
Raise the lid to expose the record player
2
or smartphone with
the ‘AUX IN’ input
RATION
at the back side of the unit via an aux in
M/FM/CD/PH/AUX
to ‘AUX’
cable.
connect your MP3 player
e with the ‘AUX IN’ input
de of the unit via an aux in
Clockwise turn = Moves Tone Arm to center of album
Counter-clockwise turn = Moves Tone Arm to
outer-edge of album
- 16 -
WARRANTY
Thank you for choosing ELECTROHOME® Consumer Electronics Products!
ELECTROHOME gives the following express warranty to the original consumer purchaser or gift recipient for this ELECTROHOME
product, when shipped in its original container and sold or distributed by ELECTROHOME or by an Authorized ELECTROHOME Dealer:
ELECTROHOME warrants that this product is free, under normal use and maintenance, from any defects in material and workmanship.
If any such defects should be found in this product within the applicable warranty period, ELECTROHOME shall, at its option, repair or
replace the product as specified herein. Replacement parts furnished in connection with this warranty shall be warranted for a period
equal to the unexpired portion of the original equipment warranty.
This warranty shall not apply to:
A. Any defects caused or repairs required as a result of abusive operation, negligence, accident, improper installation or
inappropriate use as outlined in the owner’s manual.
B. Any ELECTROHOME product tampered with, modified, adjusted or repaired by any party other than BlueTronics Group or
ELECTROHOME’s Authorized Service Centres.
C. Damage caused or repairs required as a result of the use with items not specified or approved by ELECTROHOME, including
but not limited to head cleaning tapes and chemical cleaning agents.
D. Any replacement of accessories, glassware, consumable or peripheral items required through normal use of the product
including but not limited to earphones, remote controls, AC adapters, batteries, stylus, trays, filters, cables, paper, cabinet,
cabinet parts, knobs, buttons, baskets, stands and shelves.
E. Any cosmetic damage to the surface or exterior that has been defaced or caused by normal wear and tear.
F. Any damage caused by external or environmental conditions, including but not limited to transmission line/power line
voltage or liquid spillage.
G. Any product received without appropriate model, serial number and CSA /cUL /cULus /cETL /cETLus markings.
H. Any products used for rental or commercial purposes.
I. Any installation, setup and/or programming charges.
Should this ELECTROHOME product fail to operate during the warranty period, warranty service may be obtained upon delivery
of the ELECTROHOME product together with proof of purchase and a copy of this LIMITED WARRANTY statement to an Authorized
ELECTROHOME Service Centre. In-home warranty service may be provided at ELECTROHOME’s discretion on any ELECTROHOME
television with the screen size of 40” or larger. This warranty constitutes the entire express warranty granted by ELECTROHOME and
no other dealer, service centre or their agent or employee is authorized to extend, enlarge or transfer this warranty on behalf of
ELECTROHOME. To the extent the law permits, ELECTROHOME disclaims any and all liability for direct or indirect damages or losses or
for any incidental, special or consequential damages or loss of profits resulting from a defect in material or workmanship relating to
the product, including damages for the loss of time or use of this ELECTROHOME product or the loss of information. The purchaser will
be responsible for any removal, reinstallation, transportation and insurance costs incurred. Correction of defects, in the manner and
period of time described herein, constitute complete fulfillment of all obligations and responsibilities of ELECTROHOME Electronics to
the purchaser with respect to the product and shall constitute full satisfaction of all claims, whether based on contract, negligence,
strict liability or otherwise.
1 YEAR PARTS & LABOUR WARRANTY PERIODS
TO OBTAIN THE NAME AND ADDRESS OF THE NEAREST AUTHORIZED ELECTROHOME SERVICE CENTRE OR FOR MORE
INFORMATION ON THIS WARRANTY
Contact ELECTROHOME Support by:
•
•
•
Support: www.electrohome.com/support
Website: www.electrohome.com
By mail: ELECTROHOME Customer Service, 4080 Montrose Road, Niagara Falls, ON L2H 1J9
ELECTROHOME is a registered trade-mark of Circus World Displays Limited 04.2013
- 17 -
NOTES
- 18 -
NOTES
- 19 -
GARANTIE
Merci d’avoir choisi un produit électronique grand public ELECTROHOME!
ELECTROHOME accorde la garantie expresse suivante à l’acheteur original de cet appareil ELECTROHOME ou à la personne qui l’a reçu en
cadeau, pourvu qu’il ait été expédié et vendu ou distribué par ELECTROHOME ou un détaillant ELECTROHOME autorisé dans son emballage
original. ELECTROHOME garantit que cet appareil est exempt de tout défaut de matériau et de fabrication dans des conditions d’utilisation
et d’entretien normales. Si un défaut est décelé dans ce produit pendant la période de cette garantie, ELECTROHOME s’engage à le réparer
ou, le cas échéant et à son entière discrétion, le remplacer. Les pièces de rechange qui sont fournis dans l’exécution de cette garantie sont
aussi couvertes par la garantie pendant une période égale à la portion non échue de la garantie originale de l’appareil.
Cette garantie ne couvre pas :
A. Les défectuosités ni les réparations résultant d’un usage abusif, d’une négligence, d’un accident ou d’une installation inadéquate
ou un usage inapproprié selon les directives fournies dans le guide d’utilisation accompagnant l’appareil.
B. Les appareils de marque ELECTROHOME trafiqués, modifiés, réglés, ajustés ou réparés par une entité autre que ELECTROHOME ou
un centre de réparation autorisé par ELECTROHOME.
C. Les dommages causés ni les réparations requises à l’appareil résultant de son usage avec des composantes ou accessoires non
recommandés ni approuvés par ELECTROHOME, incluant, sans en exclure d’autres, les cassettes et/ou produits chimiques de
nettoyage.
D. Le remplacement d’accessoires ou de pièces de verre, consommables ou des éléments périphériques nécessaires à une utilisation
normale du produit, y compris mais pas limité aux écouteurs, télécommandes, adaptateurs CA, piles, pointes de lecture, stylets,
plateaux, filtres, câbles, papier, boîtier, composantes de boîtiers, boutons, paniers, supports et tablettes.
E. Tout dommage apparent à la surface ou au boîtier extérieur de l’appareil et attribuable à la détérioration ou à l’usure résultant
d’un usage normal.
F. Tout dommage causé par des conditions externes ou environnementales, y compris mais pas limité aux lignes de transmission ou
de transport d’énergie ou le renversement de liquide.
G. Tout appareil ne portant pas les identifications appropriées quant aux numéros de modèle et de série ni les étiquettes et
attestations de l’ACNOR, de l’ULC, de l’ULI, de l’ETL au Canada et aux États-Unis.
H. Tout appareil utilisé à des fins commerciales ou de location.
I. Tous les frais d’installation, d’ajustement et/ou de programmation.
Si cet appareil de marque ELECTROHOME devient défectueux au cours de la période de garantie, une réparation peut être obtenue,
conformément aux termes de cette garantie, en présentant cet appareil ELECTROHOME avec la preuve d’achat originale et une copie
de cette GARANTIE LIMITÉE à un centre de service autorisé par ELECTROHOME. Le service à domicile est effectué, à la discrétion de
ELECTROHOME, aux téléviseurs de marque ELECTROHOME dotés d’un écran de 40 pouces et plus. Cette garantie constitue la garantie
expresse entière accordée par ELECTROHOME et aucun autre détaillant, centre de service ni leur agent ou employé est autorisé à
prolonger, étendre ou transférer cette garantie au nom de ELECTROHOME. Dans la mesure où la loi le permet, ELECTROHOME désavoue
toute responsabilité pour des dommages ou pertes directs et indirects, tous dommages accessoires, particuliers ou consécutifs ou perte
de profits résultant d’un défaut de matériel ou de fabrication de cet appareil, incluant les dommages attribuables à la perte de temps
ou perte de l’utilisation de cet appareil ELECTROHOME ou de la perte de données. Il incombe à l’acheteur de défrayer les coûts encourus
pour l’enlèvement, la réinstallation, le transport et l’assurance de cet appareil. La correction de toute défectuosité, de la manière et
dans les délais indiqués dans la présente, constitue l’exécution complète de toutes les obligations et les responsabilités contractés par
ELECTROHOME envers l’acheteur à l’égard du produit et constituera un acquittement complet de toutes les réclamations contractuelles ou
attribuables à la négligence, et la responsabilité absolue ou autre.
GARANTIE D’UN ANS POUR LES PIÈCES ET LA MAIN D’OEUVRE
POUR OBTENIR LE NOM ET L’ADRESSE DU CENTRE DE SERVICE ELECROHOME AUTORISÉ LE PLUS PRÈS DE CHEZ VOUS OU POUR PLUS
DE RENSEIGNEMENTS SUR CETTE GARANTIE :
•
•
•
•
Contactez le service de soutient ELECTROHOME par:
Soutien: www.electrohome.com/support
Site Web: www.electrohome.com
Par la poste à: Service à la clientèle ELECTROHOME, 4080 Montrose Road, Niagara Falls, ON L2H 1J9
ELECTROHOME est une marque déposée de Circus World Displays Limited. 04.2013
- 15 -
SOIN
ET ENTRETIEN
POWER
ON/OFF
OS501/EANOS502
OPERATION
DIFFERENCE
Press the power ON/OFF button on the
RÉGLAGE DU BRAS DE 1,
LECTURE
of the
unit
to athe
position’-’
to si le bras de lecture
Le point de retour automatique
du bras
de lecture
été préréglé
en usine par contre,
revient automatiquementturn
avant laon
fin dethe
l’album,
veuillez suivre les mises au point suivantes. Vous
unit;
OFFaurez besoin d’un petit tournevis cruciforme. TournezEANOS501/EANOS502
la vis de réglage
dansOPERATION
le sens
horaire
¼ deon
tourthe
et
DIFFERENCE
2, Press the power
ON/OFF
button
power
ON/OFF
button
on
the
back
réessayez le retour automatique.
Veuillez
effectuer
d'autrespoistion’0’to
ajustements si nécessaire.
of the
unit
to the
he position’-’ toturn off the unit;
Décollez l’autocollant pour le service
nit; 1 Branchez l’appareil
power ON/OFF button on the back
he poistion’0’to
nit;
POWER ON/OFF
1, Press the power ON/OFF button on the back
of the unit to the position’-’ to
turn on the unit;
2, Press the power ON/OFF button on the back
of the unit to the poistion’0’to
turn off the unit;
Service
sticker
EANOS501/EANOS502 OPERATION DIFFERENCEEANOS501/EANOS502 OPERATION DIFFERENCE
POWER ON/OFF
1, Press the power ON/OFF button on the back
of the unit to the position’-’ to
turn on the unit; Vis de réglage
2, Press the power ON/OFF button on the back
of the unit to the poistion’0’to
turn off the unit;
POWER ON/OFF
1, Press the power ON/OFF button on the back
of the unit to the position’-’ to
turn on
unit; Alimentez l’appareil
AUX
IN the
OPERATION
2, Pressthe
the
power ON/OFF button
on the back
Rotate
AM/FM/CD/PH/AUX
to ‘AUX’
of the unit
to connect
the poistion’0’to
position
and
your MP3 player
turn
off the unit;with the ‘AUX IN’ input
or
smartphone
at the back side of the unit via an aux in
cable.
ON - OFF
MARCHE - ARRÊT
AUX IN OPERATION
Rotate the AM/FM/CD/PH/AUX to ‘AUX’
position and connect your MP3 player
or smartphone with the ‘AUX IN’ input
at the back side of the unit via an aux in
cable.
AUX IN OPERATION
Rotate the AM/FM/CD/PH/AUX to ‘AUX’
position and connect your MP3 player
or smartphone with the ‘AUX IN’ input
at the back side of the unit via an aux in
cable.
AUX IN OPERATION
FAIRE L’AJUSTEMENT
Rotate the AM/FM/CD/PH/AUX to ‘AUX’
position
and connect
MP3 player
Levez le couvercle afin
d’exposer le tourne-disque
Verrouillez leyour
bras de lecture
2
or smartphone with the ‘AUX IN’ input
RATION
at the back side of the unit via an aux in
M/FM/CD/PH/AUX
to ‘AUX’
cable.
connect your MP3 player
e with the ‘AUX IN’ input
de of the unit via an aux in
Tour sens horaire = Déplace bras de lecture vers le
centre de l’album
Tour sens anti-horaire = Déplace bras de lecture
vers le le bord extérieur de l’album
21 - 14
ba
ba
SOIN ET ENTRETIEN
POUR REMPLACER LA CARTOUCHE DU BRAS DE LECTURE, S’IL VOUS PLAÎT SUIVRE LA PROCÉDURE
CI-DESSOUS.
1.
2.
3.
4.
5.
6.
Soulevez délicatement le bras de lecture du support.
En utilisant votre main gauche pour tenir le
bras et à l’aide de votre main droite pour tenir
la partie arrière de la cartouche, poussez la
cartouche vers l’arrière et vers le bas selon
le sens indiqué à la gauche, pour séparer la
cartouche du bras de lecture.
En utilisant une pince à épiler ou vos doigts, débranchez
soigneusement les bornes de la cartouche.
Branchez soigneusement les bornes à la nouvelle
cartouche (non inclus).
Pour réinstaller la nouvelle cartouche pour le bras de
lecture, tout d’abord, verouillez l’extrémité avant de la
nouvelle cartouche sur le crochet du bras de lecture.
Appuyez sur le côté arrière de la nouvelle cartouche vers le
haut pour le verrouiller sur le bras de lecture.
AVERTISSEMENT: Prenez garde de ne pas endommagez le
stylet lors de l’installation de la nouvelle cartouche.
FIL BLANC
G
FIL ROUGE
D
FIL NOIR
CROCHET
CARTOUCHE NEUVE
VERROU
APPUYEZ VERS LE HAUT
POUR VERROUILLER
PRENDRE SOIN DE DISQUES COMPACTS
•
•
•
•
•
•
•
•
Traiter le disque compact avec soin. Manipulez le disque compact que par ses bords. Ne touchez jamais avec vos
doigts le côté brillant, non imprimé du disque compact.
Ne fixez pas de ruban adhésif, autocollants, etc, à l’étiquette de disques compacts.
Nettoyez le disque régulièrement avec un chiffon doux, non pelucheux et sec. N’utilisez jamais de détergents ou
de nettoyants abrasifs pour nettoyer le disque compact. Si nécessaire, utilisez un kit de nettoyage CD.
Si un disque saute ou se coince sur une section du disque compact, il est probablement sale ou endommagé (rayé).
Lorsque vous nettoyez le disque compact, essuyez-le dans des lignes droites du centre du disque jusqu’au bord
extérieur du disque compact. N’essuyez-le jamais avec des mouvements circulaires.
Les disques compacts doivent être rangés dans leurs étuit après chaque utilisation pour éviter des dommages.
N’exposez pas les disques compacts en plein soleil, beaucoup d’humidité, des températures élevées ou à la
poussière. Une exposition prolongée ou des températures extrêmes peuvent déformer le disque compact.
Ne pas coller ni écrire quoi que ce soit de chaque côté du disque compact. Des instruments d’écriture pointues,
ou de l’encre, peuvent endommager la surface.
22 - 15
UTILISATION
Remplacer le stylet:
IMPORTANT: Évitez de toucher le stylet
1. Levez le bras de lecture du support.
2. À l’extrémité du bras de lecture, placez le bout de votre ongle entre le porte-stylet rouge et le boîtier de
cartouche noir comme indiqué, appuyez sur le porte-stylet rouge jusqu’à ce qu’il soit séparé du boîtier
de la cartouche.
3. Retirez complèment le porte-stylet rouge contenant le stylet usé, puis jetez-le.
4. Placez le nouveau porte-stylet rouge avec le stylet sous le boîtier de cartouche. Commencez en
appuyant sur l’arrière du porte-stylet, et ensuite appuyez sur le bord de la façade du porte stylet
jusqu'à ce qu'il s'enclenche au boîtier de cartouche.
IMPORTANT!
Pour protéger le plateau de dommages pendant le transport, une vis de transport argentée se
trouve en haut à droite du plateau.
1. Avant de jouer un disque, veuillez utiliser un tournevis pour tourner
la vis de transport dans le sens horaire (vis tourne vers le bas)
complètement pour déverrouiller le plateau.
2. Pour verrouiller le plateau pour le transport à nouveau, veuillez tourner
la vis dans le sens anti-horaire.
23 - 14
UTILISATION
• L’indicateur d’enregistrement clignote lors de l’enregistrement.
• Appuyez sur la touche STOP une fois pour annuler la fonction d’enregistrement.
• En enregistrant (sans tenir compte de la source), la position du volume n’affectera pas
l’enregistrement, comme le volume d’enregistrement est préréglé.
• Lorsque vous insérez la clé USB avec des dossiers enregistrés par ce système dans l’ordinateur et
puis vous les ouvrez, l’heure sera toujours affichée comme ‘2006-3-23 04h05’ pour tous les dossiers
d’enregistrement. Ce n’est pas une erreur, l’heure d’enregistrement et la date est seulement une
date de référence du système d’enregistrement USB seulement et non le reflet de la date et l’heure
d’enregistrement courante.
EFFACER LES FICHIERS DU PÉRIPHÉRIQUE USB
1. Tournez le commutateur AM-FM-CD-PH-AUX à la position CD. Branchez la clé USB dans la prise USB.
Appuyez sur la touche PLAY / PAUSE pour choisir USB; “USb” apparaîtra brièvement à l’écran.
2. Sélectionnez un fichier à supprimer à l’aide de la touche ou SKIP REV ou FWD. Appuyez plusieurs fois
sur la touche FOLDER + / 10 ou FOLDER -/-10 de la télécommande pour passer à un dossier qui a un
numéro plus haut ou plus bas (si les dossiers sont sur la clé USB).
3. Appuyez sur la touche DELETE sur la télécommande une fois et le fichier sera supprimé. IMPORTANT : Une fois que vous appuyez et retenez la touche DELETE, le fichier choisi sera immédiatement
supprimé. «Del» s’affiche sur l’écran pour confirmer que la piste a été supprimée avec succès
ENLEVER LA CLÉ USB: Assurez-vous d’arrêter la lecture et éteindre l’appareil avant de retirer la clé USB pour
éviter d’endommager le port USB et le système.
CHANGER LE STYLET
Le stylet bijouté installé sur votre platine au moment de votre achat durera jusqu’à 300 heures de lecture
avec les albums 33 tours ou les singles 45 tours. Si vous utilisez des 78 tours plus vieux, qui sont fabriqués
avec un matériau beaucoup plus dur, la durée de vie du stylet peut être réduite.
Lorsque le son de la lecture devient distordu et insatisfaisant, vérifiez d’abord si de la poussière ou de
la charpie s’est accumulée sur le stylet. Si vous voyez une matière visible sur le bout du stylet, retirez-là
soigneusement avec un pinceau souple pour nettoyage de stylet.
S’il n’y a pas de matière visible sur le stylet et que le son est toujours insatisfaisant, le stylet est usagé et
doit être changé. Si vous continuez à jouer vos disques avec un stylet usagé, vous pouvez endommager les
disques eux-mêmes.
24 - 13
UTILISATION
FICHIERS/DOSSIERS MP3: Pendant la lecture, appuyez le bouton FOLDER +/10 ou FOLDER -/-10 plusieurs
fois pour sauter les fichiers +10 ou -10. En mode Stop, appuyez le bouton FOLDER +/10 ou FOLDER -/-10
plusieurs fois sur la télécommande pour passer à un dossier qui a un numéro plus haut ou plus bas (si les
dossiers sont sur la clé USB).
ENREGISTRER D’UN CD À UN PÉRIPHÉRIQUE USB
1. Avec l’appareil alimenté et une clé USB insérée, tournez le commutateur AMFM-PH-CD-AUX à la
position CD et insérez le CD désiré, la lecture démarrera automatiquement.
2. Choisissez une piste en utilisant le bouton ou SKIP REV ou FWD. Appuyez sur la touche RECORD une
fois ; “REC” apparaîtra à l’écran.
3. Appuyez sur la touche RECORD une deuxième fois ; «rad» (prêt) apparaîtra brièvement à l’écran et le
lecteur redémarrera la piste sélectionnée et commencer l’enregistrement. Il continue d’enregistrer
jusqu’à ce que le bouton «Stop» soit appuyé.
• L’indicateur d’enregistrement clignote lors de l’enregistrement.
• Appuyez STOP une fois pour annuler l’enregistrement et deux fois pour arrêter la lecture.
ENREGISTREMENT D’UN PROGRAMME D’UN CD À USB
1. Effectuez les étapes 1 à 3 à la page 10 pour programmer la mémoire. Appuyez sur le bouton PLAY /
PAUSE pour démarrer la lecture du programme.
2. Choisissez une piste en utilisant le bouton SKIP REV ou FWD, si désiré. Appuyez sur la touche RECORD
une fois; “REC” apparaîtra à l’écran.
3. Appuyez sur la touche RECORD une deuxième fois ; «rad» (Prêt) apparaît brièvement à l’écran et le
lecteur va redémarrer la piste sélectionnée et commencer l’enregistrement. Il continue d’enregistrer
jusqu’à ce que le bouton «Stop» soit appuyé.
• L’indicateur d’enregistrement clignote lors de l’enregistrement.
• Appuyez STOP une fois pour annuler l’enregistrement et deux fois pour arrêter la lecture.
ENREGISTREMENT DU PHONOGRAPHE AU PÉRIPHÉRIQUE USB
1. Avec l’appareil alimenté et une clé USB insérée, tournez le commutateur AM-FM-PH-CD-AUX à la
position PH.
2. Appuyez sur la touche RECORD une fois; “rEC” apparaîtra à l’écran. Appuyez sur la touche RECORD une
deuxième fois ; «rad» (Prêt) apparaît brièvement à l’écran.
3. Placez un disque sur la platine et commencez la lecture. L’enregistrement de PHONO commencera
après que ‘rad’ disparaît de l’écran.
25 - 12
UTILISATION
LECTURE DE DISQUES
Ce système a une platine taille réelle, à 3 vitesses, à entrainement par courroie qui joue des disques 33, 45
et 78 tours.
Assurez-vous de débrancher tous les périphériques (lecteur MP3 ou téléphone intelligent)
avant d’utiliser le tourne-disque.
1. Allumez l'appareil et tournez l’interrupteur AM-FM-PH-CD-AUX à la position PH. S’assurer que vous avez
enlevé la couverture du stylet et que vous avez déverrouillé le Bras de Lecture (Voir Page 7)
2. Réglez la vitesse de la platine à la bonne vitesse : 33, 45, ou 78 tours. Mettez le disque sur la platine. Si
vous utilisez des singles 45 tours, placez l’adaptateur 45 tours sur le pivot central.
3. Lever le levier pour sortir le bras de lecture de l’appareil. Déplacez le bras de lecture vers le bord du disque.
La platine démarrera automatiquement. Utiliser le levier pour baisser doucement le bras de lecture sur le
disque.
• Réglez la touche VOLUME pour définir le volume comme vous le souhaitez.
• IMPORTANT: Assurez-vous que vous avez retiré le couvercle du stylet et que vous avez déverrouillé
le bras de lecture (Voir Page 7).Ne pas tourner ou arrêter la platine manuellement. Déplacer la
platine sans sécuriser le bras de lecture peut endommager le bras de lecture ou le stylet.
INSERTION ET LECTURE DE FICHIERS D’UNE CLÉ USB
Appuyez sur la touche PLAY / PAUSE (lecture/pause) pendant 2 secondes pour changer le mode de lecture
entre CD et USB. La valeur par défaut lorsque vous allumez le système est le mode CD, le nombre total
pistes sera indiqué sur l’écran si le disque est dans le tiroir CD, “Nod” sera indiqué si il n’y a pas de disque.
S’il n’y a pas de disque dans le tiroir du CD en mode CD, placez la clé USB dans la prise USB, le lecteur lira
l’USB automatiquement.
1. Appuyer sur l’interrupteur MARCHE/ARRÊT pour le mettre à la position “–” pour allumer l’appareil. Le
voyant DEL s’allume.
2. Tournez le bouton AM-FM-PH-CD-AUX à la position CD.
3. Branchez la clé USB dans la prise USB. Appuyez et retenez la touche PLAY / PAUSE (lecture/pause) pour
choisir USB; “USb” apparaîtra brièvement à l’écran. “NOU” apparaîtra à l’écran si aucune clé USB n’est insérée
dans la prise USB. “NOF” s’affiche sur l’écran si il n’y a pas de pistes sur la clé USB.
4. Le joueur lira la clé USB et commencera à jouer automatiquement. Ceci pourrait prendre un peu de temps,
selon les fichiers USB. Le numéro de piste, « USB » et le nom de la fiche seront à l’affichage. Ajustez le
bouton VOLUME pour régler le volume comme vous le souhaitez.
5. Pour passer à la piste suivante ou précédente de la clé USB, appuyez sur la touche SKIP REV ou FWD. Voir
la note ci-dessous pour lire des MP3. Pour effectuer une recherche avant ou en arrière à travers les pistes,
appuyez et retenez la touche ou SKIP REV ou FWD.
6. Appuyez sur la touche PLAY / PAUSE (lecture/pause) pour interrompre la lecture. Le numéro de piste
clignotera à l’écran. Appuyez à nouveau pour reprendre la lecture. Lorsque la clé USB a terminé la lecture, il
s’arrêtera automatiquement. Appuyez sur la touche STOP pour arrêter le lecteur USB avant qu’il ne soit terminé.
26 - 11
UTILISATION
LECTURE RÉPÉTÉ
1. Pour répéter une seule chanson, appuyez le bouton REPEAT une fois, l’indicateur DEL clignotera,
appuyez le bouton SKIP REV ou SKIP FWD pour sélectionner la chanson désirée, appuyez le bouton
PLAY/PAUSE pour commencer la répétition de la chanson sélectionnée.
2. Pour répéter toutes les chansons d’un disque en continue, appuyez le bouton REPEAT deux fois,
l’indicateur DEL REPEAT sera allumé et fixe. Appuyez le bouton PLAY/PAUSE pour commencer la
répétition du disque en entier.
3. Pour annuler une lecture répétée, appuyezr le bouton REPEAT jusqu’à ce que l’indicateur DEL REPEAT s’éteigne.
4. La lecture répétée s’annule aussi en appuyant le bouton STOP, ou en mettant l’interrupteur AM-FM-PH-CD-AUX à la position AM, FM ou PH.
LECTURE PROGRAMMÉE
Le Lecteur CD possède une mémoire de 20 chansons programmables qui vous permet de programmer le
disque pour qu’il lise les chansons dans n’importe quel ordre.
1. En mode STOP de la lecture d’un CD, appuyez le bouton PROGRAM ; “0” apparaîtra à l’écran et
l’indicateur DEL PROGRAM clignotera.
2. Sélectionnez la première chanson à programmer en utilisant les boutons SKIP REV et SKIP FWD.
3. Appuyez le bouton PROGRAM à nouveau pour confirmer, lorsque la chanson désirée apparaît à l’écran.
Répéter les étapes 2 et 3 pour programmer jusqu’à 20 chansons. Vous pouvez programmer une chanson
plusieurs fois.
4. Appuyez le bouton PLAY/PAUSE pour commencer la lecture programmée; l’indicateur DEL clignotera.
Le lecteur commencera avec la première chanson programmée et continuera jusqu’à ce que la dernière
chanson programmée soit jouée.
5. Appuyez les touches SKIP REV ou SKIP FW pour sélectionner une chanson précise parmi les chansons
programmées. Après que la dernière chanson ets jouée, le lecteur s’arrêtera. Cependant, la séquence
programmée reste en mémoire. L’indicateur « PROGRAM » s’éteindra.
6. Pour répéter la séquence programmée, appuyez le bouton PROGRAM et ensuite appuyez le bouton
PLAY/PAUSE. La séquence programmée peut être annulée en appuyant le bouton STOP pendant le
mode STOP.
• Programmer vous permet de présélectionner l’ordre d’une série de chansons à jouer.
• Le lecteur CD s’arrêtera dès que toutes les chansons programmées auront été jouées ou que le
bouton STOP est appuyé.
• "--" et l’indicateur PROGRAM clignoteront lorsque vous aurez programmé 20 chansons.
• Pendant la lecture PROGRAMMÉE, appuyez le bouton REPEAT deux fois pour activer la répétition
de toutes les fonctions. L’indicateur REPEAT s’allumera et toutes les chansons de votre séquence
programmée seront répétée en continu. Pour annuler la lecture programmée répétée, appuyez le
bouton STOP jusqu’à ce que les DEL PROGRAM et de REPEAT s’éteignent.
27 - 10
UTILISATION
UTILISER LA FONCTION AUX IN
Écoutez de la musique en connectant votre lecteur MP3 ou votre téléphone intelligent via l’entrée AUX IN.
Tournez le bouton AM-FM-PH-CD-AUX au mode PH. Insérez le câble audio 3,5mm (pas inclus) dans l’entrée
correspondante AUX IN à l’arrière de l’appareil. Branchez l’autre bout du câble à votre dispositif. Réglez le
volume en utilisant le bouton de réglage VOLUME sur le panneau de commande.
Débranchez votre dispositif lorsqu’il n’est pas utilisé.
Le système est préréglé à la prise AUX IN par défaut
lorsqu’un dispositif est connecté.
INSÉRER ET LIRE UN CD
1. Appuyer sur l’interrupteur MARCHE/ARRÊT pour le mettre à la position “–” pour allumer l’appareil. Le voyant DEL s’allume.
2. Tournez l’interrupteur AM-FM-PH-CD-AUX à la position CD. ‘- -’ apparaîtra à l’écran.
3. Appuyez le bouton OPEN/CLOSE pour ouvrir le lecteur CD. Placer un CD dans le lecteur, face imprimée sur
le dessus. Appuyez le bouton OPEN/CLOSE à nouveau pour fermer le lecteur.
4. Le disque tournera pendant quelques secondes pendant que le lecteur lit le disque et le nombre total
de chansons apparaîtra à l’écran. Appuyez le bouton PLAY/PAUSE pour commencer à lire la première
chanson du disque. Ajuster le bouton VOLUME pour régler le volume.
5. Pour passer à la chanson suivante ou précédente, appuyez les boutons SKIP REV ou SKIP FWD. Pour
naviguer vers l’avant ou vers l’arrière dans les chansons, appuyez et maintenir appuyer le bouton SKIP
REV ou SKIP FWD.
6. Appuyez le bouton PLAY/PAUSE pour mettre la lecture en pause. L’indicateur PLAY/PAUSE clignotera à
l’écran. Appuyez à nouveau pour reprendre la lecture. Lorsque le disque est fini, il arrêtera de tourner.
7. Pour arrêter la lecture complètement, appuyez le bouton STOP.
Note:
• Lorsqu’une chanson est en cours, le numéro de la chanson est affichée à l’écran.
• L’indicateur PLAY/PAUSE apparaîtra à l’écran pendant la lecture du CD.
LECTURE ALÉATOIRE
Lorsque le mode CD-R/RW est arrêté, appuyez le bouton RANDOM une fois ; l’indicateur aléatoire s’allumera
et l’appareil jouera alors les chansons de manière aléatoire. Appuyez le bouton STOP pour annuler le réglage
aléatoire et l’indicateur aléatoire s’éteindra.
• Pendant la lecture RANDOM, appuyez le bouton REPEAT une fois pour activer la répétition d’une
chanson. L’indicateur DEL REPEAT clignotera et l’indicateur DEL RANDOM sera fixe.
• Le lecteur répétera la chanson sélectionnée jusqu’à ce que vous annuliez la fonction REPEAT en
appuyant sur le bouton REPEAT deux fois. L’indicateur DEL REPEAT s’éteindra.
• La fonction RANDOM ne peut être utilisée pendant le mode REPEAT 1.
--28
9 --
PRÉPARATION POUR L’UTILISATION
the back
LEVER ET BAISSER LE COUVERCLE IMPORTANT:
Pour ouvrir le couvercle, le lever au maximum jusqu’à ce que la baguette de support se arrête à la position
ouverte. Pour fermer le couvercle, soulevez le couvercle légèrement jusqu’à ce que la baguette de support se
dégage, et ensuite baisser doucement le couvercle.
AFIN D’ÉVITER D’ENDOMMAGER LE COFFRET OU LE COUVERCLE, NE FORCEZ PAS LE COUVERCLE À
FERMÉ. LEVEZ LE COUVERCLE POUR LIBÉRER LA BAGUETTE DE SUPPORT DU COUVERCLE.
PROTÉGER VOS MEUBLES
Ce modèle est équipé de tampons de caoutchouc antidérapant pour éviter que le produit ne se déplace
lorsque l’on utilise les touches. Ces tampons sont fabriqué en caoutchouc antidérapant spécialement conçu
pour éviter de laisser des marques ou des tâches sur vos meubles. Cependant, certains types de vernis pour
meubles à base d’huile, de préservateurs de bois, ou de sprays nettoyants peuvent ramollir les tampons,
et laisser des marques de résidu de caoutchouc sur le meuble. Pour éviter tout dommage à vos meubles,
nous vous recommandons fortement d’acheter des languettes de feutre auto-adhésive, disponibles dans
des magasins de bricolage ou centres d’aménagement intérieur, et de les placer en dessous des tampons de
caoutchouc avant de placer le produit sur des meubles en bois de qualité.
ÉCOUTEURS
Pour une écoute privée, branchez les écouteurs dans la prise écouteur sur la façade de votre lecteur. Les haut-harleurs se déconnecteront lorsque les écouteurs seront branchés.
UTILISATION
ÉCOUTER LA RADIO
1. Appuyer sur l’interrupteur MARCHE/ARRÊT pour le mettre à la position "–"
pour allumer l’appareil. Le voyant DEL s’allume.
MARCHE - ARRÊT
2. Tournez le bouton AM-FM-PH-CD-AUX à la position AM ou FM. Le
rétroéclairage AM/FM s’illuminera.
3. Tournez le bouton RECHERCHE pour choisir une station. L’indicateur FM
Stéréo s’allumera et le son sera en stéréo sur une station FM forte.
4. Tournez le bouton VOLUME pour régler le volume de lecture.
5. Pour éteindre l’appareil, appuyer sur l’interrupteur MARCHE/ARRÊT pour le mettre à la position "o".
Note AM:
L’antenne AM est à l’intérieur du coffret. Si la réception n’est pas satisfaisante essayez de repositionner
le coffret légèrement pour atteindre un signal plus puissant.
FM Note:
L’antenne est située à l’arrière du coffret. Si nécessaire, ajustez la position et la direction de cette
antenne pour une meilleure réception.
--29
8 --
PRÉPARATION POUR L’UTILISATION
DÉBALLAGE ET INSTALLATION
•
•
•
•
•
•
•
•
•
•
Vis de Transit
Retirer avec précaution l’unité du carton d’emballage et retirer
tous les emballages de l’unité.
Dérouler le câble d’alimentation jusqu’à sa longueur maximale.
Dérouler le câble d’antenne FM jusqu’à sa longueur maximale.
Placer l’unité sur une surface stable et nivelée, proche d’une
prise secteur, sans lumière du soleil directe, et loin de sources de
chaleur excessive, de poussière, de moisissure, d’humidité ou de
champs magnétiques puissants.
Élever le couvercle pour exposer le phonographe. Le phonographe a été sécurisé pour l’envoi avec une
vis de transport. Utiliser une pièce ou un tournevis pour TOURNER LA VIS DE TRANSIT VERS LA DROITE.
Cela permettra à la platine de « flotter » et de tourner librement.
Retirer la protection du stylet en plastique blanc opaque du phonographe en le faisant glisser dans la
direction de la flèche.
Couvert
Bras de Lecture
Retirer la couverture du stylet.
du Stylet
Levier de Verrouillage
Retirer le ruban à fermeture par torsade utilisé pour sécuriser le bras de lecture pendant le transport.
Libérer le levier de fermeture du bras de lecture.
Connecter la prise dans votre prise secteur.
SOURCE D’ALIMENTATION
Ce système est prévu pour une utilisation avec
une prise normale 120V 60Hz seulement. Essayer
d’utiliser ce système sur une quelconque autre
source d’alimentation peut causer des dommages au
système, et de tels dommages ne sont pas couverts
par votre garantie.
Note: Ce système est équipé d’une prise secteur polarisée
avec une lame plus large que l’autre. Ceci est une fonction
de sécurité. Si cette prise ne convient pas à votre prise
murale existante, n’essayez pas de contrarier cette
fonction de sécurité en altérant la lame large pour qu’elle
tienne dans votre prise. Si cette prise ne convient pas,
vous avez certainement une prise murale obsolète et non
polarisée. Faire changer cette prise par un technicien qualifié.
INSTALLATION DE LA PILE DE LA
TÉLÉCOMMANDE
• La télécommande fonctionne avec une pile
CR2025 (3V) au lithium.
• Tenez-le horizontalement en appuyant sur le
fermoir avec le pouce dans la bonne direction
suivant la flèche sur l’illustration, et retirez
le compartiment à piles en le glissant vers
vous. Retirez le compartiment des piles
de la télécommande. Installez une pile au
lithium (CR-2025) dans le compartiment
en respectant la polarité positive. Tenezle horizontalement et appuyez sur le
compartiment des piles de la télécommande
légèrement. Il est installé correctement une
fois que vous entendez un clic.
--30
7 --
TOUCHES ET CONNEXIONS
1. 2. 3. 4. 5. 6. 7.
8.
9.
10.
11.
12.
13.
14.
15.
16.
17.
18.
19.
20.
21.
22.
23.
24.
25.
Couvercle du Phonographe
26. Entrée AUX IN
Lever pour révéler la platine
Connectez votre lecteur MP3 ou téléphone intelligent pour
Baguette de support du couvercle écouter de la musique
du Phonographe
27. Interrupteur
Lever et placer pour maintenir le couvercle soulevé
Allume et éteint l’appareil
Haut-Parleurs
28. Antenne FM
Joue les sons de la radio, d’un cd ou d’un disque
Améliore la réception FM
Bande FM
29. Câble d’alimentation
Indique les stations FM
Branchez dans une prise murale
Indicateur FM Stéréo
30. Platine
Indique lorsque FM stéréo est alimenté
Pour la lecture d’un disque vinyle
Bouton Recherche
31. Adaptateur 45 tours
Indique quelle station est en cours
Placez au centre de la platine pour permettre la
Touche Random
lecture de disques 45 tours
Joue les chansons aléatoirement
32. Vis de transit
Touche Repeat
Serrez pendant le transport
Répéter une ou toutes les chansons d’un CD
33. Levier marqueur
Bouton AM-FM-PH-CD-AUX
Lever ou Baisser le bras de lecture
Change la fonction du lecteur
34. Sélecteur de vitesse Bouton Program
(33/45/78 tours) Sélectionne la vitesse de
Programme une série de chansons à jouer
lecture du disque
Connexion USB
35. Verrou du bras de lecture
Bouton Play/Pause
Verrouille le bras de lecture
Commence la lecture et/ou pause la musique
36. Bras de Lecture avec stylet
Bouton Stop
Lit les disques
Arrête la lecture
37. Touche Open/Close
Bouton Skip Reverse
Ouvre et ferme le tiroir du lecteur
Revient à la chanson précédente
38. Bouton Repeat
Bande AM
Répéter une ou toutes les chansons d’un CD
39. DN/FB (Skip Reverse)
Affiche les stations AM
Revient à la chanson précédente
Affichage de la chanson CD
40. Bouton Stop
Affiche la chanson en cours
Arrête la lecture
Bouton Record (enregistrement)
41. Piste -10
Enregistrez CD vers USB ou album à USB
42. Bouton Random
Dossier +/+10
Joue les chansons aléatoirement
Touche Volume
43. Bouton Record (enregistrement)
Contrôle le volume de la chandon en cours
44. Bouton Play/Pause
Dossier –/–10
Commence la lecture et/ou pause la musique
Prise d’écouteurs
45. UP/FF (Skip Forward)
Branchez vos écouteurs ici
Passe à la chanson suivante
Touche Open/Close
46. Piste +10
Ouvre et ferme le tiroir du lecteur CD
47. Bouton Delete (efface)
Bouton Skip Forward
48. Bouton Program
Passe à la chanson suivante
Programme une série de chansons à jouer
Tiroir CD
Garde le CD en place
NOTE: Tous les boutons de la télécommande ont les mêmes
Autocollant de service
fonctions que les boutons sur l’unité principale.
Done accès à la vis de réglage
--31
6 --
TOUCHES ET CONNEXIONS
Unité principale
1
2
3
Panneau de comande
4
5
6
7
8
9
10
11
12
13
14
15
16
17
18
19
20
21
22
23
24
Arrière de l’appareil
Télécommande
25
Platine
30
31
26
27
28 29
32
37
43
38
44
39
45
40
33
34
35
36
41
46
42
47
48
--325--
TABLE DES MATIÈRES
Instructions de sécurité importantes ..............................................................................................................................2
Ce qui est inclus...............................................................................................................................................................4
Dispositifs.......................................................................................................................................................................4
Touches et Connexions....................................................................................................................................................5
Préparation Pour L’Utilisation..........................................................................................................................................7
Déballage et installation........................................................................................................................................7
Source d’alimentation............................................................................................................................................7
Installation de la pile (télécommande)...................................................................................................................7
Lever et baisser le couvercle...................................................................................................................................8
Protéger vos meubles.............................................................................................................................................8
Écouteurs...............................................................................................................................................................8
Utilisation.......................................................................................................................................................................8
Écouter la radio......................................................................................................................................................8
Utilisation AUX IN...................................................................................................................................................9
Insérer et lire un CD................................................................................................................................................9
Lecture aléatoire....................................................................................................................................................9
Lecture répétée................................................................................................................................................... 10
Lecture programmée........................................................................................................................................... 10
Lecture de disques............................................................................................................................................... 11
Insertion et lecture de fichiers d’une clé USB....................................................................................................... 11
Fichiers/dossiers USB........................................................................................................................................... 12
Enregistrer d’un CD à une clé USB........................................................................................................................ 12
Enregistrement d’un programme de CD à une clé USB........................................................................................ 12
Enregistrement du phonographe à une clé USB.................................................................................................. 12
Effacer les fichiers d’une clé USB.......................................................................................................................... 13
Enlever la clé USB................................................................................................................................................ 13
Changer le stylet.......................................................................................................................................................... 13
Soin et entretien.......................................................................................................................................................... 15
Réglage du bras de lecture........................................................................................................................................... 16
Garantie Electrohome.................................................................................................................................................. 17
CE QUI EST INCLUS
•
•
•
•
•
Système de musique rétro Wellington™
Télécommande
Manuel d’instruction
Garantie d’un an
Soutien à la clientèle en direct à vie
DISPOSITIFS
• Lecture de disques vinyle, les CD, la radio AM/FM et
les MP3 via l’entrée USB/AUX
• Convertissez votre collection de CD et de disques
vinyle à USB
• Haut-parleurs dynamiques à haute performance
• Tourne-disque pleine grandeur à 3 vitesses
• Meuble élégant de qualité avec un fini en bois véritable
• Commutateur rotatif rétro pour radio AM/FM
--33
4 --
INSTRUCTIONS DE SÉCURITÉ IMPORTANTES
• Évitez l’installation de cet appareil dans des endroits exposés à la lumière directe du soleil ou à proximité d’appareils
de chauffage comme les radiateurs électriques, le dessus d’équipement stéréo qui produisent trop de chaleur, des
endroits sans ventilation, des zones poussiéreuses, des endroits sujets à la vibration constante et/ou les zones humides
• Ne tentez pas de nettoyer cet appareil avec des solvants chimiques car cela pourrait endommager la finition. Utilisez
un chiffon propre et sec
• Utilisez les touches et les interrupteurs comme décrit dans le manuel. Avant d’allumer, assurez-vous que le cordon
d’alimentation est correctement installé
• Rangez vos CD dans un endroit tempéré pour éviter les dommages causés par la chaleur
• Lorsque l’appareil est déplacé, assurez-vous de débrancher le cordon d’alimentation.
APPAREIL À LASER DE CLASSE 1
CLASS 1 LASER PRODUCT
APPAREIL À LASER DE CLASSE 1
PRODUCTO LASER DE CLASE 1
Radiation laser invisible quand l’appareil
est ouvert ou que le verrouillage est en panne ou
désactivé. Évitez une exposition directe au rayon.
INFORMATION FCC:
Cet appareil a été testé et s’avère conforme aux restrictions relatives aux appareils numériques de classe B, d’après l’article 15
des règlements de la FCC. Ces restrictions ont été instaurées pour offrir une protection raisonnable contre les interférences
nuisibles au sein d’une installation résidentielle. Cet appareil génère, utilise et peut émettre des fréquences radio et s’il n’est
pas installé selon les instructions, peut nuire aux radiocommunications. Toutefois, rien ne garantit que des parasites ne
risquent pas de survenir dans une installation particulière. Si cet appareil cause des interférences nuisibles à la réception du
téléviseur ou de la radio, ce que vous pouvez déterminer en allumant et en éteignant votre appareil, nous vous invitons à
essayer l’une des mesures correctivessuivantes :
• Réorienter ou déplacer l’antenne de réception
• Augmenter la distance entre l’appareil et le récepteur
• Branchez l’appareil dans une prise de courant CA différente de celle utilisée par le récepteur
• Consulter le revendeur ou un technicien spécialisé dans le service des radios/téléviseurs pour obtenir de l’aide.
Cet appareil est en accord avec la partie 15 des Lois FCC. Son utilisation est sujette aux deux conditions suivantes :
(1) cet appareil ne doit pas causer d’interférences nuisibles et
(2) Cet appareil doit accepter toute interférence reçue, incluant les interférences pouvant causer un mauvais fonctionnement.
IMPORTANT
Puisque les circuits numériques peuvent causer des interférences radio ou aux syntoniseurs de télévision à proximité,
éteignez cette appareil lorsqu’il n’est pas utilisé ou éloignez du téléviseur ou de la radio affectée.
NOTE: Cet appareil numérique ne dépasse pas les limites de la classe B pour les émissions radio, telles que définies dans
le Radio Interference Regulations du Département Canadien des Communications. Ces limites sont conçues pour fournir
une protection raisonnable contre les interférences nuisibles dans une installation résidentielle. Cet appareil génère, utilise
et peut émettre des fréquences radio et, s’il n’est pas installé et utilisé en accord avec les instructions, peut causer des
interférences nuisibles aux communications radio. Cependant, il n’y a aucune garantie qu’une interférence n’aura pas lieu
lors d’une installation particulière. Si cet appareil cause des interférences nuisibles à la réception du téléviseur ou de la radio,
ce que vous pouvez déterminer en allumant et en éteignant votre appareil, nous vous invitons à essayer l’une des mesures
correctivessuivantes :
• Réorienter ou déplacer l’antenne de réception
• Augmenter la distance entre l’appareilet le récepteur
• Branchez l’appareil dans une prise de courant CA différente de celle utilisée par le récepteur
• Consulter le revendeur ou un technicien spécialisé dans le service des radios/téléviseurs pour obtenir de l’aide.
--34
3 --
INSTRUCTIONS DE SÉCURITÉ IMPORTANTES
AFIN D’ÉVITER TOUT RISQUE DE FEU OU DE RISQUE ÉLECTRIQUE, N’UTILISEZ PAS CETTE PRISE AVEC UNE RALLONGE, UN
RÉCEPTACLE OU UNE AUTRE PRISE À MOINS QUE LES LAMES NE PUISSENT ÊTRE TOTALEMENT INSÉRÉES POUR ÉVITER
L’EXPOSITION DES LAMES. POUR ÉVITER TOUT RISQUE DE FEU OU DE RISQUE ÉLECTRIQUE, N’EXPOSEZ PAS CE MATÉRIEL À
L’HUMIDITÉ OU À LA PLUIE.
ATTENTION
RISQUE DE CHOC ÉLECTRIQUE
N’OUVREZ PAS
Le symbole de l’éclair dans un triangle
équilatéral a pour but d’alerter
l’utilisateur d’une présence d’une
tension dangeuse non isolée dans le
boîtier du produit qui pourrait être d’une
ampleur suffisante pour constituer un
risque de choc électrique aux personnes.
1.
2.
3.
4.
5.
6.
7.
8.
9.
10.
11.
12.
13.
14.
15.
16.
17.
18.
AVERTISSEMENT : POUR RÉDUIRE LE
RISQUE DE CHOC ÉLECTRIQUE, NE RETIREZ
PAS LE COUVERCLE (OU L’ARRIÈRE), POUR
L’ENTRETIEN DES PIECES INTÉRIEURES.
VEUILLEZ CONSULTER LE PERSONNEL DE
SERVICE QUALIFIÉ.
Le point d’exclamation à l’intérieur
d’un triangle équilatéral a pour but
d’alerter l’utilisateur de la présence
d’instructions importantes concernant
l’utilisation et l’entretient dans le
manuel accompagnant cet appareil.
Lisez ces consignes.
Gardez ces instructions.
Conformez-vous à tous les avertissements.
Suivez toutes les consignes applicables.
N’utilisez pas cet appareil près de l’eau.
Nettoyez uniquement à I’aide d’un chiffon sec.
N’obstruez jamais les orifices d’aération de l’appareil et installez-le en conformité avec les instructions du fabricant.
N’installez pas l’appareil à proximité d’une source de chaleur telle que radiateurs, registres de chaleur, poêles ou
autre appareil (y compris les amplificateurs) qui produisent de la chaleur.
N’allez pas à l’encontre de I’objectif de sécurité de la fiche polarisée ou avec mise à la terre. Une fiche polarisée a
deux lames, une étant plus large que I’autre. Une fiche avec mise à la terre a deux lames et une troisième broche
de terre. La lame large ou la troisième broche est destinée à vous protéger. Si la fiche fournie ne s’insère pas dans
votre prise, contactez un électricien pour faire remplacer la prise désuète
Empêchez Ie cordon d’être piétiné ou pincé, surtout aux fiches, prises de courant, et au point de leur sortie de I’appareil.
Utilisez uniquement les accessoires précisés par Ie fabricant.
Débranchez cet appareil durant des orages électriques ou lorsqu’il n’est pas utilisé pendant des périodes prolongées.
Confiez toutes réparations de cet appareil à un personnel qualifié. Une réparation peut être requise lorsque
l’appareil a éte endommagé de quelque manière que ce soit, tel qu’un cordon ou une fiche endommagé, du
liquide déversé ou des objets tombés dans I’appareil, I’appareil a été exposé à la pluie ou à I’humidité, un
appareil qui ne fonctionne pas normalement ou qui est tombé.
L’appareil ne doit pas être exposé à des égouttements d’eau ou des éclaboussures, et de plus aucun
objet rempli de liquide, tel que des vases, ne doit être placé sur I’appareil.
Ne surchargez pas les prises électriques murales ni les cordons de rallonge, car cela risque de causer un incendie
ou des chocs électriques.
Utilisez des pièces de rechange comme spécifiées par le fabricant.
Le produit peut être monté sur un mur seulement si cela est recommandé par le fabricant.
Après le service ou une réparation, demandez au technicien d’effectuer des vérifications de sécurité pour
s’assurer que l’appareil soit en bon état de fonctionnement.
--35
2 --
SYSTÈME DE MUSIQUE RÉTRO
WELLINGTON™
MANUEL D’ INSTRUCTION
Merci d’avoir fait l’achat de cet appareil Electrohome®. Veuillez lire ce manuel attentivement avant de faire
fonctionner l’appareil pour vous assurer de l’utiliser correctement. Conservez ce manuel dans un endroit sûr afin de
pouvoir vous y référer au besoin.
www.electrohome.com