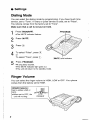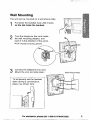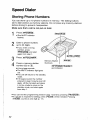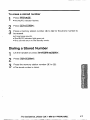
1
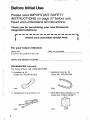
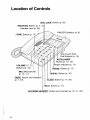
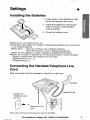
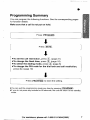
PLEASE READ BEFORE USE AND SAVE.
PanasonicWorldWideWebaddress: http://www.panasonic.com
for customers
in the USAor PuertoRico
BeforeInitial Use
Please read IMPORTANT
SAFETY
INSTRUCTIONS
on page 27 before use.
Readandunderstand
all instructions.
Thank you for purchasing your new Panasonic
integrated telephone.
Attach your purchasereceipt here.
For your future reference
Serial No.
(foundon the bottomof the unit)
Date of purchase
Nameand address of dealer
Accessories
(included)
For extra orders, call 1-800-332-5368.
rq HandsetCord (p. 5)
~ Handset(p. 5)
Order No. PQJXC0102Z
Order No. PQJA212M
one
[] TelephoneLine Cord (p. 5)
one
2
one
Wall MountingAdaptor (p. 9)
Order No. PQKL10038Y1
one
Contents
Location of Controls .................................
Settings ............................................
Installing the Batteries ................................
Connectingthe Handset/Telephone
Line Cord .............
Connectinga Communication
Device... : ..............
...
Programming Summary..............................
Dialing Mode.... ...................................
Ringer Volume .....................................
Wail Mounting..... " .................................
4
5
5
5
6
7
8
8
9
MakingCalls ........................................
AnsweringCalls .....................................
10
11
SpeedDialer... ~ ....................................
Storing PhoneNumbers............
: .................
Dialing a Stored Number..............................
12
12
13
14
14
16
17
17
One-TouchDialer .....................................
Storing PhoneNumbers..............................
Dialing a Stored Number..............................
Special Features .................................
....
For Call Waiting Service Users .........................
TemporaryToneDialing
(For Rotary or Pulse Service Users) ...................
Howto Use the PAUSE
Button
(For AnalogPB×Line/LongDistanceService Users) .......
Muting Your Conversation .............................
FLASHButton .............
~ ........................
PIN Code .........................................
Dial Lock .... ......................................
Call Restriction .....................................
17
18
18
19
20
21
Optional Headset....................................
Battery Replacement.................................
22
24
ImportantSafety Instructions ..........................
FCCand Other Information ............................
Index ..............................................
27
29
31
17
Locationof Controls
(DIALLOCK1
Button(p. 20)
~~P_R_._0_.._GRAM_..~
Button
(p.7, 12.)./
HeadsetJack(p. 22)
I1~ Button (p. 17)
VOLUME
~_..~i
Buttons(p. 10)
MIC(Microphone)
(p. 10, 11)
~ Button and Indicator
(p. 7, 18)
RINGER
Selector (p. 8)
,,
e-TouchAuto
Dial Buttons(p. 14)
-)
A~TO/LO~/i=~
Button(p. 12, 15)
RingerIndicator(p. 11)
CP~-IJSE~
Button(p. 17)
~_E.D_!_.A._~
Button
(p. 10)
Button(p. 17, 18)
¯ ~LD~Button(p.
11
ButtonandIndicator (p. 10, 11,23)
4
Settings
Installing the Batteries
1. Press downin the direction of the
arrow and removethe cover.
2. Install the batteries in the proper
order as shown, matching the
correct polarity.
3. Close the battery cover.
oBatteriesare not includedin the unit.
~ Install three high quality "AA"Alkaline or Manganese
batteries. Werecommend
to useAlkalinebatteries.
Batterylife is: --aboutsix months
in useof Alkalinebatteries.
--about three monthsin use of Manganese
batteries.
Battery life maydependon usageconditions and ambienttemperature.
¯ Make
sureto install the batteriesfor the followingfeaturesto operateproperly:
--Buttons’ function whenthe handsetis on the cradle
--Speakerphone
(p. 10, 11)
--Programming
(p. 7)
Connectingthe Handset/TelephoneLine
Cord
After connection,lift
the handsetto checkfor a dial tone.
Single-Line
TelephoneJack
(R J11C)
¯ Useonly a PanasonicHandsetfor the KX-TS105W.
" =::For~
a~sistance;:
p.iease
cail=:i=.1]-800!.21:%pANA(7262
) !.
5
Settings
Connecting a Communication Device
If you connect a communicationdevice (computer, modem,fax,
answeringmachine,etc.) to the telephoneline, you can connectit through
this unit using the DATAjack.
After connecting the handset and telephoneline cord (p. 5), connect the
communicationdevice telephone line cord to the DATAjack.
Single-Line
TelephoneJack
(R J11C)
¯Computer
¯ Modem
¯ Fax
¯ Answeringmachine
¯ Makesure the communication
deviceis not in usebeforeusingthis unit (making
calls, storing phonenumbers
in memory
etc.) or the communication
devicemay
not operateproperly.
ProgrammingSummary
You can programthe following functions. Seethe corresponding pages
for function details.
Makesure that a call is not put on hold.
Press ~pROGRA~.
Press
=To set the call restriction, press ~. (page 21)
=To changethe flash time, press ~C~l. (page 18)
=To select the dialing mode,press ~. (page 8)
=To changethe PIN code for the dial lock and call restriction,
press15--~. (page19)
Press [.PROG~I~to store the setting.
oYoucan exit the programmingmodeany time by pressing i~RO~.
olf youdonot pressanybuttonsfor 60 seconds,
the unit will return to the standby
mode.
: F0rassis~anCe,
please.Caili =1~8e0-2~I:1~-P/~NAi~:~62):
;,
Settings
Dialing Mode
You can select the dialing modeby programming.If you have touch tone
service, set to "Tone". If rotary or pulse service is used,set to "Pulse".
Your phonecomesfrom the factory set to "Tone".
Makesure that a call is not put on hold.
1
2
3
Press I~PROGRAi~I.
=TheMUTE
indicator flashes.
~IPRO.G__R__AM
i
Press ~1.
",-,~.4
.:..,"!-’;,.’-,:"
To select"Pulse", press
or
To select "Tone", ~ress :~.
5
~N~TE)an6 In6~cator
*~ Ion~ bae~ soun6s.
*The MUT~
~n6~cator I~ht ~oes out.
~Th~unit w~ll return to th~ stan6bgmo6e.
Ringer Volume
You can select the ringer volume to HIGH, LOWor OFF. Your phone
comesfrom the factory set to HIGH.
RINGER
Selector:
Set to HIGH,LOW
or
OFF.
eWhen
set to OFF,the
unitwill notring.
Wall Mounting
The unit can be mountedon a wall phoneplate.
Pull downthe handsethook until it locks,
so the tab holds the handset.
2
Tuck the telephone line cord inside
the wall mountingadaptor, and
pushit in the direction of the arrow.
e"UP"should be facing upward.
Connectthe telephoneline cord.
Mountthe unit, and slide down.
To temporarily set the handset
downduring a conversation,
place it as shownhere.
Wall PhonePlate
SpeedDialer
Storing Phone Numbers
You can store up to 10 phonenumbersin memory.The dialing buttons
(i511 to ~-~) function as memory
stations. Donot press any memory
stations
before storing to prevent misoperation.
Makesure that a call is not put on hold.
Press ~PR~GRAM!.
eTheMUTE
indicator
flashes.
2
Enter a phone number,
up to 22 digits.
¯ If youenter a wrong
number,press
~-GR~I and start
againfromstep1.
3
4
Press
~AU~OW~!.
Press a memorystation
number
(~0i to ~_~,).
eA long beepsounds.
eTheMUTE
indicator light goes
out.
eTheunit will returnto the standby
mode.
elf 3 beepssound,the number
enteredin step 2 maybe over 22
digits. Lift the handset
andplace
it onthecradleto returnto the
standbymode,andstart again
fromstep1.
i’SP-P HONE/HEADSET"i
andIndicator
¯ Youcan exit the programming
modein step 1 and 2 by pressing ..~.RO~M~.
elf a pauseis requiredfor dialing, press~-~0SE-~
whereneeded.Pressing
(PAU--~.
E~countsas onedigit (p. 17).
To erase a stored number
Press fPROGRAMI.
oTheMUTE
indicator flashes.
2
3
Press ~~U-TO_
?L~R.).
Press a memory
station number(~ to :"9,~) for the phonenumber
be erased.
oA long beepsounds.
eTheMUTE
indicator light goesout.
¯ Theunit will return to the standby
mode.
Dialing a Stored Number
Lift the handset or press (~P-P~NE/HEADSET__!.
Press
Press the memory
station number(L~., to i9~).
eThestored numberis dialed.
, ’,.POt assistance:,
=l~l~ase:(~a!!::.1,-800!211
~PANA(7262i..
=
]jf
One-TouchDialer
Storing Phone Numbers
Youcan store up to 20 phonenumbersin the one-touch auto dial buttons
(10 numbers in UPPERmemorylocations, 10 numbers in LOWER
memorylocations).
To store in an UPPER
memory
location
It is recommended
that you program an emergencynumberin the
EMERGENCY
button.
Makesure that a call is not put on hold.
Press IPROGRAMI.
oTheMUTE
indicator flashes.
One-touch
auto dial buttons
/EMERGENCY~
2
Enter a phonenumber, up to
22 digits.
olf youenter a wrongnumber,
press (PROGRAM/and
start
againfromstep1.
3
Press one of the one-touch
auto dial buttons.
=A long beepsounds.
=TheMUTE
indicator light goes
out.
eTheunit will returnto the
standbymode.
=If 3 beepssound,the number
enteredin step 2 maybe over
22 digits. Press rPROGRAM/
to return to the standbymode
andstart againfromstep 1.
(PROGRAM)
I
IAUTO/LOWER.~
S~-PHONE/HEADSET/
andIndicator
olf a pauseis required for dialing, press ~ whereneeded.Pressing
~ counts as one digit (p. 17).
eWhen
usingthe Dial Lock(p~20) or Call Restrictionfeature (p. 21), youcannot
store a phonenumberin the EMERGENCY
button.
To store in a LOWER
memorylocation
Makesure that a call is not put on hold.
Press (PROGRAM).
¯ TheMUTE
indicator flashes.
Enter a phonenumber,up to 22 digits.
¯ If you enter a wrongnumber,press (PROGRAMI
and start again from
step1.
3
4
Press (AUTO/LOWERI.
Press one of the one-touchauto dial buttons.
¯ A long beepsounds.
¯ TheMUTE
indicator light goesout.
¯ Theunit will return to the standbymode.
¯ If 3 beepssound,the number
enteredin step 2 maybe over22 digits. Lift
the handsetandplaceit on the cradle to return to the standbymode,and
start againfromstep1.
¯ If a pauseis required for dialing, press ~ whereneeded.Pressing
P[-P~us~-~
countsas onedigit (p. 17).
To erase a stored number
Press
~a~.
¯ TheMUTE
indicator flashes.
If the phonenumberis in an UPPER
memorylocation, press the
one-touch auto dial button for the phonenumberto be erased.
OR
If the phone numberis in a LOWER
memorylocation, press
[AUTO/LOWER),
then press the one-touch auto dial button for the
phone numberto be erased.
¯ A long beepsounds.
¯ TheMUTE
indicator light goesout.
¯ Theunit will return to the standbymode.
¯ When
usingthe Dial Lock(p. 20) or Call Restrictionfeature(p. 21), youcannot
erase a phonenumberin the EMERGENCY
button.
=k One-Touch
Dialer
Dialing a Stored Number
From an UPPERmemorylocation:
Lift the handset or press ISP-PHONE/HEADSETI.
Press the required one-touchauto dial button.
oThestorednumberis dialed.
OR
From a LOWERmemorylocation:
Lift the handset or press [SP-PHONE/HEADSET
I.
Press IAUTO/LOWERI.
Press the required 0ne-touchauto dial button.
oThestored numberis dialed.
Memory card
Removethe memorycard and use it as a nameor phone numberindex
for the stored numbers.
Special Features
/DIAL LOCKI
For Call Waiting Service Users
Press ~ if you hear a call-waiting tone while talking.
¯ Thefirst call is put onhold andyoucananswer
the second
call.
¯ To return to the first caller, press ~ again.
¯ If this function doesnot operateproperly,consult yourtelephonecompany.
TemporaryTone Dialing
(For Rotary or Pulse Service Users)
Press ~ before entering access numberswhich require tone dialing.
¯ Thedialing modechangesto tone. Youcan enter numbersto accessan
answeringservice, electronic bankingservice, etc. When
you hangup, the mode
will returnto pulse.
Howto Use the PAUSEButton
(For Analog PBXLine/Long Distance Service Users)
Werecommendyou press ~ if a pause is required for dialing
PBXor to accessa long distance service.
Ex. Line access number~ (PBX)
~ ~ ~ ~" I Phone
number
I
with a
¯ Pressing ~ once creates a few seconds pause.
This preventsmisdialingwhenyouredial or dial a storednumber.
¯ Pressing ~ morethan once increases the length of the pausebetween
numbers.
Special Features
Muting Your Conversation
Press ~ while talking.
oTheMUTE
indicator lights.
oTheother party cannothear youbut youcan hearthem.
¯ To resumethe conversation, press ~ again.
FLASH Button
Pressing ~ allows you to use special features of your host PBX
such as transferring an extension call or accessingspecial telephone
services (optional) suchas call waiting.
Selectingthe flash time
The flash time dependson your telephone exchangeor host PBX. You
can select the following flash times: "80, 90, 1001110, 200, 250, 300, 400,
600, 700 ms (milliseconds)". Your phonecomesfrom the factory set
"600 ms".
Makesure that a call is not put on hold.
Press IPROGRAM/.
¯ TheMUTE
indicator flashes.
/PROGRAM1
Press
Press (~.
(~O~E)and Indicator
Pressa dialing button ([~ to (~).
(~)’80
(~" 90 ms [~ : 100 ms
[~" 110 ms
®:~00ms ®: ~0 ms~: 3OO
ms ®:4OO
r~s
(~: 600 ms
(~) : 700
Press [PROGRAM).
oA long beepsounds.
oTheMUTE
indicator light goesout.
¯ Theunit will return to the standbymode.
¯ lf you are connected
via a PBX,a longer flash time maybe necessaryto use
PBX
functions(transferringa call, etc.). ConsultyourPBXinstaller for the correct
setting.
PIN Code
A 4-digit PiN Code(Personal Identification Number)prevents
unauthorized persons from using your unit. The PIN Codeis required for
the dial lock and call restriction to be set or canceled.Thefactory preset
PIN code is "1111".
Makesure that a call is not put on hold.
1
2
3
Press IPROGRAMI.
eTheMUTE
indicator flashes.
Press~.
Press~.
Enter the current PiN code.
5
Press IPROGRAMI.
~ and indicator
elf a correct PINcodeis entered,a beepwill sound.
elf a wrongPiNcodeis entered,3 beepswill sound.Enterthe correct PIN
code and press I PROGRAM).
eToreturn to the standbymode,lift the handsetandhangup.
6
7
Enter a new PIN code using a 4-digit number.
Press (PROGRAMI.
eA long beepsounds.
eTheMUTE
indicator light goesout.
eTheunit will return to the standbymode.
Special Features
Dial Lock
Youcan prevent others from making a call to any numberexcept the one
pre-programmed in the memoryof the EMERGENCY
button. Once you
locked the dialing buttons, even emergencynumberscannot be dialed.
Only incomingcalls are accepteduntil the dial lock is canceled.
Before using this feature, werecommend
storing an emergency
numberin the
memoryof the EMERGENCY
button (p. 14).
Evenif the dialing buttons are locked, the
number
storedin the buttoncanbe dialed,
/E~-E~N~]
..........
~~~...~....~
f~/~-~....
\.~
elf you choosenot to programemergency
numbers,
but plan to usethe dial lock, any
numberprogrammed
into the
EMERGENCY
buttoncanbeaccessed.
~--~..~~.~..:~ :..~-.,>~...-.-.~ .~..~-~.
Toset the dial lock
Press .~IA~ LOCKi.
eTheMUTE
indicator flashes.
Enterthe PIN code (p. 19).
3
Press~._~O~-~-AM~.,.
eA long beepsounds.
elf a wrongPINcodeis entered,3 beepswill sound.Entera correct PIN
codeand press ,,’-~O~RAM’I.
eTheMUTE
indicator light goesout.
eTheunit will return to the standbymode.
Youcanusethe followingfeatureswhile the dialing buttonsare locked.
eDialing a numberyou programmed
into the memoryof the EMERGENCY
button(p. 16)
eAdjustingthe handsetand speakerphone
volumes(p. 10)
eMutingthe conversation(p. 18)
eAnswering
the secondcall by pressing,’-~A~) (p. 17)
To cancel the dial lock
Follow steps 1 through 3 aboveagain.
2O
Call Restriction
Youcan prevent the unit from dialing phonenumbersbeginning with
specified digit(s) (1 digit or 2 digits). Phonenumberswith the restricted
leading digits cannotbe dialed out.
Toset the call restriction
Makesure that a call is not put on hold.
1
2
3
Press/PROGRAM/.
eTheMUTE
indicator flashes.
4
5
Enter the PIN code (p. 19).
/PROGRAM/
PreSs~.
Press ~.
elf you use "1111"as a PIN code
(factoryset), thereis noneed
enter a PINcode.Goto step 6.
andIndicator
Press [ PROGRAM
).
elf a wrongPINcodeis entered,3 beepswill sound.Entera correct PIN
code and press (PROGRAM/.
Enter the number(s)(1 digit or 2 digits) you wantto restrict (~ to
elf youenter a wrongnumber,enter a correct number.
eTochange
restricteddigits from2 digits to 1 digit, press~ andenter1 digit.
Press (PROGRAMI.
eA long beepsounds.
eTheMUTE
indicator light goesout.
eTheunit will return to the standbymode.
elf your unit is connected
to a PBX,this functionmaynot operate.Contactyour
PBXsupplier for moreinformation.
Tocancelthe call restriction
Follow steps 1 through5. In step 6, press ~ to cancel call restriction and
press [PROGRAMI.
eAlongbeepwill soundandthe unit will return to the standbymode.
Optional Headset
Pluggingan optional headsetinto the unit allows a hands-freephone
conversation. Please use only a PanasonicKX-TCA87
or KX-TCA90
headset.To orderl call the accessoriestelephonenumber
on page2.
Connecting an Optional Headset to the Unit
Connectan optional headsetto the headsetjack as shownbelow.
Theillustration
headsetis a
KX-TCA90.
Microphone
Ear
22
Headset
Jack
Making/AnsweringCalls
Makesure to install the batteries.
VOLUME ~,
~
ISP-PHONE/HEADSETI
and Indicator
Press (.SP-PHONE/HEADSET/to
makeor answer a call.
eTheSP-PHONE/HEADSET
indicator flashes.
elf you misdial whenmakinga call, press ISP-PHONE/HEADSET1
twice and
dial again.
To hang up, press S~P--PHONE/HEADSETI.
eTheindicator light goesout.
To adjust the headsetreceiver volume (4 levels):
While using the headset, press VOLUME
~ or
eDuringa conversationusingthe headset,youcannotswitchthe call to the
handset
bylifting it off thecradle.
elf youdisconnectthe optional headsetduringa conversationwith the handseton
the cradle, the call will be switchedto the speakerphone.
eDuringa conversationusingthe speakerphone,
youcan switchthe call to the
headsetby connectingthe headset.
23
Battery Replacement
If the speakerphone
does not work, it maybe the time to replace the
batteries. Replacethe batteries within 1 minute to keep the programmed
settings.
Disconnectthe telephone line cord
fromthe unit.
Press downin the direction of the
arrow and removethe cover.
Replacethe batteries with new ones
using correct polarity (+, -), and
close the cover.
Connectthe telephoneline cord to
the unit.
BatteryPrecautions:
Thebatteries shouldbe usedcorrectly, otherwisethe unit maybe damaged
by
battery leakage.
--Donot mix different typesof batteries.
--Donot charge,short-circuit, disassemble,
heator disposeof in fire.
--Remove
all the batteries whenreplacing.
Note:
--Replace
all the batteriesoncea half yearin useof Alkalinebatteries, or
misoperationmayoccur. (When
you use Manganese
batteries, replaceall of
themoncein three months.)
--Do not use nickel-cadmium
batteries.
24
Troubleshooting
Remedy
¯ Checkthe settings (p. 5-9).
¯ Remove
the batteries and reinstall
themto reset the unit.
¯ The RINGER
selector is set to OFF.
Set to HIGHor LOW(p. 8).
¯ Checkthat the dialing modeselection
is correct (p. 8).
¯ Dial lock modeis set. To cancel the
mode, see page 20.
¯ Thedialed numberis restricted. To
cancel, see page 21.
¯ [~ may have been pressed during
the conversation. Press M~0-TE~.
¯ Programmingis not possible whena
call is put on hold.
¯ Do not pause for over 60 seconds
while programming.
¯ Programmingis not possible whena
call is put on hold.
¯ Checkthat the batteries are installed in
the unit and that the battery poweris
not low.
¯ Do not enter a phone number more
than 22 digits long.
¯ Whenusing the Dial Lock (p. 20)
Call Restriction feature (p. 21), you
cannot store a phonenumberin the
EMERGENCY
button.
¯ To answerthe call, lift the handsetor
press ISP-PHONE/HEADSET).
Start
again from the beginning after hanging
up.
elf the last numberdialed wasmore
than 32 digits long, the numberwill not
be redialed correctly.
25
Troubleshooting
Remedy
¯ If thebatteriesinstalledin theunit
expire, programmed
information may
be erased.After the batteries are
replaced,reprogram
if necessary.
¯ Call our customer
call centerat
1-800-211-PANA(7262).
¯ Panasonic’se-mail addressfor customer
inquiries:
consumerproducts
@panasonic.com
for customersin the USAor PuertoRico
ONLY
ImportantSafety Instructions
When
using this unit, basic safety precautionsshouldalwaysbe followed
to reducethe risk of fire, electric shock,or personalinjury.
1. Readandunderstand
all instructions.
2. Followall warningsandinstructions marked
on this unit.
3. Unplugthis unit fromwail outlets beforecleaning.Donot useliquid
or aerosolcleaners.Usea damp
cloth for cleaning.
4. Donot usethis unit nearwater, for example,neara bathtub,
washbowl,
kitchensink, or the like.
and/or
5. Placethis unit securelyon a stable surface. Seriousdamage
injury may
resultif theunit falls.
6. Donot coverslots andopeningson the unit. Theyare providedfor
ventilation andprotectionagainstoverheating.Neverplacethe unit
nearradiators, or in a placewhereproperventilation is not provided.
7. Donot placeobjects on the powercord. Install the unit whereno one
canstepor trip onthe cord.
8. Donot overloadwall outlets andextensioncord. This canresult in
the risk of fire or electric shock.
9. Neverpushanyobjectsthroughslots in this unit. Thismayresult in
the risk of.fire or electric shock.Neverspill anyliquid onthe unit.
10. Toreducethe risk of electric shock,do not disassemble
this unit.
Takethe unit to an authorizedservicenterwhenserviceis required.
Openingor removingcovers mayexposeyou to dangerousvoltages
or other risks, Incorrect reassembly
cancauseelectric shockwhen
the unit is subsequently
used.
this unit fromthe wall outlet andrefer servicingto an
11. Unplug
authorizedservicenterwhenthe following conditionsoccur:
A. Whenthe powersupply cord or plug is damaged
or frayed.
B. If liquid hasbeenspilled into the unit.
C. If the unit hasbeenexposed
to rain or water.
D. If the unit doesnot worknormallyby following the operating
instructions. Adjustonly controls coveredby the operating
instructions. Improperadjustmentmayrequire extensiveworkby
an authorizedservicenter.
E. If the unit hasbeendroppedor physically damaged.
F. If the unit exhibits a distinct change
in performance.
12.Duringthunderstorms,avoid using telephonesexceptcordlesstypes.
Theremaybe a remoterisk of an electric shockfromlightning.
13. Donot usethis unit to reporta gasleak, whenin the vicinity of the
leak.
SAVE THESE INSTRUCTIONS
2?
Important Safety Instructions
WARNING:
TO PREVENTFIRE OR SHOCKHAZARD, DO NOT EXPOSE THIS
PRODUCTTO RAIN OR ANY TYPE OF MOISTURE.
CAUTION:
To reducethe risk of fire or injury to persons,read and follow these
instructions.
1. Useonly the battery(ies) specified.
2. Donot disposeof the battery(ies) in a fire. It (they) mayexplode.
Checkwith local waste management
codes for special disposal
instructions.
3. Donot openor mutilate the battery(ies). Releasedelectrolyte
corrosive and maycause burns or injury to the eyes or skin. The
electrolyte maybe toxic if swallowed.
4. Exercisecare in handlingthe battery(ies) in order not to short the
battery(ies) to conductivematerials such as rings, bracelets, and keys.
The battery(ies) and/or conductor mayoverheat and cause burns.
5. Donot rechargethe battery(ies) providedwith or identified for use
with this product. Thebattery(ies) mayleak corrosive electrolyte
explode.
6. Donot attempt to rejuvenate the battery(ies) provided with
identified for use with this product by heating. Suddenrelease of
battery electrolyte mayoccur causingburns or irritation to the eyesor
skin.
7. Replaceall batteries at the sametime. Mixing fresh and discharged
batteries could increaseinternal cell pressureand rupture the
dischargedbatteries. (Applies to products employingmorethan one
separately replaceable primary battery.)
8. When
installing batteries observethe proper polarity or direction.
Incorrect installation can causecharging, and mayresult in leakageor
explosion. (Applies to products employing morethan one separately
replaceable Primary battery.)
9. Remove
the battery(ies) from this product if the product will not
used for a long period of time (several monthsor more). During this
time the battery(ies) could leak in the product.
10. Discard the "dead" battery(ies) as soon as possible. The "dead"
battery(ies) mayleak in the product.
11. Donot store this product, or the battery(ies) providedwith or identified
for use with this product, in high temperatureareas. Batteries that are
stored in a freezer or refrigerator for the purposeof extendingshelf life
should be protected from condensationduring storage and defrosting.
Batteries should be stabilized at roomtemperatureprior to use after
cold storage.
28
FCCand Other Information
If requestedby the telephonecompany,
inform themas follows:
FCCRegistration No ......................
(foundon the bottomof the unit)
Ringer Equivalence ............................................
1.0B
Theparticular telephoneline to whichthe equipment
is connected.
This unit mustnot beconnected
to a coin operatedline.
If youare on a party line, checkwith yourlocal telephonecompany.
RingerEquivalenceNo. (REN):
TheREN
is useful in determiningthe quantity of devicesyou mayconnectto your
telephoneline andstill haveall of thosedevicesring whenyour telephonenumber
is called. In most,but not all areas,the sumof the REN’s
of all devicesconnected
to oneline shouldnot exceed
five (5.0). To be certain of the number
of devices
you mayconnectto your line, as determined
by the REN,youshouldcontact your
local telephonecompany
to determinethe maximum
REN
for your calling area.
In the eventterminal equipment
causesharmto the telephonenetwork,the
telephonecompany
shouldnotify the customer,if possible, that service maybe
stopped.
However,
whereprior notice is impractical, the company
maytemporarilycease
serviceprovidingthat they:
(a) Promptlynotify the customer.
(b) Givethe customer
an opportunityto correct the problem
with their equipment.
of the right to bring a complaintto the Federal
(c) Informthe customer
Communication
Commission
pursuantto proceduresset out in FCCRules
and RegulationsSubpartE of Part 68.
TheTelephoneCompany
maymakechangesin its communications
facilities,
equipment,operationsor procedures,wheresuchaction is reasonablyrequiredin
the operationof its businessandis not inconsistentwith the rules andregulations
in FCCPart 68.
If suchchangescan be reasonablyexpectedto renderanycustomerterminal
equipment
incompatiblewith telephonecompany
communications
facilities, or
requiremodificationor alteration of suchterminalequipment,
or otherwise
materially affect its useor performance,
the customer
shall begivenadequate
notice in writing, to allow the customer
an opportunityto maintainuninterrupted
service.
Whenprogramming
emergency
numbersand/or makingtest calls to emergency
numbers:
1. Remain
on the line andbriefly explainto the dispatcherthe reasonfor the call
before hangingup.
2. Performsuchactivities in the off-peakhours,suchas early morninghoursor
late evenings.
FCCand Other Information
This devicecomplieswith Part 15of the FCCRules.Operationis subject to the
followingtwoconditions:
(1) This devicemaynot causeharmfulinterference, and(2) this device
acceptanyinterferencereceived,including interferencethat maycauseundesired
operation.
CAUTION:
Anychangesor modificationsnot expresslyapprovedby the party responsiblefor
compliance
couldvoid the user’s authority to operatethis device.
Note:
This equipment
has beentested andfoundto complywith the limits for a ClassB
digital device,pursuantto Part 15 of the FCCRules.Theselimits are designedto
providereasonable
protectionagainstharmfulinterferencein a residential
installation. This equipment
generates,uses,andcanradiate radio frequency
energyand, if not installed andusedin accordance
with the instructions, may
causeharmfulinterferenceto radio communications.
However,
there is no
guarantee
that interference
will notoccurin a particularinstallation. If this
equipment
doescauseharmfulinterferenceto radio or television reception,which
can be determined
by turning the equipment
off andon, the user is encouraged
to
try to correct the interferenceby oneor moreof the followingmeasures:
--Reorientor relocate the receivingantenna.
--Increase the separationbetweenthe equipmentandreceiver.
--Connectthe equipment
into an outlet on a circuit different fromthat to whichthe
receiveris connected.
--Consultthe dealeror an experienced
radio/TVtechnicianfor help.
A FCCcomplianttelephonecord and modularplug is providedwith this
equipment.This equipment
is designedto be connected
to the telephonenetwork
or premiseswiring usinga compatiblemodular
jack that is Part 68 compliant.
eEnvironment--do
not place the unit in a roomwherethe temperatureis less
than 5°C(41°F)or greater than 40°C(104°F).Allow10 cm(4") clearance
the unit for properventilation. Avoidexcessivesmoke,
dust, mechanical
vibration,shock,or direct sunlight.
oRoutine
care---wipethe unit with a soft cloth. Donotusebenzine,thinner, or
any abrasivepowder.
elf thereis anytrouble--disconnect
the unit fromthe telephoneline andconnect
a knownworkingphone.If the knownworkingphoneoperatesproperly, have
your unit repairedby oneof the authorizedPanasonic
FactoryServiceCenters.
If the knownworkingphonedoesnot operateproperly, consult your telephone
company.
Index
A
Accessories ................
Answeringcalls .............
B
Battery, Installing ............
Battery life .................
Battery replacement.........
2 MakingCalls ...............
11 Mute
O
5 One-TouchDialer ...........
5 One-Touch
Dialer,
24 dialing ....................
storing ...................
10
18
14
16
14
C
Call on hold ...............
11 P
17
Call Restriction .............
21 PAUSE...................
Call waiting tone ...... ~ ..... 17 PIN code ..................
19
Pulse service ..............
17
D
Dial lock
20 R
Dialing mode...............
10
8 Redial ....................
Ringer Off ..................
8
F
Ringer Volume..............
8
FCCand other information .... 29 Rotaryservice,tonedialing .... 17
18
FLASHbutton ..............
Flash time .................
18 S
Safety Instructions ..........
27
H
ShippingProductfor
Headset,optional ...........
22
Service ............
back cover
SpeedDialer ...............
12
I
SpeedDialer,
Installation,
dialing ..............
..... 13
Battery ....................
5 storing ...................
12
Communication
Device . ...... 6
Handset ..................
5 T
Telephoneline cord .........
5 Troubleshooting ............
25
L
Location of controls ..........
V
4 Volumecontrol .............
10
For product service
=*Call 1-800-211-PANA(7262)
or 1-800-833-9626for the location of
authorized servicenter,
=~Panasonic’se-mail addressfor customerinquiries:
consu merproducts @panasonic.com
for customers in the USAor Puerto Rico ONLY
When you ship the product
=~Carefullypackyour unit, preferably in the original carton.
=*Attacha letter, detailing the symptom,
to the outside of the carton.
Symptom
=*Sendthe unit to an authorized servicenter, prepaid and adequately
insured.
=*Do not send your unit to the Panasonic ConsumerElectronics Company
listed belowor to executive or regional sales offices. Theselocations do
not repair consumerproducts.
If you need assistance with the set-up or operation,
please call 1-800-211-PANA(7262)
Panasonic ConsumerElectronics Company,
Division of MatsushitaElectric Corporation of America
One Panasonic Way, Secaucus, NewJersey 07094
Panasonic Sales Company,
Division of MatsushitaElectric of Puerto Rico, Inc.
Ave. 65 de Infanter~a, Km.9.5, SanGabriel Industrial Park
Carolina, Puerto Rico 00985
PQQX13158ZA-BMF1201-0 @