1
MTS STEREO COLOR TELEVISION
TELEVISOR COLOR ESTEREO MTS
MT2274
ATTENTION
ATENCION
If you purchase a universal remote control from your local retailer, please contact the
remote manufacturer for the required programming code.
Si usted a comprado un control de remoto universal, por favor comunicace con el
fabricante para el codico de programaccion requerido.
TV/CATV MODE SELECTION
SELECCION DE MODO DE TV/CATV
When shipped from the factory, the TV/CATV menu option is set to the "CATV"
(Cable Television) mode. If not using CATV (Cable TV), set this menu option to the
"TV" mode.
Al modo de "CATV" (Televisión por cable). Si no utiliza CATV, ajuste esta opción
de menú al modo de "TV".
Before operating the unit, please read this manual thoroughly.
Antes de utilizar su aparato favor de leer las siguientes instrucciones.
3R20521A-E
1
27/4/04, 14:04
ESPAÑOL ENGLISH
OWNER'S MANUAL
MANUAL DE INSTRUCCIONES
ENGLISH
The lightning flash with arrowhead symbol, within an equilateral triangle
is intended to alert the user to the presence of uninsulated dangerous
voltage within the product's enclosure that may be of sufficient
magnitude to constitute a risk of electric shock.
CAUTION: TO REDUCE THE RISK OF ELECTRIC
SHOCK, DO NOT REMOVE COVER
(OR BACK). NO USER-SERVICEABLE
PARTS INSIDE. REFER SERVICING
TO QUALIFIED SERVICE PERSONNEL.
The exclamation point within an equilateral triangle is intended to alert
the user to the presence of important operating and maintenance
(servicing) instructions in the literature accompanying the appliance.
CAUTION: Changes or modifications not expressly approved by the party responsible for compliance with the FCC
Rules could void the user's authority to operate this equipment.
WARNING: TO PREVENT FIRE OR SHOCK HAZARD, DO NOT EXPOSE THIS APPLIANCE TO RAIN OR MOISTURE.
NOTE:
Please keep all packaging material for at least 90 days in case you need to return this product to your place of purchase
or Memorex.
IMPORTANT SAFEGUARDS
1. READ INSTRUCTIONS
All the safety and operating instructions should be read before the unit is operated.
2. RETAIN INSTRUCTIONS
The safety and operating instructions should be retained for future reference.
3. HEED WARNINGS
All warnings on the unit and in the operating instructions should be adhered to.
4. FOLLOW INSTRUCTIONS
All operating and use instructions should be followed.
5. CLEANING
Unplug this unit from the wall outlet before cleaning. Do not use liquid cleaners or aerosol cleaners. Use a damp cloth for cleaning
the exterior cabinet only.
6. ATTACHMENTS
The manufacturer of this unit does not make any recommendations for attachments, as they may cause hazards.
7. WATER AND MOISTURE
Do not use this unit near water. For example, near a bathtub, washbowl, kitchen sink, laundry tub, in a wet basement, or near a
swimming pool.
PORTABLE CART WARNING
(symbol provided by RETAC)
8. ACCESSORIES
Do not place this unit on an unstable cart, stand, tripod, bracket, or table.
The unit may fall, causing serious injury, and serious damage to the unit.
8A. An appliance and cart combination should be moved with care. Quick stops, excessive
force, and uneven surfaces may cause the appliance and cart combination to overturn.
9. VENTILATION
S3126A
Slots and openings in the cabinet back or bottom are provided for ventilation, to ensure reliable operation of the unit and to
protect it from overheating. These openings must not be blocked or covered. The openings should never be blocked by placing
the unit on a bed, sofa, rug, or other similar surface. This unit should never be placed near or over a radiator or heat source.
This unit should not be placed in a built-in installation, such as a bookcase, or rack unless proper ventilation is provided or the
manufacturer's instructions have been adhered to.
10. POWER SOURCE
This unit should be operated only from the type of power source indicated on the rating plate. If you are not sure of the type of
power supply to your home, consult your appliance dealer or local power company. For units intended to operate from battery
power, or other sources, refer to the operating instructions.
11. GROUNDING OR POLARIZATION
This unit is equipped with a polarized alternating current line plug (a plug having one blade wider than the other). This plug will
fit into the power outlet only one way. This is a safety feature. If you are unable to insert the plug fully into the outlet, try
reversing the plug. If the plug should still fail to fit, contact your electrician to replace your obsolete outlet. Do not defeat the
safety purpose of the polarized plug. If your unit is equipped with a 3-wire grounding-type plug, a plug having a third (grounding) pin, this plug will only fit into a grounding-type power outlet. This too, is a safety feature. If you are unable to insert the plug
into the outlet, contact your electrician to replace your obsolete outlet. Do not defeat the safety purpose of the grounding-type plug.
12. POWERCORD PROTECTION
Power-supply cords should be routed so that they are not likely to be walked on or pinched by items placed upon or against
them, paying particular attention to cords at plugs, convenience receptacles, and the point where they exit from the appliance.
2
3R20521A-E
2
27/4/04, 14:04
EXAMPLE OF ANTENNA GROUNDING AS PER NATIONAL ELECTRICAL CODE
ANTENNA LEAD IN WIRE
GROUND CLAMP
ELECTRIC
SERVICE
EQUIPMENT
ANTENNA DISCHARGE UNIT
(NEC SECTION 810-20)
GROUNDING CONDUCTORS
(NEC SECTION 810-21)
GROUND CLAMPS
NEC-NATIONAL ELECTRICAL CODE
S2898A
POWER SERVICE GROUNDING ELECTRODE SYSTEM
(NEC ART 250, PART H)
3
3R20521A-E
3
27/4/04, 14:04
ENGLISH
13. LIGHTNING
To protect your unit during a lightning storm, or when it is left unattended and unused for long periods of time, unplug it from the
wall outlet and disconnect the antenna or cable system. This will prevent damage to the unit due to lightning and power line
surges.
14. POWER LINES
An outside antenna system should not be located in the vicinity of overhead power lines, other electric light or power circuits, or
where it can fall into such power lines or circuits. When installing an outside antenna system, extreme care should be taken to
keep from touching such power lines or circuits as contact with them might be fatal.
15. OVERLOADING
Do not overload wall outlets and extension cords as this can result in a risk of fire or electric shock.
16. OBJECT AND LIQUID ENTRY
Do not push objects through any openings in this unit as they may touch dangerous voltage points or short out parts that could
result in fire or electric shock. Never spill or spray any type of liquid into the unit.
17. OUTDOOR ANTENNA GROUNDING
If an outside antenna or cable system is connected to the unit, be sure the antenna or cable system is grounded to provide
some protection against voltage surges and built-up static charges. Section 810 of the National Electrical Code, ANSI/NFPA
70, provides information with respect to proper grounding of the mast and supporting structure, grounding of the lead-in wire to
an antenna discharge unit, size of grounding conductors, location of antenna discharge unit, connection to grounding electrodes, and requirements for the grounding electrode.
18. SERVICING
Do not attempt to service this unit yourself as opening or removing covers may expose you to dangerous voltage or other
hazards. Refer all servicing to qualified service personnel.
19. DAMAGE REQUIRING SERVICE
Unplug this unit from the wall outlet and refer servicing to qualified service personnel under the following conditions:
a. When the power-supply cord or plug is damaged.
b. If liquid has been spilled, or objects have fallen into the unit.
c. If the unit has been exposed to rain or water.
d. If the unit does not operate normally by following the operating instructions. Adjust only those controls that are covered
by the operating instructions, as an improper adjustment of other controls may result in damage and will often require
extensive work by a qualified technician to restore the unit to its normal operation.
e. If the unit has been dropped or the cabinet has been damaged.
f. When the unit exhibits a distinct change in performance, this indicates a need for service.
20. REPLACEMENT PARTS
When replacement parts are required, be sure the service technician uses replacement parts specified by the manufacturer or
those that have the same characteristics as the original part.
Unauthorized substitutions may result in fire, electric shock or other hazards.
21. SAFETY CHECK
Upon completion of any service or repairs to this unit, ask the service technician to perform safety checks to determine that the
unit is in proper operating condition.
22. WALL OR CEILING MOUNTING
If mounting this unit to a wall or ceiling follow the installation recommended by the manufacturer of a mounting bracket
specifically designed for this type of product. Use only a mounting device that can handle the weight and size of your unit.
Should your bracket require drilling holes into this unit, this would void the manufacturers warranty.
23. HEAT
The product should be situated away from heat sources such as radiators, heat registers, stoves, or other products (including
amplifiers) that produce heat.
24. NOTE TO CATV SYSTEM INSTALLER
This reminder is provided to call the CATV system installer's attention to Article 820-40 of the NEC that provides guidelines for
proper grounding and, in particular, specifies that the cable ground shall be connected to the grounding system of the building,
as close to the point of cable entry as practical.
FEATURES
• 181 Channel Tuner - The tuning system is capable of receiving all 68 VHF/UHF standard broadcast channels that
are available in your area. When operating on a cable system, it can tune to the standard VHF channel frequencies
plus up to 113 cable channel frequencies. The actual number of channels received depends upon channel
reception in your area or your cable system.
• On-Screen 3 Language Display - This TV can display the on screen language in English, Spanish or French.
• Sleep Timer - Operable from the remote control, this TV can be programmed up to 120 minutes to turn off automatically.
• Memory Back Up - This system prevents loss of memorized channel selections in case a power interruption to the
TV should occur.
• V-Chip - The V-Chip function can read the rating of a TV program or movie content if the program is encoded with
this information. V-Chip will allow you to set a restriction level.
• Picture Control Adjustments - The On-Screen display allows precise remote control adjustment of BRIGHTNESS,
COLOR, CONTRAST, SHARPNESS and TINT.
• Closed Captioned Decoder - Displays text captions or 1/2 of full screen text on the screen for hearing impaired viewers.
• Stereo/SAP Reception - This TV is designed to receive stereo and second audio program (SAP) broadcasts
where available.
LOCATION OF CONTROLS
FRONT
BACK
6 7
–
POWER
CHANNEL
ENTER
1
2
SET
+
VOLUME
RESET
VIDEO IN
8 9
(MONO)
L – AUDIO IN – R
MENU
3
4
5
1. POWER Button - Press to turn the TV on or off.
2. Remote Sensor - Signals from the Remote Control
unit are received here.
3. CHANNEL ▼ / ▲ Buttons - Press to select a higher
or lower numbered channel set into memory.
(ENTER Button) - Press to enter or select information for On-Screen operations.
(RESET Button) - Press to reset the On-Screen
picture and sound adjustments to their factory preset
positions. Press to reset a password in the V-CHIP
Password setting mode.
4. VOLUME ▼ / ▲ Buttons - Press to raise or lower the
level of the sound.
(MENU Buttons) - Press both VOLUME ▼ / ▲ buttons
at the same time to display the On-Screen menu function.
(SET – / + Buttons) - Press to select the desired
setting during On-Screen operations.
5. FRONT AUDIO (L / R) / VIDEO IN Jacks (AUX2) Audio and video signal cables from an external
source can be connected here.
6. VHF/UHF IN (ANT.) Jack - Connect a VHF/UHF
antenna or CATV cable to this jack.
7. S-VIDEO IN Jack - S-Video signal cable from an
external source can be connected here.
8. REAR AUDIO (L / R) / VIDEO IN Jacks (AUX1) Audio and video signal cables from an external
source can be connected here.
9. REAR AUDIO (L / R) / VIDEO OUT Jacks - Used to
output audio and video signals to a TV, amplifier or VCR.
10. AC Power Cord - Plug into an outlet having 120V,
60 Hz AC power only.
4
4
3R20521A-E
10
4
27/4/04, 14:04
1
2
3
POWER
1
2
3
4
5
6
7
8
9
0
4
QUICK VIEW
SLEEP
10
CALL
11
MUTE
CH
5
12
VOL
6
VOL
MENU
7
8
ENTER
CH
– SET
+
AUDIO
SELECT
RESET
TV/AV
CH.1/2
TV
13
14
15
CAP/TEXT
9
16
1. POWER Button - Press to turn the TV on. Press again to
turn the TV off.
2. Direct Channel Selection Buttons (0-9) - Allows direct
access to any channel.
3. QUICK VIEW Button - This button allows you to go back
to the previous channel selected by just pressing the
QUICK VIEW button. Press this button again to return to
the channel you were watching.
4. SLEEP Button - To set the TV to turn off after a preset
amount of time, press the SLEEP button on the remote
control. The clock will count down 10 minutes each time
the button is pressed in the order of 120, 110, 100, ······ 20,
10, 0. After the sleep time is programmed, the display will
disappear then reappear momentarily every ten minutes to
remind you the sleep timer function is operating. To confirm
the sleep time setting, press the SLEEP button once and the
remaining time will be momentarily displayed. To cancel
sleep time, press the SLEEP button repeatedly until the
display turns to 0.
5. VOL (VOLUME) / Buttons - Press the button to
increase, or the button to decrease the volume level.
6. MENU Button - Press to display the On-Screen menu
function.
7. SET – / + Buttons - Press to select the desired setting during
On-Screen operations.
8. RESET Button - Press to reset the On-Screen picture and
sound adjustments to their factory preset positions. Press to
reset a password in the V-CHIP Password setting mode.
9. TV/AV Button - Switches between TV and external inputs.
10. CALL Button - When you press this button, the channel
number will appear in the upper right corner of the screen.
Press the button again to remove display from the screen.
11. MUTE Button - To turn off the sound, press this button
once. The TV will be silenced and the symbol "MUTE" will
appear on the screen. The muting feature can be released
by pressing the MUTE button again or one of the VOL
or button.
12. CH (CHANNEL)
/
Buttons - Press the
button to
change to a higher numbered channel set into memory. Press
button to change to a lower numbered channel set into
the
memory.
13. ENTER Button - Press to enter or select information for OnScreen operations.
14. AUDIO SELECT Button - Switches sound between mono
and stereo when receiving broadcasts in stereo or SAP.
15. CH.1/2 Button - Switches between Channel 1 and Channel 2
in the Closed Caption mode.
16. TV/CAP/TEXT Button - Press this button to switch between
normal TV and the two Closed Caption modes (captions and
1/2 of full screen text). Closed Captioning will display text on
screen for hearing impaired viewers.
Before using the remote control, batteries must first be installed.
HOW TO INSTALL BATTERIES
1. Open the battery compartment cover.
Use two "AAA" size batteries. The batteries may last
approximately one year depending on how much the remote
control is used. For best performance, it is recommended
that batteries should be replaced on a yearly basis, or when
the remote operation becomes erratic. Do not mix old and
new batteries or different types.
BATTERY PRECAUTIONS
2. Install two "AAA" batteries (not supplied).
3. Replace the battery compartment cover.
These precautions should be followed when using batteries
in this device:
• Use only the size and type of batteries specified.
• Be sure to follow the correct polarity when installing the
batteries as indicated in the battery compartment.
Reversed batteries may cause damage to the device.
• Do not mix different types of batteries together (e.g.
Alkaline and Carbon-zinc) or old batteries with fresh ones.
• If the device is not to be used for a long period of time,
remove the batteries to prevent damage or injury from
possible battery leakage.
• Do not try to recharge batteries not intended to be recharged; they can overheat and rupture (Follow battery
manufacturer's directions).
5
3R20521A-E
5
27/4/04, 14:05
ENGLISH
REMOTE CONTROL
ANTENNA/CATV CONNECTIONS
Combination VHF/UHF Antenna
This television has an extended
tuning range and can tune most
cable channels without using a
cable company supplied
converter box. Some cable
companies offer "premium pay
channels" in which the signal is
scrambled. Descrambling these
signals for normal viewing
requires the use of a descrambler
device which is generally
provided by the cable company.
Single 75 ohm Cable
300 ohm Twin-lead Wire
Take off the Splitter
Splitter
300-75 ohm
Matching Transformer
(not supplied)
UHF Antenna
300 ohm Twin-lead Wire
Separate VHF/UHF Antennas
VHF Antenna
Single 75 ohm Cable
300 ohm Twin-lead Wire
Incoming CATV
Combiner
(not supplied)
300-75 ohm
Matching Transformer
(not supplied)
For basic cable service not requiring a Converter/Descrambler box,
connect the CATV 75 ohm Coaxial Cable directly to the Antenna
Jack on the back of the television.
If you subscribe to a cable service which requires the use of a
Converter/Descrambler box, connect the incoming cable to the
Converter/Descrambler box and connect the output of the box to the
Antenna Jack on the back of the television. Follow the connections
shown left. Set the television to the output of the Converter/
Descrambler box (usually channel 3 or 4) and use the Converter/
Descrambler box to select channels.
Converter/ Descrambler
A / B Switch
For Subscribers to Basic Cable TV Service
For Subscribers to Scrambled Cable TV Service
Converter/ Descrambler
Splitter
Connect the 75 ohm Cable from the VHF antenna and the UHF
antenna Twin-lead to a combiner (not supplied). Attach the Combiner
to the Antenna Jack.
NOTE: If your VHF antenna has a Twin-lead Wire, use the 300-75
ohm Matching Transformer (not supplied), then connect the
Transformer to the Combiner.
A B
Combination VHF/UHF Antenna (Single 75 ohm Cable or
300 ohm Twin-lead Wire)
For Subscribers to Unscrambled Basic Cable with
Scrambled Premium Channels
Connect the 75 ohm cable from a combination VHF/UHF antenna to
the Antenna Jack. If your combination antenna has a 300 ohm Twinlead Wire, use the 300-75 ohm Matching Transformer (not supplied).
If you subscribe to a cable service in which basic cable channels
are unscrambled and premium channels require the use of a
Converter/Descrambler box, you may wish to use a two-set signal
splitter (sometimes called a "two-set coupler") and an A/B Switch
box from the cable installer or an electronics supply store. Follow
the connections shown left. With the switch in the "B" position, you
can directly tune any nonscrambled channels on your TV. With the
switch in the "A" position, tune your TV to the output of the Converter/
Descrambler box (usually channel 3 or 4) and use the box to tune
scrambled channels.
Combination VHF/UHF Antenna (Separate VHF and UHF
300 ohm Twin-leads)
Connect the UHF Twin-lead Wire to a Combiner (not supplied).
Connect the VHF Twin-lead to the 300-75 ohm Matching
Transformer (not supplied). Attach the Transformer to the Combiner.
Attach the Combiner to the Antenna Jack.
AUDIO/VIDEO JACK CONNECTIONS
The exact arrangement you use to interconnect various video and audio components to the TV is dependent on the model and features
of each component. Check the Owner's Manual provided with each component for the location of video and audio inputs and outputs.
The connection diagrams below are offered as suggestions. You may need to modify them to accommodate your particular assortment
of components. The diagrams are intended to show component video and audio interconnections only.
Press the TV/AV selector button to select the AV mode to use the TV as a monitor.
Operate your VCR as usual.
TV/AV SELECTION
If you connect the TV to a VCR, camcorder, or TV game, through
the audio/video in jacks, use the TV/AV button to make your
selection.
Press the TV/AV button repeatedly to select the desired mode.
"AUX1" or "AUX2" will display on the screen for 4 seconds.
AUX 1
TV
AUX 1
AUX 2
2. To connect the TV to a TV Game
The TV can also be used as a display device for many video
games. However, due to the wide variety of different types of
signal generated by these devices and subsequent hook-up
variations required, they have not all been included in the
suggested connection diagrams. You'll need to consult each
component's Owner's Manual for additional information.
To Audio/Video OUT
(MONO)
VIDEO IN L – AUDIO IN – R
TV GAME
1. To connect the TV to a VCR
Front of TV
(not supplied)
Rear of TV
VCR
VIDEO
3. To connect the TV to the camcorder
To playback from the camcorder, connect the camcorder to the
TV as shown.
AUDIO (L)
(MONO)
VIDEO IN L – AUDIO IN – R
AUDIO (R)
To Audio/Video OUT
6
3R20521A-E
(not supplied)
6
To AV OUT jack
(not supplied)
27/4/04, 14:05
Front of TV
AUDIO/VIDEO JACK CONNECTIONS
(CONTINUED)
Rear of TV
VCR
(not supplied)
AUDIO (L)
AUDIO (R)
NOTE: When the S-video cable and the video cable
are connected to each jack at the same time,
the S-video cable takes precedence over the
video cable.
S-VIDEO
(not supplied)
SETTING LANGUAGE
This TV can display the on-screen language in English, Spanish or French.
On-screen language selection (step 3) will automatically appear on the screen when you press the MENU button initially.
Select the language you prefer first, then proceed with the other menu options.
1
2
Press the MENU button.
Press the SET + or – button to
select the LANGUAGE mode,
then press the ENTER button.
MENU
CH SETUP
PICTURE
AUDIO
LANGUAGE
V-CHIP SET
〈 + / – / ENTER / MENU 〉
3
Press the SET + or – button to select
the desired language: English (ENGLISH),
Spanish (ESPAÑOL) or French
(FRANCAIS), then press the ENTER
button.
LANGUAGE / IDIOMA / LANGUE
ENGLISH
ESPAÑOL
FRANCAIS
〈 + / – / ENTER / MENU 〉
4 Press the MENU button until the menu screen is cleared.
NOTE:
If Spanish or French is chosen, the Closed Caption indicators will be in the selected language, but the Closed Caption text
will not be affected by the language selection.
TV OPERATION
1
To turn on the TV, press the POWER button.
2
The VOLUME can be adjusted to a desired level by
pressing the VOL (VOLUME) or button.
CATV Mode Direct Channel Selection
When the TV/CATV menu option is in the CATV setting,
channels can be selected as follows:
CH. 1-9
The sound level will be indicated on the TV screen by
green bars and a number. As the sound level increases, so do the number of bars and the number on
the screen. The same is true for decreasing the level.
3
Set the TV/CATV menu option to the appropriate
position. When shipped from the factory, this menu
option is in the CATV setting. See "MEMORIZING
CHANNELS".
TV
CATV
4
CH. 13-99
CH. 100-125
- VHF/UHF channels
- CABLE TV channels
CH (CHANNEL)
and
buttons
or
Press and release the CH (CHANNEL)
button. The channel automatically stops at the next
channel set into memory. Press and hold the button
down to change channels more quickly.
For proper operation, before selecting channels, they
should be set into the TV's memory.
See "MEMORIZING CHANNELS".
Direct Channel Selection buttons (0-9)
Press these buttons to select a channel. The channel number
will appear on the upper right corner of the TV screen. If an
invalid channel number is selected, the display will revert to the
original channel.
TV Mode Direct Channel Selection
When the TV/CATV menu option is in the TV setting, all
channels can be instantly selected by using two buttons. (For
example, to select channel 2, press "0", then "2". If you press
only "2", channel selection will be delayed for a few seconds).
For channels 10 and above, press the 2 digits in order.
3R20521A-E
CH. 10-12
7
Press "0" twice, then 1-9 as needed.
Example, to select channel 2, press
"002".
Press "0", then remaining 2 digits.
Example, to select channel 12, press
"012".
Press the 2 digits in order.
Example, to select channel 36, press
"36".
Press the 3 digits in order.
Example, to select channel 120, press
"120".
NOTE: If the station being viewed stops broadcasting, the
TV will automatically shut off after 15 minutes.
SLEEP
To set the TV to turn off after a preset amount of time, press
the SLEEP button on the remote control. The clock will count
down 10 minutes each time the button is pressed in the order
of 120, 110, 100, ······ 20, 10, 0. After the sleep time is programmed, the display will disappear then reappear momentarily every ten minutes to remind you the sleep timer function
is operating. To confirm the sleep
SLEEP
time setting, press the SLEEP button
120
once and the remaining time will be
momentarily displayed. To cancel
sleep time, press the SLEEP button
repeatedly until the display turns to 0.
7
27/4/04, 14:05
ENGLISH
4. To connect the TV to a VCR with an S-VIDEO jack
If you connect a VCR with an S-video jack to the S-VIDEO jack on the rear of TV, you must also connect the audio cables to the
AUDIO IN jacks on the rear of the TV. The S-video cable only carries the video signal; the audio signal is separate.
MEMORIZING CHANNELS
This TV is equipped with a channel memory feature which
allows channels to skip up or down to the next channel set
into memory, skipping over unwanted channels.
Before selecting channels, they must be programmed into
the TV's memory. In addition to normal VHF and UHF
channels, this TV can receive up to 113 Cable TV channels.
To use this TV with an antenna, set the TV/CATV menu
option to the TV setting. When shipped from the factory, this
menu option is in the CATV setting.
TV/CATV SELECTION
1
2
3
AUTOMATIC CHANNEL MEMORY
1
Press the MENU button.
2
Press the SET + or – button until the
indicator next to "CH SETUP" begins
to flash, then press the ENTER button.
3
Press the SET + or – button until the
indicator next to "AUTO CH MEMORY"
begins to flash, then press the ENTER
button. The TV will begin memorizing
all the channels available in your
area. Channel numbers will remain
red until auto memorizing is complete.
Press the MENU button.
Press the SET + or – button until the
indicator next to "CH SETUP" begins
to flash, then press the ENTER
button.
Press the SET + or – button until the
indicator next to "TV/CATV" begins
to flash.
MENU
CH SETUP
PICTURE
AUDIO
LANGUAGE
V-CHIP SET
〈 + / – / ENTER / MENU 〉
TV
4
Press the ENTER button to select
the TV or CATV mode. The arrow
indicates the selected mode.
5
Press the MENU button twice to
return to normal TV viewing.
14
A
32
S
50
NN
68
III
86
86
104
104
122
122
31
R
49
MM
67
HHH
85
ZZZ
103
103
121
121
ADD / DELETE
1
Press the MENU button.
2
Press the SET + or – button until the
indicator next to "CH SETUP" begins
to flash, then press the ENTER button.
3
Press the SET + or – button until the
indicator next to "ADD/DELETE"
begins to flash, then press the
ENTER button.
15
16
17
18
19
B
C
D
E
F
33
34
35
36
37
T
U
V
W
AA
51
52
53
54
55
OO PP QQ RR SS
69
70
71
72 73
JJJ KKK LLL MMM NNN
87
88
89
90
91
87
88
89
90
91
105 106 107 108 109
105 106 107 108 109
123 124 125 01
123 124 125 5A
20
G
38
BB
56
TT
74
OOO
92
92
110
110
21
H
39
CC
57
UU
75
PPP
93
93
111
111
22
I
40
DD
58
VV
76
QQQ
94
94
112
112
MENU
CH SETUP
PICTURE
AUDIO
LANGUAGE
V-CHIP SET
〈 + / – / ENTER / MENU 〉
TV
CATV
AUTO CH MEMORY
ADD / DELETE
〈 + / – / ENTER / MENU 〉
Select the desired channels to be
added or deleted using the Direct
Channel Selection buttons (10 keys,
or
button or the
0-9), the CH
SET + or – button.
5
Press the ENTER button to select ADD or DELETE.
If an unmemorized channel was selected (step 4), the
channel indication will be red. Press the ENTER button
if you wish to ADD the unmemorized channel. The
channel indicator will change from red to green when a
channel is added and the channel will be memorized.
If a memorized channel was selected (step 4), the
channel indication will be green.
Press the ENTER button if you wish
to DELETE the channel from memory.
The channel indicator will change
from green to red when a channel is
deleted.
Repeat steps 4 and 5 for each
channel to be added or deleted.
6
ADD
CH 012
〈0-9 / + / – / ENTER / MENU 〉
Press the MENU button three times after adding or
deleting all of the desired channels, to return to normal
TV viewing.
8
8
〈 + / – / ENTER / MENU 〉
4
NOTE: Contact your cable company to determine the
type of cable system used in your area.
3R20521A-E
ADD / DELETE
TO ADD/DELETE CHANNELS
CATV
CATV CHART
30
Q
48
LL
66
GGG
84
YYY
102
102
120
120
CATV
AUTO CH MEMORY
The chart below is typical of many cable system channel
allocations.
Number on this TV
Corresponding CATV channel
23
24
25
26
27
28
29
J
K
L
M
N
O
P
41
42
43
44
45
46
47
EE FF GG HH
II
JJ
KK
59
60
61
62
63
64
65
WW AAA BBB CCC DDD EEE FFF
77
78
79
80
81
82
83
RRR SSS TTT UUU VVV WWW XXX
95
96
97
98
99 100 101
A-5 A-4 A-3 A-2 A-1 100 101
113 114 115 116 117 118 119
113 114 115 116 117 118 119
TV
AUTO CH MEMORY
Press the MENU button twice to
return to normal TV viewing.
〈 + / – / ENTER / MENU 〉
4
MENU
CH SETUP
PICTURE
AUDIO
LANGUAGE
V-CHIP SET
〈 + / – / ENTER / MENU 〉
27/4/04, 14:05
SETTING V-CHIP
1
Press the MENU button and press the SET + or – button to
select the V-CHIP SET option, then press the ENTER button.
TV RATING
2
Enter your password (4 digits) using the Direct channel
selection buttons (0-9).
In the event of entering incorrect password press the
RESET button, and re-enter the same password. Then
press the ENTER button.
OFF
3
Enter the same password for confirmation, then press
the ENTER button.
4
Press the SET + or – button to select the V-CHIP option.
Press the ENTER button to select the ON.
5
Press the SET + or – button to select the TV RATING or
MOVIE RATING option. Press the ENTER button.
6
Press the SET + or – button to select the desired rating
for the applicable video or TV channel. Press the
ENTER button.
SET –
TV-Y7
SET +
TV-G
TV-PG
TV-14
TV-MA
TV-Y : all children
TV-PG : parental guidance
TV-Y7 : 7 years old and above TV-14 : 14 years old and above
TV-G : childrens program
TV-MA : 17 years old and above
When you select TV-Y7, TV-PG, TV-14 or TV-MA, press the CALL
button to explain the rating.
Press the SET + or – button to select the desired rating you want.
Press the ENTER button to select the setting ON or OFF.
MOVIE RATING
SET –
OFF
7
TV–Y
Press the MENU button until the MENU screen is cleared.
G
PG
SET +
PG-13
G
: all ages
PG
: parental guidance
PG-13 : parental guidance
less than 13 years old
R
NC-17
X
: under 17 years old
parental guidance
suggested
NC-17 : 17 years old and above
: adult only
X
R
NOTES:
• If you forget or lose the password, you can cancel the existing password by the following procedure:
- Press VOLUME ▼ button of main unit.
- Keep pressing VOLUME ▼ button and press "0" key of remote control simultaneously for a few seconds.
• If you want to change password, follow steps 1 and 2 and select "CHANGE PASSWORD" option then enter your new password.
• The V-Chip function is activated only on programs and tapes that have the rating signal.
• Once you block a program using the V-Chip function, the blocked program cannot be watched based on the content of the show.
When the program starts, the "ENTER PASSWORD" will appear on the screen. When you want to release the V-Chip temporarily,
enter the password.
If you change the channel or turn off the TV while the V-Chip function was temporarily released, the original setting will be resumed.
If you return to the channel you were watching you must re-enter your password to temporarily release your V-Chip function again.
• If you are changing channels using a VCR or a cable box, while the TV remains on channel 3 or 4, the V-Chip operates differently.
When you enter your password to temporarily release the block on any channel, you have completely disabled the V-Chip function
for all stations. To reset the V-Chip turn your TV off and back on.
• Some cable boxes are built with a delay feature, in some cases it can take up to 10 seconds for a program to appear after the
password has been input.
CLOSED CAPTION
WHAT IS CLOSED CAPTIONING?
This television has the capability to decode and display Closed
Captioned television programs. Closed Captioning will display text
on the screen for hearing impaired viewers or it will translate and
display text in another language.
TO VIEW CLOSED CAPTIONS
Press the TV/CAP/TEXT button on the remote control to switch
between normal TV and the two Closed Caption Modes (Captions
and 1/2 of Full Screen Text).
Captions: This Closed Caption Mode will display text on the
screen in English or another language (depending on the setting
of the Closed Captions CH.1/2 button). Generally, Closed
Captions in English are transmitted on Captions Channel 1 and
Closed Captions in other languages are transmitted on Captions
Channel 2.
The Captions will appear in places on the screen where they will
least interfere with the picture, usually on the bottom of the screen.
News programs will usually show three-line Closed Captions which
scroll onto the screen. Most other shows provide two or three lined
Captions placed near the character who is speaking so the viewer
can follow the dialogue. Words in italics or underlined describe
titles, words in foreign languages or words requiring emphasis.
Words that are sung usually appear enclosed by musical notes.
Text: The Text Closed Caption Mode will usually fill 1/2 of full
screen with a programming schedule or other information. After
selecting a Closed Caption Mode, it will stay in effect until it is
changed, even if the channel is changed. If the Captions signal is
lost due to a commercial or a break in the signal, the Captions will
reappear when the signal is received again. If the channels are
changed, the Captions will be delayed approximately 10 seconds.
For television programs broadcasting with Closed Captions, look
in your TV guide for the Closed Captions symbol (CC).
•
•
•
•
When activating the Closed Captioned Decoder, there will be a short delay before the Closed Captioned text appears on the screen.
Closed Captioned text is only displayed in locations where it is available.
If no caption signal is received, no captions will appear, but the television will remain in the Caption Mode.
Misspellings or unusual characters may occasionally appear during Closed Captioning. This is normal with Closed Captioning,
especially with live programs. This is because during live programs, captions are also entered live. These transmissions do not allow
time for editing.
• When Captions are being displayed, on-screen displays, such as volume and mute may not be seen or may interfere with Closed
Captions.
• Some cable systems and copy protection systems may interfere with the Closed Captioned signal.
• If using an indoor antenna or if TV reception is very poor, the Closed Caption Decoder may not appear or may appear with strange
characters or misspelled words. In this case, adjust the antenna for better reception or use an outdoor antenna.
9
3R20521A-E
9
27/4/04, 14:05
ENGLISH
This TV is fitted with a V-CHIP controller which provides you with channel viewing access controls and restrictions. This function is to
prevent your children from watching violence or sexual scenes that you may choose to exclude.
STEREO AND SECOND AUDIO PROGRAM (SAP)
The TV is equipped with a feature known as Multi-channel TV
Sound or MTS. MTS broadcasts greatly enhance TV viewing
by bringing you programs with high fidelity stereo sound.
MTS also provides an extra channel called the Second
Audio Program or SAP which broadcasters can use to
transmit a second language for bilingual transmission or for
other purposes.
When the TV is turned on or a channel selection is made,
make certain that the word “STEREO” appears on the
screen. This means that "Stereo" broadcasting is available.
You can enjoy stereo sound from the left and right speakers.
• When the "MONO" broadcasting is received, no indication
is displayed.
• If the broadcast signal is not strong enough or clear stereo
sound is not available, press the AUDIO SELECT button
to change to mono sound. The noise should be eliminated.
Press it again to return to the stereo sound.
SOUND ADJUSTMENTS
You can adjust the setting for bass, treble, balance,
surround and stable sound.
Press the MENU button.
2
Press the SET + or – button until
the indicator next to “AUDIO”
begins to flash, then press the
ENTER button.
BASS
TREBLE
STABLE SOUND
4
TO SELECT DESIRED SOUND
Press the AUDIO SELECT button to select the desired sound.
MAIN SOUND
(MONO)
SAP SOUND
MAIN + SAP SOUND
(MONO)
STEREO+SAP BROADCASTING
MAIN SOUND
(STEREO)
SAP SOUND
MAIN SOUND
(MONO)
MAIN + SAP SOUND
(MONO)
NOTE: If connecting this TV with a VCR and/or Cable box, to
receive stereo sound you must use audio/video cables for all
connections. You must also verify that your VCR and/or Cable
box are stereo units.
SURROUND FEATURE
The SURROUND feature expands the audio listening field
wider and deeper to create exceptional sound quality from
the TV’s speakers. The feature uses stereo signals from a
TV broadcast or video input.
MENU
CH SETUP
PICTURE
AUDIO
LANGUAGE
V-CHIP SET
STABLE SOUND FEATURE
When a loud sound is broadcast the stable sound feature
assists in balancing the volume to a more comfortable
listening level.
Press the ENTER button repeatedly to select the item
you want to adjust.
3
When the TV is turned on or a channel selection is made, make
certain that the letters “SAP” appear on the screen. This means
that the "Second Audio Program" broadcasting is available.
MONO+SAP BROADCASTING
LISTENING TO STEREO SOUND
1
LISTENING TO SAP (SECOND AUDIO PROGRAM)
BALANCE
TO RETURN TO INITIAL SETTING
Pressing the RESET button while making sound adjustments,
will return all adjustments to the factory preset levels.
SURROUND
Use the SET + or – button to adjust the setting.
+
–
BASS
stronger
weaker
TREBLE
stronger
weaker
right speaker stronger left speaker stronger
BALANCE
OFF
SURROUND
ON
OFF
STABLE SOUND
ON
NOTE:
The on-screen display will disappear 6 seconds after finishing
an adjustment. The settings can only be adjusted while they
are displayed on the TV screen.
ADJUSTING PICTURE
You can adjust the settings for color, sharpness, contrast,
brightness and tint.
1
2
Press the MENU button.
3
Press the ENTER button repeatedly to select the item you
want to adjust.
Press the SET + or – button until the indicator next to
"PICTURE" begins to flash, then press the ENTER button.
4
Press the SET + or – button to adjust the setting.
BRIGHTNESS
CONTRAST
COLOR
TINT
SHARPNESS
+
–
increase brightness
increase contrast
brilliant color
greenish color
makes picture clearer
decrease brightness
decrease contrast
pale color
reddish color
makes picture softer
TO RETURN TO INITIAL SETTING
BRIGHTNESS
CONTRAST
COLOR
TINT
SHARPNESS
Press the RESET button while the picture adjusting mode
appears on-screen.
10
3R20521A-E
10
27/4/04, 14:05
TROUBLESHOOTING GUIDE
Before requesting service, please refer to the following chart for the symptom and possible solution.
POSSIBLE SOLUTIONS
• Make sure the power cord is plugged in.
TV does not • Try another AC outlet.
• Power is off, check fuse or circuit breaker.
operate.
• Unplug unit for an hour, then plug it back in.
• Station or CATV experiencing problems,
tune to another station.
Poor sound
• Check sound adjustments (Volume and Muting).
or No sound.
• Check for sources of possible interference.
• Station or CATV experiencing problems,
tune to another station.
• Make sure channels are set into memory.
Poor picture
• Check antenna or CATV connections, adjust
or No picture.
antenna.
• Check for sources of possible interference.
• Check picture control adjustments.
• Station or CATV experiencing problems,
Poor
tune to another station.
reception on • Make sure channels are set into memory.
some
• Station is weak, adjust antenna to receive
channels.
desired station.
• Check for sources of possible interference.
• Station or CATV experiencing problems,
tune to another station.
• Make sure channels are set into memory.
Poor color or • Check picture control adjustments.
no color.
• Check antenna or CATV connections, adjust
antenna.
• Check for sources of possible interference.
• Station or CATV experiencing problems,
tune to another station.
Picture
• Make sure channels are set into memory.
wobbles or
• CATV company is scrambling signal.
drifts.
• Adjust antenna.
POSSIBLE SOLUTIONS
SYMPTOMS
No CATV
reception.
• Check all CATV connections.
• Set TV/CATV menu option to the CATV mode.
• Station or CATV system problems, try
another station.
Horizontal or • Check antenna connections, adjust or
diagonal bars re-direct antenna.
on screen.
• Check for sources of possible interference.
No reception • Make sure TV/CATV menu option is in the
appropriate mode.
above
channel 13. • If using antenna, check UHF antenna connections.
No Remote
operation.
• Batteries are weak, dead or inserted incorrectly.
• Remote is out of range, move closer to TV
(within 15 feet).
• Make sure Remote is aimed at sensor.
• Confirm there are no obstructions between
the Remote and the TV.
• Make sure the power cord is plugged in.
No reception. • Reset your password.
• No broadcast on station tuned.
TV shuts off. • Sleep Timer is set.
• Power interrupted.
• TV station experiencing problems or program
tuned is not closed captioned. Try another channel.
Closed • Check CATV connection or VHF/UHF
Caption is
not activated. antenna, reposition or rotate antenna.
• Press TV/CAP/TEXT button to turn on the
closed caption decoder.
Display is not
shown in your • Select proper language in the menu options.
language.
DEGAUSSING SYSTEM
This television has a degaussing circuit that will clear up color distortions on the TV screen that are caused by any excess
magnetism which happens to get too close to the TV. This circuit is designed to operate once when the set is first plugged in. If
minor color distortions are seen in some locations on the screen, please unplug the TV for approximately 15 minutes. When the
TV is plugged back in, the degaussing circuit will operate once to clear up any color distortions. Repeat this procedure any time
the TV screen is accidentally magnetized, or when the TV is moved or relocated.
SPECIFICATIONS
AC Power Input:
AC Power Consumption:
Chassis Construction:
Picture Tube:
Horizontal resolution:
Audio Power Output Rating:
Speaker:
Tuner Type:
Remote Control:
120V, 60Hz
125 Watts
IC Solid state
27" (measured diagonally)
260 lines
2.5 + 2.5 Watts
2" x 3-1/2" Full Range, 8 ohm x 2
181 Channel, Quartz PLL
Frequency Synthesized
Infrared, Direct Access, 2 x AAA
batteries (not supplied)
ACCESSORY
Receiving Channels:
VHF 2-13
UHF 14-69
CATV 01-97 (5A)-(A-3)
98-99 (A-2)-(A-1)
14-22 (A)-(I)
23-36 (J)-(W)
37-65 (AA)-(FFF)
66-125 (GGG)-(125)
Antenna Input Impedance: 75 Ohm (VHF/UHF/CATV)
Coaxial Input
Input/Output:
S-Video Y-Input : 1.0Vp-p/75 ohm
C-Input : 0.3Vp-p/75 ohm
Video:
In (RCA) 1.0Vp-p/75 ohm
Out (RCA) 1.0Vp-p/75 ohm
Audio:
In (RCA) –8dB/50K ohm
Out (RCA) –8dB/1K ohm
Dimensions:
25-9/16" (W) x 19-11/16" (D) x 22-1/2" (H)
Weight:
80.5 Ibs
Remote Control
11
3R20521A-E
11
27/4/04, 14:05
ENGLISH
SYMPTOMS
ESPAÑOL
REDUCIR EL RIESGO DE DESCARGA
AVISO: PARA
ELECTRICA, NO RETIRE LA CUBIERTA (O POS
TERIOR). EN EL INTERIOR DEL APARATO NO
HAY COMPONENTES QUE REQUIERAN SERVICIO
DE MANTENIMIENTO POR EL USUARIO. SOLICITE
CUALQUIER OPERACION DE MANTENIMIENTO
A PERSONAL DE SERVICIO CALIFICADO.
El símbolo del rayo dentro de un triángulo equilátero tiene por
finalidad alertar al usuario acerca de la presencia de tensión
peligrosa (sin aislación) en el interior del producto, que puede tener
la intensidad suficiente como para constituir un riesgo de descarga
eléctrica.
El signo de exclamación dentro de un triángulo equilátero tiene por
finalidad alertar al usuario de importantes instrucciones de
operación y mantenimiento (servicio) en la literatura que acompaña
a este aparato.
CAUTION: El usuario corre el riesgo de perder la autorización para hacer funcionar este equipo en caso de que ejecte
un cambio o modificación no aprobado por la parte responsable para la conformidad con las Reglas FCC.
AVISO: Para reducir el riesgo de incendio o descarga eléctrica, no exponga esta unidad a la lluvia ni a la humedad.
NOTA:
Por favor guarde todo el material de embalaje durante por lo menos 90 días en caso de que necesite devolver este
producto a su lugar de compra o Memorex.
PARA SU SEGURIDAD
1. LEA LAS INSTRUCCIONES - Antes de usar la unidad, lea detenidamente todas las instrucciones de seguridad y operación.
2. CONSERVE ESTE MANUAL DE INSTRUCCIONES - Conserve las instrucciones de seguridad y operación para consultas
futuras.
3. RESPETE LAS ADVERTENCIAS - Observe estrictamente todas las advertencias impresas en la unidad y las incluidas en el
manual de instrucciones.
4. SIGA LAS INSTRUCCIONES - Siga todas las instrucciones de operación y uso.
5. LIMPIEZA - Antes de limpiar esta unidad, desconéctela del tomacorriente. No use limpiadores líquidos ni aerosol.
Limpie la unidad con un paño húmedo.
6. ENCHUFES - El fabricante de esta unidad no hace ninguna recomendación de accesorios ya que pueden ser peligrosos.
7. AGUA Y HUMEDAD - No use esta unidad cerca del agua -- por ejemplo, cerca de una bañera o lavamanos, cerca del
fregadero de la cocina o lavandería, en un piso mojado, o cerca de una piscina.
AVISO PARA CARRO PORTATIL
(símbolo provisto por RETAC)
8. ACCESORIOS - No instale esta unidad en un carro, soporte, trípode o mesa inestables.
La unidad podría caerse, causando serios daños a la unidad.
8A. La combinación de aparato y carro deberá ser movida con cuidado.
Las detenciones bruscas, la fuerza excesiva y las superficies disparejas podrán hacer
que el aparato y el carro se vuelven.
S3126A
9. VENTILACION - Las ranuras y aberturas en la parte trasera o inferior del mueble son para
ventilación y permiten un funcionamiento fiable de la unidad, protegiendo contra calentamiento excesivo. Estas aberturas no
deberán ser bloqueadas ni cubiertas. Para evitar bloquear las aberturas, nunca sitúe la unidad encima de una cama, sofá,
alfombra u otra superficie similar. Tampoco instale la unidad cerca o encima de un radiador o calefactor. La unidad no deberá
ser instalado en un mueble empotrado, como ser una repisa para libros o bastidor, a menos que se pueda garantizar una
ventilación adecuada, o cuando las instrucciones del fabricante así lo especifiquen.
10. FUENTES DE ALIMENTACION - Esta unidad sólo deberá ser operada mediante el tipo de fuente de alimentación
especificado en la etiqueta indicadora. Si no está seguro del tipo de fuente de alimentación que tiene en su casa, consulte a su
distribuidor o a la compañía de electricidad local. En el caso de unidades diseñadas para funcionar a pilas o con otras fuentes
de alimentación, consulte el manual de instrucciones respectivo.
11. CONEXION A TIERRA O POLARIZACION - Esta unidad está equipada con una clavija polarizada de corriente alterna (una
clavija que tiene una espiga más ancha que la otra). Esta clavija solamente puede ser insertada en el toma-corriente en una
sola dirección. Esta es una medida de seguridad. Si no pudiera insertar completamente la clavija en el tomacorriente, vuelva a
intentarlo invirtiendo la clavija. Si aún no fuera posible insertar la clavija, tome contacto con un electricista para que reemplace
su toma-corriente obsoleto. Si su unidad está equipada con una clavija de conexión a tierra de 3 alambres (una clavija con una
tercera espiga de conexión a tierra), no modifique las carac-terísticas de seguridad de la clavija polarizada. Este tipo de clavija
sólo puede ser insertado en un tomacorriente con contacto a tierra. Esto también es una medida de seguridad. Si no pudiera
insertar la clavija en el tomacorriente, tome contacto con un electricista para que reemplace su tomacorriente obsoleto.
No modifique las características de seguridad de la clavija de conexión a tierra.
12. PROTECCION DEL CABLE DE ALIMEN-TACION - Los cables de alimentación deberán ser tendidos de manera tal que la
probabilidad de que sean pisados o aplastados por otros objetos sea mínima. Preste especial atención a las clavijas de los
cables, a los receptáculos, y al punto por donde salen del aparato.
2
3R20521A-S/P02-07
2
27/4/04, 14:05
EJEMPLO DE CONEXION A TIERRA DE LA ANTENA SEGUN
EL CODIGO NACIONAL DE ELECTRICIDAD
ALAMBRE DE ENTRADA DE
LA ANTENA
ABRAZADERA DE
TIERRA
EQUIPO DE
SERVICIO
ELECTRICO
NEC - CODIGO NACIONAL DE
ELECTRICIDAD
S2898A
UNIDAD DE DESCARGA
DE LA ANTENA
(NEC, SECCION 810-20)
CONDUCTORES DE PUESTA A
TIERRA (NEC, SECCION 810-21)
ABRAZADERAS DE TIERRA
SISTEMA ELECTRODO DE PUESTA
A TIERRA (NEC ART 250, PARTE H)
3
3R20521A-S/P02-07
3
27/4/04, 14:05
ESPAÑOL
13. TORMENTAS ELECTRICAS - Como medida de protección durante tormentas eléctricas, o cuando la unidad permanezca sin
uso durante períodos prolongados de tiempo, desconéctelo del tomacorriente mural y desconecte la antena o sistema de
cable. Esto evitará que la unidad resulte dañada por tormentas eléctricas o sobretensiones en la línea de alimentación.
14. LINEAS DE ALIMENTACION - Una antena exterior no deberá ser instalada en la cercanía de líneas de alimentación aéreas ni
de otros circuitos de iluminación eléctrica o potencia, o donde pueda caerse y hacer contacto con tales líneas o circuitos.
Al instalar un sistema de antena exterior, tenga mucho cuidado de no tocar tales líneas o circuitos de alimentación, ya que el
contacto con ellos podría ser fatal.
15. SOBRECARGA - No sobrecargue los toma-corrientes murales ni los cables de extensión, ya que esto podría causar incendios
o descargas eléctricas.
16. ENTRADA DE OBJETOS Y LIQUIDOS - Nunca introduzca objetos de ningún tipo por las aberturas de la unidad, ya que
podría tocar peligrosos puntos de alta tensión o piezas de cortocircuito, provocando incendios o descargas eléctricas. Nunca
derrame ni rocíe ningún tipo de líquido sobre la unidad.
17. CONEXION A TIERRA DE LA ANTENA EXTERIOR - Si se conecta una antena externa o sistema de cable a la unidad,
cerciórese de que el sistema de antena o cable está conectado a tierra para darle protección contra sobretensión y
acumulación de carga estática. La Sección 810 del Código Nacional de Electricidad, ANSI/NFPA 70, entrega información
acerca de la manera correcta de conectar a tierra el mástil y la estructura soportante, puesta a tierra del alambre de entrada a
una unidad de descarga de antena, tamaño de los conductores de puesta a tierra, ubicación de la unidad de descarga de la
antena, conexión a los electrodos de tierra, y requisitos para el electrodo de tierra.
18. SERVICIO - No intente reparar la unidad usted mismo; al abrir o retirar las cubiertas usted se expondrá a alta tensión y a
otros peligros. Solicite todo servicio a personal calificado.
19. DAÑOS QUE REQUIERAN REPARACION - En los siguientes casos, desconecte la unidad del tomacorriente mural y llame a
un técnico de servicio calificado:
a. Cuando el cable de alimentación o la clavija estén dañados.
b. Si se ha derramado líquido sobre la unidad, o si algún objeto ha caído dentro de la unidad.
c. Si la unidad ha sido expuesta a la lluvia o al agua.
d. Cuando a pesar de haber seguido las instrucciones de operación, la unidad no funcione normalmente. Ajuste solamente
los controles indicados en el manual de instrucciones; el ajuste incorrecto de otros controles podrá causar daños a la
unidad, la que por lo general requerirá de un prolongado trabajo de reparación (por un técnico calificado) para que sus
condiciones normales de operación puedan ser restablecidas.
e. Si la unidad se ha caído o si el gabinete se ha dañado.
f. Cuando la unidad muestre un cambio notorio en su rendimiento.
20. PIEZAS DE REPUESTO - Cuando sea necesario reemplazar piezas, asegúrese de que el técnico de servicio emplee las
piezas de repuesto especificadas por el fabricante, o piezas que tengan las mismas características que las piezas originales.
Los cambios no autorizados podrán causar incendios, descargas eléctricas y otros problemas.
21. REVISION DE SEGURIDAD - Al finalizar cualquier servicio de mantenimiento o reparación de esta unidad, solicítele al técnico
que efectúe comprobaciones de seguridad para determinar si la unidad se encuentra o no en condiciones óptimas de
operación.
22. INSTALACION EN PARED O TECHO
Si se instala esta unidad en pared o techo siga la instalación recomendada por el fabricante de un montante diseñado
específicamente para este tipo de producto. Use sólo un montante que pueda acomodar el peso y el tamaño de su unidad.
Si la instalación del montante requiere que se practiquen perforaciones en esta unidad, esto invalidaría la garantía del fabricante.
23. CALOR - El producto debe ser situado lejos de fuente de calor como radiadores, reguladores de calefacción, estufas u otros
productos (incluyendo amplificadores) que se producen calor.
24. NOTA PARA LA PERSONA QUE INSTALE EL SISTEMA CATV - Se ha incluido este recordatorio para llamar la atención de
quien instale el sistema CATV, con respecto al Artículo 820-40 de la NEC, que entrega directivas de guía para realizar una
conexión adecuada a tierra y, en particular, especifica que el cable de puesta a tierra debe ser conectado al sistema de
conexión a tierra del edificio, lo más cerca del punto de entrada del cable como sea posible.
CARACTERISTICAS
• 181 canales de TV cable - El sistema de sintonización es capaz de recibir los 68 canales de VHF/UHF de emisión estándar
disponibles en su área. Al ser usado con un sistema de TV cable, este sistema puede sintonizar las frecuencias de VHF estándar
y 113 frecuencias de TV cable. El número real de canales recibidos dependerá de la recepción de canales en su área y del
servicio de TV cable al que usted esté suscrito.
• Indicaciones en la pantalla en 3 idiomas - Indica el canal, temporizador para dormir, nivel de volumen, silenciamiento, indicadores
de texto/capciones y ajustes de control de imagen. Pueden aparecer en inglés, español o francés.
• Temporizador de desactivación automática - Controlando esta función desde la unidad de control remoto, usted podrá
programar el televisor para que se apague automáticamente después de un período de hasta 120 minutos.
• Protección de la memoria - En caso de interrupciones en el suministro de energía al televisor, este sistema evita la pérdida de
los canales memorizados.
• Chip V - La función de prohibición para menores con Chip V puede leer la clasificación de un programa de TV o película, si el
programa tiene codificada esta información. El Chip V permite seleccionar el nivel de prohibición.
• Ajustes de imagen usando la unidad de control remoto - La indicación en pantalla permite realizar precisos ajustes de
BRILLO, COLOR, CONTRASTE, NITIDEZ y TINTE desde la unidad de control remoto.
• Descodificador de subtítulos - Exhibe subtítulos de texto en una tercera parte de pantalla completa de TV para personas con
problemas de audición.
• Recepción estéreo/SAP - Este TV fue diseñado para recibir programas de estéreo y de audio por sonido (SAP).
UBICACION DE LOS CONTROLES
DELANTERA
TRASERA
6 7
–
POWER
CHANNEL
ENTER
1
2
SET
+
VOLUME
RESET
VIDEO IN
8 9
(MONO)
L – AUDIO IN – R
MENU
3
4
5
1. Interruptor de alimentación (POWER) - Presione este
interruptor para encender y apagar el televisor.
2. Sensor de control remoto - Recibe las señales
provenientes del control remoto.
3. Botones selectores de canal (CHANNEL ▲ / ▼ ) - Utilice
estos botones para seleccionar alguno de los canales
almacenados en la memoria.
(Botón ENTER) - Presione para entrar o seleccionar
información para las operaciones en la pantalla.
(Botón RESET) - Presione para reposicionar los ajustes
de la imagen en pantalla y de sonido a sus posiciones de
preajuste de fábrica. Presione para reposicionar una
contraseña en el modo de ajuste V-CHIP Password.
4. Botones de volumen (VOLUME ▲ / ▼ ) - Utilice estos
botones para aumentar o disminuir el nivel de volumen.
(Botones MENU) - Presione ambos botones para que
aparezca la función de menú en la pantalla.
(Botones SET+ / –) - Presione para seleccionar el ajuste
desado durante las operaciones en la pantalla.
5. Tomas FRONT AUDIO (L/R) VIDEO IN (AUX2) - Aquí
pueden conectar desde una fuente externa los cables
de señales de audio y video.
6. Conector de entrada de ANTENA VHF/UHF - Conecte
una antena VHF/UHF o un TV cable a este conector.
7. Toma S-VIDEO IN - Aquí puede conectar el cable de
señal S-Video desde una fuente externa.
8. Tomas REAR AUDIO (L/R) VIDEO IN (AUX1) - Aquí
pueden conectar desde una fuente externa los cables
de señales de audio y video.
9. Tomas REAR AUDIO (L/R) VIDEO OUT - Se usa para la
salida de señales de audio y video a un TV, amplificador o
VCR.
10. Cordón de CA- Conéctelo a un enchute de 120V, 60Hz.
4
3R20521A-S/P02-07
10
4
27/4/04, 14:05
1
2
3
POWER
1
2
3
4
5
6
7
8
9
0
4
QUICK VIEW
10
CALL
SLEEP
11
MUTE
CH
5
12
VOL
6
VOL
MENU
7
8
ENTER
CH
– SET
+
AUDIO
SELECT
RESET
TV/AV
CH.1/2
TV
13
14
15
CAP/TEXT
9
16
1 Interruptor de alimentación - Para encender y apagar el
televisor.
2 Botones de selección directa de canal (0-9) - Permiten
acceder en forma directa a cualquier canal de TV.
3 Botón de visión rápida - Esta función le permite retornar
al canal previamente seleccionado; simplemente presione
el botón QUICK VIEW. Para retornar al canal que estaba
viendo, vuelva a presionar este botón.
4 Botón de desactivación mediante tempo - rizador - Para
hacer que el televisor se apague después de un período de
tiempo prefijado, presione el botón SLEEP del unidad de
control remoto. La indicación disminuirá en intervalos de 10
minutos cada vez que el botón sea presionado (en el orden
Antes de usar la unidad control remoto deben ser instaladas
las pilas.
COMO INSTALAR LAS PILAS
1. Abra la tapa del compartimiento de pilas.
de 120, 110, 100, ... 20, 10, 0.). Una vez programado el
tiempo de desactivación automática, la indicación
desaparecerá de la pantalla, después de lo cual volverá a
aparecer momentáneamente cada diez minutos para
recordarle que la función de desactivación automática está
activada. Para confirmar el tiempo de desactivación
automática, presione el botón SLEEP una vez; el tiempo
restante será momentáneamente exhibido. Para cancelar la
función de desactivación automática, presione repetidamente el botón SLEEP hasta que la indicación sea 0.
5 Botones de / de volumen - Presione el botón para
aumentar el nivel de volumen, y el botón para disminuirlo.
6 Botón MENU - Presione este botón para indicar el menú de
función en la pantalla.
7 Botones de SET + / – - Presione los botones para
seleccionar los ajustes deseados durante las operaciones
en pantalla.
8 Botón de reposición (RESET) - Presione para reposicionar
los ajustes de la imagen en pantalla y de sonido a sus
posiciones de preajuste de fábrica. Presione para
reposicionar una contraseña en el modo de ajuste V-CHIP
Password. Presione para retornar la contraseña en el modo
de ajuste de contraseña V-CHIP.
9 Botón TV/AV - Cambia entre las entradas de TV y externa.
10 Botón de llamada - Cuando este botón sea presionado, el
canal sintonizado aparecerá en la esquina superior derecha
de la pantalla de TV. Presione nuevamente el botón para
borrar la indicación de la pantalla.
11 Botón de silenciamiento - Para cortar el sonido, presione
este botón una vez. El televisor será silenciado y la
indicación "MUTE" aparecerá en la pantalla. Para desactivar
la función de silenciamiento, vuelva a presionar el botón de
silenciamiento/reposición (MUTE) o presione el botón de
aumento o disminución de volumen (VOL o ).
12 Botones selectores de canal en
/
- Presione el
botón de ascenso
para cambiar a un canal más alto
almacenado en la memoria. Presione el botón de descenso
para cambiar a un canal más bajo.
13 Botón ENTER - Presiónelo para introducir o seleccionar la
información de las operaciones en pantalla.
14 Botón de AUDIO SELECT - Conmuta el sonido entre
monoaural y estéreo y SAP cuando se reciben
transmisiones en estéreo o SAP.
15 Botón CH.1/2 - Para cambiar entre el canal 1 y el canal 2
en el modo de cerrado/subtitulado.
16 Botón de TV/CAP/TEXT - Presione este botón para
cambiar entre TV normal y los dos modos de subtítulo
cerrado (subtítulo y texto en una tercera parte de pantalla
completa). Subtítulo cerrado indicará el texto en pantalla
para los usuarios con problemas de audición.
Utilice pilas de tamaño "AAA" tipo lápiz (no suministradas) para
la unidad control remoto. Las pilas duran aproximadamente un
año, dependiendo de cuánto se utilice el control remoto. Para
su mejor funcionamiento se recomienda que las pilas se
reemplacen en forma anual, o cuando el fun-cionamiento del
control remoto sea errático. No mezcle pilas nuevas y viejas.
PRECAUCIONES PARA LAS PILAS
Se deben tomar las siguientes precauciones cuando se usan las
pilas para el control remoto.
2. Instale dos pilas "AAA" (tipo lápiz).
• Utilice solo el tipo y tamaño de pila especificado.
• Asegurese de colocar correctamente la polaridad como está
señalado en el compartimiento para pilas. Las pilas invertidas
pueden causar daño al control.
• No mezcle diferentes tipos de pilas (por ejemplo: alcalinas,
zinc-carbon), o pilas viejas con pilas nuevas.
• Si Ud. no utiliza el control por un largo período de tiempo,
saque las pilas para prevenir daños por posible fuga de
electrolito.
• No trate de recargar las pilas que no son recargables; pueden
sobrecalentarse y reventar (Siga las instrucciones del
fabricante de pilas).
3. Recaloque la tapa del compartimiento.
5
3R20521A-S/P02-07
5
27/4/04, 14:05
ESPAÑOL
CONTROL REMOTO
CONEXIONES DE ANTENA
Antena combinada de VHF/UHF
Este televisor, puede sintonizar
la mayoría de los canales por
cable sin necesidad de recurrir
al convertidor suministrado por
los canales de cable. Algunas
compañías de cable ofrecen
"canales pagados premiados"
en los cuales la señal esta
codificada. La decodificación de
esas señales para la obtención
de una señal normal, requiere
el uso de un decodificador que
es generalmente provisto por
la compañía de cable.
Cable solo de 75 ohmios
300 ohmios de conductores gemelos
Divisor
Desmonte el divisor
Antenas de UHF
Transformador de adaptación de
300-75 ohmios (no suministrado)
300 ohmios de conductores gemelos
Antenas de VHF/UHF separadas
Conecte el cable de 75 ohmios desde antena de VHF y UHF de
conductores gemelos al combinador (no suministrado). Fije el
combiandor al soporte de antena.
NOTA: Si su antena de VHF tiene un cable de conductores
gemelos, use un transformador de adaptación de 300-75 ohmios (no
suministrado), luego conecte el transformador al combinador.
Antenas de VHF
Cable solo de 75 ohmios
300 ohmios de conductores gemelos
Combinador
(no suministrado)
Transformador de adaptación de
300-75 ohmios (no suministrado)
Cable entrante de CATV
Convertidor/Decodificador
Converter/ Descrambler
Convertidor/Decodificador
Converter/ Descrambler
Splitter
Divisor
A / B Switch
Conmutador
A/B A B
Antena combinada de VHF/UHF (Cable solo de 75 ohmios o de
conductores gemelos de 300 ohmios)
Conecte el cable de 75 ohmios desde antena combinada de VHF/
UHF al soporte de antena.
Si su antena combinada es un cable de 300 ohmios de conductores
gemelos, use un transformador de adaptación de 300-75 ohmios
(no suministrado).
Antena combinada de VHF/UHF (VHF separada y UHF 300
ohmios de conductores gemelos)
Conecte el cable de conductores gemelos de UHF al combinador (no
suministrado). Conecte el cable de conductores gemelos de VHF al
transformador de adaptación de 300-75 ohmios (no suministrado).
Fije el combinador al soporte de antena.
PARA LOS ASOCIADOS A UN SERVICIO DE TV POR CABLE
BASICO
Para un servicio de cable básico que no requiera convertidor/
descodificador, conecte el cable coaxial CATV 75 ohmios
directamente a la entrada de antena en la parte trasera del televisor.
PARA LOS ASOCIADOS A UN SERVICIO DE TV POR CABLE
"CODIFICADO"
Si Ud. está asociado a un servicio de cable que requiere el uso de
un convertidor/descodificador conecte el cable de bajada de antena
al convertidor/descodificador y conecte la salida de ésta a la entrada
de antena en la parte trasera del televisor. Siga el conexionado
como se muestra en la figura. Sintonice el televisor en el canal de
salida del convertidor/descodificador (usualmente canal 3 ó 4) y
utilice el convertidor/descodificador para la selección de canales.
PARA ASOCIADOS A UN SERVICIO DE CABLE BASICO CON
CANALES ESPECIALES CODIFICADOS
Si Ud. está asociado a un servicio de cable en el cual los canales
básicos son comunes y los canales especiales necesitan un
convertidor/descodificador, puede utilizar un divisor de señal (a
veces llamada "acoplador") y una caja de interruptor de cambio A/B.
Siga el conexionado como se muestra en la figura. Con la
interruptor en la posición "B", Ud. puede sintonizar directamente
cualquier canal común en su televisor. Con la interruptor en la
posición "A", puede seleccionar los canales codificados desde el
convertidor/decodificador sintonizando el televisor en el canal de
salida del convertidor/decodificador (canal 3 ó 4).
CONEXIONES DE TOMA AUDIO/VIDEO
La instalación exacta a utilizar para hacer las conexiones de los distintos componentes de video y audio en el TV depende del modelo y
funciones de cada componente. Confirme en el manual de instrucciones de cada componente para la posición de las entradas y salidas de
video y de audio.
Los diagramas de conexión a continuación son sugerencias. Puede ser necesario modificarlos según los equipos que posee. Los diagramas
muestran sólo las conexiones de componentes de video y audio.
Presione el botón selector TV/AV para seleccionar el modo AV para utilizar el TV como monitor.
Haga funcionar su videograbadora como lo haría normalmente.
2. Para conectar el TV a un juego de TV
El TV puede utilizarse también como pantalla para muchos juegos
SELECCION TV/AV
de video. Sin embargo, debido a que existe una gran variedad de
Si conecta el TV en la videograbadora, videocámara o juego de TV,
tipos diferentes de señales generadas por estos aparatos y
puede seleccionarlo presionando el botón TV/AV.
diferentes requisitos de conexión correspondientes, no se han
incluido todas las posibilidades posibles en los diagramas de
Presione repetidamente el botón TV/AV para seleccionar el modo
conexión sugeridos. Para más detalles, deberá consultar el
deseado.
manual de instrucciones de cada componente.
Aparecerá "AUX1" o "AUX2" en la pantalla durante 4 segundos.
A salida de Audio/Video
Frente del TV
TV
AUX 1
AUX 1
AUX 2
(no está incluido)
1. Para conectar el TV a una videograbadora
Atrás del TV
VCR
VIDEO
AUDIO
(Izquierda)
A salida de
Audio/Video
(no está incluido)
3R20521A-S/P02-07
3. Para conectar el TV a la videocámara
Para reproducir de la videocámara, conecte la videocámara en el
TV tal como se indica.
Frente del TV
A salida de AV
(MONO)
VIDEO IN L – AUDIO IN – R
AUDIO
(Derecha)
(no está incluido)
6
6
(MONO)
VIDEO IN L – AUDIO IN – R
JUEGO
DE TV
TV GAME
27/4/04, 14:05
CONEXIONES DE LA TOMA DE AUDIO/VIDEO
(CONTINUACIÓN)
4. Para conectar el TV a un VCR con una toma S-VIDEO
Si conecta un VCR con una toma S-video a la toma S-VIDEO de la parte posterior del TV, también debe conectar los cables de audio
a las tomas AUDIO IN de la parte posterior del TV. El cable S-video sólo transporta la señal de vídeo. La señal de audio es independiente.
Parte posterior del TV
AUDIO (L)
AUDIO (R)
(no suministrado)
NOTA: Cuando el cable S-video y el cable de vídeo
estándar se conectan al mismo tiempo, el
cable S-video toma preferencia.
S-VIDEO
(no suministrado)
AJUSTE DE LENGUA
Este TV puede mostrar las indicaciones en la pantalla en inglés, español o francés.
La selección de idioma en la pantalla (paso 3) aparecerá automáticamente en la pantalla cuando presione el botón MENU al
principio. Seleccione primero el idioma preferido y vaya a las otras opciones de menú.
3 Presione el botón SET + ó – hasta LANGUAGE / IDIOMA / LANGUE
MENU
1 Presione el botón MENU.
que el indicador " " señale la
CH SETUP
ENGLISH
PICTURE
lengua deseada:inglés (ENGLISH),
ESPAÑOL
AUDIO
español
(ESPAÑOL)
o
francés
Presione
el
botón
SET
+
ó
–
2
LANGUAGE
FRANCAIS
(FRANCAIS), y después presione
para seleccionar el modo
V-CHIP SET
el botón ENTER.
LANGUAGE, y después presione
+
〈
〈 + / – / ENTER / MENU 〉
/ – / ENTER / MENU 〉
el botón ENTER.
Presione
el
botón
MENU
otra
vez
4 para volver a la imagen normal de TV.
NOTA:
Si español o francés se ha escogido, los indicadores de Subtítulo Cerrado será en la lengua seleccionada, pero el texto de
Subtítulo Cerrado será no afectado por la selección de lengua.
OPERACION DEL TELEVISOR
Antes de hacer funcionar su TV, presione el botón TV en la
parte inferior del remoto para controlar el TV utilizando el remoto.
1
Para encender el televisor, presione el interruptor de
alimentación (POWER).
2
Ajuste el volumen al nivel deseado usando los botones
de aumento/disminución de volumen (VOL / ).
El nivel de sonido se indicará en la pantalla de TV
mediante barras verdes y un número. Cuando el nivel de
sonido aumente, también aumentará el número de barras
y el número en la panlalla. De igual forma, el número de
barras disminuirá cuando disminuya el nivel.
3
Ajuste la opción de menú de TV/CATV al modo deseado.
Al despacharse de fábrica, esta opción de menú está en el
modo de CATV. Vea "PARA MEMORIZAR CANALES".
TV - Canales de VHF/UHF
CATV - Canales de CABLE TV
4
Botones selectores de canal (CH
/
)
Presione y libere el botón selector de canal en
o . La
unidad se detendrá automáticamente en el siguiente canal
almacenado en la memoria. Presione y mantenga presionado
el botón para hacer que los canales cambien más rápido.
Antes de seleccionar canales, éstos deberán ser
almacenados en la memoria del televisor. Consulte la
sección "PARA MEMORIZAR CANALES".
Botones de selección directa de canal (0-9)
Utilice estos botones para seleccionar canales. El número del
canal será indicado en la esquina superior derecha de la
pantalla de TV. Si se selecciona un número de canal inválido, la
pantalla volverá al canal anterior.
Selección directa de canal en modo de TV
Cuando la opción de menú de TV/CATV está en el modo de
TV, todos los canales pueden seleccionarse intantáneamente
usando dos botones. (Por ejemplo, para seleccionar el canal 2,
presione "0" y "2". Si usted sólo presiona "2", la selección del
canal se retardará unos segundos.) Para los canales de 10 en
adelante, presione los dos dígitos en orden.
3R20521A-S/P02-07
7
Selección directa de canal en modo CATV
Cuando la opción de menú de TV/CATV está en el modo de
CATV, los canales pueden seleccionarse como sigue:
Presione "0" dos veces, y luego 1-9
según sea necesario.
Por ejemplo, para seleccionar el canal
2, presione "002".
Primero presione "0", y luego los 2
CANAL 10-12
dígitos restantes.
Por ejemplo, para seleccionar el canal
12, presione "012".
Presione los 2 dígitos en orden.
CANAL 13-99
Por ejemplo, para seleccionar el canal
36, presione "36".
CANAL 100-125 Presione los 3 dígitos en orden.
Por ejemplo, para seleccionar el canal
120, presione "120".
CANAL 1-9
NOTA: Si el canal sintonizado deja de transmitir programas, el
televisor se apagará automáticamente al cabo de 15 minutos.
SLEEP
Para hacer que el televisor se apague después de un
período de tiempo prefijado, presione el botón SLEEP del
unidad de control remoto. La indicación disminuirá en
intervalos de 10 minutos cada vez que el botón sea
presionado (en el orden de 120, 110, 100, ... 20, 10, 0.).
Una vez programado el tiempo de desactivación
automática, la indicación desaparecerá de la pantalla,
después de lo cual volverá a aparecer momentáneamente
cada diez minutos para recordarle que la función de
desactivación automática está activada. Para confirmar el
tiempo de desactivación automática, presione el botón
SLEEP una vez; el tiempo restante
SLEEP
será momentáneamente exhibido.
120
Para cancelar la función de
desactivación automática, presione
repetida-mente el botón SLEEP hasta
que la indicación sea 0.
7
27/4/04, 14:05
ESPAÑOL
VCR
PARA MEMORIZAR CANALES
Este televisor está equipado con una función de
memorización de canales que permite avanzar o retroceder
al siguiente canal almacenado en la memoria, pasando por
alto los canales no deseados.
Antes de seleccionar canales, éstos deberán estar
programados en la memoria del televisor. Además de los
canales normales de VHF y UHF, este televisor puede recibir
hasta 113 canales de TV cable. Para usar el televisor con
una antena, coloque la opción de menú de TV/CATV al modo
de TV. Cuando sale de fábrica, la opción de menú TV/CATV
está en el modo CATV.
MEMORIA AUTOMATICA DE CANAL
1
2
Presione el botón MENU.
3
Presione el botón SET + ó – hasta que
el indicador "AUTO CH MEMORY"
empiece a parpadear seguidamente, y
a continuación presione el botón ENTER. El TV comenzará a memorizar
todos los canales disponibles en su
área.
SELECCION DE TV/CATV
1
Presione el botón MENU.
2
Presione el botón SET + ó – hasta
que el indicador "CH SETUP"
empiece a parpadear seguidamente,
y a continuación presione el botón
ENTER.
3
4
5
Presione el botón SET + ó – hasta que
el indicador "TV/CATV" empiece a
parpadear seguidamente.
Presione el botón ENTER para
seleccionar el modo TV o CATV. La
flecha indica el modo seleccionado.
MENU
CH SETUP
PICTURE
AUDIO
LANGUAGE
V-CHIP SET
〈 + / – / ENTER / MENU 〉
TV
CATV
AUTO CH MEMORY
4
Presione el botón MENU.
3
Presione el botón SET + ó – hasta que
el indicador "ADD/DELETE" empiece a
parpadear seguidamente, y a
continuación presione el botón
ENTER.
ADD / DELETE
14
A
32
S
50
NN
68
III
86
86
104
104
122
122
31
R
49
MM
67
HHH
85
ZZZ
103
103
121
121
15
16
17
18
19
B
C
D
E
F
33
34
35
36
37
T
U
V
W
AA
51
52
53
54
55
OO PP QQ RR SS
69
70
71
72 73
JJJ KKK LLL MMM NNN
87
88
89
90
91
87
88
89
90
91
105 106 107 108 109
105 106 107 108 109
123 124 125 01
123 124 125 5A
20
G
38
BB
56
TT
74
OOO
92
92
110
110
21
H
39
CC
57
UU
75
PPP
93
93
111
111
22
I
40
DD
58
VV
76
QQQ
94
94
112
112
Presione el botón SET + ó – hasta
que el indicador "CH SETUP"
empiece a parpadear seguidamente,
y a continuación presione el botón
ENTER.
〈 + / – / ENTER / MENU 〉
MENU
CH SETUP
PICTURE
AUDIO
LANGUAGE
V-CHIP SET
〈 + / – / ENTER / MENU 〉
TV
CATV
AUTO CH MEMORY
ADD / DELETE
〈 + / – / ENTER / MENU 〉
5
Presione el botón ENTER para seleccionar ADD o
DELETE. Si un canal no memorizado se ha
seleccionado (paso 4), el indicador de canal será en
rojo. Presione el botón ENTER si usted desea añadir el
canal no memorizado. Cuando un canal se añadido, el
indicador de canal cambiará de rojo a verde y el canal
será memorizado.
Si un canal memorizado se ha seleccionado (paso 4), el
indicador de canal será en verde.
Presione el botón ENTER si usted
desea borrar el canal de la memoria.
Cuando el canal se borrado, el
indicador de canal cambiará de
verde a rojo.
Repita los pasos 4 y 5 para ser
añadido o borrado cada canal.
6
ADD
CH 012
〈0-9 / + / – / ENTER / MENU 〉
Presione el botón MENU tres veces después de añadir
o borrar todos los canales deseados, para volver a la
imagen normal de TV.
8
8
ADD / DELETE
Seleccione los canales deseados a
agregar o borrado mediante los
botones de Selección Directa de
Canal (10 teclas, 0-9), el botón CH
Subir/Bajar o el botón SET + ó –.
NOTA: Póngase en contacto con la compañía de cable
para determinar el tipo de sistema de cable
usado en su área.
3R20521A-S/P08-BACK
CATV
4
CANALES CATV
30
Q
48
LL
66
GGG
84
YYY
102
102
120
120
TV
AUTO CH MEMORY
Presione el botón MENU dos veces
para volver a la imagen normal de TV.
1
2
Presione el botón MENU dos veces
para volver a la imagen normal de
TV.
Números en este TV
Canal de CATV correspondientes
23
24
25
26
27
28
29
J
K
L
M
N
O
P
41
42
43
44
45
46
47
EE FF GG HH
II
JJ
KK
59
60
61
62
63
64
65
WW AAA BBB CCC DDD EEE FFF
77
78
79
80
81
82
83
RRR SSS TTT UUU VVV WWW XXX
95
96
97
98
99 100 101
A-5 A-4 A-3 A-2 A-1 100 101
113 114 115 116 117 118 119
113 114 115 116 117 118 119
MENU
CH SETUP
PICTURE
AUDIO
LANGUAGE
V-CHIP SET
〈 + / – / ENTER / MENU 〉
PARA AÑADIR/BORRAR CANALES
〈 + / – / ENTER / MENU 〉
El cuadro abajo muestra el sistema típico de la localización
de los canales por cable.
Presione el botón SET + ó – hasta que
el indicador "CH SETUP" empiece a
parpadear seguidamente, y a
continuación presione el botón ENTER.
27/4/04, 14:05
SELECCION DE CHIP V
Este televisor tiene un control V-CHIP para fijar una prohibición y controlar el acceso para ver determinados canales.
1
Presione el botón SET + ó – para seleccionar la opción
V-CHIP SET y presione el botón ENTER.
PROHIBICION DE TV
2
Entre su contraseña (4 cifras) utilizando los botones de
selección de canal directo (0-9).
En el caso de haber entrado una contraseña equivocada,
presione el botón RESET y vuelva a entrar la misma
contraseña. A continuación, presione el botón ENTER.
OFF
Entre la misma contraseña para confirmarla, y presione el
botón ENTER.
4
Presione el botón SET + ó – para seleccionar la opción
V-CHIP. Presione el botón ENTER para activar a ON.
5
Presione el botón SET + ó – para seleccionar la opción TV
RATING o MOVIE RATING. Presione el botón ENTER.
6
Presione el botón SET + ó – para seleccionar la prohibición
deseada para el video o canal de TV aplicable. Presione el
botón ENTER.
TV-Y7
SET +
TV-G
TV-PG
TV-14
TV-MA
TV-Y : todos los niños
TV-Y7 : 7 años o mayor
TV-G : programa para niños
TV-PG : con autorización de los
padres
TV-14 : 14 años o más
TV-MA : 17 años o más
Cuando seleccione TV-Y7, TV-PG, TV-14 o TV-MA, presione el
botón CALL para mostrar el nivel de prohibición.
Presione el botón SET + o – para seleccionar la clasificación deseada.
Presione el botón ENTER para seleccionar el ajuste ON u OFF.
PROHIBICION DE PELICULAS
SET –
OFF
G
PG
SET +
PG-13
R
NC-17
X
: menores de 17 años se
: para todas las edades R
recomienda autorización
:
con
autorización
de
los
7
de los padres
padres
PG-13 : con autorización de los NC-17 : 17 años o mayor
: sólo para adultos
X
padres menos de 13
años
NOTAS:
• Si no puede localizar o pierde la contraseña, puede cancelar la contraseña existente usando el siguiente procedimiento:
- Oprima el botón VOLUMEN ▼ de la unidad principal.
- Siga oprimiendo el botón VOLUMEN ▼, simultáneamente, oprima la tecla “0” del control remoto durante unos cuantos segundos.
• Si desea cambiar la contraseña, siga los pasos 1 y 2 y seleccione la opción "CHANGE PASSWORD" para entrar su nueva contraseña.
• La función de chip V se activa sólo en los programas y cintas que tienen la señal de nivel de prohibición.
• Cuando se prohibe un programa con la función del Chip V, el programa prohibido no puede verse según su contenido. Cuando el
programa empieza, aparecerá “ENTER PASSWORD” en la pantalla. Para cancelar el Chip V temporalmente, entre la contraseña.
Si cambia de canal o desconecta el TV cuando el Chip V está cancelado temporalmente, volverá a activarse el Chip V seleccionado.
• Si está cambiando los canales utilizando una videograbadora o una caja de cable mientras que el TV está sintonizando en el canal 3
ó 4, el V-Chip funciona de forma diferente. Cuando entre su contraseña para cancelar temporalmente el bloqueo en cualquier canal,
se desactivará enteramente la función del V-Chip para todas las emisoras. Para reponer el V-Chip, desconecte el TV y vuelva a conectar.
• Algunas cajas de cable fueron diseñadas con una función de retardo, en algunos casos puede demorar unos 10 segundos para
que un programa aparezca después de entrar una contraseña.
Presione el botón MENU hasta que se borre la pantalla
MENU.
G
PG
SUBTÍTULO CERRADO
¿QUE ES LA RECEPCION DE TEXTO?
Las leyendas aparecerán en los lugares de la pantalla que
interfieran mínimamente con la imagen, generalmente en la parte
inferior de la misma. Los programas de noticias mostrarán
generalmente tres líneas de leyendas que cambiarán en la pantalla
La mayoría de los otros programas ofrecen dos o tres líneas de
leyendas colocadas cerca del personaje que está hablando de
tal manera que el usuario pueda seguir el diálogo. Las letras
itálicas o subrayadas indican títulos, palabras en lenguas extranjeras
PARA VER LOS SUBTITULOS CERRADOS
o palabras que requieren énfasis. Las letras de canciones
Presione el botón TV/CAP/TEXT en el mando a distancia para
aparecen encerradas entre notas musicales.
cambiar entre el TV normal y los dos modos de subtítulos
Texto: El modo de recepción de texto llenará usualmente una
cerrados (subtítulos y texto en toda la pantalla).
tercera parte de pantalla completa con la programación de
programas y otras informaciones. Después de seleccionar uno
Leyendas: Este modo de recepción de texto mostrará el texto
de los modos de recepción de texto, éste continuará activado
en pantalla en inglés o otra lengua (dependiendo de la
hasta que se lo cambie, independientemente de que se sintonice
programación del botón CH.1/2 de recepción de texto).
otro canal. Si se pierde la señal de la emisión de texto debido a
Generalmente las emisiones de textos en inglés son recibidas
un aviso comercial o al corte de la señal, las leyendas
reaparecerán cuando la señal sea recibida nuevamente. Si se
en el canal 1 de recepción de texto y los textos en otras
cambia de canal, las leyendas se retardarán en 10 segundos
lenguas son recibidos en el canal 2 de recepción de texto.
aproximadamente.
Para recibir emisiones de programas de televisión con emisión de
texto, refiérase a su guía de TV en la que estarán indicadas con
el símbolo (CC).
• Cuando está activando el descodificador de subtítulo cerrado, habrá una demora corta antes de aparecer texto de subtítulo
cerrado en la pantalla.
• El texto del programa aparecerá en pantalla solo en aquellas áreas donde exista este tipo de servicio.
• Si no se recibe la señal de emisión de texto, no aparecerán leyendas, pero el televisor permanecerá en el modo de recepción de texto.
• Ocasionalmente podrán aparecer faltas de ortografía o caracteres extraños durante la recepción de texto. Esto es normal en este
modo, especialmente con los programas en vivo. Esto se debe a que durante los programas en vivo, los textos son ingresados
sin edición, ya que no hay tiempo para la misma.
• Cuando las leyendas estén en pantalla, puede ser que las indicaciones de funciones como volumen y silenciamiento no
aparezcan ya que interferirían con las leyendas.
• Algunos sistemas de cable y sistemas de protección contra copias pueden interferir con la señal de emisión de texto.
• Si utiliza una antena interior o si la recepción del TV es muy insuficiente, el texto de las emisiones puede no aparecer o mostrar
caracteres extraños y errores de ortografía. En tal caso, ajuste la antena para mejorar la recepción o utilice una antena externa.
Este televisor tiene capacidad para descodificar y mostrar los
programas de televisión con emisión de texto. Esta función
mostrará el texto en pantalla para los usuarios con problemas
de audición o traducirá y mostrará el texto que se encuentre en
otra lengua.
9
3R20521A-S/P08-BACK
9
27/4/04, 14:05
ESPAÑOL
3
SET –
TV–Y
PROGRAMA DE AUDIO SONIDO (SAP) Y ESTEREO
El aparato de TV está equipado con una función conocida
como sonido de TV multicanal o MTS. Las transmisiones
MTS permiten disfrutar mejor de la TV ya que sus programas
tienen un sonido en estéreo de alta fidelidad. MTS también
tiene un canal adicional llamado programa de audio sonido
o SAP que los canales de TV pueden utilizar para transmitir
un segundo idioma en las transmisiones bilingües o para
otros propósitos.
PARA ESCUCHAR EN SAP (PROGRAMA DE
AUDIO SONIDO)
PARA ESCUCHAR SONIDOS EN ESTEREO
TRANSMISION MONOAURAL+SAP
Cuando el aparato de TV está encendido o se hace una
selección de canal, asegúrese de que aparece "STEREO"
en la pantalla. Esto significa que se pueden recibir
transmisiones en "Estéreo". Puede disfrutar de los sonidos
en estéreo utilizando las altavoces izquierdo y derecho.
• Cuando se reciben transmisiones "MONO" no aparece
ninguna indicación.
• Si la señal transmisora no es lo suficientemente fuerte o
no puede escuchar nítidamente los sonidos en estéreo,
presione el botón AUDIO SELECT para cambiar a un
sonido monoaural. Con este deberán eliminarse los ruidos.
Presione nuevamente para escuchar los sonidos en estéreo.
AJUSTES DE SONIDO
Se pueden hacer los ajustes de graves, agudos, balance,
surround y sonido est.
1
Presione el botón MENU.
2
Presione el botón SET + ó –
hasta que el indicador al lado de
"AUDIO" empiece a parpadear y
presione el botón ENTER.
3
Presione el botón ENTER repetidamente para
seleccionar el punto que desea ajustar.
GRAVES
AGUDOS
(BASS)
(TREBLE)
SONIDO EST.
(STABLE SOUND)
4
MENU
CH SETUP
PICTURE
AUDIO
LANGUAGE
V-CHIP SET
BALANCE
(BALANCE)
SURROUND
(SURROUND)
Cuando el aparato de TV está encendido o se hace una selección
de canal, asegúrese de que aparece SAP en la pantalla. Esto significa
que se puede recibir transmisiones en "Programa de audio sonido".
PARA SELECCIONAR SONIDO DESEADO
Presione el botón AUDIO SELECT para seleccionar el
sonido deseado.
SONIDO PRINCIPAL
(MONOAURAL)
SONIDO
SEPARADO
SONIDO
PRINCIPAL+SEPARADO
(MONOAURAL)
TRANSMISION ESTEREO+SAP
SONIDO PRINCIPAL
(ESTEREO)
SONIDO SEPARADO
SONIDO PRINCIPAL
(MONOAURAL)
SONIDO
PRINCIPAL+SEPARADO
(MONOAURAL)
NOTA: Si conecta este aparato de TV con un aparato de
vídeo o un sintonizador por cable, debe utilizar cables de audio/vídeo estéreo para poder recibir sonido estéreo. Además,
debe comprobar que el aparato de vídeo o el sintonizador por
cable sean unidades estéreo.
FUNCIÓN SURROUND (ENVOLVENTE)
La función SURROUND profundiza y ensancha el campo
de escucha del sonido para crear una excepcional calidad
del sonido procedente de los altavoces del televisor. La
función usa señales estéreo desde una emisión de TV o
una entrada de vídeo.
FUNCIÓN STABLE SOUND (SONIDO ESTABLE)
Cuando se emite un sonido de alto volumen, la función de
sonido estable contribuye a equilibrar el volumen hasta un
nivel de escucha más confortable.
PARA VOLVER AL AJUSTE INICIAL
Presione el botón RESET cuando aparece en la pantalla el
modo de ajuste de imagen.
Presione el botón SET + ó – dos veces para hacer el ajuste.
GRAVES
AGUDOS
BALANCE
SURROUND
SONIDO EST.
+
más
más
más en el altavoz
derecho
ON
ON
–
menos
menos
más en el altavoz
izquierdo
OFF
OFF
NOTA:
Las indicaciones en la pantalla desaparecen 6 segundos
después de terminar los ajustes o cuando se presiona el
botón CALL. Los ajustes sólo pueden cambiarse cuando
aparecen en la pantalla de TV.
AJUSTE DE IMAGEN
Se pueden hacer los ajustes de color nitidez, contraste,
brillo y tinte.
1
Presione el botón MENU.
2
Presione el botón SET + ó – hasta que el indicador al
lado de "PICTURE" empiece a parpadear y presione el
botón ENTER.
3
Presione el botón ENTER repetidamente para
seleccionar el punto que desea ajustar.
BRIGHTNESS
(BRILLO)
CONTRAST
(CONTRASTE)
COLOR
(COLOR)
TINT
(TINTE)
SHARPNESS
(DIFINICION)
4
Presione el botón SET + ó – dos veces para hacer el
ajuste.
BRILLO
CONTRASTE
COLOR
TINTE
DIFINICION
+
–
aumenta el brillo
aumenta el contraste
color brillante
color hacia el verde
le imagen es más nítida
disminuye el brillo
disminuye el contraste
tiene un color pálido
color rojizo
le imagen es más suave
PARA VOLVER AL AJUSTE INICIAL
Presione el botón RESET cuando aparece en la pantalla el
modo de ajuste de imagen.
10
3R20521A-S/P08-BACK
10
27/4/04, 14:05
ANTES DE SOLICITAR SERVICIO
Antes de solicitar servicio, verifique los puntos síntoma y posible solución en la siguiente tabla.
POSIBLE SOLUCION
• Verifique que el cable de alimentación esté
conectado.
• Pruebe con otro tomacorriente de CA.
El televisor
• La alimentación está desconectada; revise el
no funciona.
fusible o el interruptor automático.
• Desconecte la unidad, y vuelva a conectarla al
cabo de una hora.
• La estación o el servicio de TV cable están
Sonido de
con problemas; sintonice otra estación.
baja calidad • Verifique los ajustes de sonido (volumen y
o ausencia
silenciamiento).
de sonido.
• Determine si hay posibles fuentes de
interferencia.
• La estación o el servicio de TV cable están con
problemas; sintonice otra estación.
Imagen de
• Verifique que haya canales almacenados en la
baja calidad
memoria.
o ausencia
• Revise las conexiones de la antena o sistema
de imagen.
CATV; reoriente la antena.
• Determine si hay posibles fuentes de interferencia.
• Verifique los ajustes de los controles de imagen.
• La estación o el servicio de TV cable están
con problemas; sintonice otra estación.
Mala
• Verifique que haya canales almacenados en la
recepción
memoria.
en algunos
• La señal de la estación es débil; reoriente la antena.
canales.
• Determine si hay posibles fuentes de
interferencia.
• La estación o el servicio de TV cable están
con problemas; sintonice otra estación.
Mala
• Verifique que haya canales almacenados en la
definición de memoria.
los colores o
ausencia de • Verifique los ajustes de los controles de imagen.
• Revise las conexiones de la antena o sistema
color.
CATV; reoriente la antena.
• Determine si hay posibles fuentes de interferencia.
La imagen
presenta
oscilación o
desplazamiento.
• La estación o el servicio de TV cable están
con problemas; sintonice otra estación.
• Verifique que haya canales almacenados en
la memoria.
• El servicio CATV está transmitiendo una señal
codificada.
• Reoriente la antena.
SINTOMA
POSIBLE SOLUCION
• Revise todas las conexiones del sistema CATV.
La recepción
• Ajuste la opción de menú de TV/CATV al
CATV no es
modo CATV.
posible.
• La estación o el servicio de TV cable están
con problemas; pruebe con otra estación.
Aparecen barras • Revise las conexiones de la antena y
horizontales o
reoriente la antena.
verticales en la • Determine si hay posibles fuentes de interferencia.
pantalla.
• Asegúrese de que la opción de menú TV/
La recepción
CATV está ajustado a la posición apropiada
no es posible
en la selección de menú de la pantalla.
más allá del
• Si está usando una antena, revise las
canal 13.
conexiones de la antena de UHF.
• Las pilas están débiles o agotadas, o han
sido insertadas en forma incorrecta.
• El remoto está fuera de la gama, acérquese
al TV dentro del entorno de (15 pies).
El televisor no
• Asegúrese de apuntar la unidad de control
puede ser
remoto hacia el sensor de control remoto.
operado a
control remoto. • Verifique que no haya obstáculos entre la
unidad de control remoto y el televisor.
• Asegúrese de que el cable de alimentación
esté conectado.
• La estación sintonizada no está transmitiendo.
El televisor se • El temporizador de desactivación automática
apaga.
ha sido activado.
• El suministro de energía se ha interrumpido.
No hay
recepción.
La función de
subtítulo
cerrado no es
activada.
La lengua
deseada no se
muestra.
• Cancelar su clave.
• Estación de TV está experimentando problemas
o programa sintonizado no es en modo de
subtítulo cerrado. Pruebe en otro canal.
• Asegúrese de conexión de CATV o antena
VHF/UHF, reposición o gire antena.
• Precione el botón de TV/CAP/TEXT para
encender la codificador de subtítulo cerrado.
• Seleccione la lengua apropiada en las
selecciones de menú.
SISTEMA DE DESMAGNETIZACIÓN
Esta televisión tiene un circuito de desmagnetización que eliminará todas las distorsiones de color de la pantalla del televisor
causadas por un exceso de magnetismo que se acerque demasiado al televisor. Este circuito está diseñado para funcionar una
vez cuando se enchufe la unidad por primera vez. Si se ven pequeñas distorsiones de color en algunos puntos de la pantalla,
desenchufe el televisor durante 15 minutos aproximadamente. Cuando se vuelva a enchufar el televisor, el circuito de
desmagnetización funcionará una vez par eliminar cualquier distorsión de color. Repita este procedimiento en cualquier momento
en que el televisor sea magnetizado accidentalmente o bien se mueva o se cambie de lugar.
ESPECIFICACIONES
Alimentación de CA:
Consumo de CA:
Construcción del chasis:
Tubo de imagen:
Résolution horizontale:
Potencia nominal de salida de audio:
Altavoz:
Tipo de sintonizador:
Unidad de control remoto:
ACCESORIO
Unidad de control remoto
120 V, 60 Hz
125 watts
CI de estado sólido
27" (medido diagonalmente)
260 lignes
2,5 + 2,5 watts
2" x 3-1/2" gama completa, 8
ohmios x 2
Sintetizador de frecuencias PLL a
cuarzo para 181 canales
Infrarroja, de acceso directo, 2 pilas
AAA (no suministradas)
Canales de recepción: VHF 2-13
UHF 14-69
CATV 01-97 (5A)-(A-3)
98-99 (A-2)-(A-1)
14-22 (A)-(I)
23-36 (J)-(W)
37-65 (AA)-(FFF)
66-125 (GGG)-(125)
Impedancia de entrada
de antena:
Entrada coaxial de 75 ohmios
Entradas/Salidas:
(VHF/UHF/CATV)
S-Video Y-Input : 1,0Vp-p/75 ohmios
C-Input : 0,3Vp-p/75 ohmios
Video:
In (RCA) 1,0Vp-p/75 ohmios
Out (RCA) 1,0Vp-p/75 ohmios
Audio:
In (RCA) –8dB/50K ohmios
Out (RCA) –8dB/1K ohmios
Dimensiones:
25-9/16" (ancho) x 19-11/16" (prof)
x 22-1/2" (alto.)
Peso:
80,5 Ibs
11
3R20521A-S/P08-BACK
11
27/4/04, 14:05
ESPAÑOL
SINTOMA
90 Day Full Warranty
If this product experiences any failure due to a defect in material or workmanship within 90 days
from the date of purchase, return it to your nearest Sears Parts & Repair Center, and Sears will
repair it free of charge.
After 90 days and until one (1) year from the date of purchase, Sears will replace defective parts
free of charge. You pay for labor.
After 90 days and until two (2) years from the date of purchase, Sears will replace the Picture
Tube if it is defective. You pay for labor.
This warranty applies only if this (product) is used for private household purposes.
This warranty gives you specific legal rights, and you may also have other rights which vary from
state to state.
Sears, Roebuck and Co., Dept. 817WA, Hoffman Estates, IL 60179
Please keep all packaging material for at least 90 days in case you need to return this product.
For parts, accessories, and service information, see the back cover.
12
3R20521A-S/P08-BACK
12
27/4/04, 14:05
○
○
○
○
○
○
○
○
○
○
○
○
○
○
○
○
○
○
○
○
○
○
○
○
○
○
○
○
○
○
○
○
○
○
○
○
○
○
○
○
○
○
○
○
○
○
○
○
○
○
○
○
○
○
○
○
○
○
○
○
○
○
○
○
○
○
○
○
○
○
○
○
○
○
○
○
○
○
○
○
○
○
○
○
○
○
○
○
○
○
○
○
○
○
○
○
○
○
○
○
○
○
○
○
○
○
○
○
○
○
○
○
○
○
○
○
○
○
○
○
○
○
○
○
○
○
○
○
○
○
○
○
○
○
○
○
○
○
○
○
○
○
○
○
○
○
○
○
○
○
○
○
○
○
○
○
○
○
○
○
○
○
○
○
○
○
○
○
○
○
○
○
○
○
○
○
○
○
○
○
○
○
○
○
○
○
○
○
○
○
○
○
○
○
○
○
○
○
○
○
○
○
○
○
○
○
○
○
○
○
○
○
○
○
○
○
○
○
○
○
○
○
○
○
○
○
○
○
○
○
○
○
○
○
○
○
○
○
○
○
○
○
○
○
○
○
○
○
○
○
○
○
○
○
○
○
○
○
○
○
○
○
○
○
○
○
○
○
○
○
○
○
○
○
○
○
○
○
○
○
○
○
○
○
○
○
○
○
○
○
○
○
○
○
○
○
○
○
○
○
○
○
○
○
○
○
○
○
○
○
○
○
○
○
○
○
○
○
○
○
○
○
○
○
○
○
○
○
○
○
○
○
○
○
○
○
○
○
○
○
○
○
○
○
○
○
○
○
○
○
○
○
○
○
○
○
○
○
○
○
○
○
○
○
○
○
○
○
○
○
○
○
○
○
○
○
○
○
○
○
○
○
○
○
○
○
○
○
○
○
○
○
○
○
○
○
○
○
○
○
○
○
○
○
○
○
○
○
○
○
○
○
○
○
○
○
○
○
○
○
○
○
○
○
○
○
○
○
○
○
○
○
○
○
○
○
○
○
○
○
○
○
○
○
○
○
○
○
○
○
○
○
○
○
○
○
○
○
○
○
○
○
○
○
○
○
○
○
○
○
○
○
○
○
○
○
○
○
○
○
○
○
○
○
○
○
○
○
○
○
○
○
○
○
○
○
○
○
○
○
○
○
○
○
○
○
○
○
○
○
○
○
○
○
○
○
○
○
○
○
○
○
○
○
○
○
○
○
○
○
○
○
○
○
○
○
○
○
○
○
○
○
○
○
○
○
○
○
○
○
○
○
○
○
○
○
○
○
○
○
○
○
○
○
○
○
○
○
○
○
○
○
○
○
○
○
○
○
○
○
○
○
○
○
○
○
○
○
○
○
○
○
○
○
○
○
○
○
○
○
○
○
○
○
○
○
○
○
○
○
○
○
○
○
○
○
○
○
○
○
○
○
○
○
○
○
○
○
○
○
○
○
○
○
○
○
○
○
○
○
○
○
○
○
○
○
○
○
○
○
○
○
○
○
○
○
○
○
○
○
○
○
○
○
○
○
○
○
○
○
○
○
○
○
○
○
○
○
○
○
○
○
○
○
○
○
○
○
○
○
○
○
○
○
○
○
○
○
○
○
○
○
○
○
○
○
○
○
○
○
○
○
○
○
○
○
○
○
○
○
○
○
○
○
○
○
○
○
○
○
○
○
○
○
○
○
○
○
○
○
○
○
○
○
○
○
○
○
○
○
○
○
○
○
○
○
○
○
○
○
○
○
○
○
○
○
○
○
○
○
○
○
○
○
○
○
○
○
○
○
○
○
○
○
○
○
○
○
○
○
○
○
○
○
○
○
○
○
○
○
○
○
○
○
○
○
○
○
○
○
○
○
○
○
○
○
○
○
○
○
○
○
○
○
○
○
○
○
○
○
○
○
○
○
○
○
○
○
○
○
○
○
○
○
○
○
○
○
○
○
○
○
○
○
○
○
○
○
○
○
○
○
○
○
○
○
○
○
○
○
○
○
○
○
○
○
○
○
○
○
○
○
○
○
○
○
○
○
○
○
○
○
○
○
○
○
○
○
○
○
○
○
○
○
○
○
○
○
○
○
○
○
○
○
○
○
○
○
○
○
○
○
○
○
○
○
○
○
○
○
○
○
○
○
○
○
○
○
○
○
○
○
○
○
○
○
○
○
○
○
○
○
○
○
○
○
○
○
○
○
○
○
○
○
○
○
○
○
○
○
○
○
○
○
○
○
○
○
○
○
○
○
○
○
○
○
○
○
○
○
○
○
○
○
○
○
○
○
○
○
○
○
○
○
○
○
○
○
○
○
○
○
○
○
○
○
○
○
○
○
○
○
○
○
○
○
○
○
○
○
○
○
○
○
○
○
○
○
○
○
○
○
○
○
○
○
○
○
○
○
○
○
○
○
○
○
○
○
○
○
○
○
○
○
○
○
○
○
○
○
○
○
○
○
○
○
○
○
○
○
○
○
○
○
○
○
○
○
○
○
○
○
○
○
○
○
○
○
○
○
○
○
○
○
○
○
○
○
○
○
○
○
○
○
○
○
○
○
○
○
○
○
○
○
○
○
○
○
○
○
○
○
○
○
○
○
○
○
○
○
○
○
○
○
○
○
○
○
○
○
○
○
○
○
○
○
○
○
○
○
○
○
○
○
○
○
○
○
○
○
○
○
○
○
○
○
○
○
○
○
○
○
○
○
○
○
○
○
○
○
○
○
○
○
○
○
○
○
○
○
○
○
○
○
○
○
○
○
○
○
○
○
○
○
○
○
○
○
○
○
○
○
○
○
○
○
○
○
○
○
○
○
○
○
○
○
○
○
○
○
○
○
○
○
○
○
○
○
○
○
○
○
○
○
○
○
○
○
○
○
○
○
○
○
○
○
○
○
○
○
○
○
○
○
○
○
○
○
○
○
○
○
○
○
○
○
○
○
○
○
○
○
○
○
○
○
○
○
○
○
○
○
○
○
○
○
○
○
○
○
○
○
○
○
○
○
○
○
○
○
○
○
○
○
○
○
○
○
○
○
○
○
○
○
13
3R20521A-S/P08-BACK
13
27/4/04, 14:05
ESPAÑOL
MEMO
Get it fixed, at your home or ours!
Your Home
For repair - in your home - of all major brand appliances,
lawn and garden equipment, or heating and cooling systems,
no matter who made it, no matter who sold it!
For the replacement parts, accessories and
owner’s manuals that you need to do-it-yourse l f .
For Sears professional installation of home appliances
and items like garage door openers and water heaters.
1-800-4-MY-HOME¤
(1-800-469-4663)
Call anytime, day or night (U.S.A. and Canada)
www.sears.com
www.sears.ca
Our Home
For repair of carry-in items like vacuums, lawn equipment,
and electronics, call or go on-line for the location of your nearest
Sears Parts & Repair Center.
1-800-488-1222
Call anytime, day or night (U.S.A. only)
www.sears.com
To purchase a protection agreement (U.S.A.)
or maintenance agreement (Canada) on a product serviced by Sears:
1-800-827-6655 (U.S.A.)
Para pedir servicio de reparación
a domicilio, y para ordenar piezas:
SM
1-888-SU-HOGAR
(1-888-784-6427)
1-800-361-6665 (Canada)
Au Canada pour service en français:
1-800-LE-FOYERMC
(1-800-533-6937)
www.sears.ca
® Registered Trademark / TM Trademark / SM Service Mark of Sears, Roebuck and Co.
® Marca Registrada / TM Marca de Fábrica / SM Marca de Servicio de Sears, Roebuck and Co.
MC Marque de commerce / MD Marque déposée de Sears, Roebuck and Co.
Printed in Thailand
Impreso en Tailandia
04/04 U
3R20521A-S/P08-BACK
© Sears, Roebuck and Co.
14
27/4/04, 14:05
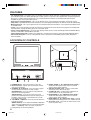
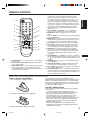
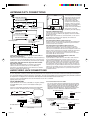

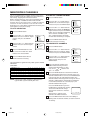
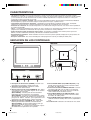
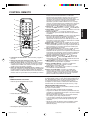
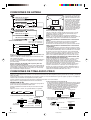


![3T11131A [COVER]](http://vs1.manualzilla.com/store/data/006164578_1-b091c799fbe2f54ad080b700a0e61ea1-150x150.png)
![3T30631A [COVER]](http://vs1.manualzilla.com/store/data/006334567_1-569f92049c2ac3665fee2b2debb524ca-150x150.png)