1
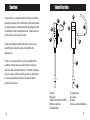
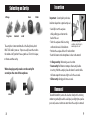
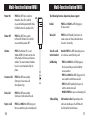
LED Chart
Power ON
Blue LED is solid for
one second while powering on
Power OFF
Yellow LED is solid for
one second then powers off
Pairing
Blue LED blinks twice every
3 seconds
Active call
Blue LED blinks once per second
No active call
Blue LED blinks every 4 seconds
Charging
Solid yellow LED
Low battery
Blinking yellow LED
high-fidelity, noise-isolating bluetooth headset
Charge complete Solid blue LED
ETYMOTIC RESEARCH INC.
61 Martin Lane • Elk Grove Village, IL 60007
www.etymotic.com • 1-847-228-0006
©2010.
etyBLU2 is a trademark of Etymotic Research, Inc. Bluetooth is a registered trademark of Bluetooth SIG, Inc.
ER089402
User Manual
Introduction
The Etymotic etyBLU2 noise-isolating headset contains a highly
directional noise-canceling microphone. The combination of an
in-ear noise-isolating earphone and a directional microphone
placed close to the mouth provides exceptional sound quality
and clear communication at both ends of the conversation. The
etyBLU2 headset was developed by Etymotic Research for use in
high levels of background noise.
Warranty
Etymotic Research, Inc. warrants this product against defects in
material or workmanship for a period of two years from the date
of original purchase from an authorized Etymotic distributor or
reseller. Etymotic will repair or replace the defective product at its
option if returned within the warranty period to our designated
service facility.This warranty is in lieu of all other warranties,
expressed or implied, including, but not limited to, any implied
warranty of merchantability or fitness for a particular purpose.
2
Included
•
•
•
•
•
•
etyBLU2 noise-isolating headset
Assortment of eartips
Earloop
2 Windscreens
Filter removal tool and replacement filter
USB charging cable
Bluetooth Profiles
Compliant with Bluetooth® Core Specification 2.1, Headset
1.1 and Handsfree 1.5 profiles (supports Bluetooth 1.1
and later)
Talk Time: Up to 7 hours
Standby: Up to 100 hours
Range: 30 feet (10 meters)
Weight: Less than .5 oz
3
Caution
Identification
F
In rare instances an eartip may come off in the ear canal when
removing the earpiece. If this should occur and the eartip cannot
be easily removed, it is recommended that you promptly contact
an audiologist or other medical professional. A professional can
use blunt tweezers to remove the eartip.
B
A
D
G
C
C
E
D
Consult an audiologist or physician if you have excessive ear
wax, difficulty inserting the eartips, or discomfort after
prolonged use.
Do not use at excessively loud levels. Research confirms that
earphones that seal the ear canal allow listeners to listen at
safer levels. Noise-induced hearing loss is a function of exposure
time, the average sound level and the peak of very loud sounds.
A sealed eartip and lower listening levels allow for longer
periods of safe listening.
H
I
A. Eartip
B. Speaker
C. Multi-Function Button (MFB)
D. Volume Up/Down
E. Earloop Holder
4
F. Charging port
G. Earloop
H. Boom
I. Noise-canceling Microphone
5
Charging
Pairing
The etyBLU2 headset comes with a rechargeable lithium polymer
battery. Charge the headset for at least one hour before first use.
Charging time from empty: 2-3 hours
80% charge: 1 hour
Pairing varies by device
Charging with the USB connector (included)
• Plug the micro USB connector into the etyBLU2 headset as shown.
• Plug USB end of the charging cable into a computer USB port.
• The solid yellow LED will indicate that the headset is charging.
• When charging is complete the yellow LED turns blue.
•
•
•
•
The etyBLU2 headset is discoverable for five minutes after
Power On.
•
•
•
Turn the phone OFF and then back ON.
Turn on the mobile phone’s Bluetooth function.
Press and hold the Multi-Function Button (MFB) for 5 seconds.
The blue LED will flash rapidly when ready for pairing.The
etyBLU2 stays in pairing mode for 5 minutes.
Activate the search for BT and/or audio devices on the phone.
When the etyBLU2 is found, the phone will display
“etyBLU2.” Scroll to it and press OK to confirm pairing.
If a passkey/password is requested, enter 0000.
Note: Bluetooth transmitter pairing varies. For best results,
consult the user instructions for the specific device being paired
with the etyBLU2. Some mobile phones require a security setting
change for automatic headset-phone pairing.
6
7
Insertion
Selecting an Eartip
3-flange
long stem
Foam
standard
Glider
small
The eartip that is most comfortable is the likely choice, but it
MUST SEAL well in your ear. If you can easily hear others when
the volume is off, you don’t have a good seal. Twist it in deeper,
or choose another eartip.
When changing eartips make sure the eartip fits
securely on the stem of the earphone.
Important: Sound quality and noise
isolation depend on a good eartip seal.
• Carefully insert the earpiece
while pulling up and out on the
back of the ear.
For a video on proper
• Twist the earpiece while inserting,
earphone insertion go to
www.etymotic.com
until outside noise is blocked out.
• Position the earpiece for best fit and comfort.
• Bend the boom so the microphone is close to the mouth.
• 3-flange eartip: Moistening eases insertion.
• Foam eartip: Roll down or compress foam eartip before
inserting. Hold the eartip in place for about 5 seconds while
the foam expands to create a tight seal in the ear canal.
• Glider eartip: Simply push into ear canal.
Removal
correct
8
incorrect
To avoid discomfort, remove the headset slowly with a twisting
motion to gradually break the seal. Open jaw slightly to equalize
pressure, because suction can occur when the eartip is removed.
9
Multi-Function Button (MFB)
Power ON
PRESS the MFB for 4 seconds to
MFB
Power On. Blue LED is solid for
one second while powering ON. Blue
LED blinks when the headset is ON.
Multi-Function Button (MFB)
The following features depend on phone support:
Redial
PRESS and HOLD the MFB (long press)
for one second.
Power OFF
PRESS the MFB for 4 seconds
to Power Off. Yellow LED is solid for
one second then powers OFF.
Voice Call
PRESS the MFB quickly (short press) to
make a voice call. Voice Call works when
the unit is in standby.
Volume
PRESS the Volume UP (+) and
Volume DOWN (-) buttons on the side
of the headset to increase or decrease
volume. The exact number of volume
levels is set and maintained by the
phone.
Transfer a Call
to the Handset
Double PRESS the MFB (two quick presses
less than one second) during a call
Call Waiting
• PRESS and HOLD the MFB (long press)
for one second to put a call on hold to
answer another
• PRESS and HOLD the MFB (long press) for
one second to switch between calls
• PRESS the MFB quickly (short press) to
end the current active call
• DOUBLE PRESS to reject a call-waiting call
3-Way Calling
Add another caller: Depending on the
call status, double press the MFB to add
the held call to the conference.
Answer a Call
PRESS the MFB once quickly
(short press) to answer a call
when phone rings.
End a Call
PRESS the MFB once quickly
(short press) to disconnect the call.
Reject a Call
PRESS and HOLD the MFB (long press)
for one second to reject an incoming call.
10
11
Multi-Function Button (MFB)
Power ON
PRESS the MFB for 4 seconds to
MFB
Power On. Blue LED is solid for
one second while powering ON. Blue
LED blinks when the headset is ON.
Multi-Function Button (MFB)
The following features depend on phone support:
Redial
PRESS and HOLD the MFB (long press)
for one second.
Power OFF
PRESS the MFB for 4 seconds
to Power Off. Yellow LED is solid for
one second then powers OFF.
Voice Call
PRESS the MFB quickly (short press) to
make a voice call. Voice Call works when
the unit is in standby.
Volume
PRESS the Volume UP (+) and
Volume DOWN (-) buttons on the side
of the headset to increase or decrease
volume. The exact number of volume
levels is set and maintained by the
phone.
Transfer a Call
to the Handset
Double PRESS the MFB (two quick presses
less than one second) during a call
Call Waiting
• PRESS and HOLD the MFB (long press)
for one second to put a call on hold to
answer another
• PRESS and HOLD the MFB (long press) for
one second to switch between calls
• PRESS the MFB quickly (short press) to
end the current active call
• DOUBLE PRESS to reject a call-waiting call
3-Way Calling
Add another caller: Depending on the
call status, double press the MFB to add
the held call to the conference.
Answer a Call
PRESS the MFB once quickly
(short press) to answer a call
when phone rings.
End a Call
PRESS the MFB once quickly
(short press) to disconnect the call.
Reject a Call
PRESS and HOLD the MFB (long press)
for one second to reject an incoming call.
10
11
Changing the Filter
Care
The earpiece in the etyBLU2 headset has a special filter that
smoothes the frequency response and prevents earwax from
entering the earphone.The filter is located at the end of the
earphone and is visible when the eartip is removed.
• Do not expose to extreme temperatures.
• Avoid dropping and strong impact.
• Leave eartip on the headset for shock protection.
• Clean or replace eartips prior to use by others.
Change the filter if loudness decreases or the sound quality
declines. Note: Filters are not reusable.
Filter Removal
Note: Use the tool to remove the filter.
1. Remove eartip.
Filter Replacement
2. Insert tool into
the filter.
Note: Do not use the tool to replace filter.
1. Insert a new filter and press
gently against a hard surface
to secure it in place.
12
3. Remove filter.
2. Re-attach eartip.
Cleaning and Replacing Eartips
Over time eartips may lose their elasticity. For best performance
and retention, replace 3-flange eartips every 3-6 months. Replace
foam and glider eartips regularly.
To clean the 3-flange eartips:
1. Remove the eartip from the headset.
2. Clean with water and mild soap.
3. Dry the eartip before placing it back on the headset.
13
FCC & Other Information
This equipment has been tested and found to comply with the
limits for a Class B digital device, pursuant to Part 15 of the FCC
Rules. Operation is subject to the following two conditions:
1.This device may not cause harmful interference, and
2.This device must accept any interference received, including
interference that may cause undesired operation.These limits
are designed to provide reasonable protection against harmful
interference in a residential installation.Some equipment operates at frequencies that may cause interference to nearby TVs
and VCRs; to minimize or prevent such interference, the system
base should not be placed near or on top of a TV, PC monitor, or
VCR; and, if interference is experienced, moving the desk station
farther away from the TV or VCR will often reduce or eliminate
the interference.However, there is no guarantee that interference will not occur in a particular installation.If this equipment
does cause harmful interference to radio or television reception,
which can be determined by turning the system off and on, the
user is encouraged to try to correct the interference by one or
more of the following measures:
1. Increase the separation between the equipment and receiver.
2.Consult the dealer or an experienced radio TV technician for
help.
14
FCC & Other Information
FCC Health and Safety Information
Your device is a radio transmitter and receiver. It is designed and
manufactured not to exceed the emission limits for exposure to
radio frequency (RF) energy set by the Federal Communications
Commission of the U.S. Government.The FCC has established
criteria for the amount of radio frequency energy various products
may produce depending on their intended usage.This product has
been evaluated and found to comply with the FCC’s exposure
criteria. For body worn operation, the FCC RF exposure guidelines
were also met when used with the accessories supplied or
designed for this product. Use of other accessories may not ensure
compliance with FCC RF exposure guidelines and should be
avoided. Caution: Any changes or modifications not expressly
approved by the party responsible for compliance could void the
user’s authority to operate this device.This device must not be
colocated with other transmitters.
15
FCC & Other Information
This equipment has been tested and found to comply with the
limits for a Class B digital device, pursuant to Part 15 of the FCC
Rules. Operation is subject to the following two conditions:
1.This device may not cause harmful interference, and
2.This device must accept any interference received, including
interference that may cause undesired operation.These limits
are designed to provide reasonable protection against harmful
interference in a residential installation.Some equipment operates at frequencies that may cause interference to nearby TVs
and VCRs; to minimize or prevent such interference, the system
base should not be placed near or on top of a TV, PC monitor, or
VCR; and, if interference is experienced, moving the desk station
farther away from the TV or VCR will often reduce or eliminate
the interference.However, there is no guarantee that interference will not occur in a particular installation.If this equipment
does cause harmful interference to radio or television reception,
which can be determined by turning the system off and on, the
user is encouraged to try to correct the interference by one or
more of the following measures:
1. Increase the separation between the equipment and receiver.
2.Consult the dealer or an experienced radio TV technician for
help.
14
FCC & Other Information
FCC Health and Safety Information
Your device is a radio transmitter and receiver. It is designed and
manufactured not to exceed the emission limits for exposure to
radio frequency (RF) energy set by the Federal Communications
Commission of the U.S. Government.The FCC has established
criteria for the amount of radio frequency energy various products
may produce depending on their intended usage.This product has
been evaluated and found to comply with the FCC’s exposure
criteria. For body worn operation, the FCC RF exposure guidelines
were also met when used with the accessories supplied or
designed for this product. Use of other accessories may not ensure
compliance with FCC RF exposure guidelines and should be
avoided. Caution: Any changes or modifications not expressly
approved by the party responsible for compliance could void the
user’s authority to operate this device.This device must not be
colocated with other transmitters.
15
LED Chart
Power ON
Blue LED is solid for
one second while powering on
Power OFF
Yellow LED is solid for
one second then powers off
Pairing
Blue LED blinks twice every
3 seconds
Active call
Blue LED blinks once per second
No active call
Blue LED blinks every 4 seconds
Charging
Solid yellow LED
Low battery
Blinking yellow LED
high-fidelity, noise-isolating bluetooth headset
Charge complete Solid blue LED
ETYMOTIC RESEARCH INC.
61 Martin Lane • Elk Grove Village, IL 60007
www.etymotic.com • 1-847-228-0006
©2010.
etyBLU2 is a trademark of Etymotic Research, Inc. Bluetooth is a registered trademark of Bluetooth SIG, Inc.
ER089402
User Manual