1
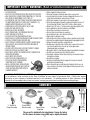
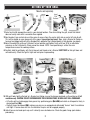
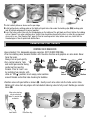
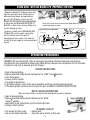
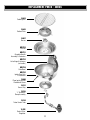
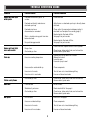
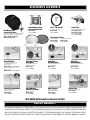
Owner’s Manual
U.S. PATENTS 4,788,962 : 5,330,154 : 5,414,090 : D 292,163 : Other Patents and Design Patents Pending
For questions regarding performance, assembly, operation, parts, or
returns, contact the kettle experts by calling (562) 627-0500
7:00 a.m. - 5:00 p.m. Pacific Time Monday thru Friday or
e-mail: [email protected]
Read these instructions carefully before use. Familiarize yourself with the appliance before connecting it to its
gas container. Keep these instructions for future reference.
IMPORTANT SAFETY WARNINGS ( Read all instructions before operating)
• Utilisez cet appareil à l’extérieur seulement.
• N’utilisez pas cet appareil à l’intérieur du bateau ni dans un espace fermé.
• Les grilles produisent de la chaleur. Conservez un dégagement d’au moins 61 cm
(24 po) de tout combustible aux surfaces latérales et à l’arrière.
• N’utilisez jamais l’appareil sous des marquises, des auvents de patio, etc.
• N’utilisez que du gaz propane. Entreposez le carburant conformément à la norme A-1
(9) du American Boat And Yacht Council (ABYC), intitulée « Marine Liquified
• Petroleum Gas (LPG) Systems » [Systèmes marins à gaz de pétrole liquéfiés (GPL)].
• Pour les applications au gaz naturel, contactez la société Magma.
• Allumez toujours la grille avec le couvercle ouvert.
• Ne laissez jamais une grille chaude sans supervision.
• Ne surchauffez pas la grille ; voir les directives d’utilisation.
• Éteignez toujours la grille après l’usage.
• Utilisez des gants de cuisinier ou un tampon isolant en manipulant une grille chaude.
• Ne laissez jamais une bouteille de gaz ni le régulateur branché lorsque l’appareil est arrimé.
• Entreposez les bouteilles de gaz dans un endroit bien aéré.
• N’entreposez pas les bouteilles de gaz à l’intérieur, dans les rayons directs du soleil,
sous le pont d’un bateau ni dans un caisson qui n’est pas approuvé pour
l’entreposage de butane ou de propane.
• Mise en garde : Vérifiez s’il y a une fuite de gaz à chaque fois que la bouteille est remplacée.
• Ne vérifiez jamais la présence d’une fuite à l’aide d’une flamme !
• Ne pas bloquer, restreindre ni obstruer de toute autre façon les ouvertures d’air pour
la combustion ou l’aération.
• Ne modifiez pas cet appareil.
• Vérifiez que la rondelle d’étanchéité de la soupape (A) est en place et en bon état
avant de brancher la bouteille de gaz.
• Attachez les bouteilles dans un endroit bien aéré et éloigné des flammes nues, des
sources de chaleur et des étincelles. Gardez l’appareil à l’écart des personnes et des
matériaux inflammables.
• USE OUTDOORS ONLY.
• DO NOT USE THIS APPLIANCE INSIDE THE BOAT OR ANY ENCLOSED SPACE.
• GRILLS RADIATE HEAT. CLEARANCE FROM COMBUSTIBLES, 24” SIDES AND
BACK. NEVER USE UNDER AWNINGS, PATIO COVERS, ETC.
• USE PROPANE GAS ONLY. FUEL STORAGE SHOULD BE IN COMPLIANCE WITH
THE AMERICAN BOAT AND YACHT COUNCIL (ABYC) STANDARDS A-1 (9),
MARINE LIQUIFIED PETROLEUM GAS (LPG) SYSTEMS.
• FOR NATURAL GAS APPLICATION CONTACT (562) 627-0500.
• ALWAYS LIGHT GRILL WITH LID OPEN.
• NEVER LEAVE HOT GRILL UNATTENDED.
• DO NOT OVERHEAT GRILL, SEE OPERATING INSTRUCTIONS
• ALWAYS TURN GRILL OFF AFTER USE.
• USE GLOVE OR HOT PAD WHEN HANDLING HOT GRILL.
• NEVER LEAVE GAS CYLINDERS AND REGULATOR CONNECTED WHEN STOWED.
• STORE GAS CYLINDERS IN WELL VENTILATED AREA.
• DO NOT STORE GAS CYLINDERS INDOORS, IN DIRECT SUNLIGHT, BELOW
DECKS ON BOATS, OR IN LOCKERS NOT APPROVED FOR BUTANE OR
PROPANE STORAGE.
• CAUTION: CHECK FOR GAS LEAKS EACH TIME CYLINDER IS CHANGED.
• NEVER CHECK FOR GAS LEAKS WITH A FLAME!
• DO NOT BLOCK, RESTRICT, OR OTHERWISE OBSTRUCT COMBUSTION OR
VENTILATION AIR OPENINGS.
• DO NOT MODIFY THIS APPLIANCE.
• CHECK THAT VALVE SEALING WASHER (A) IS
IN PLACE AND IN GOOD CONDITION BEFORE
A
CONNECTING THE GAS CONTAINER.
• INSTALL CANISTERS IN WELL VENTILLATED AREA
AND AWAY FROM OPEN FLAME, HEAT SOURCE OR
SPARKS. KEEP AWAY FROM OTHER PEOPLE OR
FLAMMABLE MATERIALS.
CALIFORNIA PROPOSITION 65 – WARNING – The burning of gas cooking fuel generates some by-products, which are on the
list of substances, which are known by the State of California to cause cancer or reproductive harm. California law requires
businesses to warn customers of potential exposure to such substances. To minimize exposure to these substances, always
operate this unit according to the use and care manual, ensuring you provide good ventilation when cooking with gas.
CONTENTS
Tools
Needed
Radiant
Plate
Grill Grate
“L” Bracket &
Clamp Assembly
Turbo Venturi
Tube Assembly
Control Valve/
Regulator
Grill Body
This gas grill is individually fire tested before it leaves the factory.
For this reason, the burner on your BBQ may be slightly discolored.
2
2 - 9/16”
Wrenches
not included
SETTING UP YOUR GRILL
Mounts sold separately.
Level
Flat
Surface
2
1
4
3
1 Select and install appropriate mount in your desired location. Prior to installing the grill, check that mount
does not easily move with a reasonble force applied.
2 Next, decide if gas control valve will be easier to access from the center right side or center left side of grill.
This will be based on your placement of the mount (see picture front cover). Now, slide L-Bracket & Clamp on
to mount rod (ridged end) so that the threaded flat L-portion of the L-Bracket points in that direction (see above).
3 Adjust threaded flat surface of L-Bracket to level position and tighten firmly with two 9/16" or adjustable
wrenches so that L-Bracket & Clamp cannot be moved. NOTE: Level positoning is critical for even
temperatures across the cooking surface.
4 Carefully hold the grill body, with the lid closed, and thread on to L-Bracket VERY TIGHT so that grill does not
unthread easily. Check that grill is tight and level prior to proceeding.
Grease Tray
Grease Tray Pins
5a
5
5c
Electrode
5b
Threaded Burner Pipe
Electrode Protection Cap
5d
Electrode
6
5 With grill body tightly attached to L-Bracket and taking care not to damage electrode, unthread burner 3 full
revolutions only. CAUTION: DO NOT UNTHREAD MORE THEN 3 REVOLUTIONS, AS GRILL MAY FALL OVERBOARD.
• Lift entire grill up to disengage from grease tray positioning pins (5a & 5b) and rotate so lid operates freely in
desired position (5a).
• Carefully lower back down (5d), making sure pins are re-engaged and rethreaded “burner” back 3 revolutions
until tight. If burner does not turn 3 revolutions the pins are not engaged properly.
6 Adjust burner electrode spark cap so it is directly over electrode wire. Check for good strong spark before
proceeding.
3
9
8a
8
7
7 Install radiant plate over burner on fire pan ridge.
8 Install grill grate by rotating grate so that both grill grate tabs slide under the holding clips (8a), locking grate
and all internal components in correct position.
9 Insert the turbo venturi tube into the threaded pipe on the bottom of the grill body and firmly tighten the holding
nut so it doesn’t turn when rotating valve. Venturi tube should be stowed with valve in a clean dry environment
when not in use. (See Stowing Tips” page 6) Prior to inserting venturi tube, before each use, check that the
threaded pipe is free of spider web obstructions.
CONNECTING FUEL SOURCE
CONTROL VALVE REGULATOR
•Uses standard 1-lb. disposable propane canisters (DOT-39 NRC 228/286).
•Prior to installing valve, become familiar with the valve function and graphics on valve knob. Never
force the knob.
Lock
Indicator
Always turn or push gently.
OFF/
ON
Lock
•Turn control valve to “lock ”
Off
and install gas canister being
careful not to cross the
High
threads. Prior to “each” use
by installing fuel canister, with
Low
valve on “OFF ” position, brush soapy water solution
Unlock
Medium
around threads and orifice hole checking for bubbles.
•Position valve with gas bottle as shown (A). Gently insert valve stem into the turbo venturi tube.
Rotate until valve stem key aligns with lock detent allowing valve to fully insert. Rotate gas canister
down (B).
Align valve stem key
way to valve lock
detent in venturi tube
and rotate.
A
Lock Detent
B
Valve Stem Key
4
USING GRILL WITH ON-BOARD LPG (PROPANE) SYSTEMS
• Magma On-Board LPG (Propane) Valves and
Hose Kits allow grills to be installed within a
boats existing on-board, pre-regulated low
pressure LPG (Propane) system. Use only
Magma A10-220 Low Pressure Propane Valve
in conjunction with Magma A10-225 LPG 10'
Hose Kit, as other hoses, valves or fittings may
result in damage or injury.
• A primary shutoff valve (supplied with A10225 hose kit) must be used in conjunction
with this control valve at the point of
connection into your system. This allows for
shut off of the gas supply to the hose leading to
the grill.
Gently insert valve stem into venturi tube upside down until fully
inserted and rotate as shown.
Typical Boat and R.V. Application
Cylinder Valve
Solenoid
Gauge
Gas grill
Propane (LPG)
Gas
Regulator
Shut off
valve
A10-225
Hose Kit
A10-220
Valve
To other LPG
appliance
or use cap
OPERATING PROCEDURES
WARNING: Do not overheat grill. Grills do not require pre-heating. Stainless Steel loses anti-corrosive
characteristics when subjected to extreme heat. Most grilling is done on low temperature with the lid closed.
If medium or high heat is required, grill with lid open.
LIGHTING INSTRUCTIONS
• Open lid during lighting.
• Depress knob and rotate counter-clockwise to the “HIGH” flame position.
• Push Piezo Igniter.
• Visually confirm ignition.
• Turn knob to adjust flame.
• If grill does not light, insure that a burner electrode spark cap is directly above electrode.
• If the piezo ignition continues to fail to ignite the gas, see MATCH LIGHTING INSTRUCTIONS.
MATCH LIGHTING INSTRUCTIONS
(Back up system allows use of grill until piezo ignition system is repaired.)
• Open lid during lighting.
• Depress knob and rotate counter-clockwise to the “HIGH”
flame
position.
• Hold match or gas flame lighter up to the match light hole.
• Visually confirm ignition.
• Trim excess fats from meat.
• Use non-oil based marinades.
TO REDUCE FLARE-UP
• Reduce heat.
• Use water spray directly on flare-ups.
5
Match Light Hole
PLEASE CHECK THESE IMPORTANT CRITICAL POINTS PRIOR TO LIGHTING YOUR GRILL.
• Mount is secure and grill does not move.
• Grease tray and fire pan are clean from excess drippings to reduce flare up and ensure even
air flow.
• Lid is correctly positioned to operate freely and is in best position for blocking the wind.
• Venturi tube, burner, threaded burner pipe and valve orifice are free of obstructions, such as
spider webs.
• Electrode is clean and has a good strong spark.
• Radiant plate & dome are positioned correctly.
• Grill grate is in locked position under holding clips.
• Venturi tube holding nut is tight and doesn't turn when rotating valve position.
• Valve is installed and locked into venturi tube properly.
• Sufficient fuel is available.
COOKING TIPS
• The most common mistake when grilling is using too high of a heat setting. Grills become
hotter as you cook, so use moderate heat settings when cooking with lid closed.
• Always keep a water spray bottle handy for flare ups and quick cooling if grill overheats.
• Coat the grill grate with vegetable or olive oil to prevent food from sticking.
STOWING TIPS
• Always disconnect the fuel canister from the valve prior to stowing.
• Stow the valve and venturi tube in a clean, dry area to protect from corrosion to valve and
spider web obstructions in venturi tube.
• Always stow by unthreading the entire grill from the L-Bracket. Do not remove the L-Bracket &
Clamp unless repositioning is necessary.
• Always store propane in a sealed propane storage locker that allows leakage to vent overboard or
use Magma A10-210 Propane Storage Tote. Never stow below decks.
6
MAINTENANCE
ABOUT STAINLESS STEEL
Stainless steel exposed to prolonged periods of high heat will change color and texture. Magma grills require no
preheating. Not preheating will keep your grill cooler and greatly extend its life and beauty. Texture and color
change is normal on components and will not affect the product's performance. Stainless steel scratches easily
and should never be cleaned with abrasive pads, brushes or abrasive cleaners.
COMPLETE DISASSEMBLY FOR CLEANING (or access to Piezo Igniter)
1 - Remove entire grill body from L-Bracket of Mount.
2 - Unthread and remove burner, fire pan and grease pan from outer bowl.
3 - To inspect piezo igniter, remove single screw from inside of outer bowl to release igniter box and carefully
inspect for corrosion or loose wire connection.
4 - To reassemble, reverse above steps and steps 6 through 9 from page 3 Setting Up Your Grill.
CLEANING WITH OVEN CLEANER
We recommend disassembly and complete cleaning at least once a year, depending on amount of use, and always
prior to long-term storage. For burnt-on residue we recommend "Easy-Off" brand "Original Formula Oven & Grill
Cleaner". Just spray it on, let it set, wash in warm soapy water and rinse. If cleaner is used, complete disassembly
is required to remove any cleaner residue left between components. Wash all components with soapy water after
using cleaner. CAUTION: AVOID CONTACT OF OVEN CLEANER WITH CONTROL VALVE, PLASTIC IGNITER,
ELECTRODE WIRE AND ALL BOAT SURFACES AND FOLLOW MANUFACTURER'S DIRECTIONS ON OVEN CLEANER.
EXTERIOR STAINLESS STEEL COMPONENTS
Cleaning the exterior surface after every use will help prevent discoloration. Use soapy water with a soft cloth or
sponge. Rinse with fresh water and dry. We recommend covering the grill between uses. Optional covers are
available through www.MagmaProducts.com. CAUTION: ABRASIVE PADS OR CLEANERS WILL DAMAGE THE FINISH.
INTERIOR COMPONENTS & GRILL GRATES
Remove heavy residue from barbeque and empty grease tray between each use. Grates can be cleaned with brass
wire brush while grill is warm.
CERAMIC ELECTRODE
Located just beside the burner, it should be kept clean of grease and debris. Electrode spark cap must be directly
over the electrode for proper operation, Be careful not to damage the ceramic insulation or the wire.
CONTROL VALVE
All valves are set and tested at the factory. Do not attempt to adjust or disassemble the valve. Call (562) 627-0500
if you suspect it is not adjusted properly. Clean valve with a cloth and remove any debris obstructing the orifice.
REPLACEMENT PARTS
All replacement parts are readily available through West Marine and Boat US stores, catalog or website:
www.westmarine.com
7
REPLACEMENT PARTS - 200SS
10-453
Cooking Grill
10-465
Radiant Plate
10-657
Burner
WM-758
Fire Pan
WM-751
Complete Handle
Assembly & Fastenters
WM-752
Lid w/hinge & fasteners
(no handle)
WM-759
Outer Bowl
WM-762
Igniter Case Only
& Fastenters
10-960
Piezo Igniter w/Wire
Electrode & Screw
10-161
Grease Tray
10-164
“L” Bracket &
Clamp Assembly
10-160
Turbo Venturi Tube
10-263
Control Valve
Regulator
8
TROUBLE SHOOTING GUIDE
Problem
Possible Cause
Possible Solution
Burner will not light
with igniter
Electrode covered with grease or
residue
Clean electrode
Electrode not directly under burner
electrode spark cap
Adjust burner so electrode spark cap is directly above
electrode
Electrode wire loose,
disconnected, or corroded
Clean, adjust & reconnect wire between igniter &
electrode, see Complete Disassembly (page 7)
Wire is shorted causing spark from wire
before electrode
Replace Igniter, Electrode & Wire
See page 8 for part number
Replace Igniter, Electrode & Wire
See page 8 for part number
No spark being generated
Check fuel level, replace canister or refill cylinder
Burner will not light
even with match
No gas flow
Clean burner, turbo venturi tube, and valve orifice.
Remove debris/spider webs
Obstructed gas flow
Flare-up
Operate only on low when lid is closed
Reduce flame level
Leave lid open
Use water spray to cool
Excessive cooking temperature
Grease and/or residue build-up
Clean components
Excessive fat in meats
Trim fat from cuts of meat before grilling
Excessive oils in marinades
Use non-oil based marinades
Obstructed gas flow
Clean burner, turbo venturi tube, and valve orifice.
Remove debris/spider webs
Flame too low
Increase flame
Wind directly on burner
Block wind with lid. See page 3
Obstructed gas flow
Clean burner, turbo venturi tube, and valve orifice.
Remove debris/spider webs
Grill not level
Level Grill. See page 3
Grease or residue build-up
Clean components
Excessive fat in meats
Trim fat from cuts of meat before grilling
Excessive oil in marinades
Use non-oil based marinades
Yellow sooty flame
Blow-out
Hot Spots
9
ACCESSORIES and MOUNTS
West Marine 200SS
Propane Kettle Covers
Propane/Butane Canister
Storage Locker/Tote Bag
LPG 10’ (3m) Hose Kit
Control Valve
(for on-board LPG systems)
(for on-board LPG or CNG gas systems)
Model 236935
A10-210 (MAGMA)
Model 141353
A10-225 (MAGMA)
Model 236943 (LPG)
Model 255788 (CNG)
A10-220 LPG (MAGMA)
A10-230 CNG (MAGMA)
Made of water and fade resistant Sunbrella® boat cover
material to resist damage from sunlight and mildew.
Model 7200249 (Pacific Blue)
Model 7200181 (Black)
Round Rail Mount
BOTH MOUNTS BELOW FIT ANY ANGLE RAIL
Fits Standard Round Rail 7/8” or 1”
(22mm or 25mm)
Model 158923 A10-080 (MAGMA)
Fits Oversized Round Rail 1 1/8” or 1 1/4”
(28.5mm or 32mm)
Fish & Veggie Grill Trays
Stainless Steel Finish
Teflon® Select Non-Stick Finish
Model 2342889
A10-295 (MAGMA)
Model 3779741
A10-296 (MAGMA)
Pow’r Grip® Fish Rod
Holder Mount
Socket Type
Rod Holder Mount
Socket Type
Rod Holder Mount
Fits all standard fish rod holders.
Rod Holder not included.
Fits Tempress Fish-On® Rod Holder
Sockets (not included)
Fits Scotty®/Striker Grip Rod Holder
Sockets (not included)
Model 118377
A10-175 (MAGMA)
Model 249136
A10-160 (MAGMA)
Model 2794303
A10-165 (MAGMA)
Side, Bulkhead or
Square/Flat Rail Mount
Mount Extension
On Shore Stand
Add’s 8” (20cm) to any
Magma Marine Kettle Mount
Collapses for flat compact storage
Model 437137 A10-085 (MAGMA)
Surface Deck Socket Mount
Locks in four different positions.
Fasteners not included
Model 158972
A10-120 (MAGMA)
Fasteners not included
Model 271536
A10-240 (MAGMA)
Model 158980
A10-140 (MAGMA)
Model 2794295
A10-650 (MAGMA)
WEST MARINE 500 Westridge Drive, Watsonville, CA 95076
LIMITED WARRANTY
The manufacturer warranties this Propane Barbecue to the original consumer to be free from defective material(s) and workmanship while
under normal use and service for a period of (1) year. During the warranty period, the manufacturer, at its option and without charge, may
repair and/or replace but not remove or reinstall the faulty product. This limited warranty applies only to products that have been installed
and used in accordance to printed instructions in this owner’s manual and does not cover improper use, vandalism, negligence or accidents.