1
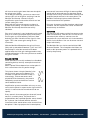
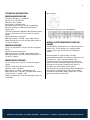
PRODUCT MANUAL
MERIDIAN MICROPHONE
FOR ACOUSTIC GUITAR
Thank you for purchasing the K&K Meridian Microphone! This manual covers installation and use for the
Meridian and Meridian Pro Microphone systems for acoustic guitar.
INSTALLATION INSTRUCTIONS FOR ACOUSTIC GUITAR
Separate the two clamp parts. They are held
together by Velcro. Bend the bottom part to fit the
exact shape (angle) of the guitar body. This might
not be a right angle, depending on the guitar model.
T i g h tl y press the 2 clamp parts towards each other
while snapping the Velcro together. If done properly
the non-slip padding will now hold the clamp and
mic securely to the instrument.
On an Archtop guitar the top part needs to be
adjusted/bend to the fitting angle as well. Align the
top part of the clamp (the part with the mic) over the
bottom part without snapping the Velcro together.
92798 Cape Arago Hwy, Coos Bay, OR 97420 | 541-888-3517 | Toll Free 1-800-867-6863 | www.kksound.com
2
I f yo u n eed to ti g h ten
th e c l amp , loosen the
bottom clamp part to one
side but leave it attached
at the edge by the Velcro
(see the phot, right). Move
it up by 1/16” and press
the Velcro back together.
Slide the assembled
clamp/mic back onto the
guitar.
MICROPHONE POSITION
To start, position the mic as shown in the photos
below. Aim it more towards the sound hole for more
bass or more towards the 14th fret for a tighter and
brighter sound.
positioning that minimizes unwanted handling noise.
We also found the sound quality superb for
recording. You can move the mic closer to the sound
hole or away from it to control the amount of bass.
To cut down on cable handling noise and for extra
strain relief please wrap the cable under the clamp
as shown below.
REMOVAL AND TRANSPORTATION
Remove the mic by pulling the assembled
clamp/mic off the guitar. If you want to leave the
clamp on the instrument, carefully remove the mic
from the little clip on the clamp.
W e s el l the c l amp i ndi vi dual l y. For a quick
change from one instrument to another leave the
clamp on the guitar and buy another clamp or your
second instrument. You can easily remove/snap-on
the microphone itself with the little clip on the
clamp.
ALT E R N ATE PO S I T I O N
Please note that the foam windscreen sits snug on
the guitar top with some pressure from the
gooseneck that holds it down. This is a very quiet
Please slide the supplied protective tubing over the
windscreen before you put your mic into the box.
This protects the windscreen foam and ensures it
holds its shape.
If you are using the microphone and clamp on
multiple guitars, please follow the complete
92798 Cape Arago Hwy, Coos Bay, OR 97420 | 541-888-3517 | Toll Free 1-800-867-6863 | www.kksound.com
3
installation instructions for each separate instrument
to ensure that the clamp fits tightly and precisely.
MERIDIAN PREAMP
Your Meridian Preamp comes factory-preset with the
mid-frequency control system fully activated, which
means the midrange is cut by 16dB. We find this
setting to sound very elegant and “studio like”. You
can adjust this control with a small precision
screwdriver. Turn it clockwise to increase midrange.
Connect the microphone to the Mi c I n and use an
XLR microphone cable to connect the preamp’s
O U T to an XLR input of a PA or amp. The preamp
works on phantom power via the XLR output, or with
a suitable 12 volt DC power supply (100mA, DC
connector center plus).
Start with both- bass and treble EQ on your amp/PA
turned all the way down. Then add frequencies to
your liking.
MERIDIAN PRO PREAMP
The Meridian Pro Preamp handcrafted at the K&K
facility in Oregon/USA to extremely low noise
specifications with excellent clarity and warm EQ. It
is optimized for the use with the Meridian
Microphone.
Plug the mic in the I N P U T and connect the LINE or
XLR OUTPUT (or both) to an amp or PA system.
consumers are connected to a mixing board, the
power may drop down below a sufficient supply
voltage for the Meridian Pro Preamp. The battery
will be activated only in case the phantom power
gets too low but it will not be discharged as long as
Phantom Power is higher that the battery voltage.
The LED light on the front-panel indicates if phantom
power is present. In order to save battery it will not
light when the unit works on battery power only.
Always turn the volume on the PA or amp channel
OFF before you plug the XLR cable in/out the
preamp or the mixing board/amp. If you don’t, the
loud crack in combination with a phantom power
spike might damage the preamp’s op-amp!
C HAN G I N G THE B ATT ER Y
To insert and change the battery, open the 2 screws
on the sides of the unit, remove the lid, connect a
fresh 9 volt battery to the battery clip and place it in
the marked compartment.
The unit is delivered without a battery.
ALWAYS UNPLUG THE INPUT CABLE IN ORDER TO
SWICH OFF THE BATTERY when the unit is not in
use!
ADJU S TI N G THE S O U N D W I TH THE PR EAMP
We recommend to start with all EQ controls turned
down all the way and add frequencies to your liking.
Then listen to the two phase switch settings to get
the best tone and the lowest feedback. But first,
please read the following paragraphs:
ADJU S TAB LE G AI N C O N TR O L
Gain and volume do both have an effect on the
output volume of the preamp but they accomplish
different tasks.
The gain (also called input gain or sensitivity
control) controls the input signal level in the circuit
in the preamp. It sets the amount of preamplification before the signal enters the EQ section
etc.
The volume control on the other hand is located at
the end of the circuit and simply allows lowering or
shutting down the volume.
The Meridian Pro Preamp operates on industry
standard Phantom Power or one 9-volt battery. We
recommend having a 9-volt battery installed in the
unit at all times. Phantom power drops down
considerably under load. If several phantom power
It is very important to properly set the gain control
to fit the instrument you are using. An instrument
with a high volume will require less gain than one
that is not as loud. Also a player who strums hard
92798 Cape Arago Hwy, Coos Bay, OR 97420 | 541-888-3517 | Toll Free 1-800-867-6863 | www.kksound.com
4
will have to set the gain lower than one who picks
the strings very lightly.
To set the gain correctly, you have to mount and
connect your mic to the guitar and plug it into the
Meridian Pro Preamp. Connect it to your
amplification system and set the channel to a low
volume setting for a start.
Begin with the gain on the preamp at about 12
o’clock center setting. The volume control on the
Meridian Pro Preamp should be set to fully
clockwise.
Play your instrument in your loudest dynamic range
(play it as hard as you expect to play) and slowly
turn the gain up until distortion just occurs. Now
back the gain off a little bit until the signal is clear
again. This is the correct gain setting for this
instrument.
With the Meridian Microphone the gain will most
likely end up somewhere between “half” and “full”.
Please keep in mind that excessive EQ boost
applied after the initial gain setting procedure may
introduce distortion, in this case you have to reduce
the gain a little bit.
the acoustic instrument will fight its own amplified
sound and no balanced tone can develop. Round
and warm tone is only achieved when acoustic and
amplified sound oscillate in the same phase. The
Meridian Pro Preamp’s phase switch allows for
instant correction of this problem.
Play your instrument and flip the phase switch back
and forth. You will experience a fuller and warmer
tone one way or the other.
O U TPU TS
The active DI XLR output and the line output can be
used simultaneously. Like this the 1/4" line out can
conveniently be used as a monitor out or for
connection to a tuner while the unit is connected to
the PA via the XLR out. You can of course use each
output individually.
The Meridian Mic can also be used with the K&K
Quantum Blender. The microphone itself does not
work on 48V phantom power! It is powered with 5
volts by the preamp.
P HAS E S W I T C H
Phase switches are usually marketed as a feedback
controlling device, but they accomplish more than
just that.
What is phase? Phase determines at what point in
time a sound wave has it’s peak or trough.
This picture shows 2 simple (identical) sine
waves, but the wave on the bottom (2) is
inverted in respect to the wave on top (1).
Interestingly, if these two waves were
played back simultaneously, they would
completely cancel each other out and no
sound would be heard.
Amplification systems and effect units may or may
not invert the phase in respect to the signal which is
send in. In most cases the manufacturers do not
specify.
Every acoustic instrument projects (acoustic) sound
waves in a certain phase. The phase that is
projected from the amplified speaker source should
be "in phase" (not inverted) with the acoustic
instrument's own sound waves or the result will not
be optimal. If the amp projects the inverted phase,
92798 Cape Arago Hwy, Coos Bay, OR 97420 | 541-888-3517 | Toll Free 1-800-867-6863 | www.kksound.com
5
TECHNICAL INFORMATION
Polar Pattern
MERIDIAN MICROPHONE
Frequency Range: 30 - 18,000 Hz
Sensitivity: 7 mV/PA/1 kHz
Maximum SPL: 142dB
Polar Pattern: Unidirectional
Mic Power requirement: 5 Volt DC (supplied by
Meridian preamp or K&K Quantum Blender)
Cable 8 feet
Technical Information Meridian Microphone Preamp
Input: ¼ mono with 5-volt DC lavalier mic power
supply
Output: XLR active balanced
Midrange control: +/-20 dB - super wide band Q
Power requirements: 12-48 Volt phantom power or
12 volt DC 100mA
MERIDIAN PREAMP
Input: 1/4" mono with 5-volt DC lavalier mic power
supply
Output: XLR active balanced
Midrange control: +/-20 dB - super wide band Q
Power requirements: 12-48 Volt phantom power or
12 volt DC 100mA
MERIDIAN PRO PREAMP
Input: ¼ mono with 5 volt DC lavalier mic power
supply
Output 1: XLR active balanced – 8K Ohm
Output 2: Line – 100 Ohm
Bass control: +/- 20 dB - 100 Hz high pass
Midrange control: +/-20 dB–1.5K super wide band Q
Treble control: +/- 20 dB – 10K
Power requirements: 12-48 Volt phantom power or 9
volt battery
Frequency response curve - Microphone
SPECIAL NOTE REGARDING PHANTOM
POWER
The Meridian preamp works on 12-48 volt phantom
power or on 12VDC power via a suitable power
supply like the one we sell for this microphone
system.
Phantom power is unfortunately not 100%
standardized and differs in respect to how clean and
hum-free it is. “Dirty” phantom power may
introduce a more or less noticeable hum into the
signal and when connected to preamp devices, the
preamp circuit naturally amplifies this noise. In
situations you need studio quality noise
specifications we recommend to power the Meridian
preamp with its designated 12VDC power supply
and switch the phantom power supply off. This will
guarantee noise free operation.
92798 Cape Arago Hwy, Coos Bay, OR 97420 | 541-888-3517 | Toll Free 1-800-867-6863 | www.kksound.com