1
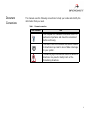
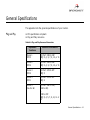
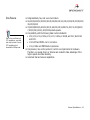
User’s Manual
Broadxent DSI V.92 PCI DI3631
Information in this document is subject to change without notice and does not represent a commitment on the part of Broadxent Ptd. Ltd. or Creative Technology Ltd. The
software described in this document is furnished under a license agreement and may be used or copied only in accordance with the terms of the license agreement. It is against
the law to copy the software on any other medium except as specifically allowed in the license agreement. The licensee may make one copy of the software for backup purposes.
No part of this manual may be reproduced or transmitted in any form or by any means, electronic or mechanical, including photocopying and recording, for any purpose without
the written permission of Broadxent Inc.
Copyright © 2001 by Broadxent Inc. All rights reserved.
Version 1.0
November 2001
IBM is a registered trademark of International Business Machines Corporation.
Microsoft, MS-DOS, Windows, and the Windows logo are registered trademarks of Microsoft Corporation.
All other products are trademarks or registered trademarks of their respective owners.
Contents
Introduction
Before You Begin ....................................................................................... i
Recording Model and Serial Numbers .................................................. i
Checking System Requirements ......................................................... i
Document Conventions..................................................................... ii
1
About Your Modem
Jacks .................................................................................................... 1-1
2
Installing Hardware
Installation Steps ................................................................................... 2-1
Step 1: Prepare your computer ...................................................... 2-1
Step 2: Insert the modem card ...................................................... 2-2
Step 3: Connect to power supply .................................................... 2-2
3
Installing and Testing Modem Drivers
Installing the Modem Driver in Windows 95............................................... 3-2
Testing the Installation in Windows 95...................................................... 3-5
Installing the Modem Driver in Windows 98/98SE ...................................... 3-6
Testing the Installation in Windows 98/98SE ............................................. 3-8
Installing the Modem Driver in Windows 2000 ........................................... 3-9
Testing the Installation in Windows 2000 ................................................ 3-11
Installing the Modem Driver in Windows Me ............................................ 3-12
Testing the Installation in Windows Me ................................................... 3-14
Installing the Modem Driver in Windows XP............................................. 3-15
Testing the Installation in Windows XP.................................................... 3-18
4
Uninstalling Modem Drivers
Uninstalling the Modem in Windows 95..................................................... 4-2
Uninstalling the Modem in Windows 98/98SE ............................................ 4-3
Uninstalling the Modem in Windows 2000 ................................................. 4-4
Uninstalling the Modem in Windows Me .................................................... 4-5
Uninstalling the Modem in Windows XP..................................................... 4-6
5
Modem Features
Plug and Play ............................................................................... 5-1
Faxes .......................................................................................... 5-1
Internet Access ............................................................................ 5-1
Answering Machine ....................................................................... 5-1
Video Conferencing ....................................................................... 5-2
QuickConnect ............................................................................... 5-2
PCM Upstream.............................................................................. 5-2
V.44 Data
Compression .............................................................................. 5-2
Modem-on-Hold............................................................................ 5-3
Using Modem-on-Hold............................................................ 5-3
Appendixes
A
General Specifications
Plug and Play ........................................................................A-1
Data Features .......................................................................A-2
Fax Features .........................................................................A-3
Voice Features ......................................................................A-3
Video Conferencing Support....................................................A-3
B
Troubleshooting
Problems With Your Modem.....................................................................B-1
Resolving Conflicts in Windows 95/98/
98SE/ME .................................................................................... B-4
Resolving Conflicts in Windows 2000/XP .......................................... B-5
C
Service and Warranty Information
Product Return ......................................................................................C-1
Tech Support.........................................................................................C-2
Warranty Information.............................................................................C-3
Introduction
Introduction
Before You Begin
This section contains information you should know about before using this manual.
Read the information carefully before proceeding further.
Recording Model
and Serial Numbers
Your modem card has a model number and a serial number. After removing the
modem card from its packaging, write down its model and serial numbers for future
reference. You will need to quote these numbers when contacting our Technical
Support office.
Checking System
Requirements
The following are the minimum system requirements:
❑ Available PCI 2.1 compliant slot
❑ 133 MHz or faster Pentium® IBM® compatible PC or AMD® K series, or higher
❑ 25 MB of free hard disk space
❑ 16 MB RAM on motherboard (32 MB recommended)
❑ Microsoft® Windows® 95, Windows 98, Windows 98 Second Edition (SE),
Windows 2000, Windows Millennium Edition (Me) or Windows XP
❑ CD-ROM drive for modem and communication software installation
❑ An audio card for video conferencing.
i
Document
Conventions
This manual uses the following conventions to help you locate and identify the
information that you need.
Table i:
Document conventions
Text Element
Use
This notepad icon indicates information that is of
particular importance and should be considered
before continuing.
This alarm clock icon indicates that failure to adere
to directions may result in loss of data or damage
to your system.
The warning sign indicates that failure to adhere to
directions may result in bodily harm or lifethreatening situations.
ii
1
About Your Modem
About Your Modem
This chapter helps you locate and identify the components of your modem.
Jacks
• Place the modem in front of
you as you go through this
chapter. This will help you
identify the various
components on your card.
• If you encounter a hardware
conflict while connecting a
Plug and Play device, refer to
Table A-1 on page A-1 for a
list of available Plug and Play
resources.
Jacks are one-hole connecting interfaces on your modem card. They allow you to
attach other devices to your card. The jacks on your modem card can be seen in
Figure 1-1.
Rear Panel
Telephone Line Jack
The Telephone Line jack allows
you to connect to a telephone
line for data transmission and
document faxing.
Phone Jack
The Phone jack allows you to
connect a telephone to the
card. This jack may differ in
certain countries.
Figure 1-1
The jacks on your modem card.
About Your Modem
1-1
2
Installing Hardware
Installing Hardware
Installation Steps
Step 1: Prepare your
computer
Turn off the main power
supply and disconnect your
computer’s power cord.
Systems using an ATX power
supply unit with soft power
off may still be powering the
PCI slot. This can damage
your modem card when it is
inserted into the slot.
1. Turn off your computer and all peripheral devices.
2. Touch a metal plate on your computer to ground yourself and to discharge any
static electricity, and then unplug the power cord from the wall outlet.
3. Remove your computer casing.
4. Remove the metal bracket from an unused PCI slot as shown in Figure 2-1. Put
the screw aside for use later.
PCI slot
ISA slot
Figure 2-1
Removing a metal plate
Installing Hardware
2-1
Step 2: Insert the
modem card
1. Align the modem card with the PCI slot and press the card gently but firmly into
the slot as shown in Figure 2-2.
2
Unused brackets
Do not force the modem card
into the slot. Make sure that
the gold finger PCI connector
on the modem card is aligned
with the PCI bus connector
on the motherboard before
you insert the card into the
PCI expansion slot.
If it does not fit properly,
gently remove it and try
again.
1
PCI
slot
ISA slot
Figure 2-2
Aligning the card against the slot.
2. Secure the modem card with the screw you had placed aside earlier.
Step 3: Connect to
power supply
1. Replace the computer casing.
2. Plug the power cord back into the wall outlet, and then turn on the computer.
To install drivers, refer to “Installing and Testing Modem Drivers” on page 3-1.
Installing Hardware
2-2
Step 4: Connect to
the telephone line
1. Locate the most convenient telephone wall outlet.
2. If a phone is already connected to it, unplug the telephone cable from the wall
outlet.
3. Connect the telephone cable from the telephone to the Phone jack of the modem.
Telephone Line
jack
To telephone
line wall outlet
Telephone
cable
(provided)
Modem card
Phone jack
Figure 2-3
Connecting the telephone line to your modem.
4. Connect one end of the telephone cable (provided) to the wall outlet and the
other end to the Telephone Line jack of the modem.
Installing Hardware
2-3
Notes on
Telephone Lines
To ensure that the modem works properly, know that:
❑ Your modem cannot be used on “party lines”, nor can it be used on toll or
coin-operated lines.
Contact your local telephone company for help if you are not sure about the
suitability of your telephone line.
❑ This modem is intended for use on an analog telephone line, also called a
POTS (Plain Old Telephone Service) line. This modem cannot be connected
directly to a digital telephone line, such as those commonly found in
businesses.
Either obtain an analog line or an analog converter compatible with the
telephone line you are using.
Installing Hardware
2-4
3
Installing and Testing Modem
Drivers
Installing and Testing Modem Drivers
This chapter is organized as follows:
❑ Installing the Modem Driver in Windows 95
❑ Testing the Installation in Windows 95
❑ Installing the Modem Driver in Windows 98/98SE
❑ Testing the Installation in Windows 98/98SE
❑ Installing the Modem Driver in Windows 2000
❑ Testing the Installation in Windows 2000
❑ Installing the Modem Driver in Windows Me
❑ Testing the Installation in Windows Me
❑ Installing the Modem Driver in Windows XP
❑ Testing the Installation in Windows XP
Installing and Testing Modem Drivers
3-1
Installing the
Modem Driver in
Windows 95
1. Turn on your computer to allow the operating
system to detect the modem.
2. When the dialog box similar to Figure 3-1
appears, insert the Installation CD into your
CD-ROM drive and then click the Next button.
Figure 3-1
3. When the dialog box similar to Figure 3-2
appears, click the Other Locations button.
Figure 3-2
Installing and Testing Modem Drivers
3-2
4. When the dialog box similar to Figure 3-3
appears, click the Browse button to locate the
driver files in E:\Drivers\Win95 (where E:
represents your CD-ROM drive).
5. Click the OK button.
Figure 3-3
6. When the dialog box similar to Figure 3-4
appears, click the Finish button.
Figure 3-4
Installing and Testing Modem Drivers
3-3
7. When the dialog box similar to Figure 3-5
appears, click the OK button.
Figure 3-5
After you have set up your
modem, run a test to ensure
that your card has been
installed properly (see
“Testing the Installation in
Windows 95” on page 3-5).
8. When the dialog similar to Figure 3-6 appears,
click the Browse button to locate the driver
files in E:\Drivers\Win95 (where E:
represents your CD-ROM drive), and then click
the OK button.
9. Restart your computer to let the new settings
take place.
Figure 3-6
Installing and Testing Modem Drivers
3-4
Testing the
Installation in
Windows 95
1. Click Start -> Settings -> Control Panel.
2. Double-click the Modems icon.
3. When the Modems Properties dialog box
similar to Figure 3-7 appears, click the
Diagnostics tab.
4. Select the COM port that has been assigned to
your modem.
5. Click the More Info button to display the
response status of your modem.
If your modem is not responding, it may be
due to a conflict between the modem and
another peripheral device. To resolve the
conflict, you must change the settings on your
modem (see “Resolving Hardware Conflicts”
on page B-4).
Figure 3-7
: Modem Properties
dialog box.
Installing and Testing Modem Drivers
3-5
Installing the
Modem Driver in
Windows 98/
98SE
1. Turn on your computer to allow the operating
system to detect the modem.
2. When the dialog box similar to Figure 3-8
appears, insert the Installation CD into your
CD-ROM drive and then click the Next button.
Figure 3-8
3. When the dialog box similar to Figure 3-9
appears, click the Search for the best driver
for your device (Recommended) option
and click the Next button.
Figure 3-9
Installing and Testing Modem Drivers
3-6
After you have set up your
modem, run a test to ensure
that your card has been
installed properly (see
“Testing the Installation in
Windows 98/98SE” on page
3-8).
4. When the dialog box similar to Figure 3-10
appears, click the Specify a location check
box, and click the Browse button to locate the
driver files in E:\Drivers\Win98 (where E:
represents your CD-ROM drive).
5. Click the Next button.
6. When Windows prompts you with the message
Windows has found an updated driver for
this device, and also some other drivers
that should work with this device, click the
The updated driver (Recommended)
option and then click the Next button.
7. When the dialog box similar to Figure 3-11
appears, click the Next button.
8. Follow the remaining onscreen steps to install
the rest of the drivers and to complete your
modem installation.
9. Restart your computer to let the new settings
take place.
Figure 3-10
Figure 3-11
Installing and Testing Modem Drivers
3-7
Testing the
Installation in
Windows 98/
98SE
1. Click Start -> Settings -> Control Panel.
2. Double-click the Modems icon.
3. When the Modems Properties dialog box
similar to Figure 3-12 appears, click the
Diagnostics tab.
4. Select the COM port that has been assigned
to your modem.
5. Click the More Info button to display the
response status of your modem.
If your modem is not responding, it may be
due to a conflict between the modem and
another peripheral device. To resolve the
conflict, you must change the settings on
your modem (see “Resolving Hardware
Conflicts” on page B-4).
Figure 3-12 : Modem Properties
dialog box.
Installing and Testing Modem Drivers
3-8
Installing the
Modem Driver in
Windows 2000
1. Turn on your computer to allow the
operating system to detect the modem.
2. When the Found New Hardware Wizard
dialog box appears, click the Search for a
suitable driver for my device
(recommended) option, and then click the
Next button.
3. When the dialog box similar to Figure 3-13
appears, insert the Installation CD into your
CD-ROM drive.
4. Click the Specify a location check box, and
then click the Next button.
5. When the dialog box similar to Figure 3-14
appears, click the Browse button to locate
the driver files in E:\Drivers\Win2K
(where E: represents your CD-ROM Drive),
and then click the OK button.
Figure 3-13
Figure 3-14
Installing and Testing Modem Drivers
3-9
6. When the dialog box similar to Figure 3-15
appears, click the Next button.
7. Click the Yes button.
Figure 3-15
8. When the dialog box similar to Figure 3-16
appears, click the Finish button.
9. Restart your computer to let the new
settings take place.
Figure 3-16
Installing and Testing Modem Drivers
3-10
Testing the
Installation in
Windows 2000
1. Click Start -> Settings -> Control Panel.
2. Double-click the Phone and Modems icon.
3. In the Broadxent DSI V.92 PCI DI3631
WIN2K Properties dialog box, click the
Diagnostics tab.
4. Click the Query Modem button to display
the response status of your modem.
If your modem is not responding, it may be
due to a conflict between the modem and
another peripheral device. To resolve the
conflict, you must change the settings on
your modem (see “Resolving Hardware
Conflicts” on page B-4).
Figure 3-17 : Broadxent DSI V.92 PCI
DI3631 Properties dialog
box.
Installing and Testing Modem Drivers
3-11
Installing the
Modem Driver in
Windows Me
1. Turn on your computer to allow the operating
system to detect the modem.
2. Insert the Installation CD into your CD-ROM
drive.
3. When the Add New Hardware Wizard dialog
box similar to Figure 3-18 appears, click the
Specify the location of the driver
(Advanced) option and click the Next
button.
Figure 3-18
4. When the dialog box similar to Figure 3-19
appears, click the Specify a location check
box to select it. Make sure that the
Removable Media (Floppy, CD-ROM...)
check box is not selected.
5. Click the Browse button to locate the driver
files in E:Drivers\WinMe (where E:
represents your CD-ROM drive).
6. Click the Next button.
Figure 3-19
Installing and Testing Modem Drivers
3-12
After you have set up your
modem, run a test to ensure
that your card has been
installed properly (see
“Testing the Installation in
Windows Me” on page 3-14).
7. When Windows prompts you with the message
Windows driver file search for the device:
DSI WDM MODEM ENUMERATOR, click the
Next button.
8. When the dialog box similar to Figure 3-20
appears, click the Finish button.
9. Follow the remaining onscreen steps to install
the rest of the drivers and to complete your
modem installation.
10.Restart your computer to let the new settings
take place.
Figure 3-20
Installing and Testing Modem Drivers
3-13
Testing the
Installation in
Windows Me
1. Click Start -> Settings -> Control Panel.
2. Double-click the Modems icon.
3. When the Modems Properties dialog box
similar to Figure 3-21 appears, click the
Diagnostics tab.
4. Click the COM port that has been assigned to
your modem.
5. Click the More Info button to display the
response status of your modem.
If your modem is not responding, it may be due
to a conflict between the modem and another
peripheral device. To resolve the conflict, you
must change the settings on your modem (see
“Resolving Hardware Conflicts” on page B-4).
Figure 3-21 : Modem Properties
dialog box.
Installing and Testing Modem Drivers
3-14
Installing the
Modem Driver in
Windows XP
1. Turn on your computer to allow the operating
system to detect the modem.
Windows XP will automatically install a
default driver. You will, however, need to
replace this default driver with the driver on
the Installation CD.
2. Click Start -> Control Panel.
3. Double-click the Systems icon.
4. In the System Properties dialog box,
double click the Hardware tab.
5. Click the Device Manager button.
6. Double-click the Modems icon.
7. Right-click Broadxent DSI V.92 PCI
DI3631.
8. In the menu that appears, select the Update
Drivers option and insert the Installation CD
into your CD-ROM drive.
9. When the Hardware Update Wizard dialog
box similar to Figure 3-22 appears, click the
Don’t search. I will choose the driver to
install option, and then click the Next
button.
Figure 3-22
Installing and Testing Modem Drivers
3-15
After you have set up your
modem, run a test to ensure
that your card has been
installed properly (see
“Testing the Installation in
Windows XP” on page 3-18).
10.When the dialog box similar to Figure 3-23
appears, click the Show compatible
hardware option to select it, and then click
ESS ES56T-PI Data Fax Modem in the
Models box.
11.Click the Have Disk button.
Figure 3-23
12.When the dialog box similar to Figure 3-24
appears, click the Browse button to locate
the driver files in E:\Drivers\WinXP
(where E: represents your CD-ROM Drive),
and then click the OK button.
13.In the Hardware dialog box that appears,
click the Show compatible hardware
option to select it, and then click Broadxent
DSI V.92 PCI DI3631 in the Models box.
14.Click the Next button.
Figure 3-24
Installing and Testing Modem Drivers
3-16
At the time of this
product’s release, Microsoft
strongly encouraged
companies to submit their
hardware solutions for
certification. If a hardware
device driver is not
submitted, or does not
qualify, for Microsoft
certification, a warning
message similar to
Figure 3-25 appears.
15.When the dialog box similar to Figure 3-25
appears, click the Continue Anyway
button.
16.Click the Finish button.
17.Restart your computer to let the new
settings take place.
Figure 3-25
You may see this message
when installing this driver
or update. If you do, you
may choose to click the
Continue Anyway button.
Broadxent has tested this
driver or update on
Windows XP, and it does
not impair or destabilize
your computer. If you need
more XP-related
information, go to the
product web site's Help.
Installing and Testing Modem Drivers
3-17
Testing the
Installation in
Windows XP
1. Click Start -> Control Panel.
2. Click the Phone and Modem Options
icon.
3. Click the Modems tab.
4. In the Modems tabbed page, click
Broadxent DSI V.92 PCI DI3631 and
then click the Properties button.
5. When the dialog box similar to
Figure 3-26 appears, click the
Diagnostics tab.
6. Click the Query Modem button to
display the response status of your
modem.
If your modem is not responding, it may
be due to a conflict between the modem
and another peripheral device. To
resolve the conflict, you must change the
settings on your modem (see “Resolving
Hardware Conflicts” on page B-4).
Figure 3-26 : Broadxent DSI V.92 PCI
DI3631 Properties dialog
box.
Installing and Testing Modem Drivers
3-18
4
Uninstalling Modem Drivers
Uninstalling Modem Drivers
This chapter is
❑ Uninstalling
❑ Uninstalling
❑ Uninstalling
❑ Uninstalling
❑ Uninstalling
organized as follows:
the Modem in Windows
the Modem in Windows
the Modem in Windows
the Modem in Windows
the Modem in Windows
95
98/98SE
2000
Me
XP
Uninstalling Modem Drivers
4-1
Uninstalling the
Modem in
Windows 95
1. Click Start -> Settings -> Control Panel.
2. Double-click the Add/Remove Programs
icon.
3. When the Add/Remove Programs
Properties dialog box similar to Figure 4-1
appears, click Uninstall Broadxent DSI
Modem.
4. Click the Add/Remove button.
5. When Windows prompts you to remove the
modem, click the Yes button.
6. Click the OK button.
7. Turn off your computer and remove
the modem card from your system.
Figure 4-1
: Add/Remove Programs
Properties dialog box.
Uninstalling Modem Drivers
4-2
Uninstalling the
Modem in
Windows 98/
98SE
1. Click the Start -> Settings -> Control
Panel.
2. Double-click the Add/Remove Programs
icon.
3. When the Add/Remove Programs
Properties dialog box similar to Figure 4-2
appears, click Uninstall Broadxent DSI
V.92 PCI DI3631.
4. Click the Add/Remove button.
5. When Windows prompts you to remove the
modem, click the Yes button.
6. Click the OK button.
7. Turn off your computer and remove
the modem card from your system.
Figure 4-2 : Add/Remove Programs
Properties dialog box.
Uninstalling Modem Drivers
4-3
Uninstalling the
Modem in
Windows 2000
1. Click Start -> Settings -> Control Panel.
2. Double-click the Add/Remove Programs icon.
3. In the Add/Remove Programs dialog box similar to Figure 4-3, click Uninstall
Broadxent DSI Modem, and then click the Change/Remove button.
Figure 4-3: Add/Remove Programs dialog box.
4. When Windows 2000 prompts you to remove the selected modem, click the Yes
button to complete the uninstallation.
5. Turn off your computer and remove the modem card from your system.
Uninstalling Modem Drivers
4-4
Uninstalling the
Modem in
Windows Me
1. Click Start -> Settings -> Control Panel.
2. Double-click the Add/Remove Programs
icon.
3. When the Add/Remove Programs
Properties dialog box similar to Figure 4-4
appears, click the Install/Uninstall tab.
4. Click Uninstall Broadxent DSI Modem from
the list and then click the Add/Remove
button.
5. When Windows prompts you to remove the
modem, click the Yes button.
6. Click the OK button.
7. Turn off your computer and remove the modem
card from your system.
Figure 4-4 : Add/Remove Programs
Properties dialog box.
Uninstalling Modem Drivers
4-5
Uninstalling the
Modem in
Windows XP
1. Click Start -> Control Panel.
2. Click the Add or Remove Programs icon.
3. In the Add or Remove Programs dialog box similar to Figure 4-5, click the
Change/Remove button.
4. When Windows prompts you to remove the modem, click the Yes button.
5. Click the Close button.
Figure 4-5 : Add or Remove Programs dialog box.
6. Turn off your computer and remove the modem card from your system.
Uninstalling Modem Drivers
4-6
5
Modem Features
Modem Features
Broadxent DSI V.92 PCI DI3631 allows you to fax documents, transfer data and
access online information easily from your computer. Some features of your
Broadxent DSI V.92 PCI DI3631 are:
Plug and Play
This feature allows you to install your Broadxent DSI V.92 PCI DI3631 easily, as the
device is automatically configured.
Faxes
Use your Broadxent DSI V.92 PCI DI3631 to send and receive fax documents. This
feature also allows you to configure the modem to serve as a fax-on-demand
system by using the software provided.
Internet Access
Broadxent DSI V.92 PCI DI3631 allows you to access computer bulletin boards and
to browse the Internet at speeds of up to 56 Kbps.
Answering Machine
Broadxent DSI V.92 PCI DI3631 functions as an answering machine with multiple
mail boxes. Remote users can leave messages in your mail box, and you can play
back these messages at any time. Broadxent DSI V.92 PCI DI3631 even pages you
to notify you of new messages!
Modem Features
5-1
Video Conferencing
Your Broadxent DSI V.92 PCI DI3631 comes complete with V.92 standard support,
for use with H.32x video conferencing systems.
QuickConnect
This feature drastically reduces the amount of time it takes for your Broadxent DSI
V.92 PCI DI3631 to establish a connection with your Internet Service Provider. The
characteristics of the last call are saved in your computer, and retrieved for
subsequent calls, resulting in a shorter connection time.
PCM Upstream
This feature enhances your Broadxent DSI V.92 PCI DI3631’s data upload speed
from 33.6 Kbps to a maximum of 48 Kbps.
V.44 Data
Compression
Your Broadxent DSI V.92 PCI DI3631 incorporates the new V.92 standard. This new
standard offers V.44 Data Compression technology that allows you to browse the
Internet at higher speeds than existing data compression standards.
Modem Features
5-2
Modem-on-Hold
This feature allows you to answer an incoming call even when you are surfing the
Internet. Check with your local Internet Service Provider to ascertain that this
feature is supported in your area.
Modem-on-Hold suspends the data connection between your modem and the ISP so
that you can pick up your phone and receive an incoming call in the usual way, while
surfing the Internet. When your call is complete, the modem reconnects you to the
Internet. For more information on Modem-on-Hold, visit http://www.v92.com.
Using Modem-on-Hold
1. If a call comes in while you are on the Internet, a
dialog box similar to Figure 5-1 appears, asking you
if you want to answer the call. Click the Yes button.
Your phone line needs to be
Caller ID and Call Waiting
enabled to support Modemon-Hold.
Figure 5-1
2. A dialog box similar to Figure 5-2 appears, telling
you that you only have two minutes to complete
your call. The call is automatically cut off after two
minutes. After completing your call, click the OK
button. The modem will reconnect to the Internet.
Figure 5-2
Modem Features
5-3
A
General Specifications
General Specifications
This appendix lists the general specifications of your modem.
Plug and Play
❑ PCI specification compliant.
❑ Plug and Play resources.
Table A-1:Plug and Play Resource Information.
Dependent
functions
Resource Information
Choice 1
COM 3
I/O Port: 3E8 to 3EF
IRQ: 3, 4, 5, 7, 9, 10, or 11
Choice 2
COM 4
I/O Port: 2E8 to 2EF
IRQ: 3, 4, 5, 7, 9, 10, or 11
Choice 3
COM 2
I/O Port: 2F8 to 2FF
IRQ: 3
Choice 4
COM 1
I/O Port: 3F8 to 3FF
IRQ: 4
Choice 5
Free-For-All
I/O Port: 2A0 to 2A7,
2A8 to 2AF,
...
2D8 to 2DF
IRQ: 3, 4, 5, 7, 9, 10, 11 or
15
General Specifications
A-1
Data Features
Due to line conditions and
FCC regulations, your data
rate may be lower. Current
FCC regulations limit
download to 53Kbps max.
❑ Integrated data, fax, and voice mail modem.
❑ 56,000/54,000/52,000/50,000/48,000/46,000/ 44,000/42,000/40,000/38,000/
36,000/34,000
❑ 33,600/28,800/26,400/24,000/21,600/19,200/16,800/14,400/ 12,000/9,600/
7,200/4,800/2,400/1,200/300 bps data speeds.
❑ Compatibility with the following data modem standards:
• V.92, V.90, V.34, V.32bis, V.32, V.23, V.22bis, V.22A/B, and V.21; Bell 212A
and 103J.
• V.42 LAPM and MNP2-4 error correction.
• V.44, V.42bis and MNP5 data compression.
❑ Compression, line control, and error control are implemented in hardware.
Therefore, no special drivers or libraries are needed to take advantage of the
higher speeds and data reliability.
❑ Automatic dial and answer capabilities.
General Specifications
A-2
Fax Features
❑ Supports Class 1 fax commands.
❑ Fax speeds up to 14,400 bps for send and receive.
❑ Compatibility with the following fax modem transmission standards:
• V.17 (14400 bps)
• V.21 Channel 2 (300 bps)
• V.27ter (7200 bps)
• V.29 (9600 bps)
Voice Features
❑ Able to record and play voice messages over the telephone line.
❑ Multiple mailboxes using Included Communications software.
Video Conferencing
Support
❑ Supports ITU V.92 standard to allow high performance video conferencing over
standard phone lines and the internet. Video Conferencing standards are H.324
and H.323.
General Specifications
A-3
B
Troubleshooting
Troubleshooting
This appendix provides tips and solutions for resolving some of the problems you
might encounter with Broadxent DSI V.92 PCI DI3631 either during installation or
normal use.
Problems with
Your Modem
The modem fails to accept commands to dial or answer a call.
There may be an improper telephone line connection.
Check the following:
❑ Make sure the telephone cable is attached to the Telephone Line jack.
❑ Check that all devices are turned on.
There is interference on the telephone line that is connected to the modem.
To solve this problem:
Try moving the telephone line away from any power source, monitor, printer or any
computer cable.
Troubleshooting
B-1
The modem cannot connect to the Internet at 56,000 bps.
This may be due to line conditions in your area. Due to FCC regulations and/or line
conditions, it is not always possible to achieve the maximum data rate.
To solve this problem:
Try moving the telephone line away from any power source, monitor, printer or
computer cable.
The modem or communications software fails to detect that the remote user has
hung up.
The modem or communications software relies on the dial tone, busy tone or silence
period to detect that a remote user has hung up.
This detection may fail due to one of the following reasons:
❑ Your local telephone system does not generate the dial or busy tone when the
remote user hangs up.
❑ The silent period for the modem or communications software to detect that the
remote user has hung up is not long enough.
❑ The modem or communications software cannot detect a different dial or busy
tone. For example, if you are connecting to a PABX system, the dial or busy tone
generated is different from the usual dial or busy tone.
To solve this problem:
Prompt the remote user to respond.This may, however, result in a long delay before
the communications software responds to the remote user hanging up. To minimize
this delay, modify the following settings:
❑ Voice message recording time.
❑ Number of prompts.
❑ Time to wait for a response after prompting.
Troubleshooting
B-2
Poor sound quality when using communications software.
Some 32-bit sound and communications software require a Unimodem V file.
Windows 95 normally installs this file. However, in some installations, the file is
missing.
Follow these steps to install the Unimodem V file:
1.
2.
3.
4.
5.
6.
7.
8.
Go to www.modemblaster.com.
Locate the Download Drivers section.
Select your region and operating system.
Download the Unimodem V file.
Start Windows Explorer.
Copy the file UNIMODV.EXE to your Windows\System directory.
Locate and double-click the file UNIMODV.EXE to run it.
Restart your computer.
No dial tone when using the modem.
The IRQ of the modem is either in conflict with another device or is mis-reported in
Windows.
To solve this problem:
Many chipsets have IRQ routing drivers for Windows. If you have an internal
modem, and these drivers do not work or do not exist on your system, changing the
slot of the modem card may help.
Troubleshooting
B-3
Resolving Hardware
Conflicts
Hardware conflicts may occur when two or more peripheral devices are set to use
the same I/O address, IRQ line or DMA channel.
Resolving Conflicts
in Windows 95/98/
98SE/ME
To run Device Manager:
If you are unsure of which
peripheral device is causing
the conflict, you can isolate
the source of the problem by
temporarily removing all
devices (except your modem
and essential devices such as
the disk controller). After
that, add the devices back
one at a time until the device
that is causing the conflict is
found.
To resolve conflicts in Windows 95, Windows 98/98SE, Windows 2000, Windows Me
or Windows XP, change the resource settings of your modem or the conflicting
peripheral device using Device Manager.
Click Start -> Settings -> Control Panel.
Click the System icon. The System Properties dialog box appears.
Click the Device Manager tab.
Double-click Modem.
Select your modem and click the Properties button. The Properties dialog box
of the modem appears.
6. Click the Resources tab.
7. Click the Use Automatic Settings check box to select it. If this check box is
already selected, you need to go to the Properties dialog box of the conflicting
peripheral device and select the same check box there.
8. Restart your system to allow Windows 95/98/98SE to reassign resources to your
modem and/or the conflicting peripheral device.
1.
2.
3.
4.
5.
Troubleshooting
B-4
Resolving Conflicts
in Windows 2000/
XP
To run Device Manager:
Click Start -> Settings -> Control Panel.
Click the System icon. The System Properties dialog box appears.
Click the Hardware tab.
Click the Device Manager button.
Double-click Modem.
Click the name of your modem.
Right-click the name of your modem.
A menu appears.
8. Select the Properties option.
9. Click the Resources tab.
10.Click the Use Automatic Settings check box to select it. If this check box is
already selected, you need to go to the Properties dialog box of the conflicting
peripheral device and select the same check box there.
11.Restart your system to allow Windows 2000/XP to reassign resources to your
modem and/or the conflicting peripheral device.
1.
2.
3.
4.
5.
6.
7.
Troubleshooting
B-5
Problems with
installing Broadxent
drivers
A Hardware Installation error message appears on a Windows XP operating system
when a driver is being installed.
At the time of this product's release, Microsoft strongly encouraged companies to
submit their hardware solutions for certification. If a hardware device driver is not
submitted, or does not qualify, for Microsoft certification, a warning message similar
to the one below appears.
You may see this message when installing this driver or update. If you do, you may
choose to click the Continue Anyway button. Broadxent has tested this driver on
Windows XP, and it does not impair or destablize your computer.
If you need more XP-related information, go to the product web site's Help.
Troubleshooting
B-6
C
Service and Warranty
Information
Service and Warranty Information
Visit our online help website for help with installation, answers to frequently asked
questions, or troubleshooting tips. Our website hold a wealth of information as well
as up-to-the-minute software and driver upgrades.
www.americas.creative.com/support
Product Return
Retain your purchase receipt,
as well as all packaging and
contents, until all product
components are functioning
to your satisfaction. They are
required in the unlikely event
you need to return the
product to Creative.
To return a Creative product for a factory service, contact the Creative Technical
Support office. Once the staff has verified the product is defective, you will be given
a Return Merchandise Authorization (RMA) number.
When returning a product for factory service:
❑ Shipment to Creative is at your expense and you assume all risk. Ship the
package through a carrier that provides proof of delivery; insure the shipment at
full product value.
❑ Place the RMA number on the outside of the package.
❑ Use proper materials for packing the product for shipment.
❑ For free repair or replacement, you must include a copy of a dated proof of
purchase (store receipt), proving that the product is still under Warranty
Creative may replace or repair the product with new or reconditioned parts, and the
faulty parts or product will become the property of Creative.
Service and Warranty Information
C-1
Tech Support
BEFORE YOU CONTACT US
Please fill out the following information and be seated at your computer.
• Model #: _____________Serial # _____________(both found on the back of the
device)
• Error message on the screen and how it came about:
_____________________________________________________________________
_____________________________________________________________________
_____________________________________________________________________
_____________________________________________________________________
• Information on the adapter card that conflicts with the product (if applicable):
_____________________________________________________________________
_____________________________________________________________________
_____________________________________________________________________
_____________________________________________________________________
• Hardware configuration information:
_____________________________________________________________________
• IRQ line: (if applicable):
_____________________________________________________________________
• DMA channel used (if applicable):
_____________________________________________________________________
• Computer type and speed:
_____________________________________________________________________
• Type and version of your operating system; Windows 95/98/Me/2000/XP:
_____________________________________________________________________
For comments or questions regarding our technical support, you can also
contact us at the following address: Creative Labs, Inc., Technical
Support, 1523 Cimarron Plaza, Stillwater, OK 74075.
Service and Warranty Information
C-2
Warranty Information
CREATIVE (“the manufacturer”) warrants that equipment furnished
will be free from defects in material and workmanship for a period
of one (1) year from the confirmed date of purchase of the product
new from the retail location. Upon written notice of any such defect,
the manufacturer will, at its option, repair or replace the defective
item under the terms of this warranty, subject to the provisions and
specific exclusions listed herein.
This warranty shall not apply to equipment that has been previously
repaired or altered outside our plant in any way. Nor will it apply if
the equipment has been used in a manner exceeding its
specifications or if the serial number has been removed.
We do not assume any liability for consequential damages as a result
from our products use, and in any event our liability shall not exceed
the original selling price of the equipment.
The equipment warranty of Creative Technology Ltd., shall
constitute the sole and exclusive remedy of any buyer of the
manufacturer’s equipment and the sole and exclusive liability of the
manufacturer, its successors or assignees, in connection with
equipment purchase and in lieu of all other warranties expressed,
implied or statutory, including, but not limited to, any implied
warranty of merchantability or fitness and all other obligations or
liabilities of the manufacturer, its successors or assignees.
Service and Warranty Information
C-3