1
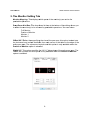
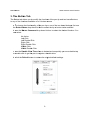
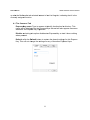
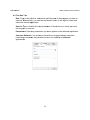
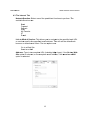
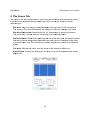
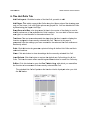
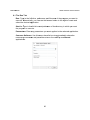
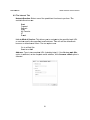
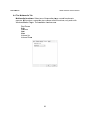
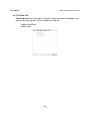
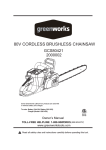
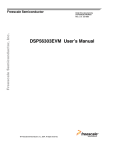
MONOPRICE
10594 Windows User's Manual
MONOPRICE
10594 Windows User's Manual
CONTENTS
I. General Information ......................................................................................... 1
1. Overview............................................................................................................... 1
2. Pen Tablet Functions ............................................................................................ 1
3. System Requirements .......................................................................................... 1
4. Technical Support ................................................................................................. 2
5. Package Contents ................................................................................................ 2
6. Installing the Driver Software ................................................................................ 3
7. Hardware Installation ............................................................................................ 4
8. Verifying Hardware and Driver Functionality......................................................... 5
9. Usage Tips ........................................................................................................... 6
II. Configuration .................................................................................................... 7
1. The Info Tab ......................................................................................................... 7
2. The Monitor Setting Tab ....................................................................................... 8
3. The Button Tab ..................................................................................................... 9
4. The Express Keys Tab ....................................................................................... 10
4.1 The Common Tab .......................................................................................... 11
4.2 The Run Tab .................................................................................................. 12
4.3 The Internet Tab ............................................................................................ 13
4.4 The Hot Key Tab ............................................................................................ 14
4.5 The Mouse Tab .............................................................................................. 15
4.6 The Multimedia Tab ....................................................................................... 16
4.7 The Other Tab................................................................................................ 17
5. The Scope Tab ................................................................................................... 18
6. The Hot Cells Tab ............................................................................................... 19
6.1 The Run Tab .................................................................................................. 20
6.2 The Internet Tab ............................................................................................ 21
6.3 The Hot Key Tab ............................................................................................ 22
6.4 The Multimedia Tab ....................................................................................... 23
6.5 The Other Tab................................................................................................ 24
7. The Pressure Tab ............................................................................................... 25
III. Pen Storage and Maintenance ................................................................. 26
1. Storing the Digital Pen ........................................................................................ 26
2. Replacing the Battery in the Digital Pen ............................................................. 26
3. Replacing the Pen Tip ........................................................................................ 27
MONOPRICE
10594 Windows User's Manual
I. General Information
1. Overview
Thank you for purchasing this Monoprice Graphic Tablet!
A Graphic Tablet, with its accompanying wireless digital pen, is a natural and intuitive
input device for drawing and image editing tasks. It is also an excellent alternative input
device over a mouse when performing conventional computer tasks.
2. Pen Tablet Functions
After installing the device driver, your pen tablet can perform the following functions:
Direct Pointing: You can move the cursor to any location on the screen by hovering
the digital pen tip over the tablet's surface.
Three-Button Mouse Commands: Your pen tablet provides all the functionality of a
three-button mouse using the pen tip and two buttons.
Pen Scrolling: You can scroll in documents and applications by pressing the middle
button on the digital pen while moving the pen over the tablet's surface.
Pressure Sensitivity: The tablet and pen feature 2048 levels of pressure sensitivity
so, like a real pencil, the harder you press down the darker and thicker the lines,
while minimal pressure will produce faint, thin lines.
3. System Requirements
Windows XP/Vista/Windows 7/Windows 8 (32- & 64-bit)
Available USB port
CD-ROM drive
1
MONOP
PRICE
10594 Windows User's Manual
4. Te
echnicall Suppo
ort
Monop
price is plea
ased to pro
ovide free, live, online
e technical support to
o assist yo
ou with
any questions yo
ou may havve about in
nstallation, setup, trou
ubleshootin
ng, or prod
duct
recomm
mendations. If you evver need assistance
a
with your new
n
product, please come
online to talk to one
o of our friendly
f
and knowledgeable Tech Supporrt Associate
es.
Technical supporrt is availab
ble through
h the online
e chat buttton on our website
(www.m
monoprice.com) during regularr business hours, 7 days a week. You can
n also get
assista
ance throug
gh email byy sending a message
e to tech@
@monoprice
e.com.
5. Pa
ackage C
Contentts
After re
eceiving the product, please invventory the
e contents to ensure you have all the
proper parts, as listed below
w. If anythiing is misssing or dam
maged, please contacct
price Custo
omer Servicce for a rep
placementt.
Monop
1x Graphic
G
tablet
1x Wireless
W
graphic tablet pen
1x Mini
M USB ccable (4.9fft/1.5m)
1x Pen
P holderr (with 4x replaceme
r
nt pen tipss and 1x pe
en clip tip rremoval too
ol)
1x Drivers
D
and
d software
e CD
1x User's
U
man
nual
1x AAA
A
batterry
2
MONOP
PRICE
10594 Windows User's Manual
6. Ins
stalling the Driver Sofftware
IMPORTA
ANT! Do no
ot plug the
e tablet in
nto your PC
P until aftter you ha
ave
installed the
t device
e driver.
Driver CD into the CD
D-ROM drivve, and wa
ait for the m
main installation
a. Insert the D
een to app
pear. If you
u have auto
orun disablled or for some
s
otherr reason th
he
scre
insttallation pro
ogram doe
es not startt, open the
e disc in Windows Exxplorer and
d doubleclick the SETU
UP.EXE prrogram to begin the setup.
s
C
the W
Win Driver button to launch the installer.
b. Click
c. The
T defaultt install dire
ectory is C:\Program
C
m Files (x8
86)\Monop
price Table
et 10594.
Clicck the OK button to begin
b
the in
nstallation process.
3
MONOP
PRICE
10594 Windows User's Manual
d by Windo
ows Security to verifyy the driverr source, click the Ins
stall
d. Iff prompted
buttton to conttinue the in
nstallation. Repeat th
his processs as neede
ed until the
insttallation is complete.
e. When
W
the installation is complete, you will be promp
pted to rebo
oot your co
omputer.
Savve any ope
en files you
u may be working
w
on and click the
t OK buttton to reboot your
sysstem.
7. Ha
ardware
e Installa
ation
Once the device driver has been insta
alled and you
y have re
ebooted yo
our PC, you can
t tablet.
install the
a. Plug
P
one end of the in
ncluded US
SB cable in
nto the US
SB port on the tablet and
a the
othe
er into an available
a
U
USB
port on
o your PC
O
connected a sm
mall tablet icon will ap
ppear in the system ttray.
b. Once
c. In
nstall the in
ncluded AA
AA battery
y in the pen
n using the
e instruction
ns found in
n section
III below.
b
4
MONOPRICE
10594 Windows User's Manual
8. Verifying Hardware and Driver Functionality
Once the software and hardware has been installed, verify the operation and
functionality of the tablet.
a. Press the power button on top of the pen. The tablet will initiate and then the LED
indicator on the left side will flash briefly.
b. Press a button on the pen. The LED indicator will flash briefly.
c. Hover the pen over the working surface of the tablet. The LED indicator will slowly
blink and the cursor on screen will move to follow the movement of the pen.
If all three tests above pass, the pen and tablet have been properly installed and setup
on your PC.
If the tests fail, please contact Monoprice Technical Support for assistance. You can
contact Tech Support via email at [email protected], using "Contact Us" form at:
http://www.monoprice.com/home/home.asp?pn=contact
You can also use the Live Chat feature on our website, at:
https://www.monoprice.com/home/chat.asp
Tech Support is available for Live Chat during the following hours:
Monday through Friday:
Saturday and Sunday:
6:00 am ~ 7:00 pm PT
9:00 am ~ 6:00 pm PT
5
MONOPRICE
10594 Windows User's Manual
9. Usage Tips
The following guidelines will help obtain the best results in using this Graphic Tablet:
Double Tapping: A quick double tap of the pen tip is the equivalent of a double-click
on a mouse.
Scrolling: The pen can be used to perform the same scrolling function available
with an ordinary wheel mouse.
Using With A Mouse: In addition to the tablet and pen, you can also have a mouse
connected and installed. However, only one device will function at a time. Do not
connect more than two input devices at the same time as it could cause the cursor to
jitter or freeze.
Power: It is recommended to power off the pen and tablet when not in use.
Storing: Do not store the pen in such a way that pressure could be applied to the tip.
When not in use, store the pen in a pen holder or place it horizontally on a flat
surface. When storing for a long period of time, remove the pen tip using the
instructions found in section III below.
6
MONOP
PRICE
10594 Windows User's Manual
II. Config
C
gurattion
The co
onfiguration
n dialog allows you to
o modify prressure se
ensitivity, m
monitor sele
ection,
custom
mize the bu
uttons, etc.
Locate
in
e the tablet icon
n the syste
em tray and
d click it to
o open the Pen Table
et Settings
applica
ation. Alternatively, yo
ou can run
n the appliccation direcctly from th
he installattion
directo
ory. Assuming you insstalled to th
he default directory, the utility iss located at:
a
Monoprice
e Tablet 10
0594\PLau
unch.exe
C:\Prrogram Filles (x86)\M
1. Th
he Info T
Tab
The Inffo tab displays the drriver versio
on number. Additiona
ally it has tw
wo options
s, which
are selected by d
default:
Sho
ow Icon in
n System Tray
T
- Thiss option de
etermines whether
w
the tablet ico
on will be
disp
played in th
he system tray. It is recommen
r
nded to leavve this ena
abled to alllow easy
acccess to the tablet and
d pen settin
ngs dialog.
Sup
pport Tablet PC Fea
ature - Wh
hen selecte
ed the pen''s pressure
e sensitivity
y feature
will function properly
p
in Microsoft Journal,
J
OneNote (20
003-2007), etc. This does not
affe
ect the presssure senssitivity funcction of com
mmon art software
s
pa
ackages, such
s
as
Pho
otoshop, Illlustrator, Corel
C
Paintter, etc.
7
MONOP
PRICE
10594 Windows User's Manual
2. Th
he Monittor Settting Tab
b
Monitor Mapping: This
s displays which
w
parts
s of the mo
onitor(s) arre active fo
or
pen
n/tablet ope
erations.
Dro
op-Down List
L Box: The
T drop-d
down list bo
ox at the bottom
b
of th
he dialog allows
a
you
to select
s
the monitor(s)
m
to be cove
ered by pen
n/tablet op
perations. Y
You can se
elect:
Full Monitor
Porrtion of Monitor
Monitor 1
Monitor 2
Offfset X/Y: R
Rather than
n specifying
g the size of
o the pen area, this option insttead sets
the horizontal and vertic
cal distance
es from ea
ach corner of the tablet to the edge of the
ea. The values are in
n pixels and
d this optio
on is only a
available when
w
the
actiive pen are
Porrtion of Mo
onitor optiion is selec
cted.
Wid
dth X/Y: This option specifies the full X,Y
Y dimension
ns of the a
active pen area.
a
The
valu
ues are in pixels and this option
n is only avvailable wh
hen the Po
ortion of Monitor
M
optiion is selec
cted.
8
MONOP
PRICE
10594 Windows User's Manual
3. Th
he Butto
on Tab
The Bu
utton tab allows you to
t modify the function
ns of the pen tip and two barrell buttons
to any of the func
ctions available on a 3-button mouse.
m
T change the functio
onality of th
he pen tip or one of the
t two barrrel buttons
s, first use
a. To
the Button Na
ame drop--down list box
b to sele
ect the tip or
o button to
o be modifiied.
b. Use
U the Mo
ouse Com
mmand drop-down list box to se
elect the de
esired func
ction. You
can
n select:
No Action
Leftt Click
Leftt Double Click
C
Right Click
Right Double Click
ddle Click
Mid
Mid
ddle Double
e Click
c. Use
U the Do
ouble Click
k Time slid
der to dete
ermine how
w quickly yo
ou must do
ouble-tap
or double-clic
d
k to get the
e pen to re
egister a do
ouble-click
k.
C
the Default buttton to resto
ore the orig
ginal defau
ult settings.
d. Click
9
MONOP
PRICE
10594 Windows User's Manual
4. Th
he Expre
ess Key
ys Tab
The Ex
xpress Key
ys are the physical
p
bu
uttons on the
t left side
e of the tab
blet. The Express
E
Keys ta
ab allows yyou to dete
ermine the functions that will be
e assigned to each button.
xpress Key
ys tab pres
sents you with
w eight buttons
b
on the left sid
de, next to each
The Ex
Expres
ss Key on tthe tablet image. The
ere is also a Default button at tthe bottom right
corner..
he eight bu
uttons on th
he left opens the Exp
press Key e
editing dialog, with
Clicking one of th
ed:
seven tabs labele
Com
mmon
Run
n
Inte
ernet
Hott Key
Mouse
Multimedia
her
Oth
The se
elected Exp
press Key will perform
m the function that is
s displayed
d when you
u click the
OK buttton.
For exa
ample, by default the
e top Expre
ess Key is labeled Ca
ancel and the default function
is CTR
RL+Z on the
e Hot Key tab. If insttead you w
wanted it to
o mute the volume on
n your PC,
first clic
ck the Multimedia ta
ab and sele
ect Mute frrom the dro
op-down lisst box. The
e OK
button is now ava
ailable. Clic
ck it, then click Apply
y to apply the changes. If you then
t
click
he top Exp
press Key you
y will se
ee that the editing dia
alog comes
s
the Cancel button next to th
10
MONOP
PRICE
10594 Windows User's Manual
h the Multim
media tab selected in
nstead of th
he Hot Key
y tab, indiccating that it is the
up with
currenttly assigne
ed function.
4.1 The Common Tab
k name:: Type in a name to id
dentify the
e function fo
or this key
y. This
Express key
name will be display
yed on the Express Keys
K
tab an
nd will also
o appear on
n screen
whenever the Expres
ss Key is pressed.
p
Disable: Selecting
S
th
his option disables th
he Express
s Key so th
hat it does nothing
when presssed.
Default: Click
C
the De
efault buttton to resto
ore the deffault setting
gs for this Express
Key. This will not cha
ange the settings
s
forr any of the
e other Exp
press Keys
s.
11
MONOP
PRICE
10594 Windows User's Manual
4.2 The Run Tab
Run: Type
e in the fulll drive, patthname, an
nd filename
e of the pro
ogram you
u want to
execute. A
Alternativelly, you can
n use the browse
b
buttton to the rright to loc
cate and
select the desired ap
pplication.
Start in: T
Type in the
e full drive and
a pathna
ame of the
e directory in which yo
ou want
the progra
am to execute.
Paramete
ers: Enter any
a parameters you want
w
applied to the sselected ap
pplication.
Common Software: Use this drop-down
d
n list box to
o automaticcally selectt the
necessaryy command
ds and parrameters to
o run the TabTip
T
and
d Journal
application
ns.
12
MONOP
PRICE
10594 Windows User's Manual
4.3 The Internet Tab
Network ffunction: Select
S
one
e of the pre
edefined functions to perform. The
T
available ffunctions are:
a
Bacck
Forrward
Reffresh
Sto
op
My Favorite
IE
E-M
Mail
Link to Kiind of Serv
vice: This allows you
u to naviga
ate to the sspecified web
w URL
or send an
n email to the
t specifie
ed email address. Th
his will call the defaullt web
browser or default em
mail client.. The two o
options are
e:
Go to a Web Site
nd an e-Ma
ail
Sen
Address: Type in th
he complete
e URL (inc
cluding http
p:// part), if the Go to
o a Web
Site option
n is selecte
ed, or the complete
c
e
email addre
ess, if the S
Send an e-Mail
e
option is selected.
s
13
MONOP
PRICE
10594 Windows User's Manual
4.4 The Hot Key
K Tab
The
e key comb
bination to press: Use
e the chec
ck boxes to
o select wh
hether the CTRL,
C
ALT
T, SHIFT, and/or
a
Win
ndows keys
s should be used to modify
m
the
e key selec
cted in the
drop-down list box. Use the drop-d
down list box
b to selec
ct the actual key thatt will be
"pre
essed". An
ny key on a standard US PC ke
eyboard can be specified, includ
ding the
Prin
nt Screen kkey and up
p to 16 sep
parate funcction keys. For examp
ple, put a checkmark
c
k
in CTRL
C
and select
s
S fro
om the list box to spe
ecify a CTR
RL+S key combinatio
on, which
is th
he default Save File key combination for most progrrams.
Common function: Select the
e type of fu
unction to perform.
p
Th
he availablle
functions a
are:
Sho
ow Desktop
Switch Applic
cation
3D Switch Ap
pplication (W
Windows Vista
V
and Windows
W
7 only)
nd Tool (Adobe Phottoshop only
y)
Han
14
MONOP
PRICE
10594 Windows User's Manual
4.5 The Mous
se Tab
Mouse function: Se
elect a mou
use functio
on to perform. The avvailable mo
ouse
functions a
are:
Leftt Click
Right Click
Mid
ddle Click
Leftt Double Click
C
4th Click
5th Click
Wheel Up
Wheel Down
15
MONOP
PRICE
10594 Windows User's Manual
4.6 The Multiimedia Tab
Multimedia function
ns: Select one of the
e media pla
ayer contro
ol functions
s to
execute. A
All functions, except the
t two vollume contrrol function
ns, only wo
ork with
Windows Media
M
Play
yer. The av
vailable fun
nctions are
e:
Play/Pause
op
Sto
Pre
evious
Nexxt
Mutte
Volume Up
n
Volume Down
16
MONOP
PRICE
10594 Windows User's Manual
4.7 The Othe
er Tab
Tablet's work
w
zone: Allows yo
ou to resett the screen area thatt correspon
nds to the
tablet posiitioning sys
stem. The two availa
able options
s are:
Larrgest Work
k Zone
Scrreen Ratio
17
MONOP
PRICE
10594 Windows User's Manual
5. Th
he Scope Tab
The sc
cope is the area on th
he tablet in which input can be made
m
and the area on
o screen
in whic
ch screen elements
e
c be man
can
nipulated. You
Y can se
et the scop
pe in severral
differen
nt ways.
Pen
n Area: Us
se your mo
ouse to dra
ag the edge
es of the pen
p area to
o the desire
ed size.
The
e values in Pen Area Dimensions will cha
ange to reflect the cha
anges you make.
Pen
n Area Dim
mensions:: Specifies
s the full X,Y dimensio
ons of the active pen
n area.
The
e values arre in inches
s and you can speciffy to two de
ecimal placces.
Pen
n Area Offfset: Rathe
er than spe
ecifying the
e size of th
he pen area
a, this option instead
d
sets
s the horizontal and vertical
v
dis
stances fro
om each co
orner of the
e tablet to the
t edge
of the active pen
p area. The
T values
s are in inc
ches and yo
ou can spe
ecify to two
o decimal
ces.
plac
Full Area: Cliicking this button sets the scop
pe to the largest posssible size.
Scrreen Ratio
o: Clicking this button
n sets the sscope to a size that m
matches th
he screen
asp
pect ratio.
18
MONOP
PRICE
10594 Windows User's Manual
6. Th
he Hot Cells
C
Tab
Hott Pad Layo
out: Click the
t locatio
on of the Ho
ot Cell you
u wish to ed
dit.
Hott Edges: T
This tablet supports Hot
H Cells along
a
the Upper
U
edge
e of the dra
awing area
a
only
y, so the Lower, Left, and Right options are
a greyed out. You ccan disable
e Hot Cells
s
by deselecting
d
g the Uppe
er Hot Edge.
Dro
op-Down List
L Box: The
T drop-d
down list bo
ox in the center of the dialog is used to
dire
ectly selectt one of the
e available
e Hot Cells locations. You can cclick in the text area
and
d type in a new identiifier for the
e selected Hot
H Cell.
Tex
xt Area: Th
he text are
ea underne
eath the dro
op-down lis
st box is us
sed to disp
play the
func
ction assig
gned to the
e currently selected Hot
H Cell. Th
he text in this area is
gen
nerated from the settiings you have create
ed for the selected
s
Ho
ot Cell and
d cannot
be directly
d
edited.
Prin
nt: Click th
his button to
t generate
e a printout listing all defined Hot Cells an
nd their
sele
ected functtions.
Cle
ear: Click th
his button to clear alll settings fo
or the currently seleccted Hot Cell.
Loa
ad Defaultt: Click this
s button to restore the
e default Hot
H Cell settings for all
a Hot
Cells. This ha
as the same effect as
s clicking th
he Clear button for each Hot Cell entry.
Deffine: Click this button
n to open the Pen Ta
ablet dialog
g, with which you can
n define
the function to
o be execu
uted for the
e currently selected Hot
H Cell.
The selectted Hot Ce
ell will perfo
orm the fun
nction thatt is displaye
ed when you
y click
the OK bu
utton.
19
MONOP
PRICE
10594 Windows User's Manual
6.1 The Run Tab
Run: Type
e in the fulll drive, patthname, an
nd filename
e of the pro
ogram you
u want to
execute. A
Alternativelly, you can
n use the browse
b
buttton to the rright to loc
cate and
select the desired ap
pplication.
Type in the
e full drive and
a pathna
ame of the
e directory in which yo
ou want
Start in: T
the progra
am to execute.
ers: Enter any
a parameters you want
w
applied to the sselected ap
pplication.
Paramete
Common Software: Use this drop-down
d
n list box to
o automaticcally selectt the
ds and parrameters to
o run the TabTip
T
and
d Journal
necessaryy command
application
ns.
20
MONOP
PRICE
10594 Windows User's Manual
6.2 The Internet Tab
Network ffunction: Select
S
one
e of the pre
edefined functions to perform. The
T
available ffunctions are:
a
Bacck
Forrward
Reffresh
Sto
op
My Favorite
IE
E-M
Mail
Link to Kiind of Serv
vice: This allows you
u to naviga
ate to the sspecified web
w URL
or send an
n email to the
t specifie
ed email address. Th
his will call the defaullt web
browser or default em
mail client.. The two o
options are
e:
Go to a Web Site
nd an e-Ma
ail
Sen
Address: Type in th
he complete
e URL (inc
cluding http
p://), if the Go to a Web
W Site
option is selected,
s
orr the comp
plete email address, ifi the Send
d an e-Maiil option is
selected.
21
MONOP
PRICE
10594 Windows User's Manual
K Tab
6.3 The Hot Key
The key combinatio
c
on to pres
ss: Use the
e check bo
oxes to sele
ect whethe
er the
CTRL, ALT
T, SHIFT, and/or Win
ndows keyys should be
b used to modify the
e key
selected in
n the drop--down list box.
b
Use th
he drop-do
own list boxx to select the actual
key that will
w be "pres
ssed". Any key on a sstandard US
U PC keyb
board can be
specified, including the
t Print Screen key and up to 16 separa
ate function
n keys. Forr
example, put
p a chec
ckmark in CTRL
C
and sselect S fro
om the list box to spe
ecify a
CTRL+S key
k combin
nation, which is the default
d
Sav
ve File key combinatio
on for
most programs.
Common function: Select the
e type of fu
unction to perform.
p
Th
he availablle
are:
functions a
Sho
ow Desktop
Switch Applic
cation
pplication (W
Windows Vista
V
and Windows
W
7 only)
3D Switch Ap
nd Tool (Adobe Phottoshop only
y)
Han
22
MONOP
PRICE
10594 Windows User's Manual
6.4 The Multiimedia Tab
Multimedia function
ns: Select one of the
e media pla
ayer contro
ol functions
s to
All functions, except the
t two vollume contrrol function
ns, only wo
ork with
execute. A
Windows Media
M
Play
yer. The av
vailable fun
nctions are
e:
Play/Pause
op
Sto
Pre
evious
Nexxt
Mutte
Volume Up
n
Volume Down
23
MONOP
PRICE
10594 Windows User's Manual
er Tab
6.5 The Othe
Tablet's work
w
zone: Allows yo
ou to resett the screen area thatt correspon
nds to the
tablet posiitioning sys
stem. The two availa
able options
s are:
Larrgest Work
k Zone
Scrreen Ratio
24
MONOP
PRICE
10594 Windows User's Manual
7. Th
he Press
sure Tab
This dialog allows
s you to te
est the pres
ssure senssitivity of th
he pen and to adjust the
t
sensitiv
vity of the pen's "click
k" function.
essure Tes
st: Use you
ur pen with
hin this are
ea to test th
he pressurre sensitivitty.
Pre
Pus
shing hard will draw a thick, bold line, whiile light pre
essure will result in a thin, light
line
e. The vertiical bar to the
t right off the test area
a
will inc
crease in a
amplitude to
t indicate
the amount off pressure being app
plied.
ack, Red, Green,
G
Blu
ue: Use the
ese radio b
buttons to select the pen color to use
Bla
during the tesst. This allo
ows you to see the efffects with the four prrimary colo
ors.
ear: Click th
his button to clear ev
verything frrom the Pressure Tes
st area.
Cle
ck Sensitivity: Use this
t
slider to
t set the ssensitivity at which a "click" is detected
d
Clic
with
h the tip. If you have a heavy drawing han
nd or are drawing
d
thiccker, heav
vier lines,
you
u will want to use a he
eavier click
k sensitivitty.
25
MONOP
PRICE
10594 Windows User's Manual
III. Pen
P Stora
S age an
nd Ma
ainte
enanc
ce
1. Sto
oring th
he Digita
al Pen
The dig
gital pen sh
hould be stored in su
uch a way that
t
nothin
ng touches the tip. Prrolonged
pressure on the ttip, even a slight pres
ssure, can damage th
he ability o
of the pen to
t use the
full range of pressure sensiitivity.
p will sim
mply be unu
used overn
night or forr any otherr short perio
od of time,, placing it
If the pen
in the included pe
en holder or
o horizonttally on the
e desk is su
ufficient. Fo
or long-terrm storage
or ship
pping, the tip and batttery should
d be remov
ved.
2. Re
eplacing
g the Ba
attery in
n the Dig
gital Pe
en
To insttall, remove
e, or replac
ce the batttery in the digital pen
n, perform tthe followin
ng steps:
U
th
he top half of the pen from the b
bottom halff. The juncction is at the upper
a. Unscrew
edg
ge of the ru
ubberized grip
g portion
n of the pe
en.
b. Allow
A
the old
o battery to
t fall out of
o the top h
half of the pen. Dispo
ose of the battery in
acc
cordance with
w local re
egulations..
c. In
nsert a new
w AAA alka
aline batte
ery (include
ed) in the to
op half of tthe pen. Th
he positive
e
lead
d should be visible in
n the open pen half so that it ma
akes conta
act with the
e bottom
halff when the pen is rea
assembled.
C
lin
ne up the threads
t
of the bottom
m and top halves
h
of th
he pen and
d screw it
d. Carefully
toge
ether. Take
e care not to cross th
hread the p
pen because the plasstic threads can be
eas
sily damage
ed. Screw the pen to
ogether firm
mly but nott too tightlyy.
26
MONOP
PRICE
10594 Windows User's Manual
3. Re
eplacing
g the Pe
en Tip
If the pen
p tip needs replacin
ng or remo
oval due to long-term storage, p
perform the
e following
steps as
a applicab
ble:
a. Open
O
the pen
p holder and remov
ve the mettal Pen Clip
p.
b. Position
P
the
e Pen Clip over the exposed
e
po
ortion of the pen tip. S
Squeeze the clip
with
h your finge
ers to prov
vide a firm grip on the
e tip.
P gently until the tip
p is comple
etely removed.
c. Pull
d. Take
T
a replacement tip
t out of th
he pen hold
der and ge
ently insert it into the pen until
it is
s fully seate
ed into plac
ce.
e. Use
U the Pre
essure Tes
st dialog in
n the driverr utility to te
est the ope
eration of the
t newly
replaced tip.
27