1
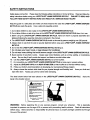
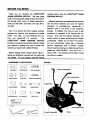
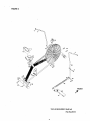
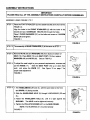
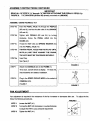
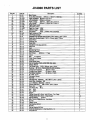
SEARS
JH4000
EXERCISE
BICYCLE
Model No. 142. 288040
Serial No.
Write number In space above for future reference
QUESTIONS?
Call Sears Exercise
Equipment Helpline
1-800-736-6879
CAUTION:
Before using this Exercise Bicycle
read this manual and follow all its
Safety Rules and Operating
Instructions.
•
•
•
•
•
Safety
Installation
Operation
Maintenance
Parts
Sears,
Roebuck
an0
Co.,
Ho maoEs
,,001,9,
O.S.A
I!!!!!
!
Visit our Sears Website: www. Sears.corn
?
3
SAFETY INSTRUCTIONS
Safety always comes first.
Please keep the following safety instructions in mind at all times.
safety instructions before using your LIFESTYLER
FOLLOW
THESE SAFETY
INSTRCUTIONS
e JH4000
CAN RESULT
EXERCISE
BICYCLE.
IN A SERIOUS
FAILURE
also reads this guide.
® JH4000 EXERCISE
2. Do not allow children or pets to be close to the LIFESTYLEI'_
3. Before using the LIFESTYLER
® JH4000
EXERCISE
EXERCISE
BICYCLE
JH4000
BICYCLE,
tightened following the assembly instructions contained
®JH4000
_ JH4000
EXERCISE
Have a safe and enjoyable workout.
1. Do not allow children to use or play on the LIFESTYLER
4. The LIFESTYLER
TO READ AND
BODILY INJURY.
Keep this guide in a safe place and make sure that everyone who uses the LIFESTYLER
BICYCLE
Read and follow the
BICYCLE.
EXERCISE
BICYCLE
when it is in use.
make sure that it is properly assembled and
in this manual.
should not be used by persons weighing over 250 pounds.
5. Always check to see that the seat is securely fastened
before using your LIFESTYLEI_
JH4000
EXERCISE
BICYCLE.
6. Do not ride the LIFESTYLER
7. Do not place your head,
e JH4000 EXERCISE
hands, or legs between
8. Do not wear loose clothing that could become
9. Never exercise in bare feet or socks.
shoes.
BICYCLE
standing up.
the handlebars.
caught in the LIFESTYLER
®JH4000
EXERCISE
BICYCLE.
Always wear correct footware, such as running, walking, or crosstraining
Be sure they fit well, provide foot support, and feature non-skid rubber soles.
10.
Use the LIFESTYLER
11.
Do not position your LIFESTYLEI_
12.
Adjust the LEVELING
13.
Follow your doctor's recommendations
14.
Always choose the workout which best fits your physical strength and flexibility level.
train within them.
_ JH4000 EXERCISE
JH4000
BICYCLE
on a level surface.
EXERCISE
CAPS on the REAR STABILIZER
Always use common
BICYCLE
on loose rugs or uneven surface.
so that the bike set on the floor without rocking.
in developing your own personal fitness program.
Know your limits and
sense when exercising.
The decal shown below has been placed on the LIFESTYLEI_
JH4000
EXERCISE
BICYCLE.
Apply the
decal in the location shown.
ILCAUTION
Donot allowchildren onor
aroundmachine.
Keep handsandfeet away
from movingparts and contact
points.
Use the machineona level
surface
Read owner's manualend
follow instructions.
WARNING:
Before
beginning
this or any exercise
program,
consult your physician.
important for persons over the age of 35 or persons with pre-existing
before using.
Sears assumes
the use of this product.
no responsibility for personal
health problems.
This is especially
Read all instructions
injury or property damage sustained by through
BEFORE YOU BEGIN
Thank
JH4000
you
for
choosing
EXERCISE
the
BICYCLE
LIFESTYLER e
We
take
carefully before using the LIFESTYLER
EXERCISE
great
° JH4000
BICYCLE.
pride in producing this quality product and hope it
will provide
many
hours of quality exercise
to
Although Sears tries to manufacture
make you feel better, look better and enjoy life to
with the finest materials
its fullest.
standards
Yes, it is a proven fact that a regular exercise
program
can improve
health.
Too often,
time
and
LIFESTYLER
your physical
our busy lifestyles
opportunity
to
e
EXERCISE
JH4000
provides a convenient
and mental
limit our
exercise.
uses the highest
manufacturing,
defective
part
process.
In addition,
necessary
for operation
product.
The
of
and
is not
found
its products
occasionally
in the
a
inspection
from time to time, a part
is not shipped
with the
Even with the highest inspection
and
quality controls in place, these things will happen
BICYCLE
occasionally.
and simple method to begin
Please
For your convenience,
do not return the product.
Sears
has a Customer
your assault on getting your body in shape and
Service
achieving a happier and healthier lifestyle.
Should a part be missing or a defective part found,
Department
with
please call 1-800-736-6879,
Before reading
further, please
below and familiarize
are labeled.
HARDWARE
ACORN
NUT
review Figure 1
yourself with the parts that
days a week.
a
toll-free
number.
7 a.m. until 7 p.m. 7
Our operators will be able to assist
you with our problem.
For your benefit, read this manual
FIGURE 1
ILLUSTRATIONS
STANDARD
NUT
PHILLIPS
RIGHT HANDLEBAR
ECREW
LEFT HANDLEBAR
THIN NYLON
NUT
NYLON NUT
SOCKET
HEAD SCREW
>9
CURVE WASHER
BUSHING
CARRIAGE
BOLT
SPRING KNOB
SPRING WASHER
HANDLEBAR
FLAT WASHER
PEDALAXLE
AXLE
TOOLS
REAR STABILIZEF
J
FRONT STABILIZER
PEDAL
FIGURE
2
35
36
4R
36
FRONT
A
TOOLS
REQUIRED:
Multi tool
Hex Key 8mm
4
ASSEMBLY
INSTRUCTIONS
PLEASE READ ALL OF THE ASSEMBLY INSTRUCTIONS
CAREFULLY BEFORE ASSEMBLING.
IMPORTANT
ASSEMBLY
STEP1
USING
FIGURE
2 TO 7
Place the FONT STABILIZER
FRAME
(2) into saddle bracket at the front of the
(1).
Align the holes in the FRONT
STABILIZER
bracket and put 2 CARRIAGE
Place 2 CURVE
WASHERS
(2) with the holes in the
3
BOLTS (35) through the holes.
(37) on the bolts and screw on 2 ACORN
NUTS (36) and tighten.
FIGURE
3
FIGURE 3
STEP
2 The assembly of REAR STABILIZER
STEP 3 I Remove NUTS (39) and WASHERS
(2) is the same as STEP 1.
(48) from studs on bottom of
SEAT (16). Place SEAT (16) onto SEAT POST (15) then replace
WASHERS
STEP4
(46) and NUTS (39).
Secure TIGHTLY,
To adjust the seat height to your personal requirements,
3ull the KNOB
3ush
(17).
Slide the SEAT POST
and screw the KNOB
(17).
See
unscrew and
/47
.-39
(15) up or down then
Figure
10 on page 7 for
_roper seat adjustment.
FIGURE
STEP5
4
1. The HANDLEBARS
FIGURE
4
FIGURE
5
(3R and 3L), with the pivot tube to the front
and GRIPS (13)facing
outside.
2. Slide the HANDLEBAR
AXLE
(9) through HANDLEBARS
(3R and
3L).
3. Fasten
the
BUSHING.
HANDLEBAR
The AXLE
4. Tighten the PHILLIPS
NOTE:
FIGURE
AXLE
(9),
until it is tight against
the
must be tightened securely.
SCREWS
The BUSHINGS
(47) on the MAIN FRAME.
(31) mounted already.
5
I
'ASSEMBLY
INSTRUCTIONS
CONTINUED
IMPORTANT
READ ALL OF STEP 6 "a" through "d" BEFORE ATTACHING THE PEDALS.
FIGURE 6. THE SPACERS (29 and 30) already mounted on LINKAGE.
ASSEMBLY
STEP 6a
USING
FIGURES
REFER TO
2 TO 7
Insert the PEDAL
AXLE
(10) through the PEDALS
8R and 8L) and the shoulder side of the LINKAGE
(4R and 4L).
i STEP 6b
Tighten
both
clockwise.
CRANK
STEP 6c
PEDALS
Screw
Thread
AXLE
PEDAL
(4t)
ARE
THE NUTS MUST
STEP 6e
PEDAL
8L)
by turning
AXLE
the NUT (40) and SPRING
TIGHTEN
NUTS
the
and
into
the
(20).
onto the PEDAL
STEP 6d
(SR
WASHER
(52)
(10).
AXLES
TIGHT
AND NUTS
AGAINST
BE TIGHTENED
(4t)
THE
UNTIL
CRANK,
SECURELY.
Insert Cap,
See Figure 6
FIGURE 6
STEP7
Attach the CONSOLE (23) to the FRAME (1).
To be sure, console shows a display,
if it does not,
check batteries and battery installation.
STEP8
Plug in the SPEED
CONSOLE
FIGURE
PICKUP
WIRE to the socket ot
(23).
7
FIGURE
7
FAN ADJUSTMENT
Fan adjustment
is required if the resistance
follow the following
of the fan increases or decreases
after use.
procedures.
FIGURE
STEP1
Loosen the NUT (41)
STEP2
Tuming the NUT (48) clockwise or counterclockwise
to adjust the FAN to your personal requirement.
STEP 3
To adjust the fan,
Tighten the NUT (41)
6
Z6_
8
41
OPERATION
LEVELING
THE LIFESTYLEI_
Place the LIFESTYLER e JH4000
it will be used.
JH4000 EXERCISE
EXERCISE
BICYCLE
FIGURE 9
BICYCLE
in the location
The floor should be hard and flat and the bike should
sit firmly on the floor.
If the bike is not stable, turn the LEVELING
CAP (12) on the REAR STABILIZER
(2) until the bike is stable.
Turn one cap at a time, as it may only be necessary
to adjust one.
SEAT HEIGHT ADJUSTMENT
FIGURE
Proper seat height is important for efficient exercise.
proper seat
height,
sit on the LIFESTYLER
10
To determine
e JH4000
EXERCISE
BICYCLE
and center the ball of your foot on the pedal in the down
position.
Your leg should be slightly bent and relaxed as shown.
EXERCISE WORKOUT
The Secret to aerobic training is achieving a selected heart rate and maintaining it.
The LIFESTYLEIP
JH4000 EXERCISE BICYCLE, with its air resistance system allows the user to easily attain the desired
pulse rate.
Since no two people or life styles are alike, the LIFESTYLEIP
JH4000 EXERCISE BICYCLE has been
designed to allow the user to isolate portions of the body that may need greater emphasis in training.
The exercises provide cardiovascular conditioning, muscle toning and joint flexing with the ability to
exercise both the upper and lower body simultaneously or independently.
by increasing the speed of the leg and/or arm movements.
FULLY BODY WORKOUT:
Sitting comfortably
Increase the workout intensity
erects, use the handlebars
while simultaneously
pedaling.
Alternate
to either push or pull
the effort to your arms or
legs to intensify or reduce the work of the upper or lower body.
handlebars
may be tripped from underneath
The
(palm up) to change the
muscle groups used.
LOWER BODY WORKOUT: Simple releases the handlebars and places your hands on your hips or
thighs as you pedal.
This concentrates
the exercise
on the lower
body.
UPPER BODY WORKOU_
Stand with feet on the stabilizer, lean over the seat and activate the fan
using the
handlebars.
This
exercise
is most effective
muscles of the torso are used in a twisting motion.
?
when
the
MONITOR
USAGE
POWER
ON:
POWER
OFF: Automatic shut off after 4 minutes of inactivity.
Auto ON when pedal movement or push the BUTTON.
f
FUNCTION:
SCAN:
Monitor will rotate through
Distance
and Calorie
all 4 functions
- Time, Speed,
every 30 seconds
automatically.
Each display will be held for 6 seconds.
TIME:
Press the button until the pointer advance
blinking.
to TIME and
Press the button once, the pointer should stop
blinking and fix on the TIME function
SPEED
Press the button until the pointer advance to SPEED and
blinking.
Press the button once, the pointer should
Stop blinking and fix on the SPEED
DISTANCE:
function.
Press the button until the pointer advance to DISTANCE
button once to fix on the DISTANCE
CALORIES:
J
_.
function
Then press the
and stop blinking.
Press the button until pointer advance to CALORIES
for stop blinking and fix on the CALORIES
and blinking.
and blinking.
Press the button once
function.
SPECIFICATIONS:
FUNCTION
SCAN
Every 6 seconds
Time
OO:OO- 99:59 min.
Speed
0 - 99.9 MPH
Distance
0 - 99.9 Mile
Calorie
0 - 999.9 K. cal
CONTROLLER
4 bit signal chip microprocessor
SENSOR
No-contact magnetic type
Two "AA" OR "UM-3"
BATTERY
TYPE
OPERATING
STORAGE
TEMPERATURE
TEMPERATURE
HOW TO REMOVE
0oc _ 4OoC (32°F - 104°F)
.1OoC _ 60oc (140F - 140OF)
BATTERY:
1. Pull off the battery cover and place two "AA" or "UM-3" batteries into battery housing on back of
monitor.
2. Insure batteries are correctly
3. Replace
positioned and battery springs are in proper contact with batteries.
battery cover and insure it is tightly closed.
4. Battery life is approx. 1 year under normal usage.
5. If the display is illegible or only partial segments appear, remove batteries and wait 15 sec_ before
reinstalling.
6. Removing the batteries will erase computer memory.
o
CONDITIONING
GUIDELINES
How you begin your exercise program, depends on your physical condition.
If you have been inactive for several
years, or are severely overweight, you must start slowly and increase your time on the LIFESTYLER
EXERCISE
BICYCLE
gradually:
_ JH4000
A few minutes per workout.
Initially, you may be able to exercise only for a few minutes in your target zone; your aerobic fitness will improve over
the next six to eight weeks.
Don't be discouraged if it takes longer.
It's important to work at your own pace.
Ultimately, you'll be able to exercise continuously for 30 minutes. Remember these essentials:
•
Have your doctor review your training and diet programs to advise you of a workout routine you should adopt.
•
Begin your training program slowly with realistic goals that have been set by you and your doctor.
•
Monitor your pulse frequently.
•
Set up your LIFESTYLER e JH4000
Establish your target heart rate based on your age and condition.
EXERCISE
BICYCLE
on a fiat, even surface at least 3 feet from walls
and furniture.
1. Periodically lubricate the moving parts with lightweight household lubricants.
2. Check all nuts, bolts and clamp assemblies to be sure they are tight and secure.
3. Check monitor batteries.
Monitor uses "AA" or "UM-3" batteries.
FULL 90 DAYS WARRANTY
For 90 days from the date of purchase, if failure occurs due to defect in material or workmanship in this Sears
product, contact the nearest Sears Service Department throughout the United States and Sears will furnish the
defective part, free of charge.
The warranty does not apply when the LIFESTYLER e JH4000
EXERCISE
BICYCLE
is used commercially or
for rental purposes.
This warranty gives you specific legal rights, and you may have other rights which vary from states to states.
Sears, Roebuck and Co. Hoffman Estates, IL 60179
Q
JH4000
/
/
EXPLODED
/
/
]
P C:_..
//'
/7
31
+"
._/49
4L
10"
22/_
"_.
. ,."
32\
+31
38 _
12
DRAWING
JH4000 PARTS LIST
Key No.
1
2
3R
3L
4R
4L
5R
5L
6R
6L
7
8R
8L
9
10
11
12
13
14
15
16
17
18
19
201
21
22
23
24
25
26
27
28
29
30
31
32
33
34
35
36
37
38
39
40
41
42
43
44
45
46
47
48
49
5O
51
52
53
54
Part NO.
321-01
321-02
321-03R
321-03L
321-04R
321-04L
321-05R
321-05L
321-06R
321-6L
321-7
321-8R
321-8L
321-9
321-10
321-11
321-12
321-13
321-14
321-15
321-16
321-17
321-18
32%19
321-20
321-21
321-22
321-23
321-24
321-25
321-26
321-27
321-28
321-29
321-30
321-31
321-32
321-33
321-34
321-35
321-36
321-37
321-38
321-39
321-40
321-41
321-42
321-43
321-44
321-45
321-46
321-47
321-48
321-49
321-50
321-51
321-52
321-53
321-54
Description
Main Frame
Front/Rear Stabilizer
O76mm x 1.5mm T x 500mm L
Right Handlebar 2125mm x 2.0 mm T
Left Handlebar
2125mm x 2.0 mm
Right Linkage
550mm L x 50mm W x 3:0mm T
Left Linkage
550mm L x 50mm W x 3.0mm T
Right Chain Guard
Left Chain Guard
Right Fan Cage
2128"
Left Fan Cage
2128"
Fan Wheel
2126" (*PRICE INCLUDE #28)
Right Pedal and Cap
Left Pedal and Cap
Handlebar Axle (Socket Head) 2116mm, M12 x 80ram, pitch 1.25mm
Pedal Axle (Socket Head) M12 x 115mm, pitch 1.25mm
Dolly Wheel
Leveling Cap
Foam Grip
Handlebar End Cap, ÷25 mm
Seat Post
Seat
Seat Spdng-Knob
Seat Post Sleeve
Belt Wheel
21350mm, O type
Crank
Belt
L=1720mm
Chain Guard Sleeve
Console
Drive Wheel Assy.
Tab for Eye Bolt (*INCLUDED #26, #34, #48)
Washer 215mm
Fan Wheel Axle
M10 x 180mm, pitch 1.0mm
Bushing
21 10mm (*MOUNTED ON FAN WHEEL)
Linkage Front Spacer
218mm x 9mm
Linkage Rear Spacer
21 16mm x 10mm
Handlebar Bushing
21 16mm x 17mm
B. B Set- 9 pcs
Computer Sensor
Eye Bolt
Carriage Bolt - Stabilizer
M8 x 85mm, pitch 1,25ram
Acorn Nut - Stabilizer M8
Curve Washer - Stabilizer 21 8mm
Socket Head Bolt
M8 x 40mm, pitch 1.25mm
Nylon Nut
M8
Thin Nylon Nut
M12
Nut
M10
Nut
MI0
Spacer
Phillips Screw M3 x 6mm, pitch 0.5mm - Fan Cage
Phillips Screw M5 x 6mm - Chain Guard
Spring Washer
218mm
M6 x 15mm Phillips Screw - Handlebar
Nut M5
Plastic Cover
Flat Washer 214mm
Nut M4
Spring Washer 2112mm
Tools Set (Multi tool x 1, Hex Key 8mm x 1)
User Manual
tl
Quantity
1
2
1
1
1
1
1
1
1
1
1
1
1
2
2
2
2
2
2
1
1
1
1
1
1
1
1
1
1
2
2
1
2
2
2
4
1
1
2
4
4
4
2
5
2
2
4
2
6
14
3
2
2
2
4
4
2
1
1
For in-home major brand repair service:
Call 24 hours a day, 7 days a week
1-800-4-MY-HOMEs.(1-800-469-4663)
Para pedir servicio de reparacion a domicilio - 1-800-676.5811
In Canada for all your service and parts need call - t-800-665-4455
AuCanadapourtoutleserviceoulespieces
For the repair or replacement parts you need:
Call 7 am - 7 pm, 7 days a week
1-800-659-PART
(1-800-659-7278)
Para ordenar peizas con entrega a domicilio -1-800-659-7084
For the location of a Sears Parts and Repair Center in your area:
Call 24 hours a day, 7 days a week
1-800-488-1222
For information on purchasing a Sears MaintenanceAgreement
or to inquireabout an existingAgreement:
Call 9 am - 5 pm, Monday - Saturday
1-800-827-6655
r-
SEARS
HomeCentral'"
The Serviceside
of Sears"