1
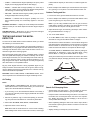
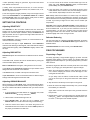
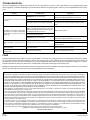
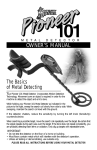
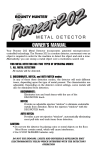
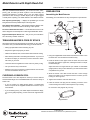
Metal Detector with Depth Read-Out
OWNER’S MANUAL — Please read before using this equipment.
With your RadioShack Metal Detector, you can hunt for coins, relics,
jewelry, gold, and silver just about anywhere. This electronically advanced metal detector is versatile, easy to use, and offers superior
performance when hunting for smaller objects (such as gold nuggets
or small pieces of jewelry). The metal detector’s other features include:
PREPARATION
Assembling the Metal Detector
Assembling your metal detector is easy and requires no special tools.
Dual Liquid Crystal Display — displays the probable type of metal
being detected and the probable depth of the target item.
Lower Stem
Slow Sweep Discrimination — distinguishes between different metals efficiently, even when the detector is swung at slow speeds.
Button
Cable
Three-Tone Audio Discrimination — sounds distinctive tones for different categories of metal objects to make target identification easier.
Eight Inch Waterproof Search Coil — lets you use your metal detector in almost any weather conditions.
Search Coil
Control
Panel
TREASURE HUNTER’S CODE OF ETHICS
All treasure hunters might be judged by the example you set. Here are
a few basic rules you should follow while using your metal detector:
Knob
Bolt
• Always get permission before searching any site.
Upper Stem
• Respect the rights and property of others.
• Observe all national, state, and local laws while treasure hunting.
• Never destroy historical or archaeological treasures. If you are not
sure about an object you have found, contact a museum or historical society in your area.
• Leave the land and vegetation as it was. Fill in any holes you dig.
• Use your detector only in safe areas.
• Dispose of any junk you find only in approved areas. Do not leave
it for the next treasure hunter to find.
CHOOSING A SEARCH COIL
The best search coil to use depends on where you use the detector
and the desired target. Your local RadioShack store carries a variety of
search coils.
• If you are looking for deeply-buried objects, a medium-sized
search coil (such as the supplied standard 8 inch search coil) is
more efficient.
1. Using the supplied bolt and knurled knob, attach the search coil to
the lower stem. Do not fasten the bolt all the way.
2. Press the button on the upper end of the lower stem, then slide
the lower stem into the upper stem, allowing the button to stop at
the desired length.
Adjust the stem to a length that lets you maintain a comfortable
upright posture, with your arm relaxed at your side and the search
coil parallel to the ground.
3. Wind the search coil’s cable around the stem. Leave enough
slack in the cable to let you adjust the search coil when you are
hunting on uneven ground.
4. Tighten the knob at the end of the search coil.
5. Insert the search coil’s plug into the matching connector on the
control housing. Be sure the holes and pins line up correctly.
Do not force it! The plug fits only one way.
• If you are looking for tiny, coin-sized objects not buried too deeply,
or if you are gold prospecting, a 4 inch search coil might work better.
Plug Connector
© 2000 RadioShack Corporation.
All Rights Reserved.
RadioShack and RadioShack.com are trademarks used by RadioShack Corporation.
Caution: When disconnecting the cable, pull it out by the plug. Do not
pull on the cable.
Listening Safely
To protect your hearing, follow these guidelines when you use headphones.
Installing Batteries
• Set the volume to the lowest setting before you begin listening.
After you begin listening, adjust the volume to a comfortable level.
Your metal detector requires two 9V batteries (not supplied) for power.
For the best performance and longest life, we recommend RadioShack
alkaline batteries.
• Do not listen at extremely high volume levels. Extended high-volume listening can lead to permanent hearing loss.
Cautions:
• Once you set the volume, do not increase it. Over time, your ears
adapt to the volume level, so a volume level that does not cause
discomfort might still damage your hearing.
• Use only fresh batteries of the required size and recommended
type.
• Do not mix old and new batteries, different types of batteries
(standard, alkaline, or rechargeable), or rechargeable batteries of
different capacities.
Traffic Safety
Do not wear headphones while operating your metal detector near
high-traffic areas.
1. Press down on the battery compartment cover’s tab and lift the
cover out.
Even though some headphones let you hear some outside sounds
when listening at normal volume levels, they still can present a traffic
hazard.
2. Snap the batteries into the terminals. 9V batteries fit only one way
— do not try to force them.
3. Place the batteries inside the compartment.
TURNING THE DETECTOR ON/OFF
4. Replace the cover.
To turn on the metal detector, rotate POWER/SENSITIVITY clockwise.
The detector sounds three beeps, display arrows appear, and the low
battery indicator lights briefly.
When the low battery indicator stays on continuously, the metal detector does not power on, the sound becomes weak or distorted or will not
tune properly, or the metal detector stops operating properly, replace
the batteries.
The metal detector is preset to the ALL METAL mode. To set the metal
detector to the desired mode, follow the Steps in the desired mode’s
section under “Setting the Mode” on Page 4.
You can extend battery life by using headphones (see “Using Headphones”).
To turn off the metal detector, rotate POWER/SENSITIVITY counterclockwise toward OFF.
Warning: Dispose of old batteries promptly and properly. Do not burn
or bury them.
UNDERSTANDING THE DISPLAY
Caution: If you do not plan to use the metal detector for a week or
longer, remove the batteries. Batteries can leak chemicals that can destroy electronic parts.
RESETTING THE METAL DETECTOR
The metal detector might lock up and sound a continuous tone if you
have low battery voltage or are testing the detector with the search coil
near a large metal object.
If the metal detector locks up, try the following:
• Reset the detector by turning it off, then back on.
Notes:
• Check and replace the batteries, as necessary.
• The target indicators are used as approximations of what is being
targeted. Many other types of metal can fall under any one of
these indicators. There is always a “trash-to-treasure” ratio when
detecting. The display provides a visual reference to minimize the
trash only. It cannot completely eliminate all trash items.
• Move to a different testing location.
USING HEADPHONES
You can connect a pair of stereo headphones (not supplied) to the
metal detector so you can listen to it privately. Using headphones also
saves battery power and makes it easier to identify subtle changes in
the sounds you hear for better detection results. We recommend using
a set of headphones with an independent volume control. Your local
RadioShack store carries a wide variety of headphones.
• When the arrow points to a coin, the detector could be sensing
either a coin or another type of metal (such as jewelry, tokens,
medals, or even junk metal).
PROBABLE TARGET ID — Shows the probable identity of the target ob-
ject, including various coins and metal objects, with a range from
GOLD to SILVER (other types of metal fall under both spectrums).
To
connect headphones to the metal detector, insert the headphones’
1
/4-inch (6.35-mm) plug into the HEADPHONE jack on the front panel.
When the detector senses a target, an arrow appears to indicate the
probable target being detected.
2
• 1¢ ZINC — Indicates that the target is probably a zinc penny. Other
targets (such as large gold) also fall into this category.
interfere with the objects you want to test, or mask the signal completely.
• S-CAPS — Indicates that the target probably is a screw cap or
other type of metal, such as a bottle cap. Medium-sized gold falls
into this range, as well as large aluminum items.
4. Move a sample of the material you want the detector to find (such
as a gold ring or a coin) about 1–2 inches above the search coil.
Outdoor Testing and Use
• PULL TAB — Indicates that the target is probably a pull-tab. Some
small gold objects also read as pull-tabs.
1. Find an area on the ground outside where there is no metal.
• IRON/FOIL — Indicates that the target is probably iron or foil.
Some oxidized (rusted) iron occasionally registers in the silver
range.
2. Place a sample of the material you want the metal detector to find
(such as a gold ring or a coin) on the ground.
PROBABLE COIN DEPTH — Displays an arrow steadily at the estimated
Note: If you are using valuable metal, such as gold, to test the
metal detector, mark the area where you placed the item to help
you find it later. Do not place it in tall grass or weeds.
depth (in inches) for coin-sized objects until another target’s depth is
detected.
3. Adjust the stem length, as necessary (see Step 2 under “Assembling the Metal Detector” on Page 1).
LOW BAT Indicator — Blinks when you turn on the power and lights
steadily when the batteries need to be replaced.
4. Turn on the metal detector.
TESTING AND USING THE METAL
DETECTOR
5. In the ALL METAL mode, make any settings or adjustments as
described in “Using the ALL METAL Mode” on Page 4.
To learn how the metal detector reacts to different metals, you should
test it before you use it the first time.
Hold the search coil level and about 1–2 inches above the ground
and slowly pass the metal detector over the target item. The metal
detector sounds a continuous tone for as long as the target is
under the search coil. Motion is not required to detect a target.
This metal detector is a very sensitive and deep-seeking detector. It
responds loudly to many targets that other detectors would only emit a
weak signal for. Because of this, trash metal and other sources of interference might cause confusing signals.
In the DISC, NOTCH, or AUTO NOTCH mode, make any settings or
adjustments as described in “Using the DISC Mode‚’ “Using
NOTCH Mode‚’ or “Using AUTO NOTCH Mode” on Page 4.
Most good targets respond with a strong, repeatable signal. If a signal
does not repeat after sweeping the search coil directly over the suspected target a few times, it is more than likely trash metal. False signals can be caused by trashy ground, electrical interference, or by
large irregular trash objects. These signals are easily recognized by
their often broken or non-repeatable nature.
Slowly and continuously move the search coil over the area where
you placed the sample, sweeping the search coil in a side-to-side
motion.
RIGHT
Dig only those targets that emit a strong repeatable signal. As you
sweep the search coil back and forth over the ground, learn to recognize the difference between the signals that occur at random and signals that are stable and repeatable.
Remember: While in DISC, NOTCH, or AUTO NOTCH modes, movement is required for the metal detector to target and identify an item.
WRONG
Air Testing
Notes:
• In DISC, NOTCH, or AUTO NOTCH mode, the search coil will not
detect without motion. To test in these modes, you must move the
object, since the metal detector is stationary.
Search Coil Sweeping Hints
• Sweep slowly, from side-to-side — hurrying makes you miss targets or causes the metal detector to give you false signals.
• If you are using a coin, the metal detector detects it more easily if
you hold it so a flat side (not the edge) is parallel with the surface
of the search coil.
• Keep the search coil level with the ground, about 1–2 inches from
the surface. Do not sweep the search coil as if it were a pendulum. Raising the search coil while sweeping or at the end of a
sweep causes false readings.
1. Remove any watches, rings, or other metal jewelry you are wearing, then place the metal detector on a wooden or plastic table.
2. Select either ALL METAL, DISC, NOTCH, or AUTO NOTCH.
• When repetitively passing the search coil over the object, allow a
few seconds to pass to give the detector a chance to recover from
its last reading.
3. Adjust the search coil so it faces up.
Note: Never test the metal detector on a floor inside a building.
Most buildings have metal of some kind in the floor, which might
• Slightly overlap your sweeps as you move forward.
3
SETTING THE MODE
2. Place the rejection target on the ground and pass the metal detector over it.
The metal detector distinguishes between ferrous and non-ferrous
metals. Ferrous metals contain iron, while non-ferrous metals (such as
gold, silver, copper, platinum, aluminum, lead, and zinc) do not.
3. As you pass the metal detector over the rejection item, adjust
DISC/NOTCH to the point at which the tab (or any other desired
object) is rejected so the metal detector does not sound a tone.
You can set the metal detector to discriminate between a variety of
precious and non-precious metals, then follow the instructions in “Outdoor Testing and Use” on Page 3 to use the metal detector.
4. To test the NOTCH setting, set a nickel on the ground and pass the
metal detector over it to make sure it is still accepted.
Three distinct tones sound when the metal detector targets an item.
(See “Understanding Three-Tone Audio Target Identification (ATI)”.)
To select the desired mode, press ALL METAL, DISC, NOTCH, or AUTO
NOTCH while the power is on.
Note: The metal detector is preset to begin in the ALL METAL mode.
Using AUTO NOTCH Mode
Using the ALL METAL Mode
Set the metal detector to AUTO NOTCH to have the metal detector automatically discriminate target items, rejecting most iron junk targets
while detecting nickels and small gold items. You can also adjust the
discrimination threshold to be wider (eliminating more junk targets),
but the starting position remains the same.
Set the metal detector to ALL METAL to detect all types of metal without discrimination.
Note: DISC/NOTCH does not affect operation in this mode.
Note: You cannot detect some gold rings while in AUTO NOTCH mode.
You may also detect a small percentage of pull-tabs, especially those
that are broken in half.
1. See “Adjusting GROUND BALANCE” on Page 5 to set GROUND
BALANCE properly, ensuring proper mineral elimination.
2. Push GROUND TRAC after adjusting GROUND BALANCE to lock in
the setting.
1. Press AUTO NOTCH to select that mode.
2. Rotate DISC/NOTCH toward HIGH to increase the NOTCH width to
reject screw caps and zinc pennies, while still detecting nickels
and gold rings.
Each time you adjust GROUND BALANCE, press GROUND TRAC.
The metal detector sounds a medium tone for all targets.
3. Adjust DISC/NOTCH to widen the discrimination window.
Using the DISC Mode
For example, you can eliminate zinc pennies and screw caps by
turning DISC/NOTCH clockwise.
Set the metal detector to DISC (motion discriminate) mode to detect
valuable metal objects while rejecting most junk targets.
Three distinct tones sound when the metal detector targets an item.
(See “Understanding Three-Tone Audio Target Identification (ATI)”.)
1. Press DISC to select that mode.
2. Adjust DISC/NOTCH to differentiate between various types of metals. Rotate DISC/NOTCH:
UNDERSTANDING THREE-TONE AUDIO
TARGET IDENTIFICATION (ATI)
• fully counterclockwise to detect all metals (including iron, nickels, and gold rings, along with pull-tabs and copper or silver
coins).
• slightly clockwise to eliminate small iron objects, then medium
iron objects.
When the metal detector is in DISC, NOTCH, or AUTO-NOTCH modes,
its Audio Target Identification (ATI) system automatically classifies
metal objects into three categories, to make it easier to identify the
type of target being detected. The detector sounds three distinct tones
to distinguish between categories of detected items.
• more clockwise to eliminate larger iron objects, followed by
items such as foil and aluminum, while still detecting silver and
copper (depending on how high DISC/NOTCH is set).
Note: When operating in the ALL METAL mode, ATI shuts down, and
the metal detector emits only one constant tone (medium) when it detects a target.
• fully clockwise to eliminate most gold and nickels.
Sounding Tone
Target Object
Three distinct tones sound when the metal detector targets an item.
See “Understanding Three-Tone Audio Target Identification (ATI)”.
Low
small gold and nickel items
Using NOTCH Mode
larger gold* items (still reading in the GOLD
RANGE of the PROBABLE TARGET ID)
Set the metal detector to NOTCH to create a variable rejection threshold that detects nickels, gold rings, and silver or copper coins while
eliminating most iron targets, pull-tabs, and foil.
old/new pull-tabs , some gold and zinc pennies
(dated after 1982), quarters and dimes
X
X
silver, brass, and copper — including pennies,
dated prior to 1982 — in any mode, except ALL
METAL
‡
iron or steel — in DISC mode
1. Press NOTCH to select that mode.
4
High
X
†
Note: Some pull-tabs or tab pieces have nearly the same detection
properties as nickels and some gold rings. These items cannot be separated.
Medium
X
X
* When specifically hunting for gold items, dig for items that sound
both medium and low tones.
5. If a tone sounds, lift the search coil about waist high in the air
again and rotate GROUND BALANCE slightly counterclockwise
(toward HIGH), then press GROUND TRAC.
† Usually, old or new pull-tabs emit a low tone, or no tone at all (if in
the NOTCH mode). If a pull-tab is broken, bent, folded in half, or oxidized, it may emit a low tone.
6. Lower the search coil to about 1 inch above the ground. If the
metal detector does not sound a tone, then the setting is correct. If
a tone sounds, repeat Steps 5–6 until no tone sounds.
‡ If the iron target item is highly oxidized, it may sound a high tone and
read in the SILVER RANGE on the PROBABLE TARGET ID. In NOTCH
and AUTO-NOTCH modes, the metal detector usually does not detect
iron, unless oxidized, then it sounds a high tone.
Note: Always make sure that there is no metal on top of or under the
ground where you will be ground balancing, otherwise you will not be
able to determine if the tone being emitted is caused by mineralization
or metal. If you think you might be over metal, move to another spot
and proceed.
SETTING THE CONTROLS
Important: When adjusting GROUND BALANCE counterclockwise, be
careful to turn it in small increments to ensure that you achieve the optimum threshold level. If you feel you have turned the knob too far
counterclockwise, you can turn it clockwise using the same ground
balancing procedure until a tone sounds, then rotate it back counterclockwise slightly until a tone no longer sounds.
Adjusting SENSITIVITY
Use SENSITIVITY to filter out terrain conditions that can cause false
signals, such as around broadcasting antennas and power lines, for
example. For maximum depth of detection, always set SENSITIVITY as
high as possible, but not so high that the target readout becomes erratic and false tones sound.
Saltwater Balancing
Rotate SENSITIVITY clockwise to increase, or counterclockwise to decrease the detector’s sensitivity.
Use the same steps as “Adjusting GROUND BALANCE” to balance
the effects of saltwater. Set GROUND BALANCE higher to balance out
saltwater effects.
To determine how high to adjust SENSITIVITY, rotate SENSITIVITY
clockwise while listening for false signals; if the metal detector starts to
chatter (emit false signals), reduce SENSITIVITY slightly until the chatter stops.
If GROUND BALANCE is moved or reset, press GROUND TRAC.
FIELD TECHNIQUES
Adjusting DISC/NOTCH
Pinpointing a Target
DISC/NOTCH adjusts the metal detector for different levels of discrimi-
nation.
Accurately pinpointing a target makes digging it up easier. Accurate
pinpointing takes practice, and we suggest you practice finding and
digging up small metal objects on your own property before you search
other locations.
In the DISC mode, increase the level of discrimination by turning the
control clockwise (away from) LOW.
Note: As DISC/NOTCH is set higher, some gold items do not sound.
Sometimes, targets are difficult to accurately locate due to the sweep
direction. Try changing your sweep direction to pinpoint a target.
In the NOTCH mode, DISC/NOTCH establishes a reject window. Items
falling within this window will not be detected.
1. When the metal detector detects a buried target and sounds a
tone, continue sweeping the search coil over the target in a narrowing side-to-side motion.
In the NOTCH mode, the width of the rejection window is fixed.
Adjust DISC/NOTCH to move the threshold window to different object
settings while retaining the fixed window width.
As you slowly move the search coil side-to-side, make a visual
note of the exact spot on the ground where the metal detector
beeps.
Adjusting GROUND BALANCE
2. Stop the search coil directly over that spot on the ground.
When searching in the ALL METAL mode, it is important that the detector be ground balanced to offset the effects of any minerals present in
the soil or to balance the effects of saltwater when you search near the
ocean.
3. Move the search coil straight forward away from you and straight
back toward you a few times.
Again, make a visual note of the spot on the ground at which the
beep sounds.
1. To ground balance the metal detector for a particular area, rotate
GROUND BALANCE all the way clockwise to PRESET.
4. Repeat Steps 1 and 2 at a right angle to the original search line,
making an -pattern. The target should be directly below the center of the , at the point of the loudest response.
×
×
2. Lift the search coil about waist high in the air.
3. Press GROUND TRAC. (To allow the unit to stabilize, press
GROUND TRAC two or three times when first ground balancing.)
4. Lower the search coil to about 1 inch above the ground. If the
metal detector does not sound a tone, then the PRESET position is
the proper ground balance for that area.
5
TROUBLESHOOTING
We do not anticipate that you will have any problems with your metal detector. However, if your metal detector is not operating properly, follow
these suggestions to eliminate the problem. If the metal detector still does not operate properly, take it to your local RadioShack store for assistance.
Problem
The metal detector is emitting false signals
in the field.
The display is not locking in or identifying
while passing over a target, and the metal
detector emits more than one tone over the
same target.
Possible Cause
Suggestion
SENSITIVITY may be set too high.
Adjust SENSITIVITY back slightly until the false signaling disappears. See “Adjusting SENSITIVITY” on Page 5.
You are moving the search coil to quickly.
Swing your search coil slowly.
Some false signals occur on highly rusted metals.
If the signal does not repeat over the same area while passing
the search coil over it, then the target is usually not worthwhile.
This usually happens when there is more than one
object in the area you are sweeping. If it is an odd
piece of metal that the detector cannot recognize,
the metal detector does not lock in.
Search another location.
Sometimes, oxidation can make the display ID
arrows and tones jump around.
SENSITIVITY may be set too high.
Adjust SENSITIVITY back slightly until the false signaling disappears. See “Adjusting SENSITIVITY” on Page 5.
Search another location.
The metal detector is not stable and has a
pulsing, distorted tone (rather than a clear
one).
The area you are searching may be trashy.
Adjust GROUND BALANCE. See “Adjusting GROUND BALANCE” on Page 5.
The metal detector does not function or
operates erratically.
Another metal detector may be within 15 feet of
your metal detector.
Move to another area. Do not operate two or more metal
detectors within 15 feet of each other.
The detector emits a constant loud tone or
repeating tones.
The batteries may be weak.
Replace the batteries with new ones.
CARE
Keep the metal detector dry; if it gets wet, wipe it dry immediately. The search coil is waterproof and may be submerged in either fresh or saltwater. Be careful to prevent water from entering the chassis. After using the search coil in saltwater, rinse it with fresh water to prevent corrosion of
the metal parts. Use and store the metal detector only in normal temperature environments. Handle the metal detector carefully; do not drop it.
Keep the metal detector away from dust and dirt, and wipe it with a damp cloth occasionally to keep it looking new.
Modifying or tampering with the metal detector’s internal components can cause a malfunction and might invalidate its warranty. If your metal detector is not performing as it should, take it to your local RadioShack store for assistance.
Limited One-Year Warranty
This product is warranted by RadioShack against manufacturing defects in material and workmanship under normal use for one (1) year from the date of
purchase from RadioShack company-owned stores and authorized RadioShack franchisees and dealers. EXCEPT AS PROVIDED HEREIN, RadioShack
MAKES NO EXPRESS WARRANTIES AND ANY IMPLIED WARRANTIES, INCLUDING THOSE OF MERCHANTABILITY AND FITNESS FOR A PARTICULAR PURPOSE, ARE LIMITED IN DURATION TO THE DURATION OF THE WRITTEN LIMITED WARRANTIES CONTAINED HEREIN. EXCEPT AS
PROVIDED HEREIN, RadioShack SHALL HAVE NO LIABILITY OR RESPONSIBILITY TO CUSTOMER OR ANY OTHER PERSON OR ENTITY WITH
RESPECT TO ANY LIABILITY, LOSS OR DAMAGE CAUSED DIRECTLY OR INDIRECTLY BY USE OR PERFORMANCE OF THE PRODUCT OR ARISING OUT OF ANY BREACH OF THIS WARRANTY, INCLUDING, BUT NOT LIMITED TO, ANY DAMAGES RESULTING FROM INCONVENIENCE, LOSS
OF TIME, DATA, PROPERTY, REVENUE, OR PROFIT OR ANY INDIRECT, SPECIAL, INCIDENTAL, OR CONSEQUENTIAL DAMAGES, EVEN IF RadioShack HAS BEEN ADVISED OF THE POSSIBILITY OF SUCH DAMAGES.
Some states do not allow limitations on how long an implied warranty lasts or the exclusion or limitation of incidental or consequential damages, so the
above limitations or exclusions may not apply to you.
In the event of a product defect during the warranty period, take the product and the RadioShack sales receipt as proof of purchase date to any RadioShack
store. RadioShack will, at its option, unless otherwise provided by law: (a) correct the defect by product repair without charge for parts and labor; (b) replace
the product with one of the same or similar design; or (c) refund the purchase price. All replaced parts and products, and products on which a refund is
made, become the property of RadioShack. New or reconditioned parts and products may be used in the performance of warranty service. Repaired or replaced parts and products are warranted for the remainder of the original warranty period. You will be charged for repair or replacement of the product made
after the expiration of the warranty period.
This warranty does not cover: (a) damage or failure caused by or attributable to acts of God, abuse, accident, misuse, improper or abnormal usage, failure
to follow instructions, improper installation or maintenance, alteration, lightning or other incidence of excess voltage or current; (b) any repairs other than
those provided by a RadioShack Authorized Service Facility; (c) consumables such as fuses or batteries; (d) cosmetic damage; (e) transportation, shipping
or insurance costs; or (f) costs of product removal, installation, set-up service adjustment or reinstallation.
This warranty gives you specific legal rights, and you may also have other rights which vary from state to state.
RadioShack Customer Relations, 200 Taylor Street, 6th Floor, Fort Worth, TX 76102
We Service What We Sell
07/00
63-3015
12/99
Printed in the USA