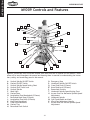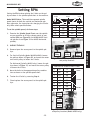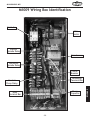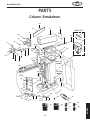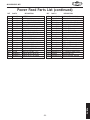
1
MODEL M1008/M1009
MILL
Model M1008
Model M1009
INSTRUCTION MANUAL
Phone: 1-360-734-3482 • On-Line Technical Support: [email protected]
COPYRIGHT © OCTOBER, 2004 BY WOODSTOCK INTERNATIONAL, INC. REVISED OCTOBER, 2007.
#6699TR
WARNING: NO PORTION OF THIS MANUAL MAY BE REPRODUCED IN ANY SHAPE OR FORM WITHOUT
THE WRITTEN APPROVAL OF WOODSTOCK INTERNATIONAL, INC.
Printed in China
WARNING
Some dust created by power sanding, sawing, grinding, drilling, and other construction activities contains chemicals known to the State of California to
cause cancer, birth defects or other reproductive
harm. Some examples of these chemicals are:
• Lead from lead-based paints.
• Crystalline silica from bricks, cement, and
other masonry products.
• Arsenic and chromium from chemically
treated lumber.
Your risk from these exposures varies, depending on
how often you do this type of work. To reduce your
exposure to these chemicals: work in a well ventilated area, and work with approved safety equipment, such as those dust masks that are specially
designed to filter out microscopic particles.
Contents
SET UP
OPERATIONS
MAINTENANCE
SERVICE
PARTS
USE THE QUICK GUIDE PAGE LABELS TO SEARCH OUT INFORMATION FAST!
SAFETY
INTRODUCTION ..................................................................................................3
Woodstock Technical Support ............................................................................ 3
M1008 Specifications ...................................................................................... 4
M1009 Specifications ...................................................................................... 4
M1008 Controls and Features ............................................................................ 5
M1009 Controls and Features ............................................................................ 6
SAFETY............................................................................................................7
Standard Safety Instructions ............................................................................. 7
Additional Safety Instructions for Mills ................................................................. 9
ELECTRICAL .................................................................................................... 10
220V Operation ............................................................................................10
110V Operation ............................................................................................10
Grounding ..................................................................................................11
Extension Cords ...........................................................................................11
SET UP .......................................................................................................... 12
Unpacking ..................................................................................................12
Items Needed for Set Up .................................................................................12
Inventory ...................................................................................................13
Machine Placement .......................................................................................14
Cleaning Machine .........................................................................................14
Floor Mounting .............................................................................................15
Way Cover ..................................................................................................16
Handles .....................................................................................................16
OPERATIONS ................................................................................................... 17
General .....................................................................................................17
Positioning Spindle Head.................................................................................17
M1009 Vertical/Horizontal Conversion ................................................................19
Table Travel ...............................................................................................20
Rotating Table .............................................................................................21
Rotating Vise ...............................................................................................21
Quill Travel ................................................................................................22
Power Feed Controls .....................................................................................23
Determining Needed RPM ................................................................................24
Setting RPM ................................................................................................25
Spindle Controls ...........................................................................................26
Start Up and Spindle Break-in Procedures ............................................................26
Installing Tools ............................................................................................27
Removing Tools ............................................................................................28
Coolant System ............................................................................................28
MAINTENANCE ................................................................................................. 29
INTRODUCTION
M1008/M1009 Mill
INTRODUCTION
SAFETY
SET UP
OPERATIONS
General .....................................................................................................29
Cleaning ....................................................................................................29
Table and Base ............................................................................................29
Checking/Adding Coolant ................................................................................29
Lubrication .................................................................................................30
Changing Coolant..........................................................................................31
Maintenance Schedule....................................................................................32
Maintenance Notes ........................................................................................32
SERVICE ......................................................................................................... 33
General .....................................................................................................33
Gibs..........................................................................................................33
Belt Replacement .........................................................................................34
M1008 Wiring Box Identification ........................................................................36
M1008 110V Wiring Diagram .............................................................................37
M1008 220V Wiring Diagram .............................................................................38
M1009 Wiring Box Identification ........................................................................39
M1009 110V Wiring Diagram .............................................................................40
M1009 220V Wiring Diagram .............................................................................41
Troubleshooting ...........................................................................................42
PARTS ........................................................................................................... 43
Column Breakdown .......................................................................................43
Column Parts List .........................................................................................44
Rotating Table Breakdown...............................................................................45
Rotating Table Parts List ................................................................................46
Headstock Breakdown ....................................................................................47
Headstock Parts List ......................................................................................48
M1009 Horizontal Spindle Breakdown..................................................................49
M1009 Horizontal Spindle Parts List ...................................................................50
Power Feed Breakdown ..................................................................................51
Power Feed Parts List ....................................................................................52
M1008 Electrical Components Breakdown ............................................................54
M1008 Electrical Components Parts List ..............................................................55
M1009 Electrical Components Breakdown ............................................................56
M1009 Electrical Components Parts List ..............................................................57
Warranty ....................................................................................................58
PARTS
SERVICE
MAINTENANCE
M1008/M1009 Mill
USE THE QUICK GUIDE PAGE LABELS TO SEARCH OUT INFORMATION FAST!
INTRODUCTION
Woodstock Technical Support
We stand behind our machines! In the event that questions arise about your machine, parts are missing, or a defect is found, please contact Woodstock International Technical Support at 1-360-734-3482 or
send e-mail to: [email protected]. Our knowledgeable staff will help you troubleshoot problems and send out parts for warranty claims.
If you need the latest edition of this manual, you can download it from http://www.shopfox.biz.
If you still have questions after reading the latest manual, or if you have comments please contact us at:
Woodstock International, Inc.
Attn: Technical Support Department
P.O. Box 2309
Bellingham, WA 98227
-3-
INTRODUCTION
M1008/M1009 Mill
INTRODUCTION
M1008/M1009 Mill
M1008 Specifications
Vertical Motor .........................2 HP, 110/220V (prewired 220V), Single-Phase, 1725 RPM, 20/10 Amps
Table Size ................................................................................................9-1/2" x 31-1/2"
Vertical Spindle Travel ............................................................................................ 4-3/4"
Maximum Distance Vertical Spindle to Column ................................................................... 22"
Maximum Distance Vertical Spindle to Table ......................................................................11"
Table Travel, Longitudinal ....................................................................................... 15-1/2"
Table Travel, Cross ................................................................................................. 8-1/2"
Knee Travel .............................................................................................................13"
Vertical Head Tilt ........................................................................................90˚ Both Ways
Work Table Swivel........................................................................................45˚ Both Ways
T-Slots ....................................................................................3 @ 1-5/8" Centers, 1/2" Stud
Speed Range ................................................. 270, 390, 550, 615, 860, 930, 1800, 1960, 2950 RPM
Spindle ................................................................................................................... R8
Overall Size ............................................................................ 41-5/16" L x 41-3/4" W x 80" H
Footprint ............................................................................................... 20-1/2" x 29-1/2"
Weight ............................................................................................................ 1622 lbs
M1009 Specifications
Vertical Motor .........................2 HP, 110/220V (prewired 220V), Single-Phase, 1725 RPM, 20/10 Amps
Horizontal Motor .................. 1-1/2 HP, 110/220V (prewired 220V), Single-Phase, 1725 RPM, 16/8 Amps
Table Size ............................................................................................... 9-1/2" x 39-3/8"
Vertical Spindle Travel ............................................................................................ 4-3/4"
Maximum Distance Vertical Spindle to Column ...............................................................26-3/4"
Maximum Distance Vertical Spindle to Table .................................................................13-3/8"
Maximum Distance Horizontal Spindle Center to Table ..........................................................11"
Table Travel, Longitudinal ........................................................................................... 22"
Table Travel, Cross ................................................................................................. 8-1/2"
Knee Travel .............................................................................................................13"
Vertical Head Tilt ........................................................................................90˚ Both Ways
Work Table Swivel........................................................................................45˚ Both Ways
T-Slots ....................................................................................3 @ 1-5/8" Centers, 1/2" Stud
Speed Range (Vertical Spindle) ........................... 270, 390, 490, 615, 860, 930, 1600, 1960, 2950 RPM
Speed Range (Horizontal Spindle) .................................. 72, 170, 210, 240, 290, 550, 830, 1300 RPM
Spindles .................................................................................................................. R8
Overall Size .................................................................... 48-13/16" L x 45-5/8" W x 80-5/16" H
Footprint ............................................................................................... 20-1/2" x 29-1/2"
Weight ............................................................................................................ 2054 lbs
-4-
M1008 Controls and Features
T
D
A
B
C
S
R
E
F
G
I
H
H
Q
I
J
P
K
L
O
M
N
Figure 1. Please take time to become familiar with each term and its location on the machine. These
terms will be used throughout the manual and knowing them is essential to understanding the instructions, safety, and terminology used in this manual.
A.
B.
C.
D.
E.
F.
G.
H.
I.
J.
K.
L.
M.
N.
O.
P.
Q.
R.
S.
T.
Spindle ON/OFF Switch
Coolant ON/OFF Switch
Vertical Spindle Speed Setting Chart
Vertical Quill Travel Lock
Vertical Spindle
Work Light
Coolant Hose
Longitudinal Feed Handwheel (2 Places)
Powerfeed Hard Stop (2 Places)
Longitudinal Feed Lock (2 Places)
Knee Feed Handwheel
-5-
Cross Feed Handwheel
Coolant Tray
Powerfeed Limit Switch
Cross Feed Lock (2 Places)
Knee Feed Lock (2 Places)
Powerfeed Controls
Quill Feed Handle and Lock
Micro-Feed Adjustment Handle
Access Panel for Spindle Speed
Adjustment
INTRODUCTION
M1008/M1009 Mill
INTRODUCTION
M1008/M1009 Mill
M1009 Controls and Features
D
B
C
Y
A
X
W
E
U
V
F
T
G
I
H
H
I
S
J
R
K
L
P
M
Q
O
N
Figure 2. Please take time to become familiar with each term and its location on the machine. These
terms will be used throughout the manual and knowing them is essential to understanding the instructions, safety, and terminology used in this manual.
A.
B.
C.
D.
E.
F.
G.
H.
I.
J.
K.
L.
M.
N.
O.
P.
Q.
R.
S.
T.
U.
Vertical Spindle ON/OFF Switch
Coolant ON/OFF Switch
Vertical Spindle Speed Setting Chart
Vertical Quill Travel Lock
Vertical Spindle
Work Light
Coolant Hose
Longitudinal Feed Handwheel (2 Places)
Powerfeed Hard Stop (2 Places)
Longitudinal Feed Lock (2 Places)
Knee Feed Handwheel
Cross Feed Handwheel
Coolant Tray
Powerfeed Limit Switch
V.
W.
X.
Y.
-6-
Emergency Stop
Horizontal Spindle ON/OFF Switch
Cross Feed Lock (2 Places)
Knee Feed Lock (2 Places)
Powerfeed Controls
Horizontal Spindle Speed Setting Chart
Access Cover for Horizontal Spindle Speed
Adjustment
Horizontal Spindle
Quill Feed Handle and Lock
Micro-Feed Adjustment Handle
Access Panel for Vertical Spindle Speed
Adjustment
M1008/M1009 Mill
SAFETY
Indicates an imminently hazardous situation which, if not avoided, WILL
result in death or serious injury.
Indicates a potentially hazardous situation which, if not avoided, COULD
result in death or serious injury.
Indicates a potentially hazardous situation which, if not avoided, MAY
result in minor or moderate injury.
NOTICE
This symbol is used to alert the user to useful information about proper
operation of the equipment, and/or a situation that may cause damage
to the machinery.
Standard Safety Instructions
1. Thoroughly read the Instruction Manual before operating your machine. Learn the applications,
limitations and potential hazards of this machine. Keep the manual in a safe and convenient place
for future reference.
2. Keep work area clean and well lighted. Clutter and inadequate lighting invite potential hazards.
3. Ground all tools. If a machine is equipped with a three-prong plug, it must be plugged into a threehole grounded electrical receptacle or grounded extension cord. If using an adapter to aid in accommodating a two-hole receptacle, ground using a screw to a known ground.
4. Wear eye protection at all times. Use safety glasses with side shields or safety goggles that meet
the appropriate standards of the American National Standards Institute (ANSI).
5. Avoid dangerous environments. Do not operate this machine in wet or open flame environments.
Airborne dust particles could cause an explosion and severe fire hazard.
6. Ensure all guards are securely in place and in working condition.
7. Make sure switch is in the OFF position before connecting power to machine.
8. Keep work area clean, free of clutter, grease, etc.
9. Keep children and visitors away. Visitors must be kept at a safe distance while operating unit.
10. Childproof your workshop with padlocks, master switches or by removing starter keys.
11. Stop and disconnect the machine when cleaning, adjusting or servicing.
-7-
SAFETY
READ MANUAL BEFORE OPERATING MACHINE.
FAILURE TO FOLLOW INSTRUCTIONS BELOW WILL
RESULT IN PERSONAL INJURY.
M1008/M1009 Mill
12. Do not force tool. The machine will do a safer and better job at the rate for which it was
designed.
13. Use correct tool. Do not force machine or attachment to do a job for which it was not designed.
SAFETY
14. Wear proper apparel. Do not wear loose clothing, neck ties, gloves, jewelry, and secure long hair
away from moving parts.
15. Remove adjusting keys, rags, and tools. Before turning the machine on, make it a habit to check
that all adjusting keys and wrenches have been removed.
16. Avoid using an extension cord. But if you must use one, examine the extension cord to ensure it
is in good condition. Immediately replace a damaged extension cord. Always use an extension cord
that uses a ground pin and connected ground wire. Use an extension cord that meets the amp rating
on the motor nameplate. If the motor is dual voltage, be sure to use the amp rating for the voltage
you will be using. If you use an extension cord with an undersized gauge or one that is too long,
excessive heat will be generated within the circuit, increasing the chance of a fire or damage to the
circuit.
17. Keep proper footing and balance at all times.
18. Do not leave machine unattended. Wait until it comes to a complete stop before leaving the
area.
19. Perform machine maintenance and care. Follow lubrication and accessory attachment instructions
in the manual.
20. Keep machine away from open flame. Operating machines near pilot lights or open flames creates
a high risk if dust is dispersed in the area. Dust particles and an ignition source may cause an explosion. Do not operate the machine in high-risk areas, including but not limited to, those mentioned
above.
21. If at any time you are experiencing difficulties performing the intended operation, stop using the
machine! Then contact our technical support or ask a qualified expert how the operation should be
performed.
22. Habits—good and bad—are hard to break. Develop good habits in your shop and safety will become
second-nature to you.
-8-
M1008/M1009 Mill
Additional Safety Instructions for Mills
USE this and other machinery with caution
and respect. Always consider safety first,
as it applies to your individual working
conditions. No list of safety guidelines can
be complete—every shop environment is
different. Failure to follow guidelines could
result in serious personal injury, damage
to equipment or poor work results.
1.
Completely assemble mill before using. Do not operate until unit is assembled and installed
according to instructions.
2.
Understand all controls. Make sure you understand the use and operation of all controls.
3.
Secure your workpiece. Never hold a workpiece by hand for any type of machining operation. Hold
your workpiece secure with a mill vise, step clamps, etc.
4.
Keep hands away from chips. Wait until machine has come to a complete stop to clear away chips.
Turn off machine and wait for cutting tool to come to a complete stop. Chips are sharp. Use a brush
to clear them.
5.
Secure the cutting tool. Make sure that the cutting tool is chucked or colleted properly. Cutting
tools that are loose or not rotating correctly can come off and cause serious personal injury.
6.
Chuck key safety. Always remove your chuck key and draw bar wrench immediately after use.
7.
Use recommended feed and speed rates. Research the proper feed and speed rate for the material
you are machining. Do not exceed these recommended rates.
8.
Cutting tool inspection. Inspect drills and end mills for sharpness, chips or cracks before each use.
Replace dull, chipped, or cracked cutting tools immediately. Handle new cutting tools with care.
Leading edges are very sharp and can cause lacerations.
9.
Keep guards in place. Make sure cover is closed and latched before turning machine ON.
-9-
SAFETY
READ and understand this
entire instruction manual
before using this machine.
Serious personal injury
may occur if safety and
operational information is
not understood and followed. DO NOT risk your
safety by not reading!
M1008/M1009 Mill
ELECTRICAL
220V Operation
The SHOP FOX® Model M1008/M1009 is prewired for
220 volt, single-phase operation. At 220V operation, the
maximum amp draw from your new mill is 10 amps.
For 220V operation, we recommend using a 6-15 plug
and receptacle (see Figure 3).
SET UP
For 220V operation, only connect your machine to a circuit that is protected by a 15 amp circuit breaker.
6-15P
6-15R
CAUTION: Using a circuit breaker rated higher than
15 amps will increase the risk of fire!
Keep in mind that a circuit being used by other machines
or tools at the same time will add to the total load being
applied to the circuit. Add up the load ratings of all
machines on the circuit. If this number exceeds the rating of the circuit breaker or fuse, use a different circuit.
Figure 3. Typical 6-15 plug and receptacle
profile for 220V operation.
110V Operation
The SHOP FOX® Model M1008/M1009 can be rewired for
110 volts. To do this, refer to the wiring diagram in the
back of this manual. Also, you will need a NEMA-style 530 plug and outlet (see Figure 4).
At 220V operation, the maximum amp draw from your
new mill is 20 amps.
For 110V operation, only connect your machine to a circuit that is protected by a 30 amp circuit breaker.
CAUTION: Using a circuit breaker rated higher than
30 amps will increase the risk of fire!
Keep in mind that a circuit being used by other machines
or tools at the same time will add to the total load being
applied to the circuit. Add up the load ratings of all
machines on the circuit. If this number exceeds the rating of the circuit breaker or fuse, use a different circuit.
-10-
5-30R
5-30P
Figure 4. Typical 5-30 plug and outlet
profile for 110V operation.
M1008/M1009 Mill
Grounding
This machine must be grounded! The electrical cord supplied with this machine does not come with a plug. Use
a plug with a ground pin. If your outlet does not accommodate a ground pin, have it replaced by a qualified
electrician or have an appropriate adapter installed and
grounded properly. An adapter with a grounding wire
does not guarantee machine will be grounded. A ground
source must be verified.
Extension Cords
•
•
•
•
•
Use cords rated for Standard Service
Only use cords 50 feet long or less
Use cords with 12 ga. wire or bigger
Ensure cord has a ground wire and pin
Only use undamaged cords
-11-
SET UP
We do not recommend using an extension cord for 220V
equipment. Instead, arrange the placement of your
machinery and installed wiring to eliminate the need
for extension cords. If you must use an extension cord,
please use the following guidelines:
This equipment must be grounded.
Verify that any existing electrical outlet and circuit you intend to plug into
is actually grounded. If it is not, it will
be necessary to run a separate 12 AWG
copper grounding wire from the outlet
to a known ground. Under no circumstances should the grounding pin be
removed from any three-pronged plug
or serious injury may occur.
M1008/M1009 Mill
SET UP
Unpacking
The SHOP FOX® Model M1008/M1009 has been carefully packaged for safe transporting. If you notice the
machine has been damaged, please contact Woodstock
International Technical Support at 1-360-734-3482 or
send e-mail to: [email protected]
SET UP
Items Needed for Set Up
The following items are needed, but not included, to
setup your machine:
•
•
•
•
•
•
Stubby Phillips Screwdriver
Flat Head Screwdriver
Safety Glasses for Each Person
Open-End Wrench 19mm
Cleaning Solvent
Shop Rags
READ and understand this entire instruction manual before using this machine.
Serious personal injury may occur if
safety and operational information is not
understood and followed. DO NOT risk
your safety by not reading!
USE POWER EQUIPMENT when lifting the machine from the box it was
shipped in. The SHOP FOX® Model
M1008/M1009 weighs 2054 lbs.
-12-
M1008/M1009 Mill
Inventory
The following is a description of the main components
shipped with the SHOP FOX® Model M1008/M1009. Lay
the components out to inventory them.
SUFFOCATION
HAZARD!
Wooden Box Contents (Figure 5)
QTY
A. Horizontal Arbor 1-1/4" (M1009 Only) .................1
B. Horizontal Arbor 1" (M1009 Only) .......................1
C. Way Cover ..................................................1
D. Vertical Drawbar ..........................................1
E. Horizontal Drawbar (M1009 Only) ......................1
F. Wrench ......................................................1
G. Knee Handle ................................................1
H. Vise 6" (not shown)........................................1
If any parts are missing, find the part number in
the back of this manual and contact Woodstock
International, Inc. at 360-734-3482 or at [email protected]
SET UP
QTY
Tool Box Contents (Figure 6)
I. Tool Box.....................................................1
J. Drill Chuck (w/Key) 1-16mm x JT33 Taper ...........1
K. Handwheel Handles .......................................3
L. Drift Key ....................................................1
M. Hex Wrench 5mm..........................................1
N. Wrench 21/24mm .........................................1
O. R8/MT2 Adaptor ...........................................1
P. R8/MT3 Adaptor ...........................................1
Q. R8/JT33 Drill Chuck Arbor ...............................1
R. One Set R8 Collets ........................................1
• 1/8" .....................................................1
• 3/16" ....................................................1
• 1/4" .....................................................1
• 5/16" ....................................................1
• 3/8" .....................................................1
• 7/16" ....................................................1
• 1/2" .....................................................1
• 9/16" ....................................................1
• 5/8" .....................................................1
• 11/16" ..................................................1
• 3/4" .....................................................1
• 13/16" ..................................................1
• 7/8" .....................................................1
Immediately discard all
plastic bags and packing materials to eliminate choking/suffocation
hazards for children and
animals.
A
B
D
E
C
G
F
Figure 5. Wooden box contents.
K
I
L
J
O
P
M
Q
N
R
Figure 6. Tool box contents.
NOTICE
When ordering replacement parts, refer
to the parts list and diagram in the back
of the manual.
-13-
M1008/M1009 Mill
SET UP
Machine Placement
•
Floor Load: The Model M1008 weighs 1622
lbs. and has a 20-1/2" x 29-1/2" footprint.
The Model M1009 mill weighs 2054 lbs.
and has a 20-1/2" x 29-1/2" footprint. We
recommend placing on concrete floors only.
•
Working Clearances: Consider existing and
anticipated needs, size of material to be
processed through the machine, and space
for auxiliary stands, work tables or other
machinery when establishing a location for
your mill. See Figures 7 & 8 for minimum
working clearances.
•
Cleaning Machine
The table and other unpainted parts of your mill
are coated with a waxy grease that protects
them from corrosion during shipment. Clean this
grease off with a solvent cleaner or citrus-based
degreaser. DO NOT use chlorine-based solvents
such as brake parts cleaner or acetone—if you
happen to splash some onto a painted surface,
you will ruin the finish.
NEVER use gasoline or
other petroleum-based
solvents to clean with.
Most
have low flash
points, which make them
extremely
flammable.
A risk of explosion and
burning exists if these
products are used. Serious
personal injury may occur
if this warning is ignored!
Lighting: Lighting should be bright enough
to eliminate shadow and prevent eye strain.
���
���
ALWAYS work in wellventilated areas far from
possible ignition sources
when using solvents to
clean machinery. Many
solvents are toxic when
inhaled or ingested. Use
care when disposing
of waste rags and
towels to be sure they
DO NOT create fire or
environmental hazards.
Figure 7. M1008 minimum working clearances.
���
���
Figure 8. M1009 minimum working clearances.
-14-
M1008/M1009 Mill
Floor Mounting
We recommend mounting your new mill to the floor with
5/16" concrete anchor studs or lag screws, depending on
your floor material and future space requirements.
When mounting to your floor, you can use anchor studs
(see Figure 9) or lag screws and lag shields (see Figure
10). Anchor studs are stronger and more permanent, but
make moving the machine in the future more difficult.
Lag bolts/shields are not as strong as anchor studs, but
are much more convenient if you need to move the mill
in the future.
Figure 9. Anchor stud for concrete floor.
To mount the mill to the floor, do these steps:
1.
Position the mill as close to its electrical source as
possible, making sure to leave at least three feet
between the back of the mill and the wall.
2.
Check the mill table with a level to ensure that it
is flat along its travel. If it is not, insert steel shims
under the stand as necessary until the table is level.
Note: If the slope of your floor requires you to
shim more than a 3/8" or your floor is very uneven,
consider pouring a level machine pad. Consult a
specialist for the proper dimensions of this new pad
because fastening anchors too close to the edge will
crack the concrete.
3.
Using the mounting holes in the mill stand as a
guide, drill at least 3-1/2" deep into your floor.
4.
Secure the mill to the floor with your chosen hardware.
-15-
Figure 10. Lag screw and lag shield
combination for concrete floor.
SET UP
Because of the large weight load and relatively small
footprint, we do not recommend mounting this machine
to wood floors.
M1008/M1009 Mill
Way Cover
The way cover protects the back part of the cross ways.
To install the way cover, do these steps:
1.
Remove the four screws from the machine at the
way cover mounting location (Figure 11).
SET UP
Note: The two screws located near the column use a
nut and washer.
2.
Place the way cover on the machine and align it
with the fastener holes.
3.
Attach the way cover with the four screws removed
in Step 1.
Screws
(two each side)
Figure 11. Way cover mounted correctly
on the machine.
Handles
Handles are provided to ease handwheel operation.
To install handles onto the handwheels, do these
steps:
1.
Thread handles into the face of the handwheels (see
Figure 12 for locations).
2.
Tighten the handles with a flat head screwdriver
Handle Installation
Locations
Figure 12. Locations to install handles.
-16-
M1008/M1009 Mill
OPERATIONS
General
The Model M1008/9 will perform many types of operations that are beyond the scope of this manual. Many of
these operations can be dangerous or deadly if performed
incorrectly.
The instructions in this section are written with the understanding that the operator has the necessary knowledge
and skills to operate this machine. If at any time you
are experiencing difficulties performing any operation,
stop using this machine!
Always wear safety glasses when operating the mill. Failure to comply may
result in serious personal injury.
If you are an inexperienced operator, we strongly recommend that you read books, trade articles, or seek training
from an experienced milling machine operator before performing any unfamiliar operations. Above all, your safety
should come first!
OPERATIONS
Positioning Spindle Head
The vertical spindle head can be moved forward/backward, tilted 90˚ both ways, and swiveled horizontally on
the column.
To move the head forward/backward, do these steps:
1.
Make sure the spindle is stopped and the work area
is free from obstructions before proceeding.
2.
Loosen the two linear lock handles that lock the
travel (see Figure 13).
3.
Place the knee travel handle on the drive nut
(Figure 13) and rotate it either clockwise or counterclockwise until the spindle is in the desired position.
4.
Remove the handle and return it to the knee travel
nut.
5.
Tighten the two linear lock handles.
DO NOT investigate problems or adjust
the Mill while it is running. Wait until
the machine is turned off, unplugged
and all working parts have come to a
complete stop before proceeding!
Linear Locks
Drive
Nut
Continued on next page
Figure 13. Location for forward/backward
movement controls.
-17-
M1008/M1009 Mill
To tilt the spindle head, do these steps:
1.
Make sure the spindle is stopped and the work area
is free from obstructions before proceeding.
2.
Loosen the three nuts that lock the spindle in place
(see Figures 14 & 15).
3.
Remove the lock pin from its position by pulling it
out.
4.
Rotate the drive nut (Figure 15) either clockwise
or counterclockwise until the spindle is tilted to the
desired angle, as displayed on the graduated scale.
5.
Tighten the three nuts to lock the spindle in place,
and push in the lock pin as far as it will go.
3rd Lock Nut on
Opposite Side
1st Lock
Nut
Lock Pin
2nd Lock
Nut
Figure 14. Controls for tilting spindle
head.
OPERATIONS
Note: For accurate positioning, additional setup tools
should be used to determine the precise angle of the
spindle head.
To swivel the spindle head horizontally, do these
steps:
1.
Make sure the spindle is stopped and the work area
is free from obstructions before proceeding.
2.
Using a wrench, loosen the four nuts at the top of
the mill base (Figure 15).
3.
Push or pull the spindle head/overarm to swivel it to
the desired position. At the base, there is a graduated scale for positioning.
4.
Tighten the four nuts to lock the spindle in position.
Note: This positioning method will generally be done
when switching between horizontal and vertical operations.
-18-
3rd Lock
Nut
Drive Nut
4 Nuts
(other two
on opposite
side)
Figure 15. Controls for tilting and
swiveling spindle head.
M1008/M1009 Mill
M1009 Vertical/
Horizontal Conversion
Overarm
Rotated 180˚
To convert the Model M1009 from vertical spindle
operation to horizontal, do these steps:
1.
UNPLUG THE MACHINE!
2.
Loosen the three nuts that lock the spindle in place
(see Figures 14 & 15).
3.
Remove the lock pin from its position by pulling it
out.
Rotate the drive nut (Figure 15) either clockwise
or counterclockwise until the spindle head is tilted
90˚.
5.
Using a wrench, loosen the four nuts at the top of
the mill base (Figure 15).
6.
Push or pull the overarm to swivel it 180˚, so that
the spindle support is in-line with the horizontal
spindle axis.
7.
Insert a horizontal arbor into the spindle support
and swivel the overarm until the horizontal arbor
will fit into the horizontal spindle, as shown in
Figure 16.
8.
Tighten the four nuts to lock the overarm in position.
-19-
Figure 16. M1009 converted for horizontal
spindle use.
OPERATIONS
4.
Spindle Head
Tilted to 90˚
M1008/M1009 Mill
Table Travel
The table of the Model M1008/M1009 can be moved in 3
axes. Each of these axes are handwheel controlled, and
all handwheels are graduated to accurately position of
the workpiece in relation to the tool (see Figure 17 for
locations).
Cross Feed Locks
Longitudinal
Handwheels
Figure 18. Cross feed lock locations.
Longitudinal Travel Locks
OPERATIONS
Knee Handle
Cross Feed
Handwheel
Figure 17. Table travel handwheel locations.
Cross Feed
The cross feed is controlled by the center handwheel and
can be locked in position by the two locks on the right
side of the mill, under the table (see Figure 18).
Figure 19. Longitudinal feed lock
locations.
Longitudinal Feed Control
The longitudinal feed is controlled by two handwheels,
one at each end of the table, and can be locked in position by the two locks at the front of the table (see Figure
19).
Knee Feed
The knee feed is controlled by one handle, just off center at the front of the machine, and the two knee travel
locks on the right side of machine where the knee meets
the ways (see Figure 20).
Knee Feed Locks
Figure 20. Knee feed lock locations.
-20-
M1008/M1009 Mill
Rotating Table
The mill table can be rotated 45º in either direction for
positioning the workpiece.
Table Nuts
To rotate the mill table, do these steps:
1.
Make sure the power is turned OFF.
2.
Remove as many items from the mill table as possible. This will make rotating the table easier.
3.
Loosen the four table nuts, two in front and two in
back, to free the table for rotation (see Figures 21
& 22).
4.
Rotate the table to the desired position. There is a
graduated scale for accurate positioning.
5.
Tighten the four nuts to secure table in position.
Figure 21. Front two table nuts.
Table Nuts
OPERATIONS
Rotating Vise
The Model M1008/M1009 comes equipped with a milling
vise. The vise has a swivel base that allows it to rotate
360º.
To rotate the vise, do these steps:
1.
Make sure the power is turned OFF.
2.
Loosen the vise nuts (see Figure 23), one on each
side, to free up the vise.
3.
Rotate the vise to the desired position. The swivel
base has graduations for more accurate positioning.
4.
Tighten the two nuts to lock the vise in place.
Figure 22. Rear table nuts.
Vise Nuts
Figure 23. Vise nuts.
-21-
M1008/M1009 Mill
Quill Travel
Quill Feed Control
The quill feed is controlled by the quill feed handle and
quill lock shown in Figures 24 & 25. The handle allows
the mill to operate as a drill. Pull the handle towards you
and the quill will feed down towards the workpiece. The
quill feed handle is spring loaded so that it will automatically return to its upmost vertical position.
Quill Feed
Handle
NOTICE: When returning the quill to its upmost position,
keep your hand on the quill feed handle so it
does not spring up and slam the quill against
the head.
OPERATIONS
Micro-Feed Adjustment
The spindle position can be accurately controlled through
the use of the micro-feed handwheel (see Figure 25). To
use this feature, you must first lock the quill feed handle lock (Figure 24) by turning it all the way in. Once
the quill feed handle is locked, verify that the micro-feed
handwheel turns, then position the cutting tool using the
graduated dial.
Quill Feed
Handle Lock
Figure 24. Quill feed handles.
Quill Lock
Micro-Feed
Handwheel
Figure 25. Quill lock and micro-feed
handles.
-22-
M1008/M1009 Mill
Power Feed Controls
The Model M1008/M1009 comes equipped with a power
feed option on the longitudinal travel. The power feed
has the following options (see Figure 26 for items A–D,
and see Figure 27 for items E–G):
B
A
A. Right/Left Feed Selector—Switch the lever to the
left or the right for the desired travel direction. The
table should come to a complete stop before changing directions.
B.
C
Rapid Speed Switch—Pressing this switch will cause
the table to feed at its maximum rate until it is
released.
C. Feed Setting Dial—Setting from 0 (no travel) to 10
(fastest travel). There is no correlation between
the numerical setting on the dial and actual feed in
inches per minute (IPM).
D
Figure 26. Power feed controls.
G
E
G
E.
Limit Switch—Stops the power feed when it makes
contact with the adjustable power feed stops.
F.
Power Feed Stops—Adjustable stops trigger the
limit switch when the power feed is at the end of its
travel.
G. Table Hard Stop—Mechanically limits the longitudinal travel. N remove the stops unless servicing the
mill.
-23-
F
F
Figure 27. Power feed and table stops.
OPERATIONS
D. ON/OFF Switch—Starts/stops the power feed. (The
power feed should be left off when not in use.)
M1008/M1009 Mill
Determining Needed RPM
Before changing speeds, you must first determine the
best RPM to use with the material and diameter of your
cutting tool. Using this determined RPM, you can then
reference the spindle speed chart on the mill and set the
V-belts to match that speed.
To determine the RPM needed for your workpiece, do
these steps:
OPERATIONS
1.
Use the chart in Figure 28 to determine the cutting
speed for your workpiece material.
Cutting Speeds for High Speed Steel
(HSS) Cutting Tools*
Workpiece Material
Cutting Speed (SFM)
Aluminum & Alloys
300
Brass & Bronze
150
Copper
100
Cast Iron, soft
80
Cast Iron, hard
50
Mild Steel
90
Cast Steel
80
2.
Measure the diameter of your cutting tool in inches.
Alloy Steel, hard
40
Tool Steel
50
3.
Use the following formula in Figure 29 to determine
the needed RPM for your operation. Note: Always
round to the closest RPM given on the spindle speed
chart.
Stainless Steel
60
Titanium
50
Plastics
300-800
Example 1
You have a piece of aluminum stock, and you are
using a 1/2" diameter HSS cutting tool.
Wood
300-500
*For carbide cutting tools, double the cutting
speed. These values are a guideline only. Refer to
the current edition of MACHINERY'S HANDBOOK for
more detailed information.
Figure 28. Cutting speed chart for HSS
cutting tools.
Step 1:
300 (SFM from chart) x 4 = 1200
Step 2:
1200 / .5" (Diameter of cutting tool) = 2400 RPM
Result:
The needed speed for this workpiece is 2400 RPM.
Example 2:
You have a piece of stainless steel, and you are
using a 1" diameter carbide cutting tool.
Step 1:
60 (SFM from chart) x 2 (for carbide tool) = 120
Step 2:
120 (determined SFM) x 4 = 480
Step 3:
480 / 1" (Diameter of cutting tool) = 480 RPM
Result:
The needed speed for this workpiece is 480 RPM.
-24-
Figure 29. Formula to determine required
RPM.
M1008/M1009 Mill
Setting RPM
Setting the RPM involves placing the V-belts on the pulleys as shown in the spindle speed chart on the machine.
VERTICAL SPINDLE SPEED CHART
SPINDLE
A
Model M1009 Note: This model has separate spindle
speed charts for both the vertical and horizontal spindles; otherwise, the instructions for changing the V-belts
only differ where specified below.
To set the spindle speed, do these steps:
1.
Examine the Spindle Speed Chart near the spindle
on your machine to find the closest match to your
needed RPM (see Figure 30 for M1008/M1009 vertical spindle or see Figure 31 for M1009 horizontal
spindle).
UNPLUG THE MILL!
3.
Remove/open the access panel to the spindle pulleys.
4.
For Vertical Spindle (Model M1008/M1009): Loosen
the pulleys shown in Figure 30, and move the motor
and center pulley to loosen the V-belts.
For Horizontal Spindle (M1009 only): Loosen the pulleys shown in Figure 31, and move the center pulley
to loosen the V-belts.
5.
Move the belts to the appropriate pulley combination as shown on the spindle speed chart.
6.
Tension the V-belts by reversing Step 4.
7.
Close/replace the access panel to the spindle pulleys.
B
C
G
D
F
E
DE
270
DG
930
CE
390
AF
1800
DF
550
BG
1960
BE
615
AG
2950
CF
860
Spindle
Pulley
Center
Pulley
Motor
Pulley
Figure 30. Vertical spindle speed chart
and pulley locations.
HORIZONTAL SPINDLE SPEED CHART
1
AG
72
2
BG
170
3
CG
210
4
AF
240
5
AE
290
6
BF
550
7
CE
830
8
BD
1300
UPPER
F
E
D
G
CENTER
C
B
A
MOTOR
Upper
Pulley
Center
Pulley
Motor
Pulley
Figure 31. Horizontal spindle speed chart
and pulley locations (Model M1009 only).
-25-
OPERATIONS
2.
MOTOR
CENTER
M1008/M1009 Mill
Spindle Controls
The spindle switch allows you control which direction the
spindle rotates, depending on your cutting tool direction
of cut. Note: The spindle switch will only work when the
main power is turned ON.
•
•
Figure 32 shows the location of the vertical spindle
switch for both Model M1008/M1009.
Figure 33 shows the location of the horizontal spindle switch for the Model M1009.
Start Up and Spindle
Break-in Procedures
OPERATIONS
Complete this process once you have familiarized yourself with all instructions in this manual and have made
sure the machine is completely lubricated. Note: These
instructions must be followed for both the horizontal and
vertical spindles.
NOTICE
The spindle break-in procedures are important for
ensuring long life and trouble-free performance from
your mill. Failure to perform these may lead to shortened life of your machine.
Vertical Spindle
ON/OFF
Figure 32. Vertical spindle control for
Model M1008/M1009.
Horizontal Spindle
ON/OFF Switch
To begin the start up procedure, do these steps:
1.
Make sure there are no obstructions around or underneath the spindle.
2.
Turn the spindle ON/OFF switch to either the FORWARD
or REVERSE and verify that the spindle rotates in the
proper direction.
To break-in the spindle, do these steps:
1.
Make sure the mill has been properly lubricated.
2.
Make sure the spindle area is free from obstructions.
3.
Set the spindle speed to the lowest RPM.
4.
Turn on the spindle and let it run for a minimum of
10 minutes.
5.
Repeat these steps for each RPM setting.
-26-
Figure 33. Horizontal spindle control for
Model M1009.
M1008/M1009 Mill
Installing Tools
To load a tool in the vertical spindle, do these steps:
Drawbar at Top
of Spindle
1.
UNPLUG THE MILL!
2.
Clean any debris from the spindle opening.
3.
Insert the tool holder or a collet into the spindle.
4.
Rotate the holder until the groove lines up with the
key and the holder slides into the spindle.
5.
Using a wrench, tighten the drawbar (see Figure 34)
until the tool is secure in the spindle.
6.
Clear all items away from the cutting tool before
turning the spindle ON.
Figure 34. Vertical spindle with tool
loaded.
Arbor
Spindle
at 90˚
To load a tool in the horizontal spindle, do these steps:
UNPLUG THE MILL!
2.
Clean any debris from the spindle opening.
3.
Rotate the vertical spindle 90º, as shown in Figure
35.
4.
Rotate the overarm 180º so that the spindle support
is in-line with the horizontal spindle axis, as shown
in Figure 35.
5.
Prepare the arbor by installing the cutting tool
between the spacers.
6.
Insert the arbor, with the cutting tool already loaded into the spindle (see Figure 36).
7.
Rotate the arbor until the groove lines up with the
key and the holder slides into the spindle.
8.
Using a wrench, tighten the drawbar until the tool is
secure in the spindle.
9.
Adjust the spindle support distance to provide proper support during the cutting operation.
10. Tighten the arbor nut to keep the cutting tool and
arbor secure.
11. Clear all items away from the cutting tool before
turning the spindle ON. Note: Remove the drawbar
from the horizontal spindle when not in use.
-27-
OPERATIONS
1.
Drawbar at
Back of Mill
Overarm
Rotated 180˚
Arbor Nut
Figure 35. Horizontal spindle with arbor
loaded.
Cutting Tool
Installed on
Arbor
Figure 36. Cutting tool installed on arbor,
between spacers.
M1008/M1009 Mill
Removing Tools
OPERATIONS
To remove cutting tools, do these steps:
1.
UNPLUG THE MILL!
2.
Remove any debris or chips from the tool and the
tool holder/arbor.
3.
Lock the spindle in place to keep it from rotating.
(If you are removing tools from a vertical spindle,
be sure to return the vertical quill to its upmost
position first.)
4.
Place one hand on the tool holder for support
and use a wrench to loosen the tool holder on the
drawbar.
5.
Once the tool is loosened, you may need to strike
the drawbar with a dead blow or rubber mallet to
release the tool holder from the spindle.
6.
Finish unscrewing the drawbar by hand.
7.
Clean any debris from the spindle opening area.
8.
Return the spindle(s) to the appropriate operating
position for the next cut.
Coolant System
The Model M1008/M1009 is equipped with a coolant system (see Figure 37), which should be filled prior to starting the pump to avoid cavitation.
Coolant
ON/OFF
Switch
NOTICE
Running the pump without coolant in the system will
damage the cooling system. This neglect will not be
covered by the warranty.
To turn the coolant system ON, do these steps:
1.
Adjust the flexible nozzle to the general area that
you want coolant applied.
2.
Turn the coolant switch ON.
3.
Adjust the nozzle as needed.
-28-
Coolant
Nozzle
Figure 37. Coolant controls.
M1008/M1009 Mill
MAINTENANCE
General
Regular periodic maintenance on your SHOP FOX®
mill will ensure optimum performance. Make a habit of
inspecting your mill each time you use it.
A thorough cleaning, on a regular basis, will increase the
machine durability and efficiency by removing chips and
grime that can gum up moving parts.
A regular application of a protective spray coating will
keep the table and other bare metal parts from rusting
and pitting.
Cleaning
MAKE SURE that your machine is
unplugged during all maintenance procedures! If this warning is ignored, serious personal injury may occur.
Cleaning the Model M1008/M1009 is relatively easy.
Vacuum excess metal chips from the table and ways, and
wipe off the remaining waste with a dry cloth. If any
coolant is left on the table, wipe it up with a rag. Treat
all unpainted cast iron and steel with a non-staining lubricant after cleaning.
Table and Base
MAINTENANCE
Protect the unpainted cast iron surfaces by wiping them
clean after every use—this ensures moisture does not
remain on bare metal surfaces.
Keep exposed cast iron rust-free with regular applications
of surface lubricants designed for cast iron.
Remove vices, clamps, rotary tables, etc. after use so
moisture cannot be trapped between the components
and cause rust.
Checking/Adding Coolant
A small amount of coolant is lost during normal machining
operations.
Drain Screen
To check/add coolant, do these steps:
1.
Remove the drain screen (Figure 38), and inspect
how far the coolant is from the top of the tank.
•
If the coolant is more than 2" from the top of
the tank, add more coolant to fill the tank.
-29-
Figure 38. Location of drain screen.
M1008/M1009 Mill
Lubrication
A
Power Feed
The power feed uses SAE 40 oil and should not need to
be changed unless the unit is being repaired.
Ball Fittings
B
Ball fittings are responsible for the majority of the
machine lubrication. To lubricate ball fittings, depress
the ball with the tip of an oil can nozzle and squirt a
little oil inside the fitting. Make sure to clean the outside
of the ball fitting before and after each use to keep out
contaminants.
Figure 39. Back of machine fittings.
G
For ball fitting lubrication points, use ISO 68 or SAE 20W
non-detergent oil or similar lubricant.
E
F
Lubricate the following areas every 8 hours of actual
use:
MAINTENANCE
Back of Machine (Model M1009 only; see Figure 39):
A. Horizontal Arbor Support Bearing
B. Horizontal Spindle Pulleys (Must open back access
cover to do this).
H
C
Figure 40. Left side of mill, under table.
Left Side of Machine (Figures 40–42):
C. Column/Knee Intersection
D. Longitudinal Feed Handwheel
E. Longitudinal Ways (under table)
F. Cross Ways (under table)
G. Table Rotation (front and back)
H. Knee Feed Handwheel
D
Continued on next page
Figure 41. Longitudinal handwheel.
G
K
Figure 42. Front of mill.
-30-
M1008/M1009 Mill
Right Side of Machine (Figures 43, 44, & 45):
I. Column/Knee Intersection
J. Cross Ways (Under Table)
K. Table rotation (Front and Back)
L. Quill Feed
M. Horizontal Spindle (Model M1009)
K
Changing Coolant
J
The Model M1008/M1009 coolant tank holds approximately 4 gallons of coolant. We recommend changing this fluid
every six months or sooner if it develops an unpleasant
odor.
I
Figure 43. Right side of mill, under table.
For the best protection against rust, coolant ratios should
be approximately 5 parts water to 1 part concentrated
cutting fluid for light-duty machining; or 3 parts water to
1 part concentrated cutting fluid for heavy-duty machining.
M
To change the cutting coolant, do these steps:
1.
Place an oil pan under the drain plug (Figure 46),
remove the drain plug, and allow the coolant to
drain completely.
Remove the drain screen and use the opening to
clean out any sludge. A magnet will help remove
metal particles.
3.
Replace the drain plug.
4.
Fill the tank with a new mixture of coolant by pouring into the tank opening where the drain screen
was removed.
5.
Replace the drain screen you removed in Step 2.
L
Figure 45. Quill handwheel.
Drain Screen
Drain Plug
Figure 46. Location of drain screen and
plug.
-31-
MAINTENANCE
2.
Figure 44. Model M1009 horizontal
spindle.
M1008/M1009 Mill
Maintenance Schedule
Daily:
• Safety Shutoffs
• Check V-belt tension.
• Clean machine to remove debris.
• Make sure table/vise is clean and free of metal chips.
• Clean spindle openings before inserting tools.
• Check for any unsafe conditions.
• Check/add coolant.
Weekly:
• Thoroughly clean the machine ways to remove chips and debris.
• Clean/grease the longitudinal, cross, and knee lead screws.
Monthly:
• Check oil level in gear box and power feed; fill if needed.
• Clean/vacuum dust buildup from the inside cabinets and from the motor(s).
Every six Months:
• Clean out coolant tank and replace coolant.
Maintenance Notes
MAINTENANCE PERFORMED
MAINTENANCE
DATE
-32-
M1008/M1009 Mill
SERVICE
General
Cross Feed Gib
Adjustment Screw
This section covers the most common service adjustments
or procedures that may need to be made during the life
of your machine. Always disconnect your machine from
the power source before performing any service!
If you have additional service questions, please contact
Woodstock International Technical Support at (360) 7343482 or send e-mail to: [email protected].
Knee Feed Gib
Adjustment Screw
Gibs
Each sliding dovetail on the Model M1008/M1009 has a
gib that is sandwiched between two adjustment screws
(see Figures 47-49 for the locations of one end of each
adjustment screw). Some minor components must be
removed to access all the gib adjustment screws. Adjust
the gibs by loosening one screw and tightening the other
at the opposite end until a slight drag is felt while moving
the table/spindle along the dovetail slides; then tighten
the loose screw at the other end to lock the setting in
place. Note: The M1009 spindle support adjusts along the
dovetail slide by a clamping system (see Figure 50).
Figure 48. Location of one end of cross
feed & knee feed gib adjustment screws.
Spindle Head Gib
Adjustment Screw
NOTICE
When adjusting gibs, the goal of gib adjustment is to
remove unnecessary sloppiness without causing the
slides to bind. Loose gibs may cause poor finishes
on the workpiece and may cause undue wear on the
slide. Over-tightening may cause premature wear.
Spindle Support
Adjustment Screw
Figure 50. Location of adjustment screw
for spindle support dovetail clamp.
Figure 47. Location of one end of
longitudinal gib adjustment screw.
-33-
SERVICE
Longitudinal Gib
Adjustment Screw
Figure 49. Location of end of spindle
head gib adjustment screw.
M1008/M1009 Mill
Belt Replacement
When a V-belt is worn, cracked, or broken, it needs to be
replaced. The following instructions are for belt replacement.
4 Screws
To replace vertical spindle belts (Model M1008/M1009),
do these steps:
1.
UNPLUG THE MILL!
2.
Loosen the motor nut and center pulley nut.
3.
Pull the motor towards front of the mill.
4.
Remove the four Phillips head screws on the top
cover (See Figure 51), and remove the cover.
Top
Cover
Access
Panel
Removed
5.
Open the access panel to the V-belts.
6.
Remove the front V-belt by moving the belt down
the center pulley set and then up the front pulley
set.
7.
Remove the rear V-belt by moving the belt down
both pulley sets.
8.
Replace the rear V-belt first, by placing the belt
under both pulley sets and then working up.
9.
Replace the front V-belt by dropping the belt over
the front pulley set, through the opening in the top,
and under the center pulley set.
10. Move the V-belts to the desired RPM setting and
tighten the nuts. Review Setting RPM on Page 25
for detailed instructions.
SERVICE
11. Replace the access cover and secure in place with
the two thumb screws.
12. Replace the top cover and secure in place with the
four Phillips head screws.
-34-
Center
Pulley
Nut
Motor
Pulley
Nut
Figure 51. Vertical spindle pulley access
for belt replacement.
M1008/M1009 Mill
To replace the horizontal spindle V-belts (Model M1009
only), do these steps:
1.
UNPLUG THE MILL!
2.
Open the horizontal spindle pulley access panel.
3.
Loosen the bolt that holds the center pulley set
in place (see Figure 52). Note: The bolt can be
accessed through the opening next to the tension
nut.
4.
Remove the tension nut between the motor and the
middle pulley sets to release tension on the V-belts.
5.
Slide the center pulley set to the right to release
tension and allow the belts to move.
6.
Remove and replace the damaged V-belt.
Spindle
Pulley
Upper
Pulley
Center
Pulley
Motor
Pulley
Figure 52. Horizontal spindle pulley cover
removed for belt replacement.
Note: The upper V-belt must be installed first.
7.
Move the V-belts to the appropriate pulley sets for
the needed RPM.
8.
Move the center pulley set back into position and
reinstall the tension nut, bringing the pulleys to the
proper tension.
9.
Tighten the nut to secure the center pulley set.
10. Close the access cover.
To replace the V-belt mounted directly on the horizontal spindle (Model M1009 only), do these steps:
UNPLUG THE MILL!
2.
Complete Steps 1–4 from the instructions above.
3.
Loosen the spindle tension bolt. Do not loosen the
nut (see Figure 52).
4.
Pull the upper pulley set up to loosen tension on the
spindle pulleys.
5.
Remove the damaged V-belt and replace it.
6.
Tighten spindle tension bolt.
7.
Push the upper pulley set back into position.
8.
Complete Steps 7–9 from the instructions above.
-35-
SERVICE
1.
M1008/M1009 Mill
M1008 Wiring Box Identification
Main
Switch
Contactor
Vertical
Spindle Relay
Transformer
Coolant
Pump Relay
Circuit
Breaker
SERVICE
Pump
Capacitor
Main
Terminal Bar
-36-
Grounding
Terminal Bar
M1008/M1009 Mill
M1008 110V Wiring Diagram
NAME
SPECIFICATIONS
M1
SINGLE-PHASE MOTOR (VERTICAL)
YC1000L2-4 1PH 110V/220V 60HZ 2HP 1725 RPM V1
M2
COOLANT PUMP
YDB-12TH 40W 1PH 110V/220V 60HZ 12L/MIN 3M
A1
POWER FEED
AS-235 AC 110V
KM
AC CONTACTOR
CJX1-32/22 AC 24V 60HZ
QS
MAIN SWITCH
HZ12-40/15
FR1
RELAY
JR16-20/3D LE:20A CURRENT RANGE: 20~32A
FR2
RELAY
JR16-20/3D LE:0.9A CURRENT RANGE 0.68~1.1A
SA1
COMBINATION SWITCH FOR VERTICAL
SPINDLE
HZ5C-25/M4D035
SA2
COMBINATION SWITCH FOR COOLANT PUMP HZ5C-10/M2C005
SB
EMERGENCY STOP BUTTON
LAY3-02ZS/1 2NC
QF
CIRCUIT BREAKER
DZ47-63 (1P 3A)
TC
TRANSFORMER
JBK4-200 1:0-110V 0:0-110V/120VA 0-220V 0-24V/80VA
EL
HALOGEN LAMP
JC-38 (50W AC:24V)
-37-
SERVICE
CODE
M1008/M1009 Mill
SERVICE
M1008 220V Wiring Diagram
CODE
NAME
SPECIFICATIONS
M1
SINGLE-PHASE MOTOR (VERTICAL)
YC1000L2-4 1PH 110V/220V 60HZ 2HP 1725 RPM V1
M2
COOLANT PUMP
YDB-12TH 40W 1PH 110V/220V 60HZ 12L/MIN 3M
A1
POWER FEED
AS-235 AC 110V
KM
AC CONTACTOR
CJX1-32/22 AC 24V 60HZ
QS
MAIN SWITCH
HZ12-40/15
FR1
RELAY
JR16-20/3D LE:8.5A CURRENT RANGE: 6.8~11A
FR2
RELAY
JR16-20/3D LE:0.45A CURRENT RANGE 0.32~0.5A
SA1
COMBINATION SWITCH FOR VERTICAL
SPINDLE
HZ5C-25/M4D035
SA2
COMBINATION SWITCH FOR COOLANT PUMP HZ5C-10/M2C005
SB
EMERGENCY STOP BUTTON
LAY3-02ZS/1 2NC
QF
CIRCUIT BREAKER
DZ47-63 (1P 3A)
TC
TRANSFORMER
JBK4-200 1:0-110V 0:0-110V/120VA 0-220V 0-24V/80VA
EL
HALOGEN LAMP
JC-38 (50W AC:24V)
-38-
M1008/M1009 Mill
M1009 Wiring Box Identification
Contactor
Main
Switch
Vertical
Spindle Relay
Transformer
Horizontal
Spindle Relay
Circuit
Breaker
Grounding
Terminal Bar
Coolant
Pump Relay
-39-
SERVICE
Pump
Capacitor
Main
Terminal Bar
M1008/M1009 Mill
SERVICE
M1009 110V Wiring Diagram
CODE
NAME
SPECIFICATIONS
M1
SINGLE-PHASE MOTOR (VERTICAL)
YC1000L2-4 1PH 110V/220V 60HZ 2HP 1725 RPM V1
M2
SINGLE-PHASE MOTOR (HORIZONTAL)
YC90L2-4 1PH 110V/220V 60HZ 1.5HP 1725 RPM B3
M3
COOLANT PUMP
YDB-12TH 40W 1PH 110V/220V 60HZ 12L/MIN 3M
A1
POWER FEED
AS-235 AC 110V
KM
AC CONTACTOR
CJX1-32/22 AC 24V 60HZ
QS
MAIN SWITCH
HZ12-40/15
FR1
RELAY
JR16-20/3D LE:25A CURRENT RANGE: 20-32A
FR2
RELAY
JR16-20/3D LE:19A CURRENT RANGE: 14~22A
FR3
RELAY
JR16-20/3D LE:0.9A CURRENT RANGE 0.6~1.1A
SA1
COMBINATION SWITCH FOR VERTICAL SPINDLE
HZ5C-25/M4D035v
SA2
COMBINATION SWITCH FOR HORIZONTAL SPINDLE
HZ5C-25/M4D035
SA3
COMBINATION SWITCH FOR COOLANT PUMP
HZ5C-10/M2C005
SB
EMERGENCY STOP BUTTON
LAY3-02ZS/1 2NC
SQ
MICRO SWITCH
LXW6-11DL LE:3A
QF
CIRCUIT BREAKER
DZ47-63 (1P 3A)
TC
TRANSFORMER
JBK4-200 1:0-110V 0:0-110V/120VA 0-220V 0-24V/80VA
EL
HALOGEN LAMP
JC-38 (50W AC:24V)
-40-
M1008/M1009 Mill
M1009 220V Wiring Diagram
NAME
SPECIFICATIONS
M1
SINGLE-PHASE MOTOR (VERTICAL)
YC1000L2-4 1PH 110V/220V 60HZ 2HP 1725 RPM V1
M2
SINGLE-PHASE MOTOR (HORIZONTAL)
YC90L2-4 1PH 110V/220V 60HZ 1.5HP 1725 RPM B3
M3
COOLANT PUMP
YDB-12TH 40W 1PH 110V/220V 60HZ 12L/MIN 3M
A1
POWER FEED
AS-235 AC 110V
KM
AC CONTACTOR
CJX1-32/22 AC 24V 60HZ
QS
MAIN SWITCH
HZ12-40/15
FR1
RELAY
JR16-20/3D LE:10A CURRENT RANGE: 6.8~11A
FR2
RELAY
JR16-20/3D LE:8.5A CURRENT RANGE: 6.8~11A
FR3
RELAY
JR16-20/3D LE:0.45A CURRENT RANGE 0.32~0.5A
SA1
COMBINATION SWITCH FOR VERTICAL SPINDLE
HZ5C-25/M4D035
SA2
COMBINATION SWITCH FOR HORIZONTAL SPINDLE
HZ5C-25/M4D035
SA3
COMBINATION SWITCH FOR COOLANT PUMP
HZ5C-10/M2C005
SB
EMERGENCY STOP BUTTON
LAY3-02ZS/1 2NC
SQ
MICRO SWITCH
LXW6-11DL LE:3A
QF
CIRCUIT BREAKER
DZ47-63 (1P 3A)
TC
TRANSFORMER
JBK4-200 1:0-110V 0:0-110V/120VA 0-220V 0-24V/80VA
EL
HALOGEN LAMP
JC-38 (50W AC:24V)
-41-
SERVICE
CODE
M1008/M1009 Mill
Troubleshooting
This section covers the most common problems. WARNING! DO NOT make any adjustments until the mill is unplugged and all moving parts have come to a complete stop.
SYMPTOM
CORRECTIVE ACTION
4. Low voltage.
5. Open circuit in motor or loose
connections.
6. Switch at fault.
7. Faulty start capacitor.
1. Make sure main power switch is turned clockwise.
2. Close wiring box door.
3. Reset circuit breaker by flipping switch on then
off then back on. Reset relay by pressing the reset
button located on the face.
4. Check power supply for proper voltage.
5. Inspect all lead connections on motor and magnetic
switch for loose or open connections.
6. Replace switch.
7. Replace start capacitor.
Fuses or circuit breakers
trip open.
1. Short circuit in line cord or plug.
2. Short circuit in motor or loose
connections.
3. Incorrect fuses or circuit breakers
in power supply.
1. Inspect cord or plug for damaged insulation and
shorted wires and replace extension cord.
2. Inspect all connections on motor for loose or
shorted terminals or worn insulation.
3. Install correct fuses or circuit breakers.
Spindle starts, but coolant
pump will not start.
1. Coolant pump relay tripped.
2. Switch at fault.
3. Pump damaged by running without
coolant present.
1. Press the reset button on the coolant pump relay.
2. Replace switch.
3. Replace pump.
Tool slips in collet
1. Collet is not fully drawn up into
spindle taper.
2. Wrong size collet.
3. Debris in collet or in spindle taper.
4. Taking too big of a cut.
1. Snug up draw bar.
2. Measure tool shank diameter and match with
appropriate diameter collet.
3. Remove all oil and debris from collet and spindle
taper.
4. Lessen depth of cut and allow chips to clear.
Breaking tools or cutters.
1. RPM and or feed rate is too fast.
2. Cutting tool getting too hot.
3. Taking too big of a cut.
1. Use tables to set correct RPM and feed rates.
2. Use cutting fluid or oil for appropriate application.
3. Lessen depth of cut and allow chips to clear.
Machine is loud when
cutting. Overheats or bogs
down in the cut.
1. Excessive depth of cut.
2. Dull cutting tools.
1. Decrease depth of cut.
2. Use sharp cutting tools.
Workpiece vibrates or
chatters during operation.
1. Table locks not tight.
2. Spindle lock not tight.
3. Workpiece not securely clamped to
table or into mill vise.
4. RPM and feed rate too high.
1. Tighten down table locks.
2. Tighten spindle lock.
3. Check that clamping is tight and sufficient for the
job. Make sure mill vise is tight to the table.
4. Use appropriate RPM and feed for the job.
Table hard to move.
1. Table locks are tightened down.
2. Chips have loaded up on bedways.
3. Bedways are dry and in need of
lubrication.
4. Longitudinal stops are interfering.
5. Gibs are too tight.
1. Check to make sure table locks are fully released.
2. Frequently clean away chips that load up during
milling operations.
3. Lubricate bedways and handles.
4. Check to make sure that stops are floating and not
hitting the center stop.
5. Loosen gib screw(s))
Micro-feed adjuster won't
lower the quill.
1. Quill knob is not tightened down
1. Turn the quill knob clockwise to tighten and engage
the micro-feed adjuster.
Bad surface finish
1. Wrong RPM or feed rate.
2. Dull cutting tool or poor cutting
tool selection.
3. Wrong rotation of cutting tool.
1. Adjust for appropriate RPM and feed rate.
2. Sharpen cutting tool or select a better cutting tool
for the intended operation.
3. Check for proper cutting rotation for cutting tool.
SERVICE
Motor will not start.
POSSIBLE CAUSE
1. Main power switch position.
2. Wiring box door open.
3. Circuit breaker or relay inside
machine wiring box tripped.
-42-
M1008/M1009 Mill
PARTS
Column Breakdown
����
��
��
����
����������
��
��
��
��
��
��
��
��
�
��
��
��
��
�
��
�� �� ��
�
�
��
��
�
��
��
��
��
��
��
��
��
��
��
��
��
��
�
��
��
��
�������
�������
��
��
��
��
��
��
��
��
��
��
��
��
��
��
��
�� ��
�� ��
��
�
��
��
�
��
��
��
�� ��
�� ��
��
��
�������
�������
��
�� ��
��
��
�
��
��
�� ��
��
��
��
�� ��
��
��
��
��
PARTS
��������
-43-
��
��
M1008/M1009 Mill
Column Parts List
PARTS
REF
1
2
3
4
5
6
7
8
9
10
11
12
13
14
15
16
17
18
19
20
21
22
23
24
25
26
27
28
29
30
31
32
33
34
35
36
37
39
40
41
42
43
44
45
46
47
48
49
50
51
PART #
XPS96M
XPFH25M
XM1009003
XM1009004
XPN13M
XPW08M
XM1009007
XPSS06M
XM1009009
XM1009010
XM1009011
XM1009012
XM1009013
XM1009014
XM1009015
XM1008016
XM1008017
XPFH43M
XM1008019
XM1008020
XPSB114M
XM1008022
XM1009023
XM1009024
XM1009025
XM1008026
XPSS80M
XM1008028
XPW19M
XPK34M
XM1008031
XPK09M
XPSS16M
XM1008034
XM1008035
XM1008036
XM1008037
XPK95M
XM1008040
XM1008041
XM1008042
XM1008043
XM1008044
XM1008045
XM1008046
XM1008047
XM1008048
XPS08M
XM1008050
XM1008051
REF
PART #
52
53
54
55
56
58
59
60
61
62
64
65
66
67
68
69
70
71
71-1
71-2
72
73
74
75
76
77
78
79
80
81
82
83
84
85
86
87
88
89
90
91
91
92
93
94
95
95
96
97
98
99
XPS08M
XM1008053
XM1008054
XPB83M
XM1008056
XM1008058
XPLW10M
XPN13M
XM1008061
XM1008062
XPSB01M
XM1008065
XM1008066
XPSB123M
XPSB122M
XM1008069
XM1008070
XM1008071
XM1008071-1
XPS09M
XM1008072
XPFH42M
XM1008074
XM1008075
XM1008076
XM1008077
XM1008078
XM1008079
XPSB77M
XM1008081
XPSB31M
XM1008083
XPLW10M
XPB131M
XPS38M
XM1008087
XPB116M
XPLW06M
XM1008090
XM1008091
XM1009091
XM1008092
XLABEL04
XM1008094
XM1008095
XM1009095
XLABEL08
XLABEL01
XLABEL09
XLABEL02
DESCRIPTION
PHLP HD SCR M10-1.5 x 8 (M1009)
FLAT HD SCR M4-.7 X 12 (M1009)
HINGE (M1009)
BEHIND COVER (M1009)
HEX NUT M16-2 (M1009)
FLAT WASHER 16MM (M1009)
OIL CUP (M1009)
SET SCREW M8-1.25 x 16 (M1009)
SPECIAL NUT M22 X 1.5MM (M1009)
COLLAR (M1009)
SPECIAL BOLT M16-2 X 218 (M1009)
SUPPORT (M1009)
CUTTER BAR COLLAR (M1009)
TOOLHOLDER (M1009)
LIFT BAR (M1009)
HANDLE
COLLAR
FLAT HD SCR M6-1 X 10
SCALE RING
BALL BEARING 25 X 42 X 11
CAP SCREW M6-1 x 22
COLLAR
ADJUSTMENT SCREW (M1009)
BALL FITTING (M1009)
HORIZ ARBOR SUPPORT (M1009)
SHAFT
SET SCREW M8-1.25 x 15
COLLAR
FLAT WASHER 25MM
KEY 5 X 5 X 20
CONICAL GEAR
KEY 8 X 8 X 36
SET SCREW M8-1.25 X 10
HEX NUT 42MM
BALL BEARING 25 X 42 X 11
COLLAR
ADJUST WASHER
KEY 6 X 6 X 10
CONICAL GEAR
CIRCULAR NUT
HOIST DESCEND LEAD SCREW
CLAMP BOLT M10-1.5 x 58 X 25
CLAMP BLOCK
KNEE
WIPER PLATE
WIPER PLATE
WIPER PLATE
PHLP HD SCR M5-.8 X 12
ADJUST SCREW M8-1.25
GIB
-44-
DESCRIPTION
PHLP HD SCR M5-.8 X 12
DUST COVER
SUPPORT
HEX BOLT M6-1 X 16
ELECTRIC PUMP
T BOLT M16-2 X 63
LOCK WASHER 16MM
HEX NUT M16-2
HOLD BRACKET
CONNECT TUBE
CAP SCREW M6-1 x 16
OIL CUP
NOZZLE
CAP SCREW M16-2 X 60
CAP SCREW M16-2 X 50
GEAR
HOLD BRACKET
COVER
SIDE COVER
PHLP HD SCR M5-.8 X 10
OVERARM
FLAT HD SCR M8-1.25 x 40
GIB
CLAMP BLOCK
CLAMP BOLT M12-1.75 X 58 X 25
COLLAR
FEED SHAFT
AROUND BRACKET
CAP SCREW M12-1.75 X 30
HOLD SUPPORT
CAP SCREW M8-1.25 x 25
COLLAR
LOCK WASHER 16MM
HEX BOLT M16-2 X 65
PHLP HD SCR M4-.7 x 10
CONNECT TUBE
HEX BOLT M10-1.5 x 45
LOCK WASHER 10MM
ELEVATING SCREW HOUSING
COLUMN (M1008)
COLUMN (M1009)
BASE
LABEL, ELECTRICITY
SHOP FOX LOGO PLATE
MACHINE ID LABEL (M1008)
MACHINE ID LABEL (M1009)
LABEL, READ MANUAL
LABEL, SAFETY GLASSES
LABEL, LOOSE CLOTHING
LABEL, UNPLUG POWER
M1008/M1009 Mill
Rotating Table Breakdown
���
���
���
���
��� ���
���
��� ���
���
���
���
���
���
��� ���
���
���
���
���
���
���
���
���
���
��� ������
���
���
���
���
���
���
���
���
���
���
���
���
���
���
���
���
���
���
���
���
���
���
���
���
���
���
��� ���
PARTS
-45-
M1008/M1009 Mill
Rotating Table Parts List
REF
XM1008101
XPS05M
XM1008103
XPSB02M
XM1008105
XM1008106
XM1008107
XM1008108
XM1008109
XM1008110
XPS08M
XM1008112
XPB03M
XM1008114
XM1008115
XM1008116
XM1008117
XM1008118
XM1008119
XM1008120
XPS68M
XM1008122
XM1008123
XM1009123
XM1008124
XM1008125
REF
DESCRIPTION
CONNECT TUBE
PHLP HD SCR M5-.8 x 8
OIL COVER
CAP SCREW M6-1 x 20
SUPPORT
BALL BEARING 17 X 30 X 9
ADJUST SCREW M8-1.25
SPECIAL NUT 1”
SHORT GIB
CROSSWISE LEAD SCREW
PHLP HD SCR M5-.8 X 12
WIPER PLATE
HEX BOLT M8-1.25 X 16
CLAMP BOLT M10-1.5 x 58 X 25
CLAMP BLOCK
CLAMP BLOCK
CLAMP BOLT M10-1.5 x 58 X 25
SADDLE
SPECIAL WASHER 32 X 9 X 1.5
FLAT HD SCR M8-1.25 x 20
SLOT SCREW M6-1 X 12
WAY COVER
LONGITUDE LEAD SCREW (M1008)
LONGITUDE LEAD SCREW (M1009)
ADJUST SCREW M8-1.25
LONG GIB
126
127
128
129
130
131
132
133
133
134
135
136
137
138
139
140
141
142
143
144
145
146
147
148
149
150
PARTS
101
102
103
104
105
106
107
108
109
110
111
112
113
114
115
116
117
118
119
120
121
122
123
123
124
125
PART #
-46-
PART #
DESCRIPTION
XM1008126
XM1008127
XM1008128
XPW06M
XPN09M
XM1008131
XM1008132
XM1008133
XM1009133
XM1008134
XM1008135
XPSB01M
XM1008137
XM1008138
XM1008139
XM1008140
XPSB61M
XM1008142
XPSB04M
XM1008144
XM1008145
XPLW05M
XPK96M
XPN09M
XM1008149
XM1008150
SHAFT
SHAFT MOUNT
T BOLT M12-1.75 X 45
FLAT WASHER 12MM
HEX NUT M12-1.75
LIMIT ASSEMBLY
SPECIAL NUT 1”
TABLE (M1008)
TABLE (M1009)
ROTARY BRACKET
OIL CUP
CAP SCREW M6-1 X 16
DOG
SCREW BRACKET
OIL CUP
SUPPORT
CAP SCREW M10-1.5 x 20
BALL BEARING 17 X 30 X 9
CAP SCREW M6-1 X 10
SCALE RING
HAND WHEEL
LOCK WASHER 12MM
KEY 3 X 3 X 20
HEX NUT M12-1.75
HANDLE COLLAR
HANDLE
M1008/M1009 Mill
Headstock Breakdown
�����
�����
�����
�����
���
���
�����
���
���
���
���
���
���
���
���
���
���
���
���
���
���
���
���
���
���
���
���
���
���
���
���
���
���
���
���
���
���
���
���
���
���
���
���
���
���
���
���
���
���
���
���
���
���
���
���
���
��� ���
���
��� ���
���
���
���
���
���
���
��� ���
���
���
���
���
���
���
���
���
���
���
���
���
���
��� ���
���
���
���
PARTS
���
-47-
M1008/M1009 Mill
Headstock Parts List
PART #
201
202
203
204
205
206
207
208
209
210
211
212
213
214
215
216
217
218
219
220
221
222
223
224
225
226
227
228
229
230
231
232
233
234
235
236
237
238
239
240
241
242
243
244
XM1008201
XM1008202
XM1008203
XM1008204
XM1008205
XM1008206
XM1008207
XP6003
XPLW13M
XM1008210
XPR56M
XPR67M
XP6003
XM1008214
XP6003
XPR67M
XPSB01M
XM1008218
XM1008219
XM1008220
XM1008221
XPVB75
XPS17M
XM1008224
XM1008225
XPSS19M
XPS11M
XM1008228
XM1008229
XM1008230
XM1008231
XPK97M
XPN26M
XM1008234
XM1008235
XM1008236
XM1008237
XM1008238
XM1008239
XPSB26M
XM1008241
XM1008242
XM1008243
XM1008244
REF
PART #
245
246
247
248
249
250
251
252
253
254
255
257
258
259
260
261
262
263
264
265
266
267
268
269
270
271
271-1
271-2
271-3
271-4
271-5
272
273
274
275
276
277
278
279
280
281
282
283
284
XM1008245
XM1008246
XM1008247
XM1008248
XM1008249
XPB133M
XM1008251
XM1008252
XM1008253
XM1008254
XPR15M
XM1008257
XPSB14M
XM1008259
XPK09M
XM1008261
XPN13M
XM1008263
XPSB13M
XM1008265
XPSS04M
XM1008267
XPK41M
XPB07M
XM1008270
XM1008271
XM1008271-1
XM1008271-2
XM1008271-3
XPC150A
XPC20A
XPW10M
XPB07M
XM1008274
XM1008275
XPLW06M
XPB74M
XM1008278
XPS26M
XM1008280
XM1008281
XM1008282
XM1008283
XM1008284
DESCRIPTION
WEDGE SHIFTER
DRILL CHUCK
SPINDLE BAR
SPINDLE
DUST COVER
BALL BEARING 50 X 80 X 20
SLEEVE
BALL BEARING 6003ZZ
LOCK WASHER 40MM
PULLEY NUT
EXT RETAINING RING 45MM
INT RETAINING RING 75MM
BALL BEARING 6003ZZ
COLLAR
BALL BEARING 6003ZZ
INT RETAINING RING 75MM
CAP SCREW M6-1 X 16
COLLAR
SPRING SLEEVE
SPINDLE PULLEY
SLOTTED LOCK NUT M50-1.5MM
V-BELT B-75 5L750
PHLP HD SCR M4-.7 x 6
SPRING CAP
SPRING PLATE
SET SCREW M8-1.25 x 30
PHLP HD SCR M6-1 X 16
SPRING SEAT
CLAMP HANDLE
CLAMP BLOCK
CLAMP BLOCK
KEY 4 X 4 X 14
ACORN NUT M12-1.75
HANDLE
HANDLE COLLAR
HANDLE WHEEL
SCALE RING
COLLAR
BALL BEARING 15 X 28 X 9
CAP SCREW M6-1 X 12
SMALL COVER
BALL BEARING 15 X 28 X 9
WORM GEAR
RIVET
PARTS
REF
-48-
DESCRIPTION
SCALE
HANDLE COLLAR
HANDLE
KNOB M12-1.75
HANDLE BAR
HEX BOLT M16-2 X 90
COVER
HANDLE BRACKET
SCALE RING
SPRING
EXT RETAINING RING 30MM
BEVEL GEAR
CAP SCREW M8-1.25 x 20
WORM BOX
KEY 8 X 8 X 36
FEED SHAFT
HEX NUT M16-2
T BOLT M16-2 X 63
CAP SCREW M8-1.25 x 30
WORM GEAR
SET SCREW M6-1 X 12
MOTOR PULLEY
KEY 8 X 8 X 40
HEX BOLT M8-1.25 x 25
HANDLE
MOTOR
MOTOR FAN COVER
MOTOR FAN
CAPACITOR BOX
S CAPACITOR 150MFD 250VAC
R CAPACITOR 20MFD 400VAC
FLAT WASHER 14MM
HEX BOLT M8-1.25 x 25
CENTER PULLEY SHAFT
CENTER PULLEY
LOCK WASHER 10MM
HEX BOLT M10-1.5 x 20
KNURLED SCREW M6-1 X 10
SLOT HEAD SCREW M6-1 x 20
PULLEY COVER
RIGHT COVER
LEFT COVER
MOTOR BASE
SPINDLE BOX
M1008/M1009 Mill
M1009 Horizontal Spindle Breakdown
���
���
���
���
���
���
���
���
���
���
���
���
���
���
���
���
���
���
���
���
���
���
���
���
���
���
���
���
���
���
���
���
���
���
���
���
���
���
���
���
���
���
���
���
���
���
���
���
���
�����
�����
���
���
���
���
�����
�����
���
���
���
���
�����
�����
���
�����
���
��� ���
PARTS
-49-
M1008/M1009 Mill
M1009 Horizontal Spindle Parts List
REF
XPVA80
XPK43M
XPSS04M
XM1009305
XPB07M
XPLW04M
XM1009308
XM1009308-1
XM1009308-2
XM1009308-3
XPC020B
XM1009308-5
XPC150A
XM1009308-7
XM1009309
XPSB02M
XM1009311
XM1009312
XPVA80
XM1009314
XPR21M
XPR18M
XP6003
XM1009318
XP6003
XM1009320
XM1009321
XPW08M
XPW08M
XPN13M
XPSB124M
XM1009328
XM1009329
XPR11M
REF
DESCRIPTION
V-BELT A800
KEY 8 X 8 X 45
SET SCREW M6-1 X 12
MOTOR WHEEL
HEX BOLT M8-1.25 x 25
LOCK WASHER 8MM
MOTOR
MOTOR FAN COVER
MOTOR FAN
R CAPACITOR COVER
R CAPACITOR 20MFD 450VAC
S CAPACITOR COVER
S CAPACITOR 150MFD 250VAC
WIRING BOX
SPECIAL NUT M8-1.25
CAP SCREW M6-1 x 20
SUPPORT
ADJUST SCREW M8-1.25
V-BELT A-80 4L800
PULLEY
INT RETAINING RING 35MM
EXT RETAINING RING 17MM
BALL BEARING 6003ZZ
COLLAR
BALL BEARING 6003ZZ
CONNECTOR
SMALL SHAFT
FLAT WASHER 16MM
FLAT WASHER 16MM
HEX NUT M16-2
CAP SCREW M12-1.75 X 80
MOTOR BASE
KEY 8 X 8 X 50
EXT RETAINING RING 25MM
331
332
333
334
335
336
337
338
339
340
341
342
343
344
345
346
347
349
350
351
352
353
354
355
356
357
358
359
360
361
362
363
364
365
PARTS
302
303
304
305
306
307
308
308-1
308-2
308-3
308-4
308-5
308-6
308-7
309
310
311
312
313
314
315
316
317
318
319
320
321
322
323
325
326
328
329
330
PART #
-50-
PART #
XM1009331
XPR25M
XM1009333
XPR11M
XPR25M
XPN02M
XPB13M
XPSB02M
XM1009339
XM1009340
XM1009341
XM1009342
XP6003
XP6003
XM1009345
XPR09M
XPK42M
XM1009349
XPR12M
XPK90M
XM1009352
XM1009353
XPSB31M
XM1009355
XM1009356
XM1009357
XM1009358
XM1009359
XM1009360
XM1009361
XM1009362
XM1009363
XM1009364
XPSB31M
DESCRIPTION
PULLEY
INT RETAINING RING 47MM
SPECIAL NUT M64 X 2
EXT RETAINING RING 25MM
INT RETAINING RING 47MM
HEX NUT M10-1.5
HEX BOLT M10-1.5 x 80
CAP SCREW M6-1 x 20
SUPPORT
COLLAR
SMALL SHAFT
COLLAR
BALL BEARING 6003ZZ
BALL BEARING 6003ZZ
WHEEL
EXT RETAINING RING 20MM
KEY 6 X 6 X 30
V BELT A787
EXT RETAINING RING 35MM
KEY 10 X 10 X 25
SPINDLE PULLEY
OIL CUP
CAP SCREW M8-1.25 x 25
COVER
SLOTTED LOCK NUT M39-1.5MM
FLAT WASHER 39MM
SPECIAL WASHER 52 X 4
BALL BEARING 40 X 90 X 25.25
COLLAR
BALL BEARING 55 X 90 X 23
SPINDLE
COVER
OIL CUP
CAP SCREW M8-1.25 x 25
M1008/M1009 Mill
Power Feed Breakdown
���
���
���
�����
�����
�����
���
�����
�����
�����
���
���
���
�����
�����
�����
���
�����
���
���
���
���
���
�����
���
�����
�����
�����
���
���
���
���
���
���
�����
�����
�����
�����
���
�������
�������
�����
���
�����
�����
�����
���
�����
�����
���
���
���
�����
���
�����
�����
�����
�����
�����
�����
���
���
�����
���
���
���
�������
�����
�����
�����
���
�����
���
���
���
���
�����
���
�����
�������
�����
���
���
�����
�����
���
�����
�����
���
�����
�����
���
�����
�����
�����
���
�����
������
�����
���
���
������ �����
������ �����
���
���
���
�����
�����
�����
���
�����
�����
�����
�����
���
�����
�����
�����
������
�����
�����
PARTS
-51-
M1008/M1009 Mill
PARTS
Power Feed Parts List
REF
PART #
401
402
403
404
405
406
407
408
409
409-1
409-2
409-3
410
411
412
413
414
415
416
417
418
419
420
421
422
423
424
425
426
427
428
429
430
431
432
433
434
434-1
435
436
437
438
439
440
501
501-1
501-2
501-3
501-4
XM1008401
XPN20M
XPW20M
XM1008404
XPW08M
XPLN09
XM1008407
XM1008408
XM1008409
XM1008409-1
XM1008409-2
XPN09M
XM1008410
XM1008411
XM1008412
XPN09M
XM1008414
XM1008415
XM1008416
XM1008417
XM1008418
XM1008419
XM1008420
XM1008421
XM1008422
XM1008423
XPS38M
XPN04M
XPS17M
XM1008427
XM1008428
XM1008429
XPLW02M
XPRP76M
XPSS79M
XM1008433
XM1008434
XPN09M
XM1008435
XPN09M
XM1008437
XM1008438
XM1008439
XPS94M
XM1008501
XM1008501-1
XM1008501-2
XM1008501-3
XM1008501-4
REF
PART #
501-5
501-6
501-7
502-1
502-2
503-1
503-2
504
505
505-1
505-1
505-2
505-3
505-4
505-5
505-6
505-7
505-8
505-9
505-11
505-12
505-13
505-14
505-15
506
506-1
507
508
508-1
508-2
508-3
508-4
509
509-1
509-2
509-3
509-4
509-5
509-6
510
510-1
510-2
510-3
510-4
510-5
510-6
510-7
510-8
510-9
XPS95M
XPN07M
XM1008501-7
XM1008502-1
XPRP11M
XM1008503-1
XM1008503-2
XM1008504
XM1008505
XPN07M
XM1008505-1
XM1008505-2
XM1008505-3
XM1008505-4
XM1008505-5
XM1008505-6
XM1008505-7
XM1008505-8
XPS12M
XPS97M
XPS98M
XPS59M
XM1008505-14
XM1008505-15
XM1008506
XM1008506-1
XM1008507
XM1008508
XM1008508-1
XM1008508-2
XPN07M
XPS59M
XM1008509
XM1008509-1
XPRP37M
XP80018
XM1008509-4
XM1008509-5
XPR66M
XM1008510
XM1008510-1
XM1008510-2
XM1008510-3
XM1008510-4
XPW18M
XM1008510-6
XM1008510-7
XPRP02M
XPRP02M
DESCRIPTION
TOP HOUSING
HEX NUT M32-2
FLAT WASHER 35MM
BEVEL GEAR
FLAT WASHER 16MM
LOCK NUT M12-1.75
INNER RING 20/28
NEEDLE BEARING
CIRCUIT BREAKER SUPPORT
CIRCUIT BREAKER
CIRCUIT BREAKER COVER
HEX NUT M12-1.75
BUSHING BEARING
LIGHT TRANSMITTER
HEX SEAL BOOT
HEX NUT M12-1.75
LIFT FORK SHAFT
CRESCENT RING
BUSHING BEARING
BOTTOM HOUSING
SPECIAL SCREW
POWER CORD
CONTROL CORD
CORD CLAMP
LOCKING NUT
BOTTOM COVER
PHLP HD SCR M4-.7 X 10
HEX NUT M4-.7
PHLP HD SCR M4-.7 X 6
ADAPTOR
SPRING FOR TOP HOUSING
BEARING MOUNT
LOCK WASHER 4MM
ROLL PIN 4 X 16
SET SCREW M4-.7 X 6
LABEL
ON/OFF SWITCH
HEX NUT M12-1.75
CAP OF ON/OFF SWITCH
HEX NUT M12-1.75
CAUTION LABEL
LABEL
LABEL
PHLP HD SCR M5-.8 X 75
MICRO SWITCH ASSY
MICRO SWITCH HOLDER
SWITCH ACTUATOR
PIN ACTUATOR
MICRO SWITCH
-52-
DESCRIPTION
PHLP HD SCR M3-.5 X 30
HEX NUT M3-.5
CAPACITOR
CAM ASSEMBLY
ROLL PIN 2.5 X 16
MOTOR FIELD ASSEMBLY
ARMATURE ASSEMBLY
BRUSH
LIMIT SWITCH ASSEMBLY
HEX NUT M3-.5
HOLD PLATE
LIMIT SWITCH HOLDER
LIMIT PLATE
ACTUATOR
SPRING
LIMIT SWTCH GASKET
ACTUATOR
CONNECTING PLATE
PHLP HD SCR M3-.5 X 6
PHLP HD SCR M3-.5 X 34
PHLP HD SCR M3-.5 X 16
PHLP HD SCR M3-.5 X 14
MICRO SWITCH
CRESCENT RING
BRUSH HOLDER
BRUSH CAP
ON/OFF NAMPLATE
MICRO SWITCH ASSEMBLY
MICRO SWITCH HOLDER
MICRO SWITCH
HEX NUT M3-.5
PHLP HD SCR M3-.5 X 14
DRIVE GEAR ASSEMBLY
DRIVE GEAR SHAFT
ROLL PIN 3 X 14
BALL BEARING 80018
DRIVE GEAR
SPACER
INT RETAINING RING 25MM
LIFT FORK ASSEMBLY
DRIVING SHAFT
SHAFT MOUNT
SPRING
CLUTCH
FLAT WASHER 18MM
BEARING COVER
BEARING
ROLL PIN 3 X 16
ROLL PIN 3 X 16
M1008/M1009 Mill
Power Feed Parts List (continued)
REF
PART #
511-1
511-2
511-3
512-1
512-2
512-2
512-3
512-4
513
513-1
513-2
513-3
513-4
513-5
514-1
514-2
514-3
514-4
514-5
515
515-1
XM1008511-1
XM1008511-2
XM1008511-3
XM1008512-1
XM1008512-2
XM1008512-2
XM1008512-3
XPSS04M
XM1008513
XM1008513-1
XPW21M
XM1008513-3
XM1008513-4
XPR29M
XM1008514-1
XM1008514-2
XM1008514-3
XPW05M
XPS17M
XM1008515
XM1008515-1
REF
PART #
515-2
515-3
515-4
516
517
518
518-1
518-2
518-3
518-4
518-5
518-6
518-7
519
519-1
519-2
519-3
512-1-1
512-1-2
514-1-1
514-1-2
XM1008515-2
XM1008515-3
XPEC13M
XM1008516
XM1008517
XM1008518
XM1008518-1
XM1008518-2
XM1008518-3
XM1008518-4
XPB07M
XM1008518-6
XPR39M
XM1008519
XM1008519-1
XM1008519-2
XPSS49M
XM1008512-1-1
XM1008512-1-2
XPN03M
XM1008514-1-2
DESCRIPTION
LIFTFORK
LIFTFORK RING
PIN, LIFTFORK RING 3 X 14
X CONTROL HANDLE ASSY
Y,Z CONTROL HANDLE ASSY
CONTROL HANDLE
HANDLE KNOB M8-1.25
SET SCREW M6-1 X 12
ZYTEL GEAR ASSEMBLY
ZYTEL GEAR WITHOUT HUB
FLAT WASHER 32MM
HUB OF ZYTEL GEAR
LOCK WASHER 38MM
INT RETAINING RING 32MM
POTENTIOMETER ASSEMBLY
POTENTIOMETER RING
POTENTIOMETER STRAIN
FLAT WASHER 4MM
PHLP HD SCR M4-.7 X 6
RAPID SWITCH BUTTON
RAPID SWITCH PLUNGER
DESCRIPTION
RAPID SWITCH HOUSING
SPRING FOR RAPID SWITCH
E-CLIP 5MM
CIRCUIT BOARD ASSEMBLY
CIRCUIT BOARD INSULATOR
TRAVEL STOP ASSEMBLY
TRAVEL STOP
TRAVEL STOP BASE
TRAVEL STOP SHAFT
SPRING
HEX BOLT M8-1.25 X 25
SPACER
EXT RETAINING RING 8MM
SPEED CONTROL KNOB ASSY
SPEED CONTROL KNOB M6-1
SPEED CONTROL LABEL
SET SCREW M4-.7 X 16
X CONTROL HANDLE DISC
Y,Z CONTROL HANDLE DISC
HEX NUT M8-1.25
POTENTIOMETER WASHER
PARTS
-53-
M1008/M1009 Mill
M1008 Electrical Components Breakdown
���
���
���
���
���
���
���
���
�����
�����
�����
���
�����
���
���
���
���
���
���
���
���
���
���
���
���
���
���
���
���
���
���
���
���
���
���
��� ���
���
���
���
���
���
���
PARTS
���
���
-54-
���
M1008/M1009 Mill
M1008 Electrical Components Parts List
REF
PART #
601
601-1
601-2
601-3
601-4
602
603
604
605
606
607
608
609
610
611
612
613
614
615
616
617
XM1008601
XM1008601-1
XM1008601-2
XM1008601-3
XPS55M
XPSB01M
XM1008603
XPLW01M
XPN06M
XPSB01M
XPLW01M
XM1008608
XM1008609
XM1008610
XM1008611
XM1008612
XPFH31M
XPS08M
XPLW01M
XPW02M
XM1008617
REF
PART #
618
619
620
621
622
623
624
625
626
627
628
629
630
631
632
633
634
635
636
637
XM1008618
XM1008619
XM1008620
XM1008621
XPSB33M
XM1008623
XPS09M
XM1008625
XM1008626
XM1008627
XM1008628
XM1008629
XM1008630
XM1008631
XM1008632
XM1008633
XM1008634
XM1008635
XM1008636
XM1008637
DESCRIPTION
HALOGEN LAMP
BULB
BULB COVER
BULB COVER RETAINER
PHLP HD SCR M3-.5 X 10
CAP SCREW M6-1 x 16
LAMP MOUNTING BRACKET
LOCK WASHER 5MM
HEX NUT M5-.8
CAP SCREW M6-1 x 16
LOCK WASHER 5MM
CONDUIT 20MM
CONDUIT 15MM
STRAIN RELIEF 20MM
STRAIN RELIEF 25MM
VERTICAL SWITCH BOX COVER
FLAT HD SCR M4-.7 X 8
PHLP HD SCR M5-.8 X 12
LOCK WASHER 5MM
FLAT WASHER 5MM
VERTICAL SWITCH BOX
DESCRIPTION
VERT SPINDLE SWITCH M4D035
COOLANT PUMP SWITCH M2C005
E-STOP BUTTON LAY3-02ZS/1
MAIN WIRING BOX W/LATCH
CAP SCREW M5-.8 X 12
ELECTRICAL BOARD
PHLP HD SCR M5-.8 X 10
CONTACTOR CJX1-32/22 24V
RELAY JR16-20/3D 6.8-11A
RELAY JR16-20/3D 0.32-0.5A
CIRCUIT BREAKER DZ47-63(1P,3A)
MAIN TERMINAL BAR (2 PC.)
PUMP CAPACITOR 2MFD 450VAC
GROUNDING TERMINAL BAR
TRANSFORMER
MAIN SWITCH W/KNOB
STRAIN RELIEF 6.5MM
STRAIN RELIEF 15MM
STRAIN RELIEF 13MM
CONDUIT 10MM
PARTS
-55-
M1008/M1009 Mill
M1009 Electrical Components Breakdown
���
���
���
���
���
�����
���
�����
�����
���
���
�����
���
���
���
���
���
���
���
���
��� ���
���
���
���
���
���
���
���
���
���
���
���
���
���
���
���
���
���
���
���
���
���
���
��� ���
���
���
���
���
���
���
���
PARTS
���
���
���
-56-
M1008/M1009 Mill
M1009 Electrical Components Parts List
REF
PART #
601
601-1
601-2
601-3
601-4
602
603
604
605
606
607
608
609
610
611
612
613
614
615
616
617
618
619
620
621
622
XM1008601
XM1008601-1
XM1008601-2
XM1008601-3
XPS55M
XPSB33M
XM1008603
XM1008604
XPN06M
XM1008606
XPLW01M
XM1008608
XM1008609
XM1008610
XM1008611
XM1008612
XPFH31M
XPS08M
XPLW01M
XPW02M
XM1009617
XM1008618
XM1008619
XM1008609
XM1008610
XM1009622
REF
PART #
623
624
625
626
627
628
629
630
631
632
633
634
635
636
637
638
639
640
641
642
643
644
645
646
647
648
XM1008623
XPW02M
XPLW01M
XPSB33M
XPS07M
XM1009628
XM1008618
XM1008620
XPLW01M
XPS09M
XM1009633
XPS09M
XM1008625
XM1008626
XM1008626
XM1008627
XM1008629
XM1008630
XM1008631
XM1008632
XM1008633
XM1008634
XM1008635
XM1008636
XM1008637
XM1008628
DESCRIPTION
HALOGEN LAMP
BULB
BULB COVER
BULB COVER RETAINER
PHLP HD SCR M3-.5 X 10
CAP SCREW M5-.8 X 12
LAMP MOUNTING BRACKET
LOCK WASHER 5MM
HEX NUT M5-.8
CAP SCREW M5
LOCK WASHER 5MM
CONDUIT 20MM
CONDUIT 15MM
STRAIN RELIEF 20MM
STRAIN RELIEF 25MM
VERTICAL SWITCH BOX COVER
FLAT HD SCR M4-.7 X 8
PHLP HD SCR M5-.8 X 12
LOCK WASHER 5MM
FLAT WASHER 5MM
VERTICAL SWITCH BOX
VERT SPINDLE SWITCH M4D035
COOLANT PUMP SWITCH M2C005
CONDUIT 15MM
STRAIN RELIEF 20MM
HORIZONTAL SWITCH BOX
DESCRIPTION
MAIN WIRING BOX W/LATCH
FLAT WASHER 5MM
LOCK WASHER 5MM
CAP SCREW M5-.8 X 12
PHLP HD SCR M4-.7 X 8
HORZ SWITCH BOX COVER
HORIZ SPINDLE SWITCH M4D035
E-STOP BUTTON LAY3-02ZS/1
LOCK WASHER 5MM
PHLP HD SCR M5-.8 X 10
ELECTRICAL BOARD
PHLP HD SCR M5-.8 X 10
CONTACTOR CJX1-32/22 24V
RELAY JR16-20/3D 6.8-11A
RELAY JR16-20/3D 6.8-11A
RELAY JR16-20/3D 0.32-0.5A
MAIN TERMINAL BAR (2 PC.)
PUMP CAPACITOR 2MFD 450VAC
GROUNDING TERMINAL BAR
TRANSFORMER
MAIN SWITCH W/KNOB
STRAIN RELIEF 6.5MM
STRAIN RELIEF 15MM
STRAIN RELIEF 13MM
CONDUIT 10MM
CIRCUIT BREAKER DZ47-63(1P,3A)
PARTS
-57-
M1008/M1009 Mill
Warranty
Woodstock International, Inc. warrants all SHOP FOX® machinery to be free of defects from workmanship and materials for a period of 2 years from the date of original purchase by the original owner.
This warranty does not apply to defects due directly or indirectly to misuse, abuse, negligence or
accidents, lack of maintenance, or to repairs or alterations made or specifically authorized by anyone
other than Woodstock International, Inc.
Woodstock International, Inc. will repair or replace, at its expense and at its option, the SHOP FOX®
machine or machine part which in normal use has proven to be defective, provided that the original
owner returns the product prepaid to the SHOP FOX® factory service center or authorized repair
facility designated by our Bellingham, WA office, with proof of their purchase of the product within 2
years, and provides Woodstock International, Inc. reasonable opportunity to verify the alleged defect
through inspection. If it is determined there is no defect, or that the defect resulted from causes not
within the scope of Woodstock International Inc.'s warranty, then the original owner must bear the
cost of storing and returning the product.
This is Woodstock International, Inc.'s sole written warranty and any and all warranties that may be
implied by law, including any merchantability or fitness, for any particular purpose, are hereby limited
to the duration of this written warranty. We do not warrant that SHOP FOX® machinery complies
with the provisions of any law or acts. In no event shall Woodstock International, Inc.'s liability under
this warranty exceed the purchase price paid for the product, and any legal actions brought against
Woodstock International, Inc. shall be tried in the State of Washington, County of Whatcom. We shall
in no event be liable for death, injuries to persons or property or for incidental, contingent, special or
consequential damages arising from the use of our products.
Every effort has been made to ensure that all SHOP FOX® machinery meets high quality and durability standards. We reserve the right to change specifications at any time because of our commitment to
continuously improve the quality of our products.
M1008/M1009 Mill
WARRANTY REGISTRATION
Name ___________________________________________________________________________________
Street __________________________________________________________________________________
City _________________________ State ___________________________Zip ________________________
Phone # ______________________ Email __________________________Invoice # ___________________
Model #_________Serial #______________Dealer Name_________________Purchase Date___________
CUT ALONG DOTTED LINE
The following information is given on a voluntary basis. It will be used for marketing purposes to help us develop better products and services. Of course, all information is strictly confidential.
1.
How did you learn about us?
_____ Advertisement
_____ Mail Order Catalog
2.
How long have you been a woodworker/metalworker?
_____ 0-2 Years
_____ 2-8 Years
____ 8-20 Years
_____ 20+ Years
3.
How many of your machines or tools are Shop Fox®?
_____ 0-2
_____ 3-5
____ 6-9
_____ 10+
4.
Do you think your machine represents a good value?
_____ Yes
____ No
5.
Would you recommend Shop Fox® products to a friend? _____ Yes
____ No
6.
What is your age group?
_____ 20-29
_____ 50-59
7.
What is your annual household income?
_____ $20,000-$29,000
____ $30,000-$39,000
_____ $50,000-$59,000
____ $60,000-$69,000
8.
Which of the following magazines do you subscribe to?
____
____
____
____
____
____
____
____
____
____
9.
Cabinet Maker
Family Handyman
Hand Loader
Handy
Home Shop Machinist
Journal of Light Cont.
Live Steam
Model Airplane News
Modeltec
Old House Journal
____ Friend
____ Website
____ Local Store
____ Other:
____ 30-39
____ 60-69
____
____
____
____
____
____
____
____
____
____
Popular Mechanics
Popular Science
Popular Woodworking
Practical Homeowner
Precision Shooter
Projects in Metal
RC Modeler
Rifle
Shop Notes
Shotgun News
____ 40-49
____ 70+
____ $40,000-$49,000
____ $70,000+
____
____
____
____
____
____
____
____
____
Today’s Homeowner
Wood
Wooden Boat
Woodshop News
Woodsmith
Woodwork
Woodworker West
Woodworker’s Journal
Other:
Comments:__________________________________________________________________
_____________________________________________________________________________
_____________________________________________________________________________
_____________________________________________________________________________
_____________________________________________________________________________
FOLD ALONG DOTTED LINE
Place
Stamp
Here
WOODSTOCK INTERNATIONAL INC.
P.O. BOX 2309
BELLINGHAM, WA 98227-2309
FOLD ALONG DOTTED LINE
TAPE ALONG EDGES--PLEASE DO NOT STAPLE