1
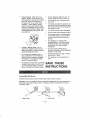
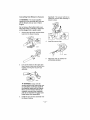
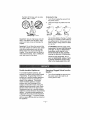
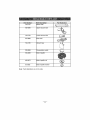
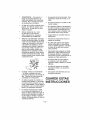
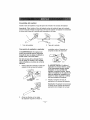
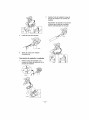
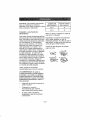
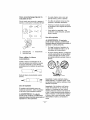
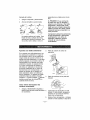
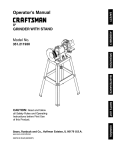
Operator's
Manual
_CRRFTSMRN
ELECTRIC
LOWER/VAC
225 mph Blower/375
Model
No.
cfm Vac
136.748270
G006299
• English
,A CAUTION:
Before using this product, read
this manual and follow all its Safety Rules and
Operating Instructions,
Sears,
Roebuck
© 2007
3358-491 Rev C
and Co,
Hoffmann
Estates,
IL 60179
° EspaSol
USA.
Printed in the USA.
All Rights Reserved
Warranty .............................................................
2 Service ........................................................... 7
Safety ........................................................
2 Storage .......................................................... 8
Setup .....................................................................
3 Troubleshooting ............................................ 8
Operation ...................................................... 5 ReptaceableParts List ................................. 9
Two Year Full Warranty on Craftsman
Electric
BlowerNac
When used and maintained according to the operator's manual, if this product fails due to
a defect in material or workmanship within two years from the date of purchase, return it
to any Sears store or other Craftsman outlet in the United States for free replacement
This warranty applies for onty 30 days from the date of purchase if this product is used for
commercial or rental purposes This warranty gives you specific legal rights, and you
may also have other rights which vary from state to state,
Sears, Roebuck
and Co., Hoffman Estates,
IL 60179
iMPORTANT SAFETY iNSTRUCTiONS
When using an electdcaI appliance, basic precautions should always be followed,
including the following:
READ ALL INSTRUCTIONS
THIS APPLIANCE
BEFORE USING
WAR NING- oreduce
the
rs, koffire,
electric
shock,
or injury,
follow
these
safety instructions
To ensure maximum safety, best
performance, and to gain knowledge of
the appliance, it is essential that you
or any other operator of the appliance
read and understand the contents of this
manual before operating the appliance Pay
particular attention to the safety alert symbol
A_, which means CAUTION, WARNING or
DANGER-personal safety instruction Read
and understand the instruction because it
has to do with safety Failure to comply
with these instructions
may result in
personal injury, risk of fire, or electrical
shock
°
°
Do not leave the appliance when
plugged in, Unplug from outlet when
not in use and before servicing
WARNING-To reduce the risk of electric
shock, do not use the appliance on
wet surfaces Do not expose it to rain
Store it indoors,
=
Do not allow appliance to be used as a
toy Do not use near children Do not
let children use the appliance_
•
Use only as described in this manual
Use only manufacturer's recommended
attachments
Dressproperly.Keephair,loose
°
clothing,
fingers,
andallpartsofthe
bodyawayfromopenings
andmoving "
parts.Beawareoftheposition
of
theblower
and the air inlets during
operation.. Loose clothing, jewelry
and hair can be drawn into the inlets
(refer to the following figure) and may
result in personal injury. Always wear
substantial footwear, long pants, and
eye protection.
Caution--Moving
Parts--do
not
operate the appliance without the air
inlet guard in place. Refer to Setup for
proper assembly instructions..
Do not use with damaged cord or
plug.. If appliance is not working as it
should, has been dropped, damaged,
left outdoors, or dropped into water,
return it to a service dealer_
Do not pult or carry by cord, usecordas
a handle, close a door on cord, or pull
cord around sharp edges or corners,,
Keep cord away from heated surfaces,,
Assembling
Do not unplug by pulling on cord. To
unplug, grasp the plug, not the cord
Do not handle plug or appliance with
wet hands..
°
Do not put any object into openings. Do
not use with any opening blocked; keep
free of dust, lint, hair, and anything that
may reduce air flow
"
°
Turn off all controls before unplugging
Use extra care when cleaning on stairs.
•
Do not use to vacuum up flammable or
combustible liquids, such as gasoline,
or use in areas where they may be
present
•
This appliance is provided with
double insulation.. Use only identical
replacement parts,. See instructions
for servicing of Double-lnsulated
Appliances.
Do not vacuum anything that is
burning or smoking, such as cigarettes,
matches, or hot ashes.
•
"
Do not use without vac bag or proper
attachments in place..
°
This appliance is for household use
only
SAVE THESE
INSTRUCTIONS
the Blower
Install the blower tube and then the inlet cover onto the blower housing
Important: You must install the b!ower tube before installing the inlet cover because the
inlet cover hooks onto the blower tube. The blower will not run unless the inlet cover
is locked in place.
I
Blower tube
2.
Inlet cover
Converting
from Blower to Vacuum
Important: The vacuum will not run
unless the vacuum tube assembly is
locked in place,
A WARNING:
The motor impeller
rotates for a few seconds after you turn
off the blower and can cut or injure
fingers°
Do not remove the bottom inlet cover
when the motor is running or when the
unit is plugged into a power outlet.
1.
2
Remove the inlet cover and the blower
tube from the blower housing,
Line up the arrows on the upper and
lower vacuum tubes and connect them
together, forming the vacuum tube
assembly
A WARNING:
If you run the
vacuum without the lower tube, you
or bystanders could get caught in
the impeller blades and be injured..
Never run the blower without the
complete vacuum tube assembly
and do not separate the upper and
lower tubes once assembled,.
3,.
Install the vacuum tube assembly onto
the blower housing
4..
Install the vacuum bag,,
5.
Adjust the strap as needed for
comfortable operation,,
Converting
1..
from Vacuum to Blower
Remove the vacuum bag and the
vacuum tube assembly from the blower
housing°
2
Install the blower tube and then the
inlet cover onto the blower housing.
Important: The blower will not run
unless the bottom inlet cover is locked
in place.
Important: This blower is intended for
outdoor, residential use only Do not use
it indoors or for commercial or industrial
purposes..
the appliance or extension cord plug in any
way..
Connecting
_, WARNING:
If you do not fully seat
the extension cord on the inlet plug, or
if the plug and cord do not fit firmly, the
loose plug could lead to overheating
and cause a fire, possibly burning you
or others.
to a Power Source
To reduce the dsk of electric shock, this
appliance has a polarized plug (Le, one
blade is wider than the other). Use only
a polarized, UL listed extension cord
recommended for outdoor use.. A polarized
plug wilt fit in a polarized cord only one
way. if the plug does not fit fully in the
cord, reverse the cord If it still does not fit,
purchase a polarized extension cor& If you
have a polarized extension cord and the
extension cord phJg does not fit fuily into the
wall receptacle, reverse the plug. if it still
does not fit, contact a qualified electrician
to install the proper outlet Do not change
Use only an extension cord recommended
for outdoor use.
Ensure that you fully seat the cord on
the plug.
Check the connection regularly to
ensure that the cord is firmly attached.
Do not use a worn-out or loose
extension cord.
Extension
Cord
Length
Minimum Wire
Gage (AoWoG.)
100 ft
14
!50 ft
I2
Using the Concentrator
Accessory
Nozzle
lnstall the concentrator nozzle into the
blower tube to help reach into narrow
spaces or to remove matted debris from
hard surfaces.
Note: Do not use an extension cord over
150 feet.
Important:
Check the extension cord
frequently during use for holes in the
insulation. Do not use a damaged cord. Do
not run the cord through standing water or
wet grass..
Remove the concentrator
finished
nozzle when
Connect the extension cord to the blower
as shown.
I
Using the Blower
2
The blower is intended for residential use
only, Use the blower outdoors to move
debris as needed
A WARNING:
The blower can throw
debris, possibly causing serious
personal injury to the operator or
bystanders.
Sta_inglStopping/A_ustingthe
Speed
Rotatethe
speed..
knobtoturn
Air
"
Do not blow hard objects such as nails,
bolts, or rocks..
Do not operate the blower near
bystanders or pets
on, off, ora_ustair
Use extra care when cleaning debris
from stairs or other tight areas
I
Wear safety goggles or other suitable
eye protection, long pants, and shoes..
C3 =--_
2
Using the Vacuum
o _
t.
High
speed
2.
LOW
speed
C3I!
_, WARNING:
The vacuum can throw
debris, possibly causing serious
personal injury to the operator or
bystanders.
3.
Off
=
Do not operate the vacuum without the
bag installed or with the bag zipper
open..
•
Do not vacuum sharp, pointed, or hard
objects that could be thrown through
thefabricofthebag,suchaswires,
staples,
nails,orrocks
Emptying
theBag
1.
Turn off and unplug the vacuum from
the power source..
2.
Unzip and empty any debris from the
bag.
•
_
_._ _,
Do not store debris in the bag., To clean
the bag, turn it inside out and shake out
any excess debris, Once a year, hand
wash the bag in soapy water and allow
it to air dry
Important:
Vacuum
onlyleaves
andsoft
items.Harditemssuchassticks,rocks,
acorns,
andpinecones
willdamage
the
impeller
Important:
Donotforcethevacuum
tube
intoapileofdebris
orholdthetubeupright
whileforcefeeding
debrisintothetube.
Eitheractionmaycloganddamage
the
impellerIfthevacuum
startstovibrate
or
makeabnormal
noise,
stopit,unplugthe
cord,andcheckforthecause,
_t, DANGER:
Normal usage of the
bag causes it to wear and deteriorate
over time, A worn or deteriorated
bag allows small objects to be
thrown through the bag, possibly
injuring the operator or bystanders°
Check the bag frequently.
If it is
worn or deteriorated, replace it with
a genuine Craftsman vacuum bag;
refer to the Replaceable Parts List.
Double*insulated
Appliances
Removing Clogged
Impeller
tn a double-insulated appliance, two
systems of insulation are provided instead
of grounding. No grounding means is
provided on a double-insulated appliance,
nor should a means for grounding be
added to the appliance Servicing a
double-insulated appliance requires
extreme care and knowledge of the
system, and should be done only by the
qualified service personnel at your Sears
Service Center (refer to the back cover).
Replacement parts for a double-insulated
appliance must be identical to the parts they
replace. A double-insulated appliance is
marked with the words "Double Insulation"
or "Double Insulated.." The symbol (square
within a square) [] may also be marked on
the appliance.
I.,
7
Debris from the
Turn off and unplug the vacuum from
the power source and wait for all
moving parts to stop.,
2
Remove the vacuum tube assembly.,
3
Remove the debris from impeller
Mades..
4
Check the impeller for any signs of
damager If it is damaged, contact your
Sear Service Center (refer to the back
cover).
5_
Install the vacuum tube or, if you want
to switch to blower mode, the bottom
inlet cover, Refer to Converting from
Blower to Vacuum or Converting from
Vacuum to Blower for more information.
Store the blowedvacuum and extension cord indoors, in a cool dry location, out of reach
of children and animals..
Problem
Appliance does not
operate.,
Possible
t
Cause
Switch is in the Off
position..
2
The inlet cover or vac
tube is not locked in
place..
3. The power cord is
disconnected,
4.. Mechanical failure
Appliance vibrates
abnormally, makes an
abnormal noise, or the
impeller does not turn
freely
Corrective
1,,
Turn the switch to On,
2., Ensure that the bottom
inlet cover or vacuum
tube is locked in place,
3, Ensure that the
extension cord is fully
connected to the blower
and the power supply,
4, Contact Sears Service
(see back cover),
1. Debris is caught in the
impeller
2, Mechanical failure
Action
Turn off the appliance,
disconnect the power
supply and, remove the
debris from the impeller
(refer to Removing
Clogged Debris from
the Impeller)
2
Contact Sears Service
(see back cover),.
Part Number
114-9151
Part Description
Part illustration
Blower tube
t00-9066
Upper vacuum tube
I14-9154
Lower vacuum tube
107-9989
Inlet cover
114-9155
Vacuum
100-9069
Concentrator nozzle
100-9068
Motor impeller
t00-9075
Motor impeller nut
93-0585
Motor impeller washer
bag
Note: Parts illustrations are not to scale,
%
½
I0
Garantia .....................................................
t
Seguridad ..........................................................
I
Montaje ...............................................................
3
Operaci6n ...................................................... 5
Mantenimiento ..............................................7
Almacenamiento .............................................8
Soluci6ndeproblemas
.............................. 8
Listas de piezas recambiables .................. 9
Garantia comp|eta de dos afios sobre el SopladodAspirador
el6ctrico
Craff_man
Siempre que se utilice y mantenga de acuerdo con las indicaciones del Manual def
operador, si este producto falia debido a un defecto de materiales o de mano de obra en
el plazo de dos aRos a partir de la fecha de la compra, devuetvalo a cualquier almac_n
de Sears o a otro punto de venta de Craftsman de los Estades Unidos y ser_fisustituido
sin cargo alguno. Esta garantia es aplicable _nicamente durante 30 dias a partir de fa
fecha de fa compra, si el producto se utiliza con fines de alquifer o comerciales.. Esta
garantia le otorga a usted derechos legales especificos; es posible que usted tenga otros
derechos que varian de un estado a otro.
Sears, Roebuck
and Co,,, Hoffman
Estates,
INSTRUCCIONES
MPORTANTES
IL 60179
DE SEGURmDAD
AI utilizar un aparato el_ctrico, debe tomar siempre unas precauciones
incluyendo las siguientes:
LEA TODAS LAS INSTRUCCIONES
UTILIZAR
b_sicas,
ANTES DE
ESTE APARATO
ADVE RTEN ClA-Paroreducir
el6ctrica o lesi6n, siga estas instrucciones
Para asegurar la m_xima seguridad,
el mejor rendimiento, y para adquirir
conocimientos sobre el producto, es
imprescindible que usted y cualquier
otra persona que opere la m_quina lea y
comprenda el contenido de este manual
antes de porter en marcha el aparato,
Preste atenciOn especial al simbolo de
alerta de seguridad ,t_ que significa
CUIDADO, ADVERTENCIA o PELIGRO -
el riesgo de incendio, descarga
de seguridad.
instrucci6n de seguridad personal, Lea y
comprenda la instrucci6n porque tiene que
ver con su seguridad. El incumplimiento
de estas instrucciones
puede dar fugar a
lesiones corporales, riesgo de incendio,
o descarga el_ctrica..
"
No deje el aparato sin supervisar
mientras est& enchufadoo
Desencht]felo cuando no se est6
utilizando y antes del mantenimiento.
ADVERTENClA
- Parareducir
el
riesgodedescarga
el_ctrica,
no
utiliceesteaparato
sobresuperficies
ht_medas
NoIoe×ponga
a lalluvia
Notoalmacene
enelexterior..
Nodejequeseutiiiceelaparato
como
juguete.Noutiliceelaparato
cerca
delosniSos.NodejequelosniSos
utilicen
elaparato
Utilicelo
solamente
taly como
sedescribe
enestemanual..
Utilicesolamente
losaccesorios
recomendados
porelfabricante..
Utilicela ropaadecuada.
Mantenga "
elpeto,lasprendas
sueltas,
losdodos
ytodoel cuerpo alejados de aberturas
y piezas en movimiento.. Est6 atento
a la posici6n def soplador y de los
entradas de aire durante la operaci6n.
Las prendas sueltas, las joyas y el
polo, si est&n sueltos, pueden ser
aspirados en tas entradas (consulte
la ilustraci6n siguiente), to que puede
resultar en lesiones personales Lleve
siempre calzado fuerte, pantat6n largo
y protecci6n ocular.
No desenchufe tirando del cable Para
desenchufar, sujete el enchufe, no el
cable
No toque el enchufe ni el cable con los
manos mojadas
No introduzca obietos en las aberturas.
No utilice el aparato si atguna abertura
est& bloqueada; mant6ngalo libre de
polvo, pelusas, pelos y cualquier cosa
que pudiera reducir el flujo de aire.
Apague todos los controles antes de
desenchufar.
Extreme tas precauciones
aparato en escaleras.
al usar el
o
No utilice este aparato para aspirar
tiquidos inflamables o combustibles,
como por ejemplo gasolina, ni Io utilice
en zonas en las que 6stos podrian
estar presentes.
•
Este aparato est_ equipado con doble
aislamiento. Utilice solamente piezas
de repuesto identicas. Consulte las
instrucciones para el mantenimiento de
Aparatos con doble aislamiento..
No aspire nada que est6 ardiendo
o humeando, como por ejemplo
cigarrillos, ceritlas o f6sforos, o cenizas
calientes.
No utilice et aparato sin que est_n
colocados la bolsa o los accesorios
adecuados.
J
CuidadoPiezas en movimiento
- no utilice el aparato sin tenor
colocado el protector de la entrada de
aire. Consulte los instrucciones de
ensamblaje en ConfiguraciSn.
"
No utilice el aparato si e! cable o el
enchufe est_n daSados.. Si el aparato
no funciona como es debido, si se ha
catdo, si esta da£_ado, si se ha dejado a
la intemperie, o si se ha caido al agua,
ll_velo a un distribuidor autorizado.
No arrastre el aparato por el cable;
no io transporte sujetandolo por el
cable; no utilice el cable como asa; no
cierre la puerto atrapando el cable; no
tire del cable por bordes o esquinas
afilados. Mantenga alejado el cable de
superficies calientes
Este aparato est& diser_ado para uso
dom6stico sotamente.
GUARDE ESTAS
INSTRUCCIONES
Ensamblaje
del soplador
Instale el tubo del soplador y luego la tapa de la entrada en la carcasa del soplador
tmportante:
Debe instalar et tubo del soplador antes de instalar la tapa de la entrada
porque la tapa de entrada se engancha en el tubo del soplador El soplador no funcionara
a menos que la tapa de la entrada est6 bloqueada en su lugar
1
Tubo del soplador
Conversi6n
2
con_ctelos entre si formando un
conjunto de tubos de aspiraci6n
de soplador a aspirador
,& ADVERTENClA:
El impulsor del
motor gira durante algunos segundos
despu6s de que se apaga el soplador,
puede cortar o herir los dedos.
Tapa de la entrada
y
No retire la tapa de la entrada inferior
con el motor en marcha o si la unidad
est_ enchufada a una toma de corriente
el6ctrica.
1
,& ADVERTENCIA:
Si utiliza el
aspirador sin el tubo inferior, usted
o los transetintes pueden quedar
atrapados en las cuchillas del
impulsor y resultar heridoso Nunca
utilice el soplador sin el conjunto de
tubos de aspiraci6n completo y no
separe los tubos superior e inferior
una vez montado el conjuntoo
Retire Zatapa de la entrada y el tubo del
soplador de Ia carcasa del soplador
3,,
instale el conjunto de tubo de
aspiraciOn en la carcasa del soplador
Importante: El aspirador no funcionara
a menos que el conjunto de tubos de
aspiraciOn este encajado en su lugar,
2,
Alinee las flechas en los tubos
de aspiraciSn superior e inferior y
2
lnstale el tubo del soplador y luego la
tapa de la entrada en la carcasa del
soplador.
Importante:
El soplador no funcionar_
a menos que la tapa de la entrada
inferior est6 bloqueada en su lugar,
G0057;
4,
..
Instale la bolsa del aspirador
Ajuste la correa para trabajar
c6modamente,
Conversi6n
1..
de aspirador
a soplador
Retire la bolsa del aspirador y el
conjunto de tubas de aspiraci6n de la
carcasa del soplador
4
Importante:
Este soplador est& diser_ado
para uso residencial en exteriores
solamente No Io utilice en interiores o para
fines comerciales o industriates..
Conexi6n a una fuente de
alimentacibn
Utilice t_nicamente alargadores
recomendados para su uso en exteriores
_& ADVERTENCIA:
Si usted no
conecta firmemente el cable alargador
al enchufe, o si el cable y la clavija no
encajan firmemente, el enchufe suelto
podria calentarse y causar un incendio,
posibtemente quem&ndole a usted o a
otras personas.
Asegurese de conectarfirmemente
cable al enchufe
el
Compruebe la conexi6n
frecuentemente para confirmar
que el cable est_ firmemente sujeto..
No utilice cables alargadores
desgastados o que no se enchufen
correctamente
Secci6n minima
det conductor
30 m
44
45 m
t2
Nota: No utilice un atargador de cable de
mrs de 45 m (150 pies),
Para reducir el riesgo de descarga electrica,
este aparato tiene una clavija polarizada (es
decir, una patitla es m&s ancha que la otra).
Utilice t3nicamente alargadores polarizados
con homologaci6n UL recomendados
para su uso en exteriores. Un enchufe
polarizado s61o puede conectarse a un
cable potarizado en un sentido_ Si el
enchufe no se acopla perfectamente al
cable, dele la vuelta al cable. Si todavia no
es posible conectarlo, compre un alargador
de cable potarizado.. Si usted tiene un
alargador de cable polarizado y la clavija
no se acopla perfectamente al enchufe de
pared, dele la vuelta a la clavija. Si todavia
no es posible conectarlo, p6ngase en
contacto con un electricista cualificado para
que instale una base de enchufe adecuada.
No modifique de ninguna manera el aparato
o el enchufe del cable alargador.
°
Longitud del
cable alargador
lmportante:
Compruebe frecuentemente
que el cable alargador no tiene el
aislamiento pefforado. No utilice el cable si
est_ daSado,, No deje que el cable pase por
zonas de agua o hierba ht]meda,
Conecte el cable alargador al soplador
segt)n se indica.
C6mo encender/apagar/ajustar
velocidad dei aire
la
No sople objetos duros como por
ejemplo clavos, pemos o piedraso
No utilice el soplador cerca de otras
personas o animales dom_sticos,
Gire el mando para encender o apagar el
aparato, o para ajustar la velocidad del aire
Extreme el cuidado al soplar residuos
en esca]eras u otros lugares de espacio
reducido
i
Lleve gafas de seguridad u otra
protecci6n ocular adecuada, pantal6n
largo y zapatos,,
C3_1
Uso del aspirador
ADVER]'ENCIA:
El aspirador
puede arrojar residuos, posiblemente
causando graves lesiones personales
operador o a otras personas,,
•
t,
2
Velocidad alta
Velocidad baja
3,
Desactivado
al
No haga funcionar el aspirador sin
que est6 instalada la bolsa o con la
cremallera de la bolsa abierta,
No aspire objetos afilados, puntiagudos
o duros que pudieran set proyectados
a tray,s del tejido de la bolsa, como
por ejemplo alambres, grapas, clavos o
piedras
C6mo utilizar la tobera
concentradora
lnstale la tobera concentradora en el
tubo del soplador para facilitar el acceso
a espacios reducidos o para eliminar
acumufaciones de residuos de superficies
duras,
Retire la tobera concenlradora
termine
cuando
_'_G00628!
Importante:
Aspire solamente hojas y
objetos blandos, Los objetos duros, como
por ejemp!o palos, piedras, bellotas y pifias
dafiar_n el impulsor,
Uso del soplador
Importante:
No introduzca a la fuerza
el tubo del aspirador en un mont6n de
residuos, ni mantenga el tubo vertical
mientras introduce residuos a la fuerza en
el tubo,, Ambas acciones pueden atascar y
dafiar el impulsor, Si el aspirador empieza
a vibrar o hacer ruidos anormales, parelo,
desenchufe el cable y compruebe la
El soplador est_ disefiado para uso
residencial solamente, Utilice el soplador
en el exterior para desplazar residuos
ADVERTENCIA:
El soplador
puede arrojar residuos, posiblemente
causando graves lesiones personales al
operador o a otras personas°
causa,
6
Vaciado
de ia bolsa
t
Apague el aspirador y desenchL_felo.
2
Abra la cremaliera y vacie la botsa
agua jabonosa y dejela secar at aire
libre
A PELIGRO:
Et uso normal de
la bolsa hace que se desgaste y
deteriore con el tiempo. Una bolsa
desgastada o deteriorada puede
dejar que sean arrojados pequeSos
objetos a trav6s de la bolsa, quiz_s
causando lesiones al operador o a
otras personas.
Compruebe la bolsa frecuentementeo
Si est_ desgastada o deteriorada,
sustitt'Jyala por una botsa de
aspirador Craftsman genuina;
consulte la Lista de piezas
recambiableso
No guarde residuos en la bolsa. Para
limpiar la bolsa, vu_lvaIa del rev_s y
sacuda para vaciarla de residuos Una
vez al aSo, lave la bolsa a mano en
Aparatos
con doble aislamiento
En un aparato con doble aislamiento, hay
dos sistemas de aislamiento en lugar de
una conexi6n a tierra No se proporciona
ningQn medio de conexi6n a tierra en un
aparato con doble aislamiento, y no se debe
aSadir al aparato una conexi6n a tierra El
mantenimiento de un aparato con dobie
aislamiento requiere un cuidado extremo
y un buen conocimiento del sistema, y
s61o debe ser realizado pot el personal
de sepJicio cualificado de su Centro de
Servicio Sears (ver contraportada)
Las
piezas de repuesto de un aparato con
doble aislamiento deben ser id&nticas a
las que sustituyen Un aparato con doble
aislamiento Ileva las palabras "Double
Insulation" o "Double Insulated'L El aparato
tambi_n puede Itevar el simbolo [] (un
cuadrado dentro de otro)
C6mo retirar del impulsor
residuos acumutados
I
2
Retire el conjunto de tubos de
aspiraci6n
3
Retire los residuos de las palas del
impulsor
4.
Compruebe que el impulsor no est&
daifiado Si est& daSado, p6ngase en
contacto con su Centro de Servicio
Sears (ver contraportada)_
los
Apague y desenchufe el aspirador y
espere a que se paren todas tas piezas
en movimiento
,,
7
Instale el tubo del aspirador, o si desea
cambiar a modo soptador, ta tapa de la
entrada inferior. Consulte Conversi6n
de soplador a aspirador o ConversiSn
de aspirador a soplador para mas
informaci6n,
Guarde el soplador/aspirador y el alargador de cable en el interior, en un lugar fresco y
seco, fuera det alcance de niSos y animales
Problema
El aparato no funciona
Posible
causa
Acci6n
t
El interruptor est_
en la posici6n de
Desconectado,,
1
2
La tapa de la entrada o
el tubo det aspirador no
est_ bien encajado,
2, Asegt3rese de que la
tapa de la entrada
inferior o el tubo
de aspiraci6n est_
bloqueado en su lugar:,
3
El cable de
alimentaci6n est_
desenchufado
3
Asegurese de que
el cable alargador
est_ correctamente
conectado al soplador
y a la toma de corrienle,,
4
Fallo mec&nico
4
P6ngase en contacto
con Servicio Sears (ver
contraportada),
,,,,,
E1 aparato vibra
anormalmente, hace
ruidos extraSos o
e! impulsor no gira
libremente
correctora
.......
Ponga el interruptor en
Conectado,
, ....
1. Hayresiduosatrapados
en el impulsor
I, Apague e[ aparato,
desconecte el cable
de atimentaci6n y
retire los residuos del
impulsor (consuIte
C6mo retirar del
impulsor los residuos
acumufados)
2, Fallo mec&nico
2, P6ngase en contacto
con Ser_icio Sears (ver
contrapodada)
Nomer 0 de pieza
,
!DescripciSn
de la pieza
,i
114-915I
rubo del soplador
100_9066
rubo de aspiraci6n superior
114-9154
Tubo de aspiraci6n inferior
!07-9989
Tapa de la entrada
114-9155
Bolsa del aspirador
ilust_acisn
(_._\
_E_ ._,
t.L_
L
100-9069
Boquilla concentradora
100-9068
lmpulsor del motor
100-9075
Tuerca det impulsor del
motor
93-0585
Arandela del impulsor del
motor
Nota: Ilustraciones
de piezas no a escala
de la pieza
Get it fixed, at your home or ours!
Your Home
For repair - in your home - of all major brand appliances,
lawn and garden equipment, or heating and cooling systems,
no matter who made it, no matter who sold it !
For the replacement parts, accessories and
owner's manuals that you need to do-it-yourself.
For Sears professional installation of home appliances
and items like garage door openers and water heaters.
1-800-4-MY-HOME ®
(1-800-469-4663)
Call anytime, day or night
(USA
_vosears.com
For
expert
home
and Canada)
_'_/,,se
solutions
advice:
8 rs
oca
www_managemyhome.com
Our Home
For repair of carry-in products like vacuums, lawn equipment,
and electronics, carl or go on-line for the nearest
Sears Parts & Repair Service Center
1-800-488-1222 (u s A )
1-800-469-4663 (Canada)
Call anytime, day or night
www.sears.,com
www.searSoCa
To purchase a protection agreement on a product serviced by Sears:
1-800-827-6655
(USA.)
Para pedir se_cio de reparaciSn
a domicilio, y para ordenar piezas:
1-888-SU-HOGAR®
(1-888-784-6427)
1-800-361-6665 (Canada)
Au Canada pour service en francis:
1-800-LE°FOYERMc
(1-800-53.3--6937)
WWM/.,se Brs
Ca
© Sea's Brands, LLC
® Registered Trademark / TM Trademark / ,_u Service Mark o[Sears Brands, LLC
® Marca Registrada I
Marca de F_brica /
Marca de Servicio de Sears Brands. LLC
M_
Marque de commerce / MO Marque d6pos6e de Sears Brands. LLC