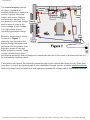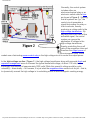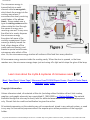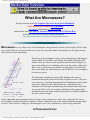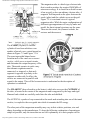
1
Howstuffworks "How Microwave Cooking Works"
Search HowStuffWorks and the Web
ComputerStuff
AutoStuff
ElectronicsStuff
ScienceStuff
HomeStuff EntertainmentStuff
HealthStuff
Main > Home > Home Appliances
Click here to go back to the normal view!
How Microwave Cooking Works
by Marshall Brain
The microwave oven is one of the great inventions of the 20th century - millions of homes in America
have one. Microwave ovens are popular because they cook food incredibly quickly. They are also
extremely efficient in their use of electricity because a microwave oven heats only the food - nothing
else.
A microwave oven uses microwaves to heat food. Microwaves are radio waves. In the case of
microwave ovens, the commonly used radio wave frequency is roughly 2,500 megahertz (2.5
gigahertz). Radio waves in this frequency range have an interesting property: they are absorbed by
water, fats and sugars. When they are absorbed they are converted directly into atomic motion - heat.
Microwaves in this frequency range have another interesting property: they are not absorbed by most
plastics, glass or ceramics. Metal reflects microwaves, which is why metal pans do not work well in a
microwave oven.
How Microwave Ovens Cook Food
You often hear that microwave ovens cook food "From the inside out." What does that mean? Here's
an explanation to help make sense of microwave cooking.
Let's say you want to bake a cake in a conventional oven. Normally you would bake a cake at 350
degrees F or so, but let's say you accidentally set the oven at 600 degrees instead of 350. What is
going to happen is that the outside of the cake will burn before the inside even gets warm. In a
conventional oven, the heat has to migrate (by conduction) from the outside of the food toward the
middle (See the HSW article entitled How a Thermos Works for a good explanation of conduction and
other heat transfer processes). You also have dry, hot air on the outside of the food evaporating
http://home.howstuffworks.com/microwave.htm/printable (1 of 2)6/7/2004 3:42:09 PM
MoneyStuff
TravelStuff
PeopleStuff
Howstuffworks "How Microwave Cooking Works"
moisture. So the outside can be crispy and brown (e.g. - bread forms a crust) while the inside is
moist.
In microwave cooking, the radio waves penetrate the food and excite water and fat molecules pretty
much evenly throughout the food. There is no "heat having to migrate toward the interior by
conduction". There is heat everywhere all at once because the molecules are all excited together.
There are limits of course. Radio waves penetrate unevenly in thick pieces of food (they don't make it
all the way to the middle), and there are also "hot spots" caused by wave interference, but you get
the idea. The whole heating process is different because you are "exciting atoms" rather than
"conducting heat".
In a microwave oven, the air in the oven is at room temperture, so there is no way to form a crust.
That is why foods like "Hot Pockets" come with a little cardboard/foil sleeve. You put the food in the
sleeve and then microwave it. The sleeve reacts to microwave energy by becoming very hot. This
exterior heat lets the crust become crispy as it would in a conventional oven.
Links
Microwave ovens are described by several interesting links on the web. Try these:
●
●
For an excellent discussion of the different parts of a microwave oven and how they work
together, click here.
For a great collection of in-depth questions and answers about microwaves, click here.
Home Store Newsletter Search Advertising Privacy Contact About Help
© 1998 - 2004 HowStuffWorks, Inc.
http://home.howstuffworks.com/microwave.htm/printable (2 of 2)6/7/2004 3:42:09 PM
Howstuffworks
Search
The website below is governed by its own terms and
conditions; its owner has no affiliation with
HowStuffWorks.com.
How Does A Microwave Oven Work?
Basic Theory of Operation
Excerpts from the book The Complete Microwave Oven Service Handbook
--NOW available on CD-ROM (CLICK HERE)
and from the video You Can Fix Your Microwave Oven, Plus VCR Know-How
Copyright ©, 1989-2000 by J. Carlton Gallawa
Debussy's L'Îsle Joyeuse for your listening
enjoyment.
(Use right mouse button on note icon to start and control music)
How A Microwave Oven Works
Microwave ovens use various combinations of electrical circuits and mechanical devices to produce
and control an output of microwave energy for heating and cooking. Generally speaking the systems of
a microwave oven can be divided into two fundamental sections, the control section and the highvoltage section .
http://home.howstuffworks.com/framed.htm?parent=microwa....htm&url=http://www.gallawa.com/microtech/how_work.html (1 of 5)6/7/2004 3:44:03 PM
Howstuffworks
The control section consists
of a timer (electronic or
electromechanical), a system to
control or govern the power
output, and various interlock
and protection devices. The
components in the high-voltage
section serve to step up the
house voltage to high voltage.
The high voltage is then
converted microwave energy.
Basically, here is how it works:
As shown in Figure 1,
electricity from the wall outlet
travels through the power cord
and enters the microwave oven
through a series of fuse and
safety protection circuits. These
circuits include various fuses
and thermal protectors that are designed to deactivate the oven in the event of an electrical short or if
an overheating condition occurs
If all systems are normal, the electricity passes through to the interlock and timer circuits. When then
oven door is closed, an electrical path is also established through a series of safety interlock switches .
Setting the oven timer and starting a cook operation extends this voltage path to the control circuits .
http://home.howstuffworks.com/framed.htm?parent=microwa....htm&url=http://www.gallawa.com/microtech/how_work.html (2 of 5)6/7/2004 3:44:03 PM
Howstuffworks
Generally, the control system
includes either an
electromechanical relay or an
electronic switch called a triac
as shown in Figure 2 . Sensing
that all systems are "go," the
control circuit generates a
signal that causes the relay or
triac to activate, thereby
producing a voltage path to the
high-voltage transformer . By
adjusting the on-off ratio of this
activation signal, the control
system can govern the
application of voltage to the
high-voltage transformer,
thereby controlling the on-off
ratio of the magnetron tube and
therefore the output power of
the microwave oven. Some
models use a fast-acting power-control relay in the high-voltage circuit to control the output power.
In the high-voltage section ( Figure 3 ), the high-voltage transformer along with a special diode and
capacitor arrangement serve to increase the typical household voltage, of about 115 volts, to the
shockingly high amount of approximately 3000 volts! While this powerful voltage would be quite
unhealthy -- even deadly -- for humans, it is just what the magnetron tube needs to do its job -- that is,
to dynamically convert the high voltage in to undulating waves of electromagnetic cooking energy.
http://home.howstuffworks.com/framed.htm?parent=microwa....htm&url=http://www.gallawa.com/microtech/how_work.html (3 of 5)6/7/2004 3:44:03 PM
Howstuffworks
The microwave energy is
transmitted into a metal
channel called a waveguide ,
which feeds the energy into the
cooking area where it
encounters the slowly revolving
metal blades of the stirrer
blade . Some models use a
type of rotating antenna while
others rotate the food through
the waves of energy on a
revolving carousel. In any case,
the effect is to evenly disperse
the microwave energy
throughout all areas of the
cooking compartment. Some
waves go directly toward the
food, others bounce off the
metal walls and flooring; and,
thanks to special metal screen,
microwaves also reflect off the
door. So, the microwave energy reaches all surfaces of the food from every direction.
All microwave energy remains inside the cooking cavity. When the door is opened, or the timer
reaches zero, the microwave energy stops--just as turning off a light switch stops the glow of the lamp
Learn more about the myths & mysteries of microwave ovens
| Back | Send Email | Home Page | Microwave OvenCD-ROM Repair Course | Free FiX Finder Repair
Database | FAQ | Links |
Copyright Information
Unless otherwise noted, all materials at this cite (including without limitation all text, html markup,
graphics, and graphic elements) are copyrighted ©, 1989-2000 by J. Carlton Gallawa. The material
available through this site may be freely used for attributed noncommercial educational purposes
only. We ask that due credit and notification be given the author.
All materials appearing on this website may not be reproduced, stored in any retrieval system, or used
in any way for commercial purposes without the express prior written permission of the copyright
holder.
http://home.howstuffworks.com/framed.htm?parent=microwa....htm&url=http://www.gallawa.com/microtech/how_work.html (4 of 5)6/7/2004 3:44:03 PM
Howstuffworks
Send correspondence to: Microtech, P.O. Box 940, Gonzalez, Florida 32560
Disclaimer: The author assumes no liability for any incidental, consequential or other liability from the
use of this information. All risks and damages, incidental or otherwise, arising from the use or misuse
of the information contained herein are entirely the responsibility of the user. Although careful
precaution has been taken in the preparation of this material, we assume no responsibility for
omissions or errors.
Debussy's L'Îsle Joyeuse courtesy of David Siu and The Classical Midi Connection: http://www.dtx.
net/~raborn/
As of 12/25/97 you are visitor number 212985
http://home.howstuffworks.com/framed.htm?parent=microwa....htm&url=http://www.gallawa.com/microtech/how_work.html (5 of 5)6/7/2004 3:44:03 PM
How Do Microwave Ovens Cook Food?
How Do Microwaves Cook?
Excerpts from the book The Complete Microwave Oven Service Handbook
--NOW available on CD-ROM (CLICK HERE)
and from the video You Can Fix Your Microwave Oven, Plus VCR Know-How
Copyright ©, 1996-99 by J. Carlton Gallawa
Music of Claude Debussy for your listening
enjoyment.
(Use right mouse button on note icon to start and control music)
Microwaves possess three basic characteristics:
1. Just as sunlight shines through a window, microwaves pass right through some
materials. Materials such as glass, paper, and plastic are transparent to and generally
unaffected by microwaves.
2. Microwaves are reflected by metal surfaces, much as a ball would bounce off a wall.
The metal walls of the cooking space actually form a cavity resonator. In other words,
the enclosure is designed to resonate the microwaves as they are radiated from the
magnetron tube. The principle of resonance may be illustrated using sound waves.
When a piano key is struck, it produces sound vibrations or sound waves. Sometimes a
note is played on a piano, and an object across the room, perhaps a wineglass, can be
heard vibrating and producing the same sound. This is the result of resonance. The
resonating characteristics of the wineglass are the same as those of the piano string.
Therefore, the wineglass is in tune, or in resonance, with the sound wave produced by
the piano string. In the same way, the cooking cavity of a microwave oven is designed to
be in "tune" with the resonant characteristics of the microwaves.
❍ Metal racks are physically proportioned so as not to disrupt the energy pattern.
3. Microwaves penetrate and are absorbed by some substances, primarily food products.
http://www.gallawa.com/microtech/howcook.html (1 of 3)6/7/2004 3:45:14 PM
How Do Microwave Ovens Cook Food?
Friction Produces the Heat That Cooks the Food
To illustrate this third characteristic, notice the cooked turkey to the right. The waves of
microwave energy are cycling above and below a horizontal baseline. The half cycle below the
baseline possesses negative properties, and the half cycle above the line is correspondingly
positive. Basically, the effect of this wave, as it alternates between positive and negative,
would be like a magnet flipping back and forth.
All liquids and food products, such as
this turkey, are made up of
molecules. These molecules have
positive and negative particles, so
they tend to behave like microscopic
magnets. As the positive half cycle of
the microwave penetrates the food,
the negative particles of the molecules are attracted and attempt to align themselves with this
positive field of energy. Then, when the microwave energy alternates to the negative half
cycle, the opposite occurs -- The negative particles are repelled and the positive particles are
attracted, causing a flipping motion (actually, this reaction is the movement of the particles
within each molecule, so, technically, they reverse polarity). This might be compared to a room
full of people trying to run back and forth, from one side to the other. Obviously, there would be
a lot of bumping, rubbing, agitation, and friction.
Now, consider that the actual frequency of the RF energy used in microwave ovens is 2450
million cycles per second! Moreover, consider that within the course of one of those cycles, the
molecules would actually change their direction (polarity) twice - once for the positive half-cycle
and once for the negative half-cycle. This red-hot rate of vibration causes tremendous friction
within the food, and - just as rubbing your hands together makes them warm - this friction
produces heat.
So the heat is produced directly in the food, but the food is not cooked, as is commonly
believed, from the inside out. Actually, the cooking begins just beneath the outer surface and
from there inward and outward, with the majority of the energy being expended in the outer
layers. The rate and degree of heating depend on the depth and density of the food, as well as
its ability to conduct heat. Because the microwave energy is changed to heat as soon as it is
absorbed by the food, it cannot make the food radioactive or contaminated. When the
microwave energy is turned off and the food is removed from the oven, there is no residual
radiation remaining in the food. In this regard, a microwave oven is much like and electric light
that stops glowing when it is turned off.
http://www.gallawa.com/microtech/howcook.html (2 of 3)6/7/2004 3:45:14 PM
How Do Microwave Ovens Cook Food?
Learn more about the myths & mysteries of microwave ovens
| Back | Send Email | Top of Page | Home Page | Microwave Oven Video Repair Course | Free FiX
Finder Repair Database | FAQ | Links |
Copyright Information
Unless otherwise noted, all materials at this cite (including without limitation all text, html
markup, graphics, and graphic elements) are copyrighted ©, 1989-99 by J. Carlton Gallawa.
The material available through this site may be freely used for attributed noncommercial
educational purposes only. We ask that due credit and notification be given the author.
All materials appearing on this website may not be reproduced, stored in any retrieval system,
or used in any way for commercial purposes without the express prior written permission of the
copyright holder.
Send correspondence to: Microtech, P.O. Box 940, Gonzalez, Florida 32560
Disclaimer: The author assumes no liability for any incidental, consequential or other liability from the
use of this information. All risks and damages, incidental or otherwise, arising from the use or misuse
of the information contained herein are entirely the responsibility of the user. Although careful
precaution has been taken in the preparation of this material, we assume no responsibility for
omissions or errors.
You are visitor number 46001 since 12/25/97
http://www.gallawa.com/microtech/howcook.html (3 of 3)6/7/2004 3:45:14 PM
Microwave Energy--What it is and what it is not
What Are Microwaves?
Excerpts from the book The Complete Microwave Oven Service Handbook
--NOW available on CD-ROM (CLICK HERE)
Copyright ©, 1989-2000 by J. Carlton Gallawa
and from the video You Can Fix Your Microwave Oven, Plus VCR Know-How
Debussy's L'Îsle Joyeuse for your listening enjoyment.
(Use right mouse button on note icon to start and control music)
Microwaves are very short waves of electromagnetic energy that travel at the speed of light (186,282 miles
per second). Microwaves used in microwave ovens are in the same family of frequencies as the signals used in
radio and television broadcasting.
The theory of electromagnetic energy can be illustrated by what happens
when a pebble is tossed into a quiet pond. The pebble striking the still
surface causes the water to move up and down in the form of ripples, or
waves, that radiate in ever-widening circles over the surface of the pond.
These waves, which move up and down at right angles to the direction
they are traveling, are called transverse waves. Microwaves are examples
of transverse waves.
The disturbance resulting from the pebble landing in the water is
transmitted through the water in the form of ripples or waves. The water
serves merely as a medium through which the disturbance travels. In this
sense, these ripples are more like sound waves, which also need a
medium to travel through, normally using the molecules that exist in the
air or water. That is why, for example, thundering rocket engines that
would deafen the ears under normal circumstances, would be inaudible in
the quiet vacuum of space.
On the other hand, electromagnetic forms of energy, such as microwaves, radar waves, radio and TV waves,
travel millions of miles through the emptiness of space without the need of any material medium through which
to travel. This is because, simply put, electromagnetic waves are, in themselves, stored energy in motion.
A Phenomenal Force
http://www.gallawa.com/microtech/mwave.html (1 of 3)6/7/2004 3:46:34 PM
Microwave Energy--What it is and what it is not
Electromagnetic radiation begins with a
phenomenon that occurs when electric current
flows through a conductor, such as a copper wire.
The motion of the electrons through the wire
produces a field of energy that surrounds the wire
and floats just off its surface. This floating zone
or cloud of energy is actually made up of two
different fields of energy, one electric and one
magnetic. The electric and magnetic waves that
combine to form an electromagnetic wave travel
at right angles to each other and to the direction
of motion. If the current flowing through the wire
is made to oscillate at a very rapid rate, the
floating electromagnetic field will break free and
be launched into space. Then, at the speed of
light, the energy will radiate outward in a
pulsating pattern, much like the waves in the
pond. It is theorized that these waves are made up
of tiny packets of radiant energy called photons.
Streams of photons, each carrying energy and
momentum, travel in waves like an undulating
string of cars on a speeding roller coaster.
Is Microwave Radiation the Same as
Radioactive Radiation?
No. There is a very important difference. As
illustrated by the frequency spectrum on the right,
microwaves used in microwave ovens, similar to
microwaves used in radar equipment, and
telephone, television and radio communication,
are in the non-ionizing range of electromagnetic
radiation. Non-ionizing radiation is very different
from Ionizing radiation . Ionizing radiation is
extraordinarily high in frequency (millions of
trillions of cycles per second). It is, therefore,
extremely powerful and penetrating. Even at low
levels, ionizing radiation can damage the cells of living tissue. In fact, these dangerous rays, have enough energy
and intensity to actually change (ionize) the molecular structure of matter. In sufficient doses, ionizing radiation
can even cause genetic mutations. As shown on the frequency spectrum, the ionizing range of frequencies
includes X-rays, gamma rays, and cosmic rays. Ionizing radiation is the sort of radiation we associate with
radioactive substances like uranium, radium, and the fall-out from atomic and thermonuclear explosions.
Non-ionizing radiation is very different. Because of the lower frequencies and reduced energy, it does not have
the same damaging and cumulative properties as ionizing radiation. Microwave radiation (at 2450 MHz) is nonhttp://www.gallawa.com/microtech/mwave.html (2 of 3)6/7/2004 3:46:34 PM
Microwave Energy--What it is and what it is not
ionizing, and in sufficient intensity will simply cause the molecules in matter to vibrate, thereby causing friction,
which produces the heat that cooks the food.
Copyright Information
Unless otherwise noted, all materials at this cite (including without limitation all text, html markup, graphics, and
graphic elements) are copyrighted ©, 1989-2000 by J. Carlton Gallawa. The material available through this site
may be freely used for attributed noncommercial educational purposes only. We ask that due credit and
notification be given the author.
All materials appearing on this website may not be reproduced, stored in any retrieval system, or used in any way
for commercial purposes without the express prior written permission of the copyright holder.
Send correspondence to: Microtech, P.O. Box 940, Gonzalez, Florida 32560
Disclaimer: The author assumes no liability for any incidental, consequential or other liability from the use of
this information. All risks and damages, incidental or otherwise, arising from the use or misuse of the
information contained herein are entirely the responsibility of the user. Although careful precaution has been
taken in the preparation of this material, we assume no responsibility for omissions or errors.
Back | Send Email | Top of Page | Home Page | FREE samples from THE COMPLETE MICROWAVE OVEN
SERVICE HANDBOOK
Debussy's L'Îsle Joyeuse courtesy of David Siu and The Classical Midi Connection: http://www.dtx.net/~raborn/
You are visitor number 65322
http://www.gallawa.com/microtech/mwave.html (3 of 3)6/7/2004 3:46:34 PM
The Interlock Switches Used In Microwave Ovens
The Purpose and Function of Interlock Switches
Used In Microwave Ovens
© 1996-2002 J. Carlton Gallawa . All Rights Reserved Worldwide
To ensure safe operation, all microwave ovens are equipped with safety interlock switches .
The door-interlock system is one of the most significant safeguards in a microwave oven. While
switch configuration, size, shape, and mounting arrangement may vary from one model to the
next, the purpose and basic operation remain the same in all models.
The purpose of the interlock system is to interrupt the
production of microwave energy when the oven door is
opened, and similarly, to prevent any microwave output until
the door is firmly and safely closed.
A principal component of the interlock system is the
interlock monitor switch . In August of 1974, a Federal
safety standard went into effect that required that all
microwave ovens be equipped with an interlock monitoring
system. The monitor switch, which is also called the safety
switch, short switch, sensing switch, and failure detector switch , functions as a fail-safe type of
device, in that it disables the microwave oven if an interlock failure should occur. The actual
method differs from model to model, but the results are the same:a blown (or opened) fuse.
Generally speaking, the normal sequence of switch operation when the door is opened is as
follows. First the primary switch opens its contacts. Second, (yes) the secondary switch opens.
Finally, the interlock monitor switch closes its contacts. The fail-safe system works like this:If
any of the switches and/or relays included in the monitor loop (or circuit) fail to open their
contacts properly when the door is opened, a short circuit is created when the monitor switch
closes its contacts. The closed contacts of the monitor switch and the faultily-closed contacts of
the defective switch combine to cause an immediate short circuit, which, in one way or another
(depending on the model), blows the line fuse, or otherwise disables the oven. All this happens
before the door can be opened far enough to allow any dangerous levels of microwave radiation
to escape.
http://www.gallawa.com/microtech/switch.html (1 of 4)6/7/2004 3:53:19 PM
The Interlock Switches Used In Microwave Ovens
All switches have a voltage and current rating. A typical door-interlock switch is rated at 15
amps with 125 or 250 VAC applied. When replacing an interlock switch, these ratings must be
met or exceeded, otherwise premature switch failure will result. Another replacement
consideration is the operating and release force. This is the relative amount of pressure needed
to actuate the switch. Various applications call for differing amounts of operating pressure. Like
the voltage and current ratings, this is an important factor when obtaining a replacement switch.
For example, if the normal pressure of a latch mechanism is insufficient to depress the actuator
button, the switch's operating force is probably too high for that application.
The interlock switch to be tested in this example has a COM. (common) terminal, a N.O.
(normally open) terminal, and a N.C. (normally closed) terminal. Interlock monitor switches are
usually constructed with only the COM and N.C. terminals. Other switches are made with just
the COM and N.O. terminals. The following tests will cover most circumstances. Simply
disregard the terminal-to-terminal tests that do not apply.
Important Safety Information
Working on a microwave oven is a very dangerous task. Therefore, BEFORE
performing any tests, troubleshooting or repairs, for your personal safety, we
strongly urge you to carfully read, fully understand and be prepared to follow
the very important safety precautions found by clicking here .
Please read the disclaimer at the bottom of this page.
How To Test Interlock Switches
1. Unplug the oven and remove the outer cover.
2. DISCHARGE ALL HIGH VOLTAGE CAPACITORS. (Procedure)
3. Visually examine the switch terminals and connectors for signs of overheating, such as
discoloration, or brittleness.
❍ Many times the problem is merely a burned slip-on connector due to a poor crimp
joint, or weakened connection. If the switch is in good working order, the repair can
be made by cleaning the terminals, and replacing the burned connector. Or, simply
cut off the burned connectors and solder the wires directly to the switch terminals.
4. Carefully remove the harness leads from the switch terminals. Pry them loose if
necessary, but do not exert too much force, or the terminal may break right out of the
switch.
❍ Many models use a connector with a locking clip in the center of the receptacle
http://www.gallawa.com/microtech/switch.html (2 of 4)6/7/2004 3:53:19 PM
The Interlock Switches Used In Microwave Ovens
5.
6.
7.
8.
9.
10.
11.
12.
terminal. This extruding lever must be pressed down while gently pulling the
connector off the terminal.
Set the ohmmeter to read ohms at a scale of R X 1
As shown in the picture, place one meter probe
on the COM terminal and the other probe on the
N.O. terminal. With the actuator (or lever, or
button) not depressed, the meter should read
infinity (an open circuit).
Without moving the meter probes, press down
on the switch actuator until a "click" is heard. At
the point of the click, the meter should swing to
a reading of zero ohms (or continuity).
❍ Rule of thumb:A healthy "click" usually
means the switch is working normally.
However, switches with just two
terminals, both of which come out the
back, do not click when actuated, and
neither do switch modules.
Move the probe from the N.O. terminal to the N.C. terminal. The other probe remains on
the COM terminal.
Press the actuator and the meter should read infinity.
Release the actuator and the meter should read zero ohms.
Set the meter to the highest resistance (ohms) scale and measure from the N.C. terminal
to the N.O. terminals for a normal reading of infinity.
Measure from each terminal to any metal mounting hardware that is part of the switch
assembly for a normal reading of infinity.
Any abnormal readings would indicate that the switch is defective and should be replaced.
Send us E-mail. Let us know what you think: [email protected]
Attention Appliance Repair
Technicians:
Want to Expand your Services
and Build Bigger Profits?
http://www.gallawa.com/microtech/switch.html (3 of 4)6/7/2004 3:53:19 PM
The Interlock Switches Used In Microwave Ovens
A Complete Course In Commercial &
Residential Microwave Oven Repair
Step up to a new level of
instruction!
Copyright © Information
Unless otherwise noted, all materials at this cite (including without limitation all text, html
markup, graphics, and graphic elements) are copyrighted © 1989-2002 by J. Carlton Gallawa. The
material available through this site may be freely used for attributed noncommercial educational
purposes only. We ask that due credit and notification be given the author.
All materials appearing on this website may not be reproduced, stored in any retrieval system, or
used in any way for commercial purposes without the express prior written permission of the
copyright holder.
Send correspondence to: Microtech, P.O. Box 940, Gonzalez, Florida 32560
Disclaimer: The author assumes no liability for any incidental, consequential or other
liability from the use of this information. All risks and damages, incidental or otherwise,
arising from the use or misuse of the information contained herein are entirely the
responsibility of the user. Although careful precaution has been taken in the preparation
of this material, we assume no responsibility for omissions or errors.
http://www.gallawa.com/microtech/switch.html (4 of 4)6/7/2004 3:53:19 PM
How To Test the Triac
The Purpose of the Triac
© 1996-2002 J. Carlton Gallawa . All Rights Reserved Worldwide
The triac is an electronic relay or switch. Triacs come in many shapes, sizes and colors. The black
and white illustration to the right shows most of
the types of triacs that are commonly used in
microwave ovens, along with their standard
terminal designations.
Located either externally or fixed within the
controller, the triac operates when it receives an
electronic "gate" signal from the control
circuitry. It then switches to its closed or "on"
state, thus providing a voltage path to the
primary winding of the high voltage
transformer, thereby energizing the cook
circuits.
Considering the heavy job that the triac does,
it's not surprising that it is a common candidate
for failure.
Important Safety Information
Working on a microwave oven is a very dangerous task. Therefore, BEFORE
performing any tests, troubleshooting or repairs, for your personal safety, we
strongly urge you to carfully read, fully understand and be prepared to follow the
very important safety precautions found by clicking here .
Please read the disclaimer at the bottom of this page.
How To Test the Triac
Triacs with three terminals, such as most of those shown above, can be tested by making a series of
resistance checks as follows.
http://www.gallawa.com/microtech/triac.html (1 of 4)6/7/2004 3:54:09 PM
How To Test the Triac
Test One
1. Unplug the oven.
2. DISCHARGE THE HIGH VOLTAGE CAPACITOR. (Procedure)
3. First identify the terminals. The three terminals are generally designated as G (gate), T1 and
T2. (A rule of thumb:smallest terminal is the gate; medium sized is T1; largest is T2.)
4. Carefully remove all harness leads. A soldered-in varistor or snubber may remain attached
providing it's in good condition.
5. Set and zero the ohmmeter to a scale capable or reading about 40 ohms.
6. Measure from the gate to T1 , note the reading, then reverse the leads.
7. In each measurement, a normal reading would be in the range of 10 to 200 ohms , depending
on the model.
8. Next, set the meter to its highest resistance scale. Each of the following readings should
produce a normal reading of infinity:
a. From T1 to T2.
b. From T2 to the gate
c. From each terminal to chassis ground
Note:These readings are approximate and may vary with manufacturer, but generally speaking,
any results that are significantly different would point to a defective triac.
Test Two
A second way to test the triac is to evaluate its gate-firing capability:
1.
2.
3.
4.
5.
Unplug the oven.
DISCHARGE THE HIGH VOLTAGE CAPACITOR. (Procedure)
Remove all harness leads. Set the meter to a scale capable of reading about 50 ohms.
Attach the negative meter lead to T1 and the positive lead to T2 .
Now, using a screwdriver blade, create a momentary short between T2 and the gate . This brief
contact should turn the triac "on," thus producing a meter reading of about 15 to 50 ohms.
6. Next, disconnect one of the meter leads, then re-connect it. The meter should return to a reading of
infinity .
7. Finally, reverse the meter leads and repeat the tests. The results should be the same.
●
●
Any abnormal tests would suggest a defective triac.
Replacement triacs are generally available at electronic and appliance parts distributors.
http://www.gallawa.com/microtech/triac.html (2 of 4)6/7/2004 3:54:09 PM
How To Test the Triac
●
Send us E-mail: [email protected]
●
●
●
CLICK HERE
●
If you would like to learn more about repairing
commercial, industrial and residential
microwave ovens and become part of a multimillion dollar service industry, we invite you
to take a look at Microtech's highly acclaimed
CD-ROM.
Take the finest repair video ever produced,
combine it with the ultimate textbook on
microwave oven repair, meticulously update
every part and you have "THE COMPLETE
MICROWAVE OVEN SERVICE HANDBOOK v.
2002 on CD-ROM." This is THE definitive stepby-step instructional CD to making safe,
successful and profitable repairs on all types
of microwave ovens.
From the common tools you'll need and
clearly outlined safety procedures, right down
to the final profit-producing repair. This stateof-the-art courseware gives you the training
you need in a progressive, straight-foward
and easy-to-use format that's guaranteed to
take you to the skill--and income--level you
want.
It takes every page of this 400-page, factcrammed course to teach you all you need to
know about this profitable field of repair.
Disclaimer: The author assumes no liability for any incidental, consequential or other liability from the
use of this information. All risks and damages, incidental or otherwise, arising from the use or misuse of
the information contained herein are entirely the responsibility of the user. Although careful precaution
has been taken in the preparation of this material, we assume no responsibility for omissions or errors.
Copyright © Information
Unless otherwise noted, all materials at this cite (including without limitation all text, html markup, graphics, and
graphic elements) are copyrighted © 1989-2002 by J. Carlton Gallawa. The material available through this site
may be freely used for attributed noncommercial educational purposes only. We ask that due credit and
notification be given the author.
All materials appearing on this website may not be reproduced, stored in any retrieval system, or used in any way
for commercial purposes without the express prior written permission of the copyright holder.
http://www.gallawa.com/microtech/triac.html (3 of 4)6/7/2004 3:54:09 PM
How To Test the Triac
Send correspondence to: Microtech, P.O. Box 940, Gonzalez, Florida 32560
http://www.gallawa.com/microtech/triac.html (4 of 4)6/7/2004 3:54:09 PM
High Voltage Transformer Test
The Purpose of the High Voltage Transformer in
Microwave Ovens
Excerpts from the book The Complete Microwave Oven Service Handbook --NOW available on CD-ROM (CLICK HERE)
and from the video You Can Fix Your Microwave Oven, Plus VCR Know-How - Copyright ©, 1989-2000 by J. Carlton
Gallawa
© 1996-2002 by J. Carlton Gallawa . All Rights Reserved Worldwide
It might be said that the HIGH-VOLTAGE TRANSFORMER is the "muscle" of the microwave oven.
With an input of 120 VAC (or 240 VAC in many commercial models) applied to the primary winding, the
high-voltage transformer (also referred to as power or plate transformer) steps up that primary voltage to a
very high voltage. This high voltage is then boosted even higher by the voltage-doubling action of the
capacitor and diode. The resulting voltage, about 3000 - 5000 volts DC (depending on the model), is
available at the high voltage (output) tap (see illustration below).
In most newer models, the transformer also incorporates a second output winding, as shown in the
illustration below. This is a stepped-down output that provides the filament voltage (typically 3 to 4 VAC)
to the magnetron tube.
Some models use a separate filament transformer . If that is the case, skip steps 3 through 5.
Important Safety Information
Microwave ovens are one of the most dangerous appliances to work on. Before
attempting any troubleshooting, testing or repairs, for your personal safety we
strongly urge you to carefully read, fully understand and be prepared to follow
carefully the very important safety precautions found by clicking here .
Please read our disclaimer at the bottom of this page.
WARNING! THESE VOLTAGES CAN BE LETHAL! NEVER,
EVER ATTEMPT TO MEASURE THE OUTPUT VOLTAGES
OF THE HIGH-VOLTAGE TRANSFORMER.!
http://www.gallawa.com/microtech/xformer.html (1 of 4)6/7/2004 3:55:41 PM
High Voltage Transformer Test
How To Test The HighVoltage Transformer
1. UNPLUG the oven.
2. DISCHARGE ALL HIGHVOLTAGE CAPACITORS.
(Procedure)
3. Disconnect the high-voltage lead from
the transformer's high-voltage terminal
(or tap).
4. With an ohmmeter set to the lowest
resistance scale, R X 1, measure the
resistance from the high-voltage
terminal to the transformer chassis
(ground).
a. Some early models are equipped
with two or three high-voltage
taps. If this is the case, perform
the measurement from each tap
to chassis ground.
5. The meter should read about 55 to 70 ohms, depending on which high-voltage tap is being
measured and the model being tested.
a. A substantially higher or lower reading would indicate that the transformer is defective.
6. Carefully disconnect the leads from the primary (input) terminals
7. Measure from one transformer primary terminal to the other for a normal reading of less than 1
ohm (i.e., .22 ohms)
a. A substantially higher reading would indicate that the primary winding is open.
8. Set the meter to its highest resistance scale and check from each transformer primary terminal to
the transformer chassis (ground) for a normal reading of infinity (open circuit).
a. Any measurement of resistance would indicate some degree of a short to ground
9. Set the meter back to its lowest resistance scale. Then carefully disconnect the filament leads and
measure from one filament terminal to the other for a normal resistance of less than 1 ohm.
10. Set the meter to its highest scale and measure from each filament terminal to chassis ground.
a. Any measurement that is substantially different from the normal readings would indicate a
defective transformer.
Send us E-mail if you have difficulty in locating this or any other replacement part. We will be
happy to help you: [email protected]
http://www.gallawa.com/microtech/xformer.html (2 of 4)6/7/2004 3:55:41 PM
High Voltage Transformer Test
Illustration from THE COMPLETE
MICROWAVE OVEN SERVICE HANDOOK
If you would like to learn more
about repairing commercial and
residential microwave ovens and
become part of a multi-million
dollar service industry, we invite
you to take a look at Microtech's
powerful new computerized
training course.
●
●
●
●
●
●
●
●
Virtually 1000s of microwave
oven repair case histories with
factory approved troubleshooting
and repair procedures
Factory troubleshooting charts,
error codes, schematics and
diagnostic procedures
Touch panel (key pad) matrix
diagrams for 100s of brands
Hundreds of vividly colored
schematics, diagrams,
illustrations and photos ease the
toughest repair chores.
Fully searchable text for quick
information gathering
All chapters, sections and
references are hyperlinked for
fast and smooth navigating
FREE technical support
Full 30-day, no-questions- asked,
money-back guarantee
THE COMPLETE MICROWAVE OVEN SERVICE HANDBOOK 2002
Operation, Maintenance, Troubleshooting and Repair
J. Carlton Gallawa
Copyright © Information
Unless otherwise noted, all materials at this cite (including without limitation all text, html markup, graphics, and
graphic elements) are copyrighted © 1989-2002 by J. Carlton Gallawa. The material available through this site
may be freely used for attributed noncommercial educational purposes only. We ask that due credit and
notification be given the author.
http://www.gallawa.com/microtech/xformer.html (3 of 4)6/7/2004 3:55:41 PM
High Voltage Transformer Test
All materials appearing on this website may not be reproduced, stored in any retrieval system, or used in any way
for commercial purposes without the express prior written permission of the copyright holder.
Send correspondence to: Microtech, P.O. Box 940 Gonzalez, FL 32560
Disclaimer: The author assumes no liability for any incidental, consequential or other liability from the use of this
information. All risks and damages, incidental or otherwise, arising from the use or misuse of the information
contained herein are entirely the responsibility of the user. Although careful precaution has been taken in the
preparation of this material, we assume no responsibility for omissions or errors.
http://www.gallawa.com/microtech/xformer.html (4 of 4)6/7/2004 3:55:41 PM
Microwave Oven Repair Safety Precautions
Website Directory:
Microtech
Home Page
Microwave
Oven FiX
Finder Case
History
Database
CD-ROM
Home Page
CD-ROM
Important
Samples
Microwave
Oven
Safety
Precautions
Search Our
Website
© 1996-2004 J. Carlton Gallawa. All Rights Reserved Worldwide
Ordering
Information
Microwave Ovens Are Dangerous Appliances to Work On
Send email
The microwave oven is one of the most dangerous appliances to repair. The
Microwave
Oven FAQ
Related
Links
About the
author,
J. Carlton
Gallawa
Copyright ©
Information
Microwave
Oven Parts
Suppliers/
Manufacturer
Contacts
high-voltage potential combined with the high-current capability of an operating
microwave oven pose a deadly threat to the reckless worker. In addition,
microwave ovens are radiation-emitting devices. Normally this does not present a problem.
However, improper replacement methods or tampering with safety systems could expose
the unwary troubleshooter to dangerous levels of microwave leakage. Therefore, extreme
caution and proper procedures MUST be used at all times.
When diagnosing a microwave oven, many problems can be detected merely with careful
observation, that is, with the power disconnected. Most tests can be accomplished with
the power off and the oven unplugged. We suggest that you leave the "live" testing to the
professionals. Nonetheless, certain safety habits must be developed and maintained. If you
have experience in troubleshooting electrical equipment, some of these safety precautions
may be familiar. However, the high-current potential of the high-voltage circuits in a
microwave oven make them possibly life-saving steps.
If you are uneasy or unsure about any of these safety procedures or warnings; or if you feel
uncertain as to their importance or your ability to manage them, it would be in your best
interest to leave the repair to a qualified professional.
http://www.gallawa.com/microtech/safety.html (1 of 4)6/7/2004 3:57:32 PM
Microwave Oven Repair Safety Precautions
FIRST and ALWAYS, before attempting any repairs, make certain that the unit is not
plugged in.
● Before touching any components or wiring, ALWAYS
DISCHARGE THE HIGH VOLTAGE CAPACITOR! The
high voltage capacitor will quite normally maintain a
painfully high-voltagecharge even after the oven is
unplugged. Some capacitors employ a bleeder resistor
(either externally or internally) that allows the charge to
slowly bleed (or drain) off after the oven is unplugged. Do
not trust a bleeder resistor--it may be open.
●
SUBMIT your
REPAIR TIP
Glossary of
Electronic
and
Microwave
Oven Related
Terms
Microtech
Home Page
Microwave
Oven FiX
Finder Case
History
Database
CD-ROM
Home Page
CD-ROM
Samples
Search Our
Website
Ordering
Information
Send email
Microwave
Oven FAQ
Related
Links
About the
author,
J. Carlton
Gallawa
Copyright ©
Information
If you forget to discharge the capacitor, your fingers
may ultimately provide the discharge path. You only make this mistake a few times,
because, while the electric shock is painful, the real punishment comes when you
reflexively yank your hand out leaving behind layers of skin on razor-like edges that
are there as a reminder to never again forget to discharge the high voltage
capacitor.
How To Discharge The High Voltage Capacitor:The capacitor is
discharged by creating a short circuit (direct connection) between the two capacitor
terminals and from each terminal to chassis ground (bare metal surface).
1. Do this by touching the blade of an insulated-handled screw driver to one terminal,
then slide it toward the other terminal until it makes contact and hold it there for a
few seconds. (This can result in a rather startling "pop!")
2. Repeat the procedure to create a short between each capacitor terminal and chassis
ground.
3. If the capacitor has three terminals, use the same procedure to create a short circuit
between each terminal and then from each terminal to ground.
4. Older Amana-made models (generally those manufactured before 1977) have red,
round filter capacitors mounted in the base of the magnetron tube which can also
hold a charge. Ground each magnetron terminal by creating a short circuit to chassis
ground using the blade of a screwdriver as explained above.
NEVER, under any circumstances, touch any oven components or
wiring with your hand or even with an insulated tool during a cook
operation.
The high-voltage circuits in a microwave oven generate from 3000
to 5000 volts DC and higher!
This combined with the potential for high current makes the HIGH VOLTAGE
CIRCUITS OF A MICROWAVE OVEN EXTREMELY
DANGEROUS TO WORK ON OR AROUND WHEN THE OVEN
IS ENERGIZED.
For this reason, most manufacturers pointedly warn that
MEASURING THE HIGH VOLTAGE IS NEITHER NECESSARY
NOR ADVISABLE.
http://www.gallawa.com/microtech/safety.html (2 of 4)6/7/2004 3:57:32 PM
Microwave Oven Repair Safety Precautions
Microwave
Oven Parts
Suppliers/
Manufacturer
Contacts
It's better (and safer) to avoid making live tests if possible. If such tests become
necessary, and if you are adequately qualified to do so, the test can be performed safely as
follows:
●
1.
2.
3.
4.
SUBMIT your
REPAIR TIP
Glossary of
Electronic
and
Microwave
Oven Related
Terms
●
Make sure the oven is unplugged and that the capacitor discharged.
Attach the meter leads to the prospective test points with insulated clip leads.
Then step back, plug in the oven, perform the test and observe the meter.
In addition, use only one hand whenever possible. Try putting the other hand behind
your back or in your pocket. (Two hands could complete a circuit through your body.
Use only one hand and/or an insulated tool, even when the unit is unplugged).
After any adjustment or repair on a microwave oven, manufacturers require that a final
microwave leakage check be performed to ensure that the unit does not
emit excessive radiation.
RF leakage test procedure:
Microtech
Home Page
1. If there is evidence that the unit has been previously tampered with by someone of
questionable competence, be prepared to check the leakage before energizing the
oven.
2. Most amateurs, and many professionals, do not own an RF leakage meter. These
meters are available at appliance and electronic parts suppliers, ranging in price
from about $10.00 up to many hundreds of dollars for the certified models used at
the professional level.
3. Inexpensive RF detection devices are also available at many retail stores such as
Walmart and Radio Shack.
4. In lieu of purchasing a certified RF leak checker, you can take your repaired unit to a
factory authorized servicer who will very likely check the leakage for free.
Microwave
Oven FiX
Finder Case
History
Database
CD-ROM
Home Page
CD-ROM
Sampless
Do not work alone. Make sure another person is nearby in case of an emergency.
● Use care when lifting and carrying a microwave oven. Remember, most of the weight is
usually on one side (the control panel side).
●
Search Our
Website
1. When lifting a microwave oven, keep your back straight and use your legs, not your
Ordering
Information
back, to do the lifting.
2. Before carrying, secure the power cord and insure a clear path to your destination.
3. When lifting an oven in or out of an automobile, lift it on to the seat--do not slide it.
Better yet, place a piece of cardboard on the seat first.
Send email
Microwave
Oven FAQ
●
1. Watches that are susceptible to magnetism will be damaged by the intense
Related
Links
About the
author,
J. Carlton
Gallawa
Remove your watch and other jewelry.
magnetic field surrounding the magnetron tube.
2. Jewelry is electrically conductive and serious injury could result.
●
●
●
Wear rubber soled shoes.
Never defeat or tamper with the safety interlock switches or the fuse.
Do not touch printed circuit board components or circuitry unless you are properly
http://www.gallawa.com/microtech/safety.html (3 of 4)6/7/2004 3:57:32 PM
Microwave Oven Repair Safety Precautions
grounded.
Copyright ©
Information
Microwave
Oven Parts
Suppliers/
Manufacturer
Contacts
SUBMIT your
REPAIR TIP
Glossary of
Electronic
and
Microwave
Oven Related
Terms
1. Static electricity can damage certain static sensitive components.
● Be aware that opening or otherwise modifying your equipment may void any
manufacturer's warranty.
If you fully understand these precautions and
are prepared to carefully observe them, proceed
to the
Master Repair Database.
If you are uneasy or unsure about any of these
safety procedures, or feel uncertain as to their
importance, it would probably be in your best
interest to leave the repair to a qualified professional.
Microtech
Home Page
Microwave
Oven FiX
Finder Case
History
Database
CD-ROM
Home Page
CD-ROM
Samples
Search Our
Website
Disclaimer: The author assumes no liability for any incidental, consequential or other
liability from the use of this information. All risks and damages, incidental or otherwise,
arising from the use or misuse of the information contained herein are entirely the
responsibility of the user.
Although careful precaution has been taken in the preparation of this material, we assume
no responsibility for omissions or errors.
You are visitor number 90695
Ordering
Information
Send email
http://www.gallawa.com/microtech/safety.html (4 of 4)6/7/2004 3:57:32 PM
Output Power Test
How To Check the Output Power (wattage) of a
Microwave Oven
© 1996 J. Carlton Gallawa . All Rights Reserved Worldwide
Over the years manufacturers have used several different methods to rate the output wattage of
microwave ovens. First, there was the traditional method. Then, in 1989-90 came the JIS (Japanese
Industrial Standard). Using the JIS method, ovens rated at 700 watts using the traditional method became
750-watt ovens. In 1990-91 the industry changed to the international IEC-705 standard. This pushed the
wattage ratings even higher. For example, models rated at 700 traditional watts were instantly turned into
800-watt ovens using the IEC-705 formula.
The following test will provide a suitably accurate
measurement of the output power of any
microwave oven. Variations or errors in performing this test will produce uncertain results. If the line
voltage (from the electrical outlet) is low, the magnetron output will be correspondingly low.
●
●
1.
2.
3.
4.
5.
Equipment needed:
Microwave safe container with 1000 mL (1 Liter) gradation.
Fahrenheit thermometer (Amana part # R0157397), or centigrade thermometer (Amana part #
M95D5)
Procedure:
Pour exactly 1000 mL (1 Liter) of cool tap water into he container. Using the thermometer, stir the
water, then measure and record the temperature. For accurate results the water should be about 60
degrees F (20 degrees C).
Place the container on the center of the oven cooking shelf (do not leave the thermometer in the
container and remove any metal racks), and heat the water (at full power) for 63 seconds. Use the
second hand of a watch, not the oven timer.
After the heating time is completed, immediately remove the container, stir the water, re-measure
and record the temperature of the heated water.
Subtract the starting water temperature (step 2) from the ending water temperature (step 3) to
obtain the temperature rise.
To determine the output power in watts, multiply the total temperature rise by a factor of:
38.75 , if you're using a Fahrenheit thermometer;
70 , if you're using a centigrade thermometer.
http://www.gallawa.com/microtech/output.html (1 of 2)6/7/2004 3:59:17 PM
Output Power Test
Dual Magnetron Systems
Most of the higher-powered commercial models use two 700-watt magnetron tubes, each with their
respective high-voltage systems, which produces an output of 1400 watts. Amana's new RC22, DQ22 and
MC22 models use three magnetrons to produce a 2200 watt output.
In order to evaluate the independent operation of each individual magnetron, the systems must first be
isolated. This is accomplished by disabling one side, then performing an output power test on the
functioning side. Either side may be disabled first.
WARNING:
Before touching components or wiring:Make sure the oven is unplugged.
DISCHARGE ALL HIGH VOLTAGE CAPACITORS. Procedure
There is high voltage present, with high-current capabilities, in
the circuits of the high voltage section. It is extremely dangerous
to work on or near these circuits with the oven energized. DO
NOT TOUCH components or wiring while the oven is operating.
Use very great caution at all times.
The procedure is as follows. Observing the above safety precautions,
first disable one side by carefully disconnecting one or both of the
leads from the primary side of the high voltage transformer. (See the
illustration to the right). Set the oven to cook at full power and do an
output wattage check as outlined above. Having established the
functional status of the one side, unplug the oven, discharge the highvoltage capacitors, re-connect the transformer primary wires, and repeat the procedure for the other side.
http://www.gallawa.com/microtech/output.html (2 of 2)6/7/2004 3:59:17 PM
High Voltage Relays
The High Voltage Relay Used In Microwave Ovens
© 1996-2002 J. Carlton Gallawa . All Rights Reserved Worldwide
The high voltage relay , also called the variable power switch, is a special type of relay. It is operated
by the control panel, but it performs its switching in the high voltage section.
Most models of microwave ovens control the output
power by governing the on-off time of the
magnetron tube. This is most commonly done by
cycling on and off the line voltage that is applied to
the primary side of the high-voltage transformer.
Models that use a high voltage relay accomplish this
power control by actually switching the high voltage
on and off. This is quite a feat for this little reed
relay, so it relies on very carefully timed signals
from the control panel.
The high voltage relay can experience two basic types of failures:1) An open operating coil, 2) A
structural breakdown resulting in internal arcing and sometimes a crippling backfeed of current to the
control panel.
Important Safety Information
Working on a microwave oven is a very dangerous task. Therefore, BEFORE
performing any tests, troubleshooting or repairs, for your personal safety, we
strongly urge you to carfully read, fully understand and be prepared to follow the
very important safety precautions found by clicking here .
Please read the disclaimer at the bottom of this page.
How To Test The High Voltage Relay
1. Unplug the oven.
http://www.gallawa.com/microtech/hvrelay.html (1 of 3)6/7/2004 3:59:53 PM
High Voltage Relays
2. DISCHARGE ALL HIGH VOLTAGE CAPACITORS. Procedure
3. First examine the relay for physical defects, such as cracks in the glass, or a smoky
appearance. Check the casing for lacerations or blistering.
4. Carefully remove all attached leads.
5. With the ohmmeter set to the appropriate scale, measure across the relay coil for a normal
resistance of about 200 to 400 ohms, depending on the brand.
6. Set the meter to the highest resistance scale and make the following measurements:
❍ From one contact terminal (or wire) to the other
❍ From each contact terminal to each coil terminal
❍ From each of the four terminals to chassis ground
A reading of less than infinity on any of these measurements indicates that the relay is defective and
should be replaced. Before doing so, however, it would be good to first inspect the relay-drive
circuit on the control panel for damaged components. Control panel repairs might also be
necessary.
Send us E-mail: [email protected]
You can enhance your level of expertise.
See this and hundreds of other professional
tests and troubleshooting procedures
clearly demonstrated and explained in
Microtech's comprehensive new CD-ROM:
THE COMPLETE MICROWAVE
OVEN SERVICE HANDBOOK:
Operation, Maintenance,
Troubleshooting and Repair
Copyright © Information
Unless otherwise noted, all materials at this cite (including without limitation all text, html markup,
graphics, and graphic elements) are copyrighted © 1989-2002 by J. Carlton Gallawa. The material available
through this site may be freely used for attributed noncommercial educational purposes only. We ask that
due credit and notification be given the author.
http://www.gallawa.com/microtech/hvrelay.html (2 of 3)6/7/2004 3:59:53 PM
High Voltage Relays
All materials appearing on this website may not be reproduced, stored in any retrieval system, or used in
any way for commercial purposes without the express prior written permission of the copyright holder.
Send correspondence to: Microtech, P.O. Box 940, Gonzalez, Florida 32560
Disclaimer: The author assumes no liability for any incidental, consequential or other liability from the use of
this information. All risks and damages, incidental or otherwise, arising from the use or misuse of the
information contained herein are entirely the responsibility of the user. Although careful precaution has been
taken in the preparation of this material, we assume no responsibility for omissions or errors.
http://www.gallawa.com/microtech/hvrelay.html (3 of 3)6/7/2004 3:59:53 PM
How to Test The High-Voltage Diode (Rectifier) Used In Microwave Ovens
How To Test the High Voltage
Rectifier (Diode)
© 1996-2001 J. Carlton Gallawa . All Rights Reserved Worldwide
The high-voltage rectifier (diode) works along with the high-voltage capacitor to effectively double the
already-high voltage that is provided by the power transformer. This powerful voltage, about 3000 - 5000
volts DC (depending on the model), is applied to the magnetron tube, causing it to produce the microwave
energy that cooks the food.
This test requires an ohm meter with at least a 6 volt battery in order to accurately measure the front to
back resistance of the diode. Meters with insufficient battery power may read infinite resistance (open) in
each direction, mistakenly showing a good diode as being open.
However, the following resistance tests will
conclusively reveal a diode that is shorted. In most
cases, defective diodes, whether shorted or open,
will show some physical signs of the defect, such
as a burned crack, a blistered spot, or it may even
be split in two. Also, a shorted diode will usually
give off a pungent electrical burning odor.
Before making this or any other test:
ALWAYS
MAKE SURE THE OVEN IS UNPLUGGED
AND THE HIGH VOLTAGE CAPACITOR IS
FULLY DISCHARGED
Important Safety
Information
Microwave ovens are one of
the most dangerous appliances to work on. Before attempting any troubleshooting, testing or
repairs, for your personal safety we strongly urge you to carefully read the very important safety
precautions found by clicking here .
http://www.gallawa.com/microtech/diode.html (1 of 3)6/7/2004 4:00:42 PM
How to Test The High-Voltage Diode (Rectifier) Used In Microwave Ovens
Please read our disclaimer at the bottom of this page.
Test 1
1.
2.
3.
4.
5.
Unplug the oven.
DISCHARGE ALL HIGH VOLTAGE CAPACITORS. (Procedure)
Carefully remove the lead that goes to the capacitor (the ground connection may remain attached)
Set the ohmmeter to read ohms at a scale of R X 10,000 or higher.
Measure the resistance across the terminals of the diode by touching the positive meter probe to
the anode and the negative probe to the cathode (the cathode is the side that goes to ground,
usually marked by an arrow, dot or stripe).
6. A normal diode, depending on make and model, should read about 50,000 to 200,000 ohms.
(Note:The polarity of the meter probes, with regard to forward and reverse bias readings, may be
relative to the type of meter being used.)
7. Reversing the leads should produce a reading of infinity (open), unless there is a bleeder resistor
across the diode, in which case the reading would show the [megohm] value of the resistor.
8. If continuity is read in both directions, the diode is shorted. If infinity is read in both directions, the
diode is open. In each case the diode must be replaced.
In some models the diode is located inside of the high voltage capacitor. In this case, identify the diode
terminal and perform the same test as above, measuring from the diode terminal to the capacitor's metal
case.
We welcome your comments and suggestions: [email protected]
Find out what makes a microwave oven tick. You
will see the above test and numerous other
procedures clearly explained, plus hundreds of other
tips and "tricks of the trade" in Microtech's
authoritative, "all-in-one" CD-ROM:
The COMPLETE MICROWAVE
OVEN SERVICE HANDBOOK on CDROM v. 2001
http://www.gallawa.com/microtech/diode.html (2 of 3)6/7/2004 4:00:42 PM
How to Test The High-Voltage Diode (Rectifier) Used In Microwave Ovens
Copyright © Information
Unless otherwise noted, all materials at this cite (including without limitation all text, html markup, graphics, and
graphic elements) are copyrighted © 1989-2001 by J. Carlton Gallawa. The material available through this site
may be freely used for attributed noncommercial educational purposes only. We ask that due credit and
notification be given the author.
All materials appearing on this website may not be reproduced, stored in any retrieval system, or used in any way
for commercial purposes without the express prior written permission of the copyright holder.
Send correspondence to: Microtech, P.O. Box 940, Gonzalez, Florida 32560
Disclaimer: The author assumes no liability for any incidental, consequential or other liability from the use of this
information. All risks and damages, incidental or otherwise, arising from the use or misuse of the information
contained herein are entirely the responsibility of the user. Although careful precaution has been taken in the
preparation of this material, we assume no responsibility for omissions or errors.
As of 4/10/98 you are visitor number 48588
http://www.gallawa.com/microtech/diode.html (3 of 3)6/7/2004 4:00:42 PM
How to Test The High Voltage Capacitor Used In Microwave Ovens
How To Test the High Voltage
Capacitor
© 1996-2001 J. Carlton Gallawa . All Rights Reserved Worldwide
The high-voltage capacitor works along with the high-voltage diode to effectively double the
already-high voltage from the secondary (output) winding of the power transformer. This high
DC voltage provides the boost necessary to fire the magnetron into oscillation. The capacitor
can hold a fearsome electrical charge long after the oven
has been unplugged. So before making this or any other
test:
ALWAYS MAKE SURE
THE OVEN IS UNPLUGGED AND THE HIGH VOLTAGE
CAPACITOR IS FULLY DISCHARGED
Microwave ovens are among the most
dangerous appliances to work on.
Before attempting any troubleshooting,
testing or repairs, for your personal
safety we strongly urge you to carefully
read the very important safety
precautions found by clicking here .
Please read our disclaimer at the bottom of this page.
How To Dishcarge The High Voltage Capacitor
The capacitor is discharged by creating a short circuit (direct
connection) between the two capacitor terminals and from
each terminal to chassis ground (bare metal surface).
a. Do this by touching the blade of an insulated-handled screw driver to one terminal, then
slide it toward the other terminal until it makes contact and hold it there for a few seconds.
(This can result in a rather startling "pop!" Note:If there is a spark, the capacitor is
evidently holding a charge, thus it is most likely not defective)
b. Repeat the procedure to create a short between each capacitor terminal and chassis
ground.
c. If the capacitor has three terminals, use the same procedure to create a short circuit
between each terminal and then from each terminal to ground.
http://www.gallawa.com/microtech/cap_test.html (1 of 4)6/7/2004 4:01:13 PM
How to Test The High Voltage Capacitor Used In Microwave Ovens
d. Older Amana-made models (generally those manufactured before 1977) have red, round
filter capacitors mounted in the base of the magnetron tube which can also hold a charge.
Ground each magnetron terminal by creating a short circuit to chassis ground using the
blade of a screwdriver as explained above.
Capacitor Test Procedure
1. Unplug the oven.
2. DISCHARGE ALL HIGH VOLTAGE CAPACITORS.
3. Note the wiring and carefully remove all leads from the capacitor terminals. (If there is a
bleeder resistor, it need not be removed. But, bear in mind that some measurements will
reflect the meg-ohm resistance of the resistor)
4. Set the ohmmeter to its highest resistance scale.
5. Measure from one terminal to the other for a normal reading of infinity (or the value of the
bleeder resistor).
6. Now reverse the leads. The meter should momentarily deflect toward the zero mark, then
slowly drift back to infinity.
7. Reverse the leads once again. This should produce the same meter deflection.
8. Next measure from each terminal to the capacitor's metal case for a normal reading of
infinity. (If there is an internal diode, the meter readings will reflect the diode's forward
bias resistance. (See HV diode test procedure)
9. A visual inspection will also reveal certain defects, such as:
❍ Evidence of arcing or burning at the insulators
❍ The presence of an oily film or smell suggests a dielectric (non-conductive
medium) leak
❍ A bulging case indicates dielectric breakdown
Any such defects or abnormal readings would require replacement of the capacitor
Send us E-mail: [email protected]
http://www.gallawa.com/microtech/cap_test.html (2 of 4)6/7/2004 4:01:13 PM
How to Test The High Voltage Capacitor Used In Microwave Ovens
Would you like to learn more? Here is
Microtech's acclaimed textbook on CDROM! Widely recommended by
electronic & appliance repair shops,
technical students and do-it-yourselfers.
You get up-to-the-minute service
information. Explore, component by
component, how microwaves work, how
they fail, and how to make safe,
profitable repairs.
The COMPLETE MICROWAVE OVEN SERVICE
HANDBOOK on CD-ROM v. 2001
Copyright © Information
Unless otherwise noted, all materials at this cite (including without limitation all text, html markup,
graphics, and graphic elements) are copyrighted © 1989-2001 by J. Carlton Gallawa. The material
available through this site may be freely used for attributed noncommercial educational purposes
only. We ask that due credit and notification be given the author.
All materials appearing on this website may not be reproduced, stored in any retrieval system, or used in
any way for commercial purposes without the express prior written permission of the copyright holder.
Send correspondence to: Microtech, P.O. Box 940, Gonzalez, Florida 32560
Disclaimer: The author assumes no liability for any incidental, consequential or other liability
from the use of this information. All risks and damages, incidental or otherwise, arising from the
use or misuse of the information contained herein are entirely the responsibility of the user.
Although careful precaution has been taken in the preparation of this material, we assume no
responsibility for omissions or errors.
http://www.gallawa.com/microtech/cap_test.html (3 of 4)6/7/2004 4:01:13 PM
How to Test The High Voltage Capacitor Used In Microwave Ovens
You are visitor number 47486. Thanks for stopping by...
http://www.gallawa.com/microtech/cap_test.html (4 of 4)6/7/2004 4:01:13 PM
The Voltage Doubler Circuit Used In Microwave Oven High Voltage Systems
The Microwave Oven Voltage-Doubler Circuit
Theory of Operation
Excerpts from the book The Complete Microwave Oven Service Handbook
--NOW available on CD-ROM (CLICK HERE)
and from the video You Can Fix Your Microwave Oven, Plus VCR Know-How
Copyright ©, 1997-99 by J. Carlton Gallawa
Music of Claude Debussy for your listening
enjoyment.
(Use right mouse button on note icon to start and control music)
In the high-voltage section of a microwave oven, the diode (rectifier) and the capacitor function
together to effectively double the already-high voltage. This is called a voltage-doubler circuit.
In order to effectively
understand the voltagedoubler circuit used in
microwave ovens, it is first
necessary to understand the
difference between effective
voltage and peak voltage.
Measured with a common
voltmeter, the voltage in the
standard household
receptacle is 115 VAC (±
10%). The actual voltage
alternates through one complete cycle every 60th of a second, as shown in the sine wave of
Figure 1 . Because the voltage is continuously varying, the value reflected on the voltmeter is
only the effective value of this voltage. The sign wave actually reaches a peak value of 1.414
times the effective value. So the peak voltage at a standard wall outlet would be:
Peak voltage = 1.414 X 115 VAC = 163 VAC
Knowing peak values and their relationship to effective values is important to understanding
the operation of a voltage-doubler circuit.
http://www.gallawa.com/microtech/doubler.html (1 of 4)6/7/2004 4:02:14 PM
The Voltage Doubler Circuit Used In Microwave Oven High Voltage Systems
Voltage-doubler circuits are fed with the stepped-up AC voltage from the high-voltage
transformer's secondary (or output) winding. Typically, a transformer would step up 115 volts
to about 2000 volts, which would have an approximate peak value of 2800 volts. We will use
this value in analyzing the operating sequence of a voltage doubler. Please note that the
values of voltages shown are peak, no-load, theoretical values. Under actual circuit operation,
the load of the magnetron tube may decrease the output of the voltage doubler by as much as
40 percent.
The Half-Wave Voltage Doubler
Refer to Figure 2A . During the first positive half-cycle, which is designated on the sine wave
graph as T1 , the voltage from the transformer increases accordingly with the polarity shown.
The current flows in the direction of the arrows, charging the capacitor through the diode.
During the capacitor charging time there is
no voltage to the magnetron because the
current takes the course of least resistance.
In other words, rather than take a path
through ground and up to the plate of the
magnetron, the current swings up through
the diode. The voltage across the capacitor
will rise to the transformer secondary voltage
to the maximum 2800 volts. As the
transformer secondary voltage begins to
decrease from its maximum positive value (at
time increment T2 on the sine wave graph),
the capacitor will attempt to discharge back
through the diode. The diode is like a one-way street in that it will not conduct in this direction.
Thus, the discharge path is blocked, and the capacitor remains charged to the 2800 volts.
Refer to Figure 2B . At time T3 , the transformer secondary (output) voltage swings into the
negative half-cycle and increases in a negative direction to a negative 2800 volts, with
polarities as shown. The transformer secondary and the charged capacitor are now essentially
http://www.gallawa.com/microtech/doubler.html (2 of 4)6/7/2004 4:02:14 PM
The Voltage Doubler Circuit Used In Microwave Oven High Voltage Systems
two energy sources in series. The 2800
volts across the transformer winding adds
to the 2800 volts stored in the capacitor and
the sum voltage of 5600 volts is applied to
the magnetron cathode .
There are two fundamental characteristics
of this 5600-volt output that should be
noted. First, because a voltage doubler is
also a rectifier, the output is a DC voltage.
Second, the resulting output voltage that is
applied to the magnetron tube is actually a
pulsed DC voltage. This is because the
doubler generates an output only during the negative half-cycle of the transformer's output
(secondary) voltage. So, the magnetron tube is, in fact, pulsed on and off at a rate of 50 or 60
times per second, depending on the frequency of the line voltage.
A Word of Warning
The circuits described here cannot be measured with a normal voltmeter . The powerful
voltages combined with the high-current potential make these circuits deadly in nature. If you
wish to measure the high voltage, you should first make sure that all your affairs are in order
and that your life insurance policy covers death by electrocution. If you still want to measure
the high voltage, a special high-voltage meter with special leads must be used. HIGH
VOLTAGE SAFETY PROCEDURES MUST BE CAREFULLY OBSERVED .
However, microwave oven problems can be diagnosed just as conclusively, and certainly more
safely without checking the high voltage. Therefore, MEASURING THE HIGH VOLTAGE IS
STRONGLY DISCOURAGED.
LEARN
HOW
Copyright Information
Unless otherwise noted, all materials at this cite (including without limitation all text, html
markup, graphics, and graphic elements) are copyrighted ©, 1989-99 by J. Carlton Gallawa.
The material available through this site may be freely used for attributed noncommercial
educational purposes only. We ask that due credit and notification be given the author.
http://www.gallawa.com/microtech/doubler.html (3 of 4)6/7/2004 4:02:14 PM
The Voltage Doubler Circuit Used In Microwave Oven High Voltage Systems
All materials appearing on this website may not be reproduced, stored in any retrieval system,
or used in any way for commercial purposes without the express prior written permission of the
copyright holder.
Send correspondence to: Microtech, P.O. Box 940, Gonzalez, Florida 32560
Disclaimer: The author assumes no liability for any incidental, consequential or other liability from the
use of this information. All risks and damages, incidental or otherwise, arising from the use or misuse
of the information contained herein are entirely the responsibility of the user. Although careful
precaution has been taken in the preparation of this material, we assume no responsibility for
omissions or errors.
| Back | Send Email | Top of Page | Home Page | Microwave Oven Video |
You are visitor number 55962
http://www.gallawa.com/microtech/doubler.html (4 of 4)6/7/2004 4:02:14 PM
The Magnetron Tube:Structure and Operation
The Magnetron Tube
Structure and Operation
Excerpts from the book The Complete Microwave Oven Service Handbook
--NOW available on CD-ROM (CLICK HERE)
Copyright ©, 1989-2001by J. Carlton Gallawa
and from the video You Can Fix Your Microwave Oven, Plus VCR Know-How
Debussy's L'Îsle Joyeuse for your listening
enjoyment.
(Use right mouse button on note icon to start and control music)
The heart of every microwave oven is the high voltage system . Its purpose is to generate microwave
energy. The high-voltage components accomplish this by stepping up AC line voltage to high voltage,
which is then changed to an even higher DC voltage. This DC power is then converted to the RF energy
that cooks the food.
Basic Magnetron Structure
The nucleus of the high-voltage system is the magnetron tube . The magnetron
is a diode-type electron tube which is used to produce the required 2450 MHz of
microwave energy. It is classed as a diode because it has no grid as does an
ordinary electron tube. A magnetic field imposed on the space between the anode
(plate) and the cathode serves as the grid. While the external configurations of
different magnetrons will vary, the basic internal structures are the same. These
include the anode, the filament/cathode, the antenna, and the magnets
The ANODE (or plate) is a hollow cylinder of iron from which an even number of
anode vanes extend inward (see Fig. 2). The open trapezoidal shaped areas
between each of the vanes are resonant cavities that serve as tuned circuits and
determine the output frequency of the tube. The anode operates in such a way
that alternate segments must be connected, or strapped, so that each segment is opposite in polarity to the segment on
either side. In effect, the cavities are connected in parallel with regard to the output. This will become easier to understand
as the description of operation is considered.
http://www.gallawa.com/microtech/magnetron.html (1 of 3)6/7/2004 4:03:00 PM
The Magnetron Tube:Structure and Operation
The FILAMENT (also called heater), which also serves as the
cathode of the tube, is located in the center of the magnetron, and is
supported by the large and rigid filament leads, which are carefully
sealed into the tube and shielded.
The ANTENNA is a probe or loop that is connected to the anode and
extends into one of the tuned cavities. The antenna is coupled to the
waveguide , a hollow metal enclosure, into which the antenna transmits the RF energy.
The MAGNETIC FIELD is provided by strong permanent magnets, which are mounted
around the magnetron so that the magnetic field is parallel with the axis of the cathode.
Basic Magnetron Operation
The theory of magnetron operation is based on the motion of electrons under the combined influence of electric and
magnetic fields. For the tube to operate, electrons must flow from the cathode to the anode. There are two fundamental
laws that govern their trajectory:
1. The force exerted by an electric field on an electron is proportional to the strength of the field. Electrons tend to
move from a point of negative potential toward a positive potential. Figure 3-A shows the uniform and direct
movement of the electrons in an electric field with no magnetic field present, from the negative cathode to the
positive anode.
2. The force exerted on an electron in a magnetic field is at right
angles to both the field itself, and to the path of the electron.
The direction of the force is such that the electron proceeds
to the anode in a curve rather than a direct path.
Effect of the Magnetic Field
In Figure 3-B two permanent magnets are added above and
below the tube structure. In Figure 3-C, assume the upper
magnet is a north pole and you are viewing from that position.
The lower, south pole magnet, is located underneath the
page, so that the magnetic field appears to be coming right
through the page. Just as electrons flowing through a
conductor cause a magnetic field to build up around that
conductor, so an electron moving through space tends to
build up a magnetic field around itself. On one side (left) of
the electron's path, this self induced magnetic field adds to
the permanent magnetic field surrounding it. On the other
side (right) of its path, it has the opposite effect of subtracting
from the permanent magnetic field. The magnetic field on the
right side is therefore weakened, and the electron's trajectory
bends in that direction, resulting in a circular motion of travel
to the anode.
The process begins with a low voltage being applied to the
filament, which causes it to heat up (filament voltage is usually 3 to 4 VAC, depending on the make and model).
Remember, in a magnetron tube, the filament is also the cathode. The temperature rise causes increased
molecular activity within the cathode, to the extent that it begins to "boil off" or emit electrons. Electrons leaving the
surface of a heated filament wire might be compared to molecules that leave the surface of boiling water in the form
of steam. Unlike steam, though, the electrons do not evaporate. They float, or hover, just off the surface of the
http://www.gallawa.com/microtech/magnetron.html (2 of 3)6/7/2004 4:03:00 PM
The Magnetron Tube:Structure and Operation
cathode, waiting for some momentum.
Continued on Page Two
| Back | Send Email | Top of Page | Home Page | FREE samples: The Complete Microwave Oven Service
Handbook
Copyright Information
Unless otherwise noted, all materials at this cite (including without limitation all text, html markup, graphics, and
graphic elements) are copyrighted ©, 1989-2001 by J. Carlton Gallawa. The material available through this site
may be freely used for attributed noncommercial educational purposes only. We ask that due credit and
notification be given the author.
All materials appearing on this website may not be reproduced, stored in any retrieval system, or used in any way
for commercial purposes without the express prior written permission of the copyright holder.
Send correspondence to: Microtech, P.O. Box 940, Gonzalez, Florida 32560
Disclaimer: The author assumes no liability for any incidental, consequential or other liability from the use of this
information. All risks and damages, incidental or otherwise, arising from the use or misuse of the information
contained herein are entirely the responsibility of the user. Although careful precaution has been taken in the
preparation of this material, we assume no responsibility for omissions or errors.
#127031
http://www.gallawa.com/microtech/magnetron.html (3 of 3)6/7/2004 4:03:00 PM
Complete Microwave Oven Repair Handbook on CD-ROM: Operation, Troubleshooting, Repair
Available NOW on Interactive Multimedia CD-ROM
Completely Updated
The Original...
THE COMPLETE MICROWAVE OVEN SERVICE
HANDBOOK
Operation, Maintenance, Troubleshooting and Repair
by J. Carlton Gallawa
Copyright © 2004
The "All-in-One" Microwave Oven Maintenance and
Repair Answerbook on CD-ROM
Plus:
●
●
●
●
●
●
●
●
●
YOU GET all the information from
key video segments of the
acclaimed 4-hour instructional
video, The Complete Microwave
Oven Service Handbook v. 2000 on
CD-ROM
Virtually 1000s of microwave oven
repair case histories with factory
approved troubleshooting and
repair procedures
Factory troubleshooting charts,
error codes, schematics and
diagnostic procedures
Touch panel (key pad) matrix
diagrams for 100s of brands
Hundreds of vividly colored
schematics, diagrams, illustrations
and photos ease the toughest
repair chores.
Fully searchable text for quick
information gathering
All chapters, sections and
references are hyperlinked for fast
and smooth navigating
FREE technical support
Full 30-day, no-questions- asked,
money-back guarantee
Finally, everything
you need to
successfully
troubleshoot and fix
industrial,
commercial and
residential microwave
ovens quickly and
safely.
You'll make more
money that you ever
thought possible
when you can find
and fix problems fast!
Here is a self-paced
CD-ROM-based total
learning environment
for anyone wanting to
learn both basic and
advanced features of
microwave oven
repair. It's packed
with proven, handson tips, practical
troubleshooting
methods and 100's of
time-saving diagrams.
This interactive
training CD-ROM will
show you how to
easily and accurately
perform all your
microwave oven
servicing chores in a
http://www.gallawa.com/microtech/microwave_repair_handbook.html (1 of 3)6/7/2004 4:05:00 PM
What Professional Technicians
Are Saying:
What's more, the CD covers
individual components and
devices in easy-to-find interactive
sections. This helps you get the
important repair facts you need
when working with: high voltage
components ... controllers and
timers ... safety protection
circuits ... cooling and energy
dispersions systems ... and more.
HTML Samples
(Just click. Loads without
Acrobat Reader)
●
●
●
●
Chapter 3 - Safety of
Microwave Energy--An
Objective Discussion
Chapter 7 - The HighVoltage System
Chapter 8 - Control Systems
Chapter 13 Troubleshooting control
panel and touch panel
problems
Complete Microwave Oven Repair Handbook on CD-ROM: Operation, Troubleshooting, Repair
flash.
Using a powerful
combination of
interactive text and
vividly colored
graphics, this CDROM course is one of
the most effective
training tools
available.
What Professional Technicians Are Saying About The
CD-ROM:
"The author covers all aspects of microwave ovens with
everything from the original Amana Radar Range to the current
power-cooking GE Advantium oven. There is a wealth of
information to be learned from this disk. As a field technician
with thousands of repairs under my belt, I was surprised with not
only the amount of information that I personally learned in
reviewing this guide, but also a few quick diagnostic procedures
I simply didn't know existed. Not only do you get theory of
operation and basic troubleshooting, but also an array of video
clips, illustrations, wiring diagrams, and tips for proper repairs of
both domestic and commercial models. The handbook is an easyto-follow guide for beginners covering important safety
procedures and diagnostics. It is also crafted as a unique
reference for the well-seasoned journeyman. Packed with
information, this CD is a must for all technicians…"
--Michael T. Maitino, Product Review, Appliance Service
News, October 2001 Issue
"I must say that I am impressed. These documents are very well
thought out and presented indeed. I have spent many hours
studying the content of the CD and have taken the liberty of
printing out the whole document and having it bound into book
form so that I have a hard copy reference. The whole document
is first class, as well as being superb reference material...Overall
the whole document is fantastic."
--Gregory Dand, Central Coast Microwave, Gosford, Australia
"Expert repair service serving the Central Coast of New South
Wales with a 48-hour turnaround time."
"It's an incredible CD, obviously well thought out, clear and
concise in all aspects including contact info of tool suppliers-Well done John!"
--Barry Nicholls, Bridgetown, Barbados
http://www.gallawa.com/microtech/microwave_repair_handbook.html (2 of 3)6/7/2004 4:05:00 PM
Complete Microwave Oven Repair Handbook on CD-ROM: Operation, Troubleshooting, Repair
"After viewing this CD, all I can say is, 'WOW!' and again,
'WOW!' These were the same sentiments expressed by my
experienced technician who works on microwave ovens for my
business… I don't know how much this CD sells for, but it
should be worth hundreds of dollars to existing microwave oven
technicians or those who know very little about microwave
ovens before they begin to look at this excellent CD instructional
handbook."
--Captain Toolhead, Appliance Service News, October 2001
Issue
"Since I have received your CD I have fixed numerous
microwaves by referring to it."
--John Kinnally, Revere, Massachusetts
1-800-700-UFIX
(8349)
Use your major credit card to
order your personal copy
The Complete
Microwave Oven
Service Handbook on
CD
Operation, Maintenance,
Troubleshooting & Repair
2004
Professional Edition
$79.95 - $10.00 Internet Discount =
$69.95 (Florida, USA, residents add 7%
sales tax), plus $5.50 shipping and handling
within continental U.S. (Cost of shipping to
destinations outside of the continental U.S.
varies)
Copyright © 1989 - 2004 by John C. Gallawa. All Rights Reserved
Worldwide
You are visitor number 88115
http://www.gallawa.com/microtech/microwave_repair_handbook.html (3 of 3)6/7/2004 4:05:00 PM
Typical Magnetron Anode and Resonant Structure
Actual Dissected Magnetron Tube
Photo courtesy of Sam Goldwasser:Sci.Electronics.Repair FAQ: http://www.repairfaq.org/
| Back | Send Email | Top of Page | Home Page |
http://www.gallawa.com/microtech/maganode.html6/7/2004 4:08:46 PM
Safety of Microwaves Used In Microwave Ovens
-From the book on CD-ROM,
The COMPLETE MICROWAVE OVEN SERVICE HANDBOOK
Operation, Maintenance, Troubleshooting and Repair
Copyright © 1989-2000 J. Carlton Gallawa . All Rights Reserved Worldwide
3.1 INTRODUCTION
In 1926, Soviet naturalist Vernadskii wrote, "We are surrounded and penetrated, at all
times and at all places, by eternally changing, combining, and opposing radiations of
different wavelengths." He was referring to electromagnetic radiation emanating from
the sun and other sources in earth’s galaxy that finds its way into our atmosphere. Vernadskii
had no way of knowing that within fifty years his observation would apply as well to radiation
generated here on earth by his fellow man. —Paul Brodeur, The Zapping of America, (Norton,
1977) p. 15.
Since the development of radar, man’s ability to generate and harness microwaves has resulted
in such a proliferation of devices using microwaves that today virtually everyone on earth is
affected by them to some degree. Some environmentalists call it "electronic smog," and one
United States government agency warned that the levels Americans are exposed to every day,
without even being aware of it, may be dangerous.
Particularly in some urban areas, microwave and related radiation is estimated to be up to a
billion times or more as great as that which naturally exists in the environment. And sources of
this kind of radiation are increasing rapidly.
Airports have navigational systems that use microwaves, and police radar operates on
microwave frequencies. Television, telephone, and computer signals are transmitted by
microwaves. Broadcasting, surveillance, and communications satellite systems utilize
microwaves, as do some air pollution monitoring systems. Motorist-aid call boxes along the
highway, many burglar alarm systems, and some automatic garage door openers work because
of microwaves.
http://www.gallawa.com/microtech/Ch3.html (1 of 8)6/7/2004 4:11:32 PM
Safety of Microwaves Used In Microwave Ovens
The world of medicine uses them for sterilization, to retard tumor growth, and to treat sore
muscles. Industry and science each have their own uses for microwaves. Researchers in Canada
have developed an aircraft that can stay aloft for months at a time without fuel. The plane is
powered by electricity, which is beamed up as microwave energy, then converted back into
electrical energy, which powers the engine. The military, by far the largest users of microwave
devices in today’s world of electronic warfare, employ microwaves for such things as guidance
systems for nuclear missiles and antimissile missiles, range finders for tanks, and for
eavesdropping.
The Soviets allegedly used microwaves to irradiate the American Embassy in Moscow.
Conversely, American warships would, reportedly, pull alongside Russian surveillance trawlers
on the high seas, turn on their radars at full megawatt power, and "paint" the Soviet vessels with
radiation. This would burn out the trawlers’ electronic listening devices, and probably accounts
for the fact that Russian sailors were seldom seen on deck. — Paul Brodeur, The Zapping of
America, (Norton, 1977) p. 308.
This era of energy pollution has brought about growing concern regarding the potential risks
involved in exposure to low-level microwave radiation, in particular from microwave ovens, the
most common consumer use of microwave energy. With the skyrocketing popularity of
microwave ovens, some are seriously questioning the wisdom of bringing these microwaveemitting devices into our homes when the effects of microwaves on the human system are not
yet completely understood. Extensive research that began particularly in the mid-1970’s in the
United States, and as far back as the 1930’s in Russia, is now rendering some interesting and
controversial results.
3.2 MICROWAVES—HOW DANGEROUS ARE THEY?
If microwaves in an oven can cook a piece of beef, they will also have the same effect on
human tissue if exposed to high enough intensities for a long enough period of time. Certain
body organs are particularly sensitive to this thermal effect. Thermal means heat. Just as it is
the heat produced by a hot stove that causes the careless cook to voice a sudden unsavory
expletive, so too, it is the heat generated by the microwaves that creates the hazard in this case.
For example, if the lens of the eye were exposed to excessive heat from microwaves, its
circulatory system would be unable to provide sufficient cooling, and it would cook like the
white of an egg. Exposure to high levels of microwaves can cause cataracts. Also, the stomach,
intestines and bladder are especially sensitive to thermal damage from high levels of
microwaves. Likewise, the testes are very sensitive to changes in temperature, since sperm can
be formed only at temperatures lower than that of the body itself. Thus, accidental exposure to
high levels of microwave energy can alter or kill sperm, producing temporary sterility. The
question is: How intense would levels of microwave energy have to be to create such a danger?
3.3 MEASURING MICROWAVES
The power density of microwaves is determined by measuring the amount of energy that flows
http://www.gallawa.com/microtech/Ch3.html (2 of 8)6/7/2004 4:11:32 PM
Safety of Microwaves Used In Microwave Ovens
through one square centimeter (a square centimeter is about the size of an aspirin tablet) of
space in one second. Western scientists believed that serious injuries could result only at levels
of 100 Milliwatts per square Centimeter (mw/ cm2) or higher. It was theorized that a built in
safety factor of 10 times would be a safe margin. So, in the mid-1950’s a voluntary industry
standard of 10 mw/cm2 (or, one-tenth of 100 mw/cm2) was adopted.
In 1971, due to the concern of the Department of Health, Education and Welfare (now the
Department of Health and Human Services), the standard for allowable leakage from
microwave ovens in the United States was set by law to the present, more stringent, levels of
1mw/cm2 (at a distance of five centimeters--see Section 15.7) prior to acquisition by a
purchaser, and 5mw/cm2 thereafter. These safety standards were based on the belief that the
only danger from exposure to high-intensity microwave energy was a thermal or overheating
effect.
3.4 SOVIET STANDARDS
In the U.S., exposure standards were being developed mainly under the American National
Standards Institute by a broad group of scientists and by representatives of users and
manufacturers. While in East European countries and, in particular, Russia, the exposure
standards were being determined by a specialized research institute on occupational health.
Rather than concentrating on the effects of high-intensity levels, ‘Soviet scientists were
focusing their efforts on the lesser-known effects of prolonged or repeated exposure to low
levels of microwaves. Their research, which began quite some time before that of their Western
counterparts, has yielded some rather unsettling reports. Soviet studies show that long-term
exposure to low levels of microwave energy could result in unpleasant effects that are not
attributable to over-heating (or thermal effect) alone. These effects could be seen at exposure
levels at and below 10mw/cm2, which is the occupational safety standard in the U.S.
The USSR, and other European countries, has thus set their own strict guidelines for microwave
safety, concluding that Western safety standards are simply not safe. For example, Russian
workers are required to wear protective goggles any time they are temporarily exposed to a
microwave radiation level of 1mw/cm2, a level routinely allowed to leak (although in recent
years, rarely does) from U.S. microwave ovens.
These reports have provoked a reexamination of Western safety standards and heightened
experimentation. Several American laboratories have since found low-level exposure to
microwaves to cause cumulative harmful effects on the eye, such as cataracts. (Cumulative
means that one low-level dose in itself would not be enough to affect you, but if you add
another and another, and so on, then eventually the effects would be seen.) Research also
reports a reduction in personnel efficiency, and in the ability to perform certain tasks, and even
a possible link to cancer. Thus, while not all the research is complete, there has been enough
evidence in support of Soviet findings to likely cause an eventual toughening of U.S. standards.
3.5 WHAT ARE SAFE LEVELS OF EXPOSURE?
http://www.gallawa.com/microtech/Ch3.html (3 of 8)6/7/2004 4:11:32 PM
Safety of Microwaves Used In Microwave Ovens
No one really knows for sure how to interpret the emerging results as painstaking
experimentation continues. One thing they do know, however, is that there is a non-thermal
effect from microwaves at levels that many people may be exposed to on a daily basis. What
degree of danger does this non-thermal effect represent? The answer to that has to do with the
controversial difference between a simple biological effect and a serious biological hazard. For
example, a reduction in the ability to perform certain tasks may be the effect, but at what point
does that effect constitute a hazard?
So, what are safe levels of exposure to microwaves? While vigorously warning of the invisible
dangers involved with non-ionizing radiation, Dr. Milton M. Zaret, a professor of
ophthalmology, and a long time student of the biological effects of microwaves, answers: "I
have no idea what a safe level is, I don’t think anyone in the world knows what a safe level is."
The effects of long term exposure to low levels of microwaves, and their significance to human
health, will become clear only after large numbers of people who are being exposed to
microwaves are studied for many years. Studies are being done with animals, but it is difficult
to translate the effects of microwaves on animals to possible effects on humans. For example,
researchers find it quite difficult to simulate the conditions (with animals) under which people
use microwave ovens. Since no one can say with certainty what levels of exposure are safe, the
course of wisdom would be, as a U.S. government spokesman pointed out, to avoid "exposure
to any unneeded radiation.’’
3.6 HOW FAR AWAY IS SAFE?
One pertinent characteristic of microwaves is that they disperse and dissipate very quickly in
the atmosphere. For example, the maximum allowable leakage from a microwave oven (after
the sale) is 5 milliwatts of microwave radiation per square centimeter at approximately 2 inches
from the oven surface. However, as Figure 3-1 illustrates, as you move away from the oven, the
http://www.gallawa.com/microtech/Ch3.html (4 of 8)6/7/2004 4:11:32 PM
Safety of Microwaves Used In Microwave Ovens
level of exposure to any energy that may be leaking decreases dramatically. This may be
likened to holding your hand immediately above a burning candle as opposed to holding it 4, 8
or 12 inches away. Say you are standing 2 inches away from a microwave oven, and are being
"zapped" by 5mw/cm2 of microwave energy, then you wisely step back to a distance of 20
inches or roughly an arm’s length. Your level of exposure would drop by a factor of 100, (the
square of the distance) to .05mw/cm2, a level compatible even with stringent Soviet standards,
(present Soviet occupational standard allows up to 0.1mw/cm in no more than two hours).
However, it must be noted that Czech scientists have reported some effects even at these
infinitesimal levels. This, combined with the opinion of Russian scientists that microwave
effects are cumulative, certainly underscores the need for consumers and servicers alike to
observe certain common sense precautions.
• Stay at least an arm’s length away from the front of an operating oven. This is
especially so with pregnant women according to a U.S. government agency, which states
http://www.gallawa.com/microtech/Ch3.html (5 of 8)6/7/2004 4:11:32 PM
Safety of Microwaves Used In Microwave Ovens
that the human fetus is "probably the most sensitive segment of the population
potentially exposed to microwave radiation." Children represent another sensitive
segment of the population. Never should anyone, and especially children, stand gazing
into, or directly against an operating microwave oven.
• If the door of an oven will not close properly, is bent, warped, tampered with, or
otherwise damaged in any way, DO NOT OPERATE the oven unless you are a qualified
servicer with an approved RF survey meter in hand.
• Never operate an oven when it is empty. This creates a no-load condition, which can
damage the oven and cause excess leakage.
• Never inactivate, interfere with, or try to adjust the built-in safety interlock system of
an oven, unless you are properly equipped and qualified to do so. Tampering with safety
interlocks would be as foolish as disconnecting the brakes on a car.
• The Food and Drug Administration recommends that microwave ovens not be used in
home canning. It is believed that they do not produce or maintain temperatures high
enough to kill harmful bacteria.
Observing these safety suggestions, as well as others that will be presented in subsequent
chapters of this book, will help to minimize exposure levels and the risk of serious accidents.
—Our thanks to the publishers of AWAKE! Magazine. Much of the preceding
information was adapted from the 3/22/81 (pp. 13-15), 4/22/81 (pp. 12-15), and 5/22/81
(pp. 27-28) issues of AWAKE!
3.7 MICROWAVES AND CARDIAC PACEMAKERS
It has been a subject of great concern, especially for many
heart patients, that stray leakage from microwave ovens
could interfere with the proper operation of their cardiac
pacemakers. The fact is, there are at least 20 other known
sources of electromagnetic interference that could also
cause a pacemaker to malfunction if it were non-shielded.
RF interference is generated by such common items as:
electric shavers, auto ignition systems, walkie-talkie
radios, fluorescent lights, and dial telephones. Many more
of these electronic interference-emitting products are
commonplace items even in hospitals; diathermy, electrosurgical units, electric bed motors, elevators, personnel
pagers, electric heaters and heating pads, to mention a few.
The problem has been resolved, for the most part, with the development of a new shielded
http://www.gallawa.com/microtech/Ch3.html (6 of 8)6/7/2004 4:11:32 PM
Safety of Microwaves Used In Microwave Ovens
pacemaker. Since microwaves, or any other type of electronic interference, cannot penetrate
their stainless steel casing, the possibility of harm to people who wear these modern heart
pacemakers is extremely remote. In an effort to determine the overall susceptibility of these
units to electromagnetic interference, U.S. government agencies contacted all known U.S.
manufacturers of cardiac pacemakers. Their findings indicate that less than 1% of all
pacemakers are sensitive to electronic interference and this number is rapidly decreasing.
Apparently, the external demand type of pacemaker continues to be a particularly sensitive
device, so wearers of this type of pacemaker should avoid all possible sources of electronic
interference. In fact, all patients with pacemakers would be well advised to contact the
manufacturer of the unit and consult with their physicians for the final word on this matter.
While signs that warn "MICROWAVE IN USE" are not a federal requirement, local
administrations or establishment owners may prefer to display such signs for various reasons.
For example, some may display warning signs for their own protection (like a "watch your step"
sign), to avoid the possible psychological trauma that could be suffered by an unwary
pacemaker patient who suddenly discovers that he is sitting next to an operating microwave
oven.
3.8 RADIATION INJURIES FROM MICROWAVE OVENS?
A 1986 report on microwave oven radiation by, among others, the Food and Drug
Administration, has this to say: "There have been allegations of radiation injury from
microwave ovens. The injuries known to FDA, however, have been injuries that could have
happened with any oven or cooking surface. For example, people have been burned by hot
food, spattering grease, or steam from food cooked in a microwave oven.
3.9 COLOR TELEVISION EMISSIONS
While not necessarily related to microwave safety, these types of emissions merit brief
consideration because they are in the same family as microwaves, and are very often the subject
of consumer concern.
Emissions from color TV sets are of the nature of X-rays, which are more serious and
penetrating than low-level microwaves. However, modern circuitry improvements, combined
with the stringent regulatory control of the Food and Drug Administration (FDA), have brought
color TV emission levels to below that of certain natural background radiations. Just as there is
a greater risk of excessive leakage from older, or improperly serviced, microwave ovens, so too,
the same potential hazard exists with color television sets. In either case, it would be the course
of wisdom to observe appropriate precautions. Use discretion when buying a used color TV set
or microwave oven. Selection of a repairman should be done with scrutiny. And, sit or stand no
closer to the unit than is necessary.
A Final Word
http://www.gallawa.com/microtech/Ch3.html (7 of 8)6/7/2004 4:11:32 PM
Safety of Microwaves Used In Microwave Ovens
As with so many modern conveniences, the benefits must be weighed against the hazards, the
risks against the rewards. Sometimes this can be a delicate and a controversial balance. So,
while these devices must be used at one’s own risk, the application of common sense and
caution will certainly minimize the risk factor in this balance. A growing knowledge and
understanding of electromagnetic radiation is producing a better perspective, enabling a more
clear definition of just what the balance is in each case and allowing each person to draw his or
her respective a conclusions accordingly. Meanwhile, the controversy, the debate, and the
research continue.
And, so do the repairs...
BACK | HOME | ABOUT THIS CD-ROM | ABOUT THE AUTHOR
Copyright © 1989-2000 J. Carlton Gallawa . All Rights Reserved Worldwide
http://www.gallawa.com/microtech/Ch3.html (8 of 8)6/7/2004 4:11:32 PM
Introduction to the High Voltage System Used in Microwave Ovens
THE COMPLETE MICROWAVE OVEN SERVICE HANDBOOK: Operation, Maintenance,
Troubleshooting and Repair
Copyright © 1989-2000 J. Carlton Gallawa . All Rights Reserved Worldwide
7.1 INTRODUCTION
The purpose of the high-voltage system (Fig. 7-1) is to
generate microwave energy. The heart of the
microwave oven, it steps up AC line voltage to high
voltage, changes the high AC voltage to an even higher
DC voltage, and then converts the DC power to RF
energy.
The nucleus of the high-voltage system is the
MAGNETRON TUBE.
7.2 MAGNETRON TUBE
http://www.gallawa.com/microtech/Ch7Pg1.html (1 of 3)6/7/2004 4:12:04 PM
Introduction to the High Voltage System Used in Microwave Ovens
The magnetron tube is a diode-type electron tube
that is used to produce the required 2450 MHz of
microwave energy. It is classed as a diode because
it has no grid, as does an ordinary electron tube. A
magnetic field imposed on the space between the
anode (plate) and the cathode serves as the grid.
Figure 7-2 is a sectional view of a typical
magnetron tube. While the outer configurations of
different type magnetrons will vary by make and
model, the basic internal structures are the same.
These are the anode, the filament/cathode, the
antenna and the magnets.
The ANODE (or plate) is a hollow
cylinder of iron from which an even
number of anode vanes extend inward, as
shown in Figure 7-3 and Figure 7-3A.
The open trapezoidal shaped areas
between each of the vanes are resonant
cavities, which serve as tuned circuits,
and determine the output frequency of the
tube. The anode operates in such a way
that alternate segments must be
connected, or strapped, so that each
segment is opposite in polarity to the
segment on either side. In effect, the
cavities are connected in parallel with
regard to the output. This will be become easier to understand as the description of
operation is considered.
The FILAMENT (also referred to as the heater), which also serves as the CATHODE of
the tube, is located in the center of the magnetron and is supported by the large and rigid
filament leads which are carefully sealed into the tube and shielded.
The ANTENNA, a probe or loop connected to the anode and extending into one of the tuned
cavities, is coupled to the waveguide into which it transmits the RF energy.
The other parts of the magnetron assembly may vary in their relative positions, size and
shape, depending on the manufacturer. To keep the following explanation of operation as
simple as possible, only the terms that are not self-explanatory as to their purpose will be
http://www.gallawa.com/microtech/Ch7Pg1.html (2 of 3)6/7/2004 4:12:04 PM
Introduction to the High Voltage System Used in Microwave Ovens
elaborated on.
The MAGNETIC FIELD is provided by strong permanent magnets, which are mounted
around the magnetron so that the magnetic field is parallel with the axis of the cathode.
7.3 BASIC MAGNETRON OPERATION
The theory of magnetron operation is based on the motion of electrons under the combined
influ- (continued next page)
BACK | HOME | ABOUT THIS BOOK | ABOUT THE AUTHOR | NEXT PAGE
Copyright © 1989-2000 J. Carlton Gallawa . All Rights Reserved Worldwide
http://www.gallawa.com/microtech/Ch7Pg1.html (3 of 3)6/7/2004 4:12:04 PM
The Magnetron Tube
THE COMPLETE MICROWAVE OVEN SERVICE HANDBOOK: Operation, Maintenance,
Troubleshooting and Repair
Copyright © 1989-2000 J. Carlton Gallawa . All Rights Reserved Worldwide
Chapter Seven: The High-Voltage System (continued)
ence of electric and magnetic fields. For the tube to operate, electrons must flow from the
cathode to the anode. There are two basic laws that govern this motion:
1. The force exerted by an electric field on an electron is proportional to the
strength of the field. Electrons tend to move from a point of negative
potential toward a positive potential.
Figure 7-4A (below) shows the uniform and direct movement of the electrons in an
electric field, from the negative cathode to the positive anode, with no magnetic field
present.
2. The force exerted on an electron in a magnetic field is at right angles to
both the field itself, and to the path of the electron.
The direction of the force is such that the electron proceeds to the anode in a curve rather
than a direct path.
http://www.gallawa.com/microtech/Ch7Pg2.html (1 of 3)6/7/2004 4:12:47 PM
The Magnetron Tube
7.3.1 Effect of the Magnetic Field
In Figure 7-4B two permanent magnets are added above and below the tube structure. In
Figure 7-4C, assume the upper magnet is a North Pole and you are viewing from that
position. The lower, South Pole magnet, is located underneath the Figure so that the
magnetic field appears to be going right through the paper. Just as electrons flowing
through a solid wire cause a magnetic field to build up around the wire, so an electron
moving through space tends to build up a magnetic field around itself. On one side (left)
of the electron’s path, this self-induced magnetic field adds to the permanent magnetic
field surrounding it. On the other side (right) of its path, it has the opposite effect of
http://www.gallawa.com/microtech/Ch7Pg2.html (2 of 3)6/7/2004 4:12:47 PM
The Magnetron Tube
subtracting from the permanent magnetic field. The magnetic field on the right side is
therefore weakened, and the electron’s trajectory bends in that direction, resulting in a
circular motion of travel to the anode.
The process begins with a low voltage being applied to the filament which causes it to
heat up (filament voltage is usually 3 to 4 VAC, depending on the make and model).
Remember, in a magnetron, the filament is also the cathode. The temperature rise causes
increased molecular activity within the cathode to the extent that it begins to "boil" off or
emit electrons. Electrons leaving the surface of a heated filament wire might be compared
to molecules that leave the surface of boiling water in the form of steam. The electrons,
however, do not evaporate. They float just off the surface of the cathode, waiting for some
momentum.
Electrons, being negative charges, are strongly repelled by like negative charges. So this
floating cloud of electrons would be repelled away from a negatively charged cathode.
The distance and velocity of their travel would increase with the intensity of the applied
negative charge. (Continued on next page)
PREVIOUS PAGE | HOME | ABOUT THIS BOOK | ABOUT THE AUTHOR | NEXT PAGE
http://www.gallawa.com/microtech/Ch7Pg2.html (3 of 3)6/7/2004 4:12:47 PM
Description of How A Magnetron Tube Operates
THE COMPLETE MICROWAVE OVEN SERVICE HANDBOOK: Operation, Maintenance,
Troubleshooting and Repair
Copyright © 1989-2000 J. Carlton Gallawa . All Rights Reserved Worldwide
Chapter Seven: The High-Voltage System (continued)
The process begins with a low voltage being applied to the filament which causes it to heat up (filament
voltage is usually 3 to 4 VAC, depending on the make and model). Remember, in a magnetron, the
filament is also the cathode. The temperature rise causes increased molecular activity within the cathode
to the extent that it begins to "boil" off or emit electrons. Electrons leaving the surface of a heated
filament wire might be compared to molecules that leave the surface of boiling water in the form of
steam. The electrons, however, do not evaporate. They float just off the surface of the cathode, waiting
for some momentum.
Electrons, being negative charges, are strongly repelled by like negative charges. So this floating cloud
of electrons would be repelled away from a negatively charged cathode. The distance and velocity of
their travel would increase with the intensity of the applied negative charge. Momentum is thus provided
by a negative 4000 volts DC, which is produced by means of the high-voltage transformer and the
doubler action of the diode and capacitor. (4000 VDC is an average; the actual voltage varies with make
and model.) A negative 4000-volt potential on the cathode puts a corresponding positive 4000-volt
potential on the anode. Needless to say, the electrons leave the vicinity of the cathode with vigor, and
accelerate straight toward the positive anode—But not for long.
As the electrons hasten toward their objective, they encounter the powerful magnetic field. The effect of
the two permanent magnets, positioned so that their magnetic field is applied parallel to the cathode,
tends to deflect the speeding electrons away from the anode as described earlier. Figure 7-4D (previous
page) shows the effect of the magnetic field on the path of the electron. Instead of traveling straight to
the anode, they curve to a path at almost right angles to their previous direction, resulting in an
expanding circular orbit around the cathode that eventually reaches the anode.
PREVIOUS PAGE | HOME | ABOUT THIS BOOK | ABOUT THE AUTHOR | NEXT PAGE
Copyright © 1989-2000 J. Carlton Gallawa . All Rights Reserved Worldwide
http://www.gallawa.com/microtech/Ch7Pg3.html6/7/2004 4:13:04 PM
Resonant Circuits in a Magnetron Tube
THE COMPLETE MICROWAVE OVEN SERVICE HANDBOOK: Operation, Maintenance, Troubleshooting
and Repair
Copyright © 1989-2000 J. Carlton Gallawa . All Rights Reserved Worldwide
Chapter Seven: The High-Voltage System (continued)
The whirling cloud of electrons, influenced by
the high voltage and the strong magnetic field,
form a rotating pattern that resembles spokes in
a spinning wheel (Fig. 7-5). The interaction of
this rotating space-charge wheel with the
configuration of the surface of the anode
produces an alternating current flow in the
resonant cavities of the anode. This is explained
as follows: as a "spoke" of electrons approaches
an anode vane (or the segment between two
cavities), it induces a positive charge in that
segment. As the electrons pass, the positive
charge diminishes in the first segment while
another positive charge is being induced in the
next segment.
Current is induced because the physical
structure of the anode forms the equivalent of a
series of high-Q resonant inductive-capacitive
(LC) circuits. The effect of the strapping of
alternate segments (mentioned earlier) is to
connect the LC circuits in parallel (Fig. 7-6).
http://www.gallawa.com/microtech/Ch7Pg4.html (1 of 3)6/7/2004 4:13:24 PM
Resonant Circuits in a Magnetron Tube
7.3.2 Resonant Circuits
A resonant circuit consists of a coil and capacitor connected in
parallel and produces high-frequency current flow as next
explained in Figure 7-7. In step 1, the battery (which represents
the energy being supplied to the circuit by the passing "spoke"
of electrons) will charge up capacitor Cl. In step 2, when S1 is
switched to position "B" (which represents the electrons having
passed by and therefore no longer inducing a charge) the
capacitor discharges through coil L1. The current flow through
the coil causes a magnetic field to develop around the coil,
which is accompanied by an internally induced voltage of a
polarity that opposes the capacitor discharge. In step 3, Cl has
completely discharged and the energy is now stored in the
magnetic field that surrounds the coil. In step 4, the magnetic
field begins to collapse around the coil causing the voltage
induced within it to change polarity. This tends to keep the
current flowing in the original direction, which at step 5, charges the capacitor with a polarity
opposite from its original charge. Consequently, at step 6 the capacitor again discharges through the
coil, although in an opposite direction, starting the process all over.
http://www.gallawa.com/microtech/Ch7Pg4.html (2 of 3)6/7/2004 4:13:24 PM
Resonant Circuits in a Magnetron Tube
This seesaw action can produce extremely high oscillations, the frequencies of which are determined
by the values of the capacitance and the inductance.
In each resonant cavity of a magnetron tube, the walls act as an inductor (or a coil), and the parallel
sides of the opening form the plates of a capacitor (refer back to Fig. 7-5). Since the amount of
inductance and capacitance is very small, the frequency of the alternating current is (continued next
page)
PREVIOUS PAGE | HOME | ABOUT THIS BOOK | ABOUT THE AUTHOR | NEXT PAGE
Copyright © 1989-2000 J. Carlton Gallawa . All Rights Reserved Worldwide
http://www.gallawa.com/microtech/Ch7Pg4.html (3 of 3)6/7/2004 4:13:24 PM
About the Microwave Oven Waveguide and Magnetron RF Capacitors
THE COMPLETE MICROWAVE OVEN SERVICE HANDBOOK: Operation, Maintenance,
Troubleshooting and Repair
Copyright © 1989-2000 J. Carlton Gallawa . All Rights Reserved Worldwide
Chapter Seven: The High-Voltage System (continued)
very high. The electromagnetic oscillations produced in the resonant cavities are
intercepted by the antenna, which then couples the energy into a waveguide.
7.3.3 The Waveguide
Microwave energy cannot
travel through a solid
conductor, so the antenna
radiates the RF power into
a waveguide. The
waveguide, a hollow metal
tube (Fig. 7-8), transports
the microwave energy into
the oven cavity. Most
microwave ovens use a
rectangular shaped
waveguide, through which
the waves of energy travel
by reflecting from side to
side in a zigzag pattern.
7.3.4 RF Capacitors
In order to prevent small amounts of RF current from backfeeding down the magnetron
tube filament leads, which would cause excessive radio and television interference, by-
http://www.gallawa.com/microtech/Ch7Pg5.html (1 of 2)6/7/2004 4:13:49 PM
About the Microwave Oven Waveguide and Magnetron RF Capacitors
pass (or RF)
capacitors and ferrite
rings are added to the
magnetron assembly
(Fig. 7-9). By-pass
capacitors filter off
any backfeeding
current to ground. The
ferrite rings are
magnetic and oppose
high-frequency
current flow.
7.3.5 Cooling Fins
Other features of the
magnetron structure
are the cooling fins,
which dissipate the
tremendous heat
generated by an
oscillating magnetron,
usually maintaining an operating temperature of about a 260 deg. F (86 deg. C).
(continued on next page)
PREVIOUS PAGE | HOME | ABOUT THIS BOOK | ABOUT THE AUTHOR | NEXT PAGE
Copyright © 1989-2000 J. Carlton Gallawa . All Rights Reserved Worldwide
http://www.gallawa.com/microtech/Ch7Pg5.html (2 of 2)6/7/2004 4:13:49 PM
Proper Phasing and Life Expectancy of Magnetrons Used in Microwave Ovens
THE COMPLETE MICROWAVE OVEN SERVICE HANDBOOK: Operation, Maintenance,
Troubleshooting and Repair
Copyright © 1989-2000 J. Carlton Gallawa . All Rights Reserved Worldwide
Chapter Seven: The High-Voltage System (continued)
7.3.6 Proper Phasing
Located near the filament terminals are the designations "F" and "FA" (Fig. 7-10). These
insure that proper
phasing is maintained
when reconnecting the
filament and highvoltage leads. Proper
phase relationships, or
polarities, within the
high-voltage circuits
are important. Failure
to observe these
relationships when
reconnecting wires
can put high-voltage
components out of
phase with each other.
This can cause such
symptoms as
intermittent
"popping," and even
the premature failure
of the components.
7.3.7 Magnetron Life Expectancy
The typical life of a magnetron tube is approximately 2000 hours of operation. Some
factors that can diminish the life of a magnetron are: 1) no-load operation, 2) operating
with too much metal in the cooking cavity, 3) line voltage consistently too low or too
high, 4) improper phasing, 5) improper installation or removal, 6) replacing associated
high-voltage components with substitutes that are incompatible with the system design, 6)
http://www.gallawa.com/microtech/Ch7Pg6.html (1 of 2)6/7/2004 4:14:07 PM
Proper Phasing and Life Expectancy of Magnetrons Used in Microwave Ovens
continual operation at the upper limit of its heat tolerance due to inadequate air
circulation, 7) obstruction in the wave-guide, 8) failed stirrer operation.
Coverage of magnetron failure modes, testing, and replacement procedures begins in
Section 12.4.
7.4 TRANSFORMERS
In microwave oven circuits, transformers serve two functions: either they increase (step up)
voltage, or they decrease (step down) voltage. The first type of transformer to be considered will
be the step-up transformer.
7.4.1 High-Voltage Transformer — Fig.
7-11
The high-voltage transformer (also referred
to as power or plate transformer) is of the
step-up vari-ety. With a typical voltage of
120 VAC (± 10%) applied to the primary
winding (some commercial units are
designed to operate with a primary voltage
of 208 to 240 VAC), the transformer will
step the voltage up to approximately 2400
VAC at the sec-ondary output.
Transformers work on a principle called
mutual induction. It is the physical characteristics of the transformer combined with
an input of alternating current that
produces this process.
A simple step-up transformer consists of an
open square or frame of iron called the core. Coils of insulated wire are wound around the two
opposite sides of the core forming two separate coils. (continued)
PREVIOUS PAGE | HOME | ABOUT THIS BOOK | ABOUT THE AUTHOR
Copyright © 1989-2000 J. Carlton Gallawa . All Rights Reserved Worldwide
http://www.gallawa.com/microtech/Ch7Pg6.html (2 of 2)6/7/2004 4:14:07 PM
The Control Systems Used in Microwave Ovens
Exerpts from the CD-ROM:
THE COMPLETE MICROWAVE OVEN SERVICE HANDBOOK: Operation, Maintenance,
Troubleshooting and Repair
Copyright © 1989-2000 J. Carlton Gallawa . All Rights Reserved Worldwide
8.13.05 Triac Drive Circuit
The schematic below shows a typical triac drive circuit. As noted, the triac is an electronic
switch (or solid state relay) that is capable of controlling heavy AC loads with a high duty
cycle.
In a microwave oven, the magnetron is generally supplied by rectified high voltage
obtained with a 50/60 Hz transformer. In models that use a triac, the voltage supplied to
the magnetron power supply is controlled by the triac, which is in series with the primary
winding of the transformer.
The description of operation is as follows. When the oven door is closed and a cook cycle
is initiated, the main microprocessor sends a signal to transistor T1 causing the circuit to
switch on. Next, at a synchronized time that depends on the model, optocoupler PH1 / IC1
(sometimes called photocoupler) activates and provides an output "gate" voltage that
triggers the triac, switching it on and thereby providing a current path to the primary
winding of the high-voltage transformer. The oven lamp, blower motor and stirrer motor
(in some models) are controlled by relay RL1, which is driven by transistor T2.
Current flow through the optocoupler circuit is controlled by a 220-ohm 1-watt limiting
resistor. To protect the circuit from inductive kickback when the load is switched off, a
surge absorber (or snubber) is placed in parallel with triac main current carrying terminals.
The varistor absorbs the potentially destructive energy of incoming transient pulses,
thereby protecting vulnerable circuit components.
http://www.gallawa.com/microtech/Ch8Pg1.html (1 of 2)6/7/2004 4:14:53 PM
The Control Systems Used in Microwave Ovens
- (continued next page)
BACK | HOME | ABOUT THIS CD-ROM | ABOUT THE AUTHOR | NEXT PAGE
Copyright © 1989-2000 J. Carlton Gallawa . All Rights Reserved Worldwide
http://www.gallawa.com/microtech/Ch8Pg1.html (2 of 2)6/7/2004 4:14:53 PM
Microwave Oven Control Systems - Theory of Operation
THE COMPLETE MICROWAVE OVEN SERVICE HANDBOOK: Operation, Maintenance,
Troubleshooting and Repair
Copyright © 1989-2000 J. Carlton Gallawa . All Rights Reserved Worldwide
Chapter Eight: Control Systems (continued)
8.13.1 System Operation
The representative schematics of Figure 8-38 illustrate the typical operation
of a triac-controlled system. Notice that the schematic symbol for a triac
resembles the two SCRs connected in the antiparallel configuration shown
earlier in Figure 8-34. A triac is essentially two silicone rectifiers fabricated
in an antiparallel arrangement with a common gate. To gain a better
http://www.gallawa.com/microtech/Ch8Pg2.html (1 of 2)6/7/2004 4:15:15 PM
Microwave Oven Control Systems - Theory of Operation
understanding of an entire operating system, the explanation to follow is of
a typical triac-controlled circuit in the context of a schematic that includes
all the associated components necessary for an actual working system.
Unfamiliar components that are not explained at this time will be elaborated
upon in subsequent chapters. Refer to Figure 8-38.
SCHEMATIC #1
With the oven plugged into a standard 115 VAC grounded outlet, voltage is
applied through the 15 amp FUSE to the primary of the LOW-VOLTAGE
TRANSFORMER, which sup-plies the operating voltages to the control
circuitry. The time-of-day clock operates and the CONTROL PANEL is
ready to receive instructions.
The oven door is then opened and the CAVITY LIGHT illumi-nates with
current supplied through the normally closed (NC) contacts of the LOWER
DOOR INTERLOCK SWITCH
(Continued on next page)
PREVIOUS PAGE | HOME | ABOUT THIS BOOK | ABOUT THE AUTHOR | NEXT PAGE
http://www.gallawa.com/microtech/Ch8Pg2.html (2 of 2)6/7/2004 4:15:15 PM
Microwave Oven Control Components: Tests and Failures
BACK | HOME | ABOUT THIS CD-ROM | ABOUT THE AUTHOR
Exerpts from the CD-ROM:
THE COMPLETE MICROWAVE OVEN SERVICE HANDBOOK: Operation, Maintenance,
Troubleshooting and Repair
Copyright © 1989-2000 J. Carlton Gallawa . All Rights Reserved Worldwide
(Excerpt)
13.3 SOLID STATE COMMERCIAL TIMERS
When symptoms indicate a possible problem in the timer there are but a few ways in which to test
that likelihood. The symptoms themselves can give ample evidence of a defective control board.
Whereas all of the following symptoms apply to electronic commercial-type timers, many of the
indications are equally symptomatic of most domestic-type electronic control panels.
13.3.1 Symptoms That Can Denote a Defective Electronic Timer
SYMPTOM:
Any type of irregularities or inconsistencies in the display, such as: 1) missing,
dimming, flashing, flickering (a slight fluorescent flicker is normal), or overly bright
numbers or segments; or 2) the occasional appearance of illogical or mysterious
Chinese-like characters (this may also be the result of improper or inadequate
grounding).
SYMPTOM:
Any type of programming problems, for example: 1) Pressing one number or
function and the panel responding with another; or, some pads program and others
do not. These symptoms may be caused by either the touch panel or the control
panel or both. When these panels are available separately, a determination of fault
http://www.gallawa.com/microtech/Ch13.html (1 of 7)6/7/2004 4:16:01 PM
Microwave Oven Control Components: Tests and Failures
must be made. Section 13.5.1 and Appendix I will be of great assistance toward
making a logical conclusion. 2) Limited or no programming functions. An exception
to this symptom is the fact that some models made by Sharp will not program unless
the stop switch is in the closed position. Therefore the oven door must be closed and
the stop switch properly adjusted before the control panel will accept programming.
3) The control panel "locks up"; maybe one or more numbers will be displayed, but
the panel will not reset or program.
SYMPTOM:
The control panel "kicking out" of a cook cycle prematurely, then possibly "locking
up." The oven may have to be unplugged then plugged back in before the panel will
accept programming. Possible causes: poor or improper grounding; or, excessive
amounts of stray RF leakage, either from the latch side of the door, or from the
magnetron within the component compartment. If removing the outer case alleviates
the symptom, suspect leakage from the RF gasket or the internal structure of the
magnetron.
SYMPTOM:
The control panel counts down too quickly or too slowly. Inaccurate timing may also
be the result of an oven (of the type that can be converted from 50 to 60 cycles and
vice-versa) being set for the wrong voltage or frequency for the area in which it is
being used.
SYMPTOM:
The control panel will not start, or fails to count down when started; or, the panel
counts down but neglects to activate the cook relay, triac, stirrer or blower motor, or
other panel-controlled component. This may also be the result of a misadjusted or
defective interlock switch, faulty wiring or related connections, or an open thermal
protector or fuse.
NOTE: The triac or triac module (part of many control units) may be checked in
several ways, all of which are outlined in Sections 13-12 through 13.16.
SYMPTOM:
Either all indicator lights are lit, or no display at all, as though the panel is
"dead." (In the case of no display or a "dead" panel, ensure that the low-voltage
control transformer is supplying the appropriate voltages. Or if the low-voltage
transformer is part of the control board, check for the appropriate input (primary)
voltage to the panel before judging it to be defective.)
SYMPTOM:
http://www.gallawa.com/microtech/Ch13.html (2 of 7)6/7/2004 4:16:01 PM
Microwave Oven Control Components: Tests and Failures
Either a continuous beep or buzz; or none at all.
SYMPTOM:
The timer buttons remain depressed, thus holding the oven in a continuous cook
mode. Litton and some other models use individual pushbuttons that are soldered on
to the printed circuit board. These buttons may stick in the depressed position due to
inadequate clearance through the cutouts in the timer faceplate. In these cases, the
circuit board position may be adjusted to equally center the buttons in their
openings, ensuring that the cutouts and buttons are free of grease and residue. In
more extreme cases, the size of the hole can be increased by filing the sides of the
obstructing cutouts with a small, fine file (the circuit board must be removed first).
Then clean any metal filings from the casting and re-assemble the timer, making
sure that the timer board is centered so that the buttons operate freely.
Self-Diagnosis: As digital circuitry becomes more sophisticated, more
manufacturers are providing a self-diagnostic test sequence that can be programmed
into the control unit. The control panel responds, in most cases, with a code that
indicates the likely problem area. For the respective test and related codes for any of
the various models that offer this feature, consult the appropriate service manual or
contact the manufacturer.
13.4 DOMESTIC CONTROL CIRCUITS—CHECKS AND FAILURES
If new technology is reflected anywhere, it is in the control circuitry of the sophisticated
microwave ovens designed for home use. It seems, paradoxically, that as technology advances, the
field-availability of the corresponding technical data declines. Indeed, the service literature testing
procedures for many control units amount to nothing more than programming instructions,
although the value of these should not be minimized, because not knowing how to operate the oven
you are about to repair can be quite perplexing to the anxious onlooker who owns the unit.
Isolating a fault in a domestic control panel is accomplished, for the most part, by observing
symptoms, just as with the preceding commercial units. In fact, all of the symptoms, causes and
corrections just listed for commercial control panels apply equally to their domestic counterparts.
The service literature supplied by many manufacturers provides input and output data for the
respective control unit. In these cases, a fairly certain diagnosis can be made using that data. A few
non-U.S. manufacturers provide detailed schematic information for their commercial and domestic
control panels. In these cases, the servicer has the option of either attempting to repair the unit at
the board level, or simply replacing the entire panel. Either way, the option is nice.
Many control panels are designed to supply the drive voltage for components such as the blower
and stirrer motors, an external triac or relay, the transformer primary winding, and so forth. The
panel’s output in each case can be verified in the following manner: 1) Unplug the oven, remove
the outer cover and DISCHARGE THE HIGH-VOLTAGE CAPACITOR(S). 2) Attach a meter
http://www.gallawa.com/microtech/Ch13.html (3 of 7)6/7/2004 4:16:01 PM
Microwave Oven Control Components: Tests and Failures
(using insulated alligator clips) capable of the measuring the intended voltage to the input
terminals of the component in question. (When no technical data is available, the appropriate drive
voltage for a given component can usually be ascertained from the case of the component itself). 3)
Operate the oven and observe the reading on the meter. 4) If the proper drive voltage for that
component is shown, the panel is operating normally in that respect. 5) If an abnormal reading is
obtained, either the panel or the wiring in between is at fault.
In conjunction with the preceding symptoms, some additional, rather uniquely domestic-type
control panels symptoms are as follows:
SYMPTOM:
Glass touch panel lock up. The panel will not program or reset and possibly a row of
numbers are displayed. Before replacing the control panel, ensure that the oven is
properly grounded and polarized. Static discharge control panels in ovens
manufactured by Amana and Tappan are particularly sensitive in this respect.
SYMPTOM:
Glass touch panel "starts," but immediately stops and either displays the time
remaining, or reverts to displaying the time of day. Once again, suspect a grounding
or polarization problem first—especially with a Tappan-made model.
SYMPTOM:
The time-of-day clock does not hold or keep the correct time.
SYMPTOM:
Temperature probe, sensor cook or other special features do not function properly.
Do not assume the control panel is at fault, though, until the temperature probe,
humidity sensor, or other related circuitry and wiring are checked. Also, tactfully
determine if the operator is using the feature properly.
SYMPTOM:
The oven cooks constantly, regardless of the power level selected. Check the control
panel’s triac-drive output as described in Section 13.12.2. If a constant voltage is
measured when no cook operation has been initiated, or a constant voltage is shown
during defrost and other low-power operations, the control panel is defective and
must be replaced.
SYMPTOM:
The program erratically shifts or jumps to different functions or memories, or resets
http://www.gallawa.com/microtech/Ch13.html (4 of 7)6/7/2004 4:16:01 PM
Microwave Oven Control Components: Tests and Failures
itself by erasing the display—except possibly for the colon.
SYMPTOM:
If while counting down, the display jumps or skips time, suspect the panel if the
grounding is proper and the polarity correct.
SYMPTOM:
The control module (Amana) appears to be "dead." Indeed, it may well be, but first
check for an open thermal fuse on the magnetron or cavity, or both.
13.5 MYLAR (MEMBRANE) TOUCH PANEL OR THE CONTROL PANEL—WHICH?
For those who like games of chance, the process of determining whether programming problems
are being caused by the control panel or the touch panel can be quite challenging—to your skill as
well as your patience. Making the right choice becomes especially venturesome if the symptoms
are intermittent; it becomes an educated guess with a 50-50 chance of being correct. However, for
those who are not so inclined, the following symptoms, tests and visual indicators will help in
separating the cause from the effect, thereby enabling the most logical deduction.
13.5.1 Membrane Touch Panel Evaluations and Considerations
Examine the ribbon cable for evidence of contaminants or "bleeding" between the lines on the
ribbon. While a certain amount of tarnishing is normal and does not in itself mean the touch panel
should be replaced, the appearance of black spots or fine web-like lines between the silver
conductor traces are good signs that the touch panel should be replaced.
Inspect the area of the ribbon tail that slips into the board connector for cleanliness, for sections
where the silver has worn off, or for evidence of scratching or hairline cracks. If cleaning is
necessary, do so using an alcohol or freon-based contact cleaner. Do not use silicone-based
cleaners or lubricants. Gently rubbing the terminals with a soft pencil eraser will also clean them,
but, a word of caution: test the effect of the eraser on a non-essential area first! Erasers have been
known to clean the silver right off of the ribbon. In many cases, the problem can be resolved
simply by evenly trimming off about 1/16-inch from the tail of the ribbon, leaving fresh new
terminals to assure good electrical contact with the circuit board connector.
A close examination of the front of the membrane touch panel may reveal dents or deep scratches
that may be creating a short in certain touch pads. Also, brightening or dimming of the paneldisplay colons while pressing certain pads is a reasonably good indication that a signal is getting
through to the control panel. In that case, try replacing control panel.
Some additional symptoms that indicate a defective key or touch panel are: 1) Only certain pads or
groups of pads will respond while others will not. 2) Touching a pad produces a string of
characters on the display. 3) One character remains constantly on the display, and disconnecting
http://www.gallawa.com/microtech/Ch13.html (5 of 7)6/7/2004 4:16:01 PM
Microwave Oven Control Components: Tests and Failures
the ribbon connector from the control board removes it. 4) Some or all pads must be pressed hard
or pressed several times to produce a response. 5) The number displayed is different from the one
pressed (i.e., press the "5" pad and a "9" appears on the display).
A categorized collection of used touch panels (or keypads) is a good idea for testing purposes.
Unless they are totally inoperative, do not throw away used touch panels. They take up little room
and can be used very effectively. For example, suppose you replace a touch panel because the "2"
and "4" pads do not work. Label the defective panel appropriately, and save it. One day, a similar
oven comes along, with a different symptom: the "start" pad will not respond. Temporarily replace
the latter touch panel (with the unresponsive "start" pad) with the used touch panel having the
functional "start" pad, and test the unit. If, with the substitute test touch panel installed, the oven
still will not "start", the problem is likely not in the original touch panel. On the other hand, if the
test panel "start" pad works, replace the original touch panel. A categorized collection of the touch
panels—commercial and domestic—will take much of the gamble out of control panel-touch panel
dilemma.
Besides the substitution of a known good panel, the next most certain method of isolating this type
of problem is to make continuity checks through each of the touch unit circuits with an ohmmeter.
However, without specific data on the matrix configuration of the unit to be tested, this is virtually
impossible. Therefore, Appendix I contains many of the common matrix diagrams, listed by make
and model number, and instructions on how they are tested.
An alternate method of checking touch panels when no matrix diagram is available is performed as
follows: 1) Unplug the oven, remove the cover and DISCHARGE THE HIGH-VOLTAGE
CAPACITOR(S). 2) Disconnect one or both leads from the primary side of the high-voltage
transformer so no high voltage will be generated during the test. 3) Remove the flex-tail ribbon
from the control board connector.
USE EXTREME CAUTION WHEN WORKING AROUND "LIVE" CIRCUITS.
4) Plug in the oven and, cautiously, use a jumper to make momentary contact between random
points on the control unit connector. This, in many cases, simulates the touch pad (key unit)
contacts. 5) If the control panel appears to respond in a relatively normal way, the touch panel is
likely the problem. However, assuming this test is compatible with the unit under test, a control
panel that fails to respond is probably defective. NOTE: For lack of access, some models may
require that the control assembly be removed and placed beside the oven with all harness
connections joined.
Many replacement touch panels are shipped with a protective plastic film. If the face of the panel
http://www.gallawa.com/microtech/Ch13.html (6 of 7)6/7/2004 4:16:01 PM
Microwave Oven Control Components: Tests and Failures
has a bubbled or a hazy appearance, it is probably due to this transparent film. Be sure to remove
the plastic film before installing the touch panel.
BACK | HOME | ABOUT THIS CD-ROM | ABOUT THE AUTHOR
http://www.gallawa.com/microtech/Ch13.html (7 of 7)6/7/2004 4:16:01 PM
Samples from The Master Microwave Oven Repair Guide
Samples from the Master Microwave Oven Repair Guide
Copyright © 1998-2000 by John C. Gallawa. All rights reserved worldwide.
AMANA
Models: DQ22HS, RC22, RC22S, RC22MP, RC22MPS, MC22MP, MC22MPT (Commercial
models)
Symptom: Display shows PCE6
Problem: This is what Amana refers to as a "communcations failure" and could be caused by any of
the following:
1. Broken or improper wire connection between high voltage board and low voltage board.
2. Inoperative cable between low voltage board and extended memory board.
3. Inoperative high voltage board
4. Inoperative low voltage board
5. Inoperative extended memory board
Solution: Carefully check for broken, loose or misplaced wires. Repair as necessary. At present there
is no practical way to isolate a defective circuit board other than replacing it.
KENMORE (Sears)
Model: 564.8878430
Symptom: Electrical burning smell during cook.
Problem: Shorted magnetron tube.
Solution: Replace magnetron tube.
PANASONIC
Model: NN-6371WM
Symptom: Stopped working after lightning storm
Problem: Built-in surge protection on printed circuit board has opened. This circuit consists of a fine
foil pattern (or filter coil - depending on the model) that acts to fuse the primary side of the lowvoltage transformer.
Solution: Rebuild the surge protection circuit. Replace the varistor
http://www.gallawa.com/microtech/repair-guide-samples.html (1 of 3)6/7/2004 4:17:09 PM
Samples from The Master Microwave Oven Repair Guide
PANASONIC
Model: NE-8021, NE-8051, NN-4208A, NN-5407, NN-5500A, NN-5512A, NN-6370WM, NN6371WM.N, NN-6372AWM, NN-6381A, NN-6482A, NN-6503A, NN-7524AK
Symptom: No heat, weak heat, or intermittent heat
Problem: Magnetron filament connectors have loosened and, due to resistive heat, the terminal
connections have deteriorated and burned off.
Solution: Repair defective terminals as follows:Either (1) Cut away burned wire, clean the magnetron
terminals, and replace the slip-on connectors, or (2) Cut away burned wire and connector(s). Clean
terminals to prepare for soldering. Solder filament leads directly to magnetron terminals. Be careful
not to apply soldering heat any longer than necessary
SHARP
Models: R-22DP, R-4A53, R-4A54, R-4A73, R-4A83, R3A53, R-4A93, R-4H80, R-5A98, R-7A82,
R-7A85, R-8010
Symptom: Oven went dead, perhaps in the middle of cooking, and possibly accompanied by a faint
electrical burning smell.
Problem: Weakened fuse clips in the fuse receptacle causing fuse to melt due to resistive heat.
Usually indicated by a bead of solder leaching out from either endcap and/or evidence of overheating
(or burned spot) at the endcap, fuse clip, or terminal connection
Solution: Replace 15 amp fuse (about $1.00) and receptacle (about $2.00) Note:In many cases, the
fuse comes as a kit that includes an interlock switch. The Sharp part # FFS-BA015. Price:about $9.00
Additional Info: Generic fuses and fuse holders are available at appliance and electronic part
suppliers.
SHARP
Model: R-8310
Symptom: Convection heat is too hot-burning things.
Problem: Opened thermistor
Solution: Replace thermistor. Sharp part # FH-HZ0017WRKO. Price:about $39.95
http://www.gallawa.com/microtech/repair-guide-samples.html (2 of 3)6/7/2004 4:17:09 PM
Samples from The Master Microwave Oven Repair Guide
SHARP
Model: R-3A75, R-4A84, R-4K52, R-5A50, R-5A82, R-5A84, R-5F80, R-5K81, R-4260, R-4840, R5560, R-5565, R-9200, R-9350, R-9480
Symptom: Arcing in cooking the compartment
Problem: Bits of food or other cooking debris has lodged beneath the waveguide cover (or stirrer
cover, depending on the model). After repeated exposure to microwave energy, the cooking residue
breaks down into carbon (which a conductor) and arcing occurs. This results in a burned spot in the
waveguide cover.
Solution: Clean out all residual grease and cooking debris. Remove all traces of the blackened
residue (carbon) from in and around the waveguide opening (use a light grade of sandpaper if
necessary, but never use steel wool),. Finally, replace the waveguide cover. Price:about $5.00 - $7.00
TAPPAN
Model: 56-4675-10/02, 56-4677-10, 56-4804/06, 56-4884-10, 56-5897/01
Symptom: Fan comes on but the oven doesn't heat.
Problem: Cracked solder joints on printed circuit board.
Solution: Remove printed circuit board and examine it for cracked, burned, or deteriorated solder
connections. In particular, check the solder joints where the harness connector is mounted. Clean,
reinforce, and re-solder as necessary.
WHIRLPOOL
Model: MW8500XR, MW8520XP, MW8550XL, MW8650XR, MW8650XS, MW8750XP
Symptom: Weak or uneven heat
Problem: Broken stirrer belt
Solution: Replace stirrer belt. Part # 311958 Price:$5.00
Plus myriads more...
http://www.gallawa.com/microtech/repair-guide-samples.html (3 of 3)6/7/2004 4:17:09 PM
FREE Microwave Oven Repair and Fix Finder
Welcome to
Microtech's
(Updated 1/2002)
© 1989-2002 J. Carlton Gallawa
A Free, On-Line Case
History Database of
Commercial and
Residential Microwave
Oven Repairs: Symptoms,
Problems and Solutions
Important Safety Information for Repairing
Microwave Ovens
Repairing a microwave oven is a dangerous task. For your personal
safety, we respectfully ask that you read and understand these very
IMPORTANT SAFETY PRECAUTIONS as well as the disclaimer at
the bottom of this page BEFORE proceeding with any tests or
troubleshooting.
Microwave Oven Repair Instructions
1. After reading the safety precautions and progressing here to the Microwave Oven Fix Finder repair database,
2.
3.
4.
5.
select the alphabetical category below that corresponds to the brand of microwave oven you want to repair.
Find the model number , or the number closest to the model you are repairing.
Find the symptom(s) that most closely match the symptom(s) being displayed by the microwave oven you are
repairing.
❍ Generally speaking, many symptoms will apply to most models within the same brand category.
Follow the specific troubleshooting and/or repair instructions to complete the repair. Click on highlighted text for
a detailed explanation of that procedure.
Since this database is constantly being updated and appended, if you don't find what you are looking for, try
again at a later time.
6.
http://www.gallawa.com/microtech/dataselect.html (1 of 3)6/7/2004 4:23:18 PM
FREE Microwave Oven Repair and Fix Finder
Click here
if you would like to be notified by e-mail when this page is updated.
We hope that you find the information here helpful...
Common Sense Troubleshooting of Microwave Ovens
Effective troubleshooting begins with a systematic approach. The objective is to eliminate the cause, not just
the symptom. Therefore, the way to a successful repair is guided by mindful alertness and common sense.
Here are three basic guidelines:
1. Be observant and alert to the obvious. The majority of common problems that occur in microwave
ovens are conspicuous and readily detectable by one or more of the senses -- your ears, eyes,
or nose. For example, listen for abnormal, unusual sounds -- or the lack of a sound, such as the
normal click of a microswitch. Look for the obvious:loose or burned connections, disconnected
wires, broken binding or melted parts. And don't overlook the presence of any unusual odors. Many
times the problem is staring you right in the face.
2. Keep an open mind. Keep in mind the areas where a particular trouble can potentially exist, but don't
allow preconceived or indeterminate conclusions to blind you to the real problem. Ask
yourself :'what could and could not cause this symptom?' Successful troubleshooting involves
a process of logical deductions based on reasonable likelihood, then progressively eliminating
all the least likely components until only the most probable suspects remain.
3. Use your volt-ohm meter. For a final and positive diagnosis, use your volt-ohm meter to make
systematic continuity and resistance tests.
Experience has shown that, by means of authentic repair histories, most common problems can be quickly
recognized and isolated by simply associating the symptom with the model or brand. Then, with careful
observation and/or continuity tests, the problem can easily be diagnosed and solved.
Please make sure that you understand and are prepared to carefully follow the
appropriate microwave oven repair safety precautions
Select the alphabetical category that corresponds to the brand you are repairing.
●
●
The manufacturers' part numbers and prices listed
here are subject to change without notice.
The various models numbers are not necessarily in
numerical order.
http://www.gallawa.com/microtech/dataselect.html (2 of 3)6/7/2004 4:23:18 PM
Disclaimer: The author assumes no
liability for any incidental,
consequential or other liability from
the use of this information. All risks
and damages, incidental or
otherwise, arising from the use or
misuse of the information contained
herein are entirely the
responsibility of the user. Although
careful precaution has been taken
in the preparation of this material,
we assume no responsibility for
omissions or errors.
FREE Microwave Oven Repair and Fix Finder
© 1989-2002 J. Carlton Gallawa .
All Rights Reserved Worldwide
Search our Site:
GO
sitemap
A to J | K to 0 | P to Q | R to Z | Home Page | Safety Information | Back | CD-ROM | Links | FAQ |
Microwave Oven Parts Suppliers & Manufacturer Contacts
You can contact these microwave oven parts suppliers and equipment
manufacturers directly for replacement parts, product literature, dealer
locations, technical assistance, etc. Please e-mail additions or corrections
to: [email protected]
●
●
●
CLICK HERE
●
If you would like to learn more about repairing commercial,
industrial and residential microwave ovens and become
part of a multi-million dollar service industry, we invite you
to take a look at Microtech's highly acclaimed CD-ROM.
Take the finest repair video ever produced, combine it with
the ultimate textbook on microwave oven repair,
meticulously update every part and you have "THE
COMPLETE MICROWAVE OVEN SERVICE HANDBOOK v.
2002 on CD-ROM." This is THE definitive step-by-step
instructional CD to making safe, successful and profitable
repairs on all types of microwave ovens.
From the common tools you'll need and clearly outlined
safety procedures, right down to the final profit-producing
repair. This state-of-the-art courseware gives you the
training you need in a progressive, straight-foward and
easy-to-use format that's guaranteed to take you to the
skill--and income--level you want.
It takes every page of this 400-page, fact-crammed course
to teach you all you need to know about this profitable field
of repair.
© 1989-2002 J. Carlton Gallawa . All Rights Reserved Worldwide
As of 1/8/98, you are visitor number 164010
http://www.gallawa.com/microtech/dataselect.html (3 of 3)6/7/2004 4:23:18 PM
Microwave Oven Service and Repair Histories: Amana through JCPenney
Microtech
This page includes the brands:
Admiral to JCPenney
Page 1
© 1998-2002 J. Carlton Gallawa
All Rights Reserved Worldwide
Last updated 1/2002
Instructions on How To Diagnose and Repair Microwave Ovens
1. After reading the safety precautions , find the brand and model number, or the number closest to the
model you are repairing.
2. Find the symptom(s) that most closely match the symptom(s) being displayed by the oven you are
repairing.
3. Follow the specific troubleshooting and/or repair instructions to complete the repair. Click on highlighted
text for a detailed explanation of that procedure.
4. Since this database is constantly being updated and appended, if you don't find what your looking for, try
again at a later time.
5.
Click here
if you would like to be notified by e-mail when this page is updated.
Please Note:
●
●
The manufacturers' part numbers and prices listed here are subject to change without notice.
The individual model numbers are not necessarily arranged in numerical order
We hope that you find the information here helpful.. .
Important Safety Information
Repairing a microwave oven is a dangerous task. For your personal safety, please do not
proceed unless you fully understand and are prepared to follow carefully these appropriate
safety precautions .
Disclaimer: The author assumes no liability for any incidental, consequential or other liability
from the use of this information. All risks and damages, incidental or otherwise, arising from the use or misuse of
the information contained herein are entirely the responsibility of the user. Although careful precaution has been
http://www.gallawa.com/microtech/data1.html (1 of 5)6/7/2004 4:24:15 PM
Microwave Oven Service and Repair Histories: Amana through JCPenney
taken in the preparation of this material, we assume no responsibility for omissions
or errors.
© 1996-2002 J. Carlton Gallawa
All Rights Reserved Worldwide
© Copyright Information
MICROWAVE OVEN REPAIR CASE HISTORY DATABASE
AMANA
Model: M84T
Symptom: Arcing in cooking area.
Problem: Accumulation of food and cooking debris beneath front cavity
lip.
Solution: Thoroughly clean all debris and carbon build up from under
cavity lip (use a tool such as a plastic knife to penetrate underneath the
lip opening and clear out all burned-on debris. Then use light sand
paper to sand away any carbon build up. Finally, install a cavity lip
protector, Amana part # R0803571. Price: about $8.00
AMANA
Model: MC2000MPP
Symptom: (1) Door hanging down. (2) Inner door molding cracked (3) Will not go into cook mode
Problem(s): (1) Door hinges (bushings) have worn prematurely, causing the (2) plastic inner door to
strike the metal cavity wall when closing the door, and (3) producing a severe misalignment of the door
latch mechanism.
Solution(s): (1) Install a hinge upgrade kit, Amana part # R0156889. Price: about $18.00 (2) Replace
inner door assembly, Amana part # D7143803. Price: about $60.00 (3) Adjust primary interlock switch for
proper actuation.
AMANA
Model: RC14S
Symptom: Certain pads will not respond.
Problem: Defective touch panel (switch panel).
Solution: Replace touch panel, Amana part # D7577807
AMANA
Model: RC14SE
Manufacturing Number: P7688114M
Symptom: Smoking and burning odor during cook. Weak heat.
Problem: Although this appears to be a simple case of a shorted high voltage transformer, there is
actually a culprit that might be quite unanticipated: A shorted high voltage capacitor, which is causing
excessive current flow through the windings of the high voltage transformer, thereby causing the
http://www.gallawa.com/microtech/data1.html (2 of 5)6/7/2004 4:24:15 PM
Microwave Oven Service and Repair Histories: Amana through JCPenney
transformer to overheat and smoke.
Test: High Voltage Capacitor Test Procedure
Solution: Replace high voltage capacitor, Amana part # D85479-20. Price: about $11.00. If the high
voltage transformer is damaged, it too must be replaced. Part # R0114320, list price: $77.38. The line
fuse may also have be weakened, so it too should be replaced. Amana part # M0805201. Price: $4.50
AMANA
Model: RMC720
Symptom: Electrical burning smell and no heat
Problem: Burned connection on upper interlock switch
Test: Interlock Switch Test
Solution: Replace interlock switch, part # R0852501. Price: $7.00. Repair burned connector(s) by either
(1) replace burned slip-on connector(s), or (2) cut off burned connectors and solder the harness wires
directly to the appropriate switch terminals.
AMANA
Model: RR-700
Symptom: In cook mode, oven only counts down--no blower, no heat
Problem: Control relay (24 VDC) not being energized due to defective relay-drive circuit on main control
board
Test: Test the relay itself as follows: Observe important safety precautions . Remove harness wires from
control relay coil terminals and test for a normal resistance of about 500 to 900 ohms.
Solution: Remove main control panel. Determine relay drive circuit components by tracing relay coil
wires back to the circuit board. Test all relevant transistors. Replace defective transistor(s).
AMANA
Model: MC22MP
Symptom: Will not program
Problem: Extended memory board is defective
Test: Observe the horizontal dashes on the display. If the fifth dash to the right is above the rest, the
extended memory board is normal. If the fifth dash is even with, or below the rest, the extended memory
board is defective.
Solution: Replace the extended memory board, Amana part # 10936806. List price: $179.
AMANA
Model: M84TMA
Symptom: Oven will not "start"
Problem: Broken door latch
Solution: disassemble door and replace broken door latch (or door key). Amana part # R0805592 upper
door key; R0805593 lower door key Price: about $0.58 each
AMANA
Model: RMC20CET6
Symptom: Blows the fuse and goes dead about 30 seconds after start of cook cycle.
http://www.gallawa.com/microtech/data1.html (3 of 5)6/7/2004 4:24:15 PM
Microwave Oven Service and Repair Histories: Amana through JCPenney
Problem: Shorted high voltage transformer.
Test: High Voltage Transformer Test
Solution: Replace transformer. Amana part #.D7474103. Price: $143.53
AMANA
Model: RCS 720A
Symptom: Door must be pushed or jiggled before oven will cook.
Problem: Defective switch module.
Solution: Replace switch module, part # R0163218. Price: about $28.00
BETTY. CROCKER
Model: BC-1861
Symptom: Pressed "Start" and the clicked then went dead.
Problem: In-line fuse not secured in fuse holder.
Solution: Replace fuse and insure that it is securely inserted into holder. Fuse: $1.50
EMERSON
Model: AR501
Symptom: Popped and went dead during cook cycle
Problem: Shorted high voltage capacitor
Test: High voltage capacitor test procedure
Solution: Install new fuse, part # M0S0063; price, about $1.50. Replace HV capacitor (.65Mfd,
2000VAC), part # M0S0060. Price: about $17.00 wholesale.
EMERSON
Model: M3060
Symptom: Dead
Problem: Weakened fuse clips in the fuse receptacle causing fuse to melt due to resistive heat. Usually
indicated by a bead of solder leaching out from either endcap and/or evidence of overheating (or burned
spot) at the endcap, fuse clip, or terminal connection
Solution: Replace 15 amp fuse (about $1.00) and receptacle (about $2.00)
Additional Inf: Generic fuse holders are available at appliance and electronic part suppliers.
FRIGIDAIRE
Model: MC-900M-2
Symptom: Went dead during cook
Problem: Weakened fuse clips on fuse receptacle causing fuse to melt due to resistive heat. Usually
indicated by a bead of solder leaching out from either endcap and/or evidence of overheating (burned
spot) at the terminal connection
Solution: Replace 15 amp fuse (about $1.00) and receptacle (about $2.00).
Additional Inf: Generic fuse holders are available at appliance and electronic part suppliers.
FRIGIDAIRE
Model: RCM10J
http://www.gallawa.com/microtech/data1.html (4 of 5)6/7/2004 4:24:15 PM
Microwave Oven Service and Repair Histories: Amana through JCPenney
Symptom: Heats unevenly
Problem: (1) After a period of years, the center of the grease shield begins to sag. This diminishes the airswirling action that is required to rotate the antenna [which functions to evenly distribute the microwave
energy]. (2) The foam-type air gasket material is deteriorated or missing. This gasket serves to channel
air from the blower assembly into the antenna chamber where the air flow drives the rotating antenna..
Solution: (1) Replace grease shield, Amana part # D7544002, price about $19.00; and install new air
gasket material. See Amana Air Gasket Replacement Procedure.
FRIGIDAIRE
Model: MC1355L-5
Symptom: Sparked out the back of the microwave.
Problem: Buildup of food debris causing high voltage arc-over from high voltage capacitor terminal to
chassis ground.
Solution: Clean away debris, repair burned connections and dress high voltage wires away from metal
edges.
To Page 2 (A to J)
A to J | K to 0 | P to Q | R to Z | Home Page | Safety Info | Back | CD-ROM
Parts Suppliers and Manufacturer Contacts
You can contact these parts suppliers and microwave oven equipment manufacturers
directly for replacement parts, product literature, dealer locations, technical assistance, etc.
Please e-mail additions or corrections to: [email protected]
Glossary of Electronic and Microwave Oven Related Terms
Let us know what you think, or submit your own repair tip [email protected]
If you would like to learn more about repairing microwave ovens and become
part of a multi-million dollar service industry, we invite you to take a look at
Microtech's powerful new CD-ROM. You'll discover a virtual goldmine of trade
secrets and have practical, illustrated step-by-step instructions on
troubleshooting and servicing every microwave oven component.
THE COMPLETE MICROWAVE OVEN SERVICE HANDBOOK 2000
Operation, Maintenance, Troubleshooting and Repair
J. Carlton Gallawa
© 1997-2002 J. Carlton Gallawa . All Rights Reserved Worldwide
You are visitor number 54668
http://www.gallawa.com/microtech/data1.html (5 of 5)6/7/2004 4:24:15 PM
Microwave Oven Repair Case Histories for the Brands Kenmore through Montgomery Wards
Microtech
This page includes the brands:
Kenmore (Sears) to
Montgomery Wards
Page 1
© 1998-2002 J. Carlton Gallawa
All Rights Reserved Worldwide
Last updated 1/2002
Instructions for Troubleshooting and Repairing Appliances
1. After reading the safety precautions, find the brand and model number, or the number closest to the
model you are repairing.
2. Find the symptom(s) that most closely match the symptom(s) being displayed by the oven you are
repairing.
3. Follow the specific troubleshooting and/or repair instructions to complete the repair. Click on
highlighted text for a detailed explanation of that procedure.
4. Since this database is constantly being updated and appended, if you don't find what your looking for,
try again at a later time.
5.
Click here
if you would like to be notified by e-mail when this page is updated.
Please Note:
●
●
The manufacturers' part numbers and prices listed here are subject to change without notice.
The individual model numbers are not necessarily arranged in numerical order
We hope that you find the information here helpful...
Important Safety Information
Repairing a microwave oven is a dangerous task. For your personal safety, please do not
proceed unless you fully understand and are prepared to follow carefully these appropriate
safety precautions .
Disclaimer: The author assumes no liability for any incidental, consequential or other
liability from the use of this information. All risks and damages, incidental or otherwise, arising from the use
http://www.gallawa.com/microtech/data2.html (1 of 6)6/7/2004 4:24:39 PM
Microwave Oven Repair Case Histories for the Brands Kenmore through Montgomery Wards
or misuse of the information contained herein are entirely the responsibility of the user. Although careful
precaution has been taken in the preparation of this material, we assume no
responsibility for omissions or errors.
© 1996-2002 J. Carlton Gallawa
All Rights Reserved Worldwide
© Copyright Information
MICROWAVE OVEN REPAIR CASE HISTORY DATABASE (CONT'D)
KENMORE (Sears)
Model: 564.9998210
Symptom: Panel locked up.
Problem: Open capacitor C1 on printed circuit board Repair:Replace defective capacitor C1, 47MFD
100V
KENMORE (Sears)
Model: 564.9998210
Symptom: No heat
Problem: Open resistor in triac drive circuit caused by erratic operation of opto-coupler (PH1 or IC1)
Solution: Replace opto-coupler (or photo-coupler), part # 409-053-9501 and 220 ohm, 1 watt coupling
resistor. Finally apply non-conductive sealer to pins of opto-coupler to prevent moisture, or roaming
nocturnal visitor, from causing further erratic operation.
KENMORE (Sears)
Model: 401.8912980
Symptom: Arcing from inside the cooking compartment
Problem: Accumulation of food and cooking debris beneath front
cavity lip.
Solution: Thoroughly clean all debris and carbon build up from
under cavity lip (use a tool such as a plastic knife to penetrate
underneath the lip opening and clear out all burned-on debris. Then
use light sand paper to sand away any carbon build up. Finally,
install a cavity lip protector, Amana part # R0803571. Price: about
$8.00
KENMORE (Sears)
Model: 401.8934980
Symptom: Control panel intermittently locks up and will not program
http://www.gallawa.com/microtech/data2.html (2 of 6)6/7/2004 4:24:39 PM
Microwave Oven Repair Case Histories for the Brands Kenmore through Montgomery Wards
Problem: Cracked solder joint at Crystal, XL1.
Solution: Repair cracked solder joint
KENMORE (Sears)
Model: 564.8598410
Symptom: None of the pads work except "fan" and "light"
Problem: Defective control panel and low voltage transformer
Solution: Replace control panel, part # 12359R. Price:$100.91. Also replace low voltage transformer,
part # 12623. Price:$17.49
KENMORE (Sears)
Model: 564.8878420
Symptom: No heat and makes buzzing noise
Problem: Shorted high-voltage diode
Test: High Voltage Diode Test
Solution: Replace shorted diode. This diode is located inside of the high voltage capacitor. So, the
entire capacitor w/diode assembly must be replaced. Price:$about $38.00
KENMORE (Sears)
Model: 564.9998010
Symptom: The control panel counts down, but nothing else happens
Problem: The plastic interlock switch actuator on the upper interlock switch has broken
Solution: Remove and disassemble the interlock switch assembly. Locate the small rectangular
plastic lever that is used to actuate the interlock switch. Replace this latch lever, part # 11090. Price:
about $1.00
KENMORE (Sears)
Model: 564.9998210
Symptom: The door must be slammed closed before the microwave will work
Problem: Defective upper door interlock switch
Test: Interlock Switch Test
Solution: Replace upper interlock switch assembly
Note: Generic interlock switches are available at appliance parts suppliers. Price, about $6.00. Be
sure to match terminal arrangement, and current and voltage rating
KENMORE (Sears)
Model: 565.8904380
Symptom: Arcing and sparking in the bottom
Problem: Bits of food or other cooking debris have lodged beneath the coupling. After repeated
exposure to microwave energy, the cooking residue breaks down into carbon (which is a conductor)
and arcing occurs.
Solution: Clean out all residual grease and cooking debris. Remove all traces of the blackened
residue (carbon) from the oven floor. Replace the coupling. Available at Sears for about $5.00
http://www.gallawa.com/microtech/data2.html (3 of 6)6/7/2004 4:24:39 PM
Microwave Oven Repair Case Histories for the Brands Kenmore through Montgomery Wards
KENMORE (Sears) 566.8844780 DEAD WHEN WENT TO USE
Problem: Weakened fuse clips in the fuse receptacle causing fuse to melt due to resistive heat.
Usually indicated by a bead of solder leaching out from either endcap , and/or evidence of overheating
(or burned spot) at the endcap, fuse clip, or terminal connection
Solution: Replace 15 amp fuse (about $1.00) and receptacle (about $2.00)
Additional Inf: Generic fuse holders are available at appliance and electronic part suppliers
KENMORE (Sears)
Model: 721.18815181
Symptom: Oven went dead shortly after starting cook cycle
Problem: Weakened fuse clips in the fuse receptacle are causing the fuse to melt due to resistive
heat. This is usually indicated by a bead of solder leaching out from either endcap , and/or evidence of
overheating (burned spot) at the terminal connection
Solution: Replace 15 amp fuse (about $1.00) and receptacle (about $2.00).
Additional Info:Generic fuse holders are available at appliance and electronic part suppliers.
LITTON
Model: 1054.000
Symptom: Electrical burning smell during cook
Problem: Triac assembly is breaking down
Test: Triac Test
Solution: Replace triac. Part # M16D93. Price $35.00 and climbing
LITTON
Model: 1420.002
Symptom: Heard a noise then smelled electrical burning
Problem: Shorted high voltage rectifier
Test: High Voltage Diode Test
Solution: Replace shorted high voltage diode (rectifier). Generic replacement available at appliance
parts suppliers for about $10.00 to $12.00
LITTON
Model: 1520.000
Symptom: No heat
Problem: Defective heat control module
Solution: Replace the heat control module. Part # M22D34. Possibly includes a dud value (e.g., part
costs $115.00 + 25.00 [dud value]=$140.00. Defective [dud] part needs to be returned to redeem the
$25.00)
LITTON
http://www.gallawa.com/microtech/data2.html (4 of 6)6/7/2004 4:24:39 PM
Microwave Oven Repair Case Histories for the Brands Kenmore through Montgomery Wards
Model: 1580.000
Symptom: Works normally for awhile, then shuts off
Problem: Deteriorated connections at interface board
Solution: Clean the interface board edge connector and pins
LITTON
Model: 70-50.08
Symptom: Broken inner-door window
Problem: Stalled stirrer motor causing direct beams of energy to strike the inner door.
Repair: Replace stirrer motor, part # M12D5 and inner door glass, part # M51D1.
Additional info: On earlier models (before s/n *) stirrer blade should be upgraded to newer style, part
# M44D13. Note:If stirrer motor is not defective, the upgraded stirrer blade may be all that is needed.
LITTON
Model: K-80/50.000, K-80/50.001
Symptom: When the door is opened, the oven powers up to the idle mode as normal (blowers, lamp,
stirrer motor operating). However, when the door is closed, the oven will not stay in the idle mode as it
should, rather it reverts back to the standby mode (nothing operating)
Problem: Although the problem would appear to be in the control panel, the failure is actually an
opened secondary winding in the low-voltage transformer.
Test: Low Voltage Transformer Test
Solution: Replace low voltage transformer. Amana part # 45507P01. Price:about $30.00
LITTON
Model: 2052.000
Symptom: No heat
Problem: Auxiliary (power) Controller failing to provide primary voltage to the high voltage transformer.
Solution: Replace controller, part # M22D52 (probably subbed to new number). Price $80.00 $100.00
with $10.00 dud value.
To Page 2 (K to O)
A to J | K to 0 | P to Q | R to Z | Home Page | Safety Information | Back | CD-ROM | Links | FAQ |
Parts Suppliers and Manufacturer Contacts
You can contact these parts suppliers and microwave oven equipment manufacturers
directly for replacement parts, product literature, dealer locations, technical assistance, etc.
Please e-mail additions or corrections to: [email protected]
Glossary of Electronic and Microwave Oven Related Terms
http://www.gallawa.com/microtech/data2.html (5 of 6)6/7/2004 4:24:39 PM
Microwave Oven Repair Case Histories for the Brands Kenmore through Montgomery Wards
Let us know what you think, or submit your own repair tip [email protected]
Stop and think about what you need to
improve your electronics knowledge and job
skills. Whether you are a do-it-yourselfer, a
technical student, or a seasoned pro,
enhancing your expertise makes you far more
valuable. In fact, it could affect your entire
level of professional success. Microtech's
acclaimed "all-in-one" CD-ROM can help give
you the edge you need!
©1998-2002 J. Carlton Gallawa . All Rights Reserved Worldwide
You are visitor number 39718 since 11/8/97
http://www.gallawa.com/microtech/data2.html (6 of 6)6/7/2004 4:24:39 PM
Free Microwave Oven Repair Histories: Panasonic through Quasar
Microtech
This page includes case histories of the
brands:
Panasonic to Quasar
Page 1
© 1998-2002 J. Carlton Gallawa
All Rights Reserved Worldwide
Last updated 1/2002
Instructions on How To Troubleshoot and Repair Microwave Ovens
1. After reading the safety precautions , find the brand and model number, or the number closest to the model you
are repairing.
2. Find the symptom(s) that most closely match the symptom(s) being displayed by the oven you are repairing.
3. Follow the specific troubleshooting and/or repair instructions to complete the repair. Click on highlighted text for
a detailed explanation of that procedure.
4. Since this database is constantly being updated and appended, if you don't find what your looking for, try again
at a later time.
5.
Click here
if you would like to be notified by e-mail when this page is updated.
Please Note:
●
●
The manufacturers' part numbers and prices listed here are subject to change without notice.
The individual model numbers are not necessarily arranged in numerical order
We hope that you find the information here helpful.. .
Important Safety Information
Repairing a microwave oven is a dangerous task. For your personal safety, please do not
proceed unless you fully understand and are prepared to follow carefully these appropriate
safety precautions .
Disclaimer: The author assumes no liability for any incidental, consequential or other liability
from the use of this information. All risks and damages, incidental or otherwise, arising from
the use or misuse of the information contained herein are entirely the responsibility of the user. Although
http://www.gallawa.com/microtech/data3.html (1 of 4)6/7/2004 4:24:55 PM
Free Microwave Oven Repair Histories: Panasonic through Quasar
careful precaution has been taken in the preparation of this material, we assume
no responsibility for omissions or errors.
© 1996-2002 J. Carlton Gallawa
All Rights Reserved Worldwide
© Copyright Information
MICROWAVE OVEN REPAIR CASE HISTORY DATABASE (CONT'D)
PANASONIC
Model: NE-7030
Symptom: Will not start unless door is pushed hard.
Problem: Burned connection at lower interlock switch.
Test: Interlock Switch Test
Solution: Replace switch and repair burned connections. Repair Info:Soldering the wires directly to the
terminals provides the best connection, but installing new slip-on connectors is adequate.
PANASONIC
Model: NE-1057, NE-1057C, NE-1257, NE-1077, NE-1277, NE-1457, NE-1457C, NE-1757, NE-1477, NE1777
Symptom: Code "F11" or "F12" appears on the display intermittently
Problem: Moisture is accumulating on control panel from steam rising out of the door.
Solution: Install foam sealer (cushion rubber) along lower edge of control panel escutcheon. Part #
A8251-3180
PANASONIC
Model: NE-1457, NE-1757
Symptom: "F12" on display
Problem: Defective lower magnetron tube
Test: Magnetron Tube Test
Solution: Replace magnetron. Part # 2M210-M1. Price:$95.00
PANASONIC
Model: NE-1457
Symptom: Weak heat and low humming sound
Problem: Weak magnetron tube
Solution: Test each magnetron output independently to determine which magnetron is weak
Test: Output Wattage Test
Solution: Replace defective upper magnetron. Part # 2M210-M. Price:$95.00
PANASONIC
Model: NE-1757A
Symptom: Weak heat
Test: Output Wattage Test
http://www.gallawa.com/microtech/data3.html (2 of 4)6/7/2004 4:24:55 PM
Free Microwave Oven Repair Histories: Panasonic through Quasar
Problem: Burned slip-on connector on magnetron filament-voltage input terminal
Solution: Repair burned connection as follows. Observe Important safety instructions . Either replace
burned connector and clean up magnetron terminal; or, Remove burned connector, clean up terminal
and solder wire directly to the terminal
PANASONIC
Model: NE-6850
Symptom: Sometimes the turntable doesn't turn.
Problem: Weakened turntable drive belt
Solution: Replace the belt. Part # ANE4110Q50GN. Price:$4.80
PANASONIC
Model: NE-8021, NE-8051, NN-4208A, NN-5407, NN-5500A, NN-5512A, NN-6370WM, NN-6371WM.N, NN6372AWM, NN-6381A, NN-6482A, NN-6503A, NN-7524AK
Symptom: No heat, weak heat, or intermittent heat
Problem: Magnetron filament connectors have loosened and, due to resistive heat, the terminal
connections have deteriorated and burned off.
Solution: Repair defective terminals as follows:Either (1) Cut away burned wire, clean the magnetron
terminals, and replace the slip-on connectors, or (2) Cut away burned wire and connector(s). Clean
terminals to prepare for soldering. Solder filament leads directly to magnetron terminals. Be careful not
to apply soldering heat any longer than necessary
PANASONIC
Model: NE-200010P
Symptom: "PPPP" on display
Problem: Defective oven temperature sensor.
Solution: Replace temperature sensor, part # ANE604LK20AP, sub to ANE604LL20AP
To Page 2 (P to Q)
A to J | K to 0 | P to Q | R to Z | Home Page | Safety Information | Back | FREE Samples From CD-ROM
Parts Suppliers and Manufacturer Contacts
You can contact these parts suppliers and microwave oven equipment manufacturers
directly for replacement parts, product literature, dealer locations, technical assistance, etc.
Please e-mail additions or corrections to: [email protected]
Glossary of Electronic and Microwave Oven Related Terms
Let us know what you think, or submit your own repair tip [email protected]
http://www.gallawa.com/microtech/data3.html (3 of 4)6/7/2004 4:24:55 PM
Free Microwave Oven Repair Histories: Panasonic through Quasar
Finally, an instructional CD-ROM that actually instructs! Yes, practical
education: Thorough without being vague, specific without being trivial. Here is
a step-by-step guide to the electronic repair skills you need to profit from the
challenging and lucrative repair industry. We invite you to take a look...
The COMPLETE MICROWAVE OVEN SERVICE
HANDBOOK
Operation, Maintenance, Troubleshooting and Repair
Copyright © 1989-2002 by J. Carlton Gallawa
© 1997-2002 J. Carlton Gallawa . All Rights Reserved Worldwide
You are visitor number 35790 since 11/8/97
http://www.gallawa.com/microtech/data3.html (4 of 4)6/7/2004 4:24:55 PM
Free Microwave Oven Repair Histories: Categories Samsung through Whirlpool
Microtech
This page includes case
histories of the brands:
© 1998-2002 J. Carlton Gallawa
All Rights Reserved Worldwide
Last updated 1/2002
Samsung to
Whirlpool
Page 1
Instructions On How To Use This Information For Troubleshooting and Repairing
Microwave Ovens
1. After reading the safety precautions , find the brand and model number, or the number closest to the
model you are repairing.
2. Find the symptom(s) that most closely match the symptom(s) being displayed by the oven you are
repairing.
3. Follow the specific troubleshooting and/or repair instructions to complete the repair. Click on
highlighted text for a detailed explanation of that procedure.
4. Since this database is constantly being updated and appended, if you don't find what your looking for,
try again at a later time.
5.
Click here
if you would like to be notified by e-mail when this page is updated.
Please Note:
●
●
The manufacturers' part numbers and prices listed here are subject to change without notice.
The individual model numbers are not necessarily arranged in numerical order
We hope that you find the information here helpful.. .
Important Safety Information
http://www.gallawa.com/microtech/data4.html (1 of 5)6/7/2004 4:25:05 PM
Free Microwave Oven Repair Histories: Categories Samsung through Whirlpool
Repairing a microwave oven is a dangerous task. For your personal safety, please do not
proceed unless you fully understand and are prepared to follow carefully these appropriate
safety precautions .
Disclaimer: The author assumes no liability for any incidental, consequential or other
liability from the use of this information. All risks and damages, incidental or otherwise, arising from the use
or misuse of the information contained herein are entirely the responsibility of the user. Although careful
precaution has been taken in the preparation of this material, we assume no
responsibility for omissions or errors.
© 1996-2002 J. Carlton Gallawa. All Rights Reserved Worldwide.
© Copyright Information
MICROWAVE OVEN REPAIR CASE HISTORY DATABASE (CONT'D)
SAMSUNG
Model: MV5510, MW 5690
Symptoms: First, arcing occurring while cooking. Now, now heat
Problems: (1) Accumulation of food and cooking debris beneath front cavity lip. (2) In addition, the
magnetron filament connectors have loosened and, due to resistive heat, the terminal connections
have deteriorated and burned off of the terminals
Solutions: (1) Thoroughly clean all debris and carbon build up from under cavity lip (use a tool such
as a plastic knife to penetrate underneath the lip opening and clear out all burned-on debris. Then use
light sand paper to sand away any carbon build up. Finally, install a
cavity lip protector, Amana part # R0803571. Price: about $8.00 (2)
Repair defective terminals as follows: Either (1) Cut away burned
wire, clean the magnetron terminals, and replace the slip-on
connectors, or (2) Cut away burned wire and connector(s). Clean
terminals to prepare for soldering. Solder filament leads directly to
magnetron terminals. Be careful not to apply soldering heat any
longer than necessary
SAMSUNG
Model: MW5630T
Symptom: Timer counts down, but nothing else operates
Problem: Main relay on printed circuit board is not functioning.
Solution: Remove and disassemble Main Relay. Repair burned contacts.
SAMSUNG
Model: RE-525T
http://www.gallawa.com/microtech/data4.html (2 of 5)6/7/2004 4:25:05 PM
Free Microwave Oven Repair Histories: Categories Samsung through Whirlpool
Symptom: Oven went dead between uses
Problem: Weakened fuse clips in the fuse receptacle causing fuse to melt due to resistive heat.
Usually indicated by a bead of solder leaching out from either endcap and/or evidence of overheating
(or burned spot) at the endcap, fuse clip, or terminal connection
Solution: Replace 15 amp fuse (about $1.00) and receptacle (about $2.00)
Additional Info: Generic fuses and fuse holders are available at appliance and electronic part
suppliers.
SAMSUNG
Model: RE-705TC
Symptom: No heat
Problem: Faulty triac
Test: Triac Test
Solution: Replace triac. Universal triac replacements are generally available at appliance and
electronic parts suppliers. Price: about $10.00
SANYO
Model: EM2500LA
Symptom: Lights and fan work, but there is no heat, and the smell of hot electrical insulation.
Problem: Shorted high-voltage transformer
Test: High-Voltage Transformer Test
Solution: Replace high-voltage transformer. Price: $90.00 to $120.00
SANYO
Model: EM-2501A
Problem: Shorted high voltage capacitor
Test: High-Voltage Capacitor Test
Solution: Replace the high-voltage capacitor and the line fuse. Universal replacements for both parts
are available at appliance parts suppliers. The replacement capacitor should be within 10% of the
original capacitor's microfarad (uF) value, and the voltage rating should be equal or higher.
SANYO
Model: EM-2520S, EM-3420A
Symptom: No heat
Problem: Defective triac has damaged the triac-drive circuit on the printed circuit board
Test: Triac Test
Solution: Replace triac (part # 12656, price: about $20.00); also replace the opto-coupler (also called
photo-coupler), PH1 or IC1, part # 409-053-9501, and replace the 220 ohm 1 watt coupling resistor.
Finally, apply non-conductive sealant, such as GE's RTV-102, to the pins of the opto-coupler to
prevent moisture or roaming nocturnal visitor from causing erratic operation
SANYO
Model: EM703T
Symptom: Oven went dead half-way through a cooking cycle
http://www.gallawa.com/microtech/data4.html (3 of 5)6/7/2004 4:25:05 PM
Free Microwave Oven Repair Histories: Categories Samsung through Whirlpool
Problem: Weakened fuse clips in the fuse receptacle causing fuse to melt due to resistive heat.
Usually indicated by bead of solder leaching out from either endcap and/or evidence of overheating (or
burned spot) at the endcap, fuse clip, or terminal connection
Solution: Replace 15 amp fuse (about $1.00) and receptacle (about $2.00)
Additional Info: Generic fuses and fuse holders are available at appliance and electronic part
suppliers
To Page 2 (R to Z)
A to J | K to 0 | P to Q | R to Z | Home Page | Safety Information | Back | CD-ROM
Parts Suppliers and Manufacturer Contacts
You can contact these parts suppliers and microwave oven equipment manufacturers
directly for replacement parts, product literature, dealer locations, technical assistance, etc.
Please e-mail additions or corrections to: [email protected]
Glossary of Electronic and Microwave Oven Related Terms
Let us know what you think, or submit your own repair tip [email protected]
Illustration from THE COMPLETE MICROWAVE
OVEN SERVICE HANDOOK
If you would like to learn more about
repairing commercial and residential
microwave ovens and become part of a
multi-million dollar service industry, we
invite you to take a look at Microtech's
powerful new computerized training
course.
●
●
●
●
●
●
●
http://www.gallawa.com/microtech/data4.html (4 of 5)6/7/2004 4:25:05 PM
Virtually 1000s of microwave oven
repair case histories with factory
approved troubleshooting and repair
procedures
Factory troubleshooting charts, error
codes, schematics and diagnostic
procedures
Touch panel (key pad) matrix diagrams
for 100s of brands
Hundreds of vividly colored
schematics, diagrams, illustrations and
photos ease the toughest repair chores.
Fully searchable text for quick
information gathering
All chapters, sections and references
are hyperlinked for fast and smooth
navigating
FREE technical support
Free Microwave Oven Repair Histories: Categories Samsung through Whirlpool
●
Full 30-day, no-questions- asked,
money-back guarantee
THE COMPLETE MICROWAVE OVEN SERVICE HANDBOOK 2000
Operation, Maintenance, Troubleshooting and Repair
J. Carlton Gallawa
© 1998-2002 by J. Carlton Gallawa . All Rights Reserved Worldwide
http://www.gallawa.com/microtech/data4.html (5 of 5)6/7/2004 4:25:05 PM