1
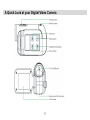
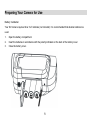
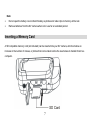
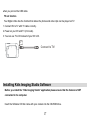
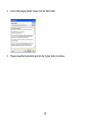
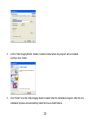
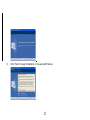
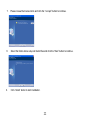
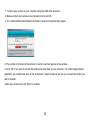
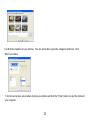
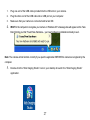
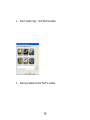
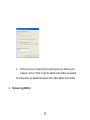
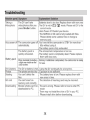
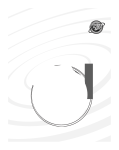
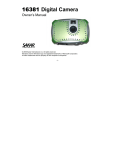
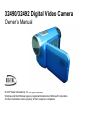
32490/32492 Digital Video Camera
Owner’s Manual
© 2007 Sakar International, Inc. All rights reserved.
Windows and the Windows logo are registered trademarks of Microsoft Corporation.
All other trademarks are the property of their respective companies.
Table of Contents
Introduction.........................................................................................................3
Key Features .....................................................................................................3
What your digital video camera includes: .........................................................4
Computer System Requirements ......................................................................4
A Quick Look at your Digital Video Camera ......................................................5
Preparing Your Camera for Use.........................................................................6
Inserting a Memory Card....................................................................................7
DV Function Control.........................................................................................10
Installing Kids Imaging Studio Software...........................................................17
Transferring Images to your PC using Media Auto Detect ..............................23
Transferring images to your PC using Kids Imaging Studio.............................26
Everything You Need To Get the Most of Your Photos and MORE.................33
Maintenance of Your Digital Camera ............................................................35
Technical Support............................................................................................35
Sakar Warranty Card........................................................................................35
Technical Specifications...................................................................................37
Troubleshooting................................................................................................38
Special Note: For best video output connect to TV instead of your PC...........39
2
Introduction
Thank you for purchasing our Digital Video camera. Now you can shoot video clips and take individual
photos. In addition, any SD compatible memory card up to 1GB can be inserted to expand the memory
of your DV camera.
Your camera includes the patented Kids Imaging Studio technology, the most powerful way to share
your photos that enable you to:
•
Create fun, personalized videos
•
Combine selected music with sound track
•
Personalize with titles and credits
•
Annotate your Jpeg photos with sound, text and more
•
Generally produce videos created with automatic editing and synchronized transitions and effects.
In short, everything you need to get the most out of your photos.
Key Features
• Effective resolution: 300k pixels.
• 1.5" CSTN LCD
• Support SD card
• Create your own movies
• Add special effects with Kids Imaging Studio
3
• Record 80 minutes of video with 1GB SD Card (not included)
• Takes digital photos
What your digital video camera includes:
• Digital Video Camera
• USB cable.
• TV cable
• Kids Imaging Studio Software
• User Manual
• 1 year warranty
Computer System Requirements
• MAC Compatible
• Windows 2000 ,XP or Vista (32-Bit Edition)
• Pentium II 300 or higher
• 128MB RAM
• 250MB free hard drive space
• CD-ROM drive
• Available USB port
4
A Quick Look at your Digital Video Camera
5
Preparing Your Camera for Use
Battery Installation
Your DV camera requires three “AA” batteries (not included). It is recommended that alkaline batteries be
used.
1.
Open the battery compartment.
2.
Insert the batteries in accordance with the polarity indicated on the back of the battery cover
3.
Close the battery cover.
6
Note:
•
Do not open the battery cover indiscriminately as photos and video clips in memory will be lost.
•
Remove batteries from the DV camera when not in use for an extended period.
Inserting a Memory Card
A SD compatible memory card (not included) can be inserted into your DV camera, which will allow an
increase in the number of movies, or photos that can be taken before the need arises to transfer them to a
computer.
7
Note:
•
This product supports SD memory cards with capacities between 128MB to 1GB.
•
Formatting will delete all data on the SD Memory Card including protected data.
•
Do not remove the SD memory Card during formatting as this may damage the card and render it
unusable.
•
Be sure to format the card with the camera.
•
SD memory cards formatted on a PC or device other than the DV camera should not be used.
•
All the data in the built-in memory will be lost if no SD Memory Card has been inserted in the DV when
you
•
change your batteries.
IMPORTANT NOTE: If you do not have an SD memory card inserted in your camera while
recording video, no sound will be recorded. The internal memory of the camera records test
video only and does not record audio. To record with sound you must have an SD memory card
inserted in your camera while recording video.
Main icons on the LCD
DV mode (for shooting video)
DSC mode (for taking photos)
8
Playback mode
9
DV Function Control
Power on
Press the Power Button and hold for about 3 seconds. The LCD monitor will light up and the DV is ready for
using.
Power off
Press the Power Button and hold for about 3 seconds. The DV camera will switch off.
If the DV camera is not operated for 60 seconds it will switch off automatically.
Shooting videos
In DV mode: There are two video resolutions for you to shooting video files. Press UP or Down button to
10
change between them.
★★: 640x480 pixels (VGA),
★:
320x240 pixels (QVGA).
1.
Switch on the DV camera. The default mode is DV (video) and the DV icon will appear on the
LCD. Alternatively, press the Mode button repeatedly until the DV icon appears on the LCD.
2.
Hold the DV camera steadily and use the LCD to focus on the subject.
3.
Press the Shutter button to commence shooting. The red spot won’t be flashing on the LCD until
you press the Shutter button again to stop shooting or the memory is full.
4.
Press the Shutter button again to stop shooting. Alternatively it will stop when the memory is full.
Note:
11
•
Before shooting, you may use a SD card to expand your memory capacity.
•
IMPORTANT NOTE: If you do not have an SD memory card inserted in your camera while
recording video, no sound will be recorded. The internal memory of the camera records test
video only and does not record audio. To record with sound you must have an SD memory
card inserted in your camera while recording video.
•
When the memory is full, the LCD will appear “ MEMORY FULL! TRANSFER TEST IMAGES TO PC
AND INSERT A SD MEMORY CARD TO TAKE MORE IMAGES!”. Download photos and video files
to your PC as often as possible.
•
If the lighting is inadequate, the shooting may fail.
Taking photos
The image resolution (640x480 pixels) is defaulted by your DV which can not change.
1.
Switch on the DV camera.
2.
Press the Mode button to select DSC mode, i.e. until the DSC icon appears on the LCD.
12
3.
Hold the DV camera steadily and use the LCD to focus on the subject.
4.
Press the Shutter button to take a photo. (There will be a short delay while the camera saves the
photo to memory.)
Note:
•
You cannot take photos whilst the camera is connected to a computer.
•
Download photos and video clips to your PC regularly.
•
When the memory is full, the LCD will appear “ MEMORY FULL! TRANSFER TEST IMAGES
TO PC AND INSERT A SD MEMORY CARD TO TAKE MORE IMAGES!”. Download photos
and video files to your PC as often as possible.
Playback mode
1.
Switch on the DV camera.
2.
Press the Mode button repeatedly until you select playback mode i.e. so that the number of
video clips or photos taken and their sequence appear in the bottom right hand corner of the
LCD, press the shutter button to confirm this mode.
13
3.
To view photos, press the UP or DOWN button.
4.
To play back video clips:
Press UP or DOWN button to select an AVI file. The number of video clips or photos taken and their
sequence appear in the bottom right hand corner of the LCD.
5.
Press the Shutter button to play back the video clips in your DV camera.
6.
Press the Shutter button to stop playing.
14
Note: Video clips are saved in AVI format.
Deleting current Photo or Video file:
1.
Whilst in Playback mode, select a photo you want to delete.
2.
Press the Delete button once. The LCD will be shown:
3.
Press UP or DOWN button to select “Yes”.
4.
Press Shutter button to confirm the deletion.
Deleting all photos and video files:
1.
Press Mode button until you select Playback mode.
2.
Press Delete button twice. A
3.
Press UP or DOWN button to select “Yes”.
4.
Press Shutter button to confirm the deletion.
appear on the LCD screen.
15
.
Format
1.
Press Mode button until you select Playback mode.
2.
Press Delete button three times. A
3.
Press UP or DOWN button to select “Yes”.
4.
Press Shutter button to confirm.
shown on the LCD screen.
Note:
•
Format will delete all datum in your DV, please make sure before you execute the function.
•
All delete operations must be done in Playback mode.
•
In Playback mode, you can exit by pressing Delete button repeatedly without any deletion and
formatting.
Mass Storage
1.
Connect your DV camera to your computer using the USB cable.
2.
“MSDC” will appear on the LCD, indicating that your DV camera is in Mass Storage Mode.
3.
Double click My Computer/Removable Disk/DCIM/).
4.
You can download photos or use it as U-Disk
Note: After you connected your DV to PC, your DV will be automatically turned on, and it won’t be switched off
16
when you pull out the USB cable.
TV out function
Your Digital Video has the function that allows the photos and video clips can be played on TV.
1. Connect DV to TV with TV cable correctly.
2. Power on your DV and TV (AV mode).
3. You can use TV LCD instead of your DV LCD.
TV ou t jack
in side !
Connect to TV!
Installing Kids Imaging Studio Software
Before you install the “Kids Imaging Studio” application please ensure that the Camera is NOT
connected to the computer.
Insert the Software CD that came with your camera into the CD-ROM drive.
17
Make sure that your camera is NOT connected to the computer.
The Kids Imaging Studio installation screen will appear.
Both Kids Imaging Studio and the muvee AutoProducer will be installed.
At the completion of the installation you will be required to restart your computer in order to complete the
software installation.
1.
Select your camera model from the list and click the “Install” button to install Kids Imaging Studio.
18
2.
On the “Kids Imaging Studio" screen, click the “Next” button.
3.
Please review the license terms and click the “Agree” button to continue.
19
4.
Let the “Kids Imaging Studio” installer create the folder where the program will be installed,
and then click “Install”.
5.
Click “Finish” to let the “Kids Imaging Studio” installer finish the installation program. After this, the
installation process will automatically install the muvee AutoProducer.
20
6.
Click “Next” to begin installation of muvee AutoProducer.
21
7.
Please review the license terms and click the “I accept” button to continue.
8.
Select the folder where setup will install files and click the “Next” button to continue.
9.
Click “install” button to start installation.
22
10.
After the installation is complete, click the “Finish” button and restart your computer.
Congratulations! You have successfully installed the “Kids Imaging Studio” software.
Transferring Images to your PC using Media Auto Detect
Connect your DV camera to PC. The word “DISK” will appear on the LCD.
This indicates that the DV camera is in Mass Storage mode.
Once in Mass Storage mode you can automatically download all the images stored on your camera to your
PC for you to edit, email, enhance, etc.
23
1. Connect your camera to your computer using the USB cable provided.
2. Make sure that your camera is connected and is turned ON.
3. The “Camera/Removable Media Auto Detect” window will automatically appear.
4. The number of pictures on the camera or memory card will appear on the window.
5. Click “OK” if you wish to transfer the photos and save them to your computer. The “Kids Imaging Studio”
application you installed will open in the “Get photos” wizard mode and will ask you to select the photos you
wish to transfer.
Select your photos and click “Next” to continue.
24
6. Add Active Captions to your pictures. You can add a date, keywords, categories and more. Click
“Next” to continue.
7. On the next screen, select where to place your photos and click the “Finish” button to copy the photos to
your computer.
25
8. All of the pictures you have imported will appear in the “Select Photos” main window.
Transferring images to your PC using Kids Imaging Studio
Connect your DV camera to your PC. The word “DISK” will appear on the LCD.
This indicates that the DV camera is in Mass Storage mode.
Once in Mass Storage mode you can manually download all the images stored on your camera to your PC
for you to edit, enhance, email and more.
How to use the “Kids imaging Studio” program to import photos and videos from your camera.
26
1.
Plug one end of the USB cable provided into the USB slot on your camera.
2.
Plug the other end of the USB cable into a USB port on your computer.
3.
Make sure that your camera is connected and turned ON.
4.
WAIT for the computer to recognize your camera. In Windows XP a message box will appear on the Task
Bar informing you that “Found New Hardware – your new hardware is installed and ready to use”.
Note: The camera will not function correctly if you open the application BEFORE the camera is recognized by the
computer.
5.
Double-click the “Kids Imaging Studio” icon on your desktop to launch the “Kids Imaging Studio”
application.
27
Click on the “Get Photos” button on the Main Menu.
28
The “Device Selection” mode will appear. Both your camera and the memory card will each appear
in the “Active Devices” list as a “Removable Disk”. Toggle between the two devices to select your
pictures.
1.
Custom Copy:
This mode is used to manually select the photos you wish to copy to your computer.
29
a.
Select "Custom Copy". Click "Next" to continue.
b.
Select your photos and click "Next" to continue.
30
c.
Add Active Captions to your pictures. With this feature, you can add a date,
keywords and categories. Click “Next” to continue.
31
d.
On the next screen, choose where you wish to place your photos on your
computer. Click on “Finish” to copy the photos to the location you selected.
All of the pictures you imported will appear in the “Select photos” main window.
2.
Express Copy Method:
32
Select this option if you wish to have all the images transferred to the PC without the option of
selecting photos. In this mode you will not see a preview of the images transferred. For more
information please refer to the Quick Start guide in the Kids Imaging Studio application
Everything You Need To Get the Most of Your Photos and MORE
Now that you have successfully downloaded the photos and videos using your Kids Imaging
Studio application on your computer, you can not use the application to:
Download photos instantly from your digital camera, SD cards, CDs and storage devices to your
computer.
Manage your photos by creating countless unique photo collections without duplicating any photos.
Burn CDs of any folders for backup and storage.
Enhance your photos: Auto Enhance, Crop, Correct Red Eye, Manually Adjust and add Special Effects.
Add Active Captions: add Text Captions, Frames, Shapes, Keywords… and more that can be viewed
or hidden any time.
Locate and Organize your photos and collections: Search by Captions, Category, Keyword or Date directly from the operating system of your computer.
Share your photos via E-mail, Local Printing and Create HTML web pages for uploading online.
Create Calendars, two-sided Greeting Cards and Postcards on standard photo paper... to print ,
share and send
33
Create Photo Albums and VideoCD Slide Shows on CDs that can be viewed on your PC and VCD’s
for viewing on your TV using your DVD player.
Frame Maker – to prepare you favorite photos within a range of colorful frame to print ,send or save
Create Videos – Use the Muvee AutoProducer to produce videos created with automatic editing and
synchronized transitions and effects.
NOTE: For more information on using these features open the Show Me How/Tour and Help in the
application
Transfer Images Directly From Windows
1.
Plug one end of the USB cable into the USB slot on your camera.
2.
Plug the other end of the USB cable into a USB port on your computer.
3.
Make sure that your camera is connected and is turned ON.
4.
Click on the START button in Windows.
5.
Click on the MY COMPUTER Icon
6.
Your memory card will appear as a REMOVABLE STORAGE DEVICE.
7.
Click on the REMOVABLE STORAGE DEVICE to view the images. The images are
stored in the subfolder called DCM100.
8.
You can now copy and paste the images to any directory you choose.
34
Maintenance of Your Digital Camera
Your DV camera is a delicate instrument- please handle it with care.
Technical Support
For technical support issues please visit our website at www.sakarhelp.com. You can find
manuals, software and FAQ’s at the website. Can’t find what you are looking for? Fill out an online
ticket and one of our technical support team members will answer questions or call 877-397-8200
to access our technical support information on the phone. For question on warranty information
please email [email protected]
Sakar Warranty Card
This warranty covers for the original consumer purchaser only and is not transferable. Products that fail to
function properly UNDER NORMAL USAGE, due to defects in material or workmanship. Your product will
be repaired at no charge for parts or labor for a period of one year.
What Is Not Covered By Warranty:
35
Damages or malfunctions not resulting from defects in material or workmanship and damages or
malfunctions from other than normal use, including but limited to, repair by unauthorized parties, tampering,
modification or accident.
What To Do When Service Is Required:
When returning your defective product (postage pre-paid) for service, your package should include:
Copy of original bill of sale
A detailed written description of the problem.
Your return address and telephone number (Daytime)
MAIL TO ADDRESS BELOW:
Sakar International
Attention: Service Department
195 Carter Drive
Edison, NJ 08817
Tel: 732-476-5098
You may also visit www.sakar.com for further assistance if necessary or call our tech support department
toll free at (877) 397-8200
36
Technical Specifications
37
Troubleshooting
Product Type
Sensor Type
Built-in memory Capacity
DV / DSC / Mass Storage
CMOS Sensor
(DSC) 640x480 Pixels
(DV) 320x240 Pixels, 640x480 Pixels
F2.8, f=3.0mm
SD Memory Card
VGA test capture about 2 photos
VGA test video record about 20
Storage
seconds; QVGA test video record
Image Resolution
Lens
Capacity Device
Shutter Speed
Image Process
Automatic Energy Saving
Transmission Interface
Power
Working Temperature
about 20 seconds
1/30 ~ 1.8µs
Auto Exposure
Auto White Balance
60 seconds
USB Interface
3x AA (1.5v) / USB 5v
0℃ ~ 40℃
38
Special Note: For best video output connect to TV instead of your PC.
This device complies with the part 15 of the FCC rules. Operation is subject to the following two conditions:(1)
this device may not cause harmful interference , and (2) this device must accept any interference received,
including interference that may cause undesired operation.
Caution: changes or modifications not expressly approved by the party responsible for compliance could void
the user's authority to operate the equipment.
39
NOTE: This equipment has been tested and found to comply with the limits for a Class B digital device,
pursuant to Part 15 of the FCC Rules, These limits are designed to provide reasonable protection against
harmful interference in a residential installation. This equipment generates. Uses and can radiate radio
frequency energy and, if not installed and used in accordance with instructions. may cause harmful interference
to radio or -television reception, which can be determined by turning the equipment off and on, the user is
encouraged to try to correct the interference by one or more of the following measures:
__ Reorient or relocate the receiving antenna.
__ Increase the separation between the equipment and receiver.
__ Connect the equipment into an outlet on a circuit different from that to which the receiver is connected.
__ Consult the dealer or experienced radio/ TV technician for help.
40
41
42