1
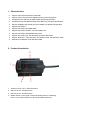
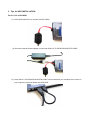
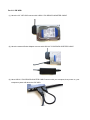
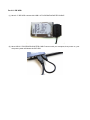
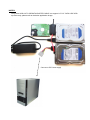
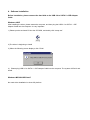
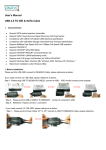
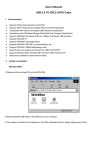
USB 2.0 TO IDE/SATA ADAPTER CABLE User Manual DA-70148-3 1. Characteristics Support SATA spread-spectrum transmitter Support SATA II Asynchronous Signal Recovery (Hot Plug) feature Compliance with USB 2.0 (Hi-Speed USB) electrical specification Compliance with USB Mass Storage Class Bulk-Only Transport Specification Support 480Mbps High Speed (HS) and 12Mbps Full Speed USB operation Support ATA/ATAPI-7 Support ATA/ATAPI Ultra DMA Mode Support ATA/ATAPI PACKET command feature set Support ATA/ATAPI LBA48 addressing mode Support dual LUN (Logic Unit Number) for USB to ATA/ATAPI Support Windows 7, Vista, Windows XP, Windows 2000, Windows ME, 98SE Need driver installation under Windows 98SE 2. Product introduction 2 1 4 3 1. SATA Port for 2.5’’/3.5’’ SATA Hard Drive 2. IDE Port for 2.5’’ IDE Hard Drive 3. IDE Port for 3.5’’ IDE Hard Drive 4. Hidden Power / Active Light: It will keep flashing when it is detecting the 2.5’’/3.5’’ SATA Hard Drive or during the Data transferring. 3. Tips for HDD INSTALLATION For 2.5’’/3.5’’ SATA HDD (1) Have SATA Hard Drive to connect with ER CABLE. (2) Have the external Power Adapter connect with USB 2.0 TO IDE/SATA ADAPTER CABLE. (3) Have USB 2.0 TO IDE/SATA ADAPTER CABLE connect with and your computer, then power on, your computer system will detect the SATA HDD. For 3.5’’ IDE HDD (1) Have the 3.5’’ IDE HDD connect with USB 2.0 TO IDE/SATA ADAPTER CABLE. (2) Have the external Power Adapter connect with USB 2.0 TO IDE/SATA ADAPTER CABLE. (3) Have USB 2.0 TO IDE/SATA ADAPTER CABLE connect with your computer, then power on, your computer system will detect the IDE HDD. For 2.5’’ IDE HDD (1) Have 2.5’’ IDE HDD connect with USB 2.0 TO IDE/SATA ADAPTER CABLE. (2) Have USB 2.0 TO IDE/SATA ADAPTER CABLE connect with your computer, then power on, your computer system will detect the IDE HDD. NOTES: Our product USB 2.0 TO IDE/SATA ADAPTER CABLE can support 2.5’’/3.5’’ SATA & IDE HDD synchronously, please refer to the below application image. Connect to PC Power supply 4. Software Installation Before installation, please connect the hard disk to the USB 2.0 to SATA II + IDE Adapter Cable Windows 98SE After installing the driver, please restart the computer, and then plug the USB 2.0 to SATA II + IDE Adapter Cable into the computer. It’s very important. 1) Please put the enclosed CD into the CD-ROM, and doubly click “setup.exe” 2) The driver is beginning to install 3) When the following screen displays, click ‘Finish’ 4) Please plug USB 2.0 to SATA II + IDE Adapter Cable into the computer. The system will find it and install. Windows ME/2000/XP/Vista/7 No need driver installation in those OS platform. 5. Verification Please track the path "My computer” and "My computer” -- > “System Properties” -- > “Device Manager" and expand the item "Hard disk controllers”, you should meet the following screen. 6. Remove Driver 1) Pull out USB 2.0 to SATA II + IDE Adapter Cable from the USB port of the computer 2) Then, Open the program "Add or Remove Programs", according to the following pass: Start/ Control Panel/ Add or Remove Programs. 3) When the following screen displays, Please click ‘ JMicron USB Disk Driver’, and then click “ADD/Remove…”, to begin canceling. 7. If you use an all new HDD 1) Please use " Fdisk " to set the capacity of your HDD, but this will destroy all the data in the HDD. 2) Format your HDD by standard procedures, if you can't find your new HDD, please following the steps in FAQ-1 Note: "Fdisk" or "Format" will destroy all the data and program in the HDD you select. Please make sure there is not any data in it, or all the data have a backup copy. 8. FAQ Q: I could see the icon at the right down comer on the screen, but I still couldn't find my external HDD. A: a. Please make sure your HDD has been installed correctly. b. Please make sure your HDD has been set in "Master" position, c. Please make sure you have installed correct driver for this USB HDD. d. Please make sure your HDD has been formatted. If no, please format your hard drive first. e. If you are sure you have installed correctly all the hardware and software, please follow the steps as below to catch your HDD. i. Enter "Control Panel" and enter "System" icon ii. Double click it to find a "System Manager". iii. Find a "Disk drivers" category. There should be 3 drivers, double click the HDD iv. Find the "Setting" button and choose the option “Removable Drive” v. Your computer will automatically assign a new letter to this USB HDD after restarting your computer 9. Caution!! a. If you are not sure what OS you are using, please contact your PC dealer. b. Please don't put this USB HDD in a humid or high-temperature environment. c. If your first installation is failed, please firstly remove the wrong device throngs the path as below: path=Control Panel > System > System Properties > Device Manager > Please remove the items with "?" or "!" mark.