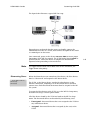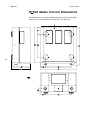
1
Owner’s Manual
No502
Media Console
FCC Notice
This equipment has been tested and found to comply with the limits for a Class B digital device,
pursuant to Part 15 of the FCC Rules. These limits are designed to provide reasonable protection
against harmful interference in a residential installation. This equipment generates, uses and can
radiate radio frequency energy and, if not installed and used in accordance with the instructions,
may cause harmful interference to radio communications. However, there is no guarantee that
interference will not occur in a particular installation. If this equipment does cause harmful
interference to radio or television reception, which can be determined by turning the equipment off
and on, the user is encouraged to try to correct the interference by one or more of the following
measures:
•
Reorient or relocate the receiving antenna.
•
Increase the separation between the equipment and the receiver.
•
Connect the equipment into an outlet on a circuit different from that to which the receiver is
connected.
•
Consult the dealer or an experienced radio/TV technician for help.
Caution!
Changes or modifications not expressly approved by the party responsible for compliance could
void the user’s authority to operate the equipment.
Canada
This Class B digital apparatus complies with Canadian ICES-003.
Cet appareil numérique de la Classe B est conforme à la norme NMB-003 du Canada.
Mark Levinson and Logic 7 are registered trademarks of Harman International
Industries.
HDCP and High-bandwidth Digital Content Protection are trademarks of Intel LLC.
Manufactured under license from Dolby Laboratories. “Dolby”, “Pro Logic”,
“Surround EX” and the double-D symbol are trademarks of Dolby Laboratories.
DTS, DTS-ES and Neo:6 are trademarks or registered trademarks of DTS, Inc.
HDMI and High-Definition Multimedia Interface are trademarks or registered
trademarks of HDMI Licensing LLC.
Microsoft and Windows are registered trademarks of Microsoft Corporation in
the United States and/or other countries.
Other company and product names may be trademarks of the respective
companies with which they are associated.
For customer service and product
shipment information, refer to the
website: www.marklevinson.com
©2008 Harman International Industries, Incorporated. All rights reserved.
Part No. 070-18870| Rev 0 |02/08
This document should not be construed as a commitment on the part of
Harman International Industries, Incorporated. The information it contains is
subject to change without notice. Harman International Industries,
Incorporated assumes no responsibility for errors that may appear within this
document.
Important Safety Instructions
1. Read these instructions.
2. Keep these instructions.
3. Heed all warnings.
4. Follow all instructions.
5. Do not use this apparatus near water.
6. Clean only with a dry cloth.
7. Do not block any ventilation openings. Install in accordance with the manufacturer’s
instructions.
8. Do not install near any heat sources such as radiators, heat registers, stoves or other apparatus
that produce heat.
9. Do not defeat the safety purpose of the polarized or grounding-type plug. A polarized plug has
two blades with one wider than the other. A grounding-type plug has two blades and a third
grounding prong. The wide blade or third prong is provided for your safety. If the provided plug
does not fit into your outlet, consult an electrician for replacement of the obsolete outlet.
10. Protect the power cord from being walked on or pinched, particularly at plugs, convenience
receptacles and the point where it exits from the apparatus.
11. Only use attachments and accessories specified by the manufacturer.
12. Use only with the cart, stand, tripod, bracket or table specified by the manufacturer or
sold with the apparatus. When a cart is used, use caution when moving the cart/
apparatus combination to avoid injury or tip over.
13. Unplug this apparatus during lightning storms or when unused for long periods of time.
14. Refer all servicing to qualified service personnel. Servicing is required when the apparatus has
been damaged in any way, such as when the power-supply cord or plug is damaged; liquid has
been spilled or objects have fallen into the apparatus; or the apparatus has been exposed to rain
or moisture, does not operate normally or has been dropped.
15. The MAINS cord is intended to be the safety disconnect device for this apparatus and shall
remain readily operable at all times.
16. Ventilation should not be impeded by covering the ventilation openings with items such as
newspapers, table cloths, curtains and so on.
17. No naked flame sources, such as candles, should be placed on the apparatus.
18. Terminals marked with this symbol may be considered HAZARDOUS LIVE, and the
external wiring connected to these terminals requires installation by an INSTRUCTED
PERSON or the use of ready-made leads or cords.
19. This product must be terminated with a three-conductor AC mains power cord that includes an
earth ground connection. To prevent shock hazard, all three connections must ALWAYS be used.
Warning!
To reduce the risk of fire or electric shock, do not expose this apparatus to rain or moisture. The
apparatus shall not be exposed to dripping or splashing. No objects filled with liquids, such as
vases, shall be placed on the apparatus.
iii
Mark Levinson
Safety Terms & Symbols
Terms in This Manual
These terms may appear in this manual:
Warning!
Calls attention to a procedure, practice, condition or the like that,
if not correctly performed or adhered to, could result in personal
injury or death.
Caution!
Calls attention to a procedure, practice, condition or the like that,
if not correctly performed or adhered to, could result in damage
or destruction to part or all of the component.
Note
Symbols on the
Product
Calls attention to information that is essential to highlight.
These symbols may appear on the product:
iv
Appears on the component to indicate the presence of
noninsulated, dangerous voltage inside the enclosure – voltage that
may be sufficient to constitute a risk of shock.
Appears on the component to indicate important operation and
maintenance instructions included in the accompanying
documentation.
Appears on the component to indicate compliance with the EMC
(Electromagnetic Compatibility) and LVD (Low-Voltage Directive)
standards of the European community.
No502 Media Console
Documentation Conventions
This document contains general safety and operation instructions
for the No502 Media Console. It is important to read this document
before attempting to use this product. Please pay particular
attention to safety instructions.
This manual is not intended as a general reference guide for home theater
systems. If you’re uncertain how to set up or maintain your system, seek
the advice of a professional installer or ask your dealer for a
recommendation.
All product graphics are included for reference only and may not
completely reflect the physical product that is shipped.
How This Manual is
Organized
Conventions
This manual is divided into five sections:
•
Getting Started provides an overview of the Nº502 Media
Console and includes installation and power considerations,
product information, unpacking instructions, and a first-time
operation procedure.
•
Basic Operation explains the basic functions of the front and
rear panels, remote control, and menu system.
•
Customizing the Nº502 describes how to set up the Nº502
Media Console and includes information on advanced user
features such as trigger outputs, ML Net, and downloading the
configuration.
•
Troubleshooting & Maintenance provides information for
troubleshooting and descriptions of error messages, as well as
maintenance instructions for proper care of the Nº502 Media
Console.
•
The Appendix provides the specifications, Declaration of
Conformity, menu trees and other useful information.
This manual uses the following conventions:
•
The names of buttons, knobs, and connectors on the product
are represented in the same manner in the manual. For
instance, if a button is labeled as “FP DISPLAY” on the front
panel of the product, then the manual refers to that button as
“FP DISPLAY”.
•
Menu names are derived from their associated buttons – i.e., the
Setup button opens the Setup menu. Any submenus associated
with the main menu follow the same rule.
v
Mark Levinson
vi
Nº502 Media Console
Table of Contents
Section 1: Getting Started
About the No502 Media Console .....................................1-1
Installation Considerations ...............................................1-3
Power Requirements ........................................................1-4
First-Time Operation ........................................................1-5
Replacing the Remote Control Batteries ...........................1-6
Section 2: Basic Operation
Front Panel Overview ......................................................2-1
Rear Panel Overview ........................................................2-4
Remote Control Overview ................................................2-8
Remote Control Versus Front Panel ................................2-11
Menu System Overview ..................................................2-12
Status Panels .................................................................2-15
Section 3: Customizing the No502
Add New, Name, & Delete ...............................................3-1
Setup Step 1: Displays ......................................................3-3
Display Setup ...................................................................3-4
Setup Step 2: Speakers .....................................................3-7
Speaker Setup ..................................................................3-8
Video Profiles ................................................................3-25
Audio Profiles ................................................................3-28
Activities ........................................................................3-32
User Options .................................................................3-35
Triggers .........................................................................3-41
Internal Web Pages .......................................................3-43
ML Net ..........................................................................3-43
Using Surround Modes ...................................................3-47
Surround Mode Descriptions ..........................................3-48
Surround Mode Parameter Descriptions ..........................3-55
Name Selector ...............................................................3-59
Section 4: Troubleshooting & Maintenance
Automatic Calibration Errors ............................................4-6
Error Messages ................................................................4-8
Troubleshooting Display Formats ...................................4-11
Restoring Factory Default Settings .................................4-14
Care & Maintenance .......................................................4-15
vii
Mark Levinson
Appendix
Specifications .................................................................. A-1
No502 Media Console Dimensions ................................... A-4
Declaration of Conformity ............................................... A-5
Rack Mount Kit Instructions ............................................. A-6
Activity Menu & Zone Menu Trees ................................... A-7
Display Setup & Video Profile Setup Menu Trees .............. A-8
Speaker Setup Menu Tree ................................................ A-9
Audio Profile Setup & Activity Setup Menu Trees ............ A-10
User Options Setup Menu Tree ...................................... A-11
Understanding Room Correction ................................... A-12
Surround Sound Issues .................................................. A-17
Link2 ............................................................................ A-19
Saving the No502 Configuration .................................... A-20
Index
viii
1
Getting Started
About the No502 Media Console
Thank you for purchasing the Nº502 Media Console. True to the
Mark Levinson® tradition of home theater excellence, the superb
sound and broadcast-quality video processing capabilities of the
Nº502 Media Console are unsurpassed in today’s marketplace.
Product Description
The Nº502 Media Console features an intuitive interface with
user-configurable Activity list, separate audio and video profiles,
and independent speaker configurations. Profiles and Setups can be
configured and then assigned to multiple Activities, making setup
time shorter while providing maximum flexibility. With a wide
range of available audio and video input formats, multiple Activities
can be assigned to efficiently manage a wide range of media sources.
The fully automated calibration performs speaker distances and
levels calibration as well as Room Correction, which neutralizes
room modes, making all audio sources sound more accurate and
true to the original recording.
The large full-color front panel display, capable of producing
elegant bit-accurate graphics, allows access to the Nº502’s menu
system and can also be used in Preview mode. Preview mode
enables other video inputs to be viewed without disturbing the
current activity, providing an effective means to monitor multiple
inputs without disturbing the active video source.
The Nº502 features an extensive list of surround modes, including
Logic 7, Dolby, and DTS modes. To retain the purity of the audio,
the Nº502 has separate analog output cards for each channel and all
input/output connectors are isolated from the chassis to prevent
noise pickup from common impedance coupling. In addition, the
volume controls have been redesigned for improved noise
performance at lower volume settings while still preserving the full
digital depth of the audio.
The Nº502 contains state-of-the-art, broadcast-quality video
processing capability, enabling true-to-life colors, exceptional
detail, and deep blacks. In addition, the Nº502 uses
specially-designed motion adaptive video de-interlacing with edge
interpolation for both high-definition and standard definition
video sources. Advanced noise reduction and detail enhancement
circuitry cleans up and sharpens images degraded by compression
or analgo circuitry from such sources as standard DVDs and satellite
or cable broadcasts.
1-1
Getting Started
Mark Levinson
For external controls, the Nº502 introduces ML Net protocol, which
controls and synchronizes other Mark Levinson products through
the use of an Ethernet port. RS-232, programmable triggers, and
Mark Levinson Link2 functions are also supported.
The Nº502 Media Console is Mark Levinson’s finest processor to
date. The processing power and superb performance will simply
astound you, as will its simplicity and versatility, proving that this
product is the latest in a line of products that represent the very
best.
What’s in the Box
The following is included with your Nº502 Media Console:
1-2
Item
Quantity
Nº502 Media Console
1
Nº502 remote control
1
Phillips-head screwdriver
1
Nº502 owner’s manual (this document)
1
AAA alkaline batteries (for remote control)
2
White gloves
1 pair
RCA-BNC connectors
3
Detachable AC power cord*
1
*Not included in shipments to Japan
Available Options
The following optional accessories are available for purchase:
•
4-Microphone Kit - provides four microphones for use with the
automatic calibration.
•
Rack Mount Kit - provides the mounting hardware necessary to
install the Nº502 into an equipment rack.
Contact an authorized Mark Levinson dealer for availability and
pricing. Authorized dealers may also have information on
additional options.
Product Registration
Register your Nº502 online at www.marklevinson.com within 15
days of purchase. Retain the original, dated sales receipt as proof of
warranty coverage.
Nº502 Media Console
Getting Started
Installation Considerations
The Nº502 Media Console requires special care during installation
to ensure optimal performance. Pay particular attention to
instructions included in this section and to precautions included
throughout this owner’s manual.
Unpacking
DO save all packing materials for possible future shipping needs.
DO inspect the Nº502 for signs of damage during shipment. If
damage is discovered, contact your authorized Mark Levinson
dealer for assistance in making appropriate claims.
DO locate and remove the accessory box from the carton. Make
sure it contains all of the items listed in the “What’s in the Box”
table on the previous page. If not, contact your authorized Mark
Levinson dealer.
Placement and
Ventilation
DO install the Nº502 Media Console on its own shelf for proper
ventilation.
DO install the Nº502 chassis on a solid, flat, level surface.
DO install the Nº502 Media Console close to associated
components to keep interconnecting cables as short as possible.
DO select a dry, well-ventilated location out of direct sunlight.
DO allow at least 3 to 4 inches (8 to 10cm) of clearance above the
Media Console for proper heat dissipation.
DO NOT place the Nº502 on a thick rug or carpet or cover the
Nº502 Media Console with a cloth, as this might prevent proper
cooling.
DO NOT expose the Nº502 Media Console to high temperatures,
humidity, steam, smoke, dampness, or excessive dust. Avoid
installing the processor near radiators and other heat-producing
appliances.
DO NOT install the Nº502 near unshielded TV or FM antennas,
cable TV decoders, or other RF-emitting devices that might cause
interference.
DO NOT place the Nº502 on a windowsill or in any location
where it will be exposed to direct sunlight.
1-3
Getting Started
Mark Levinson
DO NOT obstruct the IR (infrared) receiver/transmitter located on
the front panel display. The remote control must be in line-of-sight
with the front panel IR receiver. If strong sunlight or fluorescent
light shines on the IR receiver, remote control may be unreliable.
Warning!
MAKE SURE all components are properly grounded. Do not defeat
the safety purpose of polarized or grounding-type plugs with
“ground-lifter” or “cheater” adapters. Doing so may cause
dangerous voltage to build up between components, which may
result in personal injuries and/or product damage.
Power Requirements
At the factory, the Nº502 Media Console is configured for 100, 120,
220, or 230-240 VAC power operation at 50Hz or 60Hz. Before
operating the Nº502, ensure that the power label on the rear panel
near the AC input connector indicates the correct operating voltage.
Caution!
DO NOT attempt to adjust the operating voltage. Consult a Mark
Levinson dealer if the operating voltage is incorrect or must be
changed for relocation purposes.
1-4
Different operating voltages may require the use of different
power cords and/or attachment plugs. Contact a Mark Levinson
dealer for additional assistance.
Operating States
Caution!
The Nº502 Media Console is designed for continuous operation and
has three operating states:
•
Off – the AC mains power is disconnected using the front panel
Power switch or by removing the power cord from the rear
panel.
•
Standby – the Nº502 is powered up, but the audio outputs are
muted and the video outputs are off.
•
On – everything is powered up and all configured outputs are
active.
BEFORE moving the No502 Media Console, make sure it is
powered off with the power button. Then make sure the power
cord is disconnected from the rear panel connector and the
electrical outlet.
Nº502 Media Console
Getting Started
First-Time Operation
Perform the following steps to unpack and power up the new Nº502
Media Console.
Unpacking
1. Position the box so that the top side is facing up.
2. Use a utility knife to slice open the box and lift the box sides
apart to reveal the inner box.
3. Carefully slice open the inner box and lift the box sides apart.
4. Remove the white accessory box and put it aside.
5. Remove the foam insert from the top of the Nº502 Media
Console.
6. Carefully lift the Nº502 out of the box.
7. Remove the antistatic bag from the Nº502.
Initial Power-Up
1. Connect all system speakers and amplifiers to the Audio Output
connectors on the rear panel of the Nº502.
2. Using an HDMI cable, connect a DVD player output to the
HDMI-1 input on the rear panel of the Nº502.
3. Using a second HDMI cable, connect the HDMI-1 output on the
Nº502 to the display input.
4. Plug the power cord into the rear panel AC Input connector of
the Nº502 and then connect to your wall outlet. Make sure that
the power rating listed on the rear panel of the Nº502 is less
than the power available at the wall outlet.
5. Press the Power button on the front panel. When the Nº502
completes its power-up cycle, it automatically enters Standby
mode. When the LED above the Standby button begins to
slowly blink, the Nº502 is ready.
6. Press the Standby button to take the Nº502 out of Standby
mode.
Note
If the front panel display is not bright enough or is too bright, multiple
presses of the front panel Display Intensity button scrolls through the
different brightness levels.
1-5
Getting Started
Mark Levinson
7. Press the Activity button on the remote control. Verify that the
TV Activity is in red test, indicating that TV is the currently
selected Activity.
8. Put a disc in the DVD player and press the Play button. Once
the disc loads, the DVD media should be visible on the front
panel display. Also confirm that the audio track can be heard
through the front left and right speakers.
Now that the Nº502 Media Console is unpacked and initial
power-up confirmed, it’s time to set up and calibrate the system.
The rest of the manual is designed to help with these steps.
•
Chapter 2: Basic Operation reviews the basic functions of
the front and rear panels, remote control, and menu system.
•
Chapter 3: Customizing the Nº502 explains how to set up
the Nº502 and discusses advanced user functions such as trigger
outputs, ML Net, and the configuration download utility.
•
Chapter 4: Troubleshooting and Maintenance provides a
troubleshooting guide and error message descriptions, as well as
maintenance instructions.
•
The Appendix provides Nº502 specifications, menu trees,
rack-mount instructions, and other useful information.
1-6
Replacing the Remote Control
Batteries
The Nº502 Media Console remote control has two installed AAA
batteries. These should be replaced as required. We recommend
using alkaline batteries, which are long lasting and do not leak.
To replace the remote control batteries:
1. Locate the battery compartment cover on the bottom of the
remote control.
2. Using a Phillips-head screwdriver, remove the three screws from
the battery compartment cover and set them aside.
3. Remove the battery compartment cover.
4. Remove old batteries.
5. Observing the proper polarity, insert the new batteries.
6. Position the cover over the battery compartment and replace
the screws removed in Step 2.
7. Properly dispose of the old batteries.
2
Basic Operation
Front Panel Overview
The numbers in the front panel illustration correspond with the summary
list of items below.
1
6
2
7
3
8
4
9
5
10
2-1
12
11
13
14
15
1.
Zone button
6.
Mute button
11. Activity knob
2.
Preview button
7.
12. Standby button
3.
Display Intensity
button
Video Profile
button
8.
Audio Profile
button
9.
Surround button
4.
Setup button
5.
Menu button
13. Power button
14. Front Panel Display
15. Volume knob
10. Enter button
1. Zone button
2. Preview button
Switches the Nº502 controls between the Main Zone and Remote Zone.
When the Zone LED is lit, only the Remote Zone controls are active.
Controls that are Main Zone specific (for instance, the Video Profile
menu) are not accessible while the Zone LED is lit.
Allows the preview of video sources that are not part of the current
Activity. Preview mode is only active when the front panel LED located to
the left of the Preview button is illuminated.
Basic Operation
3. Display
Intensity button
Mark Levinson
Controls the brightness intensity level of the front panel display and all
LEDs on the front panel. Multiple presses of the Display Intensity button
cycle through the available brightness levels – High, Medium, Low, and
Off.
The Display Intensity button also provides access to the alternative video
output monitor. Refer to the “Monitor Out” description in the “Rear Panel
Overview” section found later in this chapter for more details.
4. Setup button
Accesses the Setup menu to configure all system functions, advanced user
options, and connectivity of the Nº502 Media Console. In addition,
pressing the Setup button from within any menu closes the menu
structure. To set up the Nº502, refer to Chapter 3: Customizing the Nº502.
5. Menu button
Accesses the Main Zone Audio menu to make real-time adjustments to
various audio features of the Nº502. In addition, when the Menu button is
pressed from within any menu, the navigation returns to the previous
menu level.
6. Mute button
Reduces the volume of the audio output within the Main Zone or Remote
Zone. When the Mute function is active, the front panel Mute LED is lit.
To deactivate the Mute control, simply adjust the volume or press the
Mute button until the front panel Mute LED is NOT lit. The actual
volume-level change of the Mute function can be modified in the Setup
menu.
7. Video Profile
button
Accesses the list of available Video Profiles. Multiple presses of the Video
Profile button scrolls through the list; pressing the Enter button loads the
new selection. The loaded Video Profile displays in red text.
8. Audio Profile
button
Accesses the list of available Audio Profiles. Multiple presses of the Audio
Profile button scrolls through the list; pressing the Enter button loads the
new selection. The loaded Audio Profile displays in red text.
9. Surround
button
Accesses the list of available surround modes. Multiple presses of the
Surround button scrolls through the list; pressing the Enter button loads
the new selection. The loaded surround mode displays in red text.
2-2
10. Enter button
Has two functions in the menu system:
•
to advance through the menus.
•
to save a modified parameter value.
Nº502 Media Console
11. Activity knob
Basic Operation
The Activity knob has two functions:
•
accesses the list of available Activities. Turning the knob scrolls
through the list; pressing the Enter button loads the new selection.
The loaded Activity displays in red text.
•
performs the same function as the and buttons on the remote
control from within any menu structure.
•
Navigates through the Activity list while in Preview mode.
12. Standby
button
Activates and deactivates the Nº502’s Standby mode. The Standby LED
located directly above the Standby button is illuminated when the Nº502
is operational, and blinks slowly when the Nº502 is in Standby mode.
13. Power button
Controls the AC input to the Nº502 when the supplied power cord is
connected between the rear panel power connector and an electrical outlet.
Caution!
14. Front Panel
Display
15. Volume knob
•
When the Nº502 is off, pressing the Power button supplies AC power,
putting the Nº502 into Standby mode.
•
When the Nº502 is powered on or is in Standby mode, pressing the
Power button disconnects the AC power, turning off the Nº502.
Before operating the No502, verify that the voltage label near the AC
input connector indicates an operating voltage compatible with the
voltage level of the electrical outlet you intend to use.
The full-color front panel display can:
•
access the menu system without having to turn on the main video
display.
•
monitor the Main Zone when the main display is out of sight.
•
view a different video source without disturbing the main display.
•
verify Remote Zone status.
Turning the Volume knob adjusts the volume level. The volume range for
the Main Zone is 0 to 100 in 0.1 increments. The volume range for the
Remote Zone is 0 to 100 in 0.5 increments.
The volume control for the Main and Remote Zones are independent of
each other; adjusting the Volume knob only changes the volume in the
currently active Zone. For example, adjusting the Remote Zone Volume
does not affect the Main Zone Volume.
When adjusting the volume, you may notice an REF tag positioned on the
adjustment bar. REF indicates the Reference Volume level.
2-3
Basic Operation
Mark Levinson
Rear Panel Overview
The numbers in the rear panel illustration correspond with the summary
list of items below.
1
2
3
4
5
7
6
8
9
10
11
12
13
2-4
14
15
1.
Composite Video
Inputs
2.
HDMI Inputs
3.
Digital Audio Inputs
10. Link2 port
4.
AES/EBU Inputs
11. Trigger Outputs
5.
S-Video Inputs
12. RS-232 Control port
6.
Component Video
Inputs
13. Ethernet port
7.
1. Composite
Video Inputs
2. HDMI Inputs
17
16
HDMI Outputs
18 19 20
8.
Monitor Out
15. Analog Audio Outputs
9.
Component Video
Output
16. Analog Audio Inputs
14. Microphone Inputs
17. IR Input
18. 7.1-Channel/
5.1-Channel Analog
Audio Input
19. AC Input
20. Remote Zone Analog
Audio Outputs
Accept composite analog video inputs. There are three composite video
connectors labeled 1 to 3.
Accept High-Definition Multimedia Interface™ (HDMI) inputs. There are
six HDMI input connectors labeled 1 to 6.
Nº502 Media Console
Basic Operation
3. Digital Audio
Inputs
Accept S/PDIF digital audio inputs using six coaxial RCA connectors,
labeled 1 to 6, and three TOSlink optical connectors, labeled 1 to 3.
4. AES/EBU Inputs
Accept two AES/EBU XLR inputs, labeled 1 and 2, for carrying digital
audio signals.
5. S-Video Inputs
6. Component
Video Inputs
7. HDMI Outputs
Note
8. Monitor Out
Note
Accept S-video inputs. There are three S-video input connectors labeled 1
to 3.
Accept component video inputs through four Y-Pb-Pr connector sets,
labeled 1 to 4.
Provide HDMI outputs for HDMI-equipped displays through two
connectors labeled 1 and 2.
Only one video output connector, either the Component, HDMI-1, or
HDMI-2 connector, can be active at any given time.
Provides an output for an alternative video monitor. The default setting
for the Monitor Out(put) is Off.
The front panel display and Monitor Out share the same video signal.
Therefore, when the Monitor Out connector is turned on, the front panel
display is deactivated.
The monitor output can only be turned on by a key press command on
the Nº502 front panel.
To activate the Monitor Out connector, press and hold the Display
Intensity button until the front panel display turns off. The Monitor Out
connector is now active.
To turn off the Monitor Out connector and reactivate the front panel
display, press and hold the Display Intensity button until the front panel
display turns on again.
9. Component
Video Output
Note
Provides a component video output using BNC connectors.
If HDCP (High-Bandwidth Digital Content Protection) is active, then the
component video output is disabled. To verify this condition, open the
Detailed Status Panel for the Activity. The Detailed Status Panel identifies the
presence of HDCP source material. Refer to the “Status Panels” section at the
end of this chapter for further information.
2-5
Basic Operation
2-6
Mark Levinson
10. Link2 port
Uses the Link2 protocol to link two or more Mark Levinson components.
For more information on the Link2 protocol and how to use it with the
Nº502, refer to the “Link2” section of the Appendix.
11. Trigger
Outputs
Used to activate other components in the home theater system, such as
amplifiers, lights, window shades, and video screens. When the trigger is
activated, a 12V DC signal is output. The trigger outputs use 3.5mm minijacks, labeled 1 to 4, and are programmable. For more information, refer
to the “Triggers” section of Chapter 3: Customizing the Nº502.
12. RS-232 Control
port
Provides serial control through a standard RS-232 connection. Refer to the
separate document, Nº502 Serial Protocol, for further details.
13. Ethernet port
Used to support a network connection to connect to a computer, and for
external or ML Net control. For information on how to set up and use the
Ethernet port, refer to Chapter 3: Customizing the Nº502.
14. Microphone
Inputs
Provides four 3.5mm input connectors. Only for use with the optional
microphone kit during the automatic calibration process.
15. Analog Audio
Outputs
Provide balanced XLR and unbalanced RCA connectors for the Main Zone
analog audio output. The output connectors are arranged in four groups:
Note
16. Analog Audio
Inputs
17. IR Input
•
Front – contains connectors for the Left/Right and Center outputs
•
Subwoofer 1 and Subwoofer 2 – contains Left/Right connectors
for the Subwoofer 1 & Subwoofer 2 outputs
•
Surround – contains Left/Right connectors for the Surround (aka
Side) outputs
•
Surround Back – contains Left/Right connectors for the Surround
Back (aka Rear) outputs
Whenever an audio output is enabled or disabled in the Setup menu, both the
balanced and unbalanced output connectors are affected.
Accept stereo analog audio inputs via two balanced (XLR) and four
unbalanced (RCA) input connectors.
Accepts the input of IR (infrared) signals from other equipment. The
3.5mm jack accepts a stereo (tip/ring/sleeve) or mono (tip/sleeve) plug.
Nº502 Media Console
18. 7.1-Channel/
5.1-Channel
Analog Audio
Input
19. AC Input
Caution!
20. Remote Zone
Analog Audio
Output
Basic Operation
Provides eight connectors, labeled FL, FR, CTR, SUB, SL, SR, BL, and BR,
for analog audio inputs. A 7.1 audio input signal uses all eight connectors;
a 5.1 audio input signal uses only six connectors – FL, FR, CTR, SUB, SL,
and SR.
Provides AC power to the Nº502 when the supplied power cord is
connected from the AC Input connector on the Nº502 rear panel to an
electrical outlet.
Before operating the No502, verify that the voltage label near the AC
input connector indicates an operating voltage compatible with the
voltage level of the electrical outlet you intend to use.
Provides one stereo pair of unbalanced RCA connectors for the Remote
Zone analog audio outputs. These outputs can provide audio to a location
outside of the primary listening space.
2-7
Basic Operation
Mark Levinson
Remote Control Overview
The numbers in the Remote Control illustration above correspond with
the summary list of items below.
10
1
11
2
12
3
13
4
14
5
15
6
16
7
17
8
9
2-8
1. Navigation
buttons
1.
Navigation buttons (, , , )
10. Enter button
2.
Menu button
11. Setup button
3.
Activity button
12. Surround button
4.
Audio Profile button
13. Volume button
5.
Video Profile button
14. Preview button
6.
Function F1 button
15. Mute button
7.
Function F2 button
16. Zone button
8.
Function F3 button
17. Standby button
9.
Light button
The , , andbuttons provide basic navigation within the menu
system of the Nº502. The navigation buttons:
•
highlight a new option from a list using the and buttons.
•
select a new parameter value using the button.
•
adjust an adjustment bar using the and buttons.
•
exit a submenu using the button.
•
enter a submenu using the button.
Nº502 Media Console
Basic Operation
2. Menu button
Accesses the Audio Adjust menu to make real-time adjustments to various
audio features of the Nº502. In addition, when the Menu button is
pressed from within any menu, the navigation returns to the previous
menu level.
3. Activity button
Accesses the list of available Activities. Multiple presses of the Activity
button scrolls through the list, and pressing the Enter button loads the
new selection. The loaded Activity displays in red text. This button is also
used to scroll through the Activity list while in Preview mode.
4. Audio Profile
button
Accesses the list of available Audio Profiles. Multiple presses of the Audio
Profile button scrolls through the list, and pressing the Enter button loads
the new selection. The loaded Audio Profile displays in red text.
5. Video Profile
button
Accesses the list of available Video Profiles. Multiple presses of the Video
Profile button scrolls through the list and pressing the Enter button loads
the new selection. The loaded Video Profile displays in red text.
6. to 8. Function
buttons
9. Light button
10. Enter button
The F1, F2, and F3 Function buttons provide direct access to a specific
parameter without having to go through the menu structure. For more
information, refer to the “Control Options” section of Chapter 3:
Customizing the Nº502.
Illuminates the remote control with a back light. Pressing the button a
second time turns the back light off. The back light automatically turns
off if no buttons are pressed for several seconds.
Has two functions in the menu system:
•
to advance through the menus.
•
to save a modified parameter value.
11. Setup button
Accesses the Setup menu to configure all system functions, advanced user
options, and connectivity of the Nº502 Media Console. In addition,
pressing the Setup button closes the menu structure. For more
information regarding how to set up the Nº502, refer to Chapter 3:
Customizing the Nº502.
12. Surround
button
Accesses the list of available surround modes. Multiple presses of the
Surround button scrolls through the list; pressing the Enter button loads
the new selection. The loaded surround mode displays in red text.
2-9
Basic Operation
13. Volume button
Mark Levinson
Pressing the (+) Volume button increases the volume, while pressing the
(–) Volume button decreases the volume. The volume range for the Main
Zone is 0 to 100 in 0.1 increments. The volume range for the Remote
Zone is 0 to 100 in 0.5 increments.
The volume control for the Main and Remote Zones are independent of
each other; adjusting the volume only changes the volume in the
currently active Zone. For example, adjusting the Remote Zone volume
does not affect the Main Zone volume.
When adjusting the volume, you may notice a REF tag positioned on the
adjustment bar. REF indicates the Reference Volume level.
2-10
14. Preview
button
Allows the preview of video sources that are not part of the current
Activity. Preview mode is only active when the front panel LED located to
the left of the Preview button is illuminated.
15. Mute button
Reduces the volume of the audio output within the Main Zone or Remote
Zone. When the Mute function is active, the front panel Mute LED is lit.
To deactivate the Mute control, simply adjust the Volume or press the
Mute button until the front panel Mute LED is NOT lit. The actual volume
level change of the Mute function can be modified in the Setup menu.
16. Zone Button
Switches the Nº502 controls between the Main Zone and Remote Zone.
When the front panel Zone LED is lit, only the Remote Zone controls are
active. Controls that are Main Zone specific (for instance, the Video
Profile menu) are not accessible while the front panel Zone LED is lit.
17. Standby
Button
Activates and deactivates the Standby mode of the Nº502. The Standby
LED located directly above the Standby button on the front panel is
illuminated when the Nº502 is operational, and blinks slowly when the
Nº502 is in Standby mode.
Nº502 Media Console
Basic Operation
Remote Control Versus Front Panel
Some menu navigation varies when using the front panel or the remote
control. The table below identifies the differences between basic remote
control and front panel navigation controls.
Note
For simplicity, most instructions in this manual refer only to the remote
control buttons.
Action
Remote Control
Front Panel
Enter the Activity
Menu
Press the Activity button.
Turn the Activity Knob.
Select a Menu Option
(Enter a Submenu)
Press the button or the
Enter button.
Press the Enter button.
Exit a Menu
Press the button to go
back one menu layer, or
press the Setup button to
exit the whole menu
structure.
Press the Menu button to go
back one menu layer, or
press the Setup button to
exit the whole menu
structure.
Select a Parameter
Press the button or the
Enter button.
Press the Enter button.
Change an
adjustment bar
Press the or button.
Turn the Activity Knob.
2-11
Basic Operation
Mark Levinson
Menu System Overview
The Nº502 Media Console includes a comprehensive, graphical menu
system to aid in setup, configuration, and daily operation. The menu
system has two operating paradigms:
Note
•
Activity Mode provides the day-to-day interaction with the Nº502
Media Console, and allows the user to make real-time changes to
specific audio parameters.
•
Setup Mode accesses the system setup parameters for system
functions and connectivity. Setup Mode can only be entered by
pressing the Setup button.
While in the menu structure: if the Menu button is pressed, the navigation
returns to the previous menu level. Pressing the Setup button closes the menu
structure.
While in Activity Mode, pressing the Video Profile, Audio Profile, or
Surround buttons allows the user to change the Profile or Surround Mode
associated with the current Activity. However, these changes are not saved
when a new Activity is selected. To make any Profile or Surround Mode
change permanent for the associated Activity, make the change while in
Setup Mode.
2-12
Menu Path
The menu system is designed to provide detailed information and yet
remain simple to use. The top of every menu page displays a menu path,
showing the current location in the menu system and the path taken to
get there.
Activity Menu
Pressing the Activity button displays the list of available Activities. The
current Activity is displayed in red text. When scrolling through the list,
the loaded video of each Activity is displayed in the Activity Preview
window on the right side of the menu.
To load a new Activity, select one from the list and press the Enter button.
Once loaded, the Activity remains active until a new Activity is selected.
Remote Zone
Menu
Note
The Remote Zone provides audio to a secondary location outside of the
primary listening space. The Main Zone Activity list is duplicated in the
Remote Zone menu. The audio from any Activity can be selected for the
Remote Zone.
If the Remote Zone Activity is set to Off, no audio is sent to the Remote Zone
outputs. If the Zone LED is lit, Remote Zone controls remain active until the
Zone button is pressed to switch back to the Main Zone.
Nº502 Media Console
Main Zone Audio
Menu
MainZoneAudio
Audio Adjustments
Surround Mode Adjust
Basic Operation
Accesses the Main Zone Audio menu to perform real-time audio
adjustments to the Main Zone audio outputs. Press the Menu button to
access the Main Zone Audio menu.
The Main Zone Audio menu contains:
•
Audio Adjustments menu – makes real-time audio adjustments to
selected audio parameters.
•
Surround Mode Adjust menu – makes real-time adjustments to
the available Surround Mode parameters.
Audio Adjustments Menu
-AudioAdjustments
Offsets
Left/Right Balance
Front/Back Fader
Room Correction: Off
Room Correction Adjust: Medium
Recall
The Audio Adjustments menu adjusts the Main Zone volume level by
modifying the offsets, left/right balance, or front/back fader controls. In
addition, you can control the level of Room Correction applied from the
automatic calibration. Changes made to these parameters are system-wide
changes that affect all Activities; the new settings are saved until another
adjustment is made.
The Audio Adjustments parameters are:
•
Note
Offsets – adjusts the Offset volume of the Main Zone audio output.
Individual Offsets are available for Stereo Front, Center, Surround,
Back, Subwoofer 1, and Subwoofer 2. Selecting any of the Offset
parameters opens an adjustment bar with a range of Off or –14.0dB to
+14.0dB in 0.1dB increments. The zero Offset value is labeled as
“Even”.
•
Left/Right Balance – adjusts the volume level between the left side
speakers and the right side speakers. Selecting the Left/Right Balance
parameter opens an adjustment bar with a range of Off or –14.0dB to
+14.0dB in 0.1dB increments. The zero Left/Right Balance value is
labeled as “Even”.
•
Front/Back Fader – adjusts the volume level between the front and
rear speakers. Selecting the Front/Back Fader parameter opens an
adjustment bar with a range of Off or –14.0dB to +14.0dB in 0.1dB
increments. The zero Front/Back Fader value is labeled as “Even”.
•
Room Correction – controls the application of the Room
Correction values derived during the automatic calibration. This
parameter can be On or Off.
This parameter is not available for selection until the automatic calibration has
been successfully completed.
Conditions that disable Room Correction include:
•
Adding a new speaker to an existing Speaker setup. However,
removing a speaker will NOT disable Room Correction.
2-13
Basic Operation
Mark Levinson
•
Note
•
Lowering a crossover setting by two or more octaves.
•
Changing the subwoofers from Mono to Stereo or from Stereo to
Mono, or making any other subwoofer configuration changes.
Room Correction Adjust – defines the level of Room Correction
applied to the current Activity. The settings available are Low,
Medium Low, Medium, Medium High, and High. The lowest setting
only applies a minimal amount of Room Correction; the highest
setting applies the full correction. The Room Correction Adjust
parameter is not available for selection until the Automatic
Calibration has been successfully completed and the Room
Correction parameter is set to On.
Room Correction Adjust is disabled when Room Correction is set to Off.
•
Recall – sets the Audio Adjust parameters to the factory default
settings. The Offset, Left/Right Balance, and Front/Back Fader parameters are set to zero, or Even. The Room Correction is set to Off and
the Room Correction Adjust is set to Medium.
Select OK to recall the factory default settings.
Select Cancel to exit without recalling the factory default settings.
2-14
Note
The selected action is performed without pressing the Enter key.
The message “Audio Adjustment Settings Recalled” appears on the
front panel and main displays when the adjustment settings are
returned to the factory default settings.
Surround Mode Adjust Menu
The Surround Mode Adjust menu modifies the available Surround Mode
parameters. Adjustments made in this menu are systemwide, affecting all
applicable Activities.
For descriptions of the available suround mode parameter settings, refer
to the “Surround Modes Parameter Descriptions” section of Chapter 3:
Customizing the Nº502.
Basic Operation
Mark Levinson
Status Panels
Status Panels provide both summary and detailed information regarding
the current state of the Nº502 Media Console. The Status Panels are
information-only pages that have no selectable parameters.
There are two types of Status Panels – the Quick Status Panel and the
Detailed Status Panel. With the exception of the Remote Zone Audio
Quick Status Panel, all Status Panels relate to the Main Zone of the Nº502.
Note
Quick Status Panel
2-15
Status Panels are not available during calibration.
The Quick Status Panel is displayed whenever the current Activity is
changed via the adjustment menus or the remote control Function
buttons. The Quick Status Panel displays a short summary of the current
Activity, acknowledging the change. The Quick Status Panel can also be
accessed directly by pressing the button.
The Quick Status Panel displays for six seconds, then automatically closes.
This condition and other display characteristics of the Quick Status Panel
can be customized to your preferences. Refer to the “User Options”
section of Chapter 3: Customizing the Nº502 for more information.
The Quick Status Panel identifies the current Activity in the upper left
corner and the current Zone in the upper right corner. All of the variables
listed in the Quick Status Panel are directly related to the status of the Activity
listed in the upper left corner of the panel.
The Quick Status Panel includes:
•
Volume - indicates the current volume level
•
Signal - identifies the input type of the source signal
•
Surround Mode - identifies the current Surround Mode
•
Video & Audio Profiles - indicates the current Video & Audio Profiles
The information in the Quick Status Panel varies depending upon the
current Activity and its setup.
The Remote Zone Quick Status Panel is only available for viewing when
the Remote Zone is activated.
Basic Operation
Mark Levinson
Detailed Status
Panel
The Detailed Status Panel provides a comprehensive summary of the
current Activity. To access the Detailed Status Panel, press the button.
The elements listed vary based upon the current Activity and its setup.
Thus there may be more than one page of information; the top right
corner of the menu identifies the number of pages. To access additional
pages, press the button.
Note
The Detailed Status Panel is always shown on the front panel display and
cannot be disabled.
The bottom half of each Detailed Status Panel page contains a meter
diagram that indicates the input levels of each active channel. The meters
show live data as long as the source of the current Activity is playing.
To close the Detailed Status Panel, press the button until it closes.
Note
2-16
If analog input clipping occurs, then the affected speaker in the meter section
is indicated in red.
3
Setup
Displays
Speakers
Video Profiles
Audio Profiles
Activities
User Options
Customizing the No502
The Nº502 Media Console is customized through the Setup menu. The
Setup menu is organized to proceed through the setup process in a logical
manner. While nothing prevents the user from switching back and forth
between menu options, the simplest way of setting up the system is to
start from the top of the menu and work down. This is a particularly
useful approach since some of the early decisions affect the options
available in later menus.
The Setup menu contains the following submenus:
•
Displays – sets up video output parameters.
•
Speakers – sets up the speakers, crossovers, and calibration features.
•
Video Profiles – modifies the Video Profiles for the video
processing.
•
Audio Profiles – modifies the Audio Profiles for the audio
processing.
•
Activities – associates specific Profiles and Setups with each
individual activity.
•
User Options – sets up the general user preferences for system
parameters.
Setup of the Nº502 can be streamlined because of the Activity-based
nature of the menu structure. A number of common Activities have
already been set up at the factory and can provide a good starting place.
We recommend selecting the presets that most closely resemble your
system and then modifying them.
Add New, Name, & Delete
There are three commands that are available in every Display, Speaker,
Audio & Video Profile, and Activity menu in the Setup mode. These
commands – Add New, Name, and Delete – behave in the same manner in
every Setup menu.
Add New
The Add New menu option creates a new Setup, Profile, or Activity. When
selected, the Nº502 creates a copy of the current Setup, Profile, or Activity
and then saves the copy with a default name.
3-1
Customizing the Nº502
Mark Levinson
To add a new Setup, Profile, or Activity:
1. Press the Setup button and select Display, Speaker, Video Profile,
Audio Profile, or Activity from the list. The loaded selection is
displayed in red text.
2. Select Add New and then press Enter.
The Nº502 creates the new Setup, Profile, or Activity by copying the
loaded one and giving it a default name. Then the Nº502 opens the Setup
menu for the newly made Setup, Profile, or Activity. The menu path at the
top of the screen indicates the default name.
Up to 10 different Setups and Profiles, and up to 20 different Activities,
can be created and saved. When the full number have been created, the
Add New option will not be available again until at least one Setup,
Profile, or Activity has been deleted. The loaded Setup, Profile, or Activity
cannot be deleted.
Name
Any existing Display Setup, Speaker Setup, Audio or Video Profile, or
Activity can have a customized name associated with it.
To Customize the Name of a Setup, Profile, or Activity:
1. Select the Setup, Profile, or Activity for which you want to change the
name.
3-2
2. Select the Name option from the Setup menu.
3. The Name Selector, an interactive display screen used for all custom
naming actions, now opens. The current name is displayed across the
top line with a cursor blinking at the end. Refer to the “Name
Selector” section found at the end of this chapter for further explanations on how to use it.
4. When finished customizing the name, select the Save button in the
Name Selector to save the new name. The Name Selector screen closes
and the menu navigation returns to the Setup menu. Observe that the
menu path now contains the new name.
Delete
The Delete menu option deletes the selected Setup, Profile, or Activity.
The loaded Setup, Profile, or Activity, which displays in red text, cannot
be deleted.
To Delete a Setup, Profile, or Activity:
1. Select the Delete option from the Setup, Profile, or Activity menu.
A warning message is displayed, indicating that the action cannot be
undone.
2. Select Delete and press the Enter button to delete the Setup, Profile, or
Activity. Select Cancel and press the Enter button to close the menu
without performing the Delete action.
Nº502 Media Console
Customizing the Nº502
Deleting an existing Setup, Profile, or Activity is permanent and cannot
be recovered. It can, however, be recreated by using the Add New
command and making the modifications again.
Note
Setups and Profiles cannot be deleted if linked to an Activity. The Delete menu
option is grayed out and not accessible if the Setup or Profile cannot be
deleted.
Setup Step 1: Displays
The first decision you need to make is how many displays your home
theater system must support. For instance, you might want to use a front
projection system for watching movies but prefer to watch cable
television on a plasma display.
Create a new Display Setup for each display in your home theater
system. So, in the example above, you’d make two new Display Setups –
“Front Proj” and “Plasma”.
To create the new Display Setups:
1. Press Setup.
2. Select Displays and press Enter.
3. Select Add New and press Enter.
4. Select Name and press Enter.
5. Select the name of your new Display Setup using the Name Selector. If
required, refer to the “Name Selector” section at the end of this
chapter for instructions.
6. Select Save in the Name Selector and press Enter when finished
creating your new Display Setup name. The Nº502 saves the name and
opens the new Display Setup menu. Observe that the menu path on
the top of the screen indicates the new name.
7. Select Output Path and select the appropriate rear panel video output
connector for the Display Setup you just created.
8. If you are creating more than one new Display Setup, press the
button to return to Add New again.
9. Repeat Steps 3 through 7 until all you have created and named a new
Display Setup for each display you plan to use with your home theater
system.
For now, this is all you need to configure for each Display Setup. If
desired, refer to the next section, “Display Setup”, for explanations of the
other Display Setup options.
3-3
Customizing the Nº502
Mark Levinson
Display Setup
The Display Setup menu controls the setup parameters for the video
output path, as well as the format of the video output signal.
Setup:Displays-Plasma
Name
Output Path
Display Format
Color Space
Resolution
Output Frame Rate
Zoom Ratio
Component Black Level
Delete Display
The Display Setup menu contains the following options:
•
Name – customizes the name of each Display Setup. Refer to the “Add
New, Name, & Delete” section found at the beginning of this chapter
for more details.
•
Output Path – identifies the active video output connector on the
rear panel.
•
Display Format – sets the aspect ratio of the output video signal.
•
Color Space – identifies the color mapping format used for the video
output signal.
•
Resolution – identifies the video resolution of the video output.
•
Output Frame Rate – selects the frame rate of the video output.
•
Zoom Ratio – expands the video to fill the display area, reducing or
eliminating the black bars resulting from letterboxing or pillarboxing.
•
SD Component Black Level – sets the black level of the video
output, for standard definition video.
•
Delete Display – deletes Display setups that are no longer needed.
Refer to the “Add New, Name, & Delete” section found at the
beginning of this chapter for more details.
3-4
Output Path
The Output Path identifies which high-definition video output connector
on the rear panel carries the active video output signal for the selected
Display Setup. Three options are available -– HDMI 1, HDMI 2, and
Component. The output connectors can be assigned to multiple Display
Setups, but only one video output can be active at any given time.
Note
For all source materials with HDCP (High-Bandwidth Digital Content
Protection), video is disabled on the component output. However, the Nº502
menus are still displayed. The Detailed Status Panel identifies the presence of
HDCP source material.
Display Format
The Display Format parameter sets the aspect ratio of the output video
signal. The aspect ratio is a width-to-height definition of the video display
area. The Nº502 has two options:
•
16:9 aspect ratio - standard for HDTV format, this aspect ratio is also
referred to as widescreen. Almost twice as wide as it is high, it closely
matches the aspect ratio of theatrical movie theaters. This setting
should be used for displays with 16:9 aspect ratio.
Nº502 Media Console
Customizing the Nº502
•
4:3 aspect ratio - most commonly used for SDTV format, this aspect
ratio is almost square and is also referred to as full-frame or full-screen.
This setting should be used for displays with 4:3 aspect ratio.
When the source video and the display have different aspect ratios,
letterboxing or pillarboxing is implemented.
•
Letterboxing refers to the black bars placed above and below the
picture to fill up the screen when the source material is in a
widescreen format and the display is set to a full-frame format.
•
Pillarboxing refers to the black bars placed to the right and left of the
picture to fill up the screen when the source is in a full-frame format
and the display is in a widescreen format.
Optionally, use the Zoom Ratio parameter to reduce or eliminate any
black bars introduced by the aspect ratio of the source material.
Note
Color Space
For information regarding how the video setup, DVD setup, and display
settings interact to affect the display output, refer to the “Troubleshooting
Display Formats” section of the Chapter 4: Troubleshooting & Maintenance.
The Color Space parameter identifies the color mapping format used for
the video output signal. Color space is a mathematical model that uses
numerical combinations of red, green, and blue to map the colors of the
video image. The available selections are:
•
YCbCr 4:4:4 – provides a higher-resolution video output for those
higher sample rate formats available in some digitally formatted video
source materials .
•
YCbCr 4:2:2 – standard compressed format common to DVDs and
digitally formatted video source materials.
•
RGB Normal – provides a standard RGB color conversion to the
source video. This format is only available for HDMI outputs.
Typically, this setting is used with home theater displays, such as
plasma and front projections.
•
RGB Expand – utilizes an expanded RGB color space definition to
provide higher color resolution. This format is only available for
HDMI outputs. Typically, this setting is used with PC-type displays,
such as DVI interfaces.
For optimal results, we recommend setting the Color Space
parameter to the format that matches the native format of the
video display. The color space conversion of the input source material is
then done by the Nº502, using its state-of-the-art video processing
technology, rather than by the video display, which may not have the
same processing capabilities. If necessary, refer to the documentation
included with the display to determine its native color space format.
3-5
Customizing the Nº502
Resolution
Mark Levinson
The Resolution parameter identifies the video resolution, either interlaced
or progressive, of the output signal. Interlaced video reduces bandwidth
by loading only half of the frame at a time; first the even lines, then the
odd lines. Progressive video loads the whole frame in sequence, providing
better picture quality but also increased bandwidth usage as the frame rate
is doubled.
The available Resolution selections are:
•
Standard Definition – uses interlaced video at 480i or 576i.
•
Enhanced Definition – uses progressive video at 480p or 576p
resolution.
•
High Definition 720p – uses progressive video at 720p resolution.
•
High Definition 1080i – uses interlaced video at 1080i resolution.
•
High Definition 1080p – uses progressive video at 1080p
resolution. If the Component Video Output is selected, then this
option is not available for selection.
For optimal results, we recommend setting the Resolution
parameter to the format that matches the native format of the
video display. The resolution conversion of the input source material is
then performed by the Nº502, using its state-of-the-art video processing
technology, rather than by the video display, which may not have the
same processing capabilities. If necessary, refer to the documentation
included with the display to determine its native resolution.
3-6
Note
Resolution is a preference setting – if the preferred selection is not available,
then the Nº502 selects a different resolution level. For example, if the
Resolution is set to 1080p but the output is set to Component Video, the
Nº502 outputs at a 1080i resolution level. The display EDID can also affect the
allowed Resolution settings.
Output Frame
Rate
Selects the frame rate of the output signal. The Output Frame Rate
identifies the number of frames transmitted per second. Available
selections are 50Hz or 60Hz. For 1080p resolution, 24Hz is also available.
Zoom Ratio
The Zoom Ratio parameter is used to fill the display area, reducing or
eliminating the black bars resulting from letterboxing or pillarboxing.
Before adjusting the Zoom Ratio parameter, ensure that the Nº502 has
been properly configured to match the aspect ratio of the associated
display by verifying that the Display Format parameter is set to the proper
aspect ratio.
Available selections include:
•
Normal – select when no zoom is desired.
•
Widescreen – select when using a 16:9 display and the source
material is widescreen anamorphic with a 2:35:1 aspect ratio.
Nº502 Media Console
Customizing the Nº502
•
Fill – select when viewing content of a full-frame (4:3) source on a
16:9 display or when viewing the content of a letterbox (widescreen)
source on a 4:3 display. In the second case, if the source material is an
aspect ratio other than 16:9, the letterboxing may not be totally
removed.
•
Fill + Widescreen – select for the maximum amount of zoom. This
is equivalent to having both Fill and Widescreen zoom modes active
at the same time. Picture content may be cropped on the top, bottom,
and sides.
The Zoom Ratio parameter removes or reduces the black bars from
letterboxing or pillarboxing by zooming into the picture. This results in
the slight cropping of image edges and a small amount of resolution loss
due to image scaling, but no geometric distortions are added to the source
materials.
SD Component
Black Level
Note
The SD (Standard Definition) Component Black Level parameter sets the
black level of the video output. The black level is the adjustment required
to reach a pure black, or true black, image display. Video displays are
calibrated so that the black of the image display is true to the black information of the video signal. Available selections are 0 IRE and 7.5 IRE.
Select the setting that best matches the capabilities of the display.
This parameter is only available in 480i format on the component video
output.
Setup Step 2: Speakers
The second decision you need to make is how many speakers your
home theater system must support. Specifically, what is the maximum
number of speakers and subwoofers that you plan to use?
Add a new Speaker Setup for the maximum number of
speakers, including subwoofers, that you plan to use in your
home theater system and name it “Master”. Or select the preset that most
closely matches your maximum speaker configuration and modify it.
Calibrate the Master Speaker Setup, using the Automatic Calibration
process described in the next section, “Speaker Setup”. This provides you
with a maximum-speaker system that is fully calibrated for speaker
distances, output levels, and Room Correction.
There is a specific purpose to creating this master speaker configuration,
and it’s an important feature of the Nº502 Media Console.
The main advantage of this master speaker configuration, coupled with
the Add New functionality, is it dramatically reduces the amount of time
needed to setup and calibrate the speakers of your home theater system.
3-7
Customizing the Nº502
Mark Levinson
Whenever a speaker is added to the system, the Nº502 needs to be recalibrated. So, if you started your setup with a 2-channel Speaker Setup, when
you added the surround speakers, you’d have to recalibrate the whole
system. However, when a speaker is deleted, you don’t need to recalibrate
the system because all of the calibration settings for the other speakers
remain the same.
Therefore, you could create up to 10 Speaker Setups while only
having to calibrate ONE of them.
For example, if your maximum speaker configuration is a 7.2-channel
system:
1. Create a Master Speaker Setup containing a 7.2-speaker system (Front
L/R, Center, Surround L/R, Surround Back L/R, and Subwoofer 1 L/R).
2. Calibrate the Master Speaker Setup.
3. Create copies of the Master Speaker Setup by using the Add New
option.
4. Modify the new Speaker Setups for different speaker configurations.
In this manner, you can make multiple speaker configurations – for
example, 2-channel, 5.1-channel, 2-channel plus subs, etc .– while
calibrating only the Master Speaker Setup, because in every other
configuration you are only deleting speakers.
3-8
The following section, “Speaker Setup”, provides descriptions of the
Speaker Setup options and instructions on how to perform the automatic
calibration process.
Speaker Setup
The Speaker Setup menu controls all speaker-related configurations,
including basic manual settings such as speaker distances and crossovers
as well as access to the automated calibration procedures for speaker
configuration and Room Correction.
Setup:Speakers:7.2
Name
Center
Surround
Back
Subwoofer 1
Subwoofer 2
Subwoofer Image
Crossovers
Auto Calibration
Manual Calibration
Delete Speaker Setup
The Speaker Setup menu:
•
identifies the number of speakers in each Setup.
•
selects the speaker crossover configuration.
•
sets the crossover slopes.
•
calibrates for speaker distances & output levels.
•
calibrates the Room Correction.
The Speaker Setup enables the appropriate audio output connectors on
the rear panel. Whenever an audio output is enabled or disabled, both the
balanced and unbalanced output connectors are affected.
Nº502 Media Console
Customizing the Nº502
The Speaker Setup menu contains the following options:
Activating
Surround Speakers
•
Name – customizes the name of each Speaker Setup. Refer to the
“Add New, Name, & Delete” section found at the beginning of this
chapter for more details.
•
Center – activates or deactivates the Center output.
•
Surround – activates or deactivates the Surround outputs.
•
Back – activates or deactivates the Surround Back outputs.
•
Subwoofer 1– activates or deactivates the Subwoofer 1 outputs.
•
Subwoofer 2 – activates or deactivates the Subwoofer 2 outputs.
•
Subwoofer Image – identifies if the subwoofers are mono or stereo.
•
Crossovers – sets the crossover frequency for each speaker.
•
Auto Calibration – enters the automatic calibration process.
•
Manual Calibration – provides access to manual calibration
controls.
•
Delete Speaker Setup – deletes Speaker Setups that are no longer
needed. Refer to the “Add New, Name, & Delete” section found at the
beginning of this chapter for more details.
The Center, Surround, and Back menu options control the activation or
deactivation of each speaker for each Speaker Setup. To activate speakers
for the selected Speaker Setup, the Center, Surround, or Back menu option
must be set to Yes. When the menu option is active, then the associated
rear panel analog outputs (balanced and unbalanced) are also activated.
The speakers that can be activated are:
Note
•
Center – activates or deactivates the Center channel speaker.
•
Surround – activates or deactivates the Surround, or Side, L/R (Left/
Right) speakers. The speakers can only be activated or deactivated as a
pair.
•
Back – activates or deactivates the Surround Back, or Rear, L/R
speakers. The speakers can only be activated or deactivated as a pair.
The Front L/R speakers cannot be disabled. Therefore, there is no activation or
deactivation control for the Front L/R speakers.
If the menu option is set to No, then the speaker is deactivated for the
selected Speaker Setup and no signal is output to the associated rear panel
connectors.
3-9
Customizing the Nº502
Activating
Subwoofers
Mark Levinson
Although the Nº502 supports up to four subwoofers, the outputs can only
be activated as one or two L/R pairs.
The Subwoofer 1 and Subwoofer 2 menu options control the activation or
deactivation of each Subwoofer L/R pair for each Speaker Setup. The
Subwoofer 1 menu option must be set to Yes to activate a Subwoofer L/R
pair for the selected Speaker Setup. When the menu option is active, then
the associated rear panel analog outputs (balanced and unbalanced) are
also activated.
If the menu option is set to No, then the subwoofers are deactivated for
the selected Speaker Setup and no signal is output to the associated rear
panel connectors.
Note
Subwoofer Image
3-10
Crossovers
Subwoofer 2 is only available for selection if Subwoofer 1 is set to Yes.
A single subwoofer can be used, even though a subwoofer pair is
activated. The Subwoofer Image parameter identifies if the subwoofer
outputs are mono or stereo. The selected option affects both Subwoofer 1
and Subwoofer 2. The available options are:
•
Mono – sends the same mono subwoofer information to BOTH the
left and right subwoofers. Use this setting for a system with a single
subwoofer.
•
Stereo – the left and right subwoofers are independent, so the
information sent to each is driven by the input source and selected
processing.
Controls the crossovers for each selected Speaker Setup.
:Speakers:7.2:Crossovers
Frequency
Subwoofer LPF
Subwoofer Slope
Frequency
:7.2:Crossovers:Frequency
Front L/R
Center
Surrounds
Back:
Set All Full Range
Sets the frequency for the crossover point of each speaker pair. The
crosssover frequency can be selected for the Front L/R, Center, Surround
L/R, and Back L/R speakers.
The selectable crossover frequency range is 30Hz to 120Hz in 10Hz
increments. Two additional settings are also available:
•
Full Range – the speakers reproduce full range audio. Bass is
redirected to all speakers that are set to Full Range.
•
Full Range Plus Sub – provides additional bass to the front speakers
below 60Hz. The front speakers operate at Full Range. The subwoofer
outputs only reproduce frequencies below 60Hz.
Nº502 Media Console
Customizing the Nº502
To set all of the speakers to full range, select the Set All Full Range
parameter. This parameter sets the Front L/R, Center, Surround, and Back
speakers to Full Range. If this option is selected, the Nº502:
Caution!
•
Does NOT set the Subwoofer 1 or Subwoofer 2 outputs to Full Range.
•
Does NOT route any low-frequency information, other than the LFE
channel information, to the subwoofer outputs.
In extreme cases, center and surround speakers may be damaged if
sent lower frequency information than they are specified to handle.
Subwoofer LPF
Identifies the crossover point of the subwoofers. This setting affects both
Subwoofer 1 and Subwoofer 2.
The Subwoofer LPF parameter can be configured in two ways:
•
Complementary – the Subwoofer LPF is automatically set to the
lowest crossover frequency of the active speakers, as determined by
the Frequency crossover settings. With this setting, the output of the
subwoofer(s) is designed to complement that of all other channels
perfectly to ensure that all of the source information is reproduced.
•
Full Range – no crossovers are enabled. This setting is provided for
subwoofers with internal crossovers that cannot be bypassed.
Subwoofer Slope
Sets the slope of the subwoofer low-pass filter. The available options are
24dB per octave or 48dB per octave.
Speaker
Calibration
The Nº502 offers both automatic and manual calibration of speaker
distances and output levels for each Speaker Setup. Calibration helps to
ensure accurate output-signal arrival time and level at the primary
listening position. However, calibration is not a substitute for proper
speaker placement.
All calibration settings are saved with each individual Speaker Setup.
Automatic calibration requires the HSG microphone kit. To order a HSG
microphone kit, refer to Chapter 1: Getting Started for details.
The Automatic Calibration procedure optimizes the Nº502 audio outputs
and performs Room Correction. The procedure calibrates for:
•
Room Correction
•
Speaker Distances
•
Speaker Levels
3-11
Customizing the Nº502
Mark Levinson
Manual calibration configures:
Note
Room Correction
3-12
•
Speaker Distances
•
Speaker Levels
For optimal results, read all instructions before performing the Automatic
Calibration procedure.
The Room Correction adjustment, which is part of the Automatic
Calibration procedure, uses four microphones to measure the acoustic
characteristics and modal properties of the listening room and then
applies specific parametric filters to the outputs. The main advantages of
the Room Correction adjustment are:
•
it addresses what is important for the audio – the objective is not to
make the numbers better, but to make the audio sound better.
•
resonances are a feature of the room – treating them helps the entire
room, and improves the bass uniformity of the room.
•
the amount of correction can be adjusted by the listener.
•
the calibration is simple and reliable – it can even screen out external
noise sources.
For more information about the Room Correction adjustment and why
it’s an important part of enabling the system to run at optimal
performance levels, refer to the “Understanding Room Correction”
section in the Appendix.
Room Correction is not available with manual calibration.
Automatic
Calibration
Setup:7.2:AutoCalibration
Check Microphones
Run Automatic Calibration
Note
Follow the steps below to perform the Automatic Calibration procedure.
The calibration is done in two steps: Check Microphones and Run
Calibration. Until the Check Microphones test is performed successfully,
the Run Calibration menu option is grayed out and not available. This
prevents calibration errors due to potential microphone problems and
verifies that the Nº502 can accurately detect all of the microphones before
beginning the calibration.
The HSG microphone kit is required for the Automatic Calibration procedure.
Do not use other microphone brands.
Be sure to read and observe the care and handling instructions included
with the microphone kit to ensure optimal microphone performance.
Caution!
The microphones and cables included in the HSG microphone kit are
delicate and require careful handling. Dropping or otherwise physically
abusing the microphones may cause errors during use or irreparable
damage to the microphones. Treat the microphone cables carefully; do
Nº502 Media Console
Customizing the Nº502
not sharply bend the wires or place objects on them. Finally, never
make or break the microphone input connections unless the No502 is
placed in Standby mode or powered off.
To Perform Automatic Calibration:
1. Put the Nº502 into Standby mode.
2. Connect the Mark Levinson microphone cables to the Nº502 rear
panel Microphone Input connectors. Ensure there is a good
connection between the microphone cables and the connectors.
We recommend labeling each microphone with the microphone
input number reflected on the Nº502 rear panel connector, to make
possible troubleshooting simpler.
3. Take the Nº502 out of Standby mode.
4. Press Setup.
5. Select Automatic Calibration from the Speaker Setup menu and press
Enter.
Check Microphone
Test
6. Select Check Microphones and press Enter.
The Check Microphones procedure:
•
confirms that the microphones are properly connected and
functioning.
•
calculates the average level of the microphones connected to the
Microphone Input connectors to ensure that the microphone
levels are consistent. This average-level calculation eliminates
errors due to different individual microphone levels by allowing
the Nº502 to compensate for individual microphone sensitivities.
7. Place the four microphones in the listening space as instructed on the
display. Both initial instructions and status information are displayed
as the test proceeds.
Proper microphone placement is essential to achieving optimum
calibration results. Pay particular attention to ensuring that the
microphones are properly placed.
During the Check Microphones test, position the microphones:
D as close together as possible.
D relatively centered between, and equidistant from, the front left
and front right speakers.
D in a clear line-of-sight path with all of the speakers.
D in a location unobstructed by furniture and other fixtures, where
echoes will not obscure calibration noise signals.
D at least 2 feet (0.61m) from all speakers and walls, but within 30
feet (9.14m) of all speakers.
3-13
Customizing the Nº502
Mark Levinson
The following illustration provides an example of proper
microphone placement during the Check Microphones test. All of
the microphones are positioned as close together as possible in an
unobstructed location that is equidistant from the front left and
front right speakers.
PROPER
Placement of the
Microphones
Rear
Left
Side
Left
Rear
Right
Side
Right
Front
Left
Microphone
Center
Subwoofer
3-14
Front
Right
During the Check Microphones procedure, DO NOT:
χ
separate the microphones.
χ
scatter the microphones throughout the listening space.
χ
obstruct the line-of-sight path between the microphones and the
speakers.
χ
position the microphones on the floor, on seat cushions, or in
locations obstructed by furniture and other fixtures where echoes
might obscure calibration noise signals.
χ
position the microphones within 2 feet (0.61m) of speakers and
walls or more than 30 feet (9.14m) from any one speaker.
The illustration on the next page provides an example of
improper microphone placement during the Check Microphones
test. The microphones are scattered throughout the listening
space in obstructed locations and out of the line-of-sight with the
speakers, rather than positioned properly as close together as
possible in a location that is equidistant from the front left and
right speakers.
Nº502 Media Console
Customizing the Nº502
IMPROPER
Placement of the
Microphones
Rear
Left
Side
Left
Rear
Right
Side
Right
Front
Left
Microphone
Center
Subwoofer
Front
Right
8. Press the button to begin the test.
3-15
Caution!
During the test, the No502 outputs calibration noise signals between
55dB and 95dB. These calibration noise signals are only sent to the
Front Left and Front Right speakers. The master volume level is not
adjustable while the test is in progress, but the test can be exited at any
time by pressing the button.
Note
During the test, all input sources to the Main Zone are muted. However, the
Remote Zone is NOT muted and continues to output the audio source. The
test tones are NOT output to the Remote Zone.
9. The test indicates when it’s complete by displaying a Results message.
To view the final results, press the button. Each microphone
indicates either OK or Error.
To continue with the Run Calibration sequence, at least TWO
microphones must pass the Check Microphones test. If fewer than
two have passed, then the Check Microphones test must be
performed again. Press the button of any failed microphone to see
the reason for failure. There are four possible failure descriptions:
•
Not Detected – the Nº502 did not detect the microphone during
the silence check.
•
Signal Too Low – the microphone was detected; however, the
signal level was inadequate.
Customizing the Nº502
Mark Levinson
•
Out of Range – the microphone level is more than 20dB below
the highest microphone level.
•
Too Much Room Noise – the microphone level could not be
determined because of excessive room noise.
If the calibration reports any of these errors, refer to the “Automatic
Calibration Errors” section of Chapter 4: Troubleshooting & Maintenance
for troubleshooting information.
10. If the Check Microphones test passed, leave the microphones
connected and continue to Step 11.
If the Check Microphones test failed, then:
D check the microphones and microphone cables for proper
connection or possible damage.
D remove or disable any possible external noise sources.
D press the button to return to the Automatic Calibration menu.
D return to Step 6 to perform the Check Microphones test again.
Continue to make adjustments and rerun the test until the test results
indicate that at least two microphones have passed the test. If you
have problems reaching this state, contact an authorized Mark
Levinson dealer for assistance.
3-16
Run Calibration
11. Select Run Automatic Calibration and press Enter.
If the Run Calibration option is not available for selection, then the
Check Microphones test has not passed. Return to Step 6 to perform
the test again.
12. Place the four microphones in the listening space as instructed on the
display. Both initial instructions and status information are displayed
as the calibration proceeds.
Pay particular attention to ensure that the microphones are properly
placed. The microphone placement determines whether the Nº502
calibrates optimal Room Correction, speaker distances, and output
levels for a single listening position, several listening positions in a
single row, or several listening positions in the listening space.
Refer to the following examples to position the microphones for
calibration. Select the microphone placement option that best meets
the needs of the listening space.
For a single listening position, place the microphones:
D as close together as possible in the primary listening position.
D at the approximate position of the listener’s head.
D in a clear line-of-sight path with all of the speakers.
D in a location unobstructed by furniture and other fixtures, where
echoes will not obscure calibration noise signals.
Nº502 Media Console
Customizing the Nº502
D at least 2 feet (0.61m) from all speakers and walls, but within 30
feet (9.14m) of all speakers.
The following illustration provides an example of proper microphone
placement when calibrating for a single listening position. All of the
microphones are positioned as close together as possible in a single
listening position, allowing the Nº502 to calibrate the optimal Room
Correction, speaker distances, and output levels for that position.
PROPER
Placement of
Microphones –
SINGLE Listening
Position
Rear
Left
Side
Left
Rear
Right
Side
Right
Front
Left
Microphone
Center
Subwoofer
Front
Right
For multiple listening positions in a single row, place the microphones:
D at the approximate position of the listeners’ heads.
D in a clear line-of-sight path with all of the speakers.
D in a location unobstructed by furniture and other fixtures, where
echoes will not obscure calibration noise signals.
D at least 2 feet (0.61m) from all speakers and walls, but within 30
feet (9.14m) of all speakers.
The following illustration provides an example of proper microphone
placement when calibrating for multiple listening positions in a
single row. Each microphone is positioned in a different listening
position within a single row, allowing the Nº502 to calibrate the
optimal Room Correction, speaker distances, and output levels for
that row, at the expense of a single listening position.
3-17
Customizing the Nº502
Mark Levinson
PROPER
Placement of
Microphones –
MULTIPLE
Listening Positions
in a Single Row
Rear
Left
Side
Left
Rear
Right
Side
Right
Front
Left
Microphone
Center
Subwoofer
Front
Right
For multiple listening positions in multiple rows, place the microphones:
D at the approximate position of the listeners’ heads.
3-18
D in a clear line-of-sight path with all of the speakers.
D in a location unobstructed by furniture and other fixtures, where
echoes will not obscure calibration noise signals.
D at least 2 feet (0.61m) from all speakers and walls, but within 30
feet (9.14m) of all speakers.
The following illustration provides an example of proper microphone
placement when calibrating for multiple listening positions in
multiple rows. Each microphone is positioned in a single listening
position in multiple rows, allowing the Nº502 to calibrate the optimal
Room Correction, speaker distances, and output levels for a larger
listening area, at the expense of a single listening position.
Nº502 Media Console
Customizing the Nº502
PROPER
Placement of
Microphones –
MULTIPLE
Listening Positions
in Multiple Rows
Rear
Left
Side
Left
Rear
Right
Side
Right
Front
Left
Microphone
Center
Subwoofer
Front
Right
During the Automatic Calibration procedure, DO NOT:
χ
arrange the microphones along the perimeter of the listening
positions or space.
χ
place the microphones in spots where the listeners’ heads will not
be positioned.
χ
obstruct the line-of-sight path between the microphones and the
speakers.
χ
position the microphones on the floor, on seat cushions, or in
locations obstructed by furniture and other fixtures, where echoes
might obscure calibration noise signals.
χ
position microphones within 2 feet (0.61m) of any speaker or
wall, or more than 30 feet (9.14m) from any speaker.
The following two illustrations provide examples of improper
microphone placement for calibration. In the first example, the
microphones are positioned on the floor along the perimeter of the
listening space. In the second example, the microphones are
positioned on the seat cushions instead of where the listeners’ heads
will be. These improper microphone placements make it difficult for
the Nº502 to calibrate optimal Room Correction, speaker distances,
and output levels for the actual listening positions.
3-19
Customizing the Nº502
Mark Levinson
IMPROPER
Placement of
Microphones –
Example 1
Rear
Left
Side
Left
Rear
Right
Side
Right
Front
Left
Microphone
Center
Subwoofer
Front
Right
3-20
IMPROPER
Placement of
Microphones –
Example 2
Rear
Left
Side
Left
Rear
Right
Side
Right
Front
Left
Microphone
Center
Subwoofer
Front
Right
13. Press the button to begin the test.
Caution!
During the test, the No502 outputs high audio levels. The master
volume level is not adjustable while the test is in progress, but the test
can be aborted at any time by pressing the button.
14. Read the warning on the display indicating that there will be high
audio levels while the calibration is in process.
Nº502 Media Console
Note
Customizing the Nº502
During the test, all input sources to the Main Zone are muted. However, the
Remote Zone is NOT muted and continues to output the audio source. The
test tones are NOT output to the Remote Zone.
15. Select OK and press Enter when ready.
The display shows a 10-second countdown, allowing for time to leave
the room before calibration begins.
You can abort the calibration at any time by pressing the button.
The system reverts to its previous settings and no data from the
aborted calibration is saved.
16. The test indicates when it’s complete by displaying a Results message.
The message identifies if the Room Correction, Auto Speaker
Distances, and Auto Speaker Levels were calibrated successfully.
17. All of the calibration results can be viewed when the Automatic
Calibration procedure is complete. Select the View Details option to
view the detailed calibration results.
The Room Correction details indicate only if the Room Correction
calibration was successful (Applied), if the speaker was not active
during calibration (N/A), or if there is no Room Correction
adjustment available for the speaker (- - - - ).
The Auto Speaker Distances results indicate the specific value for each
speaker calibrated. The results are set to feet or meters, as identified by
the Speaker Units parameter in the User Options menu. See the “User
Options” section found later in this chapter for more details.
The Auto Speaker Levels result indicates the specific value for each
speaker calibrated.
The full calibration details also indicate any errors that might have
occurred during calibration of the Auto Speaker Distances and Auto
Speaker Levels. There are six errors that may occur:
•
Speaker Out of Phase – the microphones detected out-of-phase
calibration signals, but the calibrated value is still accurate.
•
Signal Too Low or Speaker Output Too Low – the
microphones detected the calibration signals at an unusually low
level.
•
Unable to Calculate – the microphones didn’t detect the
calibration signals or the Nº502 could not calculate a value.
•
May Not Be Accurate – one or more of the microphones did
not detect calibration signals at a reasonable level. The calibrated
value might be inaccurate.
•
Speaker is Not Enabled – the selected speaker is not activated
in the Speaker Setup.
•
Speaker Output Too High – the microphones detected the
calibration signals at an unusually high level.
3-21
Customizing the Nº502
Mark Levinson
If the calibration reports any of these errors, refer to the “Automatic
Calibration Errors” section of Chapter 4: Troubleshooting & Maintenance
for troubleshooting information.
18. If the Run Calibration procedure passed, then proceed to Step 19.
If the Run Calibration procedure failed, then:
D check the microphones and microphone cables for proper
connection or possible damage.
D press the button to return to the Automatic Calibration menu.
D return to Step 11 to perform the Run Automatic Calibration
procedure again.
Continue to make adjustments and rerun the test until the calibration
results indicates that the calibration has passed. If you have problems
reaching this state, contact an authorized Mark Levinson dealer for
assistance.
19. The Automatic Calibration procedure is now complete. Exit the Setup
menu and place the Nº502 into Standby Mode. Disconnect the
microphone cables from the Nº502 rear panel connectors and put
away the microphones. Be sure to pay close attention to proper
handling of the microphones and cables.
3-22
Manual
Calibration
Setup:7.2-ManualCalibration
Speaker Distances
Speaker Levels
All Manual Calibration settings are saved with each individual Speaker
Setup. The Manual Calibration menu allows the user to configure:
•
Speaker Distances - the individual speaker distance adjustments.
•
Speaker Levels - the individual speaker level adjustments.
The Manual Calibration menu does not use the HSG microphone kit.
Speaker Distances
The Speaker Distances parameter allows the user to set the distance for
each individual speaker. The distance measurement is in feet or meters, as
identified by the Speaker Distance Units parameter in the User Options
menu. See the “User Options” section found later in this chapter for more
detail.
To Manually Calibrate the Speaker Distances:
1. Select Speaker Distances from the Manual Calibration Setup menu
and press Enter.
2. Select the Front Left speaker parameter and press Enter.
3. Use the and buttons to adjust. The speaker distance can be set
from 0 to 40 feet (0 to 12m) with 6-inch (10cm) increments.
4. Repeat Steps 2 and 3 to adjust each speaker distance.
Nº502 Media Console
Customizing the Nº502
Speaker Levels
:SpeakerLevels
Internal Noise Test
External Noise Test
The Speaker Levels parameter allows the user to set the output level for
each individual speaker. The Speaker Levels are calibrated using the
Internal Noise Test or the External Noise Test.
Before starting a test, make the following preparations:
Note
•
obtain a Sound-Pressure Level (SPL) meter. An SPL meter is a device
that measures the relative loudness of the speakers to ensure accurate
output-level calibration.
•
Calibrate the output levels from the primary listening position by
placing the SPL meter at the approximate location of the listener’s
head when seated.
•
Speakers that are not active cannot be adjusted. Verify that the
appropriate speakers are activated before beginning.
The Nº502 sets the volume level to the Reference volume during the Internal
and External Noise tests. Avoid adjusting the master volume level while the
test is in progress.
Internal Noise Test
The Internal Noise Test sends an internal calibration noise signal to each
Main Zone audio output connector, allowing for simultaneous output
level adjustments.
To Manually Calibrate the Output Levels During the Internal Noise Test:
1. Set the SPL meter to “C” weighting and “SLOW” response.
2. Place the SPL meter in the primary listening position.
3. On the Nº502, select the Internal Noise Test from the Speaker Levels
menu. A warning message regarding high audio levels is displayed.
4. Select OK to begin the Internal Noise Test.
5. Select the Front Left Speaker in the Internal Noise Test menu. an
adjustment bar is displayed.
6. Use the and buttons to adjust the adjustment bar for the output
level until the SPL meter reads 75dB at the primary listening position.
7. Repeat Step 5 and Step 6 until all active output levels are calibrated.
8. Press the button to exit the Internal Noise Test menu.
3-23
Customizing the Nº502
Mark Levinson
External Noise Test
Use the External Noise Test to calibrate the output levels using an audio
calibration disc. The External Noise Test activates an appropriate surround
mode, as indicated in the table below, based on the current Main Zone
input source. All custom surround mode menu parameter settings are
ignored during the test. When the External Noise Test is complete, the
surround mode returns to its custom setting.
Input Source
surround Mode
surround Mode
for 5.1 Surround for 7.1 Surround
2.0 Dolby® Digital, Analog Dolby PLII Movie
& PCM
5.1 Dolby® Digital
DTS®
Dolby PLIIx Movie
Dolby Digital
Dolby PLIIx Movie
DTS-ES®
DTS-ES®
7.1 or 5.1 Analog & PCM Multi-channel Standard
Multi-channel Standard
To Manually Calibrate the Output Levels During the External Noise Test:
1. Set the SPL meter to “C” weighting and “SLOW” response.
2. Place the SPL meter in the primary listening position.
3-24
3. On the Nº502, select External Noise Test from the menu.
4. Begin playback of the external calibration source.
5. Select the Front Left speaker in the External Noise Test menu. an
adjustment bar is displayed.
6. Use the and buttons to adjust the output level until the SPL
meter reads the expected output, as defined by the external
calibration source instructions, at the primary listening position.
7. Repeat Step 5 and Step 6 until all active output levels are calibrated.
8. Press the button to exit the External Noise Test menu.
Nº502 Media Console
Customizing the Nº502
Video Profiles
Setup:VideoProfiles:Film
Name
Deinterlacing
Adaptive Threshold
Film Detection
Chroma Bug Correction
Noise Reduction
Brightness
Contrast
Saturation
Tint
Sharpness
Delete Video Profile
Video Profiles provide the video processing and video output controls for
the Nº502 Media Console. The parameters include basic controls such as
brightness or contrast, and state-of-the-art video processing technology
that can enhance the video source material. Because of the Activity-based
nature of the Video Profiles, you can create individual Video Profiles for
each video input source or type, allowing you to tailor your viewing
preferences to the media you’re watching and minimize the time you
spend adjusting the system.
The Video Profile Setup menu contains the following options:
•
Name – customizes the name of each Video Profile. Refer to the “Add
New, Name, & Delete” section found earlier in this chapter for more
details.
•
Deinterlacing – identifies the conversion type applied to the
interlaced video.
•
Adaptive Threshold – adjusts the adaptive processing, depending
upon the video source material.
•
Film Detection – detects the presence of film-originated material.
•
Chroma Bug Correction – corrects the chroma bug caused by
some mpeg decoding devices.
•
Noise Reduction – adjusts how much noise is filtered out.
•
Brightness – adjusts the brightness or overall tone of the video.
•
Contrast – adjusts the contrast, or the variations between the
lightest and darkest areas of the video image.
•
Saturation – controls the saturation, or color intensity, of the video
image.
•
Tint – controls the color balance of the video image.
•
Sharpness – enhances the sharpness of the video image.
•
Delete Video Profile – deletes Video Profiles that are no longer
needed. Refer to the “Add New, Name, & Delete” section found earlier
in this chapter for more details.
In most cases, there is no need to change the Video Profile parameters
from the default settings as these values are designed to be optimal with
most properly adjusted video source materials. However, the Video
Profiles are exceptionally useful when source-specific adjustments are
needed, removing the need to constantly alter the global settings of the
video display.
For instance, if you find that classic movies always seem to look washed
out, you could make a “Classic Movie” Video Profile that modifies the
Contrast and Brightness settings to improve the image. This Video Profile
can then be loaded whenever you want to watch an old movie and the
adjustment will be made automatically.
3-25
Customizing the Nº502
Deinterlacing
Mark Levinson
Deinterlacing is the process of converting the fields of an interlaced video
signal into a progressive frame. This process may introduce some image
degradation as it combines two fields. For example, since moving objects
are in a different position in each field, when the frames are put together
the moving objects don’t match up exactly, which creates a combing
effect (jagged edges that don’t line up correctly). Image flickering can also
be an issue, as well as various other video artifacts. However, the advanced
processing of the Nº502 can mitigate some of these artifacts.
The Nº502 has three types of deinterlacing formats available for selection:
Temporal Filtering -– applies a time-based filter between two or more
adjacent fields. The filter softens the image to help smooth motion
artifacts. This method is a linear deinterlacing technique.
Field Merging – combines adjacent fields using a weave-type algorithm.
This method is a linear deinterlacing technique.
Adaptive – selects the deinterlacing method based on the motion of
particular areas of the video frame. Still areas are processed differently
than areas with fast motion to provide the best overall image. This
method is a non-linear deinterlacing technique. This mode should always
be used, unless there is a specific artifact to address.
3-26
Adaptive
Threshold
Adjusts the adaptive processing applied to the video output signal. When
the parameter is selected, an adjustment bar opens with a range of 0 to 15.
The smaller numbers are better for fast moving scenes; the larger numbers
are better suited for highly detailed static scenes. This parameter is only
available if the Deinterlacing parameter has Adaptive selected.
Film Detection
Detects the presence of film-originated material so that the original
film-frame sequence may be recovered by weaving together the
appropriate video fields. This option can be turned On or Off; there are no
additional settings.
Note
This parameter is most effective when the video input has not been previously
scaled or processed by the source device and is a 480i or 576i interlaced
format.
Chroma Bug
Correction
Note
Corrects the chroma bug caused by some mpeg decoding devices. This
parameter can be turned On or Off; there are no additional settings.
This parameter is only effective when the video input is an interlaced format –
480i, 576i, or 1080i.
Nº502 Media Console
Customizing the Nº502
Noise Reduction
The Noise Reduction parameter reduces the video noise often present in
analog input sources. Selecting this option opens an adjustment bar with
a range from 0 to 64 in increments of one. The larger the number selected,
the greater the suppression of the noise.
Brightness
The Brightness parameter controls the lightness or overall tone of the
image, just like the Brightness control found on a television or computer
monitor. Technically, it controls the level at which black is reproduced on
the display.
When the Brightness parameter is selected, an adjustment bar displays.
The range of the Brightness adjustment bar is –64 to +64 in increments of
one.
Note
Trying to make the picture “blacker than black” by turning this control down
too far reduces the visible detail during the dark scenes of the video.
Contrast
The Contrast parameter controls the variations between the lightest and
darkest areas in the image. Technically, it controls the level at which the
peak white is reproduced, up to the maximum light output capability of
the display.
Note
Trying to exceed this maximum light output level reduces visible detail during
bright scenes of the video. In extreme cases, trying to exceed this maximum
can actually damage the video display.
When the Contrast parameter is selected, an adjustment bar displays. The
range of the Contrast adjustment bar is –64 to +64 in increments of one.
Saturation
The Saturation parameter controls the color intensity, or vividness, of the
image. Visually, it controls the “saturation” of the color in the video
signal. Technically, it controls the strength of the color portion of the
video signal compared to the black-and-white portion of the signal.
When the Saturation parameter is selected, an adjustment bar displays.
The range of the Saturation adjustment bar is –64 to +64 in increments of
one.
Tint
The Tint parameter controls the color balance of the image. Visually, the
Tint parameter controls the “hue” or “color balance” of the video signal.
Technically, it controls the phase of the color portion of the video signal.
When the Tint parameter is selected, an adjustment bar displays. The
range of the Tint adjustment bar is –64 to +64 in increments of one.
3-27
Customizing the Nº502
Mark Levinson
Sharpness
The Sharpness parameter controls the amount of “sharpness
enhancement” that is applied to the incoming video signal. The setting
acts on the vertical and horizontal, as well as luminance and chrominance parameters to offer an enhanced depth in the picture as well as
greater small-object detail. In general, the lower settings are applicable for
digital displays and sources, while the higher settings may be preferred for
CRT-based displays and analog sources.
Note
Indiscriminate use of the Sharpness parameter distorts the picture by adding
unnecessary ringing and noise to the video image. If adjustment is required,
turn up the Sharpness control until a slight “halo” forms around the transitions from light to dark or dark to light. Then back off the adjustment until the
“halo” disappears.
When the Sharpness parameter is selected, an adjustment bar displays.
The range of the Sharpness adjustment bar is 0 to +64 in increments of
one.
Audio Profiles
Audio Profiles provide the audio processing and audio output controls for
the Nº502 Media Console. Because of the Activity-based nature of the
Audio Profiles, you can create individual Audio Profiles for each input
source or type, allowing you to tailor your listening preferences while
minimizing the time you spend adjusting the system.
3-28
In most cases, there is no need to change the Audio Profile parameters
from the default settings as these values are designed to be optimal with
calibrated speakers.
Setup:AudioProfiles:Movies
Name
Mono Signal
2-Ch Signal
Multi-Channel Signal
LFE Mix
L7 Auto Azimuth
Surround Back Processing
Dolby Digital Compression
Delete Audio Profile
The Audio Profile Setup menu contains the following options:
•
Name – customizes the name of each Audio Profile. Refer to the “Add
New, Name, & Delete” section found earlier in this chapter for more
details.
•
Mono Signal – assigns the default surround mode for any mono
input source.
•
2-Ch Signal – assigns the default surround mode for any 2-channel
input source.
•
Multi-Channel Signal – assigns the default surround mode for any
multi-channel input source.
•
LFE Mix – controls the output level of the LFE information sent to
the subwoofers.
•
L7 Auto Azimuth – allows the Nº502 to automatically adjust the
input signal to ensure that the output is sent to the appropriate
channel for correct sound performance.
•
Surround Back Processing – determines the type of decoding
used for the surround processing of the audio signal.
Nº502 Media Console
Surround Mode
Selection
Customizing the Nº502
•
Dolby Digital Compression – reduces the wide volume level
changes and increases the dialogue intelligibility at lower listening
levels for Dolby Digital input sources.
•
Delete Audio Profile – deletes Audio Profiles that are no longer
needed. Refer to the “Add New, Name, & Delete” section found earlier
in this chapter for more details.
The Mono Signal, 2-Channel Signal, and Multi-channel Signal menu
options all relate to the selection of the default surround modes. The
default surround mode is assigned to any incoming input source that
matches the requirements for the surround mode defined.
•
Select the Mono Signal surround mode that you want assigned to any
incoming mono input sources for the active Audio Profile.
•
Select the 2-Channel Signal surround mode that you want assigned to
any incoming 2-channel input sources for the active Audio Profile.
•
Select the Multi-Channel Signal surround mode that you want
assigned to any incoming multi-channel input sources for the active
Audio Profile.
The surround mode can always be changed from the Profile setting by
using the Surround Mode Adjust button on the front panel or the
Surround button on the remote control. However, these changes are
temporary. If the Activity is changed or the incoming source is
interrupted, the surround mode reverts to the saved Audio Profile setting.
Some of the surround modes are dynamic and depend upon the Speaker
Setup and the incoming input source. Not all surround modes are
available in all situations. Refer to the “Using Surround Modes” section
found later in this chapter for more details.
LFE Mix
The LFE Mix parameter controls the output level of the LFE (Low
Frequency Effects) information – the .1-channel information – that is sent
to the audio output(s) labeled Subwoofer. Low frequencies from up to
seven other channels may be combined with the LFE information to
create the subwoofer output signal, which significantly increases
subwoofer output levels.
Careful adjustment of this parameter provides proper tonal balance and
reduces the risk of subwoofer overload. When the speaker setup does not
include a subwoofer, the LFE information is mixed into the speakers that
are set to Full or that have the lowest crossover points.
Selecting the LFE Mix parameter opens an adjustment bar with an
adjustment range of –10 to 0dB in 1dB increments.
L7 Auto Azimuth
The L7 (Logic 7) Auto Azimuth parameter maximizes steering accuracy.
When set to On, the Nº502 continually monitors the 2-channel input
signal and automatically adjusts the relative level and time offset of the
input channels to ensure that signals are sent to the appropriate channels
3-29
Customizing the Nº502
Mark Levinson
with maximum separation. When set to Off, the accuracy of the selected
surround mode varies among sources.
We recommend setting this parameter to On for film and broadcast
sources, and to Off for music sources. The L7 Auto Azimuth parameter
only applies when the Logic 7 surround modes are active.
Surround Back
Processing
The Surround Back Processing parameter determines the type of decoding
used for the surround processing of the audio signal. Two options are
available - Dolby Digital EX decoding or DTS-ES decoding. Each option
can be turned to Off, On, or Auto.
Dolby Digital Decoding
Dolby Digital Surround EX decoding is available when both the Surround
and Surround Back speakers are present and Dolby Digital Surround EX
decoding is active. Matrix decoding is then applied to derive the Surround
Back channels.
When the Surround Back Processing>Dolby Digital EX parameter is set to:
3-30
•
Off – Dolby Digital Surround EX decoding is NOT activated,
regardless of the input source.
•
On – Dolby Digital Surround EX decoding is always activated.
•
Auto – Dolby Digital Surround EX decoding is activated for flagged
5.1-channel Dolby Digital Surround EX sources. If the incoming
source is NOT flagged, then the decoding remains Off.
The table below shows the behavior of the Dolby Digital EX decoding
parameter conditions.
Surround Back
Processing
Parameter Setting
5.1-Channel Dolby Digital Incoming Source
Dolby Digital
Surround EX
(Flagged)
Surround EX
(Non-flagged)
Auto
Dolby Digital
Dolby Digital Surround EX
Dolby Digital
On
Dolby Digital Surround EX
Dolby Digital Surround EX
Dolby Digital Surround EX
Off
Dolby Digital
Dolby Digital
Dolby Digital
DTS Decoding
The DTS-ES setting is designed to decode and play back 5.1-channel DTS,
5.1-channel matrix-encoded DTS-ES, and 6.1-channel discrete-encoded
DTS-ES input sources. This mode is recommended for DTS input sources
recorded with DTS-ES encoding.
DTS-ES decoding is available when both the Surround and Surround Back
speakers are present and DTS-ES decoding is active.
Nº502 Media Console
Customizing the Nº502
When the Surround Back Processing>DTS-ES parameter is set to:
•
Off – DTS-ES decoding is NOT activated, regardless of the input
source.
•
On – DTS-ES decoding is always activated.
•
Auto – DTS-ES decoding is activated for flagged 5.1-channel DTS-ES
sources. If the incoming source is NOT flagged, then the decoding
remains Off.
The table below shows the behavior of the DTS-ES decoding parameter
conditions.
Surround Back
Processing
Parameter Setting
5.1-Channel DTS
5.1-Channel DTS-ES
(Matrix-Encoded)
6.1-Channel DTS-ES
(Discrete-Encoded)
Auto
DTS
DTS ES
DTS ES
On
DTS ES
DTS ES
DTS ES
Off
DTS
DTS
DTS
Dolby Digital
Compression
DTS Incoming Source
Reduces wide volume level changes and increases the dialogue
intelligibility at lower listening levels for Dolby Digital input sources.
When set to On, the full compression is applied regardless of the current
volume level. When set to Off, no compression is applied. The Auto
setting provides compression only if the incoming source is formatted
with compression information.
For listening to Dolby Digital input sources at a lower level, set to Auto or
On – this is especially useful for nighttime listening to avoid disturbing
others.
3-31
Customizing the Nº502
Mark Levinson
Activities
The Activities menu defines actions, such as “Watch a Movie” or “Play
Games”, and then associates those actions to specific input connectors,
Setups, and Profiles.
Each input, Setup, and Profile can be assigned to more than one Activity,
but only one Display Setup, Speaker Setup, Audio Profile, and Video
Profile may be assigned to any single Activity.
Setup:Activities:TV
Name
Display Setup
Video In
Input Aspect Ratio
Video Profile
Speaker Setup
Audio In
Audio Profile
Stereo Analog In Level
Main Audio Delay
HDMI Audio Output Options
Triggers
Move Activity
Delete Activity
The Activities Setup menu contains the following options:
•
Name – customizes the name of each Activity. Refer to the “Add New,
Name, & Delete” section found earlier in this chapter for more details.
•
Display Setup – selects the Display Setup that is associated with
each Activity.
•
Video In – assigns the rear panel video input connector that is
associated with each Activity.
•
Input Aspect Ratio – identifies the aspect ratio of the input source.
•
Video Profile – selects the Video Profile that is associated with each
Activity.
•
Speaker Setup – selects the Speaker Setup that is associated with
each Activity.
•
Audio In – assigns the rear panel audio input connector that is
associated with each Activity.
•
Audio Profile – selects the Audio Profile that is associated with each
Activity.
•
Stereo Analog In Level – adjusts the 2-channel stereo analog audio
input levels.
•
Main Audio Delay – delays the audio signal until the sound and
picture are synchronized.
•
HDMI Audio Output Options – identifies the format of the HDMI
audio output signal.
•
Triggers – identifies if the trigger outputs are activated by an Activity
selection.
•
Move Activity – changes the order of the Activity list.
•
Delete Activity – deletes Activities that are no longer needed. Refer
to the “Add New, Name, & Delete” section found earlier in this
chapter for more details.
3-32
Nº502 Media Console
Display Setup
Customizing the Nº502
The Display Setup menu associates the Display Setup that is loaded by the
Nº502 for the current Activity. Selecing the Display Setup menu option
displays the list of existing Display Setups. Select one to associate with
this Activity.
If a new Display Setup is needed for this Activity, then back out of the
Activities menu and select the Displays option from the main Setup
menu. Refer to the “Displays” section found earlier in this chapter for
more detail.
Video In
The Video In menu associates the specific Nº502 rear panel video input
connector(s) to be used for the current Activity. Selecting the Video In
menu option displays the list of video input connectors available on the
rear panel. Select one of the available connectors to associate it with this
Activity.
Input Aspect Ratio
The Input Aspect Ratio parameter identifies the aspect ratio of the input
signal. This parameter, combined with the Display Setup: Display Format
parameter, ensures that all video sources are appropriately scaled. There
are three available settings:
•
Auto - sets analog and DVI source material to a 16:9 aspect ratio.
HDMI input sources specify the aspect ratio of the source material.
•
16:9 - treats all incoming source material as 16:9, regardless of the
existing format.
•
4:3 - treats all incoming source material as 4:3, regardless of the
existing format.
This control is used to aid the Nº502 in identifying the input aspect ratio
for correct processing. Generally, it should be set to Auto. But if a source is
not correctly identified, this control can be used to override the default
processing.
Video Profile
The Video Profile menu associates the Video Profile that is loaded by the
Nº502 for the current Activity. Selecting the Video Profile option displays
the list of existing Video Profiles. Select one to associate with this Activity.
If a new Video Profile is needed for this Activity, then back out of the
Activities menu and select the Video Profiles option from the main Setup
menu. Refer to the “Video Profiles” section found earlier in this chapter
for more detail.
Speaker Setup
The Speaker Setup menu associates the Speaker Setup that is loaded by the
Nº502 for the current Activity. Selecting the Speaker Setup menu option
displays the list of existing Speaker Setups. Select one to associate with
this Activity.
If a new Speaker Setup is needed for this Activity, then back out of the
Activities menu and select the Speakers option from the main Setup
3-33
Customizing the Nº502
Mark Levinson
menu. Refer to the “Speakers” section found earlier in this chapter for
more detail.
Audio In
Audio Profile
The Audio In menu associates the specific Nº502 rear panel audio input
connector(s) to be used for the current Activity. Selecting the Audio In
menu option displays the list of audio input connectors available on the
rear panel. Select one of the available connectors to associate it with this
Activity.
The Audio Profile menu associates the Audio Profile that is loaded by the
Nº502 for the current Activity. Selecting the Audio Profile option displays
the list of existing Audio Profiles. Select one to associate with this Activity.
If a new Audio Profile is needed for this Activity, then back out of the
Activities menu and select the Audio Profiles option from the main Setup
menu. Refer to the “Audio Profiles” section found earlier in this chapter
for more detail.
Stereo Analog In
Level
3-34
The Stereo Analog In(put) Level parameter adjusts the 2-channel stereo
analog audio input levels. Since analog audio sources can have a wide
range of input levels, the Nº502 allows the input levels to be
independently adjusted for each Activity through the Analog In Level
parameter.
Selecting the Stereo Analog In Level parameter opens an adjustment bar,
with an available range of –18.0dB to +12.0dB in 0.5dB increments.
Main Audio Delay
The Main Audio Delay parameter delays the audio signal until the sound
and picture are synchronized. This parameter should only need
adjustment if the audio and video become out of sync. This can happen if
the system uses any kind of post-processing on the video source, which
tends to add a small delay to the video output. Adjusting the Main Audio
Delay parameter on the Nº502 delays the audio signal to compensate for
any inherited video output delay, for each individual Activity.
Selecting this parameter opens an adjustment bar, with a range of 0.0ms
to 500.0ms in 0.5ms increments.
HDMI Audio
Output Options
This parameter identifies the format of the HDMI audio output signal.
The available selections include:
•
Encoded – the native format of the incoming signal is output. If the
receiving device does not recognize the native format, the Nº502
prompts a change to the audio output format.
•
PCM – the incoming signal is converted to a downmixed PCM format
before it is output.
•
Off – turns off the audio output entirely. If Off is selected, then NO
audio is output from the HDMI rear panel output connectors.
Nº502 Media Console
Note
Triggers
Customizing the Nº502
PCM 5.1 audio is downmixed to PCM 2.0 audio when using an HDMI
output.
The Nº502 provides four triggers that can be used to activate other
devices, such as amplifiers, lights, window shades, and video screens.
The triggers can be activated by selecting a specific Activity or by
taking the Nº502 out of Standby mode.
If activated by an Activity, then the Triggers parameter under the
Activity menu is available for selection. If the Standby option is
selected, then this parameter is grayed out and unavailable. For more
information on triggers and how to set the activation state, refer to the
“Triggers” section found later in this chapter.
Move Activity
Changes the order of the Activity list. Use the or buttons to move
the highlighted Activity to a higher or lower position within the
Activity list.
User Options
Setup:UserOptions
About
Display Options
Audio Options
Control Options
Lock Options
Restore Options
About
The User Options Setup menu sets the system preferences. This menu
sets the master Volume and Mute levels, chooses the Status Panel
display settings, restores the factory defaults, and other such system
functions. In addition, system control options, such as trigger outputs
and ML Net, are also accessed and controlled through the User Options
menu.
The About page is for information only; it identifies the version
number of the Nº502 operating software. This menu page has no
selectable parameters.
To access the About page, press the Setup button and select the User
Options menu.
Display Options
Setup
Setup:UserOptions-Display
Preview
Status Message Time
Main Screen Status
On Screen Display
Menu Background
Front Panel Status
Display Intensity
Speaker Distance Units
The Display Options menu customizes selected front panel and menu
display features on the Nº502. To access the Display Options menu,
press the Setup button and select User Options from the Setup Menu.
The Display Options menu contains:
•
Preview – controls where the Activity Preview mode is displayed.
If set to On, then the Activity Preview is viewable on both the front
panel display and the Main Zone displays. If set to Off, then the
Activity Preview is only active on the front panel display. This
option can be turned On or Off; there are no additional settings.
3-35
Customizing the Nº502
3-36
Note
Mark Levinson
•
Status Message Time – identifies the amount of time that the
Quick Status Panels are displayed, either 6 Seconds or Always On. This
parameter only applies to the Quick Status Panels; the Detailed Status
Panels remain on-screen until manually closed. Refer to the “Status
Panels” section of Chapter 2: Basic Operation for more information.
•
Main Screen Status – determines if the Status Panels are displayed
on the Main Zone display. If set to Off, Status Panels do NOT appear
on the Main Zone display. This option can be turned On or Off; there
are no additional settings.
•
On Screen Display – determines if the Nº502 menus, status panels,
and messages are displayed on the Main Zone display. This option can
be turned On or Off; there are no additional settings.
•
Menu Background – controls the background of the menus. If the
Menu Background option is set to On, then the menus are overlaid on
whatever is currently playing on the Main Zone display. If the Menu
Background option is set to Off, then the current display output
cannot be viewed while the menu structure is accessed.
•
Front Panel Status – determines if the Quick Status Panel is
displayed on the front panel display. If set to Off, the Quick Status
Panel does NOT appear on the front panel display. This option can be
turned On or Off; there are no additional settings.
The Detailed Status Panel is always shown on the front panel display. Setting
the Front Panel Status to Off does NOT disable the Detailed Status Panel.
•
Note
If using the Monitor Out connector on the rear panel instead of the front
panel display, then all front panel display controls affect the Monitor output,
except for the Display Intensity button.
•
Audio Options
Setup
:UserOptions:AudioOptions
Power On Volume
Max Volume
Mute Level
Remote Zone Volume
Multi-Channel Input Gain
Display Intensity – controls the brightness intensity level of the
Nº502 front panel display and all LEDs. Selecting this option displays
an adjustment bar with four brightness levels - Off, Low, Medium, and
High. This menu parameter performs the same function as the
Display Intensity button on the front panel.
Speaker Distance Units – identifies the units of measure for all
Speaker Distances. The units of measure can be either feet or meters.
The Audio Options menu customizes the Master Volume and Mute
controls on the Nº502. To access the Audio Options menu, press the Setup
button and select User Options from the Setup Menu.
All of the volume levels are displayed on a scale of 0.0 (no sound) to 100.0
(extremely loud). All of the Audio Options menu settings affect both the
Main Zone and the Remote Zone volume levels. The Remote Zone master
volume levels are always copied from the Main Zone.
Nº502 Media Console
Customizing the Nº502
The Audio Options menu contains:
•
Power On Volume – determines the volume level of the Nº502
when taken out of Standby mode. Selecting this option displays an
adjustment bar with a range of 1 to 50 in single increments.
The Power On Volume can also be set to Off (zero) and to Last Level.
The Last Level option sets the volume to the level it was set to when
last powered off or put into Standby mode.
Note
•
Max Volume – sets the maximum volume of the master volume
control. This is useful to minimize potential damage to speakers or
equipment due to unexpected high peaks in the audio tracks.
Selecting the Max Volume parameter displays an adjustment bar with
a range of 50 to 100 in single increments.
•
Mute Level – sets the magnitude of the volume reduction introduced
by pressing the Mute button. Pressing the Mute button can
completely turn off the sound, or just substantially decrease the
volume. Selecting the Mute Level parameter displays an adjustment
bar with a range of –80 to –3 in single increments. The Mute Level can
also be set to Fully Off, muting ALL Main Zone audio output sound.
•
Remote Zone Volume – sets the Remote Zone volume to either
Fixed or Variable. If Fixed is selected, then the Remote Zone volume is
output at a volume level of 85.5 and cannot be adjusted. If the
Variable option is selected, then the Remote Zone volume can be
changed in the normal manner.
If the Remote Zone volume is set to Variable, then the Max Volume and Poewr
On Volume levels also apply to the Remote Zone Volume level.
•
Control Options
:UserOptions:ControlOptions
Remote F1
Remote F2
Remote F3
Trigger 1
Trigger 2
Trigger 3
Trigger 4
Network Setup
External Control
ML Net
Multi-Channel Input Gain - this parameter adjusts the
multi-channel analog audio input levels. This setting affects all
Activities configured with multi-channel speaker arrays. The
Multi-Channel Input Gain parameter has an adjustment range of –18
to +12dB in 0.5dB increments.
The Control Options menu sets up the remote control function keys,
trigger and network connectors, and ML Net control.
The Control Options menu contains:
•
Remote F1 to Remote F3 – assigns specific commands to the
Function keys on the remote control.
•
Trigger 1 to Trigger 4 – assigns the activation method of the four
trigger outputs. Refer to the “Triggers” section found later in this
chapter for more information on how to set up and activate the
trigger outputs.
•
Network Setup – assigns network details such as IP address and host
name to enable use of the Ethernet port.
3-37
Customizing the Nº502
Mark Levinson
•
External Control – identifies which port is being used by the
external controller.
•
ML Net – uses Ethernet to link together two or more Mark Levinson
products. Refer to the “ML Net” section found later in this chapter for
more information.
The Nº502 has an internal Web page that provides an interface for any
computer connected via the Ethernet port. Once the Network Setup is
updated for your system, these internal Web pages can be accessed. Refer
to the “Internal Web Pages” section found later in this section for more
details about the use of these pages.
Remote Function Buttons (F1 to F3)
:ControlOptions:RemoteF1
Unassigned
Audio Adjust Functions
Surround Modes
Audio Profile Functions
Activity Functions
Display Functions
Control Functions
The Nº502 remote control has three function buttons labeled F1, F2, and
F3. These function buttons allow the user to identify a specific menu
parameter, one per button, that can be accessed directly, without going
through the menu structure.
To assign the menu parameter that each button calls, the button has to
have a function associated to it. Press the Setup button and select the User
Options >Control Options menu. Each remote button has a separate
menu for selecting the function it will control. Select the menu for the
button to be set up.
3-38
The Remote Function menus, Remote F1 to Remote F3, identify what
parameters can be accessed directly. To make finding the commands
easier, the functions have been grouped into categories:
•
Audio Adjust Functions
•
Surround Modes
•
Audio Profile Functions
•
Activity Functions
•
Display Functions
•
Control Functions
Select a functional group, then specific commands are available for
selection. The command highlighted in red is the currently assigned
command. If no commands have been previously assigned, then nothing
is highlighted in red and the status of the Function button is listed as
Unassigned.
All of the Remote Function buttons have a factory default value of
Unassigned. To clear any Remote Function button of an assigned
command, select and save the Unassigned parameter to that button.
Function button assignments behave exactly the same as any command
in the menu structure – there is no functional difference. In addition,
Nº502 Media Console
Customizing the Nº502
functions that are available in both Activity mode and Setup mode can be
assigned to a remote function button.
Note
Since using a function key bypasses menu path navigation, the cursor always
highlights the top of the menu list, not the last-selected menu item.
To Set a Remote Function Button:
1. Press the Setup button.
2. Use the or buttons to select User Options and then press the
Enter button.
3. Select Control Options and then press the Enter button.
4. Select the Remote Function option to be set and then press the Enter
button.
The status of each Remote Function button is also displayed. At the
factory default state, each of the Remote Function buttons should
display “Unassigned”.
5. Select the category for the command that the Function button will
control and then press the Enter button.
6. Highlight the desired command and press the Enter button. If another
command has been previously chosen or is set to one of the other
Function buttons, it will be highlighted in red.
Once a command is selected, the menu returns to the category page,
and the red cursor now highlights the category of the newly selected
command.
7. Press the button to return to the Control Options menu. Note that
the status of the Function button just set should identify the new
command selected.
In some cases, the function that you want to assign may be part of a
multiple-choice list. When the Function button is selected, a pop-up
window appears on the display. Multiple presses of the Function button
scrolls through the list. When you stop scrolling, that parameter
automatically loads and the pop-up window closes.
Network Setup
-ControlOptions-NetworkSetup
Host Name
DHCP
Auto IP Address
Renew IP
Static IP Address
Subnet Mask
To setup the Nº502 for network operation via the Ethernet port, first
update the Network Setup menu.
The Network Setup menu has several parameters:
•
Host Name – indicates the network name given to the Nº502. The
default name is “ML502”. Selecting this parameter opens the Name
3-39
Customizing the Nº502
Mark Levinson
Selector menu. See the “Name Selector” description found at the end
of this chapter for information on how to use the Name Selector to
edit the Host Name.
•
DHCP – turns DHCP (Dynamic Host Configuration Protocol)
capability On or Off. When activated, DHCP assigns a unique IP
(Internet Protocol) address to the Nº502. We recommend that you
leave DHCP set to On.
•
Auto IP Address – displays the dynamic IP address assigned by
DHCP, when DHCP is active. If DHCP is not active, then no IP address
is displayed. This is an information-only display and has no selectable
options.
•
Renew IP – refreshes the dynamic IP address. This is useful if the
network connection has stalled; selecting this option triggers DHCP
to assign a new IP address.
•
Static IP Address – provides a fixed, or “static”, IP address. This IP
address is NOT automatically selected, it must be entered. If DHCP is
On, then the Static IP address is not used. Use the , , and buttons to enter the IP address.
•
Subnet Mask – identifies the Subnet Mask for the Nº502. This IP
address is automatically assigned by DHCP. If DHCP is Off, then you
will need to enter this manually, and it must agree with the Subnet
Mask address of the router.
3-40
To Change the Static IP Address or Subnet Mask:
IP Address
192.168.50.2
Cancel
Enter
Selecting the IP Address or the Subnet Mask option identifies the current
address and provides the editing controls necessary to change the address.
There are four red cursor marks, similar to the highlighter used in the
Name Selector, that surround one section of the address.
Use the , , and buttons to modify the current IP address:
•
Pressing the and buttons changes the number.
•
Pressing the and buttons moves the cursor marks to the next
section of the address.
•
Use the and buttons to highlight the Enter tab.
•
With the Enter tab highlighted, press the Enter button to save any
changes.
•
From the Enter tab, press the button to highlight the Cancel tab.
•
With the Cancel tab highlighted, press the Enter button to exit
without saving any changes.
Nº502 Media Console
Customizing the Nº502
External Control
External control commands can be received over both the ethernet and
RS-232 ports. The external control parameter identifies which port is
being used by the external controller.
Lock Options
-UserOptions-LockOptions
Surround Modes
Audio Adjust
Setup
The Lock Options menu allows you to lock certain setup features and
customized parameters so that they may not be changed. Each of the
parameters in the Lock Options menu can be Locked or Unlocked.
To access the Lock Options menu, press the Setup button and select the
Lock Options menu.
Access to the Lock Options menu can never be locked. So even if the
Setup menu is Locked, the Lock Options menu can be accessed in order to
Unlock the Setup menu.
Restore Options
The Restore Options menu provides access to the Restore Factory Settings
parameter, which restores all parameter settings to the factory defaults.
Restoring the factory settings of the Nº502 erases all currently customized
settings, calibration values, and setup parameters. Once the factory
settings have been restored, all other values are permanently deleted.
Before performing this function, make sure that you’ve saved the Nº502
configuration settings. We’ve provided a configuration tool to make this
easier to accomplish. The Nº502 can download your configuration
settings to a file on the hard drive of a computer, via the Ethernet port on
the rear panel of the Nº502. For more information regarding how to save
your configuration, refer to the “Restoring Factory Default Settings”
section of Chapter 4: Troubleshooting and Maintenance.
When Restore Options is selected, a warning message is displayed. If
you’re sure you want to restore the factory defaults, select Restore and
press the Enter button. Otherwise, select Cancel and press the Enter
button to exit out of the menu without restoring the factory defaults.
Note
All parameter default settings are identified in the Menu Trees, which can be
found in the Appendix.
Triggers
The Nº502 provides four trigger outputs that can be used to control other
products, such as amplifiers, lights, shades, and video screens. The triggers
3-41
Customizing the Nº502
Mark Levinson
can be activated by selecting a specific Activity or by taking the Nº502 out
of Standby mode.
For example, you might have an Activity Setup called “Movie”. When the
Movie Activity is selected, Trigger 1 activates to lower the video screen for
your front projection system, while Trigger 2 activates to close the
window shades. This example has Trigger 1 and Trigger 2 activated by an
Activity.
If Trigger 3 is set to activate when the Nº502 is taken out of Standby
mode, it might send a signal to the amplifiers so that they are powered up
at the same time.
Trigger Activation
The first decision you need to make is how you want the trigger outputs
activated – by the selection of an Activity or by leaving the Standby mode.
To set the activation method, enter the Setup>User Options>Control
Options menu. This menu has four available selections, Trigger 1 to
Trigger 4, allowing you to set the trigger activation methods individually.
Select the trigger location that you want to set up, and then select the
activation method:
•
Out of Standby – activates the trigger when the Nº502 is removed
from Standby mode.
•
On Demand Only – activates the trigger only when a specific
Activity is selected.
3-42
When activated, the trigger supplies a 12V signal to the associated rear
panel Trigger connector.
On Demand Only
Setup
When the On Demand Only option is selected, you must then configure
the specific Activity that turns on the trigger.
To associate the Activity to an On Demand Only trigger, go to the
Setup>Activities menu. Select the Activity that you want the trigger
activation associated with and then select the Triggers option.
The triggers can be set to two different states for each specific Activity:
Note
•
Trigger On – selecting the Activity supplies a 12V signal to the
associated rear panel Trigger connector.
•
Trigger Off – the Trigger supplies no voltage to the associated rear
panel Trigger connector when the Activity is selected.
Any of the Trigger Outputs can also be assigned to a Function key on the
remote control. In this case, the Trigger Output is activated whenever the
Function key is pressed.
Nº502 Media Console
Customizing the Nº502
Internal Web Pages
The Nº502 supports network connection to a computer through the
Ethernet port. The Internal Web Pages act as the Nº502’s interface with
the network. These pages provide:
Note
•
Download/Upload Configuration - the Nº502 configuration and
calibration settings can be downloaded to a computer via the rear
panel Ethernet port. Previously saved configurations can also be
uploaded in the same manner. For more information, refer to the
“Saving the Nº502 Configuration” section of the Appendix.
•
Software Upgrade - the interface for upgrading the Nº502
operating software. This interface will be used for any future software
upgrades. A separate document with further explanation will be
available with future software upgrades.
•
Error Reporting - the Error Log page tracks ML Net or
system-related error messages. This page is a diagnostics tool for Mark
Levinson Customer Service use.
To access the Internal Web Pages requires proper network setup on both the
Nº502 and the computer. To set up the computer, refer to your computer
operating manual. To set up the Nº502, refer to the “Network Setup”
description in the “Control Options” section found earlier in this chapter.
ML Net
The ML Net protocol allows you to control two or more Mark Levinson
products simultaneously via the Ethernet port.
To use ML Net, the following conditions are required:
•
only compatible with Mark Levinson products.
•
all products must have Ethernet communication ports.
•
an IP router with Auto-detect, capable of 10baseT or 100baseT
operation.
Refer to the product documentation of each Mark Levinson product to
verify compatibility.
Note
Since ML Net operates through the use of a router and the Ethernet
connection, all devices must have networking capability. To set up the Nº502
for network operation, refer to the “Network Setup” description in the
“Control Options” section found earlier in this chapter.
3-43
Customizing the Nº502
Masters and Slaves
Mark Levinson
ML Net uses a single “Master” device to control specific functions of other
ML Net-capable Mark Levinson products. An ML Net system can only
have one “Master” device; all other devices in the system become
“Slaves”. Slave devices receive and respond to the commands of the
Master device.
An ML Net system can simultaneously support one Master device and up
to 16 Slave devices. In most cases, the Master device is the Nº502 Media
Console. The Nº502 can never be a Slave device.
Note
If assigning a 17th Slave device is attempted, the ML Net Setup and ML Net
Status menus indicate that the designated Slave device remains in an
Unassigned state.
The Master device performs the following ML Net functions:
3-44
Note
Connecting the
Devices
•
Status Reporting – status conditions of the assigned Slave devices
can be reported to the Master device; the status includes Temperature,
Session Time, Total On Time, and Fault Reporting.
•
Display Intensity – the Display Intensity level of the front panel
display and LEDs on the Master device is replicated on all assigned
Slave devices.
The Display Intensity master command does NOT change the brightness
intensity of the amplifier LEDs.
•
Standby State – the Standby state of the Master device is replicated
by all Slave devices. When the Master device is put into Standby
mode, all assigned Slave devices go to Standby mode. When the
Master device is taken out of Standby mode, the Slave devices should
also come out of Standby mode.
•
Synchronized LEDs – the Standby LEDS of the Master device and
all assigned Slave devices blink in unison.
The first step is to connect all of the devices together. Ensure that all
components are powered Off or in Standby mode before connecting to the
Ethernet ports.
To set up an ML Net system:
•
All devices must be connected to an Auto-Detect capable router using
straight-through Cat. 5 cables.
•
Each device must be connected to the same subnet, which must
include a DHCP server. In most cases, this functionality is part of the
router.
•
Each device must have a unique IP address (usually assigned via DHCP
server).
Nº502 Media Console
Customizing the Nº502
The figure below illustrates a typical ML Net setup:
If more devices are desired than the router can handle, connect the
additional devices first to a switch, then connect the uplink of the switch
to a normal port on the router.
Once connected, power on the devices one at a time to ensure proper
functioning of the ML Net controls. The Nº502 Media Console must be
powered on first. Allow each device to complete the initialization
sequence before proceeding to the next device.
Note
Discovering Slaves
-ControlOptions-MLNet
ML Net Setup
ML Net Status
If a Trigger control and ML Net are both active on the same device, the
Trigger control takes priority.
Before the Master device can control any Slave device, the Slave devices
must be “discovered” and assigned to the Master device.
The Nº502, as the Master device, searches for other devices via the
Ethernet connection, compiling a list of discovered devices and their
current status. Each discovered device must then be assigned to the ML
Net system.
To assign the Slave devices to the Nº502, go to the ML Net Setup menu,
located in the Setup: Control Options menu.
All of the devices found by the Nº502 are listed in the ML Net Setup
menu. The discovered devices are described by the following states:
•
Unassigned – discovered device that is not assigned to the Nº502 or
any other Master device.
•
Assigned – discovered device that is assigned (by the user) to the
Nº502.
3-45
Customizing the Nº502
Mark Levinson
•
Other – discovered device is assigned to a different Master device.
•
Inactive – previously discovered device was assigned to the Nº502
but is no longer visible due to a lost connection.
Each listed device can be assigned or unassigned to the ML Net system. If
you choose to unassign an already assigned device, a warning message is
displayed asking for confirmation before unassigning it.
Note
In some cases, it may take a minute or two before changes occur in the ML
Net Setup and ML Net Status device information listings. This delay is due to
the nature of the Ethernet connection, as device status information may not
be immediately noted by the router.
Slaves can only be assigned to a Master from within the menu system of
the Master. You cannot assign Slaves to a different Master than the one
you are accessing.
ML Net and Link2
A system can use ML Net and Link2 together, but the Link2 control takes
precedence. In this case, the ML Net Slaves enter a Status-Only mode
whenever the Slave is under Link2 control. The Status-Only mode allows
the notifications and status requests, but any attempt made by the Master
to change the state of the ML Net Slave is ignored. The Slave sends a
message to the Master indicating it’s in Status-Only mode.
Status Reporting
The ML Net system provides Slave status information on the Master
device. These status reports are information-only and can be accessed on
the Nº502 in the ML Net Status menu. Select any assigned Slave device
from the menu list and the following status information is displayed:
3-46
•
Temp (Temperature) – identifies the current operating temperature
of the Slave device. The status field can include up to eight
temperature values, depending upon the capabilities of the Slave
device.
•
Session Time – identifies the amount of time that the Slave device
has been powered On. This time resets each time the Slave is put into
Standby mode.
•
Total On Time – identifies the total amount of time that the Slave
device has been powered On since its manufacture. Putting the Slave
into Standby mode does NOT reset this time.
If a Slave device is Inactive or Unassigned, then the status information is
not available. A Slave device is assigned to a different Master; the status
information is also not available.
Note
If the Nº502 cannot find any Slave devices, the message “No Devices Found”
is displayed on the ML Net menu pages.
Nº502 Media Console
Fault Reporting
Customizing the Nº502
The Nº502, as the Master device, is capable of reporting selected error
conditions of the Slave devices. Error messages are posted on the front
panel and main displays when the failure event occurs in the Slave device.
The error message identifies the failure and the identity of the Slave
device experiencing the failure.
The error conditions of the Slave devices that the Nº502 can report are:
•
Slave Device DC Offset – indicates that the Slave device is experiencing a signal-related fault.
•
Slave Device Over Current – indicates that the Slave device is
experiencing an over-current condition.
•
Slave Device Over Temperature – indicates that the Slave device
is overheating.
•
Signal – indicates that the Slave has had a general signal fault.
•
Power – indicates that the Slave has had a power failure.
•
Unknown – indicates that the Slave has a fault condition that is not
supported by the current ML Net version.
Using Surround Modes
The Nº502 Media Console logically presents the available list of surround
modes based upon the detected input and the system setup. This process
simplifies surround mode selection by presenting only the relevant modes
for each Activity. The available surround modes are then assignable to any
relevant Activity.
Selecting A New
Surround Mode
The surround mode for the current Activity can be changed via the
Surround button.
1. Press the Surround button to display the list of surround modes. This
list is dynamically built by the Nº502 and includes all of the modes
available for the current Activity, based on the Activity setup and the
incoming source.
2. Use the and buttons to scroll through the list. The current mode
is displayed in red text. Repeated presses of the Surround button also
scrolls through the list.
3. Press the Enter button or the button to select the desired surround
mode. The selected surround mode now displays in red text,
indicating that it is now the active mode.
4. To close the list, press either the button or the Menu button.
The current Activity now has a new surround mode. However, this is a
temporary change and may be lost when a new Activity is selected or if
the input source is interrupted.
3-47
Customizing the Nº502
Mark Levinson
Surround Mode Descriptions
Each of the available Surround modes is described below. The table
included with each description indicates the corresponding Surround
mode parameters, their factory default settings, and all the possible
parameter settings. Surround modes that have no adjustable parameters
are indicated as such in the description.
For explanations of the individual Surround mode parameters, refer to the
“Surround Mode Parameter Descriptions” section found later in this
chapter.
Logic 7
3-48
The Logic 7 mode is an advanced mode that extracts the maximum sound
information from either surround-encoded programs or conventional
stereo material. These surround modes can derive up to 7.1-channels of
surround sound from a 2-channel or 5-channel input source. The Logic 7
mode provides full-frequency stereo surround channels that realistically
increase the perceived width, length, and sense of envelopment of the
listening space.
The Logic 7 mode also has additional bass-enhancement capability that
circulates low frequencies in the 40Hz to 120Hz range to the front and
surround speakers. This creates a soundstage that is broader and wider
than when the subwoofers are the sole source of bass energy. This
additional bass enhancement feature can be turned On or Off.
L7 Film (Logic 7 Film)
This Surround mode is designed for enhanced playback of 2-channel
stereo, multi-channel, or matrix-encoded film sources. Use this mode
with any source that contains Dolby Surround, DTS:Neo6, or similar
matrix-encoding to experience increased center channel intelligibility
and more accurate placement of sounds.
Parameter
Default Setting
Possible Settings
Vocal Enhance
+0.0dB
+0.0dB, +3.0dB, +6.0dB
Re-Equalizer
On
On, Off
Sound Stage
Neutral
Front, Neutral, Rear
5-Speaker Enhance
On
On, Off
Bass Enhance
Off
On, Off
Surround Roll-Off
7.0kHz
500Hz to 20.0kHz, Off
Rear Delay Offset
15ms
1ms to 30ms, Off
Compare
Default
Default, Custom
Nº502 Media Console
Customizing the Nº502
L7 TV (Logic 7 TV)
This mode is based on the L7 Film mode, but tailored specifically for
broadcast sources.
Parameter
Default Setting
Possible Settings
Vocal Enhance
+0.0dB
+0.0dB, +3.0dB, +6.0dB
Film
Off, Music Surround, Music,
Film
Re-Equalizer
Off
On, Off
Sound Stage
Rear
Front, Neutral, Rear
5-Speaker Enhance
On
On, Off
Bass Enhance
Off
On, Off
Surround Roll-Off
7.0kHz
500Hz to 20.0kHz, Off
Rear Delay Offset
15ms
1ms to 30ms, Off
Compare
Default
Default, Custom
Front Steering
3-49
L7 Music (Logic 7 Music)
This Surround mode is designed for enhanced playback of 2-channel
stereo, multi-channel, or matrix-encoded music sources. The L7 Music
mode enhances the listening experience by presenting a wider front
soundstage and greater rear ambience. This mode also directs the
low-frequency information to the subwoofer (if installed and configured)
to deliver maximum bass impact.
Parameter
Default Setting Possible Settings
Vocal Enhance
+0.0dB
+0.0dB, +3.0dB, +6.0dB
Music
Off, Music Surround, Music,
Film
Sound Stage
Neutral
Front, Neutral, Rear
5-Speaker Enhance
On
On, Off
Bass Enhance
Off
On, Off
Surround Roll-Off
7.0kHz
500Hz to 20.0kHz, Off
Rear Delay Offset
15ms
1ms to 30ms, Off
Compare
Default
Default, Custom
Front Steering
Customizing the Nº502
Mark Levinson
L7 Music Surround (Logic 7 Music Surround)
This Surround mode is designed for enhanced playback of 2-channel
stereo or multi-channel music sources recorded in real spaces and for
playback of recordings that contain added reverb. The L7 Music Surround
mode enhances the listening experience by extracting ambient sounds
from the input source and sending these sounds to all speakers. Since the
ambient sounds are heard from all directions, it creates a realistic playback
presentation that simulates what listeners experience in real spaces.
We recommend using this mode for classical music scores, since classical
music presentations are typically recorded in real spaces with additional
reverb to enhance the stereo mix.
Parameter
Default Setting
Possible Settings
Vocal Enhance
+0.0dB
+0.0dB, +3.0dB, +6.0dB
Music Surround
Off, Music Surround, Music,
Film
Sound Stage
Neutral
Front, Neutral, Rear
5-Speaker Enhance
On
On, Off
Bass Enhance
Off
On, Off
Surround Roll-Off
7.0kHz
500Hz to 20.0kHz, Off
Rear Delay Offset
15ms
1ms to 30ms, Off
Compare
Default
Default, Custom
Front Steering
3-50
Dolby Pro Logic®
The Dolby Pro Logic® modes are specifically designed for playback of
Dolby Surround-encoded sources. The Nº502 supports all extensions of
the Pro Logic surround mode family.
An extension of the Dolby Pro Logic matrix technology, Dolby PLIIx
dynamically creates a 7.1-channel sound field from matrix surround,
2-channel stereo, or 5.1-channel digital sources when your system is
configured for surround back speakers. Dolby PLII is available for systems
configured for 5.1-channel surround sound.
Note
The Nº502 handles Dolby EX encoding differently. Refer to the “Audio
Profiles” section found earlier in this chapter for more details.
Nº502 Media Console
Customizing the Nº502
The table below identifies the Dolby Pro Logic Surround modes available
for possible selection in the Nº502. These modes are only available if the
listed conditions are met by the selected Activity.
Dolby Pro Logic
Surround Mode
Required Conditions
Dolby Pro Logic IIx Movie
Surround AND Back speakers (7.1-channel
system) must be active
Dolby Pro Logic IIx Music
Surround AND Back speakers (7.1-channel
system) must be active
Dolby Pro Logic II Movie
Surround OR Back speakers (5.1-channel system)
must be active
Dolby Pro Logic II Music
Surround OR Back speakers (5.1-channel system)
must be active
Dolby Pro Logic IIx Movie & Dolby Pro Logic II Movie
The Dolby PLIIx Movie and Dolby PLII Movie Surround modes are
optimized for the playback of film sources.
These two Surround modes have no adjustable parameters.
3-51
Dolby Pro Logic IIx Music & Dolby Pro Logic II Music
The Dolby PLIIx Music and Dolby PLII Music Surround modes are
optimized for the playback of music sources.
Note
Parameter
Default Setting
Possible Settings
Panorama
Off
On, Off
Center Width
3
Minimum, 1 to 6, Maximum
Dimension
Neutral
Front, Neutral, Rear
Surround Delay
10 ms
0 ms to 15 ms
Compare
Default
Default, Custom
If the Activity is not configured for a center channel, the Center Width
parameter is grayed out and not available for adjustment.
Customizing the Nº502
Mark Levinson
Dolby Pro Logic
The Dolby Pro Logic Surround mode is designed for playback of Dolby
Surround-encoded sources. The mode decodes four channels from Dolby
Surround-encoded sources and uses a mono surround channel with a
high-frequency roll-off above 7kHz.
This Surround mode has no adjustable parameters.
DTS Neo:6
Note
DTS Neo:6 modes are designed for 5-channel, 6-channel, or 7-channel
surround systems.
The Nº502 handles DTS-ES encoding differently. Refer to the “Audio Profiles”
section found earlier in this chapter for more details.
DTS Neo:6 Cinema & DTS Neo:6 Music
The DTS Neo:6 modes are designed for the playback of matrix-encoded
digital stereo film or music sources. The DTS Neo:6 modes derive six
channels when both surround (side) and surround back (rear) speakers are
present (surround back speakers are mono). It derives five channels when
only surround speakers are present.
3-52
Use DTS Neo:6 Cinema when a program with any type of matrix surround
encoding is present. Select DTS Neo:6 Music for optimal processing when
playing a non-encoded, 2-channel stereo program material.
These two Surround modes have no adjustable parameters.
Multi-channel
The Multi-channel Surround modes are provided for multi-channel input
signals.
Multi-channel
The Multi-channel mode is a “pass-thru” mode, performing no processing
on the input signal so it is output in its native format.
This Surround mode has no adjustable parameters.
Nº502 Media Console
Customizing the Nº502
Downmix
The Downmix mode modifies a multi-channel signal, transforming it into
a 2-channel signal. The downmixed reproduction of the input signal is
sent to only the front left and right speakers.
2-Channel
Parameter
Default Setting
Possible Settings
Surround Mix
0dB
–5dB to +5dB
Master Level
0dB
–5.0dB to +5.0dB
Compare
Default
Default, Custom
The 2-channel Surround modes are provided for 2-channel input signals.
Stereo Surround
This mode is designed for the playback of stereo sources. The mode sends
the left channel to the Front, Surround, and Back Left channels and the
right channel to the Front, Surround, and Back Right channels. The
Center channel is a sum of the Left and Right channels. We recommend
using this mode for background music.
This mode has no adjustable parameters.
Stereo
The Stereo mode turns off all processing to present pure front left and
right channel stereo programs. Bass management remains active to route
the low frequencies to the subwoofers.
This mode has no adjustable parameters.
Mono
The Mono modes are designed for use with monophonic recordings,
although today, the only truly “mono” digital signal that still exists is
Dolby Digital 1.0, a mono version of Dolby Digital. These are most
commonly used for watching old movies that were originally released
with mono soundtracks, such as The Wizard of Oz or Casablanca.
Mono Logic
The Mono Logic mode, designed for the playback of mono sources, uses
proprietary reverb algorithms to realistically expand the mono sources to
3-53
Customizing the Nº502
Mark Levinson
use all available channels, including 7-channel surround systems. This
dramatically increases the perceived width and sense of envelopment of
the listening space as compared to the basic mono sound.
Parameter
Default Setting
Possible Settings
Effect Level
–9dB
–12dB to +6dB
Academy Filter
On
Off, On
Surround Roll-Off
3.1kHz
500Hz to 20.0kHz, Off
Compare
Default
Default, Custom
Mono Surround
The Mono Surround mode is designed for the playback of mono sources.
This mode expands the mono sources to use all available channels,
including 7-channel surround systems, but does not otherwise modify the
signal. The use of all speakers increases the soundstage and perceived
sense of envelopment of the listening space.
This mode has no adjustable parameters.
3-54
Mono
The Mono mode is designed for the playback of mono sources and sends
all audio to the center channel only. Bass management remains active to
route the low frequencies to the subwoofers.
This mode has no adjustable parameters.
Show All Modes
Hide Unused
Modes
The Show All Modes parameter, when selected, lists all available modes in
the Surround Mode Adjust menu.
When selected, the Hide Unused Modes parameter hides all unused
modes from the Surround Mode Quick Adjust menu, so that only the
current mode is available.
Nº502 Media Console
Customizing the Nº502
Surround Mode Parameter
Descriptions
This section provides detailed descriptions of the individual Surround
Mode parameters.
5-Speaker
Enhance
Academy Filter
The 5-Speaker Enhance parameter simulates 7-channel playback in
5-channel speaker configurations. When set to On, the Nº502 provides an
increased sense of spaciousness and envelopment through the surround
speakers. This enhancement is most noticeable when the surround
speakers are positioned to the sides of the primary listening position, or
when the primary listening position is located against the rear wall. The
effectiveness of this parameter varies within the listening space. For best
results, place the surround speakers to the left and right of the primary
listening position. This parameter is available in all Logic 7 modes.
The Academy Filter parameter restores the proper tonal balance of older
mono film sources that have much narrower frequency responses than
more recent mono film sources. This parameter is available in the Mono
Logic mode.
3-55
Bass Enhance
The Bass Enhance parameter enhances the stereo bass, which results in
low-frequency reproduction that is less localized and more realistic in the
listening space. The effectiveness of this parameter varies depending upon
the room acoustics and the ability of the surround speakers to reproduce
low frequencies. For best results, use front, side, or rear speakers that are
capable of reproducing frequencies of 40Hz or lower. This parameter is
available in all Logic 7 modes.
Center Width
The Center Width parameter adjusts the center image.
•
When set to Min, the center image is heard just from the center
speaker.
•
When set to Max, the center image is heard as a “phantom” center
image from the front left and right speakers.
•
When scaled from 1 to 6, the center image is heard in various combinations of the front and center speakers.
This parameter is available in Dolby PLIIx Music and Dolby PLII Music
modes.
Customizing the Nº502
Compare
Mark Levinson
The Compare function allows comparison listening between the factory
default setting of the selected Surround mode and the customized version
that you created by modifying the Surround mode parameters.
•
Select the Default option to hear the Surround mode in its factory
default condition.
•
Select the Custom option to hear the Surround mode in its custom
condition, which includes all current Surround mode parameter
settings.
Keep in mind that these two settings will sound identical when all
Surround Mode menu parameters are set to their factory default settings.
This parameter is available in all Logic 7 modes, as well as Dolby PLIIx
Music, Dolby PLII Music, Downmix, and Mono Logic modes.
Dimension
The Dimension parameter controls the relative balance of the sound field,
which can be useful with certain recordings to achieve more suitable
balance among all speakers. This parameter is available in Dolby PLIIx
Music and Dolby PLII Music modes.
•
When set to Front, the sound field is balanced toward the front of the
listening space.
•
When set to Neutral, the sound field is balanced at the center of the
listening space.
•
When set to Rear, the sound field is balanced toward the rear of the
listening space.
3-56
Effect Level
Front Steering
The Effect Level parameter adjusts the amount of effect applied to the
surround mode. This parameter is available in the Mono Logic mode.
The Front Steering parameter adjusts the front steering between the front
left, center, and front right speakers. Set this parameter to Film for film
and broadcast sources, and to Music, Music Surround, or Off for music
sources.
•
When set to Film, maximum front steering is applied.
•
When set to Music, moderate front steering is applied.
•
When set to Music Surround, minimum front steering is applied.
•
When set to Off, no front steering is applied.
This parameter is available in Logic 7 TV, Logic 7 Music, and Logic 7 Music
Surround modes.
Nº502 Media Console
Customizing the Nº502
Master Level
The Master Level parameter adjusts the output level of 2-channel sources.
This parameter is available in the Downmix mode.
Panorama
The Panorama parameter, when set to On, extends the front stereo image
to include the surround channel signals, creating a “wraparound” effect
with side wall imaging. This parameter is available in Dolby PLIIx Music
and Dolby PLII Music modes.
Re-Equalizer
The Re-Equalizer parameter simulates the high-frequency attenuation
that occurs in movie theaters.
•
When set to On, the Nº502 applies a high-frequency filter.
•
When set to Off, the Nº502 doesn’t apply the filter.
We recommend turning this parameter on for film sources as many films
are mixed for movie theaters and might sound too “bright” when played
back in your home theater without re-equalization. This parameter is
available in Logic 7 Film and Logic 7 TV modes.
Rear Delay Offset
Sound Stage
The Rear Delay Offset parameter increases the perceived depth of the
listening space by delaying the arrival time of the rear speaker signals.
Increase the setting for a greater sense of depth in the listening space. This
parameter is available in all Logic 7 modes.
The Sound Stage parameter dynamically controls the relative balance of
the audio output connectors.
•
When set to Front, the side and rear output levels are attenuated by
6dB, shifting the perceived balance of the sound field to the front of
the listening space.
•
When set to Neutral, the side and rear output levels are slightly attenuated by 3dB, shifting the perceived balance of the sound field to the
center of the listening space.
•
When set to Rear, the side and rear output levels are not attenuated,
perserving the intended balance of the sound field.
This parameter is available in all Logic 7 modes.
Surround Delay
The Surround Delay parameter increases the perceived depth of the
listening space by delaying the arrival time of signals from the side and
rear speakers. Increase this setting when a greater sense of depth is desired
in the listening space. This parameter is available in Dolby PLIIx Music
and Dolby PLII Music modes.
3-57
Customizing the Nº502
Surround Mix
The Surround Mix parameter controls the relative level of the surround
channel information sent to the audio output connectors labeled Front.
We recommend setting this parameter to +2dB or +3dB for all input
sources. This parameter is available in the Downmix mode.
Surround Roll-Off
The Surround Roll-Off parameter applies high-frequency attenuation
control to the audio output connectors labeled Surround and Back. This
filter is only applied to output signals generated by the Nº502. This
parameter is available in all Logic 7 modes and the Mono Logic mode.
Vocal Enhance
3-58
Mark Levinson
The Vocal Enhance parameter controls the level of dialogue boost in the
audio output connector labeled Center. Increase this setting to improve
dialogue intelligibility, especially for lower volume levels. This parameter
is available in all Logic 7 modes.
Nº502 Media Console
Customizing the Nº502
Name Selector
Any Display Setup, Speaker Configuration, Audio Profile, Video Profile, or
Activity can have a customized name associated with it. The same
interactive display screen, the Name Selector, is used for all custom
naming actions. The Name Selector opens whenever the menu options
Name or Add New are selected. For any custom name, a maximum limit
of 13 characters is allowed.
The Name Selector has several components:
Cursor
Setup: Displays - Plasma - Name
Name
Line
Highlighter
Plasma_
&
@
#
$
%
*
+
/
-
1
2
3
4
5
6
7
8
9
0
A
B
C
D
E
F
G
H
I
J
Keyboard
K
L
M
N
O
P
Q
R
S
T
U
V
W
X
Y
Z
(
)
‘
“
,
.
!
?
:
Small
Delete
Clear
<
>
Cancel
Save
Cursor
buttons
•
Name Line – displays the name of the Activity, Profile, or Setup
being modified. All edits made in the Name Selector are reflected on
this line.
•
Cursor – marks the current character position on the Name Line. The
blinking Cursor can be moved to any position on the Name Line by
using the Cursor buttons.
•
Cursor buttons – Cursor moves to any position on the Name Line.
•
Keyboard – contains selectable alphabet, number, and symbol
characters. The new name is made by selecting and entering letters
from the Keyboard.
•
Highlighter – encircles and highlights any command or character
on the Keyboard.
•
Small (Cap) – toggles the Keyboard between upper-case and
lower-case characters. When Small is visible, the Keyboard displays
3-59
Customizing the Nº502
Mark Levinson
upper-case letters; when Cap is visible, then lower-case letters are
displayed.
Note
•
Delete – deletes the highlighted character on the Name Line.
•
Clear – clears all of the characters on the Name Line.
•
Cancel – exits the Name Selector without saving any changes.
•
Save – saves the name displayed on the Name Line and exits the
Name Selector.
A blank name cannot be saved. The Name Line must contain at least one
character in order to save the name.
Using the Name Selector to Customize a Name:
When the Name Selector first opens, in response to the Add New or Name
selections, the existing or default Name is listed on the Name Line. The
Cursor always defaults to end of the listed Name.
1. Use the navigation buttons on the remote control to place the
Highlighter over the first letter in the new name and press the Enter
button to put the highlighted letter on the Name Line at the current
Cursor location.
3-60
If you are replacing an existing name, select the Clear button first to
erase the existing name.
To modify an existing name, use the Cursor buttons to move the
Cursor to any existing letter position or to the end of the existing
name. Pressing the Delete key erases the letter in the Cursor position.
Selecting a new letter on the Keyboard and then pressing Enter inserts
the new letter into the Cursor position.
2. Repeat Step 1 to spell out the new name.
3. When the desired name is displayed on the Name Line, move the
Highlighter to the Save button.
4. Press Enter to save the new name.
The Name Selector compares the new name to those currently in use.
If the name is a repeat, the Nº502 displays an error message,
indicating that the entered name is already in use and prompting you
to select a different name.
You have now created a custom name.
When the name is saved, the Name Selector closes and the Nº502
automatically returns to the Setup menu you were in previous to selecting
the Name menu option. The new name is displayed in the menu path at
the top of the menu, indicating that you are now editing the new Setup,
Profile, or Activity.
4
Troubleshooting & Maintenance
No Power
Incorrect operation is sometimes mistaken for malfunction. If problems
occur, see this section for troubleshooting information. If problems
persist, contact your authorized Mark Levinson dealer.
1. Examine the power cord to ensure that it is connected to both the rear
panel connector of the Nº502 and an electrical outlet.
2. Make sure the Nº502 is powered on with the power button.
3. Make sure the Nº502 is not in Standby mode (the LED should not be
slowly blinking).
4. Examine the electrical circuit breaker to ensure that power is being
supplied to the electrical outlet to which the Nº502 is connected.
Remote Control
Doesn’t Work
1. Eliminate obstructions between the remote control IR transmitter and
the front panel display IR receiver/transmitter. The remote control
must be in line-of-sight with the front panel IR receiver for proper
operation.
2. Replace the remote control batteries. Verify that the remote control
batteries are inserted correctly with the proper polarity.
3. Make sure the IR input connector is not being used.
4. Make sure the front panel display IR receiver/transmitter is not
exposed to strong sunlight, halogen light, or fluorescent light. This
can cause IR reception to become unreliable. If the Nº502 is placed
inside a glass cabinet, tinted glass will reduce the remote control
range.
5. If you have multiple Mark Levinson products, verify that you are
using the proper remote control for the product in question.
No Audio Output
1. Make sure that the source device is powered on, playing audio, and set
to the right output connector.
2. Make sure the master volume is set to an audible level.
3. Make sure that the volume is not muted. The LED beside the front
panel Mute button should not be illuminated.
4. Examine audio cables to ensure a solid connection between the Nº502
and associated components.
4-1
Troubleshooting & Maintenance
Mark Levinson
5. Make sure the Nº502 main output connectors are connected to an
operational power amplifier, and that the associated power amplifier
is connected to operational loudspeakers.
6. Verify that the Activity has the correct input and output rear panel
connections selected, as well as the correct Audio Profile. Refer to
Chapter 3: Customizing the Nº502 for more information.
Audio Has a
Humming Sound
1. If a cable TV connection is present, disconnect the cable from the wall
outlet. If this eliminates the humming sound, a ground loop isolation
device is required. Contact your dealer or cable provider for assistance.
2. Disconnect the components one at a time to isolate the problem.
Once the problem is identified, make sure the associated component
is properly grounded and connected to the same electrical circuit as
the Nº502.
4-2
Subwoofer(s)
Distorts
Frequently
The likely cause for the subwoofer(s) to distort is either an incorrectly set
output level or the subwoofer crossover point is set too low. Refer to the
“Speaker Setup” section of Chapter 3: Customizing the Nº502 for more
information.
Analog Audio
Sounds Distorted
1. Distorted analog audio is most likely caused by the input level of the
source being too high. If the input level is too high, then signal
clipping at the analog-to-digital converter occurs. This problem can
be resolved by adjusting the Stereo Analog In Level parameter. Refer to
the “Activities” section of Chapter 3: Customizing the Nº502 for more
information.
2. If the input source has a gain control for the analog output, verify that
it’s not adjusted too high.
Audio or Video RF
Interference
1. Verify that the Nº502 is not positioned too close to RF-emitting
devices. Move such items one at a time to isolate which device is
causing the problem.
2. Replace unshielded cables with shielded cables wherever possible.
Volume Can’t Be
Set to Maximum
Front Panel
Display Not
Working
The user has the option of manually setting a maximum volume level. If
set, this will prevent the maximum specified volume level of the Nº502
from being reached. Refer to the “User Options” section of Chapter 3:
Customizing the Nº502 for more information.
1. Verify that the front panel display has not been deactivated. Verify
that the Display Intensity parameter in the Setup:User OptionsDisplay Options menu is NOT set to Off.
Nº502 Media Console
Troubleshooting & Maintenance
2. Verify that the Monitor Output is not active. Connect a monitor to
the Monitor Out connector on the rear panel of the Nº502. If the
monitor displays an image matching the Main Zone display image,
then the Monitor Output is active. Refer to the “Rear Panel Overview”
section of Chapter 2: Basic Operation for more information.
No Video Output
1. Make sure that the source device is powered on, playing video, and set
to the right output connector.
2. Examine the video cables to ensure a good connection to the
associated component.
3. Verify that the selected output is not analog with an HDCP (HighBandwidth Digital Content Protection) input source. Source material
that carries HDCP-encoding is only available through the HDMI
output. No video is output on the analog output connectors.
4. Verify that the cable connections between the Nº502 rear panel
connectors and the other components are correct.
5. Verify that the Activity has the correct input and output rear panel
connections selected, as well as the correct Video Profile and Display
Setup. Refer to Chapter 3: Customizing the Nº502 for more information.
Video Format
Problems on
Fullscreen Display
Video format problems while using a fullscreen display (4:3 aspect ratio)
are typically due to incompatible or conflicting settings between the
incoming source, the display setup, and the Nº502 video format settings.
Examples of these errors include:
•
Extra pillarboxing (wider than normal black bars on the left & right
sides) and horizontal stretching, so that people appear tall & thin,
caused by incorrect settings on the source.
•
Black bars on the top & bottom and the left & right sides of the image
due to an incorrect aspect ratio setting on the Nº502 Media Console.
•
Black bars on all sides and vertical squashing, so that people appear
short & fat, caused by incorrect settings on the source.
Refer to the “Troubleshooting Display Formats” section found later in this
chapter for possible solutions to these errors.
Video is Behaving
Oddly With HDMI
Connections
Connecting together all of the components of your home theater system
with HDMI connectors requires every piece of equipment in the signal
chain to communicate its capabilities and requirements with respect to
the video stream and possible HDCP encryption. If any piece is not
communicating properly, then odd results can occur. For example, if the
timing of the communication is off, it might cause incorrect colors to
appear on the screen, or to shift all of the video to the left or toward the
top of the screen. If the video monitor doesn’t communicate properly, it
might load the color spacing incorrectly so that the screen appears to be
all one color, instead of displaying normal color.
4-3
Troubleshooting & Maintenance
Mark Levinson
To correct the problem, the system communication needs to be realigned,
which should clear the error. Some issues are easier to clear than others.
Typically power cycling the Nº502 will clear it, but some issues don’t need
a power cycle. We suggest you try the following:
1. Verify the HDMI cables have a good connection with the rear panel
connectors.
2. Put the Nº502 into Standby mode. Wait 10 seconds. Then take the
Nº502 out of Standby mode.
3. Power cycle the Nº502 by turning off the power switch; wait at least
10 seconds, and then turn the power switch to the On position. Then
take the Nº502 out of Standby mode.
4. With the Nº502 turned off, power cycle all other devices that are
connected to the Nº502, such as DVD and CD players, projectors, and
monitors. When finished turning all other devices back on, restore
power to the Nº502 and take it out of Standby mode.
Link2 Not
Working
1. Verify that the Nº502 and the amplifiers are daisy-chained properly.
Refer to the “Link2” section of the Appendix to verify proper setup.
2. Refer to the product documentation of each amplifier to verify
compatibility and the proper cabling.
4-4
3. Power down all of the devices, then power up the Nº502, followed by
each amplifier. Allow each device to go through its initialization
process before powering up the next device. The Standby LEDs should
now be blinking in unison.
Can’t Assign a
Slave in ML Net
You must assign the slave from the Master. Press the Setup button the
Nº502 and select User Options. Then select Control Options:ML Net:ML
Net Setup. Verify that the Slave you want to Assign is in the device list and
check its current state.
If the current state is assigned, then you must first unassign it from the
ML Net system. Once a Slave is assigned, it will not accept another
assignment until it has first been unassigned. Once the device is
unassigned, you can then reassign it to the desired ML Net system.
For explanations about other current states, refer to the “ML Net” section
of Chapter 3: Customizing the Nº502.
Configuration
Download Not
Working
If you are having difficulty with the Configuration Download, the issue
may be related to the Network Setup of either the Nº502, the Ethernet
connection, or the setup of the connected computer.
1. Verify that the proxy server in the computer’s network setup is
disabled. An active proxy server can interfere with the configuration
download procedure.
Nº502 Media Console
Troubleshooting & Maintenance
2. If the web browser cannot find the Host Name of the Nº502,
verify the following:
•
Ensure that the local DNS server is properly configured. We
recommend configuring the local DNS Server to “DNS
Forwarding” mode. To configure the DNS Server, refer to the
setup manual of the server.
•
When using a subdomain, enter the complete address into
the browser, http://ML502.yourhome.network.com - where
ML502 is the default Host Name for the Nº502 and yourhome
is a subdomain in the local network.
•
Enter the IP Address of the Nº502 into the browser, for
example, http://192.168.50.2 - to find the correct address,
refer to Auto IP Address in the Setup:User Options-Control
Options-Network Setup menu.
3. Verify that the Nº502 and computer are connected properly.
Connecting the Nº502 and computer together without a router
requires a special type of network cable. Refer to the “Saving the
Nº502 Configuration” section of the Appendix for more details.
No Connectivity Via
Ethernet
•
•
If All Else Fails...
Verify that the network cables are properly connected between
the router, switch, or hub and the Nº502. If connecting to a
computer, verify that the computer network cable is in the
correct port.
Verify the age of the router, switch, or hub. If the router, switch,
or hub is more than ten years old, there may be a communication
issue with the Nº502. Power cycle the Nº502 and use a newer
router, switch, or hub between the network and the Nº502.
1. Power cycle the Nº502, waiting at least 10 seconds between
powering the Nº502 off and on.
2. Download the Nº502 configuration and then restore the factory
default settings. See the “Restoring Factory Default Settings”
section found later in this chapter.
3. Contact an authorized Mark Levinson dealer.
4. Contact Mark Levinson Customer Service at 781-280-0300 or
www.marklevinson.com.
4-5
Troubleshooting & Maintenance
Mark Levinson
Automatic Calibration Errors
During the Automatic Calibration, errors that may occur are reported
at two points – after the Check Microphones test and after the Run
Automatic Calibration procedure. When the two routines are run,
any errors are logged and then reported when the procedure is
complete.
The tables below include listings of the possible errors, the
description of each error, and troubleshooting information for
resolving the errors.
Check Microphones
Test
Refer to the table below for information about errors occuring during
the Check Microphones Test.
MESSAGE
DESCRIPTION
TROUBLESHOOTING
(microphone) OK
The microphone detected the
calibration noise signal without error.
N/A
(microphone)
NOT DETECTED
The Nº502 did not detect the microphone during the silence check.
• Examine the microphone input connections to ensure
that the microphones are properly connected to the
Nº502 and that the microphone cable plugs are fully
inserted for a solid connection.
• The microphone might be damaged. Contact an
authorized Mark Levinson dealer for assistance.
4-6
(microphone)
SIGNAL TOO LOW
(microphone)
OUT OF RANGE
(microphone)
TOO MUCH ROOM
NOISE
The Nº502 detected the microphone
during the silence check. However,
the microphone level determined
during the silence check was not
confirmed during the microphone
check.
The microphone level is more than
20dB below the highest microphone
level.
The microphone level could not be
determined because of excessive
room noise in the listening space.
• Examine the microphone input connections to ensure
that the microphones are properly connected to the
Nº502 and that the microphone cable plugs are fully
inserted for a solid connection.
• The microphones might be positioned too far from the
front speakers. Refer to the microphone placement
examples in Chapter 3 to confirm that the
microphones are appropriately positioned for the
microphone check.
• The microphone might be damaged. Contact an
authorized Mark Levinson dealer for assistance.
• Eliminate extraneous noises in the listening space,
including conversations, air conditioners, and sounds
that filter in through open doors and windows.
• The microphone might be damaged. Contact an
authorized Mark Levinson dealer for assistance.
Nº502 Media Console
Troubleshooting & Maintenance
Run Automatic
Calibration
Refer to the table below for information about errors occuring during
the Run Automatic Calibration procedure.
ERROR
MESSAGE
DESCRIPTION
TROUBLESHOOTING
(speaker)
SPEAKER IS NOT
ENABLED
The selected speaker is not present in
the speaker setup.
• Return to the Speaker Setup menu and verify that the
speaker has been activated. The parameter value must
be Yes to be active.
(speaker)
SPEAKER IS OUT OF
PHASE
The microphones detected out-ofphase calibration noise signals, but
the calibrated value is still accurate.
• Examine the speaker/associated amplifier connections
to ensure that the speaker wires are not crossed.
• Dipolar speakers could cause this error. However, the
Nº502 does not report this error unless at least half of
the microphones detect out-of-phase calibration noise
signals.
• Reflections from room objects can cause an out-ofphase error.
• Drivers intentionally wired out-of-phase can cause an
out-of-phase error.
(speaker)
SIGNAL TOO LOW
The microphones detected
calibration noise signals at an
unusually low level.
• The microphones might be positioned more than 30
feet (9.14m) from the selected speaker or in a location
where echoes obscure calibration noise signals. Refer
to the placement examples discussed in Chapter 3 to
confirm that the microphones are appropriately
positioned for automatic calibration.
• Examine the microphone input connections to ensure
that the microphones are properly connected to the
Nº502 and that the microphone cable plugs are fully
inserted for a solid connection.
• Refer to the placement examples discussed in Chapter
3 to confirm that the microphones are appropriately
positioned for automatic calibration.
(speaker)
UNABLE TO
CALCULATE
The microphones did not detect
calibration noise signals or the Nº502
could not calculate a value.
(speaker)
MAY NOT BE
ACCURATE
One or more microphones did not
detect calibration noise signals at a
reasonable level. The calibrated value
could be inaccurate.
• Refer to the placement examples discussed in Chapter
3 to confirm that the microphones are appropriately
positioned for automatic calibration.
(speaker)
SPEAKER OUTPUT
TOO HIGH
The microphones detected
calibration noise signals at an
unusually high level.
• Decrease the associated amplifier volume levels –
including powered subwoofer amplifiers, if applicable.
The microphones detected
calibration noise signals at an
unusually low level.
• Increase the associated amplifier volume levels including powered subwoofer amplifiers, if applicable.
• Examine the microphone input connections to ensure
that the microphones are properly connected to the
Nº502 and that the microphone cable plugs are fully
inserted for a solid connection.
(only affects the
Speaker Levels
calibration)
(speaker)
SPEAKER OUTPUT
TOO LOW
(only affects the
Speaker Levels
calibration)
• The microphone may be positioned too close, within 2
feet (0.61m), to the selected speaker. Refer to the
placement examples discussed in Chapter 3 to confirm
that the microphones are appropriately positioned for
automatic calibration.
• The microphone may be positioned too far away, more
than 30 feet (9.14m), from the selected speaker. Refer
to the placement examples previously discussed to
confirm that the microphones are appropriately
positioned for automatic calibration.
4-7
Troubleshooting & Maintenance
Mark Levinson
Error Messages
The Nº502 Media Console displays error messages on the front panel
and main displays when certain error conditions exist. This section
provides a description of each error message and its resolution.
The displayed error message can be cleared by pressing any button or
rotating one of the front panel knobs.
For information about ML Net-specific error messages, refer to the
“ML Net” section of Chapter 3: Customizing the Nº502.
Note
4-8
Some error messages close automatically while some may need to be
closed. Any button press or knob turn clears the message.
Error Log
The Error Log page is part of the Nº502 Internal Web Pages and can
only be viewed when the Nº502 is connected to a computer. The
Error Log page is a diagnostic tool used by Mark Levinson Customer
Service.
Audio Adjust Locked
This message displays when a locked parameter is accessed through a
remote function key. To access the parameter, the lock needs to be
removed. Go to the Setup:User Options-Lock Options menu to
remove the lock.
Fixed Volume Mode is
Active
This message displays when attempting to change the Remote Zone
volume when the Remote Zone volume has been set to Fixed. The
Fixed option sets the volume at 85.5 and is not adjustable. In order
to change the volume level in this condition, the Remote Zone
Volume parameter needs to be changed from Fixed to Variable.
Function Key is
Unassigned
This message displays when a remote control function key is pressed
that has no action assigned to it. To assign a specific menu parameter
to an unassigned function key, go to the Setup:User Options –
Control Options menu.
Name is Already in
Use
This error message displays when a name is chosen in the Name
Selector that is already saved. Even if the new name is for a different
Activity, Profile, or Setup, every name MUST be unique.
To correct the problem, select and save a different name.
Nº502 Media Console
Please Save with New
Name
Troubleshooting & Maintenance
This error message displays when the Save button is pressed in the
Name Selector, but the Name Line is blank. The Name Selector will
not perform the Save function when the Name Line is blank.
To correct the problem, enter a name onto the Name Line before
selecting the Save button.
Power Failure
Room Correction is
Not Available
If the Nº502 experiences a power failure condition, the front panel
LEDs indicate the failure upon power up. When the Nº502 is able to
power up, the LEDs flash continuously between Off and full bright,
regardless of the Display Intensity setting.
This error message displays when the Room Correction control is
accessed and the Nº502 has not yet been calibrated. The Room
Correction control cannot be activated until the Automatic
Calibration has been successfully completed.
To correct the problem, perform the Automatic Calibration.
Room Correction
Adjust is Not Available
This error message displays when the Room Correction Adjust
control is accessed and the Nº502 has not yet been calibrated. The
Room Correction Adjust control cannot be activated until the
Automatic Calibration has been successfully completed.
To correct the problem, perform the Automatic Calibration.
Note
Setup Locked/
Surround Locked
Speaker Not Available
The Room Correction Adjust parameter is also not available when the
Room Correction parameter is set to No. However, this condition does
not prompt an error message.
This message displays when a locked parameter is accessed through a
remote function key. To access the parameter, the lock needs to be
removed. Go to the Setup:User Options-Lock Options menu to
remove the lock.
This message displays when a speaker Offset parameter is accessed
that is not part of the current Speaker Setup. The speaker Offset
adjustments can only be made to speakers that exist in the current
Speaker Setup.
4-9
Troubleshooting & Maintenance
Surround Mode Not
Available
Mark Levinson
This error message results from the improper selection of a surround
mode through the remote control Function keys. Input sources and
Speaker Setups do not always support every surround mode option.
Since the Nº502 dynamically builds the Surround mode selection list
based upon the input source and speaker configuration, this problem
only results from the direct access and selection of a specific
Surround mode by use of the remote control Function keys.
The following table identifies the Surround mode selection that can
cause this error condition and the resolution options for each error.
4-10
Mode
Selection
Error
Resolution
Multi-Channel with
Dolby Digital
Surround EX
surround back
processing
This mode option is NOT compatible with the current
input source.
• Choose a different Surround Back processing option
compatible with the current input source.
Dolby Digital PLIIx
Movie
Dolby Digital PLIIx
Music
This mode is NOT compatible with the current input
source.
• Choose a different surround mode option
compatible with the current input source.
• Select a different mode that is compatible with the
current input source.
• Select an input source that is formated for Dolby
Digital PLIIx modes.
Dolby Digital PLII
Movie
Dolby Digital PLII
Music
This mode is NOT compatible with the current input
source.
• Choose a different surround mode option
compatible with the current input source.
• Select an input source that is formated for Dolby
Digital PLII modes.
Multi-Channel with
DTS-ES surround
back processing
This mode is NOT compatible with the current input
source.
• Choose a different surround mode option
compatible with the current input source.
• Select an input source that is formated for DTS
modes.
DTS Neo:6 Cinema
DTS Neo:6 Music
This mode is NOT compatible with the current input
source.
• Choose a Surround mode that is compatible with
the current input
• Select a different input source that is compatible
with DTS Neo:6 Cinema or DTS Neo:6 Music mode.
Nº502 Media Console
Troubleshooting & Maintenance
Troubleshooting Display Formats
The video format is directly affected by a number of different
variables, causing a wide range of potential format problems between
the input source and the main display. This guide identifies common
format issues and suggests possible resolutions.
Note
This guide assumes that the system you are troubleshooting uses a
Widescreen display.
There are four main places where the video format is directly
impacted:
•
Input Source – the incoming video format has a fixed aspect
ratio and resolution that may not be suitable to the main display.
•
Media Player – most DVD players provide a few different aspect
ratios and zoom options.
•
Display Screen – most displays have a variety of resolution
settings, although the aspect ratio is typically fixed.
•
Nº502 Media Console – the Nº502 provides different aspect
ratio settings, resolution formats, and zoom settings, which can
alter the displayed video output.
For optimal results, make adjustments to the source video through
the Nº502 Media Console to take advantage of its superior video
processing capabilities.
To help minimize the variables that can affect the display format,
verify the following setup conditions before you start
troubleshooting:
Note
•
Verify that the display and DVD player are set to a generic,
normal, or standard setting that does not add any formatting to
the displayed image. This minimizes the amount of formatting
that the DVD player and the display add to the source image and
simplifies potential troubleshooting.
•
Verify that all zoom modes on the Nº502, display, and DVD
player are set to Normal mode.
When the input format is DVI or analog, the input resolution is 480i or
480p, and the input source is a fullscreen or letterbox DVD, in order to
view the image correctly the DVD player must be set to a mode that
adds the black bars on the left & right sides of the image and the Nº502
must be set to a 16:9 aspect ratio.
4-11
Troubleshooting & Maintenance
Mark Levinson
To use the troubleshooting tables:
1. Find the table with the same Input Source as you are using.
2. Use the Symptoms and Output descriptions to identify the
format issue you are troubleshooting.
3. Use the Possible Solution descriptions to identify and solve the
format issue.
Note
Input Source
The Front Panel Display of the No502 does not reflect display format
issues. Therefore, if the Main Zone display has a formatting issue and the
No502 front panel display does not show the same issue, the problem
must lie with the setup of the Main Zone display.
Symptoms
DVD Format
Widescreen
Anamorphic
(16:9)
Output
Possible Solutions
Output on Display
• Image fills the screen
• Image is not stretched or squashed
• No black bars
• Image is not stretched or squashed
• Image has small black bars on the
top & bottom (letterboxing)
4-12
• This is a correct image. All format settings are
correct as set.
• The black bars (letterboxing) are part of the DVD
image. In most cases, the black bars are included
on these DVDs because the original movie was
filmed in a wider widescreen format than the 16:9
aspect ratio displays available for home theater
system.
• The first Output image is typical of a 16:9 aspect
ratio; the second Output image is typical of aspect
ratios greater than 16:9.
• Image is squashed vertically, so
that people appear short & fat
• Image has too much letterboxing
on the top & bottom
• This image is NOT formatted correctly.
• The DVD player may be set to the wrong aspect
ratio.
• The Nº502 may be set to the wrong display format.
• Image has black bars on the left &
right sides (pillarboxing)
• Image is stretched horizontally, so
that people appear tall & thin
• This image is NOT formatted correctly. On a
widescreen source, there should NEVER be black
bars on the left & right sides.
• The display may be incorrectly set. If the display
settings are the issue, the front panel display of the
Nº502 should be showing a correct image.
• It’s normal for widescreen aspect ratios that are less
than 16:9 to have some pillarboxing.
• Image has black bars on the left &
right sides (pillarboxing)
• Image is NOT distorted
• This image is NOT formatted correctly. On a
widescreen movie, there should NEVER be black
bars on the right & left sides.
• The display may be incorrectly set. If the display
settings are the issue, the front panel display of the
Nº502 should be showing a correct image.
• The Nº502 may be set to the wrong aspect ratio.
• It’s normal for widescreen aspect ratios that are less
than 16:9 to have some pillarboxing.
Nº502 Media Console
Input Source
Troubleshooting & Maintenance
Symptoms
DVD Format
Fullscreen (4:3)
(typically TV shows
or movies
converted for TV)
Input Source
(typically older or
low-budget
widescreen movie)
Possible Solutions
Output on Display
• Black bars on the left & right sides
(pillarboxing)
• Image is not stretched or squashed
• Image is complete, no cropping at
the sides or top/bottom
• This is a correct image. All format settings are
correct as set.
• The black bars (pillarboxing) are added by the
display because there is literally more display than
image area available.
• Image is stretched horizontally, so
that people appear tall & thin
• Image has too much pillarboxing
on the right & left sides
• This image is NOT formatted correctly. For a
fullscreen source, the left & right bars should
ALWAYS be present and the image should not be
distorted.
• The display may be incorrectly set.
• Image fills the screen, but some of
the image is cropped or missing
• No black bars on the left & right
sides
• This image is NOT formatted correctly.
• A stretch mode or zoom mode may be set on either
the display, DVD player, or Nº502 setup. Verify all
stretch and zoom modes are set to normal.
• Image has black bars on the top &
bottom (letterboxing)
• Image is squashed vertically, so
that people appear short & fat
• This image is NOT formatted correctly. On a
fullscreen source, there should NEVER be black
bars on the top & bottom.
• The display may be set to the wrong aspect ratio.
• The Nº502 may be set to the wrong display format.
Symptoms
DVD Format
Letterbox
NonAnamorphic
Output
Output
Possible Solutions
Output on Display
4-13
• Image fills the screen
• Image is not stretched or squashed
• Image has black bars on top &
bottom and left & right sides
• This is a correct image. All format settings are
correct as set.
• The black bars on the top & bottom (letterboxing)
are part of the DVD image.
• The black bars on the left & right sides
(pillarboxing) are added by the display because the
source is a full-screen format
• In this case, a Zoom mode could be used to fill the
screen to remove the black bars without distorting
the image
• Image is stretched horizontally,
making people appear tall & thin,
or squashed vertically, making
people appear short & fat
• Image has too much letterboxing
or pillarboxing
• This image is NOT formatted correctly.
• A stretch mode or zoom mode may be set on either
the display, DVD player, or Nº502 setup. Verify
that all stretch and zoom modes are disabled.
Troubleshooting & Maintenance
Mark Levinson
Restoring Factory Default
Settings
Restoring the factory default settings erases all calibration and user
modifications to the Nº502 and returns it to the original factory
settings. This is not a recoverable action – once the factory
settings have been restored, all previous settings and
calibration values are permanently erased.
To save the configuration of the Nº502, refer to the “Saving the
Nº502 Configuration” section in the Appendix before performing the
procedure below.
Note
All parameter default settings are identified in the Menu Trees, which can
be found in the Appendix.
To restore factory default settings:
1. Press the Setup button.
2. Select User Options and press Enter.
4-14
3. Select Restore Options and press Enter.
A message displays asking if you are sure you want to restore the
factory default settings.
4. Select Restore and press the Enter button.
The message “Factory Defaults Restored” is displayed on the front
panel and main display when the factory settings have been restored.
Note
The factory defaults can also be restored through the Internal Web
Pages, if a computer is connected via the Ethernet port. Refer to the end
of the “Saving the No502 Configuration” procedure in the Appendix for
more information.
Nº502 Media Console
Troubleshooting & Maintenance
Care & Maintenance
The Nº502 requires routine care and maintenance to ensure optimal
performance. The bulleted items indicate maintenance procedures
that should be performed on a regular basis.
Note
Failure to perform the maintenance procedures included in this section
may void the manufacturer’s warranty and/or standard repair policies.
•
To remove dust from the Nº502 exterior surface, use a feather
duster or a low-pressure blower.
•
To remove dirt and fingerprints from the Nº502 exterior surface,
use a soft, lint-free cloth. DO NOT use metal polish or a cloth
made with steel wool.
If needed, this cloth can be dampened with isopropyl alcohol.
DO NOT dampen the cloth with Benzene, acetone-based
cleaners, or other commercial cleaners.
Wipe the Nº502 exterior surface in the same direction as the grain
of the brushed aluminum.
Caution!
DO NOT apply liquid directly to the No502 exterior surface. Doing
so may damage electrical components.
•
Replace the remote control batteries as needed.
Refer to Chapter 1: Getting Started for instructions on how to
replace the remote control batteries.
4-15
Troubleshooting & Maintenance
4-16
Mark Levinson
Appendix
Specifications
All specifications are subject to change without notice.
Inputs
HDMI
Analog Video
Digital Audio
Analog Audio
Control Inputs &
Outputs
Six HDMI Type A, Version 1.1, 19-pin connectors
•
Four component video – one BNC & three RCA connectors (Y, Pb, Pr)
•
Three S-video connectors
•
Three composite video, RCA connectors
•
Six S/PDIF coaxial (RCA) and three S/PDIF optical (TOSlink)
connectors
•
Coaxial and optical input connectors conform to IEC-958, S/PDIF
standards
•
Two AES/EBU inputs, XLR connectors
•
One unbalanced 8-channel input array, RCA connectors
•
Four unbalanced stereo pairs, RCA connectors
•
Two balanced stereo pairs, XLR connectors
•
Four microphone inputs, 3.5mm mini plug, accepts either stereo plug
(tip/ring/sleeve) or mono plug (tip/sleeve)
•
One RS-232 port, RJ-11 connector
•
One Ethernet port, RJ-45 connector
•
One Link port, RJ-45 connector
•
Four programmable trigger outputs, 3.5mm mini plug, accepts either
stereo plug (tip/ring/sleeve) or mono plug (tip/sleeve)
• Output Voltage: 12V
• Output Current: 100mA
•
One IR receiver, on front panel
•
One IR Input jack, 3.5mm mini plug, accepts either stereo plug (tip/
ring/sleeve) or mono plug (tip/sleeve), 12V
A-1
Appendix
Mark Levinson
Outputs
HDMI
Analog Video
Analog Audio
Remote Zone
Two HDMI Type A, Version 1.1, 19-pin connectors
•
One component with three BNC connectors (Y, Pb, Pr)
•
One composite monitor, RCA connector
•
One unbalanced 7.4-channel array, RCA connectors
•
One balanced 7.4-channel array, XLR connectors
One unbalanced stereo pair, RCA connectors
HDMI Formats
A-2
HDMI Input
Video: 480/576i, 480/576p, 720p, 1080i, 1080p
Audio: Dolby Digital, DTS, and PCM (32, 44.1, 48, 88.2, 96, 176.4, and
192kHz)
HDMI Output
Video: 480/576i, 480/576p, 720p, 1080i, 1080p
Audio: Dolby Digital, DTS, and PCM (32, 44.1, 48, 88.2, 96, 176.4, and
192kHz)
Component Video
Performance
Compatibility
480/576i, 480/576p, 720p, 1080i
A/D Conversion
12-bit, 110MHz (4x SD, 2x ED, 1x HD oversampling)
D/A Conversion
14-bit, oversampling to 216MHz
Input/Output Levels
Y: 1.0Vp-p with 75Ω load (700mVp-p video)
Pb/Pr: +/–350mV with 75Ω load (700mVp-p)
S-Video and
Composite Video
Performance
Compatibility
A/D Conversion
Composite Input Level
NTSC/PAL
12-bit, 110MHz (4x SD, 2x ED, 1x HD oversampling)
1.0Vp-p with 75Ω load
S-Video Input Level
Y (Luma): 1.0Vp-p with 75Ω load (700mVp-p video)
C (Chroma): 300mVp-p with 75Ω load
Composite Monitor
Output Level
1.0Vp-p with 75Ω load
Nº502 Media Console
Appendix
Audio
Performance
Frequency Response
Digital Audio Sample
Rates
20Hz to 20kHz, +/– 0.1dB
32, 44.1, 48, 88.2, 96, 176.4, & 192kHz
A/D Conversion
24-bit/192kHz, PCM Multibit ΣΔ
D/A Conversion
24-bit/192kHz, PCM Multibit ΣΔ
Input Impedance
THD + N
Signal-to-Noise Ratio
Dynamic Range
100KΩ
94dB (Reference level: 1kHz, 30kHz LPF)
94dB (Reference level: 30kHz LPF)
94dB (Reference level: 1kHz, 30kHz LPF)
Maximum Input Level
7.5V/15Vrms RCA/XLR
Maximum Output
Level
7.5V/15Vrms RCA/XLR
Reference Input Level
Reference Output
Level
2Vrms
1.5V/3Vrms RCA/XLR
A-3
General
Power Requirements
120V~, 60Hz / 100/220/230V~, 50-60Hz; factory set for destination
country
Power Consumption
175W
Dimensions
Weight
Operating
Environment
Rack Mounting
Remote Control
•
Height (with feet): 9.46 inches (240.4mm)
•
Height (without feet): 8.70 inches (221.0mm)
•
Width: 17.48 inches (444.0mm)
•
Depth: 17.4 inches (442.4mm)
•
See Product Dimensions diagram on the following page
•
Net weight: 54.5 lbs (24.6kg)
•
Shipping weight: 71.0 lbs (32.5kg)
•
Operating temperature: 0o to 35oC (32o to 95oF)
•
Storage temperature: –30o to 75oC (–22o to 167oF)
•
Relative humidity: 95% maximum without condensation
Optional Rack Mount Kit is available, refer to Chapter 1: Getting Started for
ordering details
Handheld, back-lit IR operation; requires two AAA batteries (included)
Appendix
Mark Levinson
No502 Media Console Dimensions
The diagram below provides detailed dimensions for the Nº502 Media
Console. The views included are the left side, top, and front.
A-4
Nº502 Media Console
Appendix
Declaration of Conformity
Application of Council Directive(s):
2004/108/EC and 2006/95/EC, as amended.
Standard(s) to Which Conformity Is Declared:
EN 55013:2001 + A1:2003 + A2:2006
EN 55020:2007
EN 61000-3-2:2006
EN 61000-3-3:1995 + A1:2001 + A2:2005
EN 60065:2002
Manufacturer:
Harman Specialty Group
3 Oak Park Drive
Bedford, MA 01730-1413
The equipment identified here conforms to the Directive(s) and
Standard(s) specified above.
Type of Equipment:
Models:
Date:
Media Console
Mark Levinson No. 502
February 2008
A-5
Harman Specialty Group
Vice President of Engineering
3 Oak Park Drive
Bedford, MA 01730-1413 USA
Tel: 781-280-0300
Fax: 781-280-0490
Appendix
Mark Levinson
Rack Mount Kit Instructions
Follow these instructions to install the Nº502 Media Console into the
optional rack mount. To order a rack mount kit, contact an authorized
Mark Levinson dealer for availability and pricing.
1. Using a Phillips head screwdriver, install the rack shelf to the rack
using four of the screws included in the rack mount kit.
Note
Be sure to tighten all screws so that they fit firmly. Ensure that you do NOT
overtighten the screws. Overtightening the screws may strip the threads,
thereby making the connection not secure.
2. Slide the Nº502 Media Console onto the rack shelf until the front
panel is flush with the edges of the rack.
3. Position one of the dress plates included with the rack mount kit
across the top of the Nº502 and screw to the rack using two of the
screws from the kit.
4. Position the second dress plate across the bottom of the Nº502 and
screw to the rack using the last two screws from the kit.
A-6
You have now completed the rack shelf installation. The finished
assembly occupies six rack units. The slots in the rear of the rack shelf are
designed for cable management.
Nº502 Media Console
Appendix
Activity Menu & Zone Menu Trees
NOTE: All defaults appear in bold.
Activity
Button
NOTE: The Zone menu always has the
same options as the Activity menu.
*Off is only an option in the Zone
menu.
Activity
-Offsets
Off; -14.0dB to
+14.0dB in 0.1dB
steps, Even
TV
Movie
Music
Game
Off*
Stereo Front Offset
Center Offset
Surround Offset
Back Offset
Subwoofer 1 Offset
Subwoofer 2 Offset
-AudioAdjustments
Menu
Button
Main Zone Audio
Audio Adjustments
Surround Mode Adjust
:SurroundModeAdjust*
L7 Film
L7 TV
L7 Music
L7 Music Surround
Dolby Pro Logic IIx Movie
Dolby Pro Logic IIx Music
Dolby Pro Logic II Movie
Dolby Pro Logic II Music
Dolby Pro Logic
DTS Neo:6 Cinema
DTS Neo:6 Music
Multi Channel
Stereo Surround
Downmix
Stereo
Mono Logic
Mono Surround
Mono
Show All Modes**
Hide Unused Modes
-DolbyPLIIxMovie
Panorama
Center Width
Dimension
Surround Delay
Compare
-Downmix
Surround Mix
Master Level
Compare
*Front Steering is not available
in the L7 Film mode.
**Re-Equalizer is not available
in the L7 Music modes.
+6.0dB
+3.0dB
+0.0dB
Off
Music Surround
Music
Film
On
Off
Front
Neutral
Rear
On
Off
Off, 1 to 30ms in
1ms steps
Default
Custom
On
Off
Low
Medium Low
Medium
Medium High
High
On
Off
Minimum, 1 to 6,
and Maximum, 3
Sets Offset, Balance,
& Fader to center,
Room Correction to
Off, Room Correction
Adjust to Medium
Front
Neutral
Rear
0ms to 15ms
in 1ms steps, 10ms
Default
Custom
Default
Custom
**This option is only available if the unused
modes are hidden.
Vocal Enhance
Front Steering*
Re-Equalizer**
Sound Stage
5 Speaker Enhance
Bass Enhance
Surround Rolloff
Rear Delay Offset
Compare
-14.0 to +14.0dB in
0.1dB steps, Even
-5dB to +5dB
in 1dB steps, 0dB
*All options are shown in this table, however the list
available may vary depending upon Speaker Setup and
the incoming source.
-Logic7Film
Offsets
Left/Right Balance
Front/Back Fader
Room Correction
Room Correction Adjust
Recall
500Hz, 641Hz, 847Hz,
1.1kHz, 1.4kHz, 1.8kHz,
2.4kHz, 3.1kHz, 4.1kHz,
5.3kHz, 7.0kHz, 9.0kHz,
11.8kHz, 15.3kHz,
20.0kHz, Off
-12dB to +6dB, -9dB
-MonoLogic
On
Off
Effect Level
Academy Filter
Surround Rolloff
Compare
Off; 500Hz to
20kHz, 3.1kHz
Default
Custom
Logic 7 mode defaults:
Parameter
Vocal Enhance
Front Steering
L7 Film
L7 TV
L7 Music
L7 Music
Surround
+0.0dB
+0.0dB
+0.0dB
+0.0dB
N/A
Film
Music
Music
Surround
Re-Equalizer
On
Off
N/A
N/A
Sound Stage
Neutral
Rear
Neutral
Neutral
5 Speaker
Enhance
On
On
On
On
Bass Enhance
Off
Off
Off
Off
Surround Rolloff 7.0kHz
7.0kHz
7.0kHz
7.0kHz
Rear Delay Offset 15ms
15ms
15ms
15ms
Custom
Custom
Custom
Compare
Custom
A-7
Appendix
Mark Levinson
Display Setup & Video Profile Setup
Menu Trees
Setup
Button
Video Profile parameter defaults:
Deinterlacing
Adaptive
Threshold
Film
Detection
Film
Adaptive
4
On
On
0
0
0
TV / Video
Adaptive
4
Off
Off
2
0
0
Sports
Adaptive
2
Off
Off
2
0
0
Setup
Displays
Speakers
Video Profiles
Audio Profiles
Activities
User Options
Chroma
Noise
Contrast /
Tint /
Bug
Reduction/
Saturation Sharpness
Correction Brightness
Video
Profile
Action
Adaptive
2
On
Off
0
0
0
Photo
Field Merging
N/A
Off
Off
0
0
0
Setup-Displays
Setup:VideoProfiles
Film
TV/Video
Sports
Action
Photo
Add New
Plasma
Projector
LCD
Analog Video
Add New
Opens Name Selector
Temporal Filtering
Field Merging
Adaptive
Opens Name Selector
Setup:VideoProfiles-Film
Setup:Displays-Plasma
A-8
0 to 15 in single steps
Name
Deinterlacing
Adaptive Threshold
Film Detection
Chroma Bug Correction
Noise Reduction
Brightness
Contrast
Saturation
Tint
Sharpness
Delete Video Profile
Name
Output Path
Display Format
Color Space
Resolution
Output Frame Rate
Zoom Ratio
SD Component Black Level
Delete Display
0 IRE
7.5 IRE
On
Off
0 to 64 in single
steps
-64 to +64 in single
steps
0 to 64 in single
steps
Normal
Widescreen
Fill
Fill + Widescreen
24 Hz
50 Hz
60 Hz
Standard Definition
Enhanced Definition
High Definition 720p
High Definition 1080i
High Definition 1080p
RGB Normal
RGB Expand
YCbCr 4:4:4
YCbCr 4:2:2
16:9
4:3
HDMI-1
HDMI-2
Component
Delete Profile?
This Action cannot
be undone. Are you
sure about deleting
this Video Profile?
Delete Display Setup?
This Action cannot
be undone. Are you
sure about deleting
this display?
Cancel
Cancel
Delete
Delete
Display Setup parameter defaults:
Display Setup Output Path
Display
Format
Color Space
Resolution
Output
Frame Rate
Zoom Ratio
Component
Black Level
60Hz
Normal
---
60Hz
Normal
---
Plasma
HDMI-1
16:9
YCbCr 4:2:2
Projector
HDMI-2
16:9
RGB Expand
High
Definition
1080p
LCD
HDMI-1
16:9
YCbCr 4:2:2
HD720p
60Hz
Normal
---
16:9
YCbCr 4:2:2
Enchanced
Definition
60Hz
Normal
---
Analog Video Component
Nº502 Media Console
Appendix
Speaker Setup Menu Tree
Setup
Setup
Button
Setup:Speakers
Displays
Speakers
Video Profiles
Audio Profiles
Activities
User Options
Opens Name Selector
:Speakers:5.1:Crossovers
Frequency
Subwoofer LPF
Subwoofer Slope
Setup:Speakers-5.1
Name
Center
Surround
Back
Subwoofer 1 L/R
Subwoofer 2 L/R
Subwoofer Image
Crossovers
Auto Calibration
Manual Calibration
Delete Speaker Setup
Full Range Plus
Subwoofer, Full
Range, 30Hz to
120Hz in 10Hz steps
24dB/oct
48dB/oct
-SpeakerDistances
Complimentary
Full Range
Front Left
Center
Front Right
Surround Right
Back Right
Back Left
Surround Left
Subwoofer 1 Left
Subwoofer 1 Right
Subwoofer 2 Left
Subwoofer 2 Right
-ManualCalibration
Speaker Distances
Speaker Levels
Delete Speaker Setup?
This Action cannot
be undone. Are you
sure about deleting
this Speaker Setup?
Cancel
:5.1:Crossovers:Frequency
Front L/R
Center
Surrounds
Back
Set All Full Range
7.4
7.2
5.1
2-Channel
2-Channel + Sub
Add New
-SpeakerLevels
Internal Noise Test
External Noise Test
0 to 40 feet in
0.5-foot steps
(0 to 12 meters in
10cm steps)
Delete
Message Panel
Caution: High Audio
Levels!
Setup:5.1:AutoCalibration
Check Microphones
Run Automatic Calibration
OK
Cancel
-SpeakerLevels
Runs Automatic
Calibration procedure
Front Left
Center
Front Right
Surround Right
Back Right
Back Left
Surround Left
Subwoofer 1 Left
Subwoofer 1 Right
Subwoofer 2 Left
Subwoofer 2 Right
Runs Check
Microphones Test
Mono
Stereo
Yes
No
-14 to +14dB in
0.1dB steps
Speaker Setup parameter defaults:
Speaker
Setup
Center
Surround
Back
Crossover
Subwoofer LPF
Subwoofer
Slope
7.4
Yes
Yes
Yes
Yes
Yes
7.2
Yes
Yes
Yes
Yes
No
Stereo
80Hz
Complementary
24dB/Oct
Stereo
80Hz
Complementary
24dB/Oct
5.1
Yes
Yes
No
Yes
No
Mono
80Hz
Complementary
24dB/Oct
2-Channel
No
No
No
No
No
No
Full Range
Complementary
24dB/Oct
2-Channel +
Subwoofer
No
No
No
Yes
No
Stereo
Full Range +
Complementary
Subwoofer
24dB/Oct
Subwoofer 1 Subwoofer 2
Subwoofer
Image
A-9
Appendix
Mark Levinson
Audio Profile Setup & Activity Setup
Menu Trees
Audio Profile parameter defaults:
Setup
Button
Setup
Displays
Speakers
Video Profiles
Audio Profiles
Activities
User Options
2-Ch
Signal
MultiChannel
Signal
LFE Mix
L7 Auto
Azimuth
Surround
Back
Processing
Dolby Digital
Compression
Movies
Mono Logic
L7 Film
L7 Film
0dB
Off
Auto
Off
Music
Mono Logic
Stereo
L7 Music
0dB
Off
Auto
Off
Setup:Actitvities
TV
Movie
Music
Game
Add New
Setup-AudioProfile
Opens Name Selector
AudioProfile:Movies
Mono
Mono Logic
Mono Surround
L7 Film
L7 TV
L7 Music
L7 Music Surround
Dolby PLIIx Movie
Dolby PLIIx Music
Dolby Pro Logic
dtsNEO:6 Cinema
dtsNEO:6 Music
Stereo
Stereo Surround
Name
Mono Signal
2-Ch Signal
Multi-Channel Signal
LFE MIX
L7 Auto Azimuth
Surround Back Processing
Dolby Digital
Delete Audio Profile
Delete Profile?
This action cannot
be undone. Are you
sure about deleting
this Audio Profile?
Cancel
Mono Signal
Opens Name Selector
Movies
Music
Add New
A-10
Audio
Profile
Setup:Activities:TV
Name
Display Setup
Video In
Input Aspect Ratio
Video Profile
Speaker Setup
Audio In
Audio Profile
Stereo Analog In Level
Main Audio Delay
HDMI Audio Output
Options
Triggers
Move Activity
Delete Activity
-SurroundBackProcessing
Dolby Digital EX
DTS ES
Cancel
Same list as the
Video Profiles
Same list as the
Speaker Setups
Same list as the
Audio Profiles
-18dB to +12dB
in 0.5dB steps
0ms to 500ms
in 0.5ms steps
Delete
Displays the
Activity List
Encoded
PCM
Off
HDMI-1 to HDMI-6, Coax-1
to Coax-6, Optical-1 to
Optical-3, AES-1, AES-2,
Analog-1 to Analog-6, 7.1
Analog, 5.1 Analog
-10 to 0dB in
1dB steps
On
Off
Auto
On
Off
Auto
16:9
4:3
Delete activity?
This Action cannot
be undone. Are you
sure about deleting
this Activity?
L7 Film
L7 TV
L7 Music
Dolby PLIIx Movie
Dolby PLIIx Music
Multi-Channel
Downmix
Delete
Same list as the
Display Setups
HDMI-1 to HDMI-6,
Component-1 to
Component-4, S-Video-1
to S-Video-3, Composite-1
to Composite-3, None
Auto
On
Off
-TV-Triggers
Trigger 1
Trigger 2
Trigger 3
Trigger 4
Trigger On
Trigger Off
Activity Setup parameter defaults:
Activity
Setup
Display
Setup
Video In
Input
Aspect
Ratio
Video
Profile
Speaker
Setup
Audio In
Audio
Profile
Stereo
Analog In
Level
Main
Audio
Delay
HDMI Audio
Output
Options
Trigger 1
Triggers
2-4
TV
LCD
HDMI-1
Auto
Film
5.1
HDMI-1
Movies
0.0 dB
0.0 ms
Off
On
Off
Movie
LCD
HDMI-2
Auto
Film
5.1
HDMI-2
Movies
0.0 dB
0.0 ms
Off
On
Off
Music
LCD
HDMI-1
Auto
Film
5.1
Coax-1
Music
0.0 dB
0.0 ms
Off
On
Off
Game
LCD
HDMI-3
Auto
Film
5.1
HDMI-3
Movies
0.0 dB
0.0 ms
Off
On
Off
Nº502 Media Console
Appendix
User Options Setup Menu Tree
Setup
Setup
Button
Setup:UserOptions-Display
Preview
Status Message Time
Main Screen Status
On Screen Display
Menu Background
Front Panel Status
Display Intensity
Speaker Distance Units
Displays
Speakers
Video Profiles
Audio Profiles
Activities
User Options
Opens the About Screen
6 Seconds
Always On
Setup:UserOptions
About
Display Options
Audio Options
Control Options
Lock Options
Restore Options
Restore
Setup:UserOptions-Lock
Surround Modes
Audio Adjust
Setup
Unlocked
Locked
Opens Name Selector
-NetworkSetup
Host Name
DHCP
Auto IP Address
Renew IP
Static IP Address
Subnet Mask
Setup:Control
Remote F1
Remote F2
Remote F3
Trigger 1
Trigger 2
Trigger 3
Trigger 4
Network Setup
External Control
ML Net
RS-232
Ethernet
On
Off
Indicates assigned
IP Address
Refreshes IP Address
Subnet Mask
192.168.50.2
255.255.0.0
Cancel
Enter
Feet
Meters
NOTE: All defaults appear in bold.
Enter
1 to 50 in single
steps, Last Level, Off
50 to 100 in single
steps
-80 to -3 in single
steps, Fully Off, -50
Variable
Fixed
IP Address
Cancel
High, Medium,
Low, Off
Setup:UserOptions-Audio
Power On Volume
Max Volume
Mute Level
Remote Zone Volume
Multi-Channel Input Gain
Restore Factory
Defaults
You are about to
restore all settings
to factory defaults.
Are you sure?
Cancel
On
Off
-18dB to +12dB in
0.5dB steps, 0.0dB
:Control-RemoteF1
Unassigned
Audio Adjust Functions
Surround Modes
Audio Profile Functions
Activity Functions
Display Functions
Control Functions
Opens a dynamic
list of available
parameters in the
category
Out of Standby*
On Demand Only*
*Trigger 1 defaults to Out of
Standby. Triggers 2-4 default
to On Demand Only.
Setup:Control-MLNet*
ML Net Setup
ML Net Status
Opens the ML Net
Status Panel, which
lists all Slaves &
their current status
-MLNet-MLNetSetup
Device Host Name
Device Host Name
**Other & Inactive are states that may be
reported, but only Unassigned & Assigned
can be actively selected.
Unassigned
Assigned
Other**
Inactive**
A-11
Appendix
Mark Levinson
Understanding Room Correction
The Nº502’s Room Correction calibration is a powerful tool for optimizing
the sound of your home theater system. We’ve included this section to
provide a little background information explaining why correcting the
room is so important for optimal sound quality.
Sound Wave
Behavior
The listening environment greatly impacts both the way that you hear
sound and the actual sound wave behavior. Outdoors, in the “open air”,
sound typically travels in straight lines, as there is little to obstruct the
sound. However, a room has walls, a floor, and a ceiling, as well as
furniture, door openings, windows, and people – all of which reflect the
sound waves and create resonances within the room.
A reflected sound wave, or reflection, means that a sound wave
bounces, or “reflects”, from any object only once.
Resonance is the phenomena of multiple reflections at a specific
wavelength. All rooms have resonances because sound waves always
reflect from the hard surfaces – the walls, ceiling, and floor – of the room.
Sound Waves in
a Room
A-12
In a typical listening room, you hear only a small amount of the sound
directly from the speakers. Most of the sound you hear is reflected off of
the walls, floor, and ceiling, in addition to reflections from the furniture,
windows, door openings, and people present in the room.
DIRECT SOUND
REFLECTED SOUND
To put it simply, think of sound waves as moving objects. The wavelength
of audible sound can be as long 54 feet (20Hz) or as short as 0.667 inches
(20kHz). A good general principle to remember is that if the wavelength is
longer than the size of the object, the wave will pass around the object as
if it wasn’t there. If the wavelength is shorter, strong reflections will occur.
For example, the wavelength of 100Hz is 11 feet, so it will pass around
any person standing in a room. However, the wavelength of 1kHz is only
1.1 feet, so it will bounce, or reflect, off of almost everything solid –
people, walls, furniture – in its path. In short, what this means is that
while the 1kHz sound wave has lots of scattered reflections within the
room, the 100Hz sound wave will actually resonate more because its
wavelength is closer to the size of the room.
Nº502 Media Console
Appendix
The lower frequencies tend to behave in predictable ways because the
wavelengths are larger than the typical objects in a room. The mid and
high frequencies generally behave differently from room to room because
the foot-by-foot and inch-by-inch details differ dramatically from room to
room. For example, no two rooms have the same placement of chairs,
tables, lampshades, bookshelves, or people.
1K H z
Reflected waves
100Hz
Direct waves
Reflected waves
DIRECTED WAVES
VERSUS
REFLECTED WAVES
A-13
The strength of each reflection, and the end effect of the resonance,
depends upon how the wavelength of the sound compares to the size and
shape of the reflecting object. A small wavelength will have strong
reflections from a large object, while a large wavelength will pass around a
small object with very little reflection. The surface of the reflecting object
can also have a strong effect on the reflections. For example, a smooth
surface, like a cabinet face, will reflect very differently from a sculpture
that has many different edges to scatter reflections. A good visual example
of this effect is the way light reflects from a faceted diamond, which
scatters the light from its many surfaces, versus how light reflects from a
mirror, where the light bounces back in the same path.
The strength of the sound wave reflections can also be affected by the
transmission properties of the reflector. For example, depending upon its
size and stiffness, a wall may have its own resonant frequency. This can
happen when a sound wave of sufficient amplitude hits the wall and
causes it to resonate.
Parallel walls can create very strong reflections because the same
wavelength bounces between them multiple times. The multiple copies,
or reflections, of the same waveform are “added together” when they
reach the listener, but the phenomenom does not necessarily produce
louder sound. The relative timing between the multiple copies can
produce phase shifts, meaning that there may be delays in how long it
takes some of the reflections to reach the listener. These delays mean that
the phase of the waveform will not match exactly and hence some reflections may actually subtract instead of add to the overall sound level. The
Appendix
Mark Levinson
end result of this effect is that you hear an extremely complicated sum
that cannot be easily characterized, but that contributes to the resonances
that create the overall “room sound”.
PARALLEL
REFLECTIONS
How Speakers
Compensate
A-14
Good speaker designers know that there are inevitable differences from
one room to another that they cannot control. So they try to develop
speaker systems that will take best advantage of the known features in any
room. For example, a typical cone driver does not radiate all frequencies
evenly in all directions. With a floor-standing speaker, designers know
how far above the floor each driver in the speaker will be and they take
that height into consideration.
But no matter how good the speaker design is, the designer is still forced
to make assumptions on how the typical home theater is set up and where
the speakers will be placed; and it’s entirely possible, perhaps even
probable, that your home theater will vary greatly from the designer’s
vision of the typical room.
Therefore, for best results, avoid setting up your home theater room in a
manner that creates problems that the speaker designer couldn’t anticipate. Here are some tips for arranging your listening room for optimal
sound enjoyment:
•
If the room is still under construction, try to avoid building large
enclaves or rectangular cavities such as foyers, bay windows, stairway
entrances, and so on. Such spaces resonate specific frequencies that
can greatly affect the sound quality within the room.
•
Try not to place speakers in cabinets or build them into walls unless
the manufacturer has specified them for such applications.
•
Seats should be positioned away from walls and corners. Seating
positions too close to one or more walls are subject to bass increases.
•
Speakers designed to be freestanding should be used that way;
likewise, those designed to be set against a wall or in a corner should
be used that way. Every close boundary wall provides a boost in the
Nº502 Media Console
Appendix
bass, so a speaker placed inappropriately will produce either
insufficient or excessive bass.
This last point is very important. In most speaker designs, high-frequency
sound is directional, while low-frequency sound is omnidirectional. If
you’ve ever stood behind a speaker, this phenomenom is quickly apparent
as you’ll hear more bass than anything else. High frequencies are usually
projected in front of the speakers, while the bass, or low frequencies,
radiate in all directions.
So a speaker set in a corner will reflect the bass from both walls, while the
treble, or high frequencies, are not reflected from the corner walls at all.
Some speakers are designed to be placed in a corner and are hence
designed to accommodate for the expected wall reflections. If one of these
speakers is then placed freestanding away from the wall, the bass will not
be adequate because it will not have the corner reflections to “boost” the
bass sound.
bad
on is
i
t
i
s
o r
er p
e
Corn s speak igned
s
es
e
d
l
un fically re
e
i
h
c
spe placed
e
b
to
Ope
n
can staircas
reso
e
nate
Bad
u
spea nless
ke
to be r was in
book placed tended
shel on a
f
A-15
Room Modes
Room modes are resonances that occur when sound wave frequencies
reinforce each other as they reflect back and forth betweeen the hard
boundaries – the walls, ceiling, and floor – of the room. The size and
shape of the room determines which specific frequencies resonate.
A typical room exhibits many room modes. The resulting “sound” of a
room is the addition of all the room’s modes. Since not all room modes
have a positive effect, the room “sound” tends to be complicated. Other
factors, such as wall stiffness or the position of furniture in the room, can
also have an effect on the room’s resonances. At higher frequencies, these
effects become less predictable and can change as people move around
the room. However, at low frequencies, the modes are predictably
consistent due to their long wavelengths, which means that
low-frequency mode problems can be mitigated.
Appendix
How Room
Modes Affect
the Listener
Mark Levinson
Room modes affect the frequency response you hear in several ways. The
most pronounced effect of room modes is to make certain frequencies too
loud. But the most difficult to solve is the tendency of some resonances to
linger in the room after the speaker has stopped vibrating. A very strong
resonance can linger as long as half a second and in the worst cases, the
sound will also have a distinct pitch.
These lingering resonances are not always noticed by listeners because the
frequencies are usually too low to be discernible as a detail unless the
listener specifically listens for them. But they do present a serious problem
because the lingering sound often obscures the following details of the
music or soundtrack. For example, the lingering sound from a kick drum
could mask the details of the following vocal passage. Subjectively, you
might feel as if you were listening to the music through a layer of gauze.
You might try to fix things by adjusting the overall volume or by tweaking
your audio controls. However, none of these fixes can provide satisfactory
results as each can cause detail loss in other areas.
For example, turning down the bass sufficiently to solve the problem with
the kick drum requires all of the bass frequencies to be turned down,
which could leave the rest of the score with too little bass.
Correcting
Room Modes
A-16
The too-slow decay of a resonance mode can be corrected only by
applying the proper filter. The severity of a resonance mode is defined by
its “Q” value, or Quality Factor. The higher the Q of a resonance, the
bigger its amplitude and the slower its decay. Proper treatment of a
resonance requires a filter with not only the correct frequency and depth,
but also the correct Q.
The Room EQ calibration of the Nº502 identifies room resonances and
measures both their Q and frequncy in a highly precise manner. Using
this information, the calibration then applies the proper parametric filters
to neutralize these resonances.
Nº502 Media Console
Appendix
Surround Sound Issues
Surround sound is a key component of modern multimedia
presentations. An action movie DVD may have great video, but the
moving image of an explosion offers little thrill to the viewer without an
accompanying BOOM! A tire-screeching vehicle entering the field of view
from the left is more effective if the accompanying audio also comes from
the left. The surround sound system is what makes it all work; hence,
properly setting up the surround sound system is essential. In most
installations, the seating positions pose a bigger problem than the system
setup.
The two key adjustments for each speaker are timing and level. The subtle
differences in timing of the sound coming out of each of several speakers
is what gives you, the listener, a sense of direction. These subtle timing
differences can be as short as a few milliseconds. If you are too close to
one speaker in the system, many of the audio effects will seem to come
from only that direction because the sound from the speaker arrives at
your ears too early. Since sound travels a bit faster than 1,100 feet per
second, each foot of travel takes just under a millisecond. So if one
speaker is 5 feet too close to you, its sound will arrive at your ears
approximately 5 milliseconds too early.
The surround processor distance settings allow the surround sound
system to delay the sound from each speaker just enough to realign them
all to each other. Levels must also be balanced because a speaker
positioned too close to you will be too loud compared to the other
speakers.
Perfect settings for level and distance apply to only one position in the
room. For example, if one set is 8 feet from every speaker in the room, no
other location in the room will also be exactly 8 feet from them all. A seat
to the left of that first one might be 3 feet closer to the left side speaker,
and the same amount further away from the right side speaker. No single
set of distances will fit both seat positions. Fortunately, our perception
will tolerate some deviation from “perfect” level and distance settings.
In the figure on the following page, the distance value for the side
speakers is set to a location about midway between the two seats, giving
an error of only 1.5 feet for both side speakers for both seats.
A-17
Appendix
Mark Levinson
Distance value for side speakers
should be set to
this point
When a room has multiple viewing positions, the distance and level
settings will be more accurate if all of those seats are clustered together as
closely as possible.
A-18
If a favorite listening chair must be located in a remote corner of the
room, the listeners will have to choose whether to accommodate the
remote seat or to ignore it. No set of values will work perfectly for
everyone if one or more seats are too far away from the “average”
position. Any compromise to accommodate remote seats will degrade the
audio for everyone.
eat
te S
o
Rem
Nº502 Media Console
Appendix
Link2
MASTER
COMMUNICATION
PORT
The main purpose of Link2 is to allow a single “master” device to control
specific functions of other Link2-capable Mark Levinson products.
In order to use Link2, the following conditions must be met:
SLAVEªIN SLAVEªOUT
AMPLIFIER
•
Link2 support is only available for the Mark Levinson Nº502 Media
Console and the Nº400-series Power Amplifiers.
•
All products must have Link2 communication ports.
Refer to the product documentation of each Mark Levinson product to
verify compatibility and cabling requirements.
AMPLIFIER
SLAVEªIN SLAVEªOUT
To use Link2, all devices are daisy-chained together using Cat. 5 Ethernet
cables, as demonstrated in the figure on the left. Each “chain” can have
only one “Master” device; all other devices in the chain become “Slaves”.
Slave devices receive and respond to the commands of the Master device.
AMPLIFIER
SLAVEªIN SLAVEªOUT
The Link2 protocol can support a maximum of one Master and eight
Slaves in a chain. The Nº502 Media Console can only be used as a Master
device. The power amplifiers must be Slave devices.
Ensure that all components are powered Off before connecting the Link2 ports.
AMPLIFIER
SLAVEªIN SLAVEªOUT
Once connected, power on the linked components one at a time to
ensure proper functioning of the Link2 controls. The Nº502 Media
Console must be powered on first.
Allow each component to complete the initialization sequence before
proceeding to the next component. Once all components are powered on,
verify that the front panel Standby LEDs on the linked components are
blinking in unison.
The Nº502 can perform the following Link2 functions:
•
Synchronized LEDs – the Standby LEDS of the Nº502 and all linked
amplifiers should blink in unison.
•
Standby Link – the state of the Nº502 Standby mode is replicated by
all linked amplifiers. When the Nº502 is taken out of Standby mode,
the amplifiers should also come out of Standby mode. Likewise, when
the Nº502 is put into Standby mode, the amplifiers should also go
into Standby mode.
•
Fault Condition Reporting – if a linked power amplifier
experiences a fault condition, it’s reported on the Nº502. If this
occurs, the power amplifier number and the fault condition code are
displayed. The power amplifier number refers to its position in the
chain. For example, AMP1 refers to the first amplifier in the chain.
Refer to the product manual of the amplifier for a description of the
fault condition code.
A-19
Appendix
Mark Levinson
Saving the No502 Configuration
The Nº502 Media Console has the ability to save your custom
configurations to a computer via the Ethernet port. The Nº502 uses an
Internal Web page to interface with the computer. Use these instructions
to download a copy of the Nº502 configuration to a computer, or to
reload a previously-saved configuration.
Materials Required:
•
Nº502 Media Console
•
Two twisted-pair network cables or a network crossover cable
•
PC-compatible computer with 100baseT network card
•
100baseT router (must be DHCP active)
Computer Requirements:
A-20
Cabling
•
Windows® 2000 Pro or Windows® XP
•
Web browser (Microsoft® Internet Explorer 6.0 or higher preferred)
The Nº502 can be connected to the computer in two ways: through a
router and directly to the computer. This section describes both methods.
While connecting the cables, ensure that both the computer and the
Nº502 are powered down.
To Connect Using a Router:
1. Connect a network cable between the Ethernet port (RJ45 connector)
on the rear panel of the Nº502 and the router.
2. Attach the second network cable between the router and the Ethernet
port of the computer.
Nº502 Media Console
Appendix
To Connect Without a Router:
To connect the Nº502 directly to the computer, you must use a network
crossover cable. A crossover cable is different from a standard network
cable and is designed specifically for connecting network access ports
directly together without the need for a hub, router, or switch.
Connect the crossover cable between the Ethernet port (RJ45 connector)
on the rear panel of the Nº502 and the Ethernet port of the computer.
Setting Up the
No502
1. Power up the Nº502 Media Console.
2. Take the Nº502 out of Standby mode by pressing the Standby button
on the front panel.
3. Press the Setup button.
4. Select User Options from the Setup menu and press Enter.
5. Select Control Options and press Enter.
6. Select Network Setup and press Enter.
7. Assign the Network Setup parameters as follows:
Note
•
DHCP: Off
•
Static IP address: 192.168.50.2
•
Subnet address: 255.255.0.0
For more detailed information about this menu, refer to the “Network Setup”
description in the “Control Options” section found in Chapter 3: Customizing
the Nº502.
8. Press the Setup button to close the menu.
9. Power cycle the Nº502.
Note
In order to see the Nº502, the computer must have the Internet Options
setup for a LAN (Local-Area Network) connection when using a router. If not
using a router, then ensure that the LAN network option is NOT selected on
the computer’s Internet Options setup.
A-21
Appendix
Mark Levinson
Managing the
No502 System
Configurations
1. On the computer, open an Internet Explorer window.
2. In the address line, enter “http://192.168.50.2” and press Enter.
This is the Static IP address of the Nº502, as set up in Step 7 of the
“Setting Up the Nº502” section just completed.
Note
An active proxy server may interfere with the configuration download. To
ensure proper download of the Nº502 configuration, turn off the proxy server
while performing the procedure.
3. The Nº502 Internal Web page should now be displayed.
There are three pages, shown as tabs across the top of the screen. The
Home tab is in red text to indicate that it is the current page.
4. Click the Manage System Configurations tab. The tab turns to red text
as the page opens.
5. There are three buttons available on the Manage System Configurations page:
•
Save Configuration – saves the Nº502 configuration to the
hard drive of the computer.
•
Send Configuration – takes a previously saved configuration
from the computer and loads it onto the Nº502. This downloaded
configuration overwrites any existing configuration settings on
the Nº502. See the “Send Configuration” procedure following this
one for further details.
•
Restore Options – restores the factory configuration settings
onto the Nº502, erasing all existing configuration settings.
A-22
6. To:
Save
Configuration
•
save the configuration from the Nº502 to the computer, continue
to Step 7.
•
send a configuration from the computer to the Nº502, skip ahead
to Step 13.
•
restore the factory default settings, skip ahead to Step 18.
7. Click the Save Configuration button to save the current Nº502
configuration to the hard drive of the computer. The browser displays
a new page.
8. Right-click on “Download” to save the configuration as directed by
the new page. This action displays the Windows “Save Target As...”
dialog box.
9. Navigate to the desired location and, if needed, change the file name.
Be sure to leave the file name extension intact.
Nº502 Media Console
Appendix
10. Click Save.
11. The dialog box closes when the configuration has been saved.
12. Verify that the file now exists on the hard drive of the computer.
Send
Configuration
13. Click the Browse button to open a Windows Browse dialog box.
14. Navigate to the location of the previously downloaded configuration
file and select the desired configuration file.
The box above the Send Configuration button should now show the
file name and location path.
15. Click the Send Configuration button. A warning prompt is displayed.
16. If you want to reinstall the selected configuration, press the Send
button. Otherwise, press Cancel.
17. Once the configuration is loaded, a message flashes on the Nº502
front panel and main displays, acknowledging that the configuration
has been sent. Then the Nº502 automatically resets.
Restore Options
18. Click the Restore button. A warning prompt is displayed.
19. If you want to restore the factory defaults, click the Restore button.
Note
This command is identical to the User Options: Restore Options menu option.
This is NOT a recoverable action. If the factory defaults are restored, the
existing configuration in the Nº502 is lost.
20. The Nº502 automatically resets once the action is complete.
A-23
Appendix
A-24
Mark Levinson
Index
Numerics
C
5-speaker enhance 3-55
calibration 3-11
automatic 3-7, 3-12–3-22
check microphones 3-13, 4-6
microphone inputs 2-6
room correction 3-12, 4-10
run calibration 3-16, 4-7
manual 3-22–3-24
speaker distance units 3-36
center width 3-55
chroma bug correction 3-26
color space 3-5
compare surround modes 3-56
contrast 3-27
control options 3-37
crossovers 3-10, 3-11
A
academy filter 3-55
activities
accessing 2-3, 2-9
delete 3-32
menu 2-12
move 3-35
preview 3-35
setup 3-32–3-35
adaptive threshold 3-26
add new 3-1
aspect ratio 3-4, 3-5, 3-6, 3-33
audio
activities setup 3-34
adjustment 2-2, 2-9
adjustment menu 2-13
adjustment recall 2-14
delete profile 3-29
HDMI output options 3-34
lock options 3-41
main audio delay 3-34
options setup 3-36
profile 2-2, 2-9
profile setup 3-28–3-31
rear panel connectors 2-4–2-7
remote zone 2-7
stereo analog in level 3-34
auto azimuth 3-29
B
balance adjustment 2-13
bass enhance 3-55
black level 3-7
brightness 3-27
D
deinterlacing 3-26
delete 3-2, 3-4, 3-9, 3-25, 3-29, 3-32
detailed status panels 2-15
DHCP 3-40
dimension 3-56
display
activities setup 3-33
delete setup 3-4
display format 3-4, 4-12
display intensity 2-2, 2-5, 3-36
front panel 2-3
input aspect ratio 3-33, 4-12
on screen 3-36
preview 2-1, 2-10, 3-35
setup 3-4–3-7
setup step 1 3-3
status panels 3-36
troubleshooting 4-12
user options 3-35
Dolby 3-30, 3-31, 3-50–3-52, 3-55, 3-56, 3-57
download configuration 3-43
downmix surround mode 3-53, 3-57, 3-58
DTS 3-30, 3-52
I-1
Mark Levinson
E
L
effect level 3-56
enter button 2-2, 2-9
error messages 3-47, 4-6
ethernet 2-6, 3-39, 3-41
external control 3-41
ethernet port 2-6
Link2 port 2-6
ML Net 3-43
network setup 3-39
RS-232 2-6
trigger outputs 2-6
triggers 3-35, 3-41, 3-42
external noise test 3-24
letterboxing 3-5, 4-13
LFE mix 3-29
light button 2-9
Link2 2-6, 3-46
lock options 3-41
Logic 7 3-29, 3-48–3-50, 3-55, 3-56, 3-57, 3-58
F
I-2
factory default settings 3-41, 4-15
fader adjustment 2-13
field merging 3-26
film detection 3-26
frequency, crossovers 3-10
front panel
button descriptions 2-1–2-3
display 2-3
display intensity 2-2, 2-5, 3-36
overview 2-1
remote control comparison 2-11
status panels 3-36
user options 3-35
front steering 3-56
function buttons 2-9, 4-8
H
HDCP 3-4
HDMI 2-4, 2-5, 3-34
host name 3-39
I
inputs 4-8, 4-9
activities setup 3-33, 3-34
aspect ratio 3-33
multi-channel input gain 3-37
rear panel connectors 2-4–2-7
installation considerations 1-3
interlaced video 3-26
internal noise test 3-23
internal web pages 3-38, 3-43
IP Address 3-40
IR input 2-6
M
main audio delay 3-34
master level 3-57
max volume 3-37
menu
audio adjustments 2-13
background 3-36
button 2-2, 2-9
overview 2-12
path 2-12
setup menu 3-1
surround mode adjustments 2-14
microphones 2-6, 3-13, 4-6
ML Net 2-6, 3-43–3-47
monitor output 2-5, 3-36
mono 3-10
mono modes 3-53, 3-54, 3-55, 3-56, 3-58
multi-channel 3-52
multi-channel input gain 3-37
multi-channel surround modes 3-56
mute 2-2, 2-10, 3-37
N
name
add new 3-1
modify 3-2, 3-4, 3-9, 3-25, 3-28, 4-9
selector 3-59
navigation buttons 2-8
network setup 2-6, 3-38, 3-39–3-41, 3-43
Nº502
about 1-1, 3-35
configuration 3-43
first-time operation 1-5
front panel 2-1
front panel display 2-3
initial power-up 1-5
maintenance 4-16
options 1-2
rear panel 2-4
registration 1-2
remote control 2-8
setup step 1 3-3
Nº502 Media Console
setup step 2 3-7
unpacking 1-5
noise reduction 3-27
O
offset adjustments 2-13
on demand only 3-42
on screen display 3-36
out of standby 3-42
output frame rate 3-6
output path 3-4
outputs
analog audio 2-6
component video 2-5
HDMI 2-5
monitor 2-5, 3-36
remote zone 2-7
P
panorama 3-57
pillarboxing 3-5, 4-13
power 4-9
AC input 2-7
initial power-up 1-5
operating states 1-4
power button 2-3
power on volume 3-37
power requirements 1-4
standby button 2-3, 2-10
preview 2-1, 2-10, 3-35
product registration 1-2
progressive video 3-26
Q
quick status panels 2-15
R
rear delay offset 3-57
rear panel connectors 2-4–2-7
recall audio adjustments 2-14
re-equalizer 3-57
registration 1-2
remote control
button descriptions 2-8–2-10
front panel comparison 2-11
function buttons 2-9, 3-38, 4-8
light 2-9
overview 2-8
replacing the batteries 1-6
remote zone audio
accessing 2-1, 2-10
menu 2-12
rear panel connectors 2-7
volume 3-37
resolution 3-6
restoring factory defaults 3-41, 4-15
room correction 2-13, 3-12, 4-10
RS-232 2-6, 3-41
S
saturation 3-27
SD component black level 3-7
setup menu
accessing 2-2, 2-9, 2-12
activities 3-32–3-35
add new 3-1
audio profiles 3-28–3-31
delete 3-2
displays 3-4–3-7
lock options 3-41
name 3-2
name selector 3-59
speakers 3-8–3-24
step 1 3-3
step 2 3-7
user options 3-35–3-41
video profiles 3-25–3-28
sharpness 3-28
sound stage 3-57
speaker setup 3-8–3-24
activities setup 3-33
automatic calibration 3-12–3-22
crossovers 3-10
delete 3-9
distance units 3-36
distances 3-22
levels 3-23
manual calibration 3-22–3-24
setup step 2 3-7
subwoofers 3-10, 3-11
standby 1-4, 2-3
status panels 2-15, 3-36
stereo 3-10, 3-34, 3-53
subnet mask 3-40
subwoofer image 3-10
surround
button 2-2, 2-9
Dolby modes 3-30, 3-31, 3-50–3-52
DTS modes 3-30, 3-52
hide all 3-54
lock options 3-41
I-3
Mark Levinson
Logic 7 modes 3-29, 3-48–3-50
mode adjustment 2-14
mode descriptions 3-48
mode parameter descriptions 3-55–3-59
mode selection 3-29, 3-47
show all 3-54
surround back processing 3-30
surround delay 3-57
surround mix 3-58
surround roll-off 3-58
using modes 3-47–3-54
T
temporal filtering 3-26
tint 3-27
triggers 2-6, 3-35, 3-41, 3-42
troubleshooting 4-1–4-5
display formats 4-12–4-14
error messages 4-8–4-10
U
user options 3-35–3-41
I-4
V
ventilation 1-3
video
activities setup 3-33
delete profile 3-25
preview 2-1, 2-10, 3-35
profile 2-2, 2-9
profile setup 3-25–3-28
rear panel connectors 2-4–2-7
vocal enhance 3-58
volume 2-2, 2-3, 2-10, 3-37, 4-8
W
web pages, internal 3-38, 3-43
Z
zone button 2-1, 2-10
zoom ratio 3-5, 3-6