1
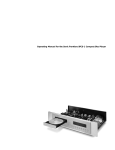
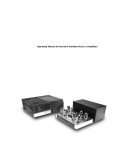
VK-3i
WARRANTY REGISTRATION FORM
Unit Serial Number: _______________________________________
Customer Name:
_______________________________________
Address:
_______________________________________
_______________________________________
Date of Purchase:
_______________________________________
Purchased From:
Dealer Name:
_______________________________________
Address:
_______________________________________
_______________________________________
IMPORTANT NOTE:
In order to receive the full five year product warranty, please mail this
completed form together with a copy of your sales receipt to Balanced Audio
Technology at the address below, within thirty days of purchase.
Failure to do so will result in the product being warrantied for one year
from the date of manufacture.
1300 First State Blvd. Suite A W ilmington, DE 19804
Tel: 302-999-8855 Fax: 302-999-8818
VK-3i
Balanced Stereo Preamplifier
Owner's Manual
1300 First State Blvd. Suite A W ilmington, DE 19804
Tel: 302-999-8855 Fax: 302-999-8818
Introduction
Thank you for your purchase of the Balanced Audio Technology VK-3i preamplifier. Please
read this owner's manual to obtain the full benefit of the VK-3i in your system. It will provide
you with the needed safety information and operating procedures for this exceptional unit.
WARNINGS:
To prevent the possibility of serious injury, electrical shock or fire:
DO NOT operate with the cover removed.
DO NOT expose to rain or moisture.
DO NOT defeat the ground power-plug.
DO NOT replace fuse with anything other than the same type and rating as supplied by the factory.
Package Contents
Included in the box should be the following:
Description
Quantity
VK-3i Preamplifier
Power Cord
Spare Fuse
Torx Wrench (T-10)
Spare Top Cover Screws
User’s Manual
VK-R1 Remote Control
1
1
1
1
5
1
(if ordered)
Save all the packaging material in a safe dry area for the unlikely event that you need
to return the VK-3i to the factory for service.
Reseating Tubes
Normally, reseating tubes upon delivery is not required. However, if any tubes have
noticeably drifted out of position due to high transportation stress, it will be advisable to
reseat the tubes. Use the supplied Torx wrench to remove the top cover. Reseat the tubes in
their sockets and reinstall the top cover.
NOTE: When using the Torx wrench, make sure it is fully inserted so that the screw head is
not stripped.
Physical Placement
It is recommended that you provide for at least 6" of free space around the unit for proper
ventilation.
Mount the unit on a hard surface with proper ventilation underneath.
Do not stack the VK-3i preamplifier on top of other units, nor vice versa.
Connecting the VK-3i to Your System
Balanced Components
Use balanced XLR interconnects. All input and output connectors are clearly marked on the
back panel.
Note: The VK-3i XLR connectors are wired as follows:
Pin 1:
Pin 2:
Pin 3:
common/shield
positive
negative
Use either the Main 1 or Main 2 Output for connection to your power amplifier. Both yield
equivalent results.
Single-Ended Components
Single-ended components have RCA connectors. The VK-3i preamplifier is designed
to work with any mix of single-ended and balanced components connected to its inputs and
outputs. All that is required to connect a single-ended component with RCA connectors to
the VK-3i’s inputs or outputs is the optional balanced to single-ended adapters. These
adapters are available from an authorized Balanced Audio Technology dealer at a nominal
charge.
Two types of adapters are available:
Input Adapters:
RCA Female to XLR Male
Output Adapters:
RCA Female to XLR Female.
Mixed Balanced and Single-Ended Systems
Any mix of single-ended and balanced components can be connected to the VK-3i by
following the above instructions.
Description of Controls
Turning the VK-3i On:
When you turn the VK-3i On, it will automatically go through a gentle power-on sequence.
This sequence takes 50 seconds, during which time the display will be flashing, indicating the
status of the unit.
1. The number on the display during this time indicates the volume setting. This will be
equal to the last volume setting before the unit was turned OFF. This setting can be
changed during this time by using the volume knob. All remote control functions
except the MUTE are disabled during this time.
2. Normally the VK-3i will be not muted (Mute LED on the display is OFF) and will
begin playing at the end of the 50 second delay. If so desired, the unit can be put in the
MUTE mode during this delay interval either by depressing the front panel MUTE switch
or by using the MUTE button on the VK-R1 remote control transmitter.
Turning the VK-3i Off:
The unit can be turned Off at any time (even while playing) without first activating the Mute
switch. It will automatically mute.
DISPLAY FUNCTIONS:
Volume Display. The two-digit display in the middle of the VK-3i front panel shows the
current volume setting. The range of values for the volume settings is from 00 to 99.
With the volume set to 00, the VK-3i output will automatically MUTE.
For volume settings from 22 to 99, the display changes by one count corresponding to the
gain change of 0.5dB. Between the numbers 13 and 22 this scale corresponds to 1dB per
step. The step size for the settings from 01 to 13 is equal to 1.5dB.
The maximum signal gain of the VK-3i (volume display at 99) is equal to 18dB.
Mute LED. This is located directly above the digital display and turns ON when the
VK-3i is in its Mute state.
Command LED. This is located to the left of the digital display. This LED is activated
whenever the remote control command is being received by the VK-3i.
DISPLAY ON-OFF Function
Turning the display OFF: The VK-3i display can be turned OFF at any time by simply
pressing the STORE button on your VK-R1 remote control transmitter TWICE.
Turning the display ON: To turn the VK-3i display back on, simply press ANY button
except the MUTE on the VK-R1 remote control. The command associated with this button
will be executed and the display will turn ON.
VOLUME KNOB:
The volume control knob on the VK-3i is linked to a digital encoder and is of a continuously
rotating type (there are no stops).
MUTE FUNCTION:
The VK-3i has two mute modes: manual and automatic. The red LED above the digital
volume display goes ON when the unit is in MUTE state. To MUTE the VK-3i, depress the
MUTE switch located on the right side of the front panel. Depressing this switch again will
return the unit to its normal operation and turn the mute LED off.
When the unit is powered up it automatically self-mutes until the proper operating points of
the circuitry are reached. It will then automatically go into Play mode, provided the Mute
function was not activated (the red Mute LED is Off).
Turning the VK-3i OFF even for short time, will make the unit reset its power sequencing
circuit and mute its output. It will then require about 50 seconds for the unit to become
operational again.
REMOTE CONTROL FUNCTIONS:
The VK-R1 remote control that comes with your VK-3i has the following functions:
1. Volume Up and Volume Down control
2. Mute function
3. Fade Down/ Fade Up function
4. Storing and recalling of the preset volume positions
The following describes these functions.
Volume Up and Down
These two buttons are programmed with variable speed volume change profiles. The rate of
volume change will be slow upon initial pressing of the volume Up or Down buttons.
Holding the button depressed will cause the rate of change to accelerate, allowing for more
flexible control when large changes in volume are required.
Mute
Pressing this button will cause the MUTE function in the VK-3i to toggle between ON and
OFF states. The Mute LED on the VK-3i display will reflect the status of the Mute circuit.
Fade
Pressing the FADE button on the VK-R1 remote control will cause the volume to smoothly
decay over the period of several seconds. This allows for a gradual reduction in volume, as
opposed to the instantaneous MUTE function. This can be particularly useful during the
presentation or demonstration of your equipment. When the FADE button is pressed, the
volume will go down all the way to zero (00 on display, unit in Mute).
Pressing the Fade button again will cause the volume to ramp up and return to its initial
value.
VOLUME PRESETS:
Volume presets. This function provides an instant change to a predetermined volume setting
at any time. This may be convenient when switching between sources with different output
levels or for accurate and repeatable gain adjustments during testing of audio equipment.
The VK-3i can store up to five user-defined volume settings. In addition, the sixth position is
reserved for the UNITY gain setting, useful and popular in Audio/Video system installations.
The UNITY GAIN position is NOT user programmable.
In the UNITY GAIN position the VK-3i gain is set to 0dB. The signal from the selected
source will propagate through the unit with its volume unchanged. This is commonly
used in Audio/Video installations, when the overall sound volume is adjusted using the
surround sound processor master volume control.
To store a volume setting:
1. Set the VK-3i volume to the desired level
2. Press the STORE button. The display will begin to flash
3. Press any Volume Preset button from 1 through 5. The volume setting number
will now be stored in this location
This preset volume associated with any of the five programmable buttons can be changed at
any time by simply following the same sequence.
To recall the volume setting:
1. Press the desired volume preset button (1 through 5) on the VK-R1 remote control
transmitter. The display will start flashing indicating the volume setting associated
with this button. (This is done for safety reasons - to avoid a sudden unpredictable
change of volume).
The display will continue flashing for 10 seconds, during which time the previous
volume setting stays unchanged. If no further command is received during this time,
the display will return to the previous setting.
2. Pressing the same preset button for the second time will lock the desired volume
into the system and the volume will now change to the new selected setting.
UNITY GAIN Setting:
Pressing the Unity Gain button on the remote control will cause the “U” symbol to be displayed.
The second press of this button will make the VK-3i to go into its Unity Gain mode. This will be
indicated by the character “U” on the volume display.
WARNING: Please use this function carefully. as invoking this setting will apply a full
scale signal from the source selected at this time to your power amplifier. If external
surround sound processor is used, set its volume control to low level before switching the
VK-3i into its UNITY GAIN position.
Fuse Protection:
A blown fuse in the VK-3i is an indication of a serious problem. If a replacement fuse fails as
well, no further attempts should be undertaken. Please contact the factory for professional
service.
The proper fuse ratings are as follows:
For 100-120 VAC Units:
2A 250V Slow Blow
For 200-240 VAC Units:
1A 250V Slow Blow
Factory supplied fuses should be only replaced with the same type and rating parts.
Servicing
The Balanced Audio Technology VK-3i should require no service other than changing tubes to
maintain its high performance. The vacuum tubes used in the VK-3i are quality 6922s and 6V6s
rated for approximately 5000 hours of use. Please direct any further service inquiries to the
factory.
Cleaning
To remove dust, occasionally wipe the front and top surfaces of your VK-3i with a damp soft
cloth. If fingerprints appear, you may use a mild, non-alkaline soap solution. Do not use
abrasive cleaners, as they may damage the fine finish of the unit.
Five Year Limited Warranty
Terms and Conditions
1. Limited Warranty
Upon receipt of the attached warranty registration form, Balanced Audio Technology warrants the purchased
product to be free from manufacturing, materials, and workmanship defects for five years from date of original
purchase, excepting vacuum tubes, subject to the following conditions. Failure to return the enclosed
registration form within 30 days from original purchase will result in a warranty period of one year from
the date of manufacture.
2. Vacuum Tubes
Vacuum tubes (including replacements under warranty) are warranted for one year from the date of the original
VK-3i purchase.
3. Limited to Original Purchaser
This warranty is for the sole benefit of the original purchaser of the covered product, and may not be transferred
to a subsequent purchaser of the product.
4. Conditions and Limitations
This warranty is subject to certain conditions and limitations, as follows. This warranty is void and inapplicable
if the product has not been used in accordance with the instructions found elsewhere in this manual, or if it has
been misused or abused, damaged by accident or neglect, or in transport once in possession of the purchaser.
The warranty is also void if the product has been repaired, modified, or tampered with by anyone other than
Balanced Audio Technology or its specifically authorized agents.
5. Remedy
If this product contains a materials, manufacturing, or workmanship defect that cannot be repaired at the
dealership where the product was purchased, it must be packed in original packaging and returned to Balanced
Audio Technology via insured freight, at the owners expense. If replacement packaging materials are required,
they will be supplied by the factory at a nominal charge. Returned products must be accompanied by a
written description of the defect, and a return authorization number (available from the factory via
phone or fax). Upon receipt of defective product, Balanced Audio Technology agrees to repair the product
without charge for parts (except vacuum tubes if the unit is more than one year old), or labor. The product will
then be returned via prepaid, insured freight, with carrier at the sole determination of Balanced Audio
Technology. This constitutes the purchasers sole remedy.
6. Design Changes
Balanced Audio Technology reserves the right to modify its products or change specifications at any time
without obligation or liability to previous purchasers.
7. Miscellaneous
Any implied warranties relating to the above product shall be limited to the duration of this warranty. This
warranty does not extend to any incidental or consequential costs or damages to the purchaser. This warranty
gives you specific legal rights. You may also have other rights which vary from state to state.