1
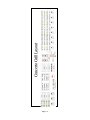
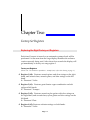
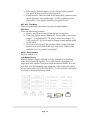
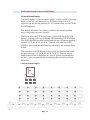
.. .. .. .. .. Accordions International 1760 South 450 West Salt Lake City, UT 84115 www.AccordionInfo.com Phone 801-485-5840 Accordions International Concerto . . . DA Series 100-255 Digital Accordion User Manual . . . . . . The ultimate accordion capable of producing an entire World of sounds with variety and contrast! . Page - 2 Concerto Grill Layout Concerto Grill – Split, Range, Volume Control & Display 1 13 17 2 14 18 3 15 19 4 16 20 5 6 7 8 9 11 Concerto Grill Effects, Exit & Next Concerto Small Display 68 10 F. 21 69 Bass CH 1 CH2 70 71 72 22 23 24 25 26 73 74 75 Solo OR1 OR2 12 59 Concerto Grill – Sounds & Registers 59 22 31 35 39 43 47 51 55 23 32 36 40 44 48 52 56 24 33 37 41 45 49 53 57 25 34 38 42 46 50 54 58 60 61 62 63 64 65 66 67 Page - 3 .. .. .. .. .. Getting the most out of your Concerto DA-250 Thanks for selecting Concerto. We are here to serve you! Best Wishes We at Accordions International wish to thank you for choosing the incomparable Concerto D/A Digital Acoustic Accordion. Concerto combines high levels of technology, rich CD quality sound, and an easy to use format. We are confident you will find it to be the most advanced and easiest to use accordion of its kind. We urge you to read and study this manual carefully so you may obtain the maximum benefits and receive many years of satisfaction from your new Concerto accordion. After reading this manual should you need further help then please feel free to contact us for technical support. Below are several ways to choose from. You may contact us via the World Wide Web at http://www.AccordionInfo.com. Where you may find updated information. Or email us directly at [email protected] Or You may phone Toll Free for an Appointment with our Tech Support; 1-800-935-0013 Please identify yourself, include your phone number and best time to call. Please take the time to review this manual and then if you feel you still are unclear or need help then please contact us for support. Page - 4 Overview Concerto is a simple to use, yet powerful system providing complete control at the touch of a button. Simply touching a register button recalls an entire, global setup, which includes sounds, volumes, octaves, effects, effect levels, velocities, and many other parameters. Concerto features eight factory registers for instant playing pleasure, and the ability to set 128 of your own favorite registers. Registers are stored in groups of eight, called a song, and may be stored on optional RAM memory cards, Registers may be sequenced from the expression pedal allowing for hands-free sequencing. Concerto's eight factory registers let yon play any style of music without studying the manual. Simply turn the power on and select one of the eight register buttons. As you learn to make you own registers you may store them in one of 128 user registers. By touching one of the 32 sound select buttons, you may quickly change sound settings in real time, allowing you to perform without programming the registers. The six LED's located on the top side of the grill will indicate which section is assigned to the 32 tone select buttons. If you wish to change a bass sound simply press the bass button to light up the bass led and make your selection from the 32 tone buttons. Concerto has eight families of voices (piano, organ, guitar, etc.). Each family has four sounds that can be recalled at the touch of a button. Over 300 additional sounds are available in the sound library. Concerto features six sections, three for the left hand (bass, chord 1, and chord 2) and three for the right hand (solo, orchestra 1, and orchestra 2). A separate sound may be selected for each section providing for a rich layering of sounds which may be fine tuned with volume, velocity, octave range, reverb type and level, chorus type and Page - 5 level, repeat and other effects, tempo settings for external drum, and sequencer devices. We urge you to study this manual carefully and to keep it as a handy reference to your Concerto. This manual has been written for the Concerto DA-250 but is also valuable for the DA-100 and DA-200 models. Please not that both the DA-200 and DA-250 have the same hardware except for the Sound Engine. The DA-250 has more sounds and more memory to provide even more accurate sound than the previous models. For those who are reading this manual that own a DA-100 the major functional difference is in how you back-up or archive the registers saved in your accordion. With the DA-100 they are saved on battery backed memory cards. Please see Appendix C at the end of this manual for specific instructions on how to use the Concerto RAM 64 Memory Cards. Those with the DA-200 and DA-250 have the latest technology in FLASH memory that requires no batteries and is non-volatile. Instructions for how you back-up or archive the registers saved in your accordion are included in Chapter 5 of this manual. Page - 6 Chapter One Concerto Setup Inventorying Your Equipment After unpacking your new Concerto carefully place all of the items in front of you. Check that you have all of the following: 1 1 1 I 1 1 Concerto accordion Concerto generator Concerto power supply Volume pedal (expression pedal) Four-way foot switch Foot-switch cable (with a five pin connector on one end and a nine pin connector on the other) 1 Firing cable (eight pin DIN plug on both ends) 2 Audio cables for Generator Left and Right 1 Stereo Y Cable for amplified accordion. You will also need an amplifier or a stereo PA system capable of handling Concerto's full spectrum of sound. Your local dealer should be able to assist you in choosing the correct amplification for your specific needs. Page - 7 Connecting Your Concerto The following steps will assist you in correctly connecting your Concerto. A. Connect the firing cable to the bottom of the Concerto and to the generator connector labeled "accordion" B. Connect the volume pedal to the generator jack labeled "pedal 1" C. Connect the four way foot pedal to the generator jack labeled "pedal 2" D. Connect the power supply to an electrical outlet and then to the generator jack labeled “power" E. Connect the audio cables to the stereo left and right outputs of the generator, then to two channels on the amplifier. It is important that both channels used on the amplifier have the same settings. F. Power up the Concerto G. Turn on the amplifier (to prevent popping in the speakers turn the amplifier off before turning off the rest of the equipment) H. Adjusting the volume: With the expression pedal in the maximum position (all the way down) and the Concerto's volume at the 3 O'clock position gradually raise the volume on the amplifier until you are at the loudest forte you desire. The expression pedal will now provide a full range of volume from zero to full volume. Page - 8 Chapter Two Factory Set Registers Exploring the Eight Factory-set Registers Each time Concerto is turned on an automatic systems check will be performed. At the same time the large display identifies the software version currently being used. After about four seconds the display will go immediately to factory-set song register 1. Factory-set Registers (Please note - The numbers in parenthesis - example (60) - refer to the drawing on page 3.) v Register 1 (60): Features acoustic piano and slow strings on the right hand, and acoustic bass, acoustic piano, and slow strings on the left hand. v Phantom*: Violin v Register 2 (61): Features great theater organ combination on both right and left hands. v Phantom*: Trumpet v Register 3 (62): Features acoustic nylon guitar with slow strings on the right hand, and acoustic bass, nylon guitar and slow strings on the left hand. v Phantom*: Flute v Register 4 (63): Features orchestra strings on both hands. v Phantom*: Violin Page - 9 v Register 5 (64): Features solo clarinet with soft brass on the right hand, and acoustic bass and soft brass on the left hand. v Phantom*: Clarinet v Register 6 (65): Features solo trumpet with brass on the right hand, and acoustic bass and brass on the left hand. v Phantom*: Trumpet v Register 7 (66): Features vibes with slow strings on the right hand, and acoustic bass and organ on the left hand. v Phantom*: Clarinet v Register 8 (67): Features mandolin with strings on the right hand, and acoustic bass with clarinet (arpeggio) on the left hand. v Phantom*: Tremolo strings Touch the Register 1 button. You should hear piano with slow strings. Notice the touch-sensitivity. The piano really comes alive with the touch feature! Turn off this feature by touching the button labeled touch. The red LED above the button will go off. Play the Concerto with the touch feature on and off and compare the difference. Touch sensitivity adds extra realism to many sounds. Now touch the Register 2 button and try the great organ sound. Notice the touch button is off. For more realistic ORGAN sounds we recommend turning off this feature and using the using the expression pedal. Try all of the factory settings and you will find they match most styles of music. Pay particular attention to Registers 5 and 6 as they feature solo sounds. Solo means there is an automatic split which plays the solo sound only on the highest note and other orchestra sounds are played on all other notes. We suggest that after becoming familiar with the factory-set registers you learn how to select and create your own registers. Refer to Chapter 3, "Making and Recording Your Very Own Registers" * Phantom is a feature that brings a new (phantom) sound to the treble keyboard. This feature is presented in the next chapter. Page - 10 Chapter Three Fixed Footswitches & Panel Buttons In this chapter you will learn the functions of the two side switches on the expression pedal, the phantom pedal on the four-way pedal, and the buttons on the front of the Concerto. Fixed Foot Switches Expression Pedal The expression pedal is equipped with two side switches. The left switch turns on and off the internal drum unit clock on the Concerto. Notice the LED above the start/stop button on the accordion flashes at the current tempo setting when the clock is off and remains steady when the clock is on. No drums will play unless your Concerto is connected to an external Midi drum unit. The right switch on the expression pedal is a very powerful tool, which allows you the hands-free ability to sequence up to the next register. Set your Concerto at Resister 1 and touch the right switch on the expression pedal. Notice the LED above the registers advances to the next register. It is important to mention that Concerto has been painstakingly studied to provide you with the most natural musical effects. One of our achievements in producing natural effects is that the sound of any note held during a register change is not affected until the note is released and a new note played. This provides for a smooth and natural transition between register changes. Notice, there is a special Page - 11 screen saver function that allows register changes to occur as fast as possible. When notes are played during a register change, the screen is not fully displayed which saves time and allows the register change to be immediate. If you wish to view the entire screen, simply touch the exit button and the full screen will be displayed. Phantom Phantom is a feature you will find invaluable no matter what your music ability. Phantom is an imaginary keyboard, or second sound, that allows you to carry on a dialogue between two separate instruments. Phantom also provides the ability to play a solo passage on notes other than those with high note priority, with phantom, notes up and down the scale may be played by the solo instrument. To see how this feature works select factory-set Register 2. You now have a theater organ sound. Touch the "phantom" foot pedal (the first, or far left pedal on the four-way pedal) and the sound will change to a trumpet. Touch the "phantom" pedal again and you will return to the organ sound. The LED above the solo button will flash when phantom is on. Now, with the phantom off touch any note on the keyboard. While holding that note (organ sound) touch the "phantom" foot switch and play a passage of notes above and below the original note. Note that these have a trumpet sound while the original note remains the organ. Now release all the notes and play a new passage. All of these notes will have a trumpet sound. Touch the "phantom" pedal (turning the phantom feature off) and any new notes return to the organ sound. Four-way Foot Pedal Foot pedal A (second pedal from the left) is set as a sustain pedal while in the factory songs. Foot pedal B (third pedal from the left) is sostenuto. To use the sostenuto effect you must first play a note(s), then before releasing it hold down the sostenuto pedal. The sostenuto pedal will sustain the notes for you allowing you to play nonsustained passages with only the pre-selected notes being sustained. Foot pedal C (far right pedal) is the soft damper pedal. This allows you to soften a passage on the right hand. The use of these pedals will be described later in this manual. Page - 12 Panel Buttons The buttons on the Concerto panel, or grill, are described below. See attachment A for a picture of Concerto with accompanying reference numbers. (Panel buttons will be italicized throughout these manuals). Important: We have placed settings in your Concerto that should suffice for your immediate needs. We do not recommend you experiment with these settings until you read about them specifically in this manual. #1. Split There are four split settings, which are indicated by the following LED patterns: a. No split (no LED): All active sections play (solo plays only high notes). b. Split one (left LED on): High note is played only by solo section. c. Split two (right LED on): Same as split one, but three notes must be played before orchestra section sounds. This split allows solo legato passages to be played without the interference of the orchestra sections popping in between legato notes. d. Split three (both LED's on): This is first note priority for the solo section. Similar to phantom in that this is not high note priority. Different from phantom in which the solo sound is really struck after the first note; this is first note priority. #2.Bass Range There are two bass ranges to select from: a. b. Bass range one (left LED on): Lowest bass note is C ranging up to B. Bass range two (right LED on): Lowest bass note is F# below C with the highest note being F above C. #3. Chord Range There are three selections: Page - 13 a. b. c. Chord range one (left LED on): Chords are formed in the octave F# to F Chord range two (right LED on): Chords are formed in the octave C to B Chord range three (both LED's on): Chords are formed in the 1.5 octave range of F# to B3 forming open harmony. #4. Arpeggio There are four positions: a. b. c. d. Arpeggio off (no LED's): Chords are fixed. Arpeggio one (left LED on): Chords are automatically inverted upward in harmony with each strike. Striking a bass note starts the chord position at the beginning. Arpeggio two (right LED on): Chords are automatically inverted up once and repeated down once with each strike. Again striking a bass note starts the pattern from the beginning. Arpeggio three (both LED's on): Chords are automatically played in a pattern of invert up, up, up then down, down, down which when combined with a bass note forms a classical six step pattern. Try with 3/4 or 6/8 time signatures. #5. Arr. Reserved for future use. #6. C. Hold LEFT HAND REGISITER FREEZE The C.HOLD button turns on and off this feature. When the C.HOLD button is on the left hand remains frozen to the current Song Register and as new Song Registers are recalled they are applied only to the right hand. While the Concerto is in this mode you can still make changes manually to the left hand and record new registers while the C.HOLD feature is on. Example you may recall Factory Setting #2 (ORGAN) and then select C.HOLD and then Recall Factory Setting #1. You will then have the ORGAN on the left hand and the Piano & Strings on the Right hand (this could then be saved as a new register). Now release the C.HOLD function and press Factory Setting #1 again and you will have Acoustic Bass & Piano again in the left hand and the Song Registers will now apply to both Left and Right sides of the Concerto. Page - 14 #7. T.Start Reserved for future use. #8. Select Used to select screens, sub-menu screens, second functions such as manual drums, and record a register. Each function is discussed in detail under the appropriate sections later in this manual. #9. Track Used to access Manual Drum Sounds with pressed together with SELECT. Other functions reserved for future updates. #10. Intro/End Reserved for future use. #11. Start/Stop Start/stop internal Midi clock #12. Exit Exit performs several functions. First it exits any sub-menu and brings back the main screen. It also writes the screen, which may not be visible when recalled while playing. Exit is also used in conjunction with select to bring up the record menu to record a register. #13. Trans You may transpose the electronics of Concerto (and all attached midi gear) up or down half steps with the up or down arrow buttons. This is easily done in real time during performance. Note you must return the transpose to +O to play the acoustic accordion together with the electronics so that they are both in the same key. #14. Bass Volume for bass section #15. Chord l Volume for chord I. section #16. Chord 2 Volume for chord 2 section Page - 15 #17. Rhythm Sends Program Change numbers 1 to 64 on Channel 10 #18. Solo Volume for solo section #19. Orch. I Volume for orchestra 1 #20. Orch. 2 Volume for orchestra 2 Additional Information about volume keys: Volume Range There are 64 increments of volume ranging from 0 (volume off) to 64 (maximum volume). The volumes settings for all sections being played are indicated in the large display while the top display shows the volume setting momentarily while you are adjusting an individual instrument. The Volume or “value” buttons are an important part of your Concerto. You will later learn that with different menu’s you can change the “value” or many different things such as changing the octave range of the section or selecting a new sound from the alphabetized “Library” of sounds. You may want to spend some time practicing using the volume buttons. They have two speeds. If you touch the button momentarily the numbers will roll by slowly one at a time. If you hold the key down after about 2 seconds the numbers go into high gear and roll by very rapidly. The high-speed feature is to get you to the general range and the slow speed (touching the button and releasing) is for accuracy. Section on/off: When both up/down volumes of a section are depressed then the section is turned off. To turn on a section, simply touch either up or down for the desired section. Example; pressing both bass volume up and down together turns off the bass section, pressing either bass volume up or down turns the bass section back on again. Page - 16 Other Functions Important: Buttons 14 - 20 are also used as value keys for other menus. The only time they perform the descriptions above is during the main screen. Each button controls the information present in the screen. There are four rows of information in the screen and four rows of volume/value keys on each side of the screen. Each button controls the corresponding line of information in the display screen. #21. Tempo Adjusts the tempo of the internal Midi clock #22. Reverb Turns on and off the reverb effect on the entire instrument #23. Chorus Turns on and off the chorus effect for the entire instrument #24. Touch Turns on and off the keyboard touch sensitivity Additional Information about Effects Buttons Note: Other functions The effects sections (buttons 22 - 24) also have sub-menus that are important to their function. To select these sub-menus simply hold select and then touch the effect you wish to select. For example, selecting reverb will bring up a reverb menu that will allow you to select the type and level of reverb for each section. Again exit brings you out of this menu. We will explore these features in further detail later. #25. Bellows Turns on and off the bellow expression. When bellows expression is engaged the expression is controlled by the bellows rather than by the expression pedal. #26. Next From/to (arrows left/right) turns the pages of the screen. There are three types of menus: a. Main menu: Includes volume (normal screen), octave, library, and velocity. Page - 17 b. Effect menu: Includes repeat, reverb, chorus, bellow, pedal 2, foot pedal A, foot pedal B, and foot pedal C. c. Global screens: These are used to set master tune, master reverb, chorus amounts, and constant bass. To select a global screen press select + next (again remember exit gets you out). #22 - #58. Tone Bank These are individual tone buttons grouped in eight families #59. Song There are three song positions a. Factory song (lower arrow): Eight factory-set registers b. User song (upper arrow): Buttons 43 - 50 are used to select user songs 1 - 8, and buttons 51 - 58 used to select user songs 9 - 16. Only buttons 27 - 43 can be used to change sound settings while in this mode. c. Tone select (no arrows): This position allows all the tone bank buttons to be used while in the user song mode. When in this mode the user songs cannot be changed. #60-67. Song registers Resister buttons 1 -8 (8-9) Manual Drums Manual drums; a feature selected from the front panel by touching select (8) and track (9) together. To try this feature we suggest you begin with user register 1 and then recall the manual drums. You will then have a 41 (46 chromatic) note drum kit on the treble keyboard of the accordion that is TOUCH SENSITIVE. To exit touch the exit button to return to the normal playing mode. Page - 18 Additional Information about Small Display (68 and 69) Small Display The small display is your navigation guide – it tells you (68) what song bank you are on – and therefore you will know what bank of 8 registers you are playing (buttons 60 – 67) whether they are FACTORY or USER registers. The display will show F for Factory (which is the normal position when you power up your Concerto). When you select the USER song banks – (done with the SONG [59] button – turning on the top triangular LED indicating USER SONGS). The SONG BANKS are then selected with the row of buttons starting with 24, 33, 37, 41, 45, 49, 53, & 58. This row will select the USER SONGS 1 thru 8 and the small display will display the number of the BANK. The second set of 8 USER Songs selected with the buttons just below the previous row – 25, 34, 38, 42, 46, 50, 54, & 58. This row selects banks 9 thru 16 but is displayed as 1. thru 8. (please pay attention to the dot (.) after the number this is indicating the second set of Bank Numbers. Concerto Small Display 68 F. 69 Bass CH 1 CH2 70 71 72 73 74 75 Solo OR1 OR2 59 22 31 35 39 43 47 51 55 23 32 36 40 44 48 52 56 24 33 37 41 45 49 53 57 25 34 38 42 46 50 54 58 60 61 62 63 64 65 66 67 Page - 19 Chapter 4 Making and Recording Your Own Registers In this chapter you will learn to record your own user registers. The ability to select sounds and record registers assists you in making your Concerto a very unique and personal instrument. The following examples will lead you through the steps necessary to record user registers. Each example results in a different type or style of sound. Example l: Jazz Guitar with Strings Step 1 Begin by selecting a factory song register, which is close to your desired style. A register that has many of the traits you already desire. This means you have far less work in creating the new register if much of the register is similar to what you desire. After you have recorded your own user song registers, you may choose either one of these or a factory song register as the basis of a new register. a. In this example choose factory song register l. b. Touch the orchestra 1 volume button c. Select jazz guitar - now assigned to orchestra I d. Activate chord l and select jazz guitar again Page - 20 You now have a jazz guitar on both the left hand chords and the right hand along with an acoustic bass. Using steps a through d practice making other changes. Important when you select or touch a volume button you must change the volume setting to activate the section. We suggest you practice this so that when you touch a section button you only move the volume up or down by one number (example 55 to 56). Step 2. Now you are ready to record your new register a. Press both the Select and Exit together until you see a J Gtr J Gtr a. Select & Exit TOGETHER b. Press 1 to record new screen appear. Since you were at factory song (which cannot be recorded over) Concerto has taken you to user song bank 1 (if you wish to select another bank then select it now [example - organ 3 button will recall song 2. b. Now select register I to write. That is it you have recorded a new register. Step 3. Recalling your new register. a. Press the song button until the user song arrow is lit b. Press user song bank l button (EP2) c. Press the desired register button 1- 8 (for this example 1 is where we recorded our new register and pressing 1 will now recall it) J Gtr b. J Gtr a. Page - 21 c. Example 2: Jimmy Smith B3 organ with key click Step 1. Selecting an appropriate register and then make selections and alterations (Since we are dealing with an organ register we will begin with factory song register 2). a. Select factory song 2 b. Select organ 2 on orchestra 1 c. Turn off the chorus effect button Step 2. Now record this new setting on user song bank 1 register 2 a. Press select and exit together b. Select song bank 1 (if not selected press EP 1 button) c. Press register 2 button to write You have now completed and recorded two new registers on your Concerto! Example 3: Banjo solo and guitar accompaniment on chord Step 1. Selecting the sounds – For this register we will begin with factory song register 3 (Guitar), which is similar to a banjo. a. Select factory register 3 b. Select banjo on orchestral c. Cancel orchestra2 (up and down volume together = off Step 2. Record to song bank 1 register 3 (remember you have 128 places to store your favorite settings located in 16 user song banks times 8 registers each). a. Press select/exit b. Make sure song 1 is selected c. Press register 3 to write Example 4: Strauss waltz style Step 1. Selecting the sounds Page - 22 a. Select factory register 4 b. Select arpeggio #1 (left LED on next to arpeggio button) c. Raise volume of both chord 1 and chord 2 to about 50 Step 2 Record to song bank 1 register 4 a. Press select/exit b. Select song 1 c. Press register 4 to write Recalling your registers Once you have entered user song bank 1 you simply need press the register button to recall one of the 4 registers we have just recorded. If you have already recalled a register in that bank (example 2 the B3 organ) and wish to recall the banjo setting simply press register 3 (you do not need to press the song bank button as long as you do not wish to go to another song bank). We are confident that with a little experimentation you will soon be creating many of your own personal combinations. Have fun experimenting. If you wish to alter one of your user registers you may record over the original and save the new version. You may also copy registers by recalling them and then recording them to a new location. (This is a necessary step to avoid erasing a previously recorded register). This is especially useful in programming sequences of registers to perform a concert type arrangement. Using the sequence up switch on the side of the volume pedal will move you smoothly to the next register. Page - 23 Chapter 5 Overall Settings & Archival Memory About Archival Memory* *NOTE – DA-100 Series Users See Appendix for Memory Card Instructions It is really simple! You can either bring (RECALL) 64 registers UP to the ACCORDION or you can send (SAVE) 64 registers down to an archival position in the generator box. Let's examine a little further - you have the ability to SAVE or RECALL 64 registers at one time. The 64 registers in the Accordion are labeled either <SONGS 1to 8> or they are <SONGS 9 to 16>. The Archive positions are labeled as numbers <1, 2, 3 and so on> and depending on what was purchased in your accordion you have a minimum of 3 positions up to total possible 14 Archival positions. Should you be interested in purchasing more memory please contact Accordions International. Below is a listing of how many archival positions are available with 1, 2 , 3 or 4 memory units. 1 UNIT (Standard) provides 3 positions 2 UNITS (with 1 optional unit) provides a total of 7 positions 3 UNITS (with 2 optional units) provides a total of 10 positions 4 UNITS (with 3 optional units) provides a total of 14 positions Page - 24 Now - back to the Archival positions - say you have 3 positions only in your Generator box. Then when you enter the ARCHIVAL SCREEN area, in the bottom half of the screen with the <ORCH 1> button you select the Archive positions and they will scroll only from 1 to 3 but should you have a second FLASH memory unit installed you will then have a total of 7 positions should you have 3 units installed you will then have 10 total archival positions and with all 4 units installed you will have the maximum of 14 positions - that is 14 X 64 registers or 896 total archival registrations (and combined with the 128 in the Concerto that is 1024 Registers) - more than even I would ever need. It is best to think about ARCHIVAL MEMORY as you would think about storing your Christmas Decorations – Archive is a place to put away registers that may be specialty items such as 64 registers for Christmas songs. Helpful hint! - It is very important that you keep a written log of your registers - and even making a title for all 64 registers as a group is a good idea - such as "Christmas Registers" then when you keep a written record and you archive them say you store them to Archive 3 and you develop 64 for Country Western and October-Fest and maybe another for weddings and parties. Then you can logically save 64 registers away with labels and for example have the following saved. Archive 1 = Weddings and Parties Archive 2 = Country Western and October-Fest Archive 3 = Christmas SAVING and RECALLING Archival Registers Archiving is simple all you need to do is follow the instructions in the Concerto’s screen – below are the steps to SAVE or RECALL registers into archival memory. GLOBAL EDIT Reverb depth Chorus depth Master Tune 64 64 0 1. Enter the GLOBALS Screens, by pressing the SELECT and NEXT together until you see the global screen appear. Page - 25 2. Step with the NEXT key until you see the ARCHIVE MEMORY screen ARCHIVE MEMORY RECALL SONGS [1 TO 8] FROM ARCHIVE [ 1 ] PUSH SPLIT & T. START 3. Follow the instructions in the screen. 4. Decide if you want to do by pressing the SOLO button < q or p > RECALL SONGS 1 TO 8 RECALL SONGS 9 TO 16 SAVE SONGS 1 TO 8 SAVE SONGS 9 TO 16 Note: You may want to SAVE the song registers in your accordion first before you RECALL song registers from the archive memory. Recalling means that you will erase and replace 64 registers in your accordion with 64 registers from the archive memory. 5. Then use the ORCH1 and press < q or p >to choose the desired archive 1, 2 or 3. Change to the archive you want to either RECALL or SAVE. 6. Double check and read the screen THREE TIMES –and make sure the statement is really what you want to do – remembering SAVE will save your registers to the selected archive location in your generator box – and RECALL means that you will replace the selected 64 registers in your accordion with the selected archive position. Once you are sure you have read it three times and are sure that you want to proceed then go on to the final step. Otherwise you may always press EXIT and abort the procedure. 7. Now that you are ready to either SAVE or RECALL the desired 64 registers – you simply press the SPLIT and T.START buttons together on your grill. Page - 26 Master Settings The following global settings are important depending on which sound engine you have in your Concerto Generator box. The settings below may need to be restored manually if your Concerto has experienced a static shock and has lost temporarily these settings. First-generation Concerto DA-100 accordions Global Reverb 64 Global Chorus 64 Master Tune 0 Second Generation Concerto DA-100 accordions Global Reverb 110 Global Chorus 40 Master Tune 0 Concerto DA-250 accordions Global Reverb 64 Global Chorus 40 Master Tune 0 To enter the global screens simply press the SELECT and NEXT keys together. Simply use the plus minus buttons on the right of the screen (SOLO, ORCH 1 and ORCH 2 buttons) to enter the desired values. GLOBAL EDIT Reverb depth Chorus depth Master Tune 64 64 0 Global Reverb is a master reverb value that adds more or less reverb to all registers. As does Global Chorus – Master Tune adjusts the pitch of the Concerto electronics in 1000th steps of semi tone. That is 0 = concert pitch and each number every 100 steps is 10 cents above or below concert pitch. The total range of tuning is from -1000 to +1000. We recommend you leave tuning at 0 which is in tune with the Concerto reeds. Page - 27 Some Final Notes Now that you have learned the basics of your Concerto it is time to explore and experiment with all the possibilities available to you. Keep this manual as a handy reference. Most importantly, have fun exploring, experimenting, and wowing your family, friends, and community with your new incomparable Concerto. We wish you lots of fun and happy years of enjoyment. To clean your accordion we recommend Uncle Paul’s Accordion Formula #1 and a clean micro fiber cloth. Spray the cloth and then wipe and restore the lustrous shine of your Concerto. Avoid spraying any cleaner or polish directly on the area’s that are engraved on your Concerto as liquids may dissolve and wash away the decorative filling. Thank you for owning a Concerto – you own a very special musical instrument that has been not only engineered with love and care – but has had much thought and design in creating the hand built Concerto you own. This has been a personal dream for me to offer to the world the Concerto accordion and I am proud that you have chosen to own the World’s BEST Accordion! All the best to you and if you have any questions please feel free to call me – it will be my pleasure to personally assist you. And again thank you for caring enough to own a Concerto! Sincerely, Paul Pasquali Accordions International (Home of the Concerto) Page - 28 APENDIX A History of Concerto Software Upgrades. Note: from time to time we have added and will continue to add features to the Concerto – below is a list of past releases and the features that have been added – note all these features are in your new Concerto DA-250. Please feel free to contact us about new updates from time to time. Version 1.07 New Release Version 1.07 provides several fixes as well as allows the Concerto to be compatible between sound engines including the new DREAM sound engine. Also version 1.07 allows the pedal feature of both sequences UP and DOWN of Song Registers. You will find that now the Right butterfly switch on the Expression Pedal advances the Song Registers while the left butterfly switch decrements the Song Register to the previous Register. If you require STOP/START to be on the floor with version 1.07 then an optional footswitch is available. Please contact your dealer or Accordions International. Version 1.10c Release Version 1.10c incorporates all previous upgrades including version 1.07 and provides two new features to the Concerto. The first is UP and DOWN volume of the Section Buttons (Bass, Solo, ORCH 1, etc.) has been changed. Now when the volume reaches the lowest or highest level it stops at either 0 or 63 and does not wrap around and cycle again. Also, the GS Bank Select is now implemented on the Footswitch programs. Page - 29 The most significant feature of is the Left Hand HOLD function. The C.HOLD button turns on and off this feature. When the C.HOLD button is on the left hand remains frozen to the current Song Register and as new Song Registers are recalled they are applied only to the right hand. While the Concerto is in this mode you can still make changes manually to the left hand and record new registers while the C.HOLD feature is on. Example you may recall Factory Setting #2 (ORGAN) and then select C.HOLD and then Recall Factory Setting #1. You will then have the ORGAN on the left hand and the Piano & Strings on the Right hand (this could then be saved as a new register). Now release the C.HOLD function and press Factory Setting #1 again and you will have Acoustic Bass & Piano again in the left hand and the Song Registers will now apply to both Left and Right sides of the Concerto. Accordions International 1760 South 450 West Salt Lake City, UT 84115 www.AccordionInfo.com Phone 801-485-5840 Version 1.10D Release Version 1.10D incorporates the GS PAN effect. This allows the sound for each of the musical sections of the Concerto to be PANNED in the STEREO field from LEFT (0) to RIGHT (63) with Center being (32). To access and adjust the PAN feature in the default mode simply press the NEXT key until you see PAN in the upper left corner of the display. The PAN setting is then displayed for each section. Simply change the number from 0 to 64 to adjust the PAN for each section desired. The PAN values are specific for each REGISTER – this means you can save the settings in a USER REGISTER and each USER REGISTER can have its very own PAN settings. NOTE – YOU MUST HAVE A STEREO SOUND SYSTEM TO HEAR THE STEREO PAN EFFECT! Version 1.11b Gateway to DA-250 Release Version 1.11B incorporates all the previous versions and is the first release for the Concerto DA-250. The major change here is the new generator box and this software is the gateway interface to the new DA-250 Generator box including the FLASH ARCHIVAL MEMORY replacing the memory cards of the DA-250 generator. The advantages are added power, quieter design, better sound, greater memory capacity and the fact that the memory is not dependent on battery power. Archival memory is more secure and stable with this new technology. You may save SONG Banks 1 to 8 OR 9 to 16 from the accordion to the ARCHIVE as well as recall archive memory back to SONG Banks 1 to 8 or 9 to 16 in the accordion Enter the GLOBAL Screens – Press SELECT and NEXT together until you see the global screen appear Page - 30 Step with the NEXT key until you see the archive memory screen and follow the instructions in the screen. The generator box is shipped with 3 archive positions and is expandable to 14 positions. To SAVE 64 Registers created in your Concerto Step 1 – Enter Archive Menu – See instructions above with SELECT & NEXT Step 2 – Select with SOLO button – UP or DOWN Select the 64 Registers you want to save either [SAVE SONGS 1-8] or [SAVE SONGS 9-16] Step 3 - Select the archive location to save your 64 registers use the ORCH 1 button, either 1, 2 or 3 (optional memory locations to 14). Step 4 – When you have completed making your selection of 64 registers to SAVE and also selected the archive location PRESS [SPIT] and [T START] and wait for your Concerto to could up to 64 as is transfers the data. Step 5 – When the data transfer reaches 64 the Archive Screen returns – you may either save or recall more groups of 64 registers or press [EXIT] to exit the archive menu. TO RECALL 64 Registers saved in your Concerto Sound Module Step 1 – Enter Archive Menu – See instructions above with SELECT & NEXT Step 2 – Select with SOLO button – UP or DOWN Select the 64 Registers you want to RECALL (bring up to your Concerto)by selecting either [RECALL SONGS 1-8] or [RECALL SONGS 9-16] Step 3 – Now select the archive location where you want to recall your 64 registers from by using the ORCH 1 button, either 1, 2 or 3 (optional memory locations to 14). Step 4 – When you have completed making your selection of the archival location to recall 64 registers to RECALL and also selected the archive location PRESS [SPIT] and [T START] and wait for your Concerto to could up to 64 as is transfers the data. Step 5 – When the data transfer reaches 64 the Archive Screen returns – you may either save or recall more groups of 64 registers or press [EXIT] to exit the archive menu. Accordions International 1760 South 450 West Salt Lake City, UT 84115 www.AccordionInfo.com Phone 801-485-5840 Page - 31 Model DA-255 Release X2 – Additional NEW Sound Samples Added OR – Theater Organ Library of Sounds Added NEW Factory Registers Featuring New Sounds Added Version 1.30p – Adds the X2 and OR libraries to the Concerto. See Appendix B DA-255 Complete Sound List for a complete listing of sounds now included in the Concerto alphabetical libraries. Various items are updated for superior performance in this release and it is full backwards compatible with any registers previously saved in your Concerto 200 series accordion. With the exception of the Mandolin sound which now incorporates a repeating sample. Any register previously saved with the mandolin sound may need to have the auto repeat feature turned off and the register resaved without the auto repeat. The 1.30p DA-255 release now features several double sounds (two sounds layered together) as well as several dynamic sounds (soft touch on keyboard plays first sound while a harder touch on the keyboard plays a second sound in the same patch). Accordions International 1760 South 450 West Salt Lake City, UT 84115 www.AccordionInfo.com Phone 801-485-5840 Page - 32 APPENDIX B Concerto DA-250 Sound List & Drum Charts On page 34 starts the library list of sounds contained in your Concerto DA-255 accordion. Please note that the chart contains under the word Display the exact name as it appears in your Concerto display screen. The list is also it the same alphabetical order as they appear in the display for each section of the library. The first column is the LIBRARY column tell the name of the library these are: AC = Accordion samples EX = Extra Sounds to the GS Library GS = General Synth sound list – the major listing of sounds X2 = NEW DA-255 Library including some double sounds and dynamic sounds! OR = NEW DA-255 Library of theater organ sounds The second and third columns are the Patch Change and Bank Number sent by you Concerto for the sound listed on that row. IMPORTANT Please note that the Patch Change numbers listed in the PC column are midi PC numbers from 0-127. When you want to program your pedals you may simply use the PC and Bank numbers as they appear in the chart! Making it much easier to enter the sound information to the footswitches of your Concerto! Full Name – this is a full description for the sound in that row. Please note that some of the new sounds are dual sounds and some are dynamic sounds. Dual sounds are layered sounds like Guitar and Strings or Jazz Guitar and Vibes. Notes – This is place for you to make notes about each of the sounds in your Concerto – you might want to add a notes about particular sounds as you hear them and experiment with them to help you make new and better registers. Page - 33 !"# !"# $%# $# "# $%# !"# :# $%# !"# %;# $%# !"# ;# $%# !"# ># $%# !"# $># $%# !"# $6# $%# !"# $$# $%# !"# %# $%# !"# @# $%# !"# %@# $%# !"# 5# $%# !"# %%# $%# !"# $:# $%# !"# $8# $%# !"# $B# $%# !"# $;# $%# !"# %B# $%# !"# $%# $%# !"# $@# $%# !"# 58# $%# !"# 5@# $%# !"# 8# $%# !"# 5B# $%# !"# 55# $%# !"# 5%# $%# !"# 5$# $%# !"# 5;# $%# !"# 5># $%# !"# 56# $%# !"# %6# $%# !"# 5:# $%# !"# %:# $%# !"# %8# $%# !"# B# $%# !"# $5# $%# !"# %># $%# !"# %$# $%# !"# 6# $%# !"# %5# $%# KL# BB# 8# KL# $%# 8# KL# $$# 8# KL# $;# 56# KL# 5%$# $# KL# 65# 56# KL# $;# 8# !"#$%&'( )**+,-( )**+,.( )/0,1,( 2&343-( 2&343.( 2&##5-( 2&##5.( 2&##!"( 2&##3!( 2&##+3( 2,"678( 9&##+8( 90%0#8( 97+,4-( 97+,4.( 97+,4:( 97,4!"( 9%&,"3( !"&8+3( ;%<80(( ;,03*7( =&,/+3( =+,3((( >8&%"&( ?,-( ?,.( ?,:( ?,@( ?,A( ?,B( ?<#CD*( ?<#088( EF+0-(( EF+0.(( E,6&3(( D"**+%( 1&36+)( 1,0/+%( 1<F&;#( G"+%"3( )8/#5.( 2&#)*:( 2"6( 2&##5H( 2",45.( 2,#2"6( 2#-BCH( &'((#)*+,# &'()*+#,-..'/#!00'123'/#456756789# !00'123'/#45678789# !<+130-/#=1+<'*'#48789# ,-/2'/5# ,-/2'/%# !00'123'/#,-..#5# !00'123'/,-..%# &3-?'/30#,-..# &'()*+#,-..'/#%#456756789# ,-..''/# ,13**3-/?# "-..'??'# "+*+.?+# !00'123'/#"A'12#5# !00'123'/#"A'12#%# !00'123'/#,-..#$# &3-?'/30#"A'12# "*-13/+?# &3-?'/30# C*(?+# C1+/0A# D-1<'/3(<#456787;9# D'1/# E?-*3-/#!00'123'/# F-.?+1#5# F-.?+1#%# F-.?+1#$# F-.?+1#;# F-.?+1#># F-.?+1#6# F(.+??+7G300'*'#48787;9# F(.+??+#4878789# H)'+5#487;9# H)'+#%#487;9# H1I-/#4567;9# G300'*'## =-/I'#!00'123'/# =1+<'*'#4E?-*3-/#=1+<'*'#J3'*3/9# =()-#C3.-#4!(.?13-/#=1+<'*'9# J3'*3/#4!<+130-/#=1+<'*'9# !?<'.MA+1+#%# !0'(.?30#,-..#$# ,3I#,-..# ,-..#8# ,312.#%# ,3I#,1-..#5# ,-..#5678# Page - 34 )-.,/# # # # # # # # # # # # # # # # # # # # # # # # # # # # # # # # # # # # # # # # # # # # # # # # !"# !"# $%# $$# "# %&# !"# 01# 0# !"# $5# %&# !"# =5# 0# !"# =5# %&# !"# %A# B# !"# 1%# %&# !"# %D5# 5# !"# A# 5A# !"# A# %&# !"# 00# %&# !"# 1$# 0# !"# &D# 0# !"# &D# %&# !"# %D%# 0# !"# &0# %&# !"# 00# 0# !"# %&# %&# !"# %1# %&# !"# %&# %A# !"# %&# %=# !"# %1# %A# !"# %1# %=# !"# %0# %A# !"# %0# %=# !"# %B# %A# !"# %B# %=# !"# %0# %&# !"# %B# %&# !"# D# 0# !"# D# %&# !"# %0# 0# !"# &=# 0# !"# &=# %&# !"# &&# 0# !"# &&# %&# !"# AB# 0# !"# %%0# B# !"# =1# 0# !"# =1# %&# !"# =&# %&# !"# =B# %&# !"# %A# %&# !"# AD# 0# !"# 0=# !"# %5&# &'((#)*+,# )-.,/# 0# !"#$%&'( )#)"*+( )#,-.(( )#/"-0( 123"4)( 123"4+( 12452)( 1%&46.( 75289(( 78:;#(( 78+3<=( >&9=6.( >%?=@A( >49B4.( >49B4C( D23#=(( EF30.(( E452)%( E4*6:;( E4*&9G( E4*,HI( E4*,H.( E4*,HC( E4*,HG( E4*,HJ( E4*,H:( E4*,HK( E4*,HL( E4*E!4( E48"$0( 8"&93J( 8"&93+( /5ME4*( +&NO=I( +&NO=.( +&NP"=( +&NQ9.( +=4*E5( +'9!4C( Q4RF.(( Q4RFC(( Q4R$=.( Q4$S=-( Q?F)0%( T"3%9.( T3"50+( '()#'*++#,-+.*(/# '*++#23*4#5# '*++#6#7(43#89:;*<# '()#8>?(@# 8>?(@6,.@(/)+#%# 8>-@C>#'3<<#5# 8<*@(/3.#,3C.(?/# !C>?#E*/# F(G#!HE(*/?# ,?I.#!HE(*/?# J*/.*+9#5# 73C?@43@# J@3/C>#K?@/#5# K?@/#,3C.(?/# L>?+.# !/)<(+>#K?@/# M@C>3+.@*#'3<<# &D#M@)*/# N3.-/3#M@)*/#5# O>3*.@3#M@)*/#%# O>3*.@3#M@)*/#5# O(;(*#%&#P#A## O(;(*#%&#P#A#O@3:?<?# 8>*Q3<#M@)*/## O(;(*#0#P#A#O@3:?<?# 2?R3@#M@)*/## S?G#0#O@3:?<?## M@)*/#N@*R;*@# 8>-@C>#M@)*/#$# L@*/4#E(*/?#5# L@*/4#E(*/?6,.@(/)+# 7?CT#M@)*/# U<.?#,*G#5# 8(@C-+#,*G# V()>.#,*G# O3/?@#,*G#S(;@*.?# MC.*#,.@(/)+#%# ,9/#4@-:#$# F3<<?R#O@?:;?/3# O@?:;?/3#$# O@-:Q3.$# F-.34#O@-:Q3.#5# O-;-<*@#'3<<+# S(?<(/#5# S?(C3#,-+.H# # # # # # # # # # # # # # # # # # # # # # # # # # # # # # # # # # # # # # # # # # # # # # &# U0&2((( W3*># # Page - 35 !"# !"# $%# $%# "# &# !"# --$# $# !"# 4-# &# !"# 4-# $# !"# --8# &# !"# -4%# &# !"# >># &# !"# -&># &# !"# 48# &# !"# -&C# &# !"# 84# &# !"# 88# &# !"# 8C# &# !"# E&# &# !"# 8G# &# !"# -G# $# !"# -G# &# !"# -48# &# !"# E%# &# !"# >4# &# !"# %-# &# !"# %-# $# !"# -4-# &# !"# -&&# &# !"# %4# &# !"# %8# &# !"# %4# $# !"# %8# $# !"# $E# &# !"# -44# C# !"# -4C# ># !"# -4C# 8# !"# -4C# 4# !"# --C# $# !"# $# &# !"# G4# &# !"# $G# &# !"# $8# &# !"# -4G# C# !"# C4# &# !"# C8# &# !"# E-# &# !"# E# &# !"# --%# $# !"# G8# &# !"# -4C# G# !"# -4G# 4# !"#$%&'( )*+,&-( ./.012( 344567( 34458*( 39191(( 3$%&:#( 3*21#$( ;&9<"$( ;&=>1=( ;&=?1(( ;&##34( ;&##6=( ;&##67( ;&##1=( ;&##<4( ;@%%A+( ;@%%0B( ;"7>((( ;1**%@( ;1-5C%( ;7&##D( ;7&##E( ;7@&*+( ;7"9+*( ;7#,'D( ;7#,'E( ;7#,'F( ;7#,'G( ;#(H(I( ;:BB%@( ;:7#*(( A&7<&#( A&7,*$( A&#*=*( A@%@#*( A@%%1(( A+&7=9( A+J7I>( A+"2@(( A+1"73( A+1"7K( A%&7=*( A%&L4>( A1=M;!( A1=*7&( A7&#+(( A7@&N(( &'((#)*+,# )-.,/# '()*+,# "./#0123#4# 52,6**6# 57,*61# 9:;:;# 9<<=72,6# 9*3;,<+616#-# ?7:<(<6# @7/:;#9AA;1B(;/# ?7/D;# 9A;2,*(A#?7,,#-# '(/:61#?7,,#-# '16*=66,#?7,,#-# F=71(/6*# H(AI#?7,,# F+21A+#?6==# F+(36,# ?(1B,# ?=;J#?;**=6# ?;J6B# ?17,,# ";)*#?17,,#8# ?167*+#K;(,6# ?1(:+*/6,,# "./*+#?17,,#-# "./*+#?17,,#4# "./*+#?17,,#8# "./*+#?17,,#G# ?7,,#L67B#-# ?2MM=6# ?21,*#K;(,6# F71#H7,,# F71#?167I# F7,*7/6*# F6=6,*7# F6==;# F+717/:# F+())# N(/B#F+(36# F+;(1#97+# "A7*#O;(A6# F=71(/6*#O(M17*;# F=7P(/6*# F;/A61*#?7,,#0123# F;/*17M7,,# F71#F17,+# 0;;1#Q<6/# # # # # # # # # # # # # # # # # # # # # # # # # # # # # # # # # # # # # # # # # # # # # # # # Page - 36 !"# !"# $%# $%# "# &# !"# ./0# .# !"# ./4# 0# !"# .&/# &# !"# 9$# &# !"# ./<# .# !"# 4# &# !"# <# &# !"# 4# %# !"# <# %# !"# ./A# 0# !"# %%# &# !"# ..&# &# !"# A0# &# !"# ./9# <# !"# 9&# &# !"# ./0# /# !"# $# &# !"# .&.# &# !"# /<# &# !"# /A# %# !"# ./&# .# !"# 0&# &# !"# 0.# %# !"# 0&# %# !"# /%# %# !"# ./&# &# !"# /4# &# !"# 0.# &# !"# /9# &# !"# /%# &# !"# /$# &# !"# /A# &# !"# ./A# &# !"# $4# &# !"# 9# %# !"# //# &# !"# 49# &# !"# 9# &# !"# /9# %# !"# ./9# 4# !"# ./<# &# !"# 0# &# !"# $9# &# !"# ./<# A# !"# .&%# &# !"# ./.# .# !"#$%&'( )*'#+%( !,-(((( !,,*((( ./0,(!( .1-2*1( .1-"13( .456((( .457((( .458+6( .458+7( .9$%#1( :&1+&#( :"88%3( :%;+3(( :,,+<+( :*2,*1( =&%%,$( =%,>31( =,?%"1( =+567<( =+5)0*( =+5);+( =+5!"#( =+5:@(( =+5:8?( =+5:1>( =+5:*+( =+5A'%( =+2*B1( =+C&DD( =+E;+8( =+FG8*( =;"+&*( =;1<0+( 2&%,48( 2&*)$%( 2&*B,1( 2&*$((( 2&*$#/( 2&H&""( 23&*+@( 23%"/$( 2,1>'I( J/3(K1( C3+(((( L&%"B?( L3')%>( &'((#)*+,# )-.,/# '()*+,-# 123# 122(#'-2*5# 67825*# :,**22;# ',(#"+,(+# 6=#>?,;2#.# 6=>?,;2#/# 6=>?,;2#0# 15+@;5#6=>?,;2/# 6BC-2*?2;# D,;+,*)#.# D?EE-5# F,GG#D-@+5# D22+#"+5C# D(5;78#H2(;#.# H2(*5# !-27I5;*C?5-# !2J-?;*# "+55-#!@?+,(# '-5,;#!@?+,(#/# !@?+,(#'@+#K2?*5# 1?*+2(+?2;#!@?+,(# !@?+,(#D55E#:,7I# D55E#:,7I#!@?+,(# D@;I#!@?+,(#.# !@?+,(#D(5+#K2?*5# K)-2;#!@?+,(# !@?+,(#H,(L2;?7*# F,GG#!@?+,(# M@+5E#!@?+,(# NO5(E(?O5#!@?+,(# '-5,;#!@?+,(#.# !@;#"82+# H,-2# H,(C*?782(E#/# H,(L2;?7,# H,(C# H,(C*?782(E#.# H,P,??,;#!@?+,(#.# H5,(+#:5,+# H5-?72C+5(# H2;I)#Q2;I# R,?;# F5+# S,-?LJ,# S5)#'-?7I# # # # # # # # # # # # # # # # # # # # # # # # # # # # # # # # # # # # # # # # # # # # # # # # Page - 37 !"# !"# $%# $%&# "# %# !"# $*&# *# !"# $*2# $# !"# $*&# $# !"# *8# $2# !"# $*# %# !"# $$&# %# !"# $$&# ># !"# ?@# %# !"# $%# %# !"# 2># %# !"# &?# %# !"# 88# %# !"# E># ># !"# *%# %# !"# $2# %# !"# $&# %# !"# $># %# !"# $?# %# !"# $?# ># !"# $2# ># !"# $&# ># !"# &8# %# !"# %# %# !"# $# %# !"# *# %# !"# &*# %# !"# ?%# %# !"# $*2# @# !"# $**# $# !"# $$?# %# !"# $8# %# !"# >$# %# !"# 28# %# !"# 2&# %# !"# 2E# %# !"# 22# %# !"# $*2# *# !"# $*E# E# !"# $**# %# !"# &&# %# !"# $%2# %# !"# $$$# %# !"# >%# ># !"# $*8# 8# !"# $%E# %# !"# @2# %# !"#$%&'( )*+*((( ,&#-./( ,&012(( 3&425/( 3&56*%( 3&."78( 3-%*9:( 3-%*9;( 3-+%<6( 30#=*>( ?8*-((( ?4&."5( ?.4@"+( ?.42#+( ?.1AB6( ?.1&5:( ?.1&5;( ?.1&5C( ?.1D2:( ?.1D2;( ?.1!+:( ?.1!+;( <&5E%+( <"&5*:( <"&5*;( <"&5*C( <"4*%*( <*%'F'( <0542(( B&"5((( B-GD'7( F&5+0.( F&HI&G( F&>J%+( F&>=&.( F&>F*$( F&>9-5( F4.-&7( F4.+42( F-.( F2&K0L( F2&7#5( F2&5&"( F"5I&G( F".-5(( F"+&.(( F%&$=:( &'((#)*+,# )-.,/# '()(#$# +,-./#!01# +,034513# 6,7451.# 6,19(:51# 6,/5;<,# 6.:(957#=(;#$# 6.:(957#=(;#*# 6.),::57# 60-57#A(B# C<(.# C7,/51,# C/74.-)/,#D5)# C/74.-)/,# F..9#C/3,1# G/,H<,/#C/3,1# I,JJ#C/3,1#@# F(7K#C/3,1#@# L40/74#C/3,1#$# L40/74#C/3,1#*# G.)01.#C/3,1#$# I,JJ#C/3,1#E# M,1#N:0).# !/,19#M5,1(# A/534)#M5,1(# O:P!/,19#M5,1(# N:0).# M(:5-Q1)4# M0174# F,51# F.R./-.#LQ;<,:# G0:75;./# ",H#=(()4# S:)(#",B#$# A,/5)(1.#",B# "(T/,1(#",B# =.1(/#",B# "7/.,;513# "7/,)74# ".,#"4(/.# "4,K04,745# "4,;5-.1# "4,1,5# "Q1#U,R.# M(:57.# "5),/# ":,T#A,--#$# # # # # # # # # # # # # # # # # # # # # # # # # # # # # # # # # # # # # # # # # # # # # # # # Page - 38 !"# !"# $%# $%# "# &# !"# ,%# &# !"# 56# &# !"# ,:# &# !"# 5&# &# !"# :>6# 5# !"# :&$# &# !"# ::A# &# !"# :>># A# !"# A5# &# !"# A6# &# !"# A,# &# !"# :>&# ># !"# 6&# &# !"# 6:# &# !"# 6&# 5# !"# AA# &# !"# ,6# &# !"# 5># &# !"# $5# &# !"# $,# &# !"# $5# 5# !"# $,# 5# !"# ::5# &# !"# 6A# &# !"# ::L# &# !"# :&%# 5# !"# :>A# &# !"# :>A# :# !"# :>># ># !"# A%# &# !"# ::># &# !"# :>6# L# !"# 6%# &# !"# 6,# &# !"# 6L# &# !"# 65# &# !"# >A# 5# !"# ::# &# !"# A:# &# !"# A&# &# !"# 5,# &# !"# %5# &# !"# :>># $# !"# ::6# &# !"# :$# &# RS# :,# $:# !"#$%&'( )%&$*+( ),-./0( )1%120( )$&34(( )5/6&7( )8&/)9( )8&/.9( )844%!( )8/4&:( )8/,;#( )8/<"=( )8/)%1( )8/)%$( )8/)'>( )8/)'+( )8/)'?( )8/./:( )@4$<-( )'A&%"( )',B*>( )',B*+( )',B*?( )',B*C( )',!/:( )',210( .&"D1(( .&"#91( .4%4B>( .4%4B+( .9E,-/( .":$&,( .",D%*( ./&",(( ./1:F,( ./$G8-( ./E:$8( .EF&((( HDE%4%( 2"F4#(( 2"1%&(( 2"1%",( 6&/:<-( 69"#8%( 6",-((( 611-*%( I'%1$9( J",K%3( &'((#)*+,# )-.,/# "'()#*(++#$# "-./012(34# 7-839###### ;<-82# "=.(29#:# "1(2#"<8)# "38?@8# "199'#B2.C# "129(C# "128/D+#E/+9CF'9#:# G8HH83(1-# "128/D+#E/+9CF'9#># "128/D#"'()# "I/1<#"128/D+#:# "I/1<#"128/D+#># "I/1<#"128/D+#$# J29C-'-#"128/D+# "K99)# ;(''8-)9# "I/1<#*(++#:# "I/1<#*(++#># "I/1<#*(++#$# "I/1<#*(++#A# "I/#B2.C#:# "I/1<#7-839# J(84-#B2.C# M-1-#># J9'9)<-/9#:# J9'9)<-/9#># J<./092# J8C)(/8# J8/4F9''# J2(8/# J2-CF-/9#:# N.190#J2.C)91# J2.C)91## J.F(# OI'-/#!.81(2#># 78F9+# 78-'(# 78-'8/#:# P(2C#G(0# P<8+1'9# P8/0# P--0#*'-34# QI'-)<-/9# J8F8(#5#J29C#T#M8/.2(#5#T#!'-34# # # # # # # # # # # # # # # # # # # # # # # # # # # # # # # # # # # # # # # # # # # # # # # # Page - 39 !"# HP! $%# %6! "# $5! HP! %:! $5! HP! ;@! $5! HP! ;5! $5! HP! %5! $5! HP! %%! $5! HP! $8! $5! HP! $B! $5! HP! $6! $5! HP! $:! $5! HP! %@! $5! HP! %$! $5! HP! %;! $5! HP! $$! $5! HP! $;! $5! HP! $>! $5! HP! 5;! $5! HP! 5>! $5! HP! 5:! $5! HP! @! $5! HP! 5! $5! HP! %! $5! HP! $! $5! HP! ;! $5! HP! >! $5! HP! 6! $5! HP! :! $5! HP! 8! $5! HP! B! $5! HP! 5@! $5! HP! 55! $5! HP! 5%! $5! HP! 5$! $5! HP! 56! $5! HP! 58! $5! HP! %>! $5! HP! %8! $5! HP! %B! $5! HP! $@! $5! HP! $5! $5! HP! 58! 5:! HP! ;%! $5! HP! ;$! $5! L%! 5%6! :! L%! 5%6! 8! L%! 5%6! B! L%! 5%6! 5@! !"#$%&'( \"3<,.( \"3<,:( \"3<,@( \"3<,A( E,D=,-( E,D=,.( E,D=,:( E,D7,@( E,1/$.( E,1/$:( E,1/$8( E,G+U-( E,G+U.( D=,1/$( D71/$.( D71/$:( 17,E,6( 17E,6.( 17E,Q%( 17E,63( 1E,63:( 1E,63@( 1E,63A( 1E,63B( 1E,63S( 1E,63H( 1E,63a( 1E,6-M( 1E,6--( 1E,6-.( 1E,6-:( 1E,6-@( 1E,6-A( 1E,6-B( 1E,6-S( 1E,6-H( 1E,6-a( 1E,6.M( 1E,6.-( 1E,6..( 1E,6.:( G+U=</( G+U1,/( -5E30(( .51R+(( :17,00( @5;+<,( &'((#)*+,# )-.,/# =3)3-!8!=1+<!7!`3/(1-!8! =3)3-!8!V!%!%c$!=1+<!7!`3/(1-!8! `3/(1-!8! `3/(1-!8!7!=1+<! =3)3-!8!=1+<!!7!G'.?!D'1/!8! =3)3-!8!V!;!=1+<!7!G'.D'1!8!! H1I-/!G'.?!D'1/! H1I-/!G'.?!D'1/!7!=1+<! H1I-/!=1(<M+?!8! H1I-/!=1(<M+?!8!Wc=1+<! =3)3-!8!=1+<!7!=1(<M+?!8!=1+<! =3)3-!8!=1+<!7!J'R!8!=1+<! =3)3-!8!V!;!=1+<!7!J'R!=1+<! G'.?!D'1/!7!=1(<M+?! G'.?!D'1/!7!=1(<M+?!7!`3/(1-!! G'.?!D'1/!7!=1(<M+?!7!`3/(1-!=1+<! =A+-?1+!H1I-/!5! =A+-?1+!H1I-/!%! =A+-?+1!H1I-/!=3)3-!8!=1+<!7!U*'0X! =A+-?A+1!H1I-/!=3)3-!56!V!;!=1+<! =3)3-!56!V!8!=1+<! =3)3-!56!V!;!V!%!=1+<! =3)3-!56!V!8!V!;!=1+<! =3)3-!56!V!8!V!;!V!%!=1+<! =3)3-!56!V!%!%c$!=1+<! =3)3-!56!V!8!V!%!%c$!=1+<! =3)3-!56!V!;!V!%!%c$!=1+<! =3)3-!56!V!8!V!;!V!%!%c$!=1+<! =3)3-!56!V!8!V!$!5c>!=1+<! =3)3-!8!V!5!$c>!=1+<! =3)3-!8!V!%!%c$!V!5!$c>!=1+<! =3)3-!56!V!6!%c>!V!8!V!;!V!%!=1+<! =3)3-!56!V!6!%c>!V!8!V!;!V!%!%c$!=1+<! =3)3-!56!V!8!V!;!=1+<!7!GD8!=1+<! =3)3-!8!V!;!V!%!Wc!=1+<'*'! =3)3-!8!=1+<! =3)3-!8!V!;!=1+<! =3)3-!8!V!%!=1+<! =3)3-!8!V!;!V!%!=1+<! =3)3-!8!V!;!V!%!%c$!=1+<! =3)3-!8!=1+<'*'! J'R!D(<-/-!8! J'R!8!=1+<! H/+! =W'! =A1++!! C'(1! ! ! ! ! ! ! ! ! ! ! ! ! ! ! ! ! ! ! ! ! ! ! ! ! ! ! ! ! ! ! ! ! ! ! ! ! ! ! ! ! ! ! ! ! ! ! ! Page - 40 ! !"# L%! $%# $%! "# 5! L%! 65! $! L%! 65! ;! L%! 65! B! L%! 65! %;! L%! 65! %>! L%! 65! %6! L%! $$! 5! L%! $$! %! L%! $$! $! L%! $>! 8! L%! >%! %>! L%! >%! 5:! L%! >%! ;! L%! :5! 8! L%! :5! %;! L%! :5! ;! L%! :! 8! L%! ;! :! L%! >! 56! L%! >! %;! L%! 6@! 5:! L%! %>! 8! L%! %:! %;! L%! %;! 56! L%! %6! %;! L%! $@! 56! L%! %:! 56! L%! %8! 56! L%! %6! 5! L%! %6! ;! L%! %6! >! L%! %6! 6! L%! %%! 8! L%! %6! 56! L%! 6! 56! L%! 58! %@! L%! %>! 56! L%! 5%! 8! L%! ;8! %>! L%! ;8! 56! L%! ;8! %8! L%! ;8! %:! L%! ;8! %6! L%! 56! 58! L%! 5B! %;! L%! $$! %;! !"#$%&'( 2&#)*.(( 2,&##:(( 2,&##@(( 2,&##A(( 2,#26.(( 2,#26:(( 2,#26@(( 2##;3.(( 2##;3:(( 2##;3@(( 2##;,.(( 97+E,6(( 97,I8.(( 97,G+U(( 9%,3?%(( 9%,3I*(( 9%,3GF(( 9%Z;3T(( LD548:(( LD5I8-(( LD5G+U(( ;%<6=,(( Q85-.I(( Q85BM#(( Q85I8,(( Q8938,(( Q8!"#.(( Q8L%0*(( Q8;3T.(( Q8O&P.(( Q8O&P:(( Q8O&P@(( Q8OPGF(( =&,2%<(( =&R&".(( =,$I8,(( \"3<,&(( ?&34+.(( ?&,"/.(( E,*;%8(( E,*7!'(( E,*=,.(( E,*=,3(( E,*EF+(( E,9++%(( E,!97,(( E,62#-(( &'((#)*+,# )-.,/# "0'(.?30!,-..!%! N'T?!,1-..!5! N'T?!,1-..!%! N'T?!,1-..!;! ,3I!,1-..!%! ,3I!,1-..!$! ,3I!,1-..!;! C3/I+1!,-..!%! C3/I+1!cc!N*-M!,-..! C3/I+1!,-..!$! C1+?*+..!,-..!%! #A'31!7!G13/03M-*!8! #A'317N?13/I.!%! #A'31!"-A!7!J'30+! #310(.!#*-13/+?! G300'*'! F+**'W!#*-13/+?! C(/XQ!#*-]3/+?! &+?(/+!KSG3-/'5! KSG3-/'!%!7!N?13/I.! KSG3-/'!%!7!J'30+! C*(I+*!D'1/! 5%!N?13/I.! 6@!.!U(3?-1! YQ*'/!U(3?-17N?13/I.! #'(/?1Q!U(3?-1! &3.?'1?+2!U(3?-1!J3)1S! K*+0?130!U(3?-1!! C(/X!U(3?-1!%! ^-__!U(3?-1!%! &'()*+!^-__!U(3?-1!5! &'()*+!^-__!U(3?-1!%! ^-__!U(3?-1!7!J3)+.! ,*(+.!D-1<'/30-! D-W-33-/!U(3?-1!%! D-1M.3!7!N?13/I.! `3/(1-!8!7!=1+<'*'! F-/2'*3/!%! F-13<)-!%! H10A+.?1-!7!C*(?+! &Q/-<30!H10A+.?1-! H10A+.?1-!7!D'1/!%! H10A+.?1-!7!D'1/!5! H10A+.?1-!7!H)'+! #''*!H1I-/! #A(10A!H1ISc&Q/-<30!#A'31! H1I-/!,-..!5! ! ! ! ! ! ! ! ! ! ! ! ! ! ! ! ! ! ! ! ! ! ! ! ! ! ! ! ! ! ! ! ! ! ! ! ! ! ! ! ! ! ! ! ! ! ! ! Page !- 41 !"# !"# $%# $%# "# "%# !"# -"# "%# !"# 34# 3$# !"# 34# 38# !"# 34# ""# !"# 34# "$# !"# 3># ""# !"# 34# "4# !"# 34# "8# !"# D# "%# !"# D# "-# !"# -%# ># !"# 3># "-# !"# >3# 3# !"# 44# "%# !"# 44# "-# !"# 44# "4# !"# -%# 34# !"# $4# ># !"# $8# ># !"# >D# 3# !"# %N# 3N# !"# %N# 3># !"# %N# 34# !"# %N# 38# !"# -"# 3># !"# $># 34# !"# >3# ># !"# 3># "%# !"# 3># 3># !"# 3># 3N# !"# 3># "3# !"# 34# "D# !"# -8# "%# !"# -4# ># !"# -8# %# !"# -># ># !"# $"# $3# !"# 3># "$# !"#$%&'( )*+,#-(( )*+./0(( )*+.%1(( )*+231(( )*+24*(( )*5#$%(( )*+6$4(( )*7&88(( )*231-(( 9"&)3:(( 9"&)3-(( 90$;0<(( 9#4=*>(( ?&@64/(( ?&<?3:(( ?&<?3-(( ?&<?3A(( ?B49&C(( ?%&$,A(( ?%&$,D(( ?E*FG-(( ?4H33-(( ?4*H33(( ?4*I>#(( ?4*)34(( ?4*;0<(( ?'>J,K(( ?'>L%4(( 6"M./*(( 6"M":N(( 6"M"&O(( 6"M;0<(( 60>PF/(( 6*QM?B( 6*Q$4A(( 6*0QMD(( 6RM&J-(( ;"M)*+(( ;0<6*Q(( &'((#)*+,# )-.,/# &'()*#+),,#"# ./01'#2#&'()*## .5167#&'()*# 9067#&'()*#3# 90:0'#&'()*# ;0,<=5#&'()*# &'()*#?'@A<=:#># B)CC#&'()*#"# 9067#&'()*#"# &6:)#E1)*0#3# &6:)#E1)*0#"# E0<#F016=# E0,:#G0'*#?'=A050# H)I#?00:/#"# H)J#H=6:10*#3# H)J#H=6:10*#"# H)J#H=6:10*#$# H0K:#E)L# H5)<#+),,#"# H5)<#+),,#%# HM@)'=#"# O660A<P#H:'1*(,#"# O660A<P#H:'1*(,#3# H:'1*(,#Q*,=AR5=#$# &6:)#H:'1*(,#"# H:'1*(,#2#F016=# HS*:/#+),,#-# HS*#T5@:=# ?1R1)#>#?'=A#2#./'S,0(50::# ?1R1)#34#U#"#?'=A050# ?1R1)#>#?'=A2E0,:#G0'*#>### ?1R1)#>#?'=A2F0J#>#?'=A# ?0*=#V==5# H0K:#?'0AR0*=# ?'@A<=:"# ?'0AR0*=#"# ?@R)#"# ?1R1)#>#?'=A#IWF1R=# F0J#>#?'=A050## # # # # # # # # # # # # # # # # # # # # # # # # # # # # # # # # # # # # # # # # Page - 42 Concerto Drum Sounds Chart A Note STANDARD PC=1 ROOM PC=9 POWER PC=17 ELECTRIC PC=25 TR-808 PC=26 24 - C1 25 - C#1 26 - D1 27 - D#1 28 - E1 29 - F1 30 - F#1 31 - G1 32 - G#1 33 - A1 34 - A#1 35 - B1 36 - C2 37 - C#2 38 - D2 39 - D#2 40 - E2 41 - F2 42 - F#2 43 - G2 44 - G#2 45 - A2 46 - A#2 47 - B2 48 - C3 49 - C#3 50 - D3 51 - D#3 52 - E3 53 - F3 54 - F#3 55 - G3 56 - G#3 57 - A3 58 - A#3 59 - B3 60 - C4 61 - C#4 62 - D4 63 - D#4 64 - E4 65 - F4 66 - F#4 67 - G4 68 - G#4 69 - A4 70 - A#4 71 - B4 72 - C5 73 - C#5 74 - D5 75 - D#5 76 - E5 77 - F5 78 - F#5 79 - G5 80 - G#5 81 - A5 82 - A#5 83 - B5 84 - C6 85 - C#6 86 - D6 87 - D#6 Fingers Snap Left Finger Snap Right Snare Roll High Q Slap Scratch Push Scratch Pull Sticks Square Click Metron. Click Metron. Bell Bass Drum 2 Bass Drum 1 Side Stick Snare Drum 1 Hand Clap Snare Drum 2 Low Floor Tom Close Hi-Hat H. Floor Tom Pedal Hi-Hat Low Tom Open Hi-Hat Low Mid Tom Hi Mid Tom Crash Cymbal1 High Tom Ride Cymbal 1 Chinese Cymbal Ride Bell Tambourine Splash Cymbal Cowbell Crash Cymbal2 Vibraslap Ride Cymbal 2 Hi Bongo Low Bongo Mute Hi Conga Open Hi Conga Conga Low High Timbale Low Timbale High Agogo Low Agogo Cabasa Maracas Short Whistle Long Whistle Short Guiro Long Guiro Claves Hi Woodblok Low Woodblok Mute Cuica Open Quica Mute Triangle Open Triangle Shaker Jingle Bell Bell Tree Castanets Mute Surdo Open Surdo Fingers Snap Left Finger Snap Right Snare Roll High Q Slap Scratch Push Scratch Pull Sticks Square Click Metron. Click Metron. Bell Bass Drum 2 Bass Drum 1 Side Stick Snare Drum 1 Hand Clap Snare Drum 2 Room Low Tom 2 Close Hi-Hat Room Low Tom 1 Pedal Hi-Hat Room Mid Tom 2 Open Hi-Hat Room Mid Tom 1 Room Hi Tom 2 Crash Cymbal1 Room Hi Tom 1 Ride Cymbal 1 Chinese Cymbal Ride Bell Tambourine Splash Cymbal Cowbell Crash Cymbal2 Vibraslap Ride Cymbal 2 Hi Bongo Low Bongo Mute Hi Conga Open Hi Conga Conga Low High Timbale Low Timbale High Agogo Low Agogo Cabasa Maracas Short Whistle Long Whistle Short Guiro Long Guiro Claves Hi Woodblok Low Woodblok Mute Cuica Open Quica Mute Triangle Open Triangle Shaker Jingle Bell Bell Tree Castanets Mute Surdo Open Surdo Fingers Snap Left Finger Snap Right Snare Roll High Q Slap Scratch Push Scratch Pull Sticks Square Click Metron. Click Metron. Bell Bass Drum 2 Bass Drum 1 Side Stick Gated Snare Hand Clap Snare Drum 2 Room Low Tom 2 Close Hi-Hat Room Low Tom 1 Pedal Hi-Hat Room Mid Tom 2 Open Hi-Hat Room Mid Tom 1 Room Hi Tom 2 Crash Cymbal1 Room Hi Tom 1 Ride Cymbal 1 Chinese Cymbal Ride Bell Tambourine Splash Cymbal Cowbell Crash Cymbal2 Vibraslap Ride Cymbalal 2 Hi Bongo Low Bongo Mute Hi Conga Open Hi Conga Conga Low High Timbale Low Timbale High Agogo Low Agogo Cabasa Maracas Short Whistle Long Whistle Short Guiro Long Guiro Claves Hi Woodblok Low Woodblok Mute Cuica Open Quica Mute Triangle Open Triangle Shaker Jingle Bell Bell Tree Castanets Mute Surdo Open Surdo Fingers Snap Left Finger Snap Right Snare Roll High Q Slap Scratch Push Scratch Pull Sticks Square Click Metron. Click Metron. Bell El. Bass Drum 2 El. Bass Drum 1 Side Stick El. Snare Drum 1 Hand Clap Gated Snare El. Low Tom 2 Close Hi-Hat El. Low Tom 1 Pedal Hi-Hat El. Mid Tom 2 Open Hi-Hat El. Mid Tom 1 El. Hi Tom 2 Crash Cymbal1 El. Hi Tom 1 Ride Cymbal 1 Reverse Cymbal Ride Bell Tambourine Splash Cymbal Cowbell Crash Cymbal2 Vibraslap Ride Cymbal 2 Hi Bongo Low Bongo Mute Hi Conga Open Hi Conga Conga Low High Timbale Low Timbale High Agogo Low Agogo Cabasa Maracas Short Whistle Long Whistle Short Guiro Long Guiro Claves Hi Woodblok Low Woodblok Mute Cuica Open Quica Mute Triangle Open Triangle Shaker Jingle Bell Bell Tree Castanets Mute Surdo Open Surdo Fingers Snap Left Finger Snap Right Snare Roll High Q Slap Scratch Push Scratch Pull Sticks Square Click Metron. Click Metron. Bell 808 Bass Drum 2 808 Bass Drum 1 Side Stick 808 Snare Drum Hand Clap Snare Drum 2 808 Low Tom 2 808 Close Hi-Hat 808 Low Tom 1 808 Pedal Hi-Hat 808 Mid Tom 2 808 open Hi-Hat 808 Mid Tom 1 808 Hi Tom 2 808 Crash Cymb 1 808 Hi Tom 1 Ride Cymbal 1 Chinese Cymbal Ride Bell Tambourine Splash Cymbal 808 Cow Bell Crash Cymbal2 Vibraslap Ride Cymbal 2 Hi Bongo Low Bongo 808 Mute Hi Cong 808 Open Hi Cong 808Low Conga High Timbale Low Timbale High Agogo Low Agogo Cabasa 808 Maracas Short Whistle Long Whistle Short Guiro Long Guiro 808 Claves Hi Woodblok Low Woodblok Mute Cuica Open Quica Mute Triangle Open Triangle Shaker Jingle Bell Bell Tree Castanets Mute Surdo Open Surdo Page - 43 Concerto Drum Sounds Chart B 24 - C1 25 - C#1 26 - D1 27 - D#1 28 - E1 29 - F1 30 - F#1 31 - G1 32 - G#1 33 - A1 34 - A#1 35 - B1 36 - C2 37 - C#2 38 - D2 39 - D#2 40 - E2 41 - F2 42 - F#2 43 - G2 44 - G#2 45 - A2 46 - A#2 47 - B2 48 - C3 49 - C#3 50 - D3 51 - D#3 52 - E3 53 - F3 54 - F#3 55 - G3 56 - G#3 57 - A3 58 - A#3 59 - B3 60 - C4 61 - C#4 62 - D4 63 - D#4 64 - E4 65 - F4 66 - F#4 67 - G4 68 - G#4 69 - A4 70 - A#4 71 - B4 72 - C5 73 - C#5 74 - D5 75 - D#5 76 - E5 77 - F5 78 - F#5 79 - G5 80 - G#5 81 - A5 82 - A#5 83 - B5 84 - C6 85 - C#6 86 - D6 87 - D#6 88 - E6 JAZZ PC=33 BRUSH PC=41 ORCHES. PC=49 Fingers Snap Left Finger Snap Right Snare Roll High Q Slap Scratch Push Scratch Pull Sticks Square Click Metron. Click Metron. Bell Bass Drum 2 Bass Drum 1 Side Stick Jazz Snare 2 Hand Clap Jazz Snare 1 Low Floor Tom Close Hi-Hat H. Floor Tom Pedal Hi-Hat Low Tom Open Hi-Hat Low Mid Tom Hi Mid Tom Crash Cymbal1 High Tom Ride Cymbal 1 Chinese Cymbal Ride Bell Tambourine Splash Cymbal Cowbell Crash Cymbal2 Vibraslap Ride Cymbal 2 Hi Bongo Low Bongo Mute Hi Conga Open Hi Conga Conga Low High Timbale Low Timbale High Agogo Low Agogo Cabasa Maracas Short Whistle Long Whistle Short Guiro Long Guiro Claves Hi Woodblok Low Woodblok Mute Cuica Open Quica Mute Triangle Open Triangle Shaker Jingle Bell Bell Tree Castanets Mute Surdo Open Surdo Fingers Snap Left Finger Snap Right Snare Roll High Q Slap Scratch Push Scratch Pull Sticks Square Click Metron. Click Metron. Bell Bass Drum 2 Bass Drum 1 Side Stick Brush Tap Brush Slap Brush Swirl Low Floor Tom Close Hi-Hat H. Floor Tom Pedal Hi-Hat Low Tom Open Hi-Hat Low Mid Tom Hi Mid Tom Crash Cymbal1 High Tom Ride Cymbal 1 Chinese Cymbal Ride Bell Tambourine Splash Cymbal Cowbell Crash Cymbal2 Vibraslap Ride Cymbal 2 Hi Bongo Low Bongo Mute Hi Conga Open Hi Conga Conga Low High Timbale Low Timbale High Agogo Low Agogo Cabasa Maracas Short Whistle Long Whistle Short Guiro Long Guiro Claves Hi Woodblok Low Woodblok Mute Cuica Open Quica Mute Triangle Open Triangle Shaker Jingle Bell Bell Tree Castanets Mute Surdo Open Surdo Fingers Snap Left Finger Snap Right Snare Roll Closed Hi-hat Pedal Hi-Hat Open Hi-Hat Ride Cymbal Sticks Square Click Metron. Click Metron. Bell Bass Drum 2 Bass Drum 1 Side Stick Concert SD Castanets Concert SD Timpani F Timpani F# Timpani G Timpani G# Timpani A Timpani A# Timpani B Timpani C Timpani C# Timpani D Timpani D# Timpani E Timpani F Tambourine Splash Cymbal Cowbell Concert Cymb. 2 Vibraslap Concert Cymb. 1 Hi Bongo Low Bongo Mute Hi Conga Open Hi Conga Conga Low High Timbale Low Timbale High Agogo Low Agogo Cabasa Maracas Short Whistle Long Whistle Short Guiro Long Guiro Claves Hi Woodblok Low Woodblok Mute Cuica Open Quica Mute Triangle Open Triangle Shaker Jingle Bell Bell Tree Castanets Mute Surdo Open Surdo Applause Page - 44 SOUND FX PC=57 High Q Slap Scratch Push Scratch Pull Sticks Square Click Metronome Click Metronome Bell Guitar Slide Guitar Cut Noise 1 Guitar Cut Noise 2 Double Bass Slap Key Click Laughing Screaming Punch Heart Beat Foot Step 1 Foot Step 2 Applause Door Creaking Door Closing Scratch Wind Chime Car Start Car Breaking Carr Pass Car Crash Police Train Jet Helicopter Starship Gun Shot Machine Gun Laser Explosion Dog Horse Birds Rain Thunder Wind Seashore Bubble Yeah Appendix C This Section For DA-100 Owners ONLY Concerto DA-100 Memory Card Memory Card Device Prior to Archival Overview The RAM-64 Memory card will hold 64 Performance Registers at one time from your Concerto. These can be either from Songs 1 to 8 or from Songs 9 to 16. The memory card must be inserted with the chrome cover face down and going in first. Opposite of the chrome cover you will find a small switch that is used for memory protection. Next to the switch is a small plastic carrier that pulls out (see the indent where the nail of your thumb can be used to pull the carrier out). The card may be shipped to you with the carrier partially open. Installing Battery Pull the battery carrier out and install the 2016 battery in the carrier positive side up and insert the carrier back into the slot fully inserted. The battery will last about two years but we suggest you change the battery once a year. Using the Memory Card With the Concerto OFF insert the card with the chrome end face down first into the Concerto Generator until you feel the card latch into place. You will first feel a little resistance and then the card will firmly latch into place. Make sure you always insert and remove the memory card with the power OFF. With the power ON from the grill of the accordion enter the GLOBAL screen by pressing SELECT and NEXT together. Then with the NEXT key turn the page in the display until you come to the page dealing with the memory card. Note that if the memory card is not installed correctly the screen will read MEMORY CARD NOT INSTALLED. Then use the SOLO key to change the wording in the display. There are four options. Page - 45 *RECALL SONGS 1 to 8= COPY from CARD to *Concerto song banks 1 to 8 *RECALL SONGS 9 to 16= COPY from CARD to *Concerto song banks 9 to 16 SAVE SONGS 1 to 8= Save from Concerto to CARD song banks 1 to 8 SAVE SONGS 9to 16= Save from Concerto to CARD song banks 9 to 16 *RECALL will ERASE registers in the accordion and replace them with registers stored on the card! Memory Protect Switch The memory protect switch will allow you to save data on the card & not accidentally write over or erase the settings you have saved. When the switch is in the WRITE PROTECT position positions 1 and 2 above will read MEMORY PROTECTED and the Concerto will not allow you to write onto the protected card. If you want to SAVE information to a protected card simply move the switch. Page - 46