1
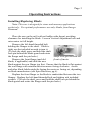
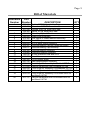
The Blue Ripper Jr™
Rail Saw
(Blade shown might not ship with saw or be available.)
Operation, Safety, and Instruction Manual
v20140506
™
Page 2
Operating/Safety Instructions
IMPORTANT: Read Before Operating Equipment
To avoid accidents or injury, keep work area clean, well lit, and well
ventilated.
Always wear eye, hand, and all other appropriate protective apparel
when operating saw.
Keep all other people, children, and small farm animals away while
operating saw.
Use only properly grounded, GFCI protected electrical outlet. GFCI
must be tested every 2 months.
Warning: Do NOT turn machine on or off with the GFCI safety switch.
Turn machine toggle switch off before resetting the GFCI.
Ensure that the electrical system in your work location meets all codes
and regulations prior to operating saw.
Do not modify the plug on the saw or use any adapters between the saw
and the electrical outlet.
Do not allow water to run directly on the motor or any other electrical
component.
If power cord or any other part of the saw is damaged, discontinue use
immediately until damaged parts can be replaced.
Keep saw blade clear of clothing, jewelry, hair, cords, hoses, or any other
object while in operation.
Ensure that the saw is switched off (trigger released) before plugging or
unplugging it.
Ensure that blade is clamped firmly between flanges and spinning freely
prior to operating.
Do not stand directly in front of or behind the saw while in operation.
Keep hands on top of the saw and away from the blade while operating.
Never force the saw if it seems to be stuck or if it seems to be moving
with difficulty.
Use only blades of correct size and shape. Do not modify blades.
Do not force bolts; most have been assembled with a threadlocking
adhesive for safety.
Page 3
Operating Instructions
Installing/Replacing Blade:
Note: This saw is designed for stone and masonry applications
exclusively. For optimal performance use only blades from Omega
Diamond.
Place the saw on the rail (with rail rubber side down) providing
clearance for installing the blade. Loosen Vertical Adjustment lock and
raise motor to full height.
Remove the left-hand threaded bolt
holding the flanges to the shaft. If bolt is
tight, use the included wrench to turn it.
(To lock the shaft, press and hold the shaft
lock pin behind the blade guard and rotate
the flange until the pin locks.)
Shaft lock pin located on
front of motor.
Remove the front flange (and old
blade, if applicable) and slide the new
blade against the rear flange top first. Ensure that the blade is flat against
the rear flange with rotation direction arrow facing clockwise. Arrow
and other blade labels might be facing the motor or facing out, depending
on blade manufacturer (see Spin Direction, pg 6).
Replace the front flange so the blade is sandwiched between the two
flanges. Replace the left-hand threaded bolt and tighten with included
wrench. (To lock the shaft, press and hold the shaft lock pin behind the
blade guard and rotate the flange until the pin locks.)
Page 4
Typical Operation:
Note: For most cutting operations, it is recommended that you lay your
slab on top of a foam sheet at least 1” (3cm) thick. (1.5” (4cm) is
preferred for less crumbling).
1) Lay the rail on the slab along the line to be cut.
2) Allow the rails to overhang enough for the blade to clear the stone
where you will begin your cut. It may be necessary to clamp the rails to
the stone to prevent wandering. Clamp onto provided angle bolted to
one side of rail.
3) Put the saw on the left side of the rail. (Blade outside stone with the
handle pointed over the stone.)
4) Adjust the blade height to just enter the stone about ¼ inch (3mm)
deep.
5) Turn the water valve on and adjust desired flow.
6) Turn saw on before blade touches the stone. Do not stand directly in
front of or behind the blade while cutting.
7) Slowly begin your cut by pulling the saw into the stone. After
entering the cut, draw the saw along the stone at good speed to finish the
“strike” cut. You may need to apply pressure to the top of the saw to
keep it from “climbing” out of the cut
8) After clearing the stone on the right side of the slab, re-position the
motor to the lowest position the blade can be set. The deeper the blade
cuts through the stone, the easier and faster the blade will cut.
9) Slowly enter the cut by pushing the saw into stone. If you enter the
cut too fast, the saw will bog down too far and may trip the electrical
breaker, and can also cause the blade to wander.
10) Once you have initiated the cut you must not go to slow or the
diamonds on the blade will glaze over, and the cutting speed will drop
dramatically. The speed of cut should be just below the point of bogging
the motor.
Example: On a 2 cm thick slab of Absolute Black granite try to
maintain a cutting speed of about 4 fpm (1 meter per minute) or faster.
Page 5
Troubleshooting
Blade seems to be cutting slowly or not cutting at all?
Suggestions: Make sure the blade is mounted to spin in the proper
direction (See Spin Direction, pg 6).
The material being cut may have “loaded” or “glazed” the diamond.
Use a dressing stone or “green stone” to free the diamond.
Blade binds or “freezes.”
Suggestions: The blade may be cutting at a slight angle. Check
alignment. Make sure that the saw is rolling freely on the rails and the
rails are not damaged or bent. Make sure that the motor is securely
fastened to the mounting plate.
Saw shuts off after a few minutes of use and/or fails to turn
on at all.
Suggestions: Check circuit breaker. If that is on and it still fails to
start, the motor may have overheated and may need to be replaced.
Also check the brushes in the motor. If these are worn out you can
either order them from us, directly from the motor manufacturer, or pick
them up from your local hardware store.
If you have any questions please call us toll free:
1 (888) 996-4777
Page 6
Spin Direction
Some of the supported motors have an arrow on the guard indicating
the spin direction of the blade. If the spin direction of the blade is not
indicated, then it may be safe to assume that it spins in a clockwise
direction.
Page 7
Replacement Parts
Is your blade worn out? Want a spare? Need extra rail? Give us a call
and we will be happy to take your order.
Toll Free:
Fax:
Web:
Email:
1 (888) 996-4777
1 (530) 885-3785
OmegaDiamond.com
[email protected]
Page 8
Page 9
Bill of Materials
Illustration Part
Number Number
1
2
3
4
5
6
7
8
9
10
11
12
13
14
15
16
17
18
19
20
538-212
617-209
201-780
764-362
401-619
099-094
973-360
596-912
009-622
504-447
538-017
508-356
214-882
755-516
110-055
046-326
541-316
585-817
511-020
092-939
320-486
812-514
DESCRIPTION
Makita 5477NB Hypoid-drive Saw
Milwaukee 6477-20 Worm-drive Saw
Skilsaw SHD77M Worm-drive Saw
Bosch 1677M Worm-drive Saw
Clear Vinyl Splash Shield
Guard Knob Assembly
Blue Ripper Jr Water Manifold Assembly
Push Fitting
5/16 to 8mm Elbow Connector
Traverse Bearing Cap Half Height Assembly
Traverse Bearing Cap Assembly
Traverse Bearing Assembly
Alignment Bearing Assembly
25 foot Electrical Cord with GFCI
Hose Kit
8 inch Archon Blade
Rear Hinge Bracket Assembly
Front Hinge Kit Assembly for Makita 5477NB
Vertical Adjustment Arm for Makita 5477NB
Front Hinge Kit Assembly for Milwaukee 6477-20
Vertical Adjustment Arm for Milwaukee 6477-20
Front Hinge Kit Assembly for Skilsaw SHD77M
and Bosch 1677M
811-117 Vertical Adjustment Arm for Skilsaw SHD77M
and Bosch 1677M
QTY
1
1
3
1
1
1
1
3
4
4
1
1
1
1
1
1
1
1
1
1
Page 10
Limited Warranty
All models of the Blue Ripper are warranted against defects in
workmanship in materials, excluding the motor, for a period of twelve
(12) months from date of purchase. Motor warranted under manufacturer
warranty, if available.
All returns will be subject to damage/usage fees. A refund is
available only within 30 days of purchase. Freight charges are nonrefundable.
OMEGA DIAMOND, INC. will, under warranty, provide free
factory service including parts, labor, and UPS GROUND SERVICE
back to the customer for any malfunction of its units. Returned units
should be packed in the ORIGINAL shipping packaging. Customers are
required to call prior to returning any unit for either warranty or nonwarranty service. We may be able to save you the inconvenience of
shipping the unit back to us.
Shipments should be sent freight prepaid and insured for
replacement cost to:
Omega Diamond, Inc.
10125 Ophir Rd.
Newcastle, CA 95658-9504
PHONE: (530) 889-8977 – FAX: (530) 885-3785
Please record the Date of Purchase and the Serial Number of your
machine here for future reference:
Date of Purchase:
Serial Number:
Page 11
USER NOTES:
NOTICE: This product may have been field tested for quality
control purposes.
Page 12
Blue Ripper Jr Rail Saw Manual
Copyright© 2006, 2008 Omega Diamond, Inc.
All Rights Reserved.
***WARNING***
Not following all of these instructions and warnings included in this
manual may result in Injury or Death. Omega Diamond, Inc. and all
related Companies and personnel cannot be held responsible for any
damages incurred by the installation, use, and/or maintenance of this
product.
The Blue Ripper, Blue Ripper Jr, Blue Ripper Rail Saw, Blur Ripper Jr Rail Saw and the Omega
Diamond Logo are legal trademarks of Omega Diamond, Inc. All Rights Reserved.
This Document may not be Copied or Distributed, in Part or in Whole, Manually or Digitally,
without the written prior Consent of the Copyright Holder.