1
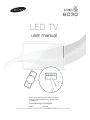
LED TV
user manual
E-MANUAL
Thank you for purchasing this Samsung product.
To receive more complete service, please register
your product at
www.samsung.com/register
Model _____________ Serial No. _____________
✎ If you have any questions, please call us at 1-800-SAMSUNG (1-800-726-7864) for assistance.
A detailed User’s Manual is built into your TV. For more information about how to view this e-Manual, see page 16.
Figures and illustrations in this User Manual are provided for reference only and may differ from actual product appearances.
Product design and specifications may be changed without notice.
Important Warranty Information Regarding Television Format Viewing
✎
See the warranty card for more information on warranty terms.
Wide screen format LED Displays (16:9, the aspect ratio of the screen width to height) are primarily designed to view wide screen format full-motion video.
The images displayed on them should primarily be in the wide screen 16:9 ratio format, or expanded to fill the screen if your model offers this feature and
the images are constantly moving. Displaying stationary graphics and images on screen, such as the dark sidebars on non- expanded standard format
television video and programming, should be limited to no more than 5% of the total television viewing per week. Additionally, viewing other stationary
images and text such as stock market reports, video game displays, station logos, web sites or computer graphics and patterns, should be limited as
described above for all televisions. Displaying stationary images that exceed the above guidelines can cause uneven aging of LED Displays that leave
subtle, but permanent burned-in ghost images in the LED picture. To avoid this, vary the programming and images, and primarily display full screen moving
images, not stationary patterns or dark bars. On LED models that offer picture sizing features, use these controls to view different formats as a full screen
picture. Be careful in the selection and duration of television formats you use for viewing. Uneven LED aging as a result of format selection and use, as well
as burned-in images, are not covered by your Samsung limited warranty.
t SAMSUNG ELECTRONICS NORTH AMERICAN LIMITED WARRANTY STATEMENT
Subject to the requirements, conditions, exclusions and limitations of the original Limited Warranty supplied with Samsung Electronics (SAMSUNG)
products, and the requirements, conditions, exclusions and limitations contained herein, SAMSUNG will additionally provide Warranty Repair Service
in the United States on SAMSUNG products purchased in Canada, and in Canada on SAMSUNG products purchased in the United States, for the
warranty period originally specified, and to the Original Purchaser only.
The above described warranty repairs must be performed by a SAMSUNG Authorized Service Center. Along with this Statement, the Original Limited
Warranty Statement and a dated Bill of Sale as Proof of Purchase must be presented to the Service Center. Transportation to and from the Service
Center is the responsibility of the purchaser. Conditions covered are limited only to manufacturing defects in material or workmanship, and only
those encountered in normal use of the product. Excluded, but not limited to, are any originally specified provisions for, in-home or on-site services,
minimum or maximum repair times, exchanges or replacements, accessories, options, upgrades, or consumables.
For the location of a SAMSUNG Authorized Service Center, please call toll-free:
- In the United States : 1-800-SAMSUNG (1-800-726-7864)
- In Canada : 1-800-SAMSUNG
Still image warning
Avoid displaying still images (such as jpeg picture files) or still image elements (such as TV channel logos, panorama or 4:3 image format, stock
or news bars at screen bottom etc.) on the screen. Constant displaying of still pictures can cause ghosting of LED screen, which will affect image
quality. To reduce risk of this effect, please follow below recommendations:
t Avoid displaying the same TV channel for long periods.
t Always try to display any image on full screen, use TV set picture format menu for best possible match.
t Reduce brightness and contrast values to minimum required to achieve desired picture quality, exceeded values may speed up the burnout process.
t Frequently use all TV features designed to reduce image retention and screen burnout, refer to proper user manual section for details.
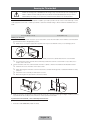
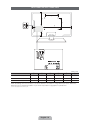
Providing Proper Ventilation for Your TV
When you install your TV, maintain a distance of at least 4 inches between the TV and other objects (walls, cabinet sides, etc.) to ensure proper ventilation.
Failing to maintain proper ventilation may result in a fire or a problem with the product caused by an increase in its internal temperature.
✎ Whether you install your TV using a stand or a wall-mount, use parts provided by Samsung Electronics only.
x
If you use parts provided by another manufacturer, it may cause difficulties with the product or result in injury caused by the product
falling.
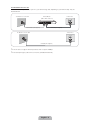
Installation with a stand.
Installation with a wall-mount.
4 inches
4 inches
4 inches
4 inches
4 inches
4 inches
4 inches
English - 2
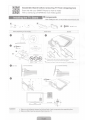
Accessories and Cables
✎ Please make sure the following items are included with your TV. If any items are missing, contact your dealer.
✎ The items’ colors and shapes may vary depending on the model.
✎ Check that there are no accessories hidden behind or under packing materials after you open the box.
y Remote Control (AA59-00601A) & Batteries (AAA x 2)
y Owner’s Instructions
y Power Cord
y Warranty Card / Safety Guide
y Holder-Wire Stand (BN61-05491A)
Assembling the Holder-Wire stand
Input Cables (Sold Separately)
To purchase the RS232 cable, contact www.SamsungParts.com.
RS232 (AA39-00311A)
HDMI
Component
HDMI-DVI
Audio
Composite (AV)
Coaxial (RF)
✎ Make sure you have the correct cable before plugging it in. Illustrations of common plugs and jacks are below.
Cable
Ports
HDMI
USB
Optical
✎ For the best cable connection to this product, use cables no thicker than the cable illustrated below:
y Maximum thickness - 0.55 inches (14mm)
English - 3
Connecting the Power Cord and the Antenna or Cable Connection
VHF/UHF Antenna
Antenna Cable (Not Supplied)
Cable
or
ANT OUT
Power Input
✎ Plug the power cord into a wall outlet only after you have made all other connections.
✎ If you are connecting your TV to a cable or satellite box using HDMI, Component, or Composite connections, you do not
need to connect the ANT IN jack to an antenna or a cable connection.
✎ Use caution when you move or swivel the TV if the antenna cable is tightly connected. You could break the antenna jack
off the TV.
Connecting to AV Devices (Blu-ray Players, DVD Players, etc.)
Using an HDMI cable or HDMI to DVI Cable for an HD connection (up to 1080p, HD, digital signals)
For the best quality HD picture, we recommend using an HDMI connection.
Use on DVD players, Blu-ray players, HD cable boxes, and HD satellite receivers (STB).
Device
R
HDMI to DVI Cable (Not Supplied)
W
DVI OUT
Red
White
HDMI IN
2
1 (DVI)
EX-LINK
Device
HDMI Cable (Not Supplied)
AUDIO
OUT
DIGITAL
AUDIO OUT
(OPTICAL)
HDMI OUT
✎ HDMI IN 1 (DVI), 2
x
x
x
x
x
For better picture and audio quality, connect to digital devices using an HDMI cable.
An HDMI cable supports digital video and audio signals, and does not require an audio cable.
– To connect the TV to a digital device that does not support HDMI output, use an HDMI to DVI cable and
separate audio cables.
If you connect an external device to the TV that uses an older version of HDMI, the video and audio may not
work. If this occurs, ask the manufacturer of the device about the HDMI version and, if it is out of date, request
an upgrade.
Be sure to purchase a certified HDMI cable. Otherwise, the picture may not display or a connection error may
occur.
We recommend using a basic high-speed HDMI cable or an HDMI cable that supports Ethernet. Note that this
TV does not support the Ethernet function via HDMI.
✎ If an HDMI to DVI cable is connected to the HDMI IN 1(DVI) port, the audio does not work.
The EX-LINK Cable Connection
EX-LINK
The EX-LINK connection is for service only.
English - 4
Using a Component Cable (up to 1080p HD signals) or Video Cable (480i, analog signals only)
Use on DVD players, Blu-ray players, cable boxes, STB satellite receivers, and VCRs.
Device
Red White
Red
Blue Green
Audio Cable (Not Supplied)
Component Cable (Not Supplied)
✎ When you connect a Video cable to AV IN,
the color of the AV IN [Y/VIDEO] jack (green)
will not match the video cable (yellow).
✎ For better picture quality, we recommend
the Component connection over the A/V
connection.
Audio Cable
(Not Supplied)
Video Cable
(Not Supplied)
Red White Yellow
Device
Connecting Audio Devices
Using an Optical (Digital) Cable Connection or a Standard Stereo Connection
Use on Digital Audio Systems, Amplifiers, and Home Theaters.
Audio cable (Not Supplied)
DVD Home Theater
AUDIO IN
R-AUDIO-L
2
Digital Audio System
1 (DVI)
EX-LINK
Optical Cable (Not Supplied)
OPTICAL
AUDIO
OUT
DIGITAL
AUDIO OUT
(OPTICAL)
✎ DIGITAL AUDIO OUT (OPTICAL)
x
When you connect a Digital Audio System to the DIGITAL AUDIO OUT (OPTICAL) jack, decrease the volume
of both the TV and the system.
x
x
5.1 CH (channel) audio is available when you connect the TV to an external device supporting 5.1 CH.
When the receiver (home theater) is set to on, you can hear sound output from the TV’s optical jack. When the
TV is receiving a DTV signal, the TV will send 5.1 CH sound to the home theater receiver. When the source is
a digital component such as a DVD player / Blu-ray player / cable box / STB (Set-Top-Box) satellite receiver
and you connected it to the TV via HDMI, you will only hear 2 CH audio from the home theater receiver. If you
want to hear 5.1 CH audio, connect the digital audio out jack from your DVD / Blu-ray player / cable box / STB
satellite receiver directly to an amplifier or home theater.
✎ AUDIO OUT: Connects to the audio input jacks on your amplifier/home theater.
x
x
When connecting, use the appropriate connector (sold separately).
When you connect an audio amplifier to the AUDIO OUT jacks, decrease the volume of the TV and adjust the
volume level with the amplifier’s volume control.
English - 5
Connecting to a PC
Using an HDMI cable or an HDMI to DVI cable
✎ Your PC may not support an HDMI connection.
✎ Use your PC speakers for audio.
✎ If an HDMI to DVI cable is connected to the HDMI IN 1(DVI) port, the audio does not work.
DVI OUT
2
HDMI IN
1 (DVI)
EX-LINK
HDMI to DVI Cable (Not Supplied)
HDMI Cable (Not Supplied)
AUDIO
OUT
DIGITAL
AUDIO OUT
(OPTICAL)
HDMI OUT
Display Modes (HDMI Input)
Optimal resolution is 1920 X 1080@60Hz.
Mode
IBM
MAC
VESA DMT
Resolution
Horizontal Frequency (KHz)
Vertical Frequency (Hz)
Pixel Clock Frequency (MHz)
Sync Polarity (H / V)
640 x 350
31.469
70.086
25.175
+/-
720 x 400
31.469
70.087
28.322
-/+
640 x 480
35.000
66.667
30.240
-/-
832 x 624
49.726
74.551
57.284
-/-
1152 x 870
68.681
75.062
100.000
-/-
640 x 480
31.469
59.940
25.175
-/-
640 x 480
37.861
72.809
31.500
-/-
640 x 480
37.500
75.000
31.500
-/-
800 x 600
37.879
60.317
40.000
+/+
800 x 600
48.077
72.188
50.000
+/+
800 x 600
46.875
75.000
49.500
+/+
1024 x 768
48.363
60.004
65.000
-/-
1024 x 768
56.476
70.069
75.000
-/-
1024 x 768
60.023
75.029
78.750
+/+
1152 x 864
67.500
75.000
108.000
+/+
1280 x 720
45.000
60.000
74.250
+/+
1280 x 800
49.702
59.810
83.500
-/+
1280 x 1024
63.981
60.020
108.000
+/+
1280 x 1024
79.976
75.025
135.000
+/+
1366 x 768
47.712
59.790
85.500
+/+
1440 x 900
55.935
59.887
106.500
-/+
1600 x 900RB
60.000
60.000
108.000
+/+
1680 x 1050
65.290
59.954
146.250
-/+
1920 x 1080
67.500
60.000
148.500
+/+
English - 6
Connecting to a Network
You can connect your TV to your local area network (LAN) using a wired or wireless connection.
✎ After you have “physically” connected your TV to your network, you must configure the network connection to complete
the process. You can configure the connection during the Initial Setup process (see page 10 ) or after the Initial Setup
process, through the TV’s menu (see page 15).
The Wireless Network Connection
You can connect your TV to your LAN through a standard wireless router or modem. To connect wirelessly, you must first
attach a “Samsung Wireless LAN Adapter” (WIS09ABGNX, WIS12ABGNX - sold separately) to the USB port on the side of
your TV. See the illustration below.
The LAN Port on the Wall
Wireless IP Sharer
(AP having DHCP Server)
TV Side Panel
Samsung Wireless
LAN Adapter
LAN Cable (Not Supplied)
Samsung’s Wireless LAN adapter is sold separately and is offered by select retailers, E-commerce sites, and Samsungparts.
com. Samsung’s Wireless LAN adapter supports the IEEE 802.11a/b/g and n communication protocols. Samsung
recommends using IEEE 802.11n. When you play video over a network connection using one of the other protocols, the video
may not play smoothly.
Wireless Security
Most wireless network systems incorporate a security system that requires devices that access the network through an access
point or AP (typically a wireless router or modem) to transmit an encrypted security code called an access key.
Your TV is compatible with the following security protocols:
y Authentication Mode: OPEN, SHARED, WPAPSK, WPA2PSK
y Encryption Type: WEP, TKIP, AES
If you select Pure High-throughput (Greenfield) 802.11n mode and the Encryption type is set to WEP or TKIP on your AP or
wireless router, your TV will not support a connection, in compliance with new Wi-Fi certification specifications.
English - 7
The Wired Network Connection
There are two main ways to connect your TV to your network using cable, depending on your network setup. They are
illustrated below:
The Modem Port on the Wall
External Modem
(ADSL / VDSL / Cable TV)
Modem Cable (Not Supplied)
TV Rear Panel
LAN Cable (Not Supplied)
The Modem Port on the Wall
TV Rear Panel
LAN Cable (Not Supplied)
✎ The TV does not support network speeds less than or equal to 10Mbps.
✎ Use Cat 6 (STP Type*) cable for the connection. (*Shielded Twisted Pair)
English - 8
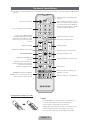
The Remote Control Buttons
✎ This remote control has Braille points on the Power, Channel, and Volume buttons and can be used by visually impaired
persons.
Display and select the available video
sources.
Turns the TV on and off.
Turns the remote control light on or off.
When on, the buttons become illuminated
for a moment when pressed. (Using the
remote control with this button set to On
will reduce the battery usage time.)
Press to directly access to channels.
Press to select additional digital
channels being broadcasted by the
same station. For example, to select
channel ‘54-3’, press ‘54’, then press
‘-’ and ‘3’.
Return to the previous channel.
Cut off the sound temporarily.
Adjusts the volume.
Change channels.
Displays the channel list on the screen.
Displays the main on-screen menu.
View Contents Home.
Turns the 3D image on or off.
Quickly select frequently used
functions.
Displays information on the TV screen.
Moves the cursor, selects the onscreen menu items, and changes the
values seen on the menu.
Exit the menu.
Return to the previous menu.
Use these buttons according to the
directions on screen.
E-MANUAL: Displays the e-Manual.
P.SIZE: Lets you choose the picture size.
CC: Controls the caption decoder.
Use these buttons in a specific feature.
Installing batteries (Battery size: AAA)
✎ NOTE
x
Install the batteries so that the polarity of the batteries (+/-)
matches the illustration in the battery compartment.
x
x
Use the remote control within 23 feet of the TV.
x
The color and shape may vary depending on the model.
Bright light may affect the performance of the remote control.
Avoid using when near fluorescent lights or neon signs.
English - 9
Configuring the Basic Settings in Initial Setup
When you turn the TV on for the first time, a sequence of screens and on-screen prompts will assist you in configuring the TV’s
basic settings. Plug the power cord into a wall outlet, and then press the POWERP button to turn on the TV.
✎ Setup is available only when the Source is set to TV. See Changing the Input Source on page 12.
✎ To return to the previous step in the Setup sequence, select Previous, and then press ENTERE button.
✎ If you are not using a cable box or satellite box, make you sure have connected the TV to an antenna or cable
connection before you turn on the TV. See page 4 for instructions.
✎ If you want to configure a network connection, make sure you’ve connected the Samsung Wireless LAN Adaptor or a
LAN cable to your TV. See pages 7 and 8 for instructions.
1
Menu Language:
Select a menu
language.
After you press the Power Button, the Start Screen appears. Press the
ENTERE button on your remote to continue. The Menu Language
screen appears.
Use the Ÿ/źbuttons to select a language, and then press ENTERE.
The cursor jumps to Next. Press the ENTERE button.
2
Use Mode: Select the
Use Mode.
On the Use Mode screen, press ENTERE to select the Home Use
mode. The cursor jumps to Next. Press the ENTERE button. The
Network Settings screen appears.
POWER
P
✎ Store Demo mode is for retail environments only. If you select
Store Demo, some functions will not work, and the TV will reset
all functions to their factory default every 15 minutes. For more
information about Store Demo, go to the end of this section.
3
Network Settings:
Configure the network
settings.
1. The TV automatically senses whether you connected the Wireless Adaptor or a LAN
cable to the TV. To continue configuring the network settings, press the ENTERE
button, and then go to Wireless Network or Wired Network below.
✎
✎
a
3
Wireless Network
If you do not have a network, select Skip, press the ENTERE button, and
then go to Auto Program (1) on the next page.
If you have a Network, you can also select Skip, and then configure your
network later through Network Settings in the TV’s Menu. For more
information, refer to “Setting the Wired Network / Setting the Wireless
Network” in the e-Manual or go to page 16 in this manual.
1. The TV searches for and then displays all the wireless networks within range. When
done, it displays a list of the networks. Use the Ÿ/źbuttons to select a network,
and then press ENTERE. The cursor jumps to Next. Press ENTERE. The
Security Key screen appears.
✎
If you have a WPS(PBC) compatible router, select WPS(PBC) instead, press
ENTERE, and then follow the directions on the screen. When done, go to
Step 4.
2. Enter your network security key or WPS PIN using the remote.
✎
✎
Enter numbers by pressing the number buttons on your remote.
Enter letters by selecting a letter using the Ÿ/ź/Ż/Ź buttons, and then
pressing ENTERE.
To display capital letters (or redisplay small letters if capital letters are
displayed), select Shift, and then press ENTERE.
To display symbols and punctuation, select , and then press ENTERE.
To redisplay letters, select Shift, and then press ENTERE.
3. When done, use the Ÿ/ź/Ż/Ź buttons to select Next if you have entered
a security key or WPS PIN if you have entered a WPS PIN, and then press
ENTERE.
✎
✎
4. The TV checks the wireless connection. If the connection is successful, the “Your
wireless network and Internet connection are setup and ready to use.” message
appears. The cursor jumps to Next. Press ENTERE, and then go to 4 Software
Update on the next page.
✎
If the connection fails, select Previous, repeat Step 1 and 2, carefully
re-enter your security key or WPS PIN, then repeat Steps 3 and 4. If it
fails again, select Next on the “Connection Failed” screen, and then go to
Auto Program (1) on the next page. Configure your network later through
Network Settings in the TV’s Menu. For more information, refer to “Setting
the Wired Network / Setting the Wireless Network” in the e-Manual.
English - 10
b
3
4
Wired Network
The TV checks the network connection, then displays the “Wired network and Internet
connection complete” message appears and highlights Next. Press ENTERE.
Software Update:
Upgrade the software
to the latest version.
On the Software Update screen, press the ENTERE button to upgrade the TV’s
software. If new software is available, the player downloads and installs the new
software. When the download is complete, select Next, and then press ENTERE.
✎ To upgrade later, select Skip, and then press ENTERE. For more information,
see “Software Update” in the e-Manual.
✎ You can only upgrade software if your TV has an active network connection.
✎ If no update software is available, the Auto Program screen appears
automatically.
5
Auto Program (1):
Select where your TV
signal comes from.
Press the Ÿ or ź button to select the correct option, and then press ENTERE twice.
Let’s find and store channels on your TV. Do you need to search for channels?
y Yes, I need to.: Select if you have an antenna or a cable connection without a settop-box, and then go to Auto Program (2) below.
y No, I don’t need to.: Select if you have a satellite or cable set-top-box. You do not
need to run Auto Program. Select Next or Skip, and then go to 6 Clock - Manual
below.
6
Auto Program (2):
Select the search
options
1. Press ENTERE. The Air/Cable screen appears.
2. Press the Ÿ or ź button to select Air or Cable, and then press ENTERE. A
check appears next to your selection. Select Next, and then press ENTERE. You
can check both if you have both connected.
3. If you selected Air, channel memorization starts. Go to 5 Auto Program (3). If you
selected Cable, you’ll go to the Cable System screen. Use theŸ or ź button to
select Digital Cable System, and then press ENTERE. Use the Ÿ or ź button
to select the correct cable signal format - STD, HRC, or IRC - and then press
ENTERE. Most cable systems use STD. Repeat the same process for Analog
Cable System.
4. When done, select Next, and then press ENTERE.
7
Auto Program (3):
Channel memorization
Channel memorization starts. Channel memorization can take up to 45 minutes.
When channel memorization is complete, the Channels Memorized screen appears.
Press ENTERE. The Clock screen appears.
✎ You can press ENTERE at any time to halt the memorization process.
8
Clock: Set the Clock
Press the Ÿ or ź button to select Auto or Manual, and then press ENTERE twice.
Auto
If you selected Auto, you’ll go to the Time Zone screen, and then the DST screen. On
the Time Zone screen, use the Ÿ or ź button to select your time zone, and then press
ENTERE twice. On the DST screen, select whether to turn DST (Daylight Savings
Time) On or Off, and then press ENTERE. When done, press ENTERE.
Manual
If you selected Manual, select Date, and then press ENTERE. Use the number
buttons or the Ÿ or ź button to set the date. Use the Ż or Ź button to move between
entry fields. When done, press ENTERE. Select Time, and then press ENTERE.
Set the time in the same fashion. When done, press ENTERE. Then, select Next, and
then press ENTERE. The Setup Complete screen appears.
9
Setup Complete
Review the Setup data, and then press the ENTERE button.
If You Want to Re-run Setup...
O
MENU ĺ System ĺ Setup ĺ ENTERE
If You Want to Turn the Store Demo Mode On or Off.
To set or unset Store Demo mode outside of Setup, press and release the Controller when the power is on. The Function
menu screen appears. Push the Controller to the left (to MENU (m)) and hold for more than 5 seconds. The Store Demo
mode is set. To cancel Store Demo, bring up the Function menu using the Controller, push the Controller to the right (to
Source(s) and hold for more than 5 seconds. See page 13 for information about the Controller.
English - 11
How to Use Edit Name
Changing the Input Source
Edit Name lets you associate a device name to an input
source. To access Edit Name, press the TOOLS button
when the Source is displayed. The following selections
appear under Edit Name:
Source
When you are watching TV and you want to
watch a movie on your DVD player or Blu-ray
player or switch to your cable box or STB
satellite receiver, you need to change the
Source.
1. Press the SOURCE button on your
remote.
■
Select the name of the device connected to each input jack
to make your input source selection easier.
✎ If you have connected a PC to the HDMI IN 1 (DVI)
2. Select a desired external input source.
■
VCR / DVD / Cable STB / Satellite STB / PVR STB /
AV Receiver / Game / Camcorder / PC / DVI PC / DVI
Devices / TV / IPTV / Blu-ray / HD DVD / DMA
port with an HDMI cable, select PC under Edit Name
to enter a device name.
TV / HDMI1/DVI / HDMI2 / AV / Component
✎ If you have connected a PC to the HDMI IN 1 (DVI)
✎ You can only choose external devices that are
connected to the TV. In Source, connected inputs are
highlighted.
port with an HDMI to DVI cable, select DVI PC under
Edit Name to enter a device name.
✎ If you connected an AV device to the HDMI IN 1 (DVI)
port with an HDMI to DVI cable, select DVI Devices
under Edit Name to enter a device name.
Information
You can see detailed information about the connected
external device.
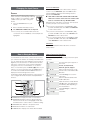
How to Operate the Main Menu
(OSD - On Screen Display)
How to Navigate Menus
Your TV’s Main and Tools menus contains functions that let
you control the TV’s features. For example, in the Main menu
you can change the size and configuration of the picture, its
brightness, its contrast and so on. There are also functions
that let you control the TV’s sound, channel configuration,
energy use, and a host of other features. To access the
main, on-screen menu, press the MENU (m) button on your
remote. To access Tools menus, press the TOOLS button.
Tools menus are available when the TOOLS menu Icon is
displayed on the bottom right of the screen.
The illustration below displays the buttons on the remote you
use to navigate the menus and select and adjust different
functions.
CONTENT
3D
The access steps may differ depending on the menu option
you select.
1
MENU
2
Ÿ/ź
3
4
5
ENTERE
6
7
ENTERE
1 MENU button: Displays the main on-screen menu.
2 ENTERE and Direction buttons: Use the Direction
buttons to move the cursor and highlight an item. Use
the Enter button to select an item or confirm the setting.
3 RETURN button: Returns to the previous menu.
4 EXIT button: Exits the on-screen menu.
5 TOOLS button: Displays Tools menus when available.
English - 12
Ÿ/ź
Ż/Ź
EXITe
The main menu options appear on
the screen:
Picture, Sound, Channel,
Network, System, Support.
Select a main menu option on the
left side of the screen with the Ÿ or
ź button.
Press ENTERE to access the
sub-menus.
Select the desired submenu with
the Ÿ or ź button.
Adjust the value of an item with the
Ż or Ź button. The adjustment in
the OSD may differ depending on
the selected menu.
Press ENTERE to confirm the
selection.
Press EXIT.
Using the TV’s Controller (Panel Key)
The TV’s Controller, a small joy stick like button on the bottom right side of the TV, lets you control the TV without the remote
control.
Function menu
CONTENT
m
R
s
P
Return
TV Controller
Remote control sensor
Power on
Turn the TV on by pressing the Controller when the TV is in standby mode.
Adjusting the
volume
Adjust the volume by moving the Controller from side to side when the power is on.
Selecting a channel
Select a channel by moving the Controller backwards and forwards when the power is on.
Using the Function
menu
To view and use the Function menu, press and release the Controller when the power is on. To close the Function
menu, press and release the Controller again.
Selecting Contents
Home
With the Function menu visible, select CONTENT by moving the Controller backwards. The Contents Home main
screen appears. Select a media source by moving the Controller back and forth, and then pressing the Controller.
Selecting the Menu
(m)
With the Function menu visible, select the Menu (m) by moving the Controller to the left. The OSD (On Screen
Display) Menu appears. Select an option by moving the Controller to the right. Move the Controller to the right or left,
or backwards and forwards to make additional selections. To change a parameter, select the it, and then press the
Controller.
Selecting a Source
(s)
With the Function menu visible, open the Source (s) by pushing the Controller to the right. The Source screen
appears. To select a source, move the Controller back and forth. When the source you want is highlighted, press the
Controller.
Power Off (P)
With the Function menu visible, select Power Off (P) by pulling the Controller forwards, and then press the Controller.
✎ To close the Menu, Contents Home, or Source, press the Controller for more than 1 second.
✎ When selecting the function by moving the controller to the up/down/left/right directions, be sure not to press the
controller. If you press it first, you cannot operate it to move the up/down/left/right directions.
Standby mode
Your TV enters Standby mode when you turn it off and continues to consume a small amount of electric power. To be safe
and to decrease power consumption, do not leave your TV in standby mode for long periods of time (when you are away on
vacation, for example). It is best to unplug the power cord.
Using Contents Home
Contents Home provides easy, on-screen access to four functions that let you manage and access channels, set favorite
channels, access photos, videos, or music on USB devices, cameras, and PCs, select video sources, and set the TV to turn
on automatically when a show you want to watch is on. The four functions are listed below:
y Channel List: Lets you manage channels, select favorite channels, and delete channels from the Added Channel list (the
channels that appear when you press the CH button).
y AllShare Play: Lets you access, view, or play photos, videos, or music located on USB devices, digital cameras, cell
phones, and PCs. PCs and cell phones can be accessed wirelessly, through your wireless network.
y Schedule Manager: Lets you schedule shows and channels for viewing. When a show or channel is scheduled, the TV
automatically turns on at the set time and changes the channel to the selected channel.
y Source: Lets you select a connected external video source to view.
To access Contents Home, press the CONTENT button on your remote.
For more information about Contents Home, see the e-Manual.
English - 13
Installing the Wall Mount (Optional)
Wall or Ceiling Mounting
If you mount this product on a wall, it should be mounted only as recommended by the manufacturer. Unless it is
correctly mounted, the product may slide or fall, causing serious injury to a child or adult, and serious damage to the
product.
Installing the Wall Mount Kit
The wall mount kit (sold separately) lets you mount the TV on the wall. For detailed information about installing the wall mount,
see the instructions provided with the wall mount. Contact a technician for assistance when installing the wall mount bracket.
Samsung Electronics is not responsible for any damage to the product or injury to yourself or others if you elect to install the
wall mount on your own.
To order the wall mount, contact Samsung Customer Care at 1-800-SAMSUNG (1-800-726-7864).
Wall Mount Kit Specifications (VESA)
Install your wall mount on a solid wall perpendicular to the floor. Before attaching the wall mount to surfaces other than plaster
board, please contact your nearest dealer for additional information. If you install the TV on a ceiling or slanted wall, it may fall
and result in severe personal injury.
✎ NOTE
x
x
x
x
Standard dimensions for wall mount kits are shown in the table below.
x
For wall mounts that do not comply with the VESA standard screw specifications, the length of the screws may differ
depending on the wall mount specifications.
x
Do not fasten the screws too firmly. This may damage the product or cause the product to fall, leading to personal
injury. Samsung is not liable for these kinds of accidents.
x
Samsung is not liable for product damage or personal injury when a non-VESA or non-specified wall mount is used or
the consumer fails to follow the product installation instructions.
x
x
Do not mount the TV at more than a 15 degree tilt.
Samsung wall mount kits contain a detailed installation manual and all parts necessary for assembly are provided.
Do not use screws that do not comply with the VESA standard screw specifications.
Do not use screws that are longer than the standard length or do not comply with the VESA standard screw
specifications. Screws that are too long may cause damage to the inside of the TV set.
Always have two people mount the TV on a wall.
Product Family
TV size in
inches
VESA screw hole
specs (A * B) in
millimeters
Standard Screw
32~40
200 X 200
M6
LED-TV
4
46~60
✎
Quantity
400 X 400
M8
Remove the screws in the mounting holes before you install the wall mount.
Do not install your Wall Mount Kit while your TV is turned on. It may result in personal injury due to
electric shock.
English - 14
Configuring Network Connections after Initial Setup
If you did not configure the network connections during initial setup, you can configure them through the Network Settings
option in the Main menu.
Configuring a Wireless Network Connection
The instructions below are for wireless networks that use the Dynamic Host Configuration Protocol (DHCP) to configure
network connections automatically. Most wireless networks use DHCP. If your have a Static IP network, see the e-Manual for
configuration instructions.
To configure the network connection for a network that uses DHCP, follow these steps:
1. Connect your TV to your network as shown in the illustration on page 7.
2. Turn on your TV, press the MENU button on your remote, and the select Network ĺ Network Settings.
3. Select Start, and then press ENTERE button.
4. The Network function searches for available wireless network. When done, it displays a list of the available networks.
5. In the list of networks, press the Ÿ or ź button to select a network, select Next, and then press ENTERE button.
✎
If you have a WPS(PBC) compatible router, select WPS(PBC) instead, press ENTERE, and then follow the
directions on the screen. When done, go to Step 8.
6. Enter your network security key or WPS PIN using the remote.
✎
✎
✎
Enter numbers by pressing the number buttons on your remote.
Enter letters by selecting a letter using the Ÿ/ź/Ż/Ź buttons, and then pressing ENTERE.
To display capital letters (or redisplay small letters if capital letters are displayed), select Shift, and then press
ENTERE.
✎
To display symbols and punctuation, select , and then press ENTERE. To redisplay letters, select Shift, and
then press ENTERE.
7. When done, use the Ÿ/ź/Ż/Ź buttons to select Next if you have entered a security key or WPS PIN if you have
entered a WPS PIN, and then press ENTERE.
8. The TV checks the wireless connection. If the connection is successful, the “Wireless network and Internet connection
complete” message appears. The cursor jumps to Next. Press ENTERE.
✎
✎
For more detailed information, see “Setting the Wireless Network” in the e-Manual.
If you want to configure the connection manually, select IP Settings on the Network Connection screen. Set IP
Setting to Enter manually, and then enter the IP Address, Subnet Mask, Gateway, and DNS Server manually.
Configuring a Wired Network Connection
Most home networks use the Dynamic Host Configuration Protocol (DHCP) to configure network connections. Home networks
that support DHCP automatically provide the IP address, subnet mask, gateway, and DNS values your TV needs to access
the Internet so you don’t have to enter them manually. If your have a Static IP network, see the e-Manual for configuration
instructions.
To configure the network connection for a wired network that uses DHCP, follow these steps:
1. Connect your TV to your network as shown in one of the illustrations on page 8.
2. Turn on your TV, press the MENU button on your remote, and then select Network ĺ Network Settings. The Network
Settings screen will appear.
3. Select Start, and then press ENTERE button.
4. The Network Connection screen appears, and verifies the network connection. Network set up is complete.
✎
✎
If your TV cannot acquire network connection values automatically or if you want to set the connection manually,
select IP Settings on the network test screen. Set IP Setting to Enter manually, and then enter the IP Address,
Subnet Mask, Gateway, and DNS Server manually.
For more detailed information, see “Setting the Wired Network” in the e-Manual.
English - 15
How to View the e-Manual
You can find instructions for your TV’s features in the e-Manual in your TV. To use,
press the E-MANUAL button on your remote. Move the cursor using the right/left
buttons to highlight a main category. Use the up/down buttons to select a topic,
and then press the ENTERE button. The e-Manual displays the page you want to
see. To change pages, use the right/left buttons.
You can also access the e-Manual through the menu:
E-MANUAL
O MENUm ĺ Support ĺ e-Manual ĺ ENTERE
✎ If you want to return to the e-Manual, press the E-MANUAL button on your remote.
✎ You can not use the Try Now function if the menu is not activated.
Screen Display
TV Screen: Displays the program,
movie, video, etc. you are currently
watching.
The category list. Press l or r
button to select the category you
want.
Basic Features
Changing the Preset Picture Mode
Adjusting Picture Settings
Displays the sub-menu list. Use the
arrow buttons on your remote to
move the cursor.
Press the ENTERE button to
select the sub-menu you want.
Changing the Picture Options
Changing the Preset Sound Modes
Sound Settings
} Index
E Enter
e Exit
Operation Buttons:
} Blue (Index): Displays index screen.
E Enter: Select a category or sub-menu.
e Exit: Exit the e-Manual.
How to toggle between an e-Manual topic and the corresponding OSD menu(s).
Picture
Basic Features > Changing the Preset Picture Mode (1/1)
Picture Mode
Standard
Changing the Preset Picture Mode
Ŷ
Picture Mode t
O MENUm ĺ Picture ĺ Picture Mode ĺ ENTERE
Try Now
Picture modes apply preset adjustments to the picture. Select a mode using the
Ÿźbuttons, and then press ENTERE.
Backlight
10
Contrast
95
Brightness
45
Sharpness
50
N When connecting a PC, you can only select Entertain and Standard.
t Dynamic: Suitable for a bright room.
t Standard: Suitable for a normal environment.
t Natural: Suitable for reducing eye strain.
t Movie: Suitable for watching movies in a dark room.
t Entertain: Suitable for watching movies and games.
E-MANUAL
N It is only available when connecting a PC.
Color
Tint (G/R)
a Try Now b Home { Zoom } Index L Page e Exit
50
R50
R50
✎ This function is not enabled in some menus.
Method 1
Method 2
1. If you want to use the menu that corresponds to an
e-Manual topic, press the red button to select Try Now.
2. To return to the e-Manual screen, press the E-MANUAL
button.
1. Press the ENTERE button when a topic is displayed.
“Do you want to execute this?” appears. Select Yes,
and then press the ENTERE button. The OSD window
appears.
2. To return to the e-Manual screen, press the E-MANUAL
button.
English - 16
Viewing the Contents
Basic Features > Changing the Preset Picture Mode (1/1)
Changing the Preset Picture Mode
Ŷ
Contents Area: Contains the topic contents
if you selected a sub-menu. To move to the
previous or next page, press the l or r button.
Picture Mode t
O MENUm ĺ Picture ĺ Picture Mode ĺ ENTERE
Picture modes apply preset adjustments to the picture. Select a mode using the
Ÿź buttons, and then press ENTERE.
N When connecting a PC, you can only select Entertain and Standard.
t Dynamic: Suitable for a bright room.
t Standard: Suitable for a normal environment.
t Natural: Suitable for reducing eye strain.
t Movie: Suitable for watching movies in a dark room.
t Entertain: Suitable for watching movies and games.
N It is only available when connecting a PC.
a Try Now b Home { Zoom } Index L Page e Exit
Operation Buttons:
a Red (Try Now): Displays the OSD menu that corresponds to the topic. To return to the e-Manual
screen, press the E-MANUAL button.
b Green (Home): Moves to the e-Manual home screen.
{ Yellow (Zoom): Magnifies a screen.
} Blue (Index): Displays the Index screen.
L (Page): Moves to previous or next page.
e (Exit): Exit the e-Manual.
Using the Zoom mode
When you are viewing an e-Manual instruction page, press
the { Yellow (Zoom) to magnify the screen. You can scroll
through the magnified screen by using the u or d buttons.
✎ To return to the screen to normal size, press the
Changing the Preset Picture Mode
Ŷ
Picture Mode t
O MENUm ĺ Picture ĺ Picture Mode ĺ ENTERE
Picture modes apply preset adjustments to the picture. Select a mode using the
Ÿź buttons, and then press ENTERE.
RETURN button.
N When connecting a PC, you can only select Entertain and Standard.
t Dynamic: Suitable for a bright room.
t Standard: Suitable for a normal environment.
t Natural: Suitable for reducing eye strain.
t Movie: Suitable for watching movies in a dark room.
U Move R Return
How to search for a topic on the index page
1. Press the Blue (Index) button on the remote. The Index screen appears.
2. To search for a topic, press the left or right arrow button to select a letter. The Index displays a list of topics and keywords
that begin with the letter you selected.
3. Press the up or down arrow button to select a topic or keyword you want, and then press the ENTERE button to select
a topic you want to see.
4. The e-Manual page with the topic appears.
✎ To close the Index screen, press the RETURN button.
English - 17
Troubleshooting
If the TV seems to have a problem, first review this list of possible problems and solution. Also review the Troubleshooting
Section in the e-Manual. If none of the troubleshooting tips apply, visit www.samsung.com/support or call Samsung customer
Service at 1-800-SAMSUNG(1-800-726-7864).
Issues
Solutions and Explanations
Flickering and Dimming
If your Samsung Television is flickering or dimming sporadically, you may need to
disable some of its energy efficient features like the Eco Sensor or the Energy Saving
feature. If you follow below step with your remote, you can turn these features off or on.
y Energy saving: User Menu ĺ System ĺ Eco Solution ĺ Energy Saving
y Eco Sensor: User Menu ĺ System ĺ Eco Solution ĺ Eco Sensor
Component Connections / Screen
Color
If you find that the color on your Samsung television’s screen is not correct or black and
white, first run a Self Diagnosis on the TV to make sure there are no device issues.
y Self Diagnosis : User Menu ĺ Support ĺ Self Diagnosis ĺ Picture Test
If the problem does not appear in the Test Picture, try making sure :
y Your connections are all consistent. For example, if you’ve used the AV In jack on
your TV, make sure you have used the AV Out jack on your video source.
y You have connected your devices to the correct jacks. For example, if you use the
Component jacks, labeled Pb, Pr, and Y, to connect your TV and video source, make sure
you have connected the blue Pb jack on the video source to the blue Pb jack on the TV,
the red Pr jack on the source to the red Pr jack on the TV, and the yellow Y jack on video
source to the yellow Y jack on the TV..
Screen Brightness
If you find that the colors on your Samsung TV are correct but just a little too dark or
bright, try adjusting the following settings in the Picture option of the Main menu:
y Backlight, Contrast, Brightness, Sharpness, Color, Tint and so on.
Unwanted Powering Off
If your Samsung TV appears to turn off by itself, there may be an issue with either your
Timer settings or your Eco friendly No Signal Power Off feature.
First make sure the Sleep Timer is not accidentally set. The sleep timer turns the TV off
after a certain period of time.
y Sleep Timer : User Menu ĺ System ĺ Time ĺ Sleep Timer
If the Sleep Timer is not activated, you may have engaged the No Signal Power Off or
Auto Power Off feature.
y No Signal Power Off : User Menu ĺ System ĺ Eco Solution ĺ No Signal Power Off
y Auto Power Off : User Menu ĺ System ĺ Eco Solution ĺ Auto Power Off
Trouble Powering On
Before you turn the TV on, find the red light on the right or left bottom of your TV.
Press the power button on the TV or remote and the light should blink about 5
times before the TV turns on.
If you find that you are having trouble powering on your Samsung television, there are a
number of things to check before making a call to the service department.
y If you happen to be using the TV as a monitor and the stand-by light only blinks for a few
seconds when you press the power button, your PC is in sleep mode. To take your PC out of
sleep mode, press a key on your keyboard or move the mouse. Then try turning your TV on.
If you’re sure your power cord, remote control, and PC are functioning properly, you may
be having a cable issue. If you have a cable or satellite box, your TV may appear to be off
because the cable or satellite box is not outputting a signal. To test the signal output of your
cable or satellite box, press the guide or info button on the cable or satellite box remote
control. If the screen displays the guide or info data, the problem is caused by the box.
Cannot Find a Channel
t Re-run Setup (Go to Menu - System - Setup) or run Auto Program. (Go to MENU Channel - Auto Program).
✎ For detailed troubleshooting information, watch the troubleshooting videos at
English - 18
www.samsung.com/spsn
Issues
Solutions and Explanations
The TV Won’t Turn On.
t Make sure the AC power cord is securely plugged in to the wall outlet and the TV.
t Make sure the wall outlet is working.
t Try pressing the POWER button on the TV to make sure the problem is not the remote. If
the TV turns on, refer to “The remote control does not work” below.
There is no picture/video.
t Check the cable connections. Remove and reconnect all cables connected to the TV
and external devices.
t Set the video outputs of your external devices (Cable/Sat Box, DVD, Blu-ray etc) to
match the TV’s input connections. For example, if an external device’s output is HDMI, it
should be connected to an HDMI input on the TV.
t Make sure your connected devices are powered on.
t Be sure to select the correct input source by pressing the SOURCE button on the
remote control.
t Reboot the connected device by unplugging it, and then reconnecting the device’s
power cable.
The Remote Control Does Not Work.
t Replace the remote control batteries. Make sure the batteries are installed with their
poles (+/–) in the correct direction.
t Clean the sensor’s transmission window on the remote.
t Try pointing the remote directly at the TV from 5~6 feet away.
The cable/set top box remote control
doesn’t turn the TV on or off, or
adjust the volume.
t Program the Cable/Set remote control to operate the TV. Refer to the Cable/Set Top Box
user manual for the SAMSUNG TV code.
✎ This TFT LED panel uses a panel consisting of sub pixels which require sophisticated technology to produce. However,
there may be a few bright or dark pixels on the screen. These pixels will have no impact on the performance of the
product.
✎ Some functions and pictures shown in this manual are available on specific models only.
✎ To keep your TV in optimum condition, upgrade to the latest firmware on the Samsung web site by USB (Go to samsung.
com ĺ Support ĺ Downloads).
Licenses
List of Features
y 3D: This exciting new feature enables you to view 3D content.
y AllShare Play: AllShare Play lets you access, view, or play photos, videos, or music located on USB devices, digital
cameras, cell phones, and PCs. PCs, cell phones, and other compatible devices can be accessed wirelessly, through your
wireless network.
English - 19
Securing the TV to the Wall
Caution: Pulling, pushing, or climbing on the TV may cause the TV to fall. In particular, ensure your
children do not hang over or destabilize the TV. Doing so may cause the TV to tip over, causing serious
injuries or death. Follow all safety precautions provided in the included Safety Flyer with your TV. For
added stability and safety, you can purchase and install the anti fall device as described below.
The TV-Holder Kit (Sold Separately):
The parts below are included in the TV Holder kit. In addition, you need to provide a wood screw, a screw and molly, or other
screw appropriate for the wall or cabinet you intend to secure the TV-Holder string to. We recommend a size M4xL20 wood
screw.
TV-Holder (BN96-15753A)
Screw (M8 X L19)
Installing the TV-Holder
1. Remove the screw attached to the back of your TV, and then connect the TV-Holder to the TV with the screw included in
the TV-Holder Kit that is designated for your TV.
✎
Make sure to use only the appropriate supplied screw. If you use a different screw, you can damage your TV.
2. Firmly fasten the screw you provided (size M4 x L20 or similar) to the wall or cabinet where the TV is to be installed.
✎
If you fasten the screw to the wall, we recommend you drive the screw into a stud. If that is not possible, use a
molly to anchor the screw.
3. Tie the TV-Holder cord to the screw fastened to the wall or cabinet so that the TV is fixed. See the illustrations below.
✎
✎
✎
✎
Install the TV close to the wall so that it does not fall.
When attaching the TV-Holder cord to the wall, tie the cord level with the ground or slanted downwards for safety
purposes.
Check the cord occasionally to make sure it is secure.
Before moving the TV, separate the connected cord first.
Wall
4. Verify all connections are properly secured. Periodically check the connections for any sign of fatigue or failure. If you have
any doubt about the security of your connections, contact a professional installer.
To purchase the TV-Holder Kit, contact Samsung Customer Care
–
–
In the United States: 1-800-SAMSUNG (1-800-726-7864)
In Canada: 1-800-SAMSUNG (1-800-726-7864)
English - 20
Specifications
Display Resolution
1920 X 1080
Environmental Considerations
Operating Temperature
Operating Humidity
Storage Temperature
Storage Humidity
50°F to 104°F (10°C to 40°C)
10% to 80%, non-condensing
-4°F to 113°F (-20°C to 45°C)
5% to 95%, non-condensing
Model Name
UN40FH6030
UN46FH6030
Screen Size
(Diagonal)
40” Class
(40.0” measured diagonally)
46” Class
(45.9” measured diagonally)
Sound (Output)
Dimensions (W x H x D)
Body
With stand
Weight
Without Stand
With Stand
10W X 2
36.5 X 21.5 X 3.6 inches
(927.5 X 548.0 X 93.1 (mm))
36.5 X 23.9 X 8.9 inches
(927.5 X 607.2 X 227.6 (mm))
41.7 X 24.5 X 3.7 inches
(1060.0 X 622.5 X 96.2 (mm))
41.7 X 26.8 X 8.9 inches
(1060.0 X 681.1 X 227.6 (mm))
19.6 Ibs (8.9 kg)
24.0 Ibs (10.9 kg)
24.9 Ibs (11.3 kg)
29.3 Ibs (13.3 kg)
Model Name
UN55FH6030
Screen Size
(Diagonal)
55” Class
(54.6” measured diagonally)
Sound (Output)
10W X 2
Dimensions (W x H x D)
Body
49.2 X 28.7 X 3.7 inches
(1251.4 X 730.1 X 94.4 (mm))
49.2 X 31.0 X 8.9 inches
(1251.4 X 789.6 X 227.6 (mm))
With stand
Weight
Without Stand
With Stand
39.6 lbs (18.0 kg)
45.4 lbs (20.6 kg)
✎ Design and specifications are subject to change without prior notice.
✎ This device is a Class B digital apparatus.
✎ For information about the power supply, and more about power consumption, refer to the label attached to the product.
✎ Typical power consumption is measured according to Energy Star Program requirements for Televisions.
Dispose unwanted electronics through an approved recycler.
To find the nearest recycling location, go to our website:
www.samsung.com/recyclingdirect Or call, (877) 278 - 0799
English - 21
Supported Video Formats
File Extension
Container
Video Codec
Resolution
Frame rate (fps)
Bit rate (Mbps)
Audio Codec
30
AC3
LPCM
ADPCM
(IMA, MS)
AAC
HE-AAC
WMA
DD+
MPEG(MP3)
DTS Core
G.711(A-Law,
μ-Law)
DivX 3.11/4.x/5.x/6.x
*.avi
*.mkv
*.asf
*.wmv
*.mp4
*.3gp
*.vro
*.mpg
*.mpeg
*.ts
*.tp
*.trp
*.mov
*.flv
*.vob
*.svi
*.divx
MPEG4 SP/ASP
AVI
MKV
ASF
MP4
3GP
VRO
VOB
PS
TS
1920 x 1080
H.264 BP/MP/HP
Motion JPEG
640 x 480
6~30
8
Window Media Video v9
MPEG2
1920 x 1080
30
MPEG1
Storage and Maintenance
✎ If a sticker was attached to the TV screen, some debris can remain after you remove the sticker. Please clean the debris
off before watching TV.
✎ The exterior and screen of the product can get scratched during cleaning. Be sure to wipe the exterior and screen
carefully using the cloth provided or a soft cloth to prevent scratches.
Do not spray water directly onto the product. Any liquid that
goes into the product may cause a failure, fire, or electric
shock.
Clean the product with a soft cloth dampened with a
small amount of water. Do not use a flammable liquid (e.g.
benzene, thinners) or a cleaning agent.
English - 22
JACK PANEL DETAIL / REAR VIEW
5
1
6
4
2
3
(Unit: inches)
1
2
3
4
UN40FH6030
9.6
5.8
6.0
24.1
7.8
7.8
UN46FH6030
11.2
5.3
7.3
29.8
15.7
15.7
UN55FH6030
15.6
6.2
7.8
36.4
15.7
15.7
Model name
5
6
NOTE: All drawings are not necessarily to scale. Some dimensions are subject to change without prior notice. Refer to the
dimensions prior to performing installation of your TV. Not responsible for typographical or printed errors.
© 2012 Samsung Electronics America, Inc
English - 23
Contact SAMSUNG WORLDWIDE
If you have any questions or comments about your Samsung TV, please contact the SAMSUNG customer care center.
Comment contacter Samsung dans le monde
Si vous avez des suggestions ou des questions concernant les produits Samsung, veuillez contacter le Service Consommateurs
Samsung.
Comuníquese con SAMSUNG WORLD WIDE
Si desea formular alguna pregunta o comentario en relación con los productos de Samsung, comuníquese con el centro de atención al
cliente de SAMSUNG.
Country
CANADA
Address
Samsung Electronics Canada Inc.,
Customer Service
55 Standish Court Mississauga
Ontario L5R 4B2 Canada
Customer Care
Center
1-800-SAMSUNG (726-7864)
Web Site
www.samsung.com/ca (English)
www.samsung.com/ca_fr (French)
U.S.A
Samsung Electronics America, Inc.
85 Challenger Road
Ridgefield Park, NJ 07660
www.samsung.com
BN68-04458E-00
© 2012 Samsung Electronics Co., Ltd. All rights reserved.
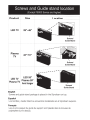
Assemble Stand before removing TV from shipping box
Scan this with your SMART Phone for How-to Video
Visit us samsung.com/SPSN for more Video guides
0
Installing the TV Stand
@~
Components
' · when installing the stand, use the provided components and parts.
~
or
x8(M4XL12)
1
Stand (depending on the model)
I! :-----------:
o·/:§):
ct
·a
V
Guide Stand
\\
Screws
-----
!
- - - - - - - - - - -
@~x4
,
Top View
1
:~:
(M4XL12)
I
I
I
I
'
® ··
:
0
~
I
~
I
G
0
. '''::: @@@ ! ~---~~ATTENTION
1
I
I
DO NOT USE DO NOT USE DO NOT USE
CHEMICALS
GREASE
1
OIL
-----------------
~
Insert the Stand Guide into the slot of TV bottom side.
(Incorrect assembly)
-----------------------~---~
'
' '
-------
Place a soft cloth over the table to protect the TV, and then
place the TV on the cloth screen side down.
(Correct assembly)
Side View
0
:
0
@~x4 ---(M4XL12)
:
Function menu
Caution
)>
)>
---......
Make sure to distinguish between the front and back of each component when assembling them.
Make sure that at least two persons lift and move the TV.
BN68-04027A-03
1111111111111111111111111111111111111111111
BN68-04027A-03
Screws and Guide stand location
(Except F8000 Series and higher)
Location
LED TV
26"----46"
Screws/
Guide-Stand
------ -----Plasma
TV
43"----51"
---Screws/
Guide-Stand
------LED 55"
LED TV Plasma 59"
Plasma TV
And larger
.............. ....
Screws/
Guide-Stand
English
Screws and guide stand package is placed in the Styrofoam on top.
Espaiiol
Los tornillos y Guide Stand se encuentran localizados en el Styrofoam superior.
Fran~ais
Les vis et le paquet du guide du support sont places dans Ia mousse de
polystyrene sur le dessus.
Top 6 Troubleshooting Tips
1. Can't Connect with Network or Apps (For internet supported model only)
• Make sure there is a network connection
(Menu --7 Network --7 Network status)
• Contact your internet service provider
2. No Picture/Sound or Distorted Picture/Sound with an External Device
• Make sure your connection to the device is correct.
• Perform a TV Self Diagnosis to identify the problem
(Menu --7 Support --7 Self Diagnosis --7 Sound or Picture Test)
• Change the picture size (Use "P. Size" button on your remote)
3. Poor Picture Quality
• Verify your signal is High Definition or Standard Definition
(Contact your service provider)
TV 6 Problemas Principales
1. No se puede conectar con Ia Red o Apps (Solo para modelos que
soporten conexi6n a internet)
• Asegurese que el equipo este conectado a una red
(Menu-? Red-? Estado de Red)
• Contactar a su proveedor de Internet
2. No hay lmagen/sonido o Distorsi6n de lmagen/sonido con un
dispositivo externo
• Asegure que Ia conexi6n fisica del dispositivo sea correcta
• Para identificar el problema, real ice un Auto diagnostico en Ia 1V
(Menu --7 Soporte Tecnico--7 Autodiagnostico--7 Prueba de Imagen o Sonido)
• Cambie el tamano de Ia imagen (Proveedor de Servicio de Internet)
3. Mala Calidad de Imagen
• Verificar si su seiial es Alta Definicion o Definicion Regular
(Contactar a su proveedor de Servicios)
4. Your Settings are Lost after 30 Minutes
• Change to Home Mode
(Menu-? Support --7 Use Mode -?Home Use)
4. Su configuraci6n se pierde despues de 30 minutos
• Cambiar a Uso Domiciliario
(Menu-? Soporte Tecnico--7 Modo de Uso --?Uso domiciliario)
S. "Weak or No Signal" Displayed in TV Mode/Cannot Find Channel
• Press Source button on your remote
• Run Auto Program and search for channels
(Menu-? Broadcasting( Channel)-? Auto Program)
5. "Senales Debiles o lnexistentes" Mensaje desplegado en
TV Mode I No puede encontrar canales
• Presione el bot6n "Source" en su control remoto
• Corra Auto Program e inicie busqueda de canales
(Menu --7 Emision --7 Prog.Automatica)
6. Can't See All Apps or Apps Not Working
Reset Smart Hub
(Menu-? Smart Features --7 Smart Hub Reset
Enter with password, Default password is 0000)
6. Nose ven todas Ia Aplicaciones o no funcionan
Restablecer Smart Hub
(Herramientas en Ia pagina principal de Funciones Smart--?Restablecim. Smart Hub
lntroducir Ia Contrasena, Ia Contrasena Predeterminada es 0000)
English
When you lift up a 55" or larger 1V, your thumd touches the sareen directly, you
can damage the screen. Samsung recommends you lift up the 1V as shown in PIC.
Espar'iol
Cuando se levante una 1V de 55" o mayor, si el dedo pulgar toea Ia pantalla
directamente, puede dafiar Ia pantalla. Samsung recomienda que levante Ia 1V
como se muestra en Ia FIG.
Fran~ais
Lorsque vous soulevez un televiseur 55" ou plus, si votre pouce touche directement
al' ecran , vous pouvez en dommager l'e cran. Samsung recommande vous soulevez
le televiseur, comme indique dans Ia photo.
~ Screen Care Guide
•
•
English
Do not spray cleaning solutopn directly onto the 1V screen . Spray the solution onto
a cleaning cloth first, and then clean the screen.
Scan the QR code to view
our helpful How-to Videos
Escanea r el Codigo QR para ver nuestros videos
d emostra t ivos d e Video Guia
Espar'iol
No rocie Ia soluci6n de limpieza directamente sobre Ia pantalla del televisor.
Rocie Ia soluci6n sobre un pano de limpieza, y luego limpie Ia pantalla.
Fran~ais
Ne pas pulveriser Ia solution de netto yage direnctement sur l'e cran du televiseur.
Pulveriser Ia solution sur un chiffon de netto yaged ' abord, puis nettoyer l'e cran .
Support Options
Search helpful video
samsung.com/spsn
Chat
REQUIRE ASSISTANCE
WITH YOUR PRODUCT
Purchase any Samsung TV and you'll enjoy
the convenience of Samsung Service. So, if
you require any assistance with your TV,
first try any of Samsung's helpful support
options listed here or call Samsung Support
to schedule a technician visit.
samsung.com/support
Scan this with your
smartphone
Call Samsung Support
1-888-899-7604
Remote Support
samsungsupport.com/remortsupport
Para :. ·,,~ n problema
Buscar ayuda de video
samsung.com/spsn
Chat
Necesita Soporte Tecnico
con su producto?
A Ia compra de cualquier TV Samsung
disfrutaras el servicio tecnico conveniente
de Samsung, esto permite que si usted
requiere de cualquier asistencia con su
Televisor, primero trate con cualquiera de
nuestras opciones utiles que aparecen en
esta lista, o llame a nuestro soporte tecnico
para que un tecnico le asista.
I 111111111111111111111111
BN68-05444A-OO
Escanea esto con tu
smartphone
samsung .com/support
Llamar al Soporte Samsung
1-888-899-7604
.
Soporte Remote
samsungsupport.com/remortsupport
ow
PG A
ODI E
I
•
The Most HD!
II
.lng Pi uDtREcTv delivers more full-tome HD channels than any
other cable or satellite provider-over 190-mcluding
local channels} You'll get access to the most movies
In 1080p' wtth Dolby" Digital 5.1 Surround Sound.' for a
viewing experience that redefines home entertainment'
Get access to the HD channels you really want
Plus, get up to 47 premium channels FREE for
3 months with the ENTERTAINMENT Package or higher!'
MtrtatiiiO'f
h lrfQ
IGIDJ
H8G)
starz.
:filtWJJME.
Sharpest picture available with the most movies in
many with Dolb~ Digital 5.1 Surround Sound5
1080p~
.... 11)..,.......... ,..
Exclusive provider of NFL SUNDAY TICKET
Get bundled Internet and phone services coast-to-coast
with top names like AT&-r- and Centurylink•
Genie, the most advanced HD DVR ever,
only from DIRECTV. An HD DVR
so advanced, your every TV wish is granted.
•
•
•
•
Genie powers your entire home with 1HD DVR6
Genie eliminates inconvenient cable boxes~
Genie stores all your favorite shows.
Genie lets you record any 5 shows at once!
Watch the same movies and shows anywhere-on your TVs at home. plus your
laptop, tablet or cell phone. At no extra charge!
,....,.,.,....--d~t..
WjCod........ - -
... ~YOUR Ol!t .E DEVICES ARt POR 3LE YS
Turn your iPad* into a portable TV and watch your favorite channels anywhere in
yourhome!O
S'TliEAM 'HOU~ANOSOF§'I01'5A 0 OVI~IIT 10 :Y
Instantly watch your favorite shows & movies from networks like HB~ STARZ~
SHOWTIME• . Nickelodeon. HGTV. A&E. Comedy Central and more-anytime.
anywhere, on any devtee?
e
~fldrltftUvanbnra•IIOJZ111119~
s !ARTS.. CH
enables you to search all channels, all movies, either On Demand or streaming.
SAVE s120 when you call this dedicated number:
_,.,_IIIIOOil l ilOJOT-o"""'ll_.,..,_,_..
or visit samsung.directv.com
FX ~
5
This symbol indicates that high voltage is present
inside . It is dangerous to make any kind of contact
with any internal part of this product.
CAUTION: TO REDUCE THE RISK OF ELECTRIC SHOCK, DO NOT
REMOVE COVER (OR BACK). THERE ARE NO USER SERVICEABLE
PARTS INSIDE. REFER ALL SERVICING TO QUALIFIED PERSONNEL.
This symbol alerts you that important literature
concerning operation and maintenance has been
included with this product.
• The slots and openings in the cabinet and in the back or bottom are provided for necessary ventilation. To ensure reliable operation of this
apparatus, and to protect it from overheating, these slots and openings must never be blocked or covered.
- Do not cover the slots and openings with a cloth or other materials.
- Do not block the slots and openings by placing this apparatus on a bed, sofa, rug or other similar surface.
- Do not place this apparatus in a confined space, such as a bookcase, or built-in cabinet, unless proper ventilation is provided.
• Do not place this apparatus near or over a radiator or heat resistor, or where it is exposed to direct sunlight.
• Do not place a water containing vessel( vases etc.) on this apparatus, as this can result in a risk of tire or electric shock.
• Do not expose this apparatus to rain or place it near water( near a bathtub, washbowl, kitchen sink, or laundry tub, in a wet basement, or
near a swimming pool etc.). If this appratus accidentally gets wet, unplug it and contact an authorized dealer immediately.
Make sure to pull out the power cord from the outlet before cleaning.
• This appratus uses batteries. In your community there might be regulations that require you to dispose of these batteries properly under
environmental considerations. Please contact your local authorities for disposal or recycling information.
• Do not overload wall outlets, extension cords or adaptors beyond their capacity, since this can result in fire or electric shock.
• Power-supply cords should be routed so that they are not likely to be walked on or pinched by items placed upon or against them, paying
particular attention to cords at plug end, adaptors and the point where they exit from the appliance.
• To protect this apparatus from a lightning storm, or when it is left unattended and unused for long periods of time, unplug it from the wall
outlet and disconnect the antenna or cable system. This will prevent damage to the set due to lightning and power line surges.
• Before connecting the AC power cord to the DC adaptor outlet, make sure the voltage designation of the DC adaptor corresponds to the
local electrical supply.
• Never insert anything metallic into the open parts of this apparatus. Doing so many create a danger of electric shock.
• To avoid electric shock, never touch the inside of this apparatus. Only a qualified technician should open this apparatus.
• Make sure to plug the power cord in until it is firmly inserted. When removing the power cord, make sure to hold the power plug when
pulling the plug from the outlet. Do not touch the power cord with wet hands.
• If this appratus does not operate normally - in particular, if there are any unusual sounds or smells coming from it
- unplug it immediately and contact an authorized dealer or service center.
• Be sure to pull the power plug out of the outlet if the TV is to remain unused or if you are to leave the house for an extended period of
time (especially when children, elderly or disabled people will be left alone in the house).
- Accumulated dust can cause an electric shock, an electric leakage or a fire by causing the power cord to generate sparks and heat or the
insulation to deteriorate.
• Be sure to contact an authorized service center, when installing your set in a location with heavy dust, high or low temperatures, high
humidity, chemical substances and where it operates for 24 hours such as the airport, the train station etc.
Failure to do so may cause serious damage to your set.
• Use only a properly grounded plug and receptacle.
- An improper ground may cause electric shock or equipment damage. (Class I Equipment only.)
• To disconnect the apparatus from the mains, the plug must be pulled out from the mains socket, therefore the mains plug shall be readily
operable.
• Do not allow children to hang onto the product.
• Store the accessories (battery, etc.) in a location safely out of the reach of children.
• Do not install the product in an unstable location such as a shaky self, a slanted floor or a location exposed to vibration.
• Do not drop or impart any shock to the product. If the product is damaged, disconnect the power cord and contact a service center.
• Unplug the power cord from the power outlet and wipe the product using a soft, dry cloth. Do not use any chemicals such as wax, benzene,
alcohol, thinners, insecticide, air freshener, lubricant or detergent. This may damage the appearance or erase the printing on the product.
• Apparatus shall not be exposed to dripping or splashing.
• Do not dispose of batteries in a fire.
• Do not short circuit, disassemble or overheat the batteries.
• Danger of explosion if battery is incorrectly replaced. Replace only with the same or equivalent type.
• WARNING- TO PREVENT THE SPREAD OF FIRE, KEEP CANDLES OR OTHER OPEN FLAMES AWAY
FROM THIS PRODUCT AT ALL TIMES.
-English-
ATTENTION
AITE:-JTIO' POUR REDL!IRE LES RJSQLES D'ELEC'TROCUTION. \E
RETIREZ PAS I.E CAPOT (NILE PAN~EAL! ARR!FRE). A LT\ITERIELR OE
L'APPAREIL. AUCUNE PIECE NE PEUT ETRE REPARH PAR L'UTIUSATELJR.
POUR TOUT DEPANNAGE. ADRESSEZ-VOUS A UN SPECIALISTE
Ce symbole indique qu'une tension ClevCe est
pn!seme fl l'interieur de l'appareil. Tout contact
avec une piCce situee a l'intericur de cet appareil
est dangereux.
Ce symbole vous previem qu'une documentation
importame relative au fonctionnemem et a
l'entretien est foumie avec \e produit.
• Les fentcs ct les ouvertures menagees dans le boitier ainsi qu'it l'arrii:re et au-dessous de l'apparcil assurent Ia ventilation de ce demier.
Afin de garantir le bon fonctionnement de l'appareil ct Cvirer les risqucs de surchauffc, ces fentes et ouvertures ne doi vent etre ni obstruCcs
ni couvertes.
- Ne couvrez pas les fentcs ct lcs ouvertures avec un marceau de tissu ou tout autre objet.
- Nc les obstruez pas non plus en pl a~ant J'appareil sur unlit, un canape, un tapis au toute autre surface apparcntCc.
- Ne placcz pas l'appareil dans un environnement clos tel qu 'une bibliutheque ou une armoire ~ncast rCe, saufsi une ventilation adequate
est prevue_
• Ne placcz pas J'appareil a proximitf ou au-dessus d'un radiateur ou d'une bouche d'air chaud, de mCme que dans un cndroit expose a Ia
lumiCrc dircctc du solei I.
• !\'e placez aucun n!cipient(vases etc.) d'eau sur l'appareil car cela represente un risque d'inccndie ou de dechargc electrique_
• 't\"'exposez pas l"appareil 3 Ia pluic ct ne le placez pas a proximitC d'une source d'eau. par exemple unc baignoire, un lavabo, un evier, un
bac de lavage, un sous-sol humide, une piscine, etc. Si l'app areil vient a etre mouil\e par accident. debranchez-le et contactez
immediatement un revendeur agree. Assurez-vous que le cordon d'alimentation est debranche avant de nettoyer le produit.
• Cet appareil peut fonctionner sur piles. Dans un souci de preservation de l'environnernent, Ia reglememation lncak prt:!voit peut-Ctre des
mesures specifiques de recuperation des piles usagees.Vcuillez done contacter les autorites competentes atin d' obtenir des informations sur
Ia mise au rebut ou le recyclage des piles.
• Evitez de surcharger lcs prises murales, les rallongcs ctles prises mult iples car cela entrainc un risque d'inccndie ou de dechargc elcctrique_
• Les cordons d'alimentation doivent etre dCroules de sorte qu'aucun objet place sur ou contre eux ne les chevauche au les pince.
Accordez une attention particuliere aux cordons au niveau des fiches, des prises et de !<J sortie de J'appareil.
• En cas d'orage, ou bien lorsque vous vous absentez ou n'utilisez pas votrc appareil pendant unc longue pCriodc, dCbranchc-z cclui-ci de Ia
prise murale et debranchez Cgalement le ciible d'antenne oule cordon de connexion au rCseau dibh!.
Ccs precautions Cviteront que l'appareil ne soit endommage par Ia foudrc ou par des surtc-nsions.
• Avant de raccorder le cordon d'alimentation CA a Ia prise de l'adaptateur CC, vCrifiez que Ia tension indiquee sur ce demier correspond
bien a Ia tension dCiivrCe par le reseau Clectrique local.
• N' inserez aucun objet metallique dans les ouvertures de l'apparcil. vous risquericz de rcccvoir unc dCcharge electriquc.
• Afin d'Cviter tout risque d'electrocution, ne mettezjamais les doigts a l'interieur de l'appareil.
Scul un tcchnicicn qualifiC est habilite aouvrir le boitier de l'appareil.
• Assurez-vous de bien brancher le cordon d'al imentation. Assurez-vous de bien tenir Ia prise en main lorsquc vous Ia debranchez.
Ne touchez en aucune circonstance le cordon d'<ilimentation avec Jes mains mouil\Ces.
• Si l'appareil ne fonction ne pas normalcmcnt, en particulicr s'il Cmct des odeurs oudes sons anormaux, dCbranchez-le immCdiatement et
contactez un revendeur ou un centre de depannage agree.
• Veillez abien dCbrancher le cordon d'alimentation si Ia tCh::vision doit rcstCe inutilisCe, ou lorsque vous quittez votre domicile, pendant une
pCriode assez longue (et plus spCcialement sides enfants, des personnes agees ou des majeurs incapables doivcnt rester scul a votre domicile).
- L'accumulation de poussiCres peut provoquer unc Clectrocution, une perte d't~ncrgie, ou un incendie induit par le cordon d'a\imentation,
dU ades variations de tension, une surchauffe au une dCtCrioration de !'isolation.
• Veillez acomactcr un centre de services homologue lorsque vous installez votre tCICviseur dans un endroit tres poussiereux, humide,
expose ades temperatures eJcvCes ou fa ibles ou ades produits chi miques, ou s'il fonctionnc sans interruption, par cxemple dans les
aeroports, Jes gares, etc. Si vous ne le faites pas, vous risquez d'cndommagcr gravcmcnt votrc tCICviscur.
• Utiliser uniquement des prises correctement re\iees a Ia terre.
- Un sol inadapte peut causer un choc Clectrique ou un incendie. (Appareils de CLASSE I uniquement.)
• Pour dCeonnecter l'appareil du secteur, Ia prise doit Ctre debranchee de Ia prise Clectriquc du secteur. Par consequent, Ia prise du sectcur doit
etre en etat de marche.
• Utiliser uniquernent des prises correctcment reliCcs it Ia terre
• Rangez les accessoires (batterie, etc.) dans un endroit stir, hors de Ia ponCe des enfants_
• N'installez pas le produit sur une surface instable tcllc qu'une CtagCrc chance\ante, un sol non horizontal ou un endroit soumis ades vibrations.
• Ne faites ni tomber, ni subir de choc au produit. Si Je produit est endommagC, dCconnectez le cordon d'ali mcntation ct contactez un centre
de services.
• Oebranchez le cordon d'alimentation de Ia prise secteur et essuyez le produit a \' aide d'un chiffon doux et sec. :"J'utilisez pas de produit
chimique, tels que de Ia eire. du benzene, de J'alcooL du diluant, de J'insccticidc, du dCsodorisant, du Jubriliant ou du detergent.
Cela peut cndommager !'aspect au etlacer \'impression sur l'appareil.
• L'appareil ne doit pas etre expose 3 J'humidite ni aux Cclaboussures.
• Ne jetez pas les batteries au feu.
• Nc court-circuitez pas nine dfsassemblez les batteries et ne les soumcttez pas a unc chaleur excessive.
• Un risque d'explosion survient si Ia battcric est rcplacee de maniCrc incorrecte. Ne Ia remplacez qu'avec une batteric du
mCme type.
• AVERTISSEMENT- POUR EVITER TOUT RISQUE D'INCEN DJE, VEILLEZ
BOUGIES OU D'AUTRES SOURCES DE FEU.
- Franvais -
AGARDER CE PRODUIT LOIN DE
F.sre simbolo indica Ia presencia de alto voltajc en
PRECAUCION
el interior. Es pdigroso entrar en contaeto con
cualquit!r picza interior de estc produclo.
PRECAUCION:PARA REDUCIR EL PELIGRO DE DESCARGA
El.f:C'I'RICA. NO RETIRE LA CCBIERTA. NO HAY PI EZAS EN EL
INTERIOR QuE PUEDA REPARAR LL USUARIO.
CONSU I.TE AL PERSONAL CALIFICADO DE SERVICIO TECNICO.
Este simbolo le alerl<l de que con este producto se
incluye documentaci6n importame corrcspondicntc al
funcionamicnto y mantenimicnto.
• Las ranuras y aberturas existentes en Ia unidad yen Ia parte trascra o infCrior se facilitan para proporcionar Ia ventilaciOn necesaria. Para
garantizar el funcionamiento iiablc de este aparato, y para protegerlo frcnte a sobrecalentamiento, estas ranuras y aberturas nunca deben
bloquearse ni cubrirse.
- No cubra las ranuras y aberturas con un pmlo o con cualquier otro material.
- No bloquee las ranuras ni aberturas colocando cste aparato sobre Ia cama, sofa, alfombra o superficie similar.
- No coloque este aparato en un espacio cerrado, como una libreria, o un annario empotrado, a menos que sc proporcione una ventilaei6n
correcta.
• No coloque este aparato cerca o sobre un radiador o una rcjilla de aire caliente, o en Jugares expuestos a luz solar directa.
• No coloque recipientes con agua subre este aparato(jarros, etc.), ya que podria representar riesgo de ineendio o desearga e\ectrica.
• No cxponga cstc aparato a Ia 1\uvia ni lo coloque cerca de agua (cerca de-una bafiera. lavabo, fregadero o lavadero, en un sOtano htimedo
ni cerca de una piscina o similar). Si este aparato accidentalmente se moja, dcsenchllfelo y p6ngasc en contacto inmediatamente con un
distribuidor autorimdo. Antes de limpiar el producto desconecte el cable de alimentaci6n de Ia toma de corriente.
• Estc aparato utiliza baterias. En su comunidad puede que existan normativas que requieran Ia disposiciOn de cstas baterias de fo nna
adecuada bajo consideraciones ambientales.
POngase t:n ~.:ontac to con las autoridades locales para obtcner informaciOn sabre desecho y reciclaje.
• No sobrecargue las tomas murales, los alargadores ni los recept3culos correspondientcs por encima de su capacidad. ya que csto puede
generar incendios o descargas elecrricas.
• Los c<lblc:s de alimentaci6n y protecci6n deben colocarse de forma que no pucdan pisarse ni quedar atrapados par objetos encima o contra ellos,
ponicndo especial atenci6n en los cables cerca del enchufe, los reccpt<iculos de los electrodomesticos y el punto en el que salen del aparato.
• Para protegcr este aparato durante una tormenta clectrica o cuando no lo utilice durante largos periodos de tiempo. desenchllfclo de Ia toma
de Ia pared y desconecte Ia antena o el cable del sistema. Esto evitar<i que el equipo se daiie por rayos o picas de tensiOn de Ia linea electriea.
• Antes de conectar el cable de alirnentaci6n de CA a Ia toma del adaptador de CC, asegtirese de que Ja designaci6n del voltaje del
adaptador de CC corresponde a Ia Fuente clCctrica local.
• Nunca inscrte nada met<ilico en las aberturas del aparato. Hacerlo asi puede crear peligros de descarga clectrica.
• Para evitar desearga e!Cctrica. no toque nunea el interior de este aparato. S61o un tfcnico cualificado debe abrir el alojamiento del aparato.
• Cuando conecte cl cable de alimentaci6n compruebe que e\ enchufe este finnemente insertado. Para dcscnchufar e\ cable de alimcntaci6n, sujetelo
pore\ enchufe y tire de este para sacarlo de Ia toma de corricntc. Nunca toque c\ cable de alimentaci6n con las manos mojadas.
• Si este aparato no funciona normalrnentc. en concreto, si emite sonidos ex traiios o desprende olorcs desde el interior, desenchl1felo
inmediatamente y p6ngasc en contacto con cl distribuidor autorizado o cl centro de scrvicio tecnico.
• Asegllrese de desconectar el enchufe de ali mentaci6n de Ia toma de corriente si Ia TV ha dejado de utilizarse, o desea salir de casa, durante
un largo periodo de tiempo (especialmente cuando sea necesario dejar solos en casa a niiios, ancianos o personas incapacitadas).
- El polvo acumulado puede provocar una descarga e\Cctrica. un cortocircuito o un fuego. hacicndo que el cable e!Cctrico genere chispas y
calor, o deteriorando Ia funda protectora.
• P6ngase en contacto con un centro de servicio tCcn ico autorizado cuando instale d aparato en un Iugar expuesto a gran cantidad de polvo,
temperaturas extremas, alto nivel de humcdad y productos quimicos. yen lugares donde sc vaya a utilizar las 24 hrs del dia, como
aeropuertos, cstaciones. etc. El incumplimiento de estas indicaciones puede causar serios dcsperfectos en el aparato.
• Cuando instale el equipo, procure guardar una distancia de mAs de 10 em desde Ia pared para faeilitar Ia ventilaci6n.
• Use s6lamente conectores y recept<iculos apropiados para hacer Ia conexi6n a tierra.
-Una conexi6n a tierra inapropiada podria causar una descarga e!Cctrica o una avcria en el eq uipo. (SOlo equipo de Clase \. )
• Para descnnectar el aparato de Ia corriente. debe desenchufar el cable de Ia toma principal, porIa que el cnchufe principal debe estar
siempre tacilmentc acccsiblc.
• No penn ita que los nii'los jueguen con el producta.
• Guarde los accesorios (pi las, etc.) en un Iugar seguro fuera del alcance de los nifios.
• No coloque el producto en un Iugar inestable. inclinado o expucsto a vibraciones.
• No Jo deje caer ni lc dC golpes. Si el producto se estropea. desenchufe cl cable de alimentaci6n y p6ngase en contacto con un
centro de servicio.
• Dcsconccte cl cable de alimcntaci6n de Ia toma de corriente y sequc c\ aparato con un paiio suave y scco. No uti lice ninglm producto
quimico como cera. benzol, alcohol. disolvcntcs, insecticida, ambicntador de aire, lubricante o detergente. Se puedc daiiar el aspecto o
borrar las cstampaciones del producto.
• Evite que cualquier liquido salpique el aparato o gotcc sabre el.
• No I ire las pi las a! fuego.
• No cortocircuite. desmonte ni sobrecaliente las pi las.
• Si Ia pila no se coloca correctamente se corre eJ riesgo de una explosiOn. Reemplacc Ia pila sOlo por una igual o de
espccificaciones equivalentes.
• A DVERT ENCIA - PARA IMPEDIR QUE EL FUEGO SE PROPAGUE, MANTENGA LAS V ELA S U OT RAS
LLAMAS EX PUESTAS SIEMPRE A LEJADAS DE EST E PR ODUCTO.
-Espana! -
Regulatory Compliance Statements
.
.
ATENCAO
( Ulf)Af)Q:PARA RF[)!Ji'.IR 0 RISCO DE CHOQUF El.f:CTI<ICO. r-;Ao RETI RE
A TAMPA (NE\1 A PARTE lRASEIRA). NO 1\TERIOR ))() TI-:LLV!SOR NAO
EXISTEM PF(,'AS QUI: POSSAM SER REPARA OAS PEI.OIJTIUZADOIC A
ASSJSTi:.NCIA SO PODt·: SFR FTECTUAUA I'O R TI::CN ICOS QUALIFICAlJOS
Lstc simbolo indica a cx istCnc ia de alta
tcns<io no interior do tt:k-visor. ~: perigoso tocar em
qualqut'r pane no interior do prnduto .
Estc simbolo informa-o d~ que estL' produto
inclui literaturaimportante sobrc o n~spcct i vo
tUncionaml!nto e
manutcn~ao
-Federal Communications Commission ( FCC) - USA
· Industry Canada Equipment Standard lor Digital Equipmont (ICES-00.1) . Canada
- Voluntary Contro l Council ror Interterence (VCCl )- Japan
- Bureau o f Standards Metro logy and lnspl'ction (BSMt ) - Taiwan
- Korea Commun ications Commission( KCC ) - Republic of Korea
-Italian Post Ministry (Homologation) · Italy
• As ranhuras e abcrturas na caixa e na parte posterior ou inferior perm item a ventila~fi.o necess:lria. Para garantir o funcionamemo corrccto
do aparelho c para o proteger do sobreaquccimcnto, nunca deve bloquear ou tapar cstas ranhuras e aberturas.
- Nao tape as ranhuras e aberturas com panos ou outros matcriais
- Nao bloqueie as ranhuras e abenuras colocando o aparelho numa cama. sofa. tapete ou outra superticie semelhante.
- Nao coloqut: cstc aparel ho num espa~o fechadu, como uma t>stante ou urn armcirio ernbutido. a menos que tenha vemila~ao
adequada.
• Nao coloquc cstc aparelho perto ou por cima de um radiador, sistema de aquec imento ou num local em que esteja cxposto a incidencia
directa dos raios so lares.
• Nao coloque recipientes com <lgua em cima do apare lhoUarras etc.), porq ue pode provocar urn incendio ou choquc electrico.
• Niio exponha o aparelho a chuva nem co toque em tocais perto de <lgua (perto de uma banheira, lavatOrio. lava-loi~a . tuba da mt.quina de
lavar a loir;a, piscina ou numa cave com humidade). Se molhar acidentalmente o aparelho, desligue-o da ficha e contacte de imediato o
revendedor autorizado. Retire sempre o cabo de alimenta<;:3o da tomada antes de limpar o produto.
• Este aparelho tem pilhas. Deite fora as pilhas adequadamente de <~cordo com as considera-rOes ambiemais existentcs no seu pais.
Contactc as autoridades locais para obtcr inforrna~tOes sobrc a destrui9ii0 ou reciclagem de pilhas.
• Nao sobrecarregue tomadas de parede, extensOes nem rcceptkulos. porque podc provocar urn incendio ou cheque electrico.
• Deve colocar os cabos de alimentacrao de forma a nao serem pisados nem entalados par objectos, tendo em especial atem;ao os cabos
ligados a fichas, a recept<lculos e ao ponto de ondc as cabos saem do aparelho.
• Para protcger o aparelho de trovoadas, ou quando niio for utiliz3.-lo durante longos pcriodos de tempo, desligue o aparelho da tomada de
parede e desliguc a antena ou o sistema de televis:io par cabo.
Oeste modo, a aparelho nao sofre eventuais danos provocados pur raios e descargas em cabus de alta tensao.
• Antes de ligar o cabo de alimentay.lo de CA a tomada do transfom1ador de CC, certifiquc-se de que a dcsignayao de tensao do
transfom1ador de CC correspondc a alimenta~ao clCctrica loca l.
• Nunca introduza objectos met<llicos nas aberturas do aparelho. Se o fizer, pode provocar choques e16ctricos.
• Para evitar cheques eh~crricos, nunca toque no interior do aparelho. A caixa do aparelho s6 deve ser abena por tecnicos qualificados.
• Introduza o cabo de a limenta~ao completamcnte ate ao fim . Quando retirar o cabo de alimemat;:ao, cenitique.se de que o segura pela fic ha
quando puxar a mesma da tomada. N~o toque no cabo de alimcnta\'ilO com as maos molhadas.
• Se o aparelho nao funcionar norrnalmente- em p<!rticular, se o aparelho em itir ruidos ou cheiros invulgares- desligue o aparelho de
imediato e contacte o revendedor autorizado ou centro de assistencia tecn ica.
• Certifiquc-sc de que retira a ficha de ali menta~5o da tomada se o aparelho de telcvisao nao fOr utilizado au se o utilizador niio estivcr em casa
durante urn perfodo de tempo Iongo (especialmente quando criam;as, idosos ou pessoas com deticiCncias forem deixadas sozinhas em casa).
- Poeira acumulada pode provocar urn choque elCctrico. uma fuga e!Cctrica ou um incCndio. fazendo com que o fio de alimenta<;:3o
produza faiscas e aqueca ou deteriore o isolamento.
• Contacte urn centro autorizado de assistCncia tCcnica quando instalar o produto em locais sujeitos a poeiras excessivas, Jocais sujeitos a
temperaturas a has ou baixas, locais com muita humidade, locais onde se utilizem substcincias quimicas e locais onde o monitor esteja a
funcionar 24 horas par dia como em aeroportos, esta~Oes de comboio, etc. Se nao a fi zer. pode provocar st:rios danos no produto.
• Utilize uma ficha c uma tomada dcvidarncntc ligadas aterra.
· Uma ligayao de terra deficiente pode causar choque elCctrico ou danos no equipamento. (S6 equipamcnto de classc 1.)
• Deve puxar a ficha da tomada para desligar o apare lho da correntc~ de forma a deixar a ficha pronta a ser utilizada.
• Nao deixe as crianyas mexer no produto.
• Guarde os acess6rios (bateria, etc.) num local seguro fora do alcance das crian<;:as.
• Nao instale o produto num local instavel. como uma prateleira inclinada. urn chao desnivclado ou um local exposto vibra,ao.
• ao deixc cair ou provoque qualquer embate no produto. Se o produto estiver danificado, desligue o cabo de alimentayao c contacte urn
centro de assistCncia.
• Dcsliguc o cabo de alimenta!Y'ao da tomada e utilize urn pano seco e macio para lim par o produto. Nao utilize quaisquer produtos quimicos
como cera, benzina, alcool, diluemes, insecticida, ambientador, lubriticante au detergente. Tal pode danificar o aspecto do produto ou
eliminar a impressao do mesmo.
• Nao deixe cair gotas ou salpicos em cima do aparelho.
• Nao destrua as pilhas atraves de fogo.
• Nao provoque curto-circuito, nem desfa\"=a uu sobreaquec;a as pilhas.
• Existe perigo de cxplos3o sea pilha for substituida incorrectamcnte. Substitua-a apenas pelo mesmo tipo de pi lha au por
uma equivalente.
• AVISO· PARA EVITAR 0 ALASTRAR DE UM INCENDIO, MANTENHA SEMPRE AS VEL AS OU OUTRO TIPO
DE CHAMA LONGE DESTE PRODUTO.
a
FCC Class A Notice
This device complies with part 15 of the FCC Rules. Operation is subject to the following two conditions:
1. This device may not cause harmful interference, and
2. This device must accept any interference received , including interference that may cause undesired operation.
NOTE:
This equipment has been tested and found to comply with the llm1ts for a Class A digital device, pursuant to Part 15 of the FCC
Rules. These limits are designed to provide reasonable protection against harmful interference when the equipment is operated
in a commercial environment. Th is equipment generates, uses, and can radiate radio frequency energy and , if not installed a nd
used in accordance with the instruction manual, may cause harmful interference to radio communications.
Operation of this equipment in a residential area is likely to cause harmful interference in which case the user will be required to
correct the interference at his own expense.
FCC Class B Notice
This device complies with part 15 of the FCC Rules. Operation is subject to the following two conditions:
1 This device may not cause harmful interference, and
2. This device must accept any interference received , including interference that may cause undesired operation.
NOTE:
This equipment has been tested and found to comply with the limits for a Class B digital device. pursuant to Part 15 of the FCC
Rules. These limits are designed to provide reasonable protectio n a gains t harmful interfere nce in a residentia l installa tion. This
eq uipment generates, uses and can radiate ra dio frequency e ne rgy and , if not installed and used in accordance with the
instructions. may cause harmful interference to radio communications. However, there is no guarantee that interference will not
occur in a particular insta llation. If this equipment does cause harmful interference to radio o r television reception, which ca n be
determined by turning the equipment off and on, the user is encouraged to try to correct the interference by one or more of the
following measures:
-· Reorient o r relocate the receiving antenna.
·- Increase the separation between the equipment and receiver.
-- Connect the equipment into an outle t on a c ircuit diffe rent from that to which the receiver is connected .
·· Consult the dealer or an experienced radio/TV technician for help.
User Information
Changes or modifications not expressly approved by the party responsible for compliance could void the user's authority to
operate the equipment. If necessary, consult with your dea ler or an experienced radio/te levis ion technician for add itiona
suggestions. You may find the booklet called How to Identify and Resolve Radio/TV Interference Problems helpful.
This booklet was prepared by the Federal Communications Commission. It is available from the U.S. Government Printing Office.
Washington, DC 20402, Stock Number 004-000-00345-4.
The party responsible for product compliance:
SAMSUNG ELECTRONICS CO .. LTD.
America QA Lab of Samsung
3351 Michelson Drive
Suite #290. Irvine. CA92612 USA
Warning
User must use shielded signal interface cables to maintain FCC compliance for the product.
Provided with this monitor is a detachable power supply cord with IEC320 style term inations.
It may be suitable for connection to any UL Listed personal computer with similar configuration
Before ma king the connection, make s ure the voltage rating of the computer convenience outlet is the same a s the monitor a nd
that the ampere rating of the computer convenience outlet is equal or exceeds the monitor voltage rating.
For 120 Volt applications, use only UL Listed detachable power cord with NEMA configuration 5-15P type(parallel blades) plug
cap. For 240 Volt applications use only UL Listed detachable power supply cord with NEMA configuration 6-15P type
(tandem blades) plug cap.
This te levision receive r provides display of television closed captioning in accordance with Section 15 .119 of the FCC rules.
(TV broadcast receivers with picture screens 13 inches or larger in diameter models only)
. 5.
Important Safety lnstructions(UL Only)
ICES-003 Class A Notice- Avis NMB-003, Classe A
This Class A digital apparatus complies with Canadian ICES-003.
Get appareil numerique de Ia classe A est conforme a Ia norme NMB-003 du Canada.
ICES-003 Class 8 Notice- Avis NMB-003, Classe 8
This Class B digital apparatus complies with Canadian ICES-003.
Get appareil numerique de Ia classe B est conforme a Ia norme NMB-003 du Canada.
VCCI Class A Notice
:: O)il!iiftli. 'J 7 A-A iUH11f.i il!iiJt""CT,
::O)il!i~~*ii!!i±.il:""CltlllT 7.> i::~;~WJ'l!tgl E-~:: "t::
i::tJI N:, '! ao"t ,
i::fJ\ N:,L) aoT,
;:O)ij,\~J::J;t!t!ll~tJili¥jiJJt.:~li1~~97.>J; ?~;J<2=h7.>::
VCCI Class B Notice
::O)!lii~~- 'J5A.B ·~a·il!i~""CT ,
::O)il!iil